Dokan multivendor has revolutionized the ability for non-technical individuals to create their own marketplaces similar to Amazon in under 30 minutes. This plugin has gained immense popularity due to its robust functionality and extensive customization options.
As a user of Dokan, you’re likely well-acquainted with our transparent transaction process, regular updates in line with industry trends, a 24/7 active support team, and a comprehensive collection of documentation.
Despite these existing features, we are committed to providing even more benefits to our users, and as part of this commitment, we are launching a series of blogs to further enhance your experience with Dokan.
In this continuity, today we’ll show you step-by-step how you can add a new customized field according to your needs in the Dokan product form.
Reasons to Have a Custom Product Form

The Dokan multivendor solution lets users build different marketplaces with advanced and unique features. You will get all the features and modules to easily manage your marketplace. With its added flexibility, you can also make the necessary changes to suit your specific needs.
Yes, if you have the technical knowledge or have the budget to hire someone, then you can use custom coding to add your modifications. One of the modifications our users most often ask for is the ability to add new fields to the “Add New Product” form in Dokan.
There are quite a few reasons to have a custom product form-
- Tailoring to Specific Industries or Niches
- Enhanced User Experience
- Accurate Product Information
- Facilitating Specialized Features
- Compliance and Regulations
- Marketing and Search Optimization
- Adapting to Evolving Trends
- Competitive Advantage
To make their life easier, we have decided to show you the steps so that you can easily customize the product form on your own.
We will show you the whole process so you can easily implement it inside your marketplace.

How to Add New Fields in Dokan Product Form
Dokan Multivendor provides a detailed product form with all the necessary fields to upload a product in the marketplace. However, the plugin didn’t restrict the use of customizations. With some custom coding, you can add new fields to the product form. We will show you how!
Below are the 4 steps you need to create new fields on the Dokan product form and show the value from frontend-
- Step 1: Create a Child Theme
- Step 2: Implement the Code Inside Your Child Theme’s Function.php File
- Step 3: Check The New Custom Field on the Upload Form
- Step 4: Display New Field Data on a Single Product Page.
Let’s see the steps in detail-
Step 1: Create a Child Theme
Firstly, create a child theme. Further, you’ll need this child theme to make adjustments to the file, as this enhancement is related to the theme.

You can follow this guide to create a child theme with ease. Alternatively, there are many plugins available inside the WordPress repository to create a child theme. You can use them as well.
Step 2: Implement the Code Inside Your Child Theme’s Function.php File
Next, open your child theme’s functions.php file and paste the below code-
/*
* Adding extra field on New product popup/without popup form
*/

add_action( 'dokan_new_product_after_product_tags','new_product_field',10 );

function new_product_field(){ ?>

     <div class="dokan-form-group">

              <input type="text" class="dokan-form-control" name="new_field" placeholder="<?php esc_attr_e( 'Product Code', 'dokan-lite' ); ?>">
        </div>

   <?php
}

/*
* Saving product field data for edit and update
*/

 add_action( 'dokan_new_product_added','save_add_product_meta', 10, 2 );
 add_action( 'dokan_product_updated', 'save_add_product_meta', 10, 2 );

function save_add_product_meta($product_id, $postdata){

    if ( ! dokan_is_user_seller( get_current_user_id() ) ) {
            return;
        }

        if ( ! empty( $postdata['new_field'] ) ) {
            update_post_meta( $product_id, 'new_field', $postdata['new_field'] );
        }
}

/*
* Showing field data on product edit page
*/

add_action('dokan_product_edit_after_product_tags','show_on_edit_page',99,2);

function show_on_edit_page($post, $post_id){
$new_field         = get_post_meta( $post_id, 'new_field', true );
?>
   <div class="dokan-form-group">
        <input type="hidden" name="new_field" id="dokan-edit-product-id" value="<?php echo esc_attr( $post_id ); ?>"/>
        <label for="new_field" class="form-label"><?php esc_html_e( 'Product ID', 'dokan-lite' ); ?></label>
        <?php dokan_post_input_box( $post_id, 'new_field', array( 'placeholder' => __( 'product id', 'dokan-lite' ), 'value' => $new_field ) ); ?>
        <div class="dokan-product-title-alert dokan-hide">
         <?php esc_html_e( 'Please enter product id!', 'dokan-lite' ); ?>
        </div>
     </div> <?php

    }

// showing on single product page
add_action('woocommerce_single_product_summary','show_product_code',13);

function show_product_code(){
      global $product;

        if ( empty( $product ) ) {
            return;
        }
 $new_field = get_post_meta( $product->get_id(), 'new_field', true );

        if ( ! empty( $new_field ) ) {
            ?>
                  <span class="details"><?php echo esc_attr__( 'Product Code:', 'dokan-lite' ); ?> <strong><?php echo esc_attr( $new_field ); ?></strong></span>
            <?php
        }
}
Here are some notes about the code you should remember so that you can alter the code to meet your requirements-
- To add the field after the tag field, we’ve used the below action. It will add the field after the tag. You can add multiple fields too-
dokan_new_product_after_product_tags.
- We’ve used these actions to save and update product meta-
dokan_new_product_added & dokan_new_product_updated
- To show the field on the edit product page, we used this action –
dokan_product_edit_after_product_tags
- To display the new field data on the single product page, we used this action-
woocommerce_single_product_summary
Step 3: Check The New Custom Field on the Upload Form
Now, go to the product upload form. Here you can see the new field after that tag field –
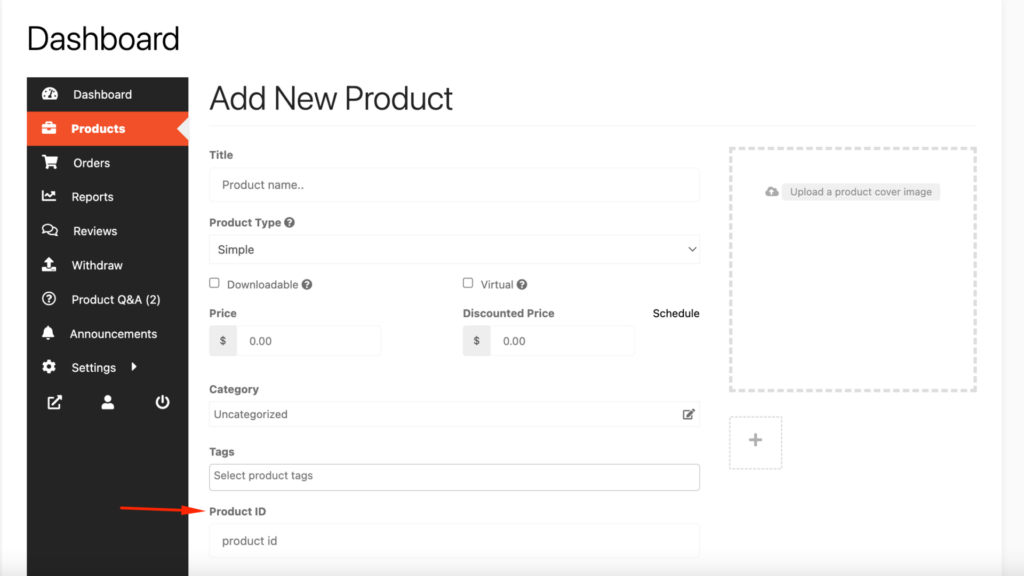
You can add the product ID using this new field to differentiate the products further.
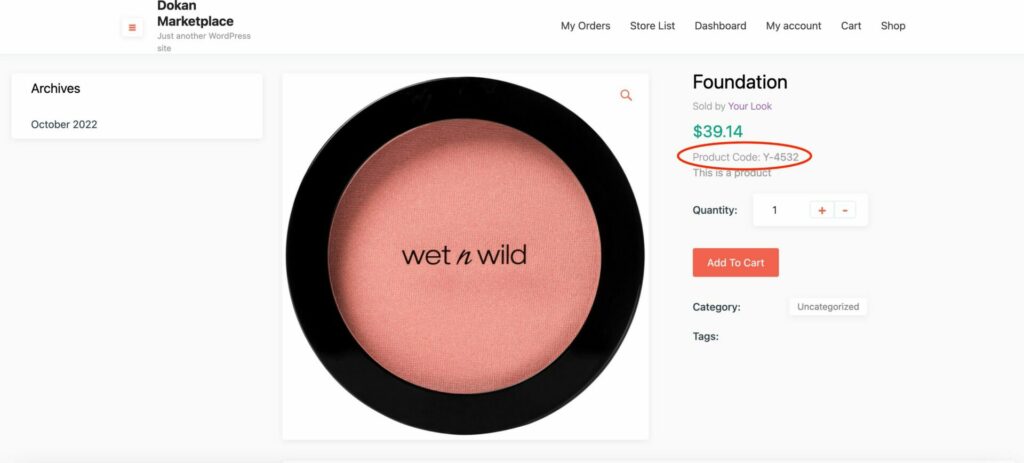
Step 4: Display New Field Data on a Single Product Page
Now you may want to show new field data on your single product page. The last part of the code helps you to do this. To serve this purpose we’ve used the action-
woocommerce_single_product_summary
You can make some changes to the code we’ve included above if you need to add more fields on your Dokan product page.
You can check out this video on how to customize the product form in Dokan,
Custom Product Form – FAQs
Can I add conditional logic to my custom product forms?
Yes. While basic forms show all fields at once, you can implement conditional logic to show or hide specific fields based on a vendor’s previous selection (e.g., showing “Weight” only if “Physical Product” is selected). This improves the vendor experience by reducing form clutter and ensuring you only collect relevant data for specific product types.
Is it possible to make certain custom fields mandatory for vendors?
Yes. Within the form builder settings, you can toggle the “Required” status for any custom field. This is a critical step for marketplace quality control, as it prevents vendors from publishing products without essential information like SKU, material type, or specific warranty details that your marketplace requires.
Customize the Product Form in Dokan!
Managing a thriving marketplace poses numerous challenges, and we understand the complexities involved. Our commitment is to assist you with any issues related to your Dokan-developed marketplace.
Now that you’re familiar with the procedure for adding a new custom field to your Dokan product form, don’t hesitate to seek additional assistance.
Feel free to comment below or reach out to our 24/7 support service for further support.
Subscribe to
Dokan blog
We send weekly newsletters, no spam for sure!


Leave a Reply