


Have you ever been stopped by the “DNS Server Not Responding” error? It’s frustrating when you are in an emergency and get trouble connecting to websites. In today’s blog, we’ll share 10 potential ways to solve this issue both on Windows and macOS.
DNS servers play a crucial role in web browsing. It enables users to access websites and other online resources by translating domain names into IP addresses.
But this process can be interrupted for several reasons. Such as an incorrect DNS server address, an issue with the DNS cache, problems with your router or modem, or your ISP’s DNS server.
Don’t worry! There are several solutions to fix DNS server issues.
For example, restarting the router and modem, flushing the DNS cache, changing the DNS server address, disabling the firewall or antivirus software, or contacting your ISP.
Let’s show you the possible scenarios regarding DNS server issues and solutions.

What is DNS Server & How Does It Work?
DNS stands for Domain Name System. It is a system that translates domain names into IP addresses.
Every device on the internet is identified by a unique IP address that computers can understand. An IP address consists of a series of numbers. However, IP addresses are not easy to remember, and that’s why domain names were introduced.
Domain names are human-readable names that correspond to IP addresses. There is no doubt it’s easier to remember the domain name www.netflix.com rather than its IP address 69.53.224.255.
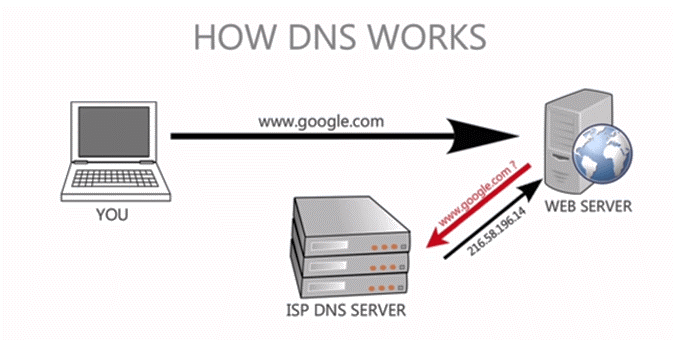
A DNS server stores a database of domain names and their corresponding IP addresses. When you type a domain name into your web browser, your device sends a request to a DNS server to find the IP address associated with that domain name.
The DNS server looks up the domain name in its database and returns the corresponding IP address to your device. And your preferred website loads on your browser. That’s how a DNS server works.
What Does “DNS Server Not Responding” Mean?
When you encounter the error message “DNS Server not responding”, it means that your computer or device is unable to connect to the DNS server or the DNS of the domain you want to reach is unavailable.
As we’ve mentioned above, the DNS server is responsible for translating human-readable domain names like www.wedevs.com into machine-readable IP addresses.
When you try to visit a website, your computer sends a request to the DNS server to look up the IP address associated with that domain name. If the DNS server is not able to respond to the request or is not available, your computer or device will not be able to connect to the website.
And you’ll get the “DNS Server Not Responding” error.
Due to this error, you may face problems accessing the internet or specific websites.
Read also: 11 Things to Know Before Buying a Hosting Plan for Your Website.
When Do People Get a “DNS Server Not Responding” Error?
There are several reasons why this error may occur. Such as-
- Incorrect DNS server address: The device may be configured to use an incorrect DNS server address, which can prevent it from connecting to the correct DNS server.
- DNS cache issues: The DNS cache stores information about recently accessed websites, and it can become corrupted or outdated, leading to DNS server errors.
- Router or modem issues: Issues with the router or modem can prevent the device from connecting to the DNS server.
- ISP DNS server issues: Internet Service Provider (ISP) DNS servers can sometimes go down, leading to DNS server errors.
- Firewall or antivirus software: Some firewalls or antivirus software can block the device from accessing the DNS server.
To fix the “DNS Server Not Responding” error, you can try troubleshooting like restarting the router and modem, flushing the DNS cache, changing the DNS server address, disabling the firewall or antivirus software, or contacting your ISP.
Let’s know about them in detail-
How to Fix DNS Server Not Responding Error

Below you can find the popular ways to identify and resolve the issue with the DNS server. So, you can access the internet and other online resources without any errors.
Here are the top 10 ways to fix DNS server not responding error:
- Switch to A Different Browser
- Check Possible Network Issues
- Restart Your PC in Safe Mode
- Restart Your Devices
- Connect With a Different Device
- Temporarily Deactivate Your Antivirus and Firewall
- Disable Additional Network Connections
- Change the DNS Server Setting
- Flush Your DNS Cache and Reset Your IP
- Disable IP Version 6 (IPv6)
It’s important to find out what causes the issue. It could be your web browser, computer, or internet connection. Go step by step and get the required solution for your problem:

1. Switch to A Different Browser
With the same internet connection, try another web browser. It is one of the quickest and easiest ways to check your DNS connections. For example, you’re using Google Chrome as your browser when you get an error on your device. Then you should download Microsoft Edge or Mozilla Firefox and try to access the web page.
If you find everything goes completely fine. Then it means there’s an issue with your default browser. You should update your browser or uninstall and reinstall it.
However, you’re still getting the “DNS server not responding” message. Then you have the confirmation that the browser is not the source of the connection problem.
Let’s move to the next step of finding the issue-
2. Check Possible Network Issues
In this step, we investigate if there exists any network issue that may cause the “DNS server isn’t responding” error.
Run network diagnostics for Windows-
- Press the Windows key + R on your keyboard.
- Type Control Panel.
- Go to Network and Internet → Network and Sharing Center.
- Select the Troubleshoot problems option under Change your networking settings.
- Select Internet Connections → Run the troubleshooter.
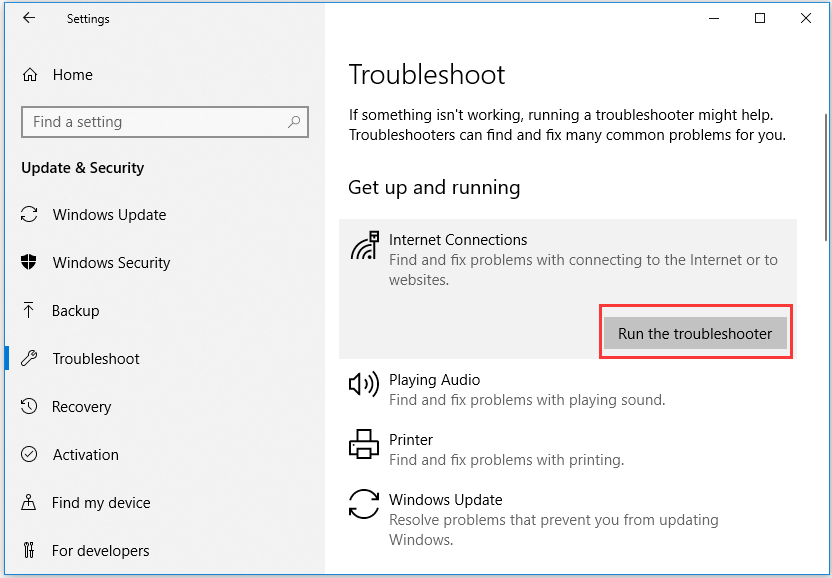
- Wait for several minutes until the troubleshooting process is complete. If you get an error message on your screen, simply follow the steps as per the instructions to fix the DNS issues.
Run Wireless Diagnostics on Mac–
- On your Mac, close all open apps.
- Get connected to the network you’re having the problem with (if you’re not already connected).
- Press and hold the Option key from your keyboard.
- While holding the Option key, click the Wi-Fi status icon in the menu bar
- Then, choose Open Wireless Diagnostics.
- Finally, follow the onscreen instructions to analyze your network connection.
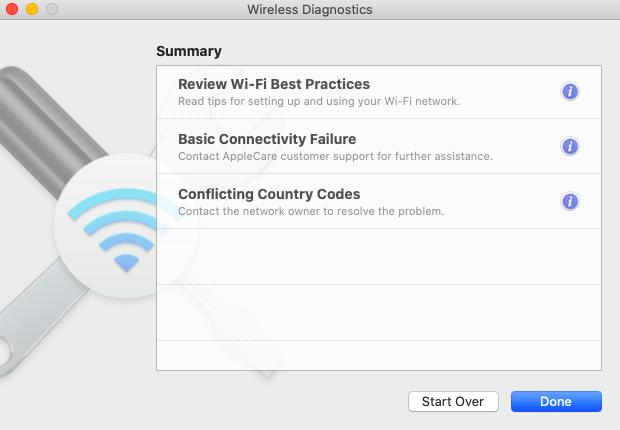
Once the analysis process is done. Click on the Info icon in the Summary window to learn more about each entry on the list.
If this method does not fix your DNS server problem, try the next one.
3. Restart Your PC in Safe Mode
If your operating system isn’t working properly, it can cause the “DNS Server Not Responding” error. To check this out, you can restart your computer in safe mode. This stripped-down version of your operating system will limit the files and resources used for running your device.
Below are the steps to start a computer in safe mode on Windows:
- Restart the computer. From the Start menu, select the Power button and press the Shift key. Then, select Restart.
- After the computer restarts to the Choose an Option screen, select Troubleshoot → Advanced Options → Startup Settings → Restart.
- After the computer restarts, you’ll get a list of options.
- Select 4 or F4 to start the computer in Safe Mode. Or you can select 5 or F5 for Safe Mode with Networking.
For Mac users, follow the steps below to start up your computer in safe mode:
- Choose Apple menu → Shut Down. Wait for your Mac to shut down completely.
- Press and hold the power button on your Mac. You’ll get “Loading startup options” on your screen.
- Press and hold the Shift key, then click Continue in Safe Mode. The computer restarts automatically.
When the login window appears, you can find “Safe Boot” in the menu bar.
If your network connection works fine in safe mode, this means any third-party application might be causing the “DNS server not responding” issue. In order to resolve this issue, you have to find and delete the software from your computer.
4. Restart Your Devices
Before getting into more complex troubleshooting tasks, restart your devices like PC, routers, or modems. If your modem or router isn’t properly functioning you can get a “DNS Server Not Responding” message.
First, turn off the power button of your modem or router. You can also unplug your router’s power cable. Wait for 30 seconds and then plug your router into the power outlet. Finally, press the power button for it to re-establish a connection.
Now, check whether you’re able to access the internet from your browser or visit your preferred website link.
If you’re still facing the DNS server issue, let’s try the next solution-
5. Connect With a Different Device
Another simple way to figure out your DNS server error reasons is to connect a different device to the same home network. And then try to access the site you’re having trouble with.
Suppose you’re trying to open a webpage from your laptop and getting DNS server errors. Now use another device to access the same web page you’re facing problems using the same network. If you get the same problem on the second device. It means your device is completely fine.
In contrast, if you can visit the website with the second device, it means the problem is with your first device.
You can also use other connections like mobile data to figure out whether the connection failing issue is caused by the site’s end or not.
6. Temporarily Deactivate Your Antivirus and Firewall
If you’re still unable to resolve the “DNS Server Not Responding” issue, try this step. For some time deactivate your antivirus software and firewall. Though these applications are to ensure the safety of your devices, sometimes they can create issues that interrupt your network connections.
In order to do this, Windows users need to open the control panel. After that, navigate to Update & Security → Windows Security → Virus & Threat Protection → Manage Settings.
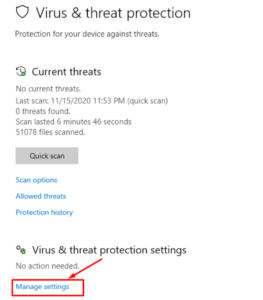
Switch Real-time protection to Off.
If you are a Mac user, go to System Preferences → Security & Privacy → Firewall.

After deactivating the firewall, try to visit the webpage again from your primary device. If you find everything fine, you should think about changing your antivirus software or reconfiguring the settings of your existing application. Once you’re done, don’t forget to reactive your firewall.
However, if the issue is still unsolved, let’s try the next solution-
7. Disable Additional Network Connections
Another potential solution to resolve the “DNS server not responding” issue is to disable any secondary connections available on your device. Make sure that only the connection you’re currently using is active.
For Windows users, here are the steps to disconnect unused network connections on Windows:
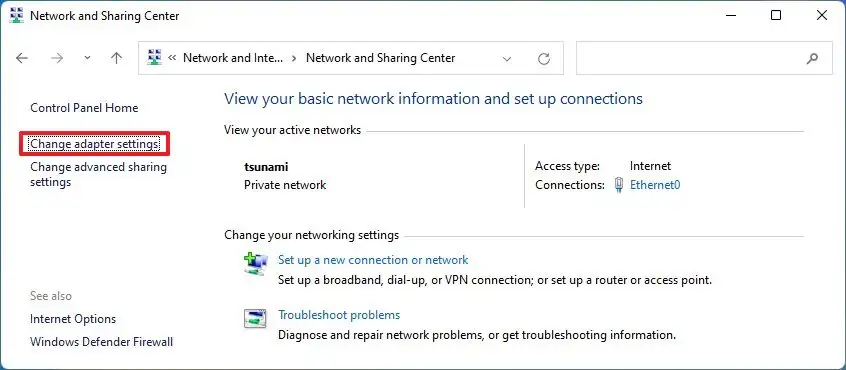
- Go to Control Panel → Network & Internet → Network and Sharing Center
- Click on Change adapter settings from the left panel.
- A Network Connections page will appear.
- Here you’ll find all the active and inactive connections. A Red cross (x) on the network symbolizes that the network is connected but not being used by the system.
- These red-crossed networks fall under secondary connections. You need to disable them.
- Right-click or tap-and-hold the connection you want to disable, then choose Disable.
If you’re using Mac, follow these steps to disable all the secondary connections-
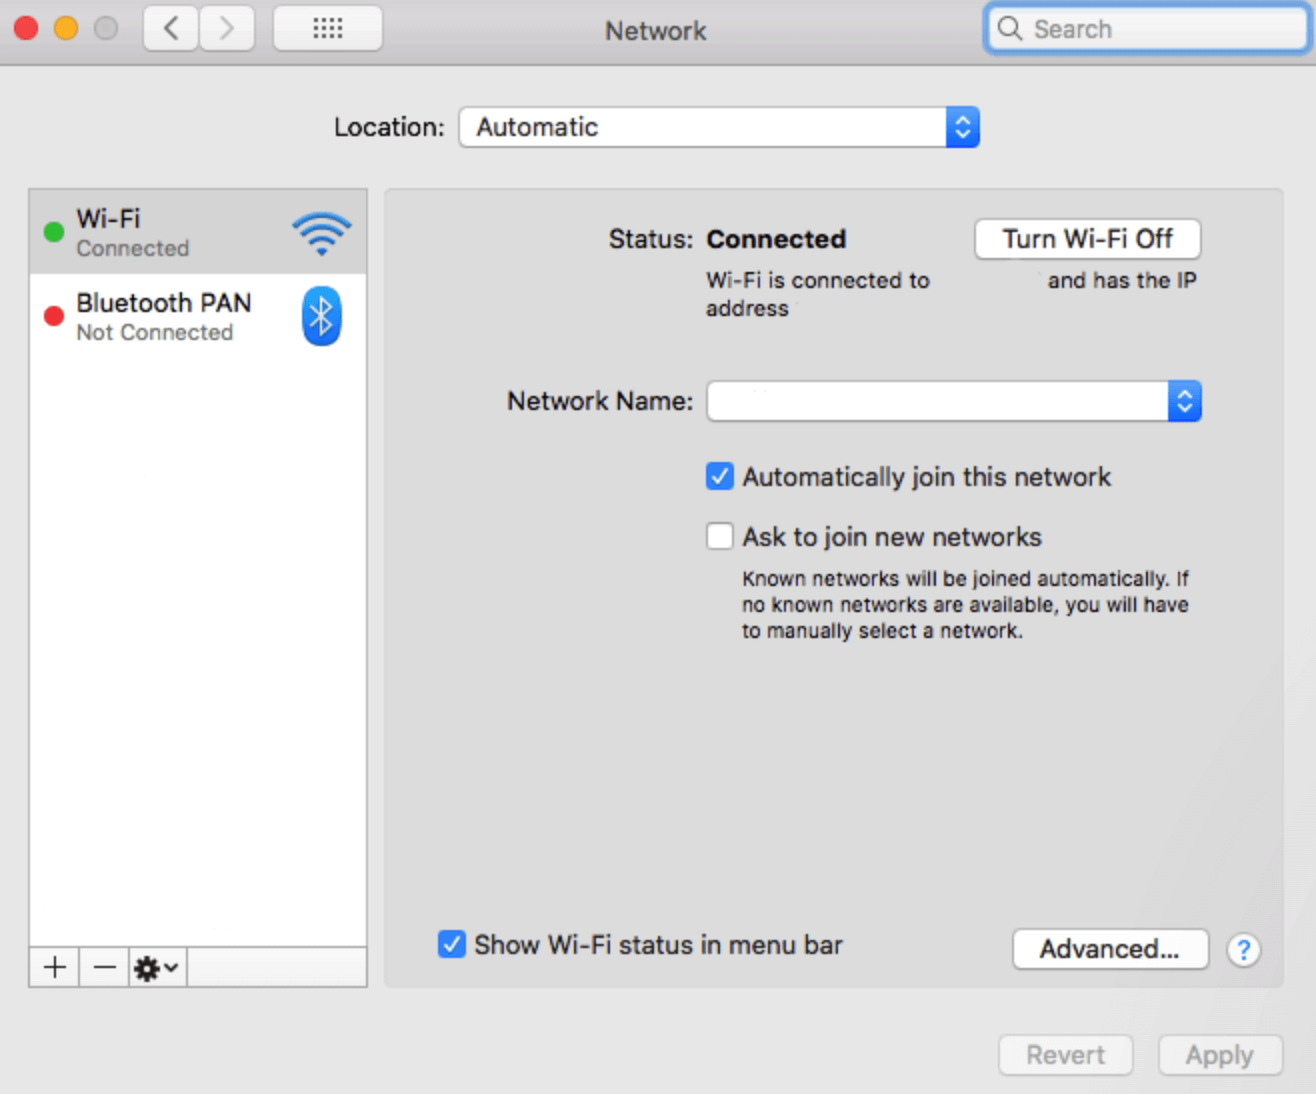
- From the Apple Menu, go to System Preferences → Network.
- On the left side of the screen, you’ll find all the connections.
- Now, select each of the unused connections and click the minus (-) button at the bottom. It’ll disconnect the connection.
Once you’ve disabled all unused connections, restart your browser and try to revisit the website.
If it works, then you have fixed the DNS server issue. Otherwise, you have to continue the process of resolving the issue.
8. Change the DNS Server Setting
It’s time to make the next move. Change your DNS server address and try to resolve the DNS server error.
Your internet service provider (ISP) provides DNS servers by default. But sometimes the configured DNS server is incorrect or does not exist. As a result, your ISP’s DNS server doesn’t respond correctly. And the internet service doesn’t work as well.
You can resolve this issue by changing your DNS settings and using a different DNS address.
Here are the steps to set up other DNS servers on Windows-
- Click on the Start menu and type “Control Panel” in the search box. Press Enter.
- Click on “Network and Sharing Center”.
- Click on “Change adapter settings” on the left-hand side of the screen.
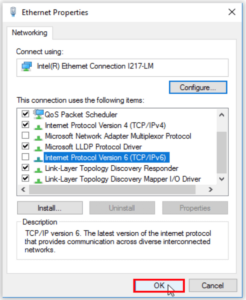
- Right-click on the network connection you want to change the DNS settings for and select “Properties”.
- Select “Internet Protocol Version 4 (TCP/IPv4)” from the list and click on “Properties”.
- Mark the Obtain an IP address automatically and Use the following DNS server Addresses options in the Internet Protocol Version 4 (TCP/IPv4) Properties page.
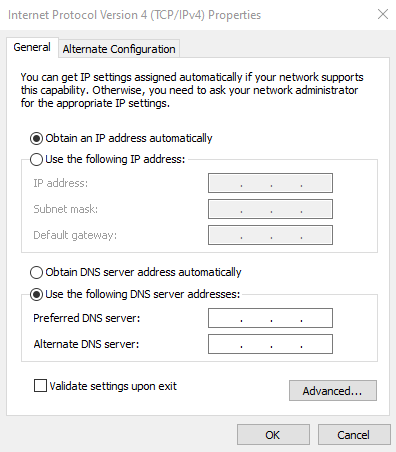
- Enter the new DNS server addresses in the “Preferred DNS server” and “Alternate DNS server” fields.
- Click “OK” to save the changes
- Restart your computer.
Mac users can follow these steps to change the DNS server address-
- Click on the Apple menu in the top-left corner of the screen and select “System Preferences”.
- Click on “Network”.
- Select the network connection you want to change the DNS settings for from the list on the left-hand side of the screen.
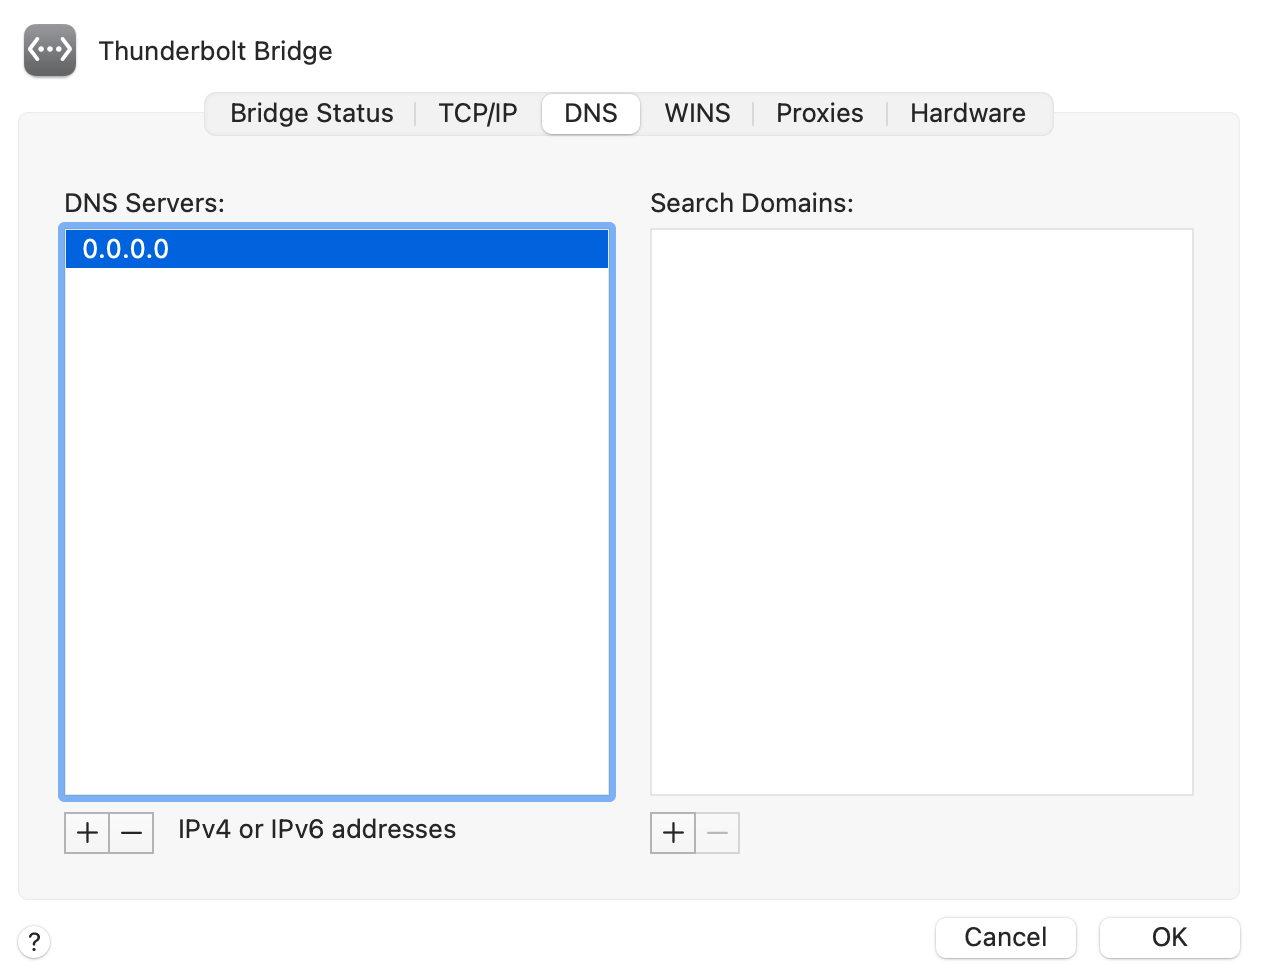
- Click on the “Advanced” button in the bottom-right corner.
- Select the “DNS” tab.
- Click on the “+” button in the bottom-left corner to add a new DNS server address.
- Enter the new DNS server address in the box.
- Click “OK” to save the changes.
Now, reset your network connections and check if the DNS server not responding error is there or not.
9. Flush Your DNS Cache and Reset Your IP
Another potential way to fix the DNS server issue is to flush the DNS cache.
As you can every program and application has a cache. They store a small space for the recently loaded data. Similarly. your DNS server has a cache too. It uses the cache to collect IP addresses and DNS records that you’ve used recently.
This DNS cache can cause problems. If you clear the router cache properly may be the DNS server will be able to make a connection to the internet.
Clear the DNS and refresh your IP address through the Command Prompt and Terminal apps.
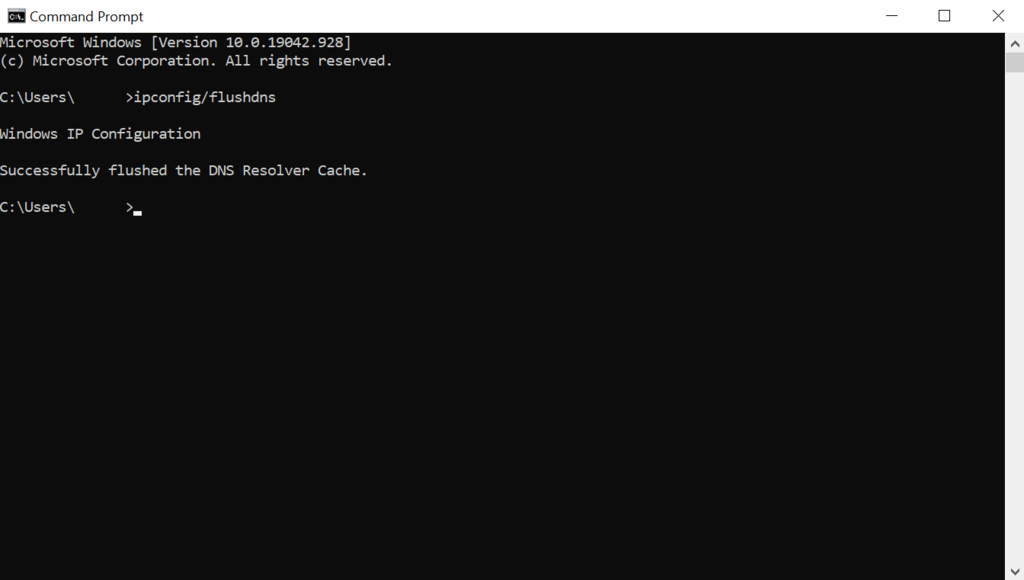
To flush the DNS cache on a Windows computer, follow these steps:
- Open the Command Prompt as an administrator. You can do this by typing “cmd” into the search bar, right-clicking on “Command Prompt,” and selecting “Run as administrator.”
- Type the following command: ipconfig /flushdns
- Press Enter.
- Wait for the confirmation message to appear, indicating that the DNS resolver cache has been successfully flushed.
- Repeat this process for the following commands:
- ipconfig /registerdns
- ipconfig /release
- ipconfig /renew
To flush the DNS cache on a Mac computer, follow these steps:
- Open the Terminal application. Press the Command + Space keys, and then type “Terminal” into Spotlight.
- Type the following command without quotes: “sudo dscacheutil -flushcache; sudo killall -HUP mDNSResponder“
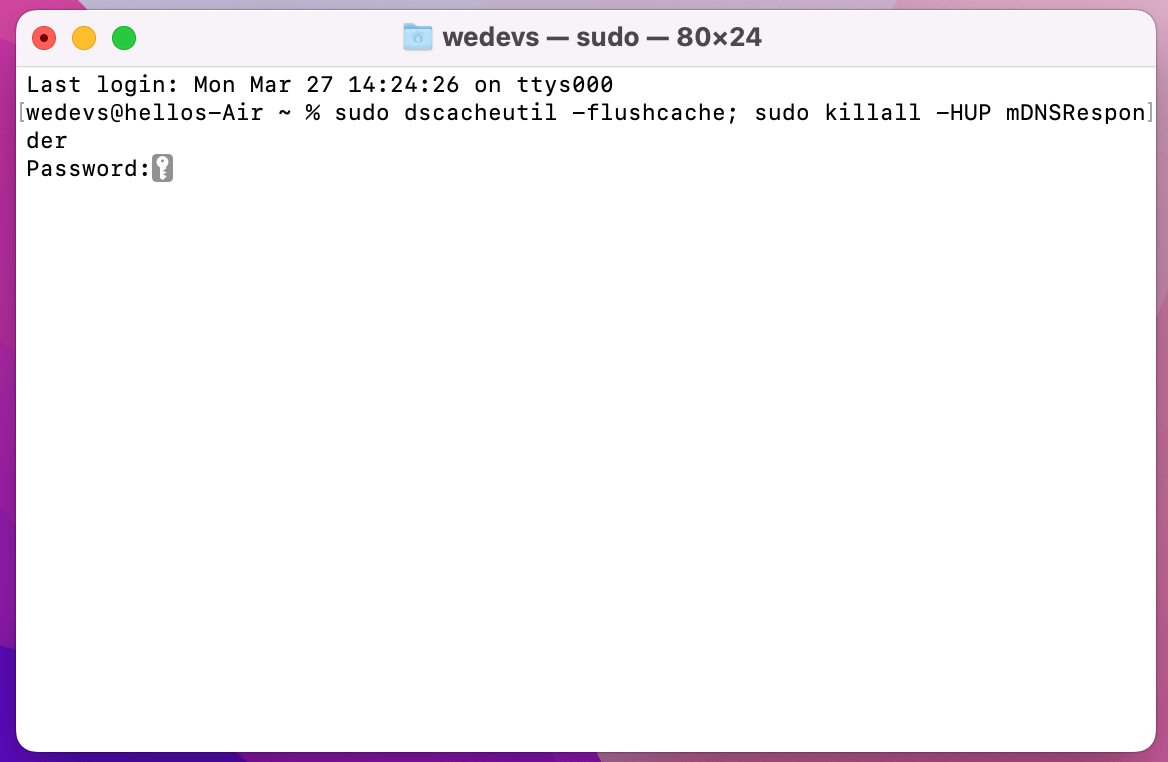
- Press Enter.
- You may be prompted to enter your password.
It will not give you any direct message that the DNS cache has been successfully flushed. Terminal just takes the command and gives you another blank entry line. This means it’s worked successfully.
10. Disable IP Version 6 (IPv6)
IPv6 is the latest Internet Protocol version. It helps route traffic between networks and the internet. IPv6 can be a reason behind the DNS server issue.
So, disable IPv6 on your computer temporarily and check if it solves the problem you’re going through.
To disable IPv6 on Windows–
- Open the Control Panel and click on “Network and Sharing Center”.
- From the left panel, click on “Change adapter settings”.
- Right-click on the network adapter you want to disable IPv6 for and choose “Properties”.
- Uncheck the box next to “Internet Protocol Version 6 (TCP/IPv6)” and hit “OK”.
- Repeat this process for all the network adapters you want to disable IPv6 for.
To disable IPv6 on Mac–
- Click on the Apple menu in the top-left corner of the screen and select “System Preferences.”
- Click on “Network.”
- Select the network adapter you want to disable IPv6 for, such as Wi-Fi or Ethernet.

- From the bottom-right corner, click on the “Advanced” button.
- Select the “TCP/IP” tab.
- Click on the “Configure IPv6” dropdown menu and select “Off.”
- Once you’re done hit the “OK” button to save the changes.
Hopefully, you’ll no longer see the “DNS Server Not Responding” message.
If none of these solutions work, we recommend you contact your ISP or a professional technician for further assistance.
Read also: A Guide to eCommerce Business Name Ideas.
Resolve DNS Server Error & Restore Your Network Connections
If your DNS server isn’t working properly, you may face internet connectivity issues or it can prevent you from accessing websites or online services.
As we’ve discussed today, DNS (Domain Name System) translates domain names (like google.com) into IP addresses. When a DNS server isn’t responding, your computer is unable to communicate with it and cannot translate domain names into IP addresses.
This issue can be caused by several factors. Such as problems with your network settings, issues with your DNS server, or malware infections. If left unsolved, it can cause internet downtime or prevent you to access important online resources.
Resolving DNS server errors can often be done through simple troubleshooting steps. Such as resetting your router or modem, clearing your DNS cache, or changing your DNS server settings.
For further queries on how to fix the DNS server not responding error, use the comment section below.


Leave a Reply