
Are you hesitating to extend your site facilities with eCommerce functions? This guide helps you to add eCommerce to an existing website.
Life after Covid-19 has changed a lot. Due to global instability and economic distress, most people are looking for an alternate source of income. Besides, large-scale layoffs and salary cuts are enabling people to think outside of the box.
Starting an eCommerce business can be an effective way to ease your stress as it creates a source of high income. There are several ways to build a fully functional online store and make it active to sell different types of products. For example, you can utilize CMS platforms, eCommerce plugins, website builders, etc. In fact, if you’re already running a WordPress site, you can easily add eCommerce features to it with eCommerce plugins.
Today we’ll break down every step of how to add eCommerce to an existing WordPress website. In the second part of the blog, you’ll also get an idea about how to customize other platforms as well to add eCommerce facilities on your site.
Is It Good to Add eCommerce Functionalities to a Regular Website?

eCommerce has completely revolutionized the retail industry in the last ten years. Moreover, the World pandemic situation makes people more habituated to online shopping. So, the number of digital buyers is increasing drastically.
43% of shoppers use the internet and social networks to research products before purchasing, and by 2024, ecommerce revenue will be worth $476 billion in the U.S.
BigCommerce
Technological advancement makes it easier to establish an online store and sell products with great profits. Even for a non-technical guy, WooCommerce keeps all the activities simple to operate and customize. Things would be easier if you’re already running a WordPress site.
As you know there are several ways to earn from a WordPress site. For example, you can earn money from your blogging site by allowing guest posts. If you have a loyal fan base for your site, you can extend your income by adding eCommerce features to your site.
How to Add eCommerce to an Existing Website with WordPress
We know that idea of creating an eCommerce site can be a nightmare to someone who is not techy. Luckily, WordPress makes it easy for online sellers in every industry. And when you have at least minimum experience in working with a WordPress site, things get even simpler.
First Thing First: Make Sure All Your Prerequisites are Ready
If you’re currently running a WordPress site, check whether you get all your attributes ready or not.
For new users, you need to go through the below steps before setting up your online store.
- Registering a domain name
- Choosing the best WordPress hosting
- Having an SSL Certificate ( for accepting payments)
- Installing & configuring WordPress
Now, you want to extend its features to an online store. Below are the steps you need to follow-
- Install WooCommerce Plugin
- Complete WooCommerce Setup Wizard
- Basic eCommerce Customization
- Add Products to WooCommerce Store
Step 1: Install WooCommerce Plugin
Login to your WordPress dashboard using personal credentials. Then-
- Navigate to Plugins → Add New
- Search for “WooCommerce” in the search box
- And hit on Install Now
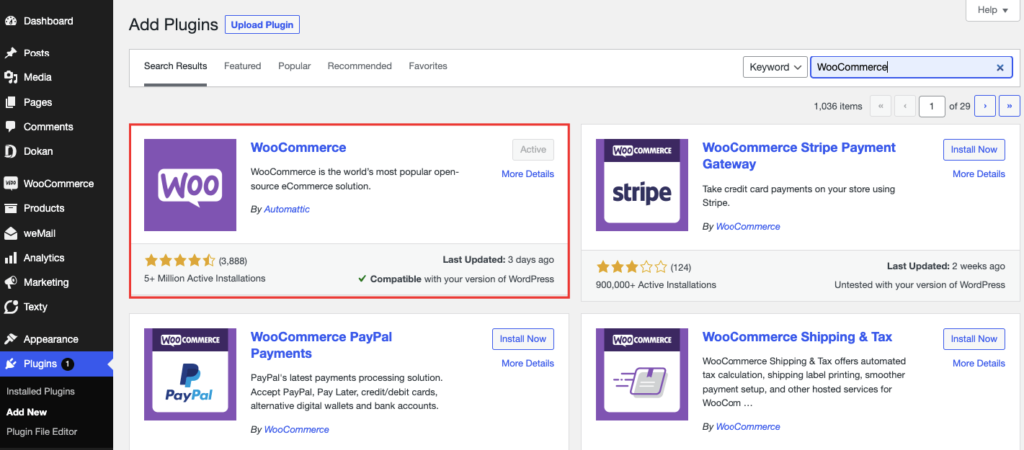
Next, click “Activate now” as consecutive attempts.
It takes you to the next level where you can configure your online store with all the required information.
Step 2: Complete WooCommerce Setup Wizard with Necessary Details
This is the main part of the WooCommerce setup. The introductory WooCmmerce setup wizard walks you through a few steps to configure the plugin with essential customizations. Below are the steps you need to go through-
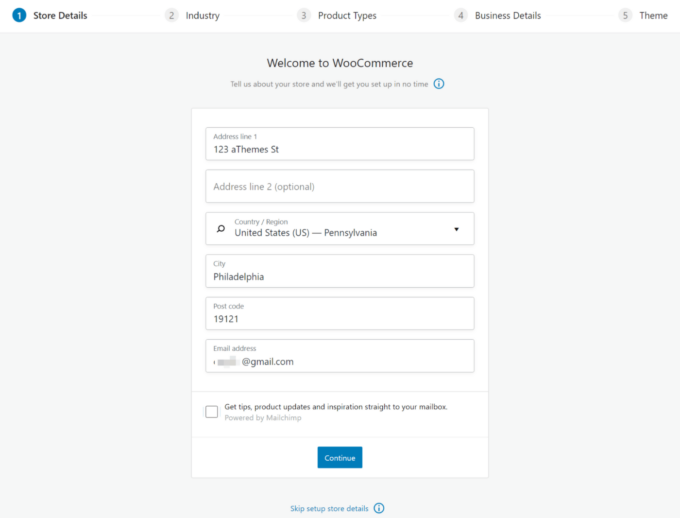
1. Store Details: First, you have to insert some basic information about your store including your address, email, etc. Tick the checkbox if you want to get updates on your mailbox. Once, you’ve done hit the Continue button.
2. Industry: Select which industry you belong to. You can choose the “Other” option to manually add your industry type.
3. Product Type: Specify the types of products that you want to sell.
4. Business Details: Include some additional business details about your store.
5. Theme: At the final step, you get the chance to select your eCommerce theme. You can either continue with your current theme or change your mind and proceed with another one.
Here, I want to continue with Storefront as this is one of the most popular online store themes, so I’ll click on Continue with my default theme and move forward.
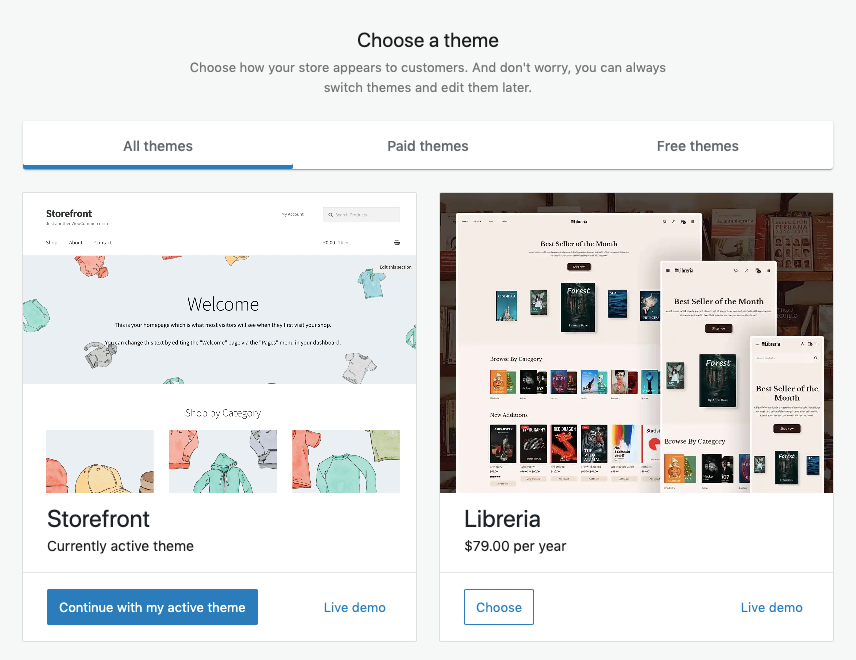
After clicking on the button it saves all your WooCommerce settings and redirects you to the WordPress dashboard. So you can proceed with other configurations of your store. Such as shipping, tax, emails, payments, and others.
Read more: How to Build an eCommerce Website with WordPress for Free.
Step 3: Basic eCommerce Customization After Installing The Plugin
You’ve created your online store in WordPress. Now, follow the below steps and sell products online-
- Create and Assign the Necessary Pages
- Setup Your Store Title, Configure the Site URL
- Configure Your Site’s Permalink Structure
- Setup Taxes
- Configure & Add Payment Methods
- Configure Shipping
- Setup Necessary Emails
Learn all the customization options by reading this blog- A Complete Guide To WooCommerce Customization Tutorial.
Step 4: Add & Publish Your First Product on WooCommerce
WooCommerce simplifies the process of adding products to your online store. There are several ways to add your first product. Such as using a template, manually, importing via CSV, or importing from another service.
From the WordPress dashboard go to WooCommerce → Home → Add Products.
In this part, we’ll show you how to add a product using a template.
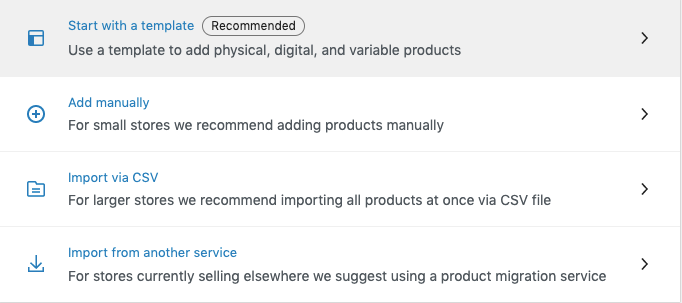
In the next step, you’ll get options to pick a template for a physical product, digital product, or variable product.

Once you hit the ‘Go’ button it takes you to the product editor. Alternatively, you can go to Products → Add New from your WordPress menu to add new products.
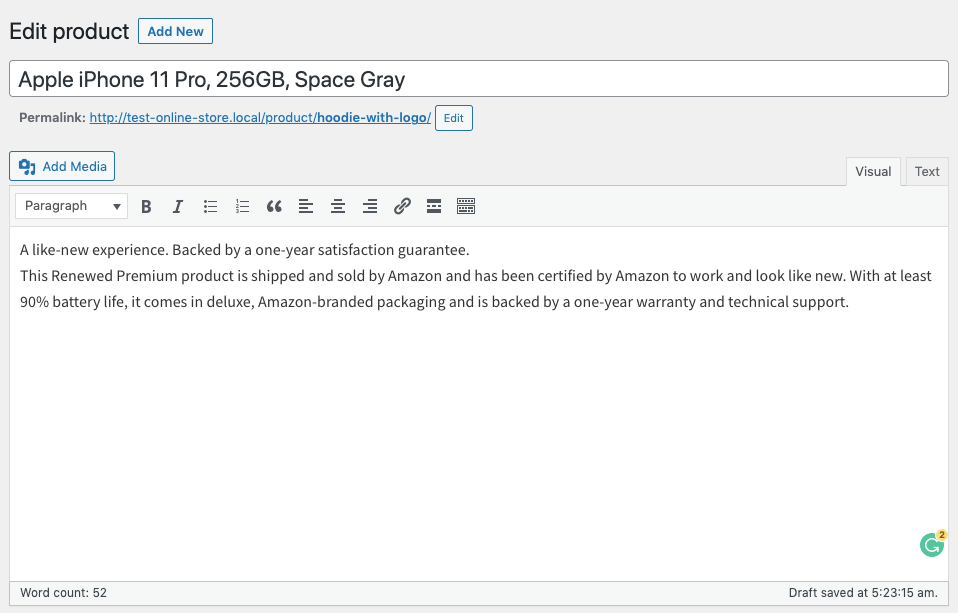
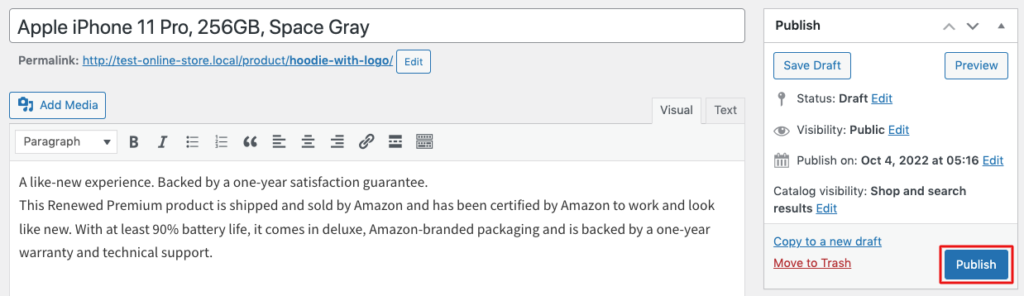
First, enter your product name and insert a short description for your product.
Important note: Product description is a crucial element of your online business. It plays a vital role to drive customer attention as well as ranking better on search engines. Instead of copying the descriptions from other sites, try to make them concise, unique, and useful.
Next, select the product category from the right editor panel. If requires you can add a new parent category and define child categories under it.
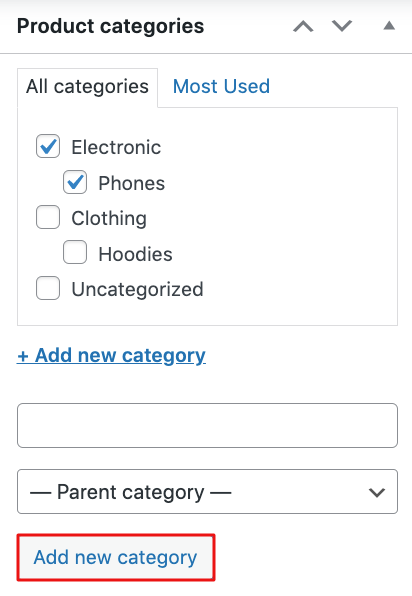
Proper categorization of your products helps users easily find items on your site which enhance customers’ experience on your site.
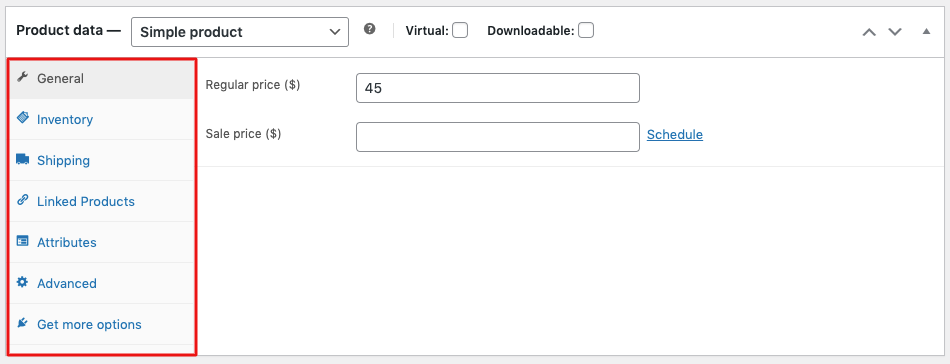
Now, scroll down a little to the ‘Product Data’ box. Here, you can define product type, regular pricing, shipping costs, grouped products, and other information.
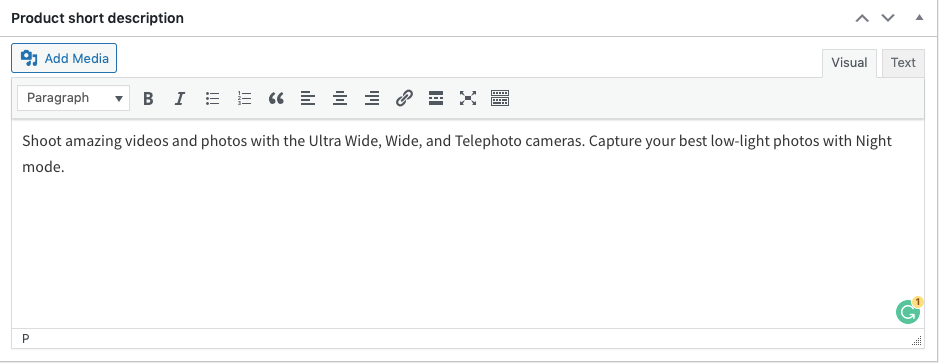
Right after this panel, you’ll find a short description box. This description will be displayed on different product pages on your WooComerce store. Keep this description short, simple, and engaging to get more clicks from users.
Product image is the most important part of your product description to make it visually attractive. Luckily, WooCOmmerce makes it super easy to add product images as well as an image gallery with each product. So, a customer gets a 360-degree view of the product before buying. It boosts their confidence to continue ordering without even seeing the product directly.

First, add the main product image that would represent that particular item on the shop pages across your site. After that, insert other images too to describe your product more precisely.
Now, check all the information carefully. If you find everything fine, it’s time to live the product in your shop.
Click on the ‘Publish’ button.
Repeat the process to upload all the products of your store one by one.
Export-Import WooCommerce Products
Sometimes, you need to export-import WooCommerce products to keep them as a backup or migrate product details from another site. WordPress supports .xml and .csv format files.
Learn how to easily export-import WooCommerce products-
Import Product to Your WooCommerce Site
You can find a sample.csv in the plugin folder, or download a sample file from here. Here, you get all the common fields used for selling products.
1. Navigate to WooCommerce → Products.
2. Select Import at the top. It takes you to the uploading window.
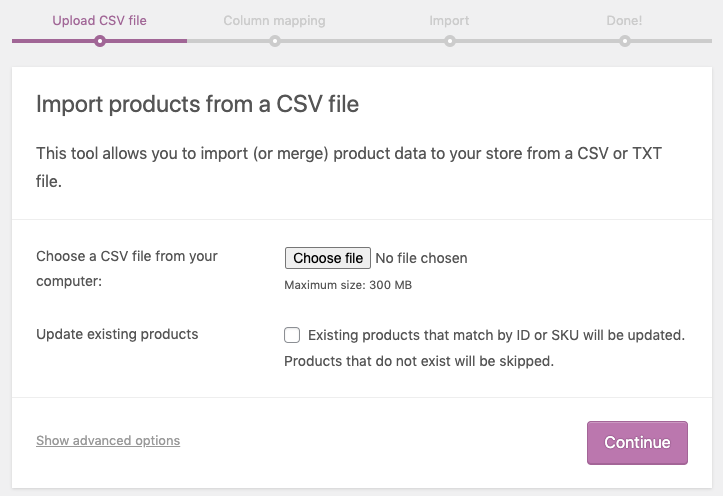
3. Select Choose File and upload a file from your computer or from wherever your CSV is located.
4. Hit the button Continue.
It takes you to the next step “Column Mapping”. WooCommerce automatically initiates to match or “map” the Column Name from your CSV to Fields.
5. Use dropdown menus on the right side to adjust fields or indicate “Do not import.”
6. Select Run the Importer.
7. Wait until the Importer is finished. Do not refresh or touch the browser while in progress.
Export Products from Your WooCommerce Site
As an online store owner, you should keep a backup of your products to avoid any future inconvenience. WooCommerce lets you generate a CSV of your current catalog of products using the Product Importer/Exporter.
Below are the steps you need to follow-
1. Go to WooCommerce → Products
2. Select Export at the top. A screen appears with several options for exporting products .
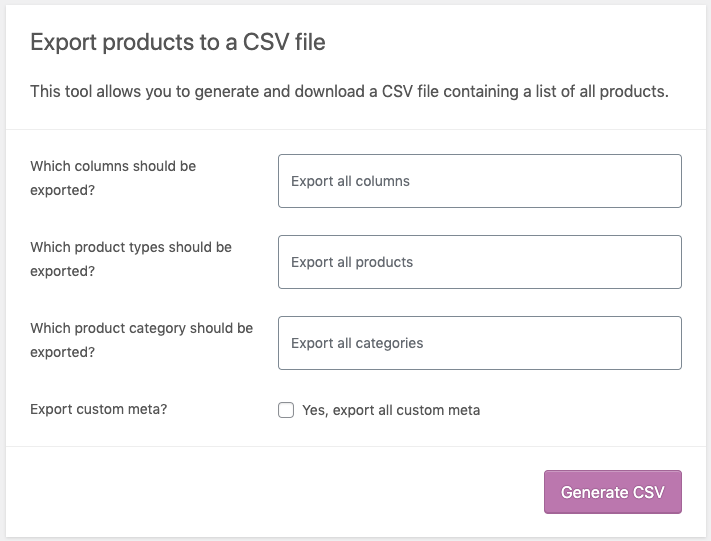
3. Select Export All Columns. Or use the dropdown menu to select which columns you want to export.
4. Select Export All Products. Or select from the dropdown menu and select which product types you want to export.
5. Select Export All Categories. Or choose the categories you want to export by using the dropdown menu.
6. Tick the box to Export Custom Meta, if this information is important to you.
7. Select Generate CSV. Wait until the export process is completed.
8. Exit the exporter.
After uploading your eCommerce products now it’s time to add some additional facilities to your store. Such as-
- Enable User Registration, Configure Account & Privacy Settings
- Create Coupons (Optional)
- Track Your Orders, Customers, and Stock with Reports.
- Add Necessary Extensions
Depending on your business strategies, store management process, and customers’ preferences, customize your online store to sell products seamlessly.
Popular CMSs or WordPress Alternatives You Can Add eCommerce to
Besides WooCommerce, you have other options as well to build your online store. Platforms like Shopify come with built-in eCommerce facilities. Here, we’re listing multipurpose web development platforms where you can add eCommerce.
Below are some options you can choose from-
- Wix
- Weebly
- Squarespace
- BigCommerce
Let’s check the details-
Wix- Best for Small Online Stores with Less than 100 Products
Wix is a popular CMS platform to build beautiful websites. It comes with an excellent drag-and-drop editor and 800 free templates. Right now, Wix empowers 700K+ active eCommerce stores in 190 countries around the world.
Below are the steps to build an eCommerce store with Wix-
- Choose a pre-built eCommerce template
- Customize the template & create an attractive storefront
- Upload your product details to your store
- Enable required payment options on Wix
- Set shipping rates, tax, automated order confirmations, etc.
- Make your store search engine friendly
- Publish & run your store
Weebly- Best for Small Businesses Who Tend to Stay Small
Weebly is an easy-to-use site builder with responsive-design themes. It supports several site-creation tools including a simple user interface. In turn, you’ll get a broad platform to build an online store having diverse features and functionalities.
Below are the steps to build an eCommerce store with Weebly-
- Create a Weebly account using your personal credentials
- Select the square editor to build your online store
- Go through a question-answer step to create your eCommerce template
- Create your Weebly online store
- Connect your domain name and URL
- Personalize your site design by modifying the template
- Upload products to your Weebly online store
- Extend functionalities with Weebly store apps
- Publish your website & enable customers to visit your store
- Promote your store to get a better ranking on search engine
Squarespace- Best for Small to Large Companies with Over 1000 Employees
Squarespace is a SaaS-based content management system (CMS) that includes a website builder, blogging platform, and hosting service.
Below are the steps to build an eCommerce store with Squarespace-
- Sign up for a Squarespace account
- Design your store with a commerce website template
- Add products to sell including details & images
- Set up payment methods & taxes
- Configure shipping options to deliver products
- Publish your online store
- Promote your new eCommerce shop
- Use Squarespace analytics to track performance
BigCommerce- Best Website Builder for Multichannel Selling
BigCommerce is a fully hosted, Software as a Service (SaaS) platform that enables you to build, run, and manage your e-commerce store regardless of any technical knowledge. Best for Large Businesses with An Extensive Product Catalog
Below are the steps to build an eCommerce store with BigCommerce-
- Sign up to Bigcommerce with your personal details
- Lets Bigcommerce build your store
- Customize your site as per your requirements
- Add products with the necessary details
- Configure payments, shipping, and taxes
- Publish your store
- Take essential steps to promote your eCommerce store
FAQs on Adding eCommerce to An Existing Website
Can I build an eCommerce website on my own?
Of course, you can build an eCommerce website by yourself in WordPress using plugins. But you should analyze first and gather knowledge about every step to create an optimized shop for selling your products.
How much does it cost for an eCommerce website?
Primarily, it costs around $3500 – $5000 to start an online store. It may include the cost of-
1. eCommerce Platform
2. Domain and Hosting Plan
3. Essential Tools
4. Design and Customization
5. eCommerce Store Content
6. Search Engine Optimization
Which is the best platform to build an eCommerce website?
WooCommerce is the best CMS platform to build your eCommerce website even for a non-techy person. Alternatively, you can check other platforms like-
1. Wix
2. Weebly
3. Squarespace
4. BigCommerce
5. Zyro
How much money can an eCommerce website make?
Research shows that after 3 months of launching a new eCommerce store it can make over $63,000 in monthly revenue. And in one year the average monthly revenue will reach $127,000 while after 3 years it projects to earn average monthly revenue of $352,000. Between year one and year 3, it’s an increase of over 175%.
That’s a Wrap on Adding eCommerce to an Existing Website
With the latest available tool in the market, creating an eCommerce site becomes easier than ever. Be a part of this growing industry by getting your own online store to sell products and earn profits.
There are several platforms and eCommerce builders to start an online business with ease. Currently, the most popular eCommerce website builder is WooCommerce. It is easy to install, highly customizable, and free to use. It only requires web hosting and a WordPress site. If you have already your WordPress site ready then adding eCommerce features is a matter of one click.
Below are the steps to add eCommerce to an existing WordPress website:
- Install WooCommerce plugin
- Add your basic information
- Choose your eCommerce theme
- Set up payment options
- Configure your tax rates
- Set up shipping options
- Add the products you want to sell
- Add security and cache plugins
- Launch your online store
Once you’ve launched your online store, start marketing your eCommerce products to generate sales. Depending on the industry, your promotional channels may vary but the basic activities are the same. Check this guide to know about 7 proven eCommerce SEO tips to get more traffic.
Have you any further queries on how to add eCommerce to an existing website? Do use the comment section below.


Leave a Reply