Dokan is one of the best multi-vendor marketplace plugins in the WordPress industry. With its extraordinary features and rich modules, it has quickly become a family of over 60,000 members. As one of the most popular marketplace plugins, it has introduced some lucrative features and modules over the years.
The Product Subscription Module is part of the amazing module list of Dokan multivendor plugin. This module helps the vendors to create their own subscription products.
This module will help business owners create a subscription-based multivendor marketplace with ease. In this write-up, we will talk about configuring the Product Subscription module and how it will help marketplace owners create and manage their subscription business.
So, let’s get into the detail- shall we?
How the Dokan Product Subscription Module Helps Vendors
Those who are familiar with building online eCommerce stores have heard about WooCommerce. Those who are in the subscription business know it has an extension called WooCommerce Subscription that helps create a subscription-based online store.
The extension allows admins to create subscription products for the customers.
Then Dokan multivendor added the Dokan Subscription module that helped the admins create highly customized subscription packs and charge vendors of a marketplace. As you can see, one thing was missing. There were no options for the vendors to create their own subscription products.
Dokan Product Subscription module will allow vendors to create and sell their own subscription products for the customers. It is mainly for the vendors.
This module is a WooCommerce subscription integration. With this module-
- Vendors can capture residual revenue with recurring payments
- Easily estimate the gross collection of their store
- Build a strong relationship with the customers
- Increase engagement with customers
- Ease of distribution
- Increase vendors loyalty
You can see there are many perks this new integration can bring to the marketplace. If any vendor wants, they can now sell different types of courses, services, SaaS products, and many more subscription-based products.
Moreover, subscription businesses are now on the rise. Not only does it provide business consistency, it also creates marketing opportunities.
Now hopefully you have understood what this module can do for you, let us see how you can set up this module for your marketplace.
How to Configure Dokan Product Subscription Module
What the admins can do with the WooCommerce Subscription module at the backend, the Dokan Product Subscription brings it all to the frontend for the vendors. That means vendors can create and sell subscription products for customers just like admins do for vendors.
However, this module is somewhat complex. That is why we are going to guide you through how to set up the module. Then hopefully you will be able to utilize it properly.
So, let us begin with the steps, shall we? We are going to show you all the details.
Before starting you need to make sure you have all the necessary plugins installed. You need to install-
Creating Subscription As a Vendor
Before creating a subscription, vendors need to know there are two kinds of subscriptions.
- Simple Subscription: A simple subscription is a recurring agreement where you pay a regular fee (often monthly or annually) in exchange for access to a product, service, or content
- Variable Subscription: Unlike a simple subscription with a one-size-fits-all approach, variable subscriptions offer different options or “variations”.
We will first see how to set up the Simple Subscription first.
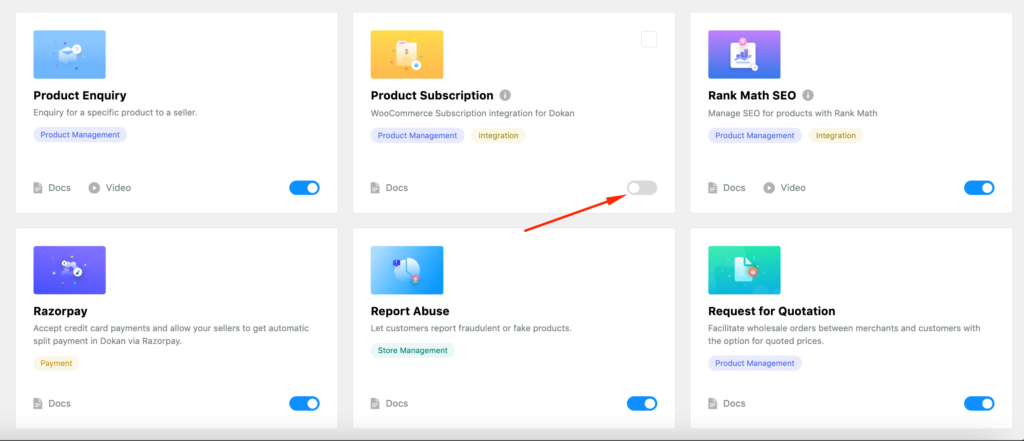
First, the admins need to enable the module from the WordPress backend. Navigate to Dokan–> Modules, find the product subscription module, and activate it.
Creating Simple Subscription Products
In a Simple Subscription, you can create only one type of subscription for a product. For example, If you selling a magazine in only one state, therefore, you can create a single subscription for the customers of that state.
Here are the steps to create the subscription.
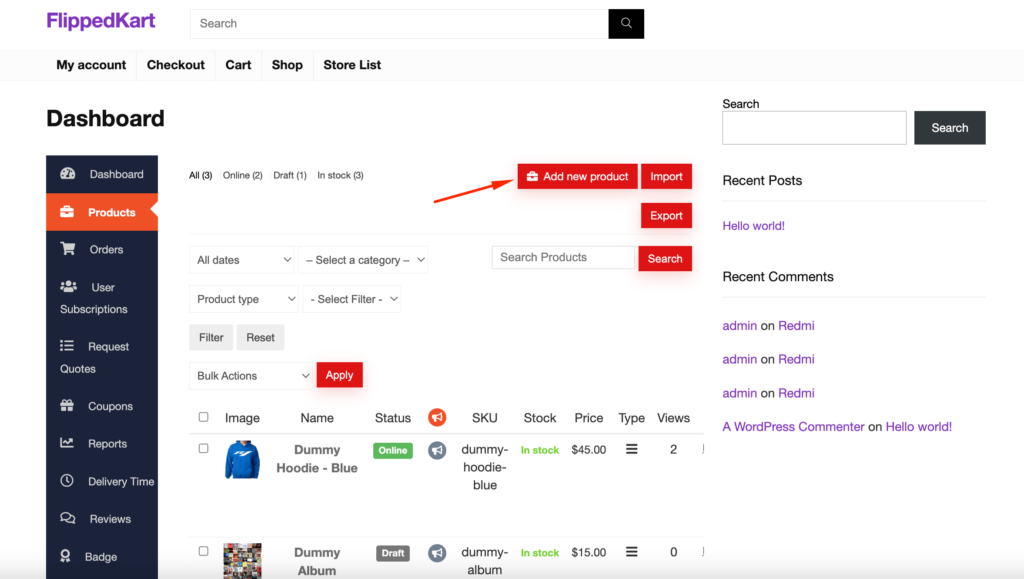
1. Create a Product from Vendor Dashboard
You need to create a product first. Log in as a vendor, go to the vendor dashboard, and select Products from the left sidebar. Now click on the Add New Products button. Fill up the necessary information and upload an image if you want. Then hit the Create Product button to finish.
2. Select Simple Subscription From the Drop- Down Menu
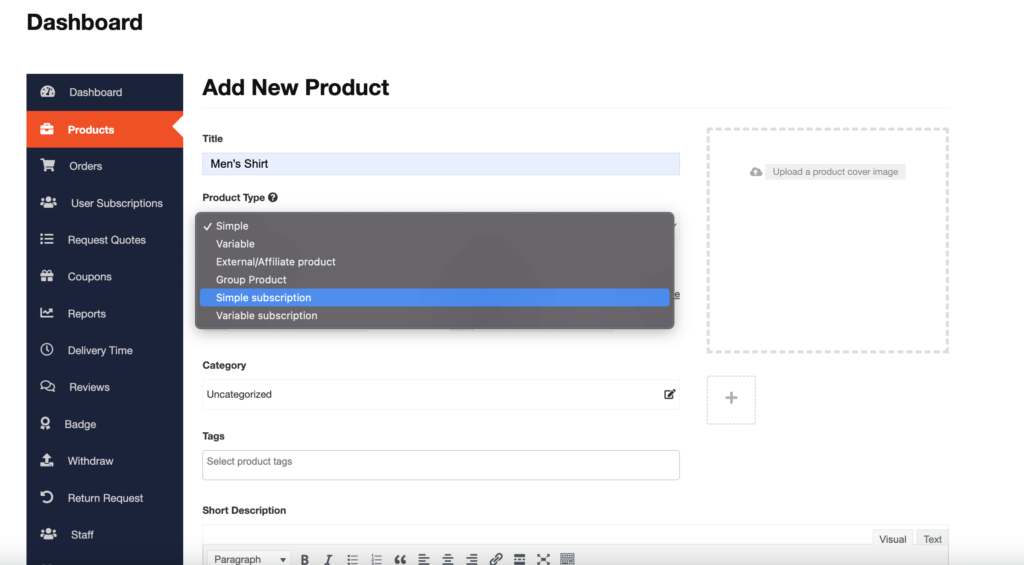
After creating the product, you need to Edit the product. On the edit page, you will find a product-type drop-down menu. There select the Simple Subscription option.
3. Fill Up the Necessary Fields with the Required Data
Now, you need to set up the necessary fields to complete creating the product. You need to set,
Subscription Price: This is the most important part as you must ensure how much you will charge for your product. You can charge renewal payments using a billing period of daily, weekly, monthly, and yearly.
Subscription Expiry Date: You need to set the expiry date of the subscription plan. However, subscriptions products with Never expire set in the field can renew indefinitely as long as renewal payments are successful.
If you create a yearly subscription plan for your magazine and charge $5 a month, the length of the subscription is 11 months. Then your plan will look like this:
- Subscription price: $5 Every Month
- Expire after: 11 Months
Sign-up Fee: This sign-up fee is in addition to any recurring amount that you have set for the subscription product. For example, if you create a subscription product for $70 per month with a $100 sign-up fee, the subscription’s initial total during checkout will be $170.
However, when a subscription has a sign-up fee and a free trial, only the sign-up fee is charged at the beginning of the subscription period. If there is no free trial period set on the subscription product with a sign-up fee, the price charged=
sign-up fee + recurring first month’s total.
Free Trial: This period is added to any length you set for the subscription. This option will allow your customers to have a test run of your product before buying.
For example, if you create a subscription of $10 per month for 8 months with a 1-month free trial period, the subscription will expire after 9 months.
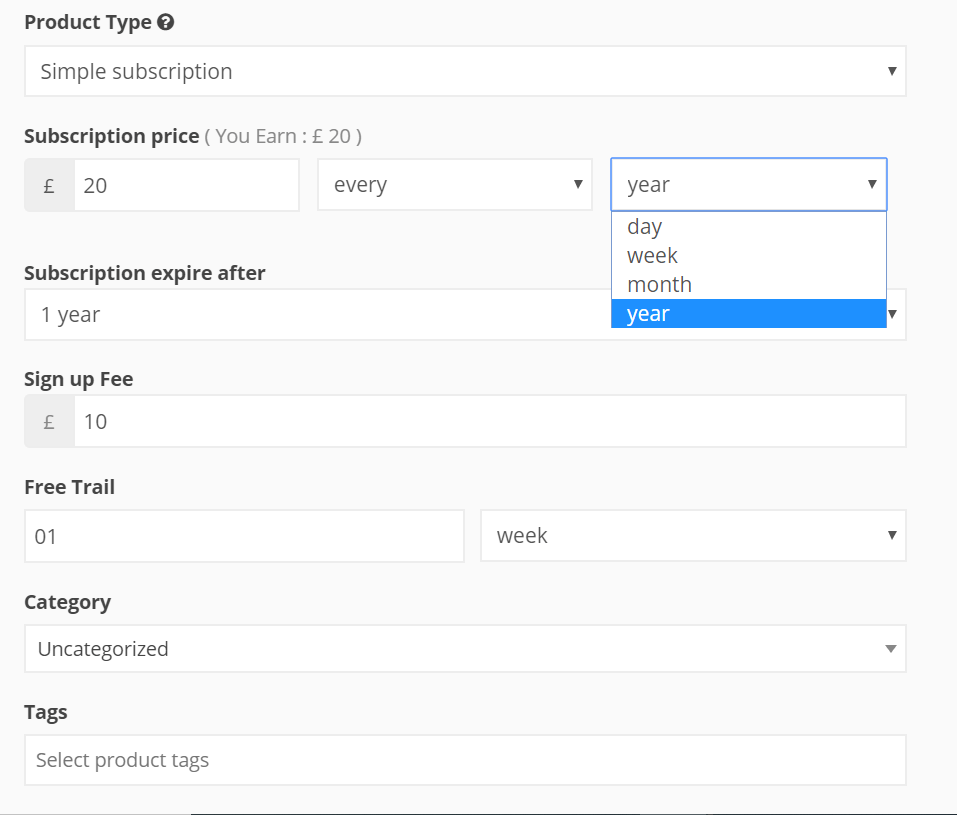
After setting all the fields, hit the Save Product button and you will able to view the product.
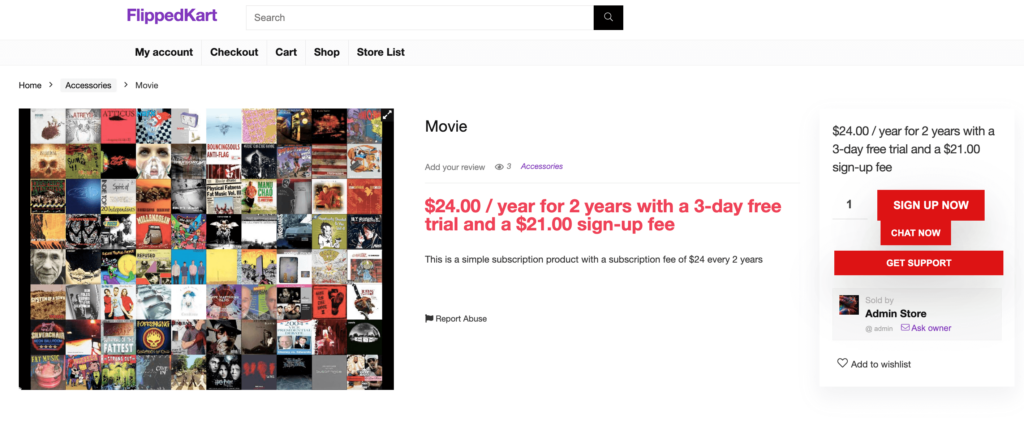
Creating Variable Subscription Product
Variable Subscription is like the Variable Product. For instance, if you are selling a course as your product, you can charge different prices based on the locations of the course. However, you need to create Attributes and Variations first.
- Attributes: It is the name for which you will create variations. Like, if you are selling various courses you can create an attribute like location, months, online, or offline.
- Variations: You can create various variations. For example, if you have a location attribute you ca create variations like Singapore, USA, Maldives, etc.
To get started, select the Variable Subscription product type from the Drop-Down menu.
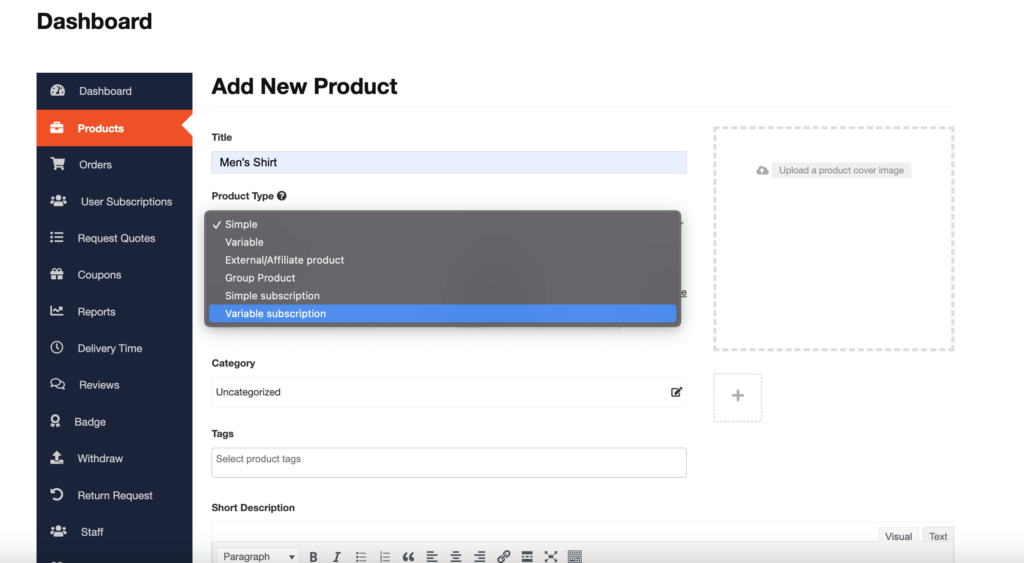
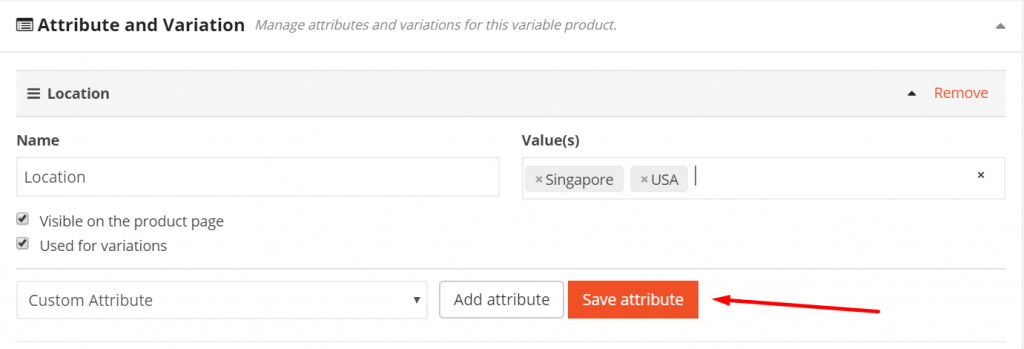
Now, you need to add Attributes. Click on the Add Attribute button.

Also, set the Attribute name, to add various variations you need to use after a variation “|”. For example, “Singapore | USA”.
Hit the Save Attribute button to finish.
Remember to choose the “Used for variations” option.
However, in different product attributes, each variation in a Variable Subscription can have a unique:
- Sign-up fee
- Trial period
- Recurring price
- Billing period
- Subscription length
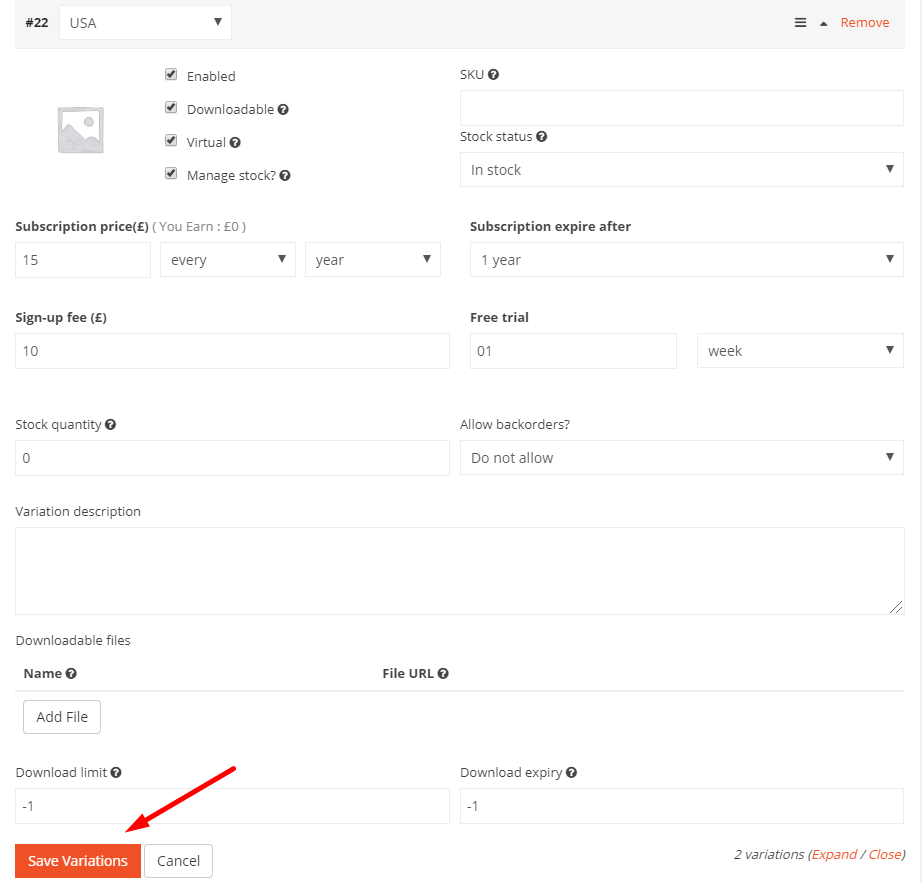
Hit Save Variations to finish.
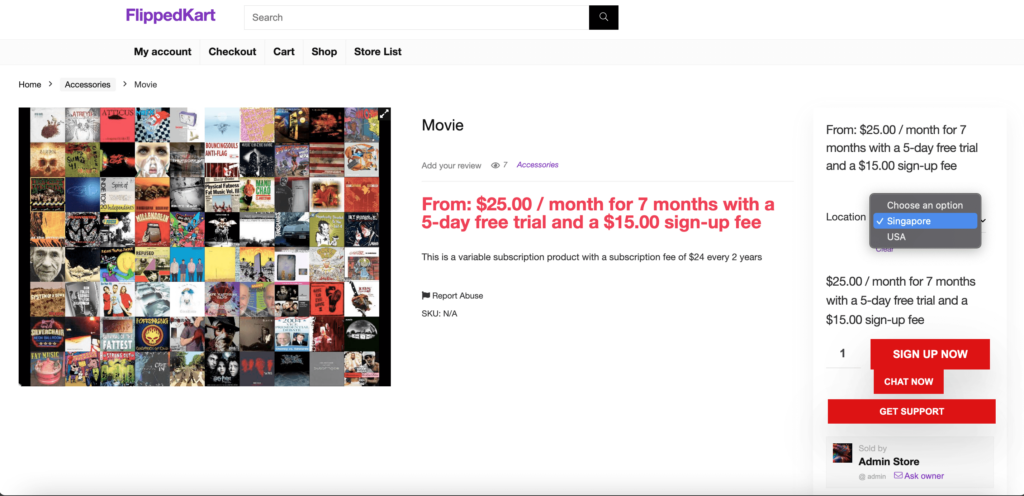
Now you can view the product with Variable Subscriptions.
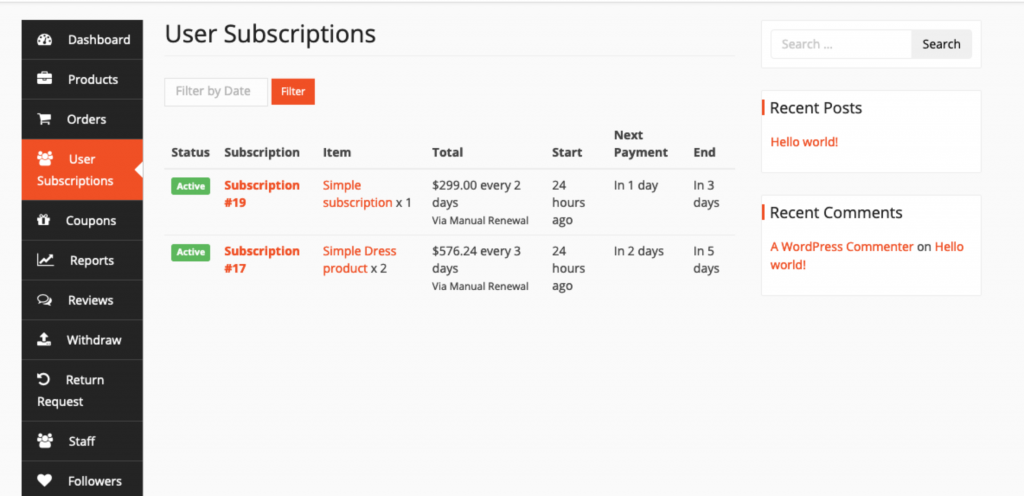
However, you can see the number of subscriptions the customers have purchased. Click on the User Subscriptions button from the sidebar of the dashboard and you will be able to see which subscriptions have been purchased.
Having said that, if you click on any of the subscriptions you will be able to see all the details regarding that subscription.

Purchasing Subscriptions As a Customer
When the customer wants to buy a subscription product, the process is very simple. Just click on the Sign up button and the product will be added to your cart.
Then, go to the Cart page and add the necessary information to Checkout. That’s it. After successfully purchasing the product, he/she can view the subscription products on the My Subscription page on his/her account.
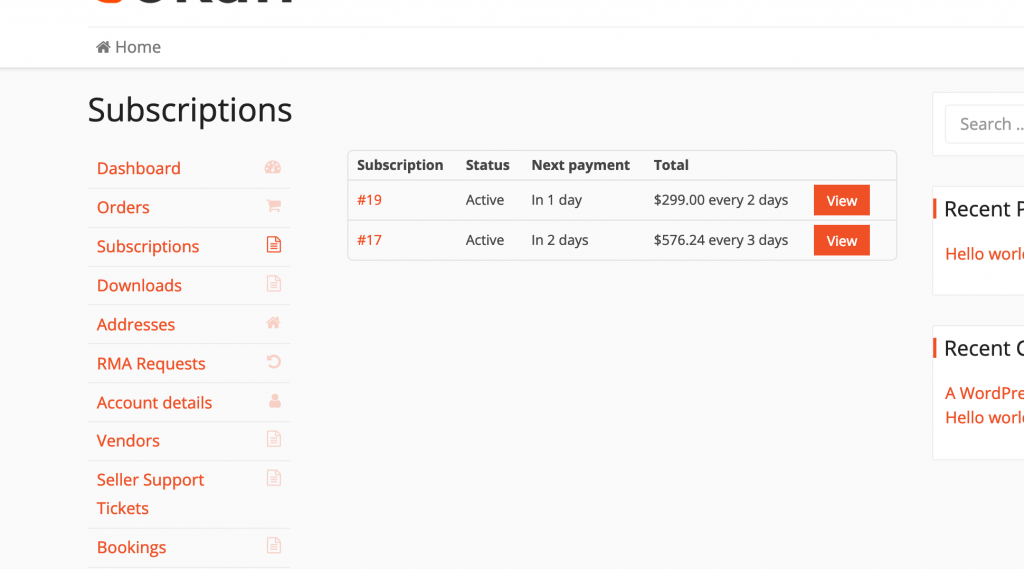
If he/she clicks on the View button. they will be able to see all the details regarding the product.
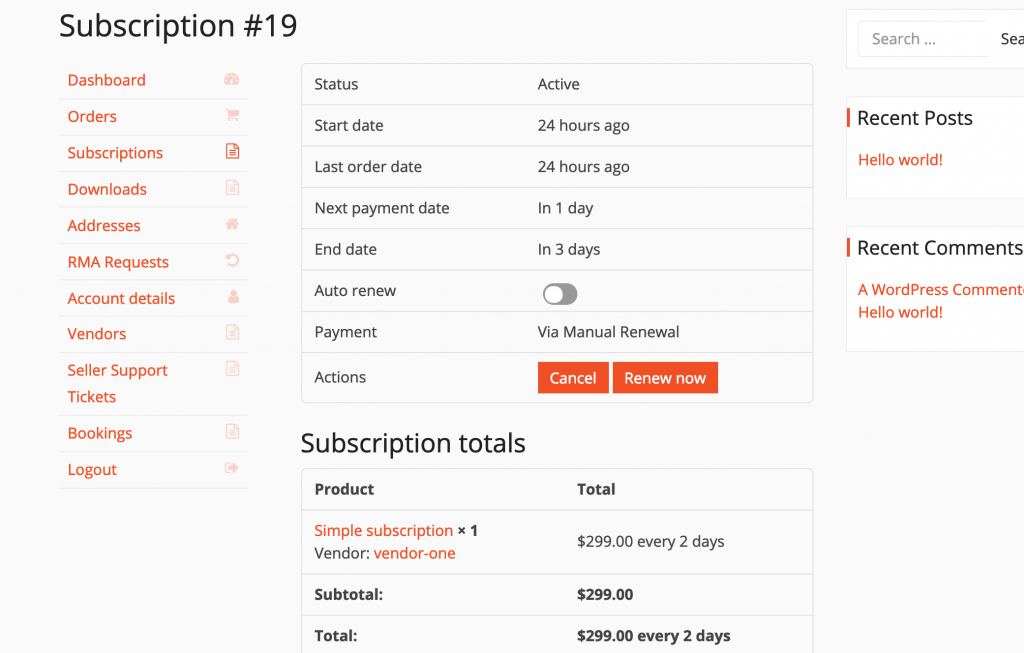
It is as simple as that.
Note: Customers can only purchase subscriptions through the supported payment gateways. For Dokan multivendor, they can use Stripe Express and PayPal Marketplace to purchase subscription products.
If you want to learn more about the Product subscription then you can check out our detailed guide on the module.
Create Subscription Products with Ease!
The subscription business model is becoming a great way to earn good money. That is why many people are going for it. In the midst of that, the Product Subscription module will open the door to this path.
Dokan has taken a play from the WooCommerece playbook and taken it one step further with this Product Subscription module.
The vendors that were looking to get into the Subscription Business will now have the opportunity and the marketplace owners will have more users because of that.
So, what are you waiting for, grab your copy of this exclusive model and take your marketplace to the next level.
Subscribe to
Dokan blog
We send weekly newsletters, no spam for sure!



Leave a Reply