

Are you aware of the Dokan Seller Badge module?
Learn about this new module of Dokan Multivendor and use it to reward your marketplace vendors who have achieved specific accomplishments.
Dokan Multivendor has been powering up more than 60,000 businesses to build a strong online presence in the last 10 years. Dokan is not just a feature-rich plugin but a constantly evolving platform that prioritizes innovation and customer satisfaction.
Along with many useful features, Dokan supports 40+ premium modules to make your marketplace stand out. Among those, the “Dokan Seller Badge” is a premium module of Dokan Multivendor that was released with the plugin’s 3.7.14 version.
In today’s blog, we’ll discuss the Dokan Seller Badge module, its unique functionality and benefits, and how it’ll redefine the dynamics of your multivendor marketplace.
What is the Dokan Seller Badge?
The Dokan Seller Badge is a premium module of the Dokan multivendor plugin. It allows you to create and assign badges to your marketplace vendors based on their marketplace activity.
As a marketplace admin, you can use these badges to:
- Recognize vendors for their achievements
- Encourage them to continue their good work, and
- Help customers make informed purchasing decisions.
Seller badges also serve as a visual sign that represents a seller’s trustworthiness and credibility. As an admin, you can highlight sellers who consistently deliver exceptional service and maintain high customer satisfaction ratings. This approach will motivate your sellers to strive for excellence.
On the other hand, when customers see that a seller has earned particular badges, they gain confidence to purchase from that vendor. It increases their (and yours) brand reputation.
Are you new to the eCommerce business or just planning to create a multivendor marketplace? This guide helps you configure your first marketplace on WordPress with ease.
How Does the Dokan Seller Badge Module Work?
Inside Dokan Multivendor, admins can create badges and define the conditions that marketplace vendors must meet to earn them. For example, you can define a badge that a vendor will get after selling a certain number of products. Similarly, you can set rules based on the number of positive reviews or getting a high rating.
Dokan Seller Badge automatically tracks vendor’s store activity and assigns badges to vendors who meet specific conditions.
Badges are displayed on vendor stores and product pages. Customers can use badges to identify vendors who are trustworthy, reliable, and experienced.
Below are the steps to create Badges for your marketplace vendors and define conditions. It includes-
- Activate the Seller Badge Module
- Create a Seller Badge & Set Conditions
- Display a Badge on Vendor Stores
Step 1: Activate Dokan Seller Badge Module
First, you have to activate the seller badge module. From your WordPress dashboard, go to Dokan → Modules. Look for the Seller Badge Module and activate it.
Now you are eligible to create a seller badge for your marketplace vendors.
Step 2: Create a Seller Badge & Set Conditions
The next step is to create seller badges and set conditions against them. We have already created some default seller badges and their images. You just need to select them from the drop-down menu.
Navigate to Dokan → Seller Badge and click on the Create Badge button.
It will take you to the next page.
Here, you can choose the type of badge from the drop-down menu of “Badge Event.” Each event represents a different threshold of achievement for the badge criteria.
After choosing the “Badge Event“, enter a descriptive Badge Name, such as “Top Seller” or “Reliable Merchant.”
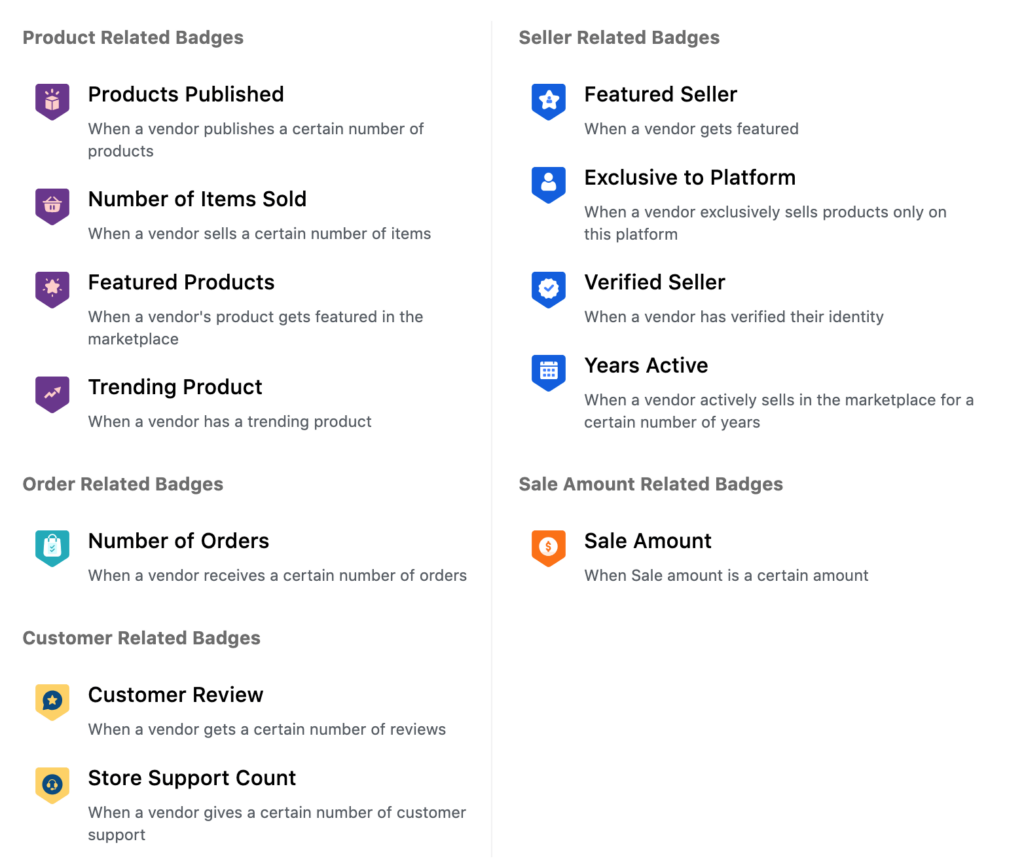
For each badge event, you can specify the conditions that vendors must meet to earn that label. You can use various conditions, such as:
- Product Related Badges: Number of products sold, number of products published, featured products, etc.
- Seller-Related Badges: Verification, contribution to the marketplace, number of days since joining the marketplace.
- Order Related Badges: Number of completed orders
- Customer Related Badges: Number of positive reviews received, average rating from customers, number of customer inquiries resolved.
- Sale Amount Related Badges: Total sales amount, average monthly sales, number of high-value orders.
Based on your Badge Event, Dokan also gives you a beautiful badge image to recognize your vendor. However, you have the flexibility to change the image and set your badge image.
Dokan comes with a large scale of customization options, so you can personalize your marketplace’s every corner with ease.
Once you are done with all the configurations, set the status to “Published.“ Finally, click on the button “Create” to make the badge active.
You can check the Preview of your badge and its elements from your WordPress dashboard.
On your Seller Badge page, click on the Preview button of the badge you want to check the details.
It shows you all the details of your badge-
If you want to know more about badge type and their attributes check our official documentation on Dokan Seller Badge.
Step 3: Display a Badge on Vendor Stores
You’ve created the badge successfully. Now, add the Dokan Seller badge widget to display the badge on your vendor store.
Go to Appearance → Widgets. Now decide where you want to display the badge in your vendor shop. We prefer to show it on the store sidebar.
Now, whenever any of your vendors satisfy the condition, the chosen badge will be appointed automatically.
The view of the storefront will be like below-
This is the process of creating the Dokan seller badge and assigning it to a vendor.
Follow these steps you can configure your Dokan Multivendor for Seller Badge module. It could be an easy approach to enhance your customers’ experience on the Dokan multivendor marketplace.
Not a Dokan user? Don’t worry.
It requires only a few moments to configure your Dokan Marketplace on WordPress. Here is the guide you can follow at your convenience- How to Create an Online Marketplace Like eBay.
Do you need further assistance to use the seller badge module on your marketplace? Check out the video tutorial below ⬇️
By setting conditions for seller badges, you can effectively motivate and recognize your top vendors, enhance customer trust in your marketplace, and encourage overall marketplace growth.
Let’s answer some common queries from Dokan users regarding Dokan Seller Badge–
FAQs on Dokan Seller Badge
There are many helpful resources available to help you work with the Dokan Seller Badge. Still, users find some difficulties in using the module. Here we’ll answer all those issues-
1. Can I Change the Default Badge Image of Seller Badges?
Answer: Yes you can easily change the image just by clicking on the default badge image.
2. How to Draft a Badge on Dokan Multivendor?
Answer: After publishing a badge, you can draft it for a while. To do this, go to the Seller Badge page from your WordPress dashboard and select the badge name. Under the badge name click on the “Set Badge As Draft” option. Once you draft the badge, it gives you a warning that the “Drafted badge will not be visible from vendor profile page”.
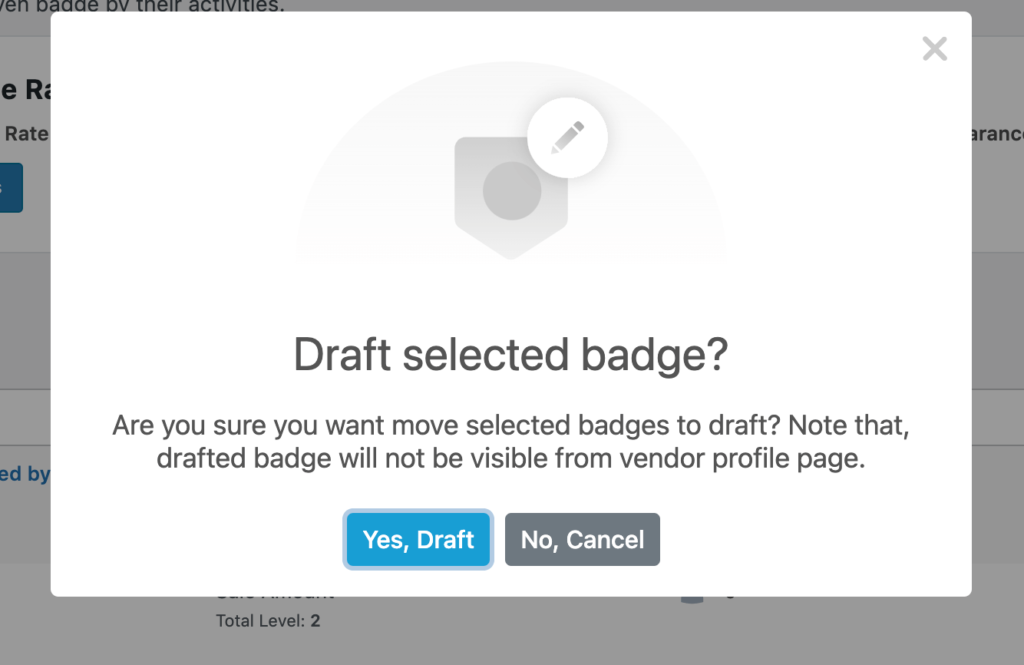
Choose the Yes option to draft the badge.
3. How to Publish a Draft Badge on Your Dokan Marketplace?
Answer: To publish a drafted badge, go to the drafted badge. Click on the Publish Badge option. And hit on the Publish badge.
Once you activate the badge again, it’ll be assigned to the vendors who were previously assigned or acquired.
4. How to Delete a Badge on Dokan Multivendor?
Answer: If you think a badge is no longer required on your marketplace, you can easily delete it. Simply select the Badge name and click on the Delete option.
Remember, after deleting a badge, all badge-related data of that badge will vanish permanently.

Make Your Marketplace More Efficient with Dokan Seller Badge
In conclusion, the Dokan Seller Badge is a powerful tool to skyrocket customer loyalty. The badge not only serves as a visual representation of a seller’s credibility and reliability but also plays a crucial role in fostering trust between sellers and buyers.
If you are a Dokan user, incorporating the Dokan Seller Badge into your marketplace could be a strategic move toward success.
In an era where competition in the eCommerce landscape is fierce, standing out from the crowd is essential. Dokan Multivendor always offers you exclusive features so you can keep your marketplace one step ahead.
Learn more about Dokan’s powerful features here 👉 Extraordinary Features of Dokan Multi-Vendor Marketplace.
Do you have questions about how to use Dokan Seller Badge in WordPress? Let us know in the comments below!
Subscribe to
Dokan blog
We send weekly newsletters, no spam for sure!


Leave a Reply