eBay is one of the largest and most popular online marketplaces in the world, with over 135 million active users. According to a recent data shared by Statista-
In 2022, eBay’s annual net revenue amounted to 9.8 billion U.S. dollars.
If you are thinking of creating an online marketplace like eBay, now is the high time. Because people nowadays feel more comfortable buying online rather than offline. As it saves their time and energy.
Also, creating an online marketplace has become easier than ever before because of WordPress. You’ll mostly need two plugins to create and manage a marketplace-
- WooCommerce– a dedicated eCommerce plugin for WordPress and
- Dokan Multivendor– the most popular online marketplace solution for WordPress
If you are wondering where to start, do not worry. In this step-by-step tutorial, we’re going to show how to create an online marketplace like eBay in only 7 steps.
Before starting the steps, let us show you-
What Makes eBay a Unique Online Marketplace
eBay is not just like another online marketplace. It is an exceptional marketplace for several reasons. It has a vast and diverse selection of products, competitive prices, and a user-friendly platform. Additionally, eBay offers a variety of buyer and seller protections, making it a safe and secure place to shop.
Here are some of the key factors that make eBay an exceptional marketplace:
- Auction-Based Marketplace Model: eBay’s auction-based marketplace model is a key differentiator, providing a dynamic and competitive pricing mechanism for buyers and sellers. This model encourages bidding wars, leading to exciting discoveries and potentially great deals.
- Robust Seller Protection Programs: eBay has implemented comprehensive seller protection programs to safeguard sellers from fraudulent transactions and non-payment issues. These programs provide sellers with peace of mind and encourage them to participate in the marketplace with confidence.
- Advanced Search and Filtering Tools: eBay’s advanced search and filtering tools help buyers quickly and easily find the specific items they are looking for. These tools allow buyers to narrow down their search based on various criteria, such as product category, price range, seller location, and condition.
- Mobile App and Multi-Platform Accessibility: eBay’s mobile app and multi-platform accessibility allow users to seamlessly access the marketplace from anywhere and anytime. This convenience enhances the user experience and expands eBay’s reach.
- Continuous Innovation and Adaptation: eBay continuously innovates and adapts to the evolving needs of its users and the eCommerce landscape. This commitment to innovation keeps eBay at the forefront of the online marketplace industry.
Now if it seems to you a daunting task to create an online marketplace like eBay, you are wrong. Don’t give us that look! Let us show you how to create an online marketplace like eBay with ease.
7 Steps to Create an Online Marketplace Like eBay
As the title says, we’ll show you how to create an online marketplace like eBay only in 7 steps. So, first, let’s take a quick look at the list:
- Install the Dokan Multivendor Plugin
- Purchase and Activate the Dokan Premium Version
- Choose a Dokan Compatible Marketplace Theme
- Configure the General Settings of the Dokan Plugin
- Enable and Configure the Dokan Auction Module
- Setup Admin Shop and Upload Products on Your Store
- Allow Vendors to Join Marketplace
Seems easy, right?
It is! Let’s dive into the deep!
Just a Heads up: To continue with this tutorial, you’ll need a ready WordPress site. We’re assuming that you already have a WordPress website. If you don’t have one already, check these blogs below to create and launch a WordPress site. Then follow this tutorial!
That’s all! Now you can follow this tutorial.
Step 00: Prerequisites to Create an Online Marketplace Like eBay
Let’s keep this straightforward! We are going to show you what you’ll require to create your eBay-like marketplace:
| Free | Pro |
| Dokan Lite | Dokan premium (Business or Enterprise) |
| WooCommerce | WordPress Simple Auctions (WooCommerce premium extension) |
| A Dokan-compatible Theme |
Now start the tutorial!
Step 01: Install the Dokan Multivendor Plugin
To turn your WordPress site into a multivendor website, you’ll need a multivendor plugin. Dokan multivendor is the best choice in this category. It is the most popular multivendor plugin for WordPress with more than 60,000 active installations.
Installing the Dokan plugin is simple. If you have ever installed a WordPress plugin on your site, you can install the Dokan plugin easily.
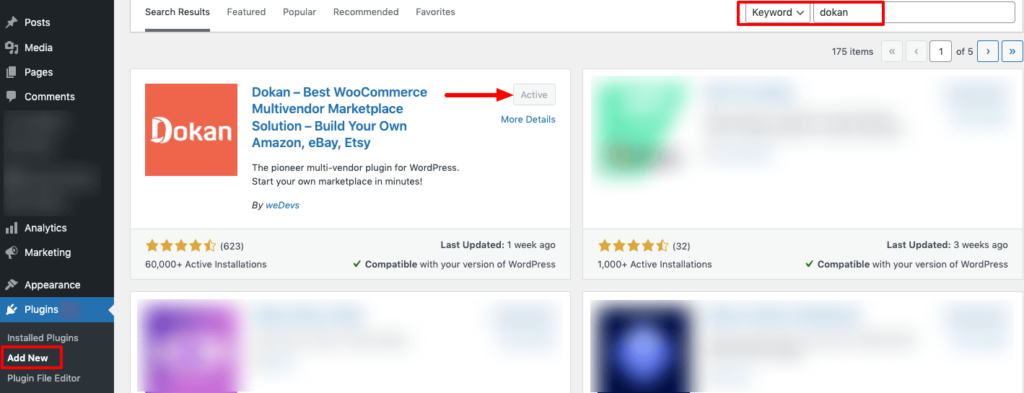
- To install the plugin, navigate to Admin Dashboard -> Plugin -> Add New -> Click the search
- Type Dokan -> Install -> Activate.
Dokan also provides a setup wizard to help you easily set up your marketplace.
Configuring Dokan is very easy by using its own Wizard. You can check this video tutorial on the Dokan installation to complete the process in an even easier way.
Step 02: Purchase and Activate the Dokan Premium Version
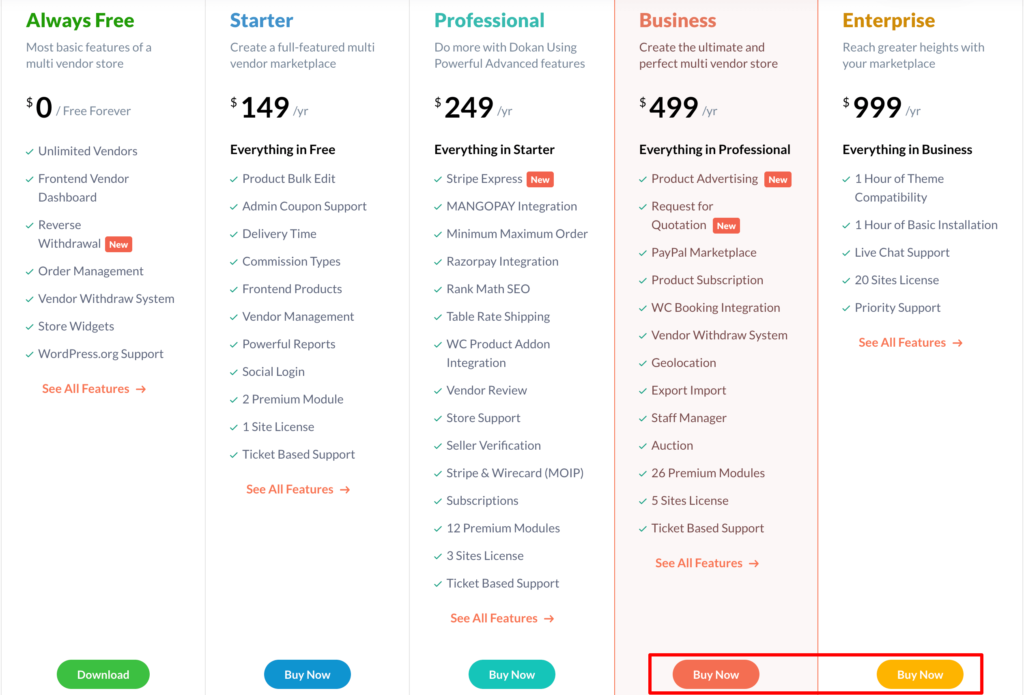
To create an auction marketplace like eBay, you’ll require a premium module called the Dokan Simple Auction module. This module is included in the Dokan Business and Dokan Enterprise packages.
So, you have to buy either Dokan Business or Dokan Enterprise packages to access this module. Let’s check how to purchase the Dokan premium version and install it on your site.
Visit the Dokan pricing page and choose a package to buy.
After completing the checkout process, go to your weDevs account. Then click on the Downloads option. There you’ll find the zip file of your purchased items. Download that zip file.
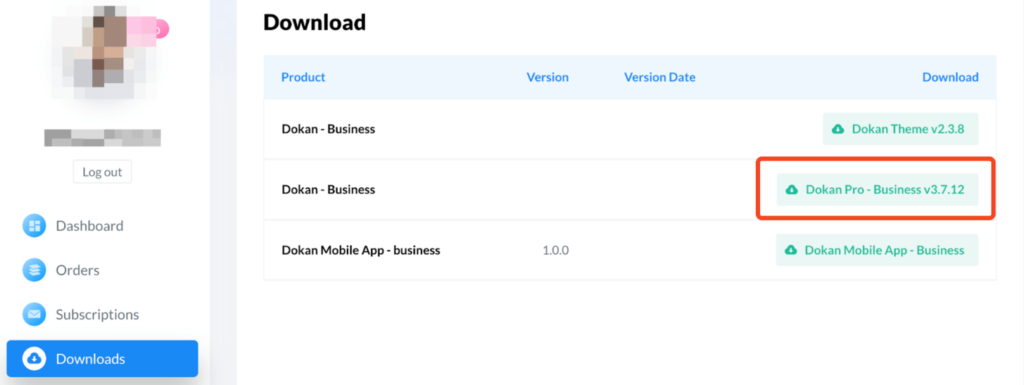
Now navigate to your WordPress Admin Dashboard -> Plugins -> Add New, then click on the Upload Plugin option.
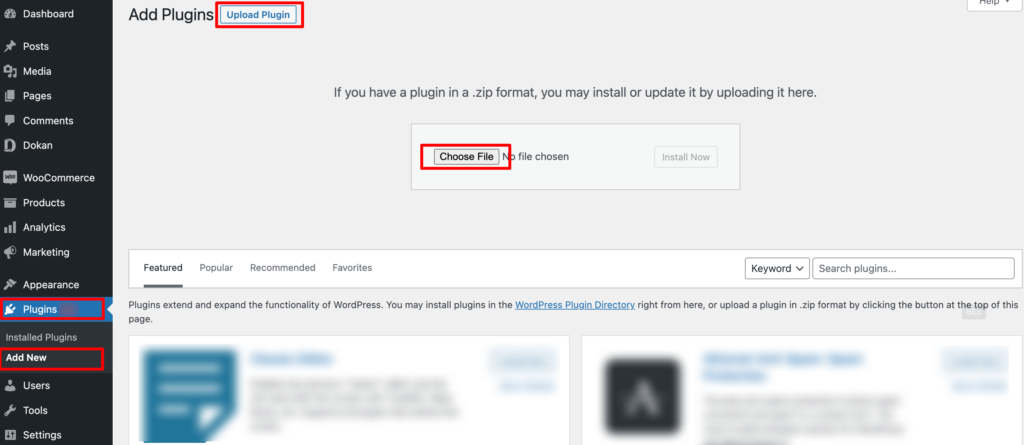
After uploading the plugin, you’ll get the install and activate option to make it usable on your site. Once the plugin is activated, head to the next step to configure the basic settings of the plugin.
Step 03: Choose a Dokan Compatible Marketplace Theme
Dokan comes with a default marketplace theme called Dokani created by the same team behind the Dokan plugin. You can simply use this theme if you don’t want to buy a third-party theme for your marketplace. On top of that, Dokani is a completely free theme to use.
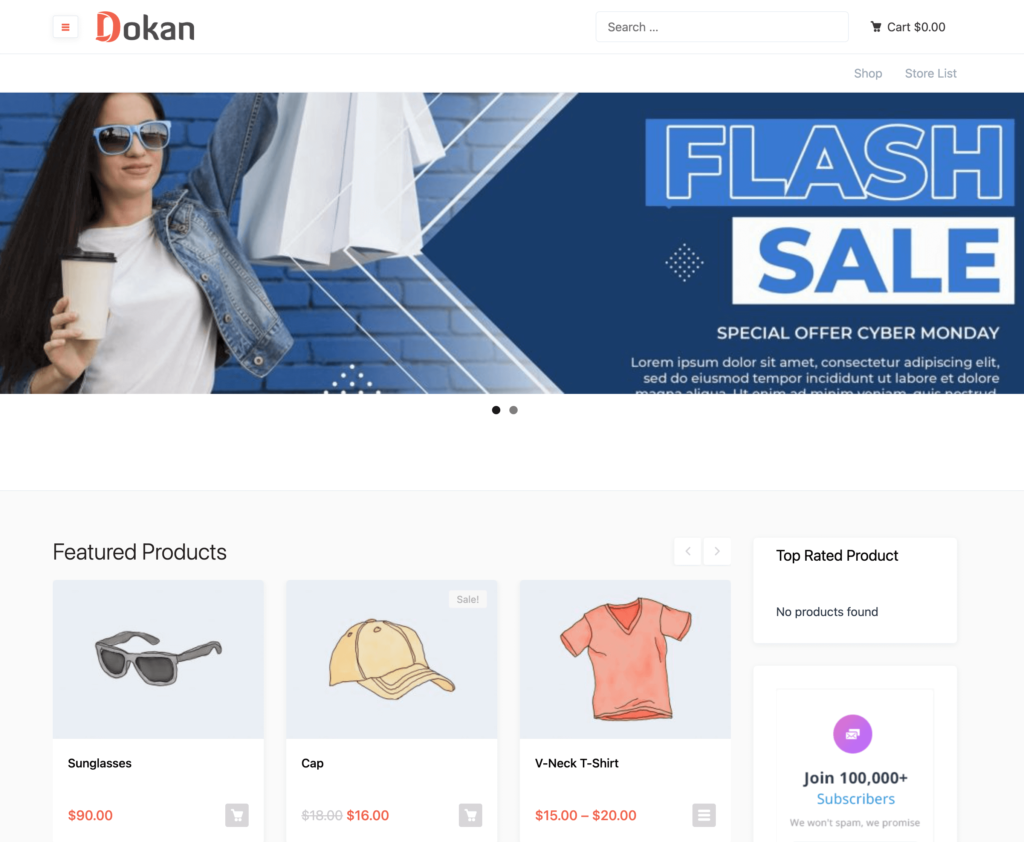
Key Features of the Dokani Theme:
- Responsive, lightning-fast, and SEO-friendly
- Handles all technical aspects of your site’s design effortlessly
- Enhances your visual appeal and captivates visitors
- Supports a wide range of useful widgets
- Fully compatible with popular page builders
That being said, you are fully allowed to use any Dokan-compatible theme for your marketplace. So, choose the best-suited theme for your marketplace according to your requirements and install it to give your site a professional look.
Step 04: Configure the General Settings of the Dokan Plugin
Dokan is a perfect WordPress plugin for creating online auction marketplaces. It comes with all the necessary and advanced features to get your marketplace done. In this step, we will configure the basic settings for the Dokan plugin.
To access the general settings of the Dokan multivendor plugin, navigate to, WP Admin -> Dokan -> Settings.
There you’ll find all the general settings like-
- Select store category
- Enable vendors to display their products
- Create essential tags
- Setup the new product status
- Choose withdrawal methods
- Set minimum withdrawal limit, and
- Include commission terms and rates.
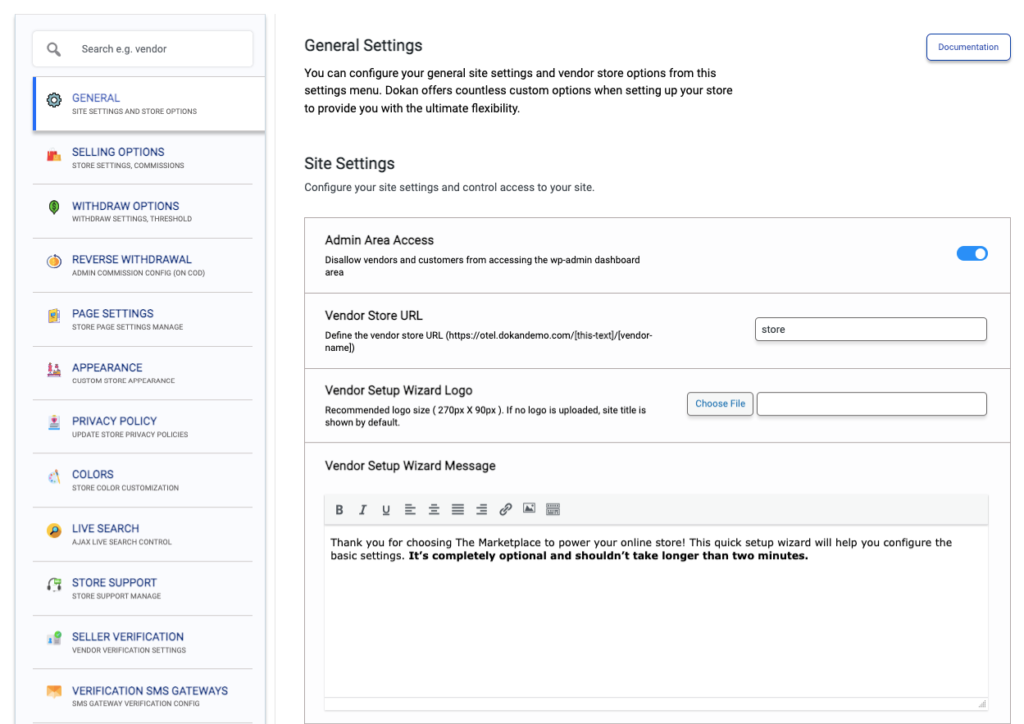
Under every tab, you’ll see several setting options to personalize your auction marketplace like eBay. Get a complete overview of Dokan multivendor plugin settings here!
Once you’ve done with all the changes, hit the button “Save Changes”.
Step 05: Enable and Configure Dokan Auction Module
Here we are going to show you how to add auctionable products. However, if you want to add physical products to your marketplace, you can do that as well. Follow the below blog to get this job done!
Easy Steps to Build Your Dream Marketplace with WordPress
As mentioned previously, the Dokan auction module is required for creating an auction marketplace. Since you have the Dokan premium package, simply enabling the Dokan auction module is all that is needed.
Note: Apart from the Dokan Auction module, you’ll need another WooCommerce extension called WordPress Simple Auctions to build an auction marketplace. Purchase the extension and upload it to your site just like you have uploaded the Dokan plugin.
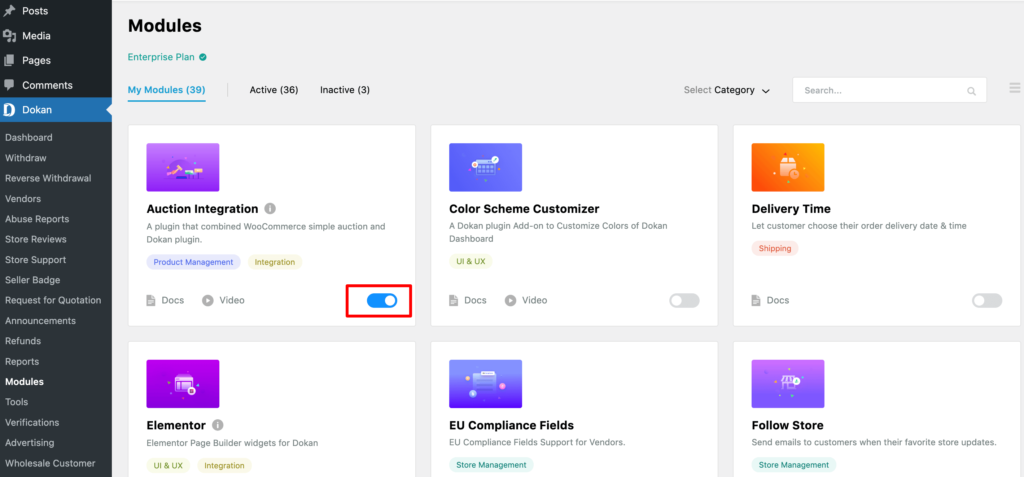
After uploading the WooCommerce auction extension, go to Dokan modules by navigating to your WordPress dashboard > Dokan > Modules. There you’ll find the Auction Integration module, enable it by clicking on the toggle button.
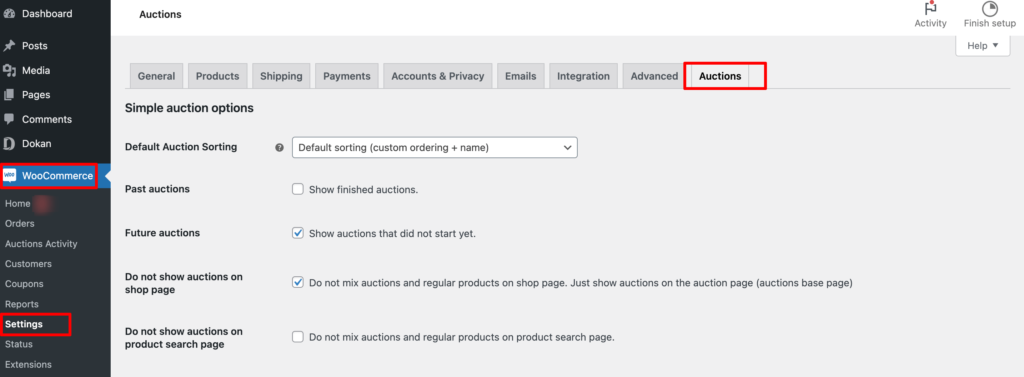
Now go to WooCommerce -> Settings, and click on the Auction tab to get the basic settings of the Auction module.
Step 06: Setup Admin Shop and Upload Products on Your Store
When any of your registered vendors sell anything you’ll get a commission as an admin of the marketplace. Apart from this earning, there is another way for an admin to make money from a marketplace. That is selling as a vendor on your own marketplace.
Important Note: If you don’t want to sell as a vendor on your marketplace, you can skip this step and continue from the next step. But if you want to set up your own store to sell products as a vendor, follow this step carefully.
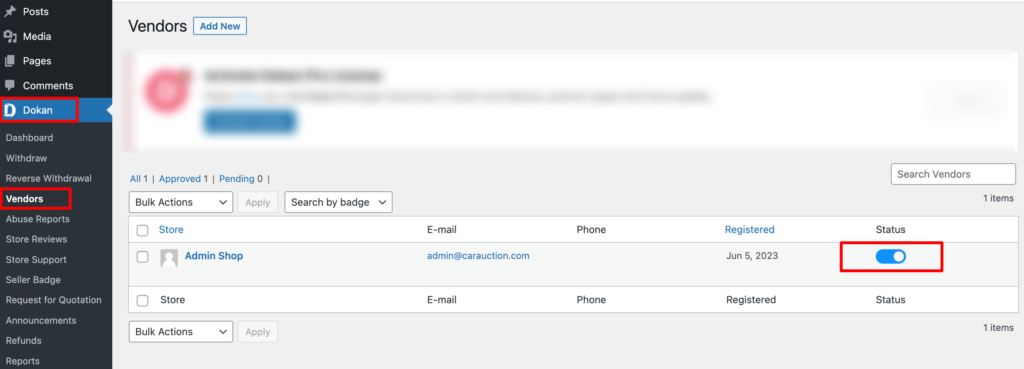
To sell your products, first, enable yourself to add products to the marketplace. To make yourself a vendor, go to WordPress Dashboard -> Dokan -> Vendor. Then turn on the toggle bar to enable the admin to add products to the marketplace.
Now let us show you how to add products to your store.
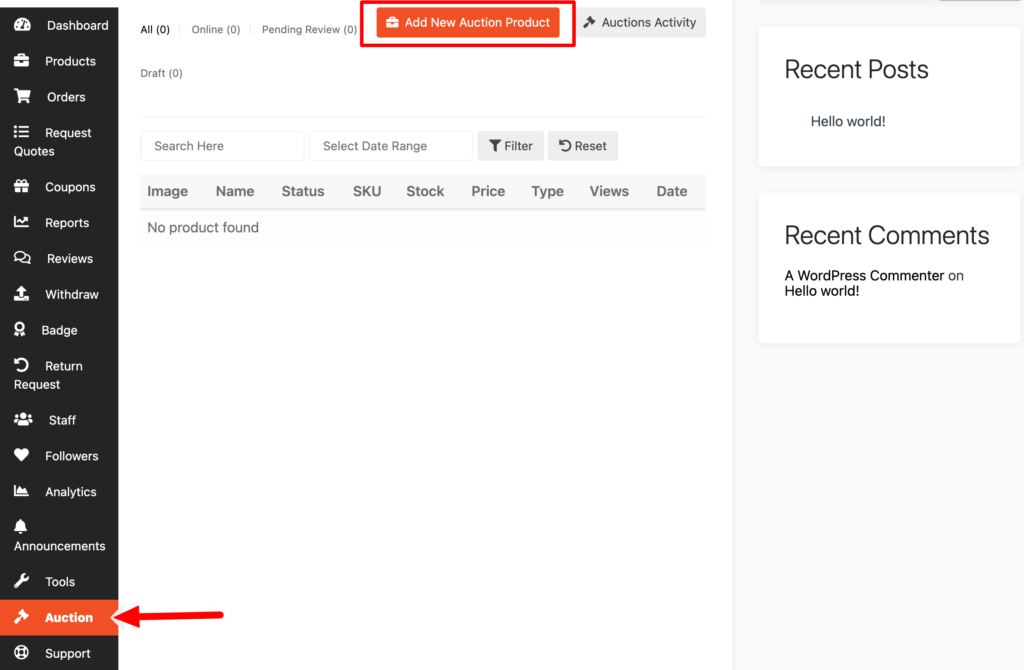
Start by accessing your Vendor Dashboard within your WordPress Dashboard. Once there, scroll down until you find the ‘Auction‘ option. By selecting the Auction option, a new menu titled ‘Add New Auction Product‘ will appear. Simply click on this option to begin adding your auction products.
There you will find options for uploading product photos, inserting product names, descriptions, and so on. Then configure the bidding options by following the below-mentioned instructions.
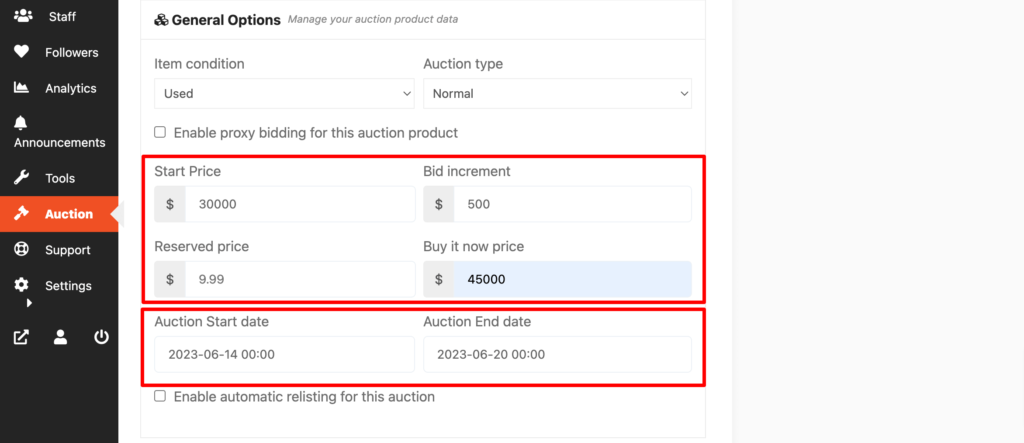
Configure Bidding Options for Your Auction Products
There are four crucial options to configure:
Start Price: This is the minimum price. So the bidding will start from here like you have set $30,000 as a starting price. So bidding will start from $30,000 and will increase each time when customers place a bid.
Bid increment: The amount that each customer will be able to increase each time while bidding. If you have set a starting price of $30,000 and increment to $500. So each time the customers increase the bid, it will increase like $30,500, $31,000, $31,500, and so on.
Reserved price: A reserve price is the lowest price at which you are willing to sell your item. If you don’t want to sell your item below a certain price, you can set a reserve price. The amount of your reserve price is not disclosed to your bidders, but they will see that your auction has a reserve price and whether or not the reserve has been met. If a bidder does not meet that price, you are not obligated to sell your item.
Buy it now price: Buy it now disappears when the bid exceeds the Buy now price for a normal auction or is lower than a reverse auction.
Once you are done with the product configuration, don’t forget to click the “Add Auction Product” button to complete the procedure.
Approve Products As an Admin
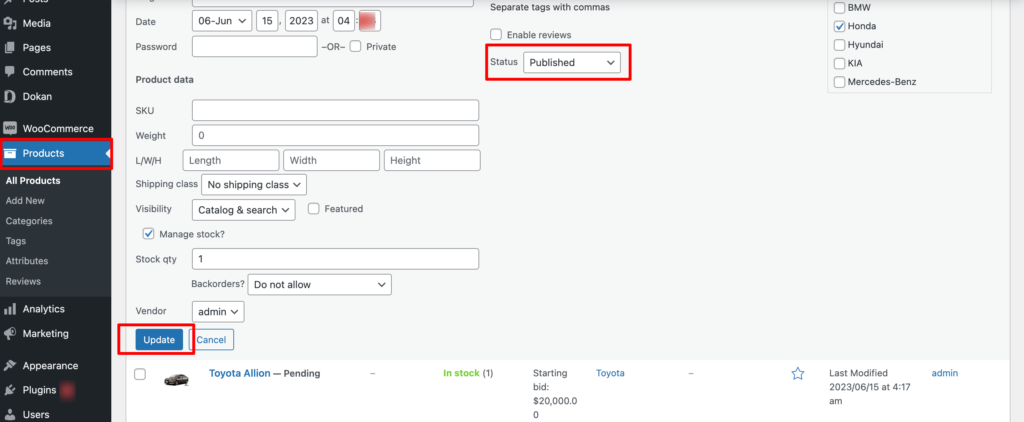
After adding a few products if you visit your product list you’ll see all your added products are still showing pending review labels. That means someone needs to approve your products. In this case, that someone is you. Because it’s your marketplace and you are the admin.

Now as an admin, visit your backend and approve these products to make them public. Click on the Products option, then click on the Quick Edit. There you will find the Status option. Choose the Published option and click the Update button to approve and publish the pending products.
Congratulations! Now your auction products are live to the world. Anyone can bid for your products. Let’s see how you can check the auction activity on your store.
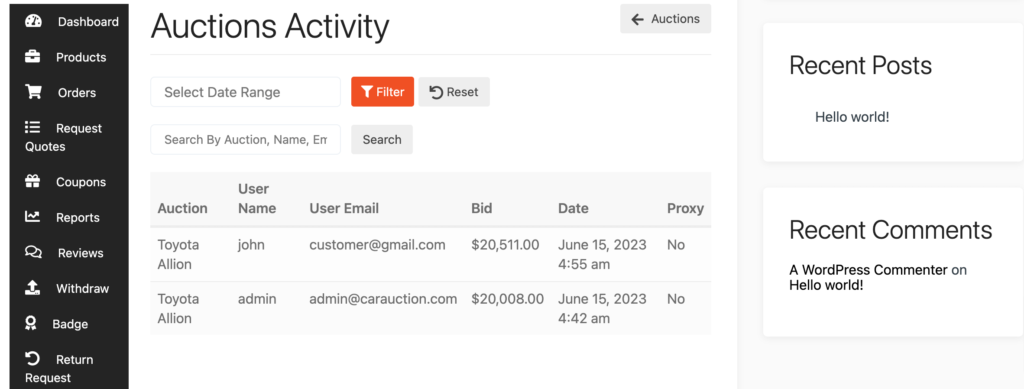
Auction Activity
Now you can check out the activity of each auction product. You will get data on who is bidding, the amount, user email, etc.
Just click on the Auction Activity button from Vendor -> Dashboard -> Auctions.

On the next page, you will see all the activities of the auction product. You can filter the activity date-wise and also search for auction products if the list is too big.
That’s it!
There is a step-by-step video tutorial on how the Dokan auction module works, you can check the video to understand it more clearly.
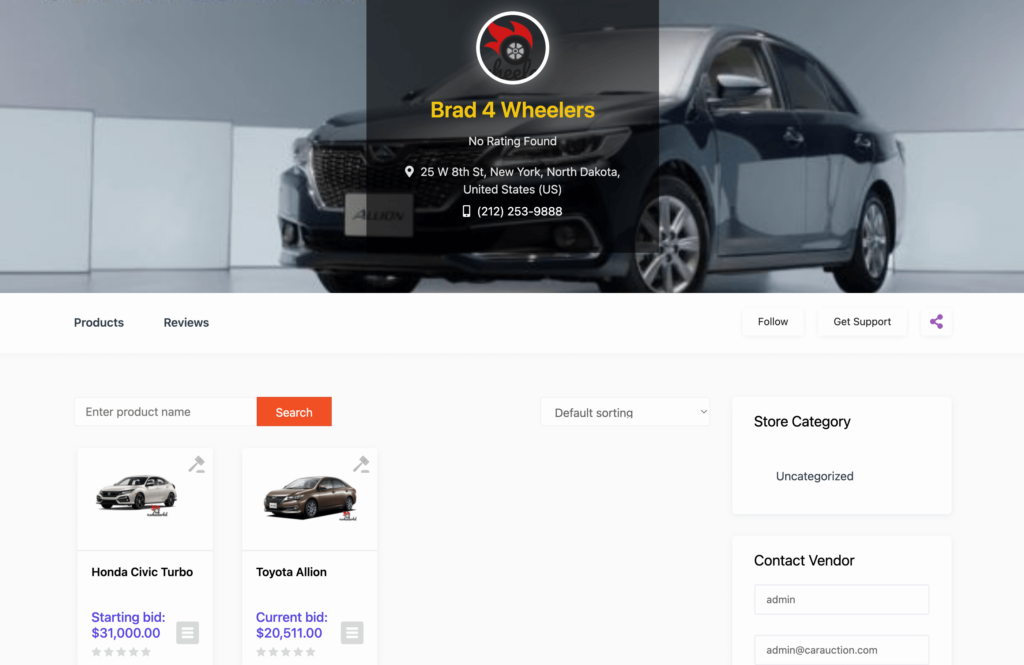
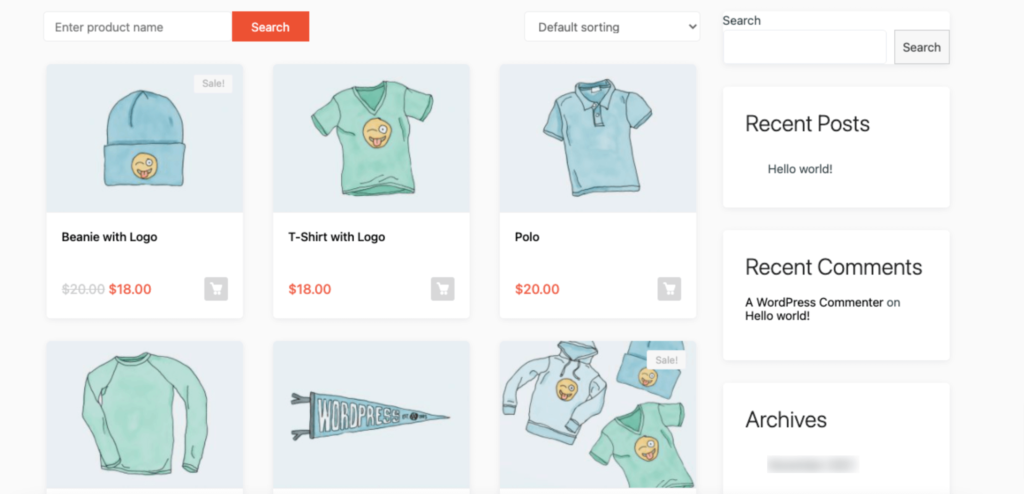
If you want to customize your store design, you can do it by going to Vendor Dashboard -> Settings. From here you can update your store name, address, opening & closing time, etc.
After doing all the customizations, your store looks like the below-
Step 07: Allow Vendors to Sign Up on Your Marketplace
All the basic configurations are done. Now it’s time to open your marketplace for third-party vendors.
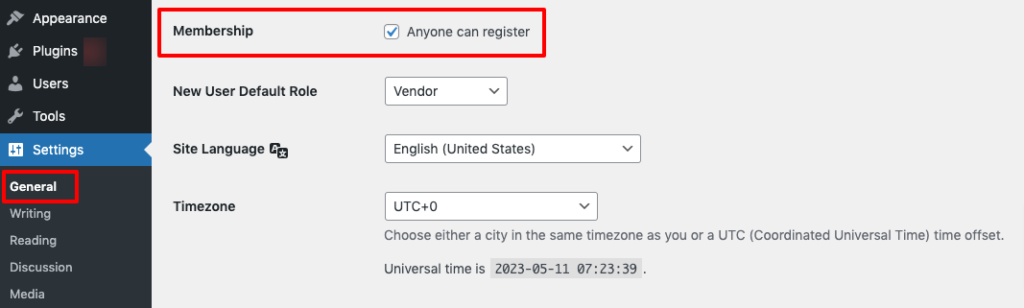
First, you need to enable the “Anyone can register” option. In order to do this, go to WordPress Dashboard -> Settings -> General -> Membership. And put the check mark on it.
Also, don’t forget to save the changes that you have made now by clicking on the “Save Changes” button.
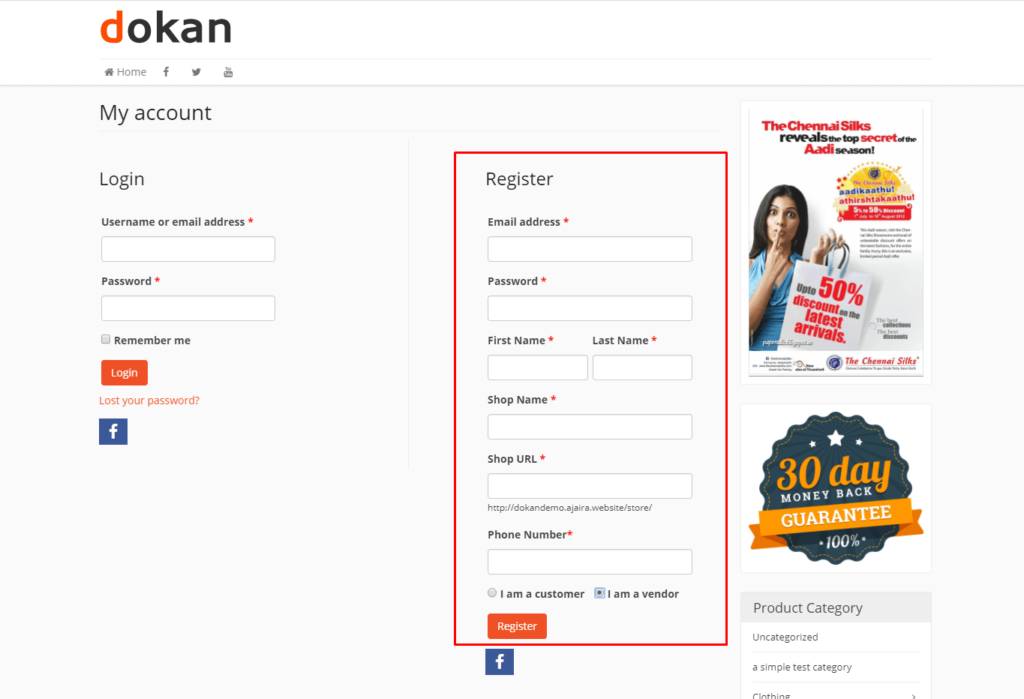
Now vendors can fill up the registration form to sign up in your marketplace-
As an admin, you have the ability to review and manage all vendor registration requests from the backend. Take a look at the profiles of potential vendors and selectively approve those who meet your criteria to sell their products on your site.
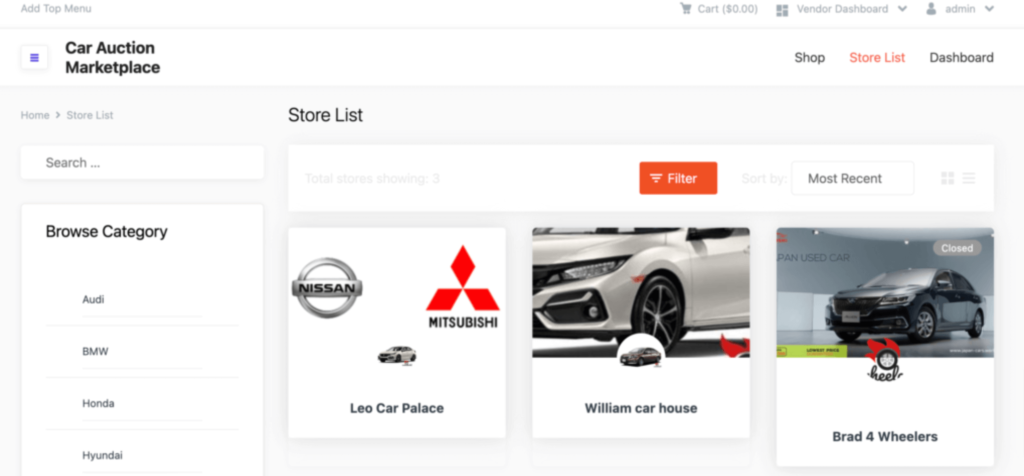
Navigate to your WordPress dashboard then click on the Visit Stores to check all the registered stores on your auction marketplace.
However, getting vendors for your online marketplace can be challenging in the early days. You need an optimized process to find and convince vendors for your multivendor marketplace. Start by researching and understanding your target market, and identifying the specific niche or industry your marketplace caters to. This knowledge will help you tailor your marketing strategy.

Bonus: Optimize Your eBay-Like Marketplace with Dokan Advanced Features
Once your marketplace starts gaining attention, you’ll require more advanced features to manage their expectations. Here is a list of the advanced features with solutions that you should implement to ensure a smooth user experience in your marketplace:
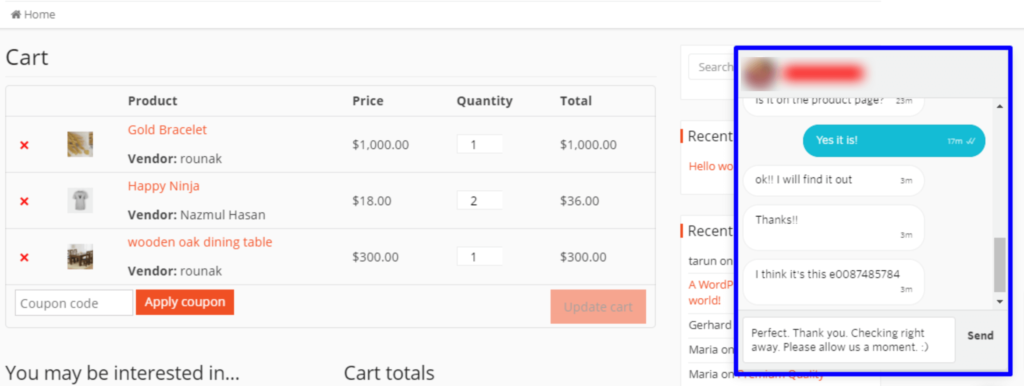
i) Live Chat
Looking to provide top-notch customer service and boost your sales? Say hello to the incredible Dokan Live Chat module! This powerful tool allows you to offer real-time support and enhance customer satisfaction.
So, why do you need it? Well, imagine being able to resolve your customers’ issues quickly and efficiently. With Dokan Live Chat, vendors can provide instant support through popular platforms like Facebook Messenger, WhatsApp, Talk.Js, or Tawk.to.
It’s all about meeting your customers where they are and providing swift assistance. By implementing this module, you’ll create a seamless and interactive experience that leads to happier customers and increased sales. Give it a try and take your customer service to the next level!
ii) Product Advertisement
Boost your earnings by offering vendors the chance to showcase their top-selling or exclusive products through a site-wide, customizable advertisement. You have the flexibility to handpick specific vendors or items to feature, ensuring maximum exposure.
It’s a win-win situation: vendors get increased visibility, and you earn more from their promotions. Customize the ad to seamlessly blend with your site’s design, creating a cohesive and eye-catching display. So, why wait? Empower your vendors and enhance your profits with our Product Advertisement Module. Start showcasing their best offerings today!
Also Read: Dokan Product Advertising- Easy Way to Highlight Your Best Seller Products on Your Marketplace
iii) Vendor Analytics
Empower your vendors with detailed store analytics right on the frontend. Our user-friendly interface allows vendors to effortlessly access and analyze key metrics for their stores. With valuable insights at their fingertips, vendors can make informed decisions to enhance their performance.
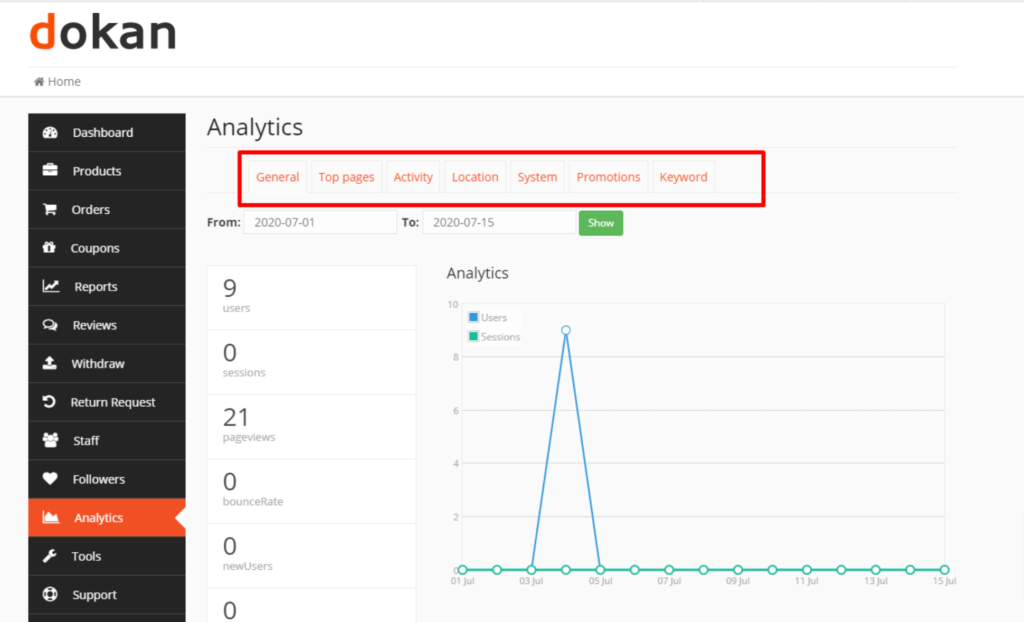
From tracking sales trends to monitoring customer behavior, our Vendor Analytics Module provides the data-driven tools necessary for vendors to thrive. Say goodbye to guesswork and hello to data-driven success for your vendors. Help them unlock their full potential with our comprehensive analytics solution today.
iv) Seller Badge
Recognize and celebrate the accomplishments of your marketplace vendors effortlessly with Seller Badges. As a marketplace owner, it can be challenging to distinguish and manually grant vendors the credibility they deserve.
However, our innovative Seller Badge feature simplifies this task. Admins can easily create conditions and automate the process of highlighting vendors based on their marketplace activity.
Whether it’s for exceptional sales, positive customer feedback, or other noteworthy achievements, Seller Badges provide a seamless way to make vendors stand out.
v) Stripe Connect
Take advantage of Stripe’s renowned low fees and streamline your payment process. With our Stripe Connect Module, you can effortlessly handle all your payments in real-time, ensuring quick and efficient transactions.
Say goodbye to manual processing and embrace the automation provided by Stripe. Plus, with Stripe’s competitive fees, you can keep more of your hard-earned money. Make the most of Stripe’s powerful capabilities and enjoy hassle-free payments for your business.
Be the Next eBay!
Wasn’t it something that you can’t do it by yourself? Nah, right?
So, what are you waiting for?
Start building your dream eCommerce multivendor marketplace and be that next eBay!
If you have the right motivation and passion to be a successful eCommerce entrepreneur, we think now is high time to kickstart your journey.
That being said, if you have any queries regarding this tutorial, feel free to share them with us using the comment box below. We are all ears!
Subscribe to
Dokan blog
We send weekly newsletters, no spam for sure!


Leave a Reply