wePOS Reports option lets you check the overall sales report of your store. Here, by default, you’ll find the ongoing year’s sales report. You can also apply different filtering options to get reports of a certain period of time.
After logging in to the wePOS reports dashboard, you’ll get to see sales reports in three different formats.
- Summary view
- Chart view, and
- Listing view
Later, we’re going to discuss these options in detail. But before that let’s check what you can track from this interface:
- Total Sales Amount
- Total Items (Total number of items that you’ve sold)
- Total Orders (Total number of orders that you’ve successfully handled)
Note: Payment Reports for Admin is a premium feature of wePOS. So, in terms of using this feature, make sure wePOS Pro is already installed on your website.
Prerequisites:
- WooCommerce
- wePOS
- wePOS Pro
To access the wePOS Reports option, navigate to your WordPress dashboard > wePOS > Reports. There you’ll find the reports interface.
As we have mentioned earlier, this interface by default shows this year’s sales reports which means if you visit this interface for July 2022, you’ll get the reports of January 2022-July 2022. However, you can apply different filters here. Let’s check them!
Filter Option
To apply filters, click on the “Filter” option.
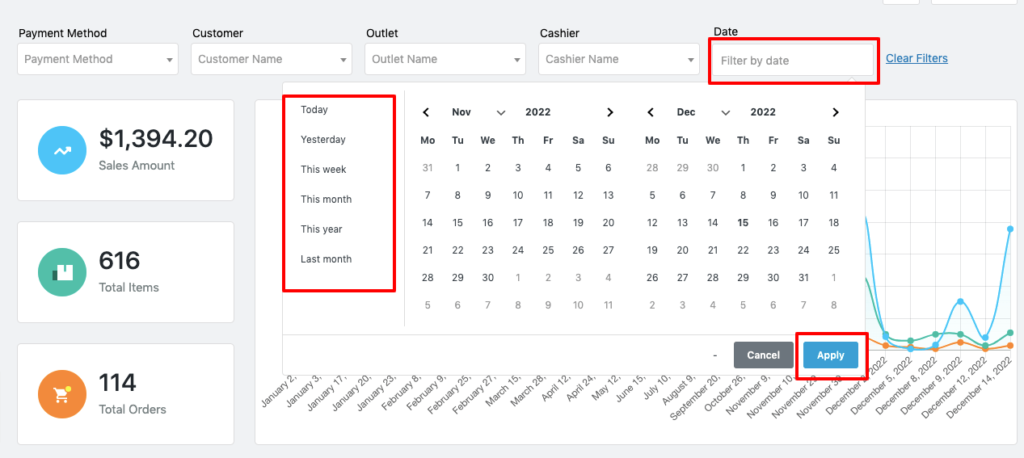
There are 5 filtering options to get a customized report:
- Payment Method: There are two options in the “Payment Method” – Cash and Card. Click on the “Payment Method” drop-down sign to get the Cash and Card options. By selecting Cash, you’ll get all the sales that have been completed with cash. And by selecting the Card, you’ll get all the sale reports that have been completed through the card.
- Customer: Customer option lets you choose the customer name that you have saved before. If you don’t save any customer information, all these unsaved customers will be automatically stored as “Guest Customer”. That means from this option, you can select any saved customer name to check his total transactions record as well as select Guest Customer to check the sales reports of unsaved customers.
- Outlet: Your business might have multiple outlets. You can choose a specific outlet name from this option to check the transaction record for that particular outlet.
- Cashier: Each outlet can have one or more than one cashier. If you want to check a particular cashier’s sales report, you can do that from this option by selecting that cashier’s name.
- Date: If you click on the Date option, you’ll get some predefined options like Today, Yesterday, This week, This Month, This Year, and Last month. You can choose any of these options, or you can set a date range manually as per your needs from the calendar. Then finally hit the Apply button to see the result.
Note: Apply button is only available for Date filtering. Other than the Date filtering, there will be no apply button which means when you enter any filtering option in Payment Method, Customer, Outlet, or Cashier, it will show you the result automatically.

You can apply all the options together or one by one to get your preferred data. There is a “Clear Filters” option as well to clear the filter if you mistakenly enter or choose an option.
Preview
After entering the filter data, here is a preview of what the result looks like.
For instance, here we want to check the sales report of “those transactions that have only been completed with cash from May 01, 2022, to November 30, 2022”.
We entered the date range from the Date option and selected Cash from the Payment Method and finally clicked the Apply button.
After clicking the Apply button, here is the result:
You can check the total Sales Amount, Total Items that have been sold, and Total Orders that have been successfully handled from the left sidebar of the interface.
wePOS reports settings have the chart view as well. If you want to check the chart view of the Sales Quantity, just click on the Sales Amount and Total Sales options to get your job done. That means when you click on a particular option, that option will disappear from the chart. And rest of the options will appear on the chart.
If you want to check the individual report of each transaction, you do that from this same interface. Just scroll a bit down and you’ll find the individual report.
There is a pagination at the bottom of the page to check the result of the next pages.
Import Reports
If you want to import and download the sales report, you can do that as well. You’ll find an import option at the top of the interface. Just click on that option to download the report as per the selected filtering.
After clicking on the import option, a CSV file will be downloaded in no time.