Creating a thriving online marketplace involves more than just connecting buyers and sellers. It requires a robust payment infrastructure to facilitate smooth and secure transactions.
In the WordPress ecosystem, Dokan multivendor is a powerful solution for transforming your website into a dynamic multivendor platform. To truly empower your marketplace, integrating payment gateway modules becomes paramount.
Luckily, Dokan supports several popular payment systems to ensure a seamless and trustworthy transaction experience for vendors and customers. This blog serves as your guide to integrating payment gateways seamlessly into your Dokan-powered marketplace.
Importance of a Payment Gateway for a Marketplace
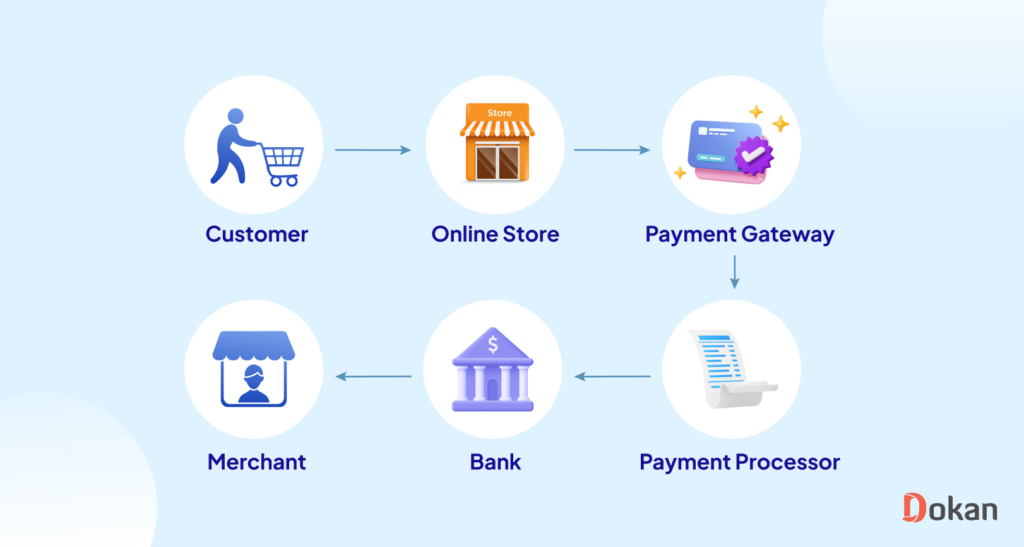
A marketplace gateway plays a crucial role in the functioning and success of an online marketplace. It is the intermediary facilitating transactions and communication between buyers, sellers, and the marketplace. Here are some key reasons highlighting the importance of a marketplace gateway:
- Fraud Detection
- Handling Marketplace Payments
- Dividing Merchant Funds
- Pay From Anywhere
- Easy Refund
- Smooth checkout process
- Multi-channel support
- API integration with various services
- Support for marketplace growth
- Data security
- Compliance with standards

Subscribe to
Dokan blog
How to Integrate Marketplace Payment Gateway Using Dokan
Dokan Multivendor plugin is the pioneer of creating multivendor marketplaces with WordPress. The plugin provides some amazing features that make creating and managing a marketplace easy.
And yes, Dokan also provides payment gateways to help you make the most important aspect of any marketplace “Transactions” hassle-free. Dokan payment gateways include-
- Stripe Express
- Wirecard
- Paypal Marketplace
- Mangopay
- Razorpay
- Stripe Connect.
Let’s see how to integrate these payment gateways into your marketplace-
Stripe Express
Stripe Express is a convenient tool for freelancers, creators, and gig workers who use online platforms that rely on Stripe for payments. It acts as a central hub for tracking your earnings, managing tax documents, and understanding your cash flow from these platforms.
Stripe Express Features:
- Real-time balance and upcoming payouts from connected platforms.
- Simplified tax preparation with consolidated earnings documentation.
- Two-factor authentication for enhanced security.
- User-friendly management of payout details and bank account information and more.
Well, the Dokan Stripe Express payment gateway satisfies all these features. You will get extra benefits like-
- Secure Payment with Google Pay & Apple Pay
- Multipurpose Express Dashboards for Vendors to Track Payments
- Options for Admin to Set Payment Disbursements
- Multiple Payment Methods With Popular eWallets
- Smart Payment Buttons for Efficient Shopping Experience.
Now, let’s see how to integrate this payment gateway with your marketplace-
Step 1: Configure Your Stripe Account
First, you need to set up your Stripe Express account. To do that, log in to your stripe account, Then add your business name and country of operation. Make sure to add the country of operation carefully. Because your currency, tax, and language will be set accordingly.
Step 2: Connect Your Stripe Account
Now you need to connect your stripe account. Select the Connect option from the More section from the dropdown menu.

Turn on your preferred payment methods. Google Pay and Apple Pay will be turned on automatically. If you want, you can choose from all the payment methods.
Step 3: Setup Dokan Stripe Express Module
Now that your Stripe account configuration is complete, you need to activate the module from the admin dashboard.
Go to Dokan–> Modules and enable the Stripe Express module,

Now go to WooCommerce–> Settings–> Payments and select the Dokan Stripe Express and hit the Manage button, Configure all the options.
The admin can allow vendors to sign up outside the marketplace’s country, inside the EU region, and in the SEPA. For that, the admin needs to enable the “Onboarding for vendors Outside Country/Region of the Marketplace”,

After enabling the option, the admin will have the option to restrict countries from the dropdown menu. But if they leave it blank then none of the countries will be restricted.
Hit the Save Changes button to finish.
Step 4: Enable Dokan Stripe Express Withdraw Method
Now, you need to enable the withdrawal method from Dokan–> Settings–>Withdrawal.

Vendors need to connect their account to Stripe in order to add that method. To do that, go to Vendor Dashboard–> Settings–> Payments. Click on the “Connect with Stripe” button.

That’s it. Now, users will see Google Pay and Apple Pay on the Product Page, Cart Page, and Checkout Page-

However, more advanced settings are required to configure this payment module. You can follow the documentation to configure the settings.

Wirecard
Wirecard stands out as a widely embraced payment gateway system, trusted by over 150 businesses across the globe. This module offers an opportunity to leverage Wirecard’s efficiency, benefiting not only your customers and vendors but also enhancing your payment processes.
Here is how you can set up the Dokan Wirecard Payment Gateway–
Step 1: Admin Configuration
- Turn on the Wirecard Gateway modules from wp-admin→Dokan→Modules.
- Go to WooCommerce→Settings→Payments. Turn on the toggle button for Dokan Wirecard Connect.
- Click on Manage to enter the page.
- Ensure the Enable Wirecard checkbox is activated. You can enter a different Title and Description.
- Admins can also determine who will pay the Wirecard Fee when a customer makes payment. To do this, select from the drop-down Vendor or Admin.
- If you’re using the module on your live site, insert the 3 Production Credentials: Production Token, Production Key, and Production Public Key.To obtain the keys, login to your Wirecard account. Go to Wirecard→My Account→Settings→Access Keys.
- If you want to try out the module first before using it live in your marketplace, ensure the checkbox for Enable Test Mode is activated. Then enter the Test Credentials for your Sandbox Account.
- After inserting the keys in dashboard, click on Save Changes.
- Go to wp-admin→Dokan→Settings→Withdraw Options. Select Wirecard from the Withdraw Methods checkbox. Click on Save Changes.
Step 2: Vendor Configuration
- Vendors need to go to Vendor Dashboard→Settings→Payment.
- You will find a Wirecard Connect widget here. Click on Connect With Wirecard.
- You will be asked to login with your username and password. Enter and authenticate.
- You will now be connected with your Wirecard account.
- The account can be disconnected when needed.
- Click on Save Changes. This completes the configuration.
Admins can view payments made, payment ID, status, amount paid, and other details from his/her Wirecard Account.
However, more advanced settings are required to configure this payment module. You can follow the documentation to configure the settings.
PayPal Marketplace
The Dokan PayPal Marketplace payment gateway will help to make the transaction process smooth. This payment is specially made to handle multi-vendor marketplace transactions. Let’s see how to set up and use this new module.
Step 1: Get PayPal API Credentials
You can either use your live PayPal Business account or create a new business account. To test the integration, you can create a Sandbox account. Both setup processes are the same. This business account would act as the Partner (API Caller) Account.
Step 2: Setup Dokan PayPal Marketplace
After configuring your PayPal API credentials, you need to enable the module. Navigate to WP Admin–> Dokan–> Modules. Now you need to enable the Dokan PayPal MarketPlace module.

Now, you need to manage the gateway from WooCommerce settings. Navigate to WooCommerce–> Settings–> Payments. Enable the Dokan PayPal Marketplace Payment gateway and click on Manage.

Here you will find all the options to set up the payment gateway.

Step 3: Vendors Will Connect Their PayPal Account
Go to Dokan–> Settings. Choose the Withdraw options. You need to select the Dokan PayPal Marketplace option in order to activate the payment gateway. Note: If you didn’t provide API Credentials for Dokan PayPal Marketplace payment gateway settings, this option won’t be visible to you or your vendors. Also, When vendors connect their PayPal account to your MarketPlace their PayPal account will be converted to a business account automatically.

Step 4: Pay With Dokan PayPal MarketPlace
We said earlier that there were two types of payment button options and a third option named Unbranded Credit Card methods for selected countries. If you choose the Standard Payment Button option, the customer will see a default Place Order button.
After they click that button, they’ll be redirected back to the PayPal site and after they complete their payment on the PayPal site, they’ll redirect back to the marketplace site. Note: In Standard Mode, the order status will change to Processing/Completed after the webhook is processed, till then, the order status will remain in a pending payment state.

When you choose the Smart Payment buttons, customers will see multiple payment options based on the country. When the customer places the order an IFrame will open in order to complete the payment.
You can follow the documentation to configure the more advanced settings of this payment gateway.
MangoPay
You can easily manage your marketplace transaction using the Dokan Mangopay payment getaway module. It is easy to set up and you can make the transaction process smooth. It handles the split payment quite easily so you don’t have to worry about manually transferring the vendor earnings.
Let’s see how to set up this module.
Step 1: Enable Dokan Mangopay Module
First, you need to enable the Dokan Mangopay module from WP-Admin–> Dokan–> Modules.

Now, you need to enable the payment gateway from WooCommerce–>Settings–>Payments.
Click on the Manage button, there you will find all the settings regarding the Dokan Mangopay payment gateway.

Step 2: Collect Mangopay API Credentials
To collect the Client ID and API key, log into your Mangopay client hub and collect your IDs. However, as we are using the Sandbox environment, you will find the IDs under the live account. But if you wish to use the Live Client ID and API key, then you need to activate your production account.

Now copy the keys, go back to WooCommerce–>Settings–>Payments, and add the credentials. Then hit the Save changes button to finish.
Step 3: Connect Dokan Mangopay with the Vendors Account
Now that you have integrated Mangopay with your Dokan-powered marketplace, it is time to connect the vendor’s account to the Mangopay payment gateway.
At first, the admin needs to enable the Dokan Mangopay gateway from Dokan–> Settings–> Withdraw,

Now, the vendors will see the option to “Connect to Dokan Mangopay” account when they navigate to Vendor Dashboard–> Settings–> Payments. They need to hit the Sign Up button to create an account in the Mangopay payment gateway.
Vendors need to add the necessary information to connect to their Mangopay account.

Step 4: Complete Payment Using Mangopay
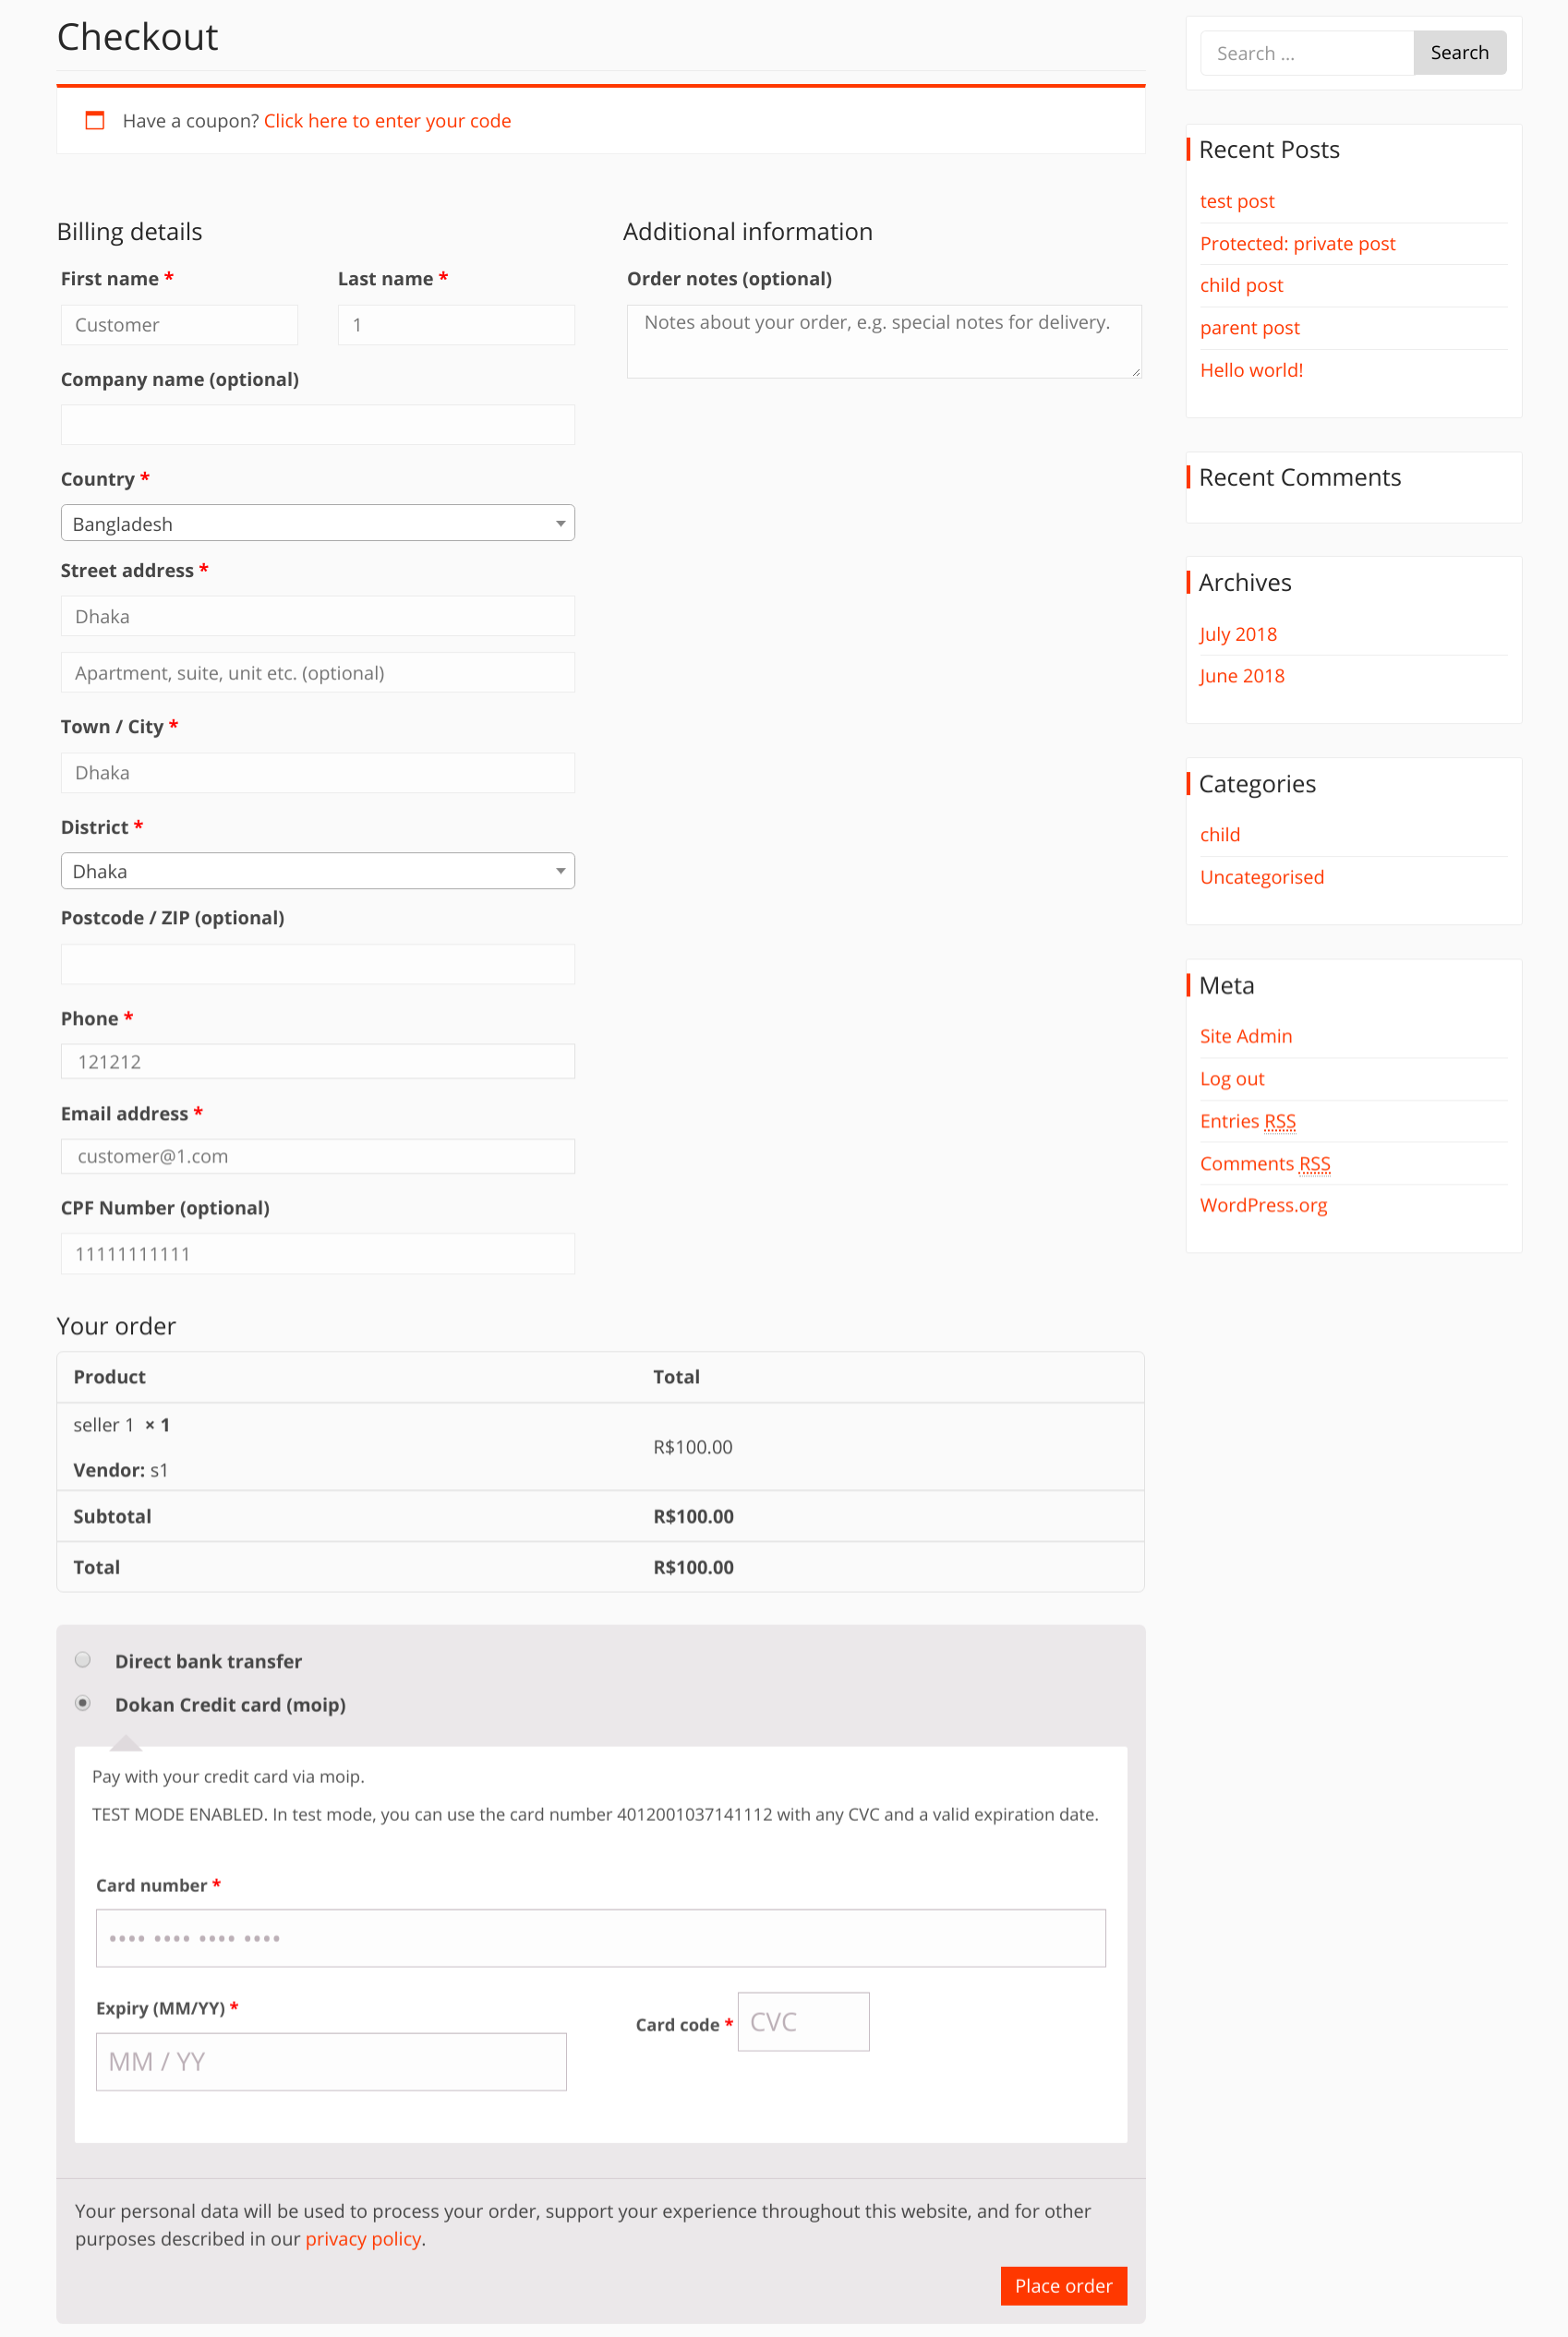
When a customer completes a purchase and moves to the checkout page, they can pay with Mangoapay. They can use Credit Cards, Direct Debit Web Wire, or Registered Cards to pay. They need to click on Proceed to Mangopay to take the next step.
The customers will get their order details like this,

Note: If any of the vendors are not connected with Mangopay, then the customer will get a notice like this.

Mangopay handles the split payment system of a multivendor marketplace efficiently. If the customer buys products from two vendors at a time, the money will be automatically split between the vendors minus the admin commission.
This is how you can use the Dokan Mangopay payment gateway module to manage your marketplace transactions.
You can follow the documentation to configure the more advanced settings of this payment gateway.

Razorpay
Razorpay’s payment gateway is designed to facilitate online transactions for businesses, allowing them to accept payments securely through various channels.
You can easily manage your marketplace transaction using the Dokan Razorpay payment getaway module. It is easy to set up and you can make the transaction process smooth.
Let’s see how to set up this payment gateway.
Step 1: Enable the Dokan Razorpay Module
First, enable the Dokan Razorpay module from WP-Admin–> Dokan–> Modules.

Now, you need to enable the payment gateway from WooCommerce–>Settings–>Payments.
Click on the Set Up button, there you will find all the settings regarding the Dokan Razorpay payment gateway.

Step 2: Collect Razorpay API Credentials
Now, to connect your Razorpay account to your marketplace, you need to add the Test Key ID (key Id for the live site) and Test Key Secret (key Secret for the live site) from your Razorpay account.
Log into your Razorpay account and go to the Settings–> API Keys option. There click on the Generate Test Key button.

You will see a pop-up containing the necessary credentials. Copy them.

Now, after you copy the Key Id and Key Secret, go back to WooCommerce–>Settings–>Payments and add the credentials. Then hit the Save Changes button to finish.

Step 3: Connect Dokan Razorpay with Vendors’ Account
Now that you have integrated Razorpay with your Dokan-powered marketplace, connecting the vendor’s account to the Razorpay payment gateway is time.
At first, the admin needs to enable the Dokan Razorpay gateway from Dokan–> Settings–> Withdraw,

Now, the vendors will see the option “Connect to Dokan Razorpay” account when they navigate to Vendor Dashboard–> Settings–> Payments. They need to hit the Sign Up button to create an account in the Razorpay payment gateway.

Step 4: How to Complete Payment Using Razorpay
So, when customers buy products from the marketplace and proceed to checkout, they will see the Razorpay option and use it to pay the amount.

They can use Cards or Paytm, GooglePay, PhonePe to finish their transaction.

This is how you can use the Dokan Razorpay payment gateway module to manage your marketplace transactions.
Follow this documentation to configure the more advanced settings of this payment gateway.
Stripe Connect
Dokan Stripe Connect is for those who want to keep paying vendors’ earnings hassle-free manually after each order or withdrawal request. The admin commission will be kept in the admin’s Stripe account, and the remaining amount will be transferred to the vendor’s Stripe account. Everything will be recorded in the Dokan Reports section.
Step 1: Configuration of Admin settings
Navigate to your WP Admin Dashboard > Dokan > Modules screen. Find the Stripe Connect and turn on the toggle button at the bottom right to activate the module.

Step 2: Create a Stripe Connect Account
Create a Stripe account. The account will be in Test Mode automatically. After completing all the steps to explore, you will get Live Mode access for payments.
Since you will use this in a marketplace, choose the “Run on a platform or marketplace” option from the second step of explore and continue the setup process.

Click on the “Connect” menu, choose the “For Platforms” option, and click on the “Get Started with Connect” button. Complete your Platform profile (if not completed yet). Click the Developer beside the Test Mode button on the top right.
Navigate to API keys to get the “Publishable Key” and the “Secret Key. Toggle On the Dokan Stripe Connect section to enable it. Then click on the Finish Set Up button to complete the configuration.

Step 3: Settings for Vendors
As you have installed a new payment gateway, your vendors should connect their stores to Stripe Connect to receive the payments.
- Navigate to – Vendor Dashboard > Settings > Payment.
- You will see an Add Payment Methods dropdown. Choose Direct to Stripe from the dropdown.

Click on the blue colored Connect with Stripe button, and you will be redirected to the Stripe.com website.
If you are in Test Mode, you will see an option to skip the stripe connect signup/login form.

If you are in Live Mode, login with your stripe account or sign up if you don’t have one.

After a successful connection, you will be redirected to your store Payment Settings page.
Step 4: Pay with Dokan Stripe Connect
When a customer adds a product to their cart and continues to checkout, they will see all the available payment methods. If they select Dokan Credit Card (Stripe), a form will appear.
The form will ask for the credit card number, expiry date, and CVC. After entering the credentials, click on the Pay/Place Order button.

After payment, the order details will show the payment method as Dokan Credit Card (Stripe).

This is all about the details of the Dokan Stripe Connect payment gateway.
FAQ on Marketplace Payment Gateway
Can I customize the payment options for my marketplace with Dokan?
Yes, Dokan is designed to offer customization options for payment gateways. Marketplace administrators can choose and configure which payment gateway modules to enable on their platform.
Are there additional costs associated with using specific payment gateway modules in Dokan?
The cost of using specific payment gateway modules in Dokan may vary. While Dokan itself is a WordPress plugin with a one-time or subscription-based pricing model, some payment gateways may have their own fees. It’s important to check the pricing details of the chosen payment gateway and any additional charges associated with its usage.
How secure are the transactions processed through Dokan payment gateway modules?
Dokan prioritizes the security of online transactions on your multi-vendor marketplace. The payment gateway modules integrated into Dokan adhere to industry-standard security protocols. These modules use encryption and follow best practices to protect financial information during transactions. It’s recommended that both Dokan and the selected payment gateways be updated to benefit from the latest security enhancements. We are at the end of our article on integrating a marketplace payment gateway using Dokan. Hopefully, you won’t have any trouble configuring the payment modules.

Configure the Payment Gateways for Your Marketplace with Ease!
We are at the end of our article on integrating a marketplace payment gateway using Dokan. Hopefully, you won’t have any trouble configuring the payment modules.
To give the best customer experience, you must ensure the payment gateways are working correctly. You have to be very careful while configuring the payment integrations.
With Dokan, you can’t do no wrong. We have provided a detailed guide to configuring all the payment gateways. If you follow the guidelines, you can easily integrate the payment gateways.
But still, if you face any trouble, we have our expert support team to help you with the setup. So, don’t forget to knock us in the comment section if you face any trouble.
Subscribe to
Dokan blog
We send weekly newsletters, no spam for sure!


Leave a Reply