You can easily manage your marketplace transaction using the Dokan Razorpay payment getaway module. It is easy to set up and you can make the transaction process smooth. It handles the split payment quite easily so you don’t have to worry about manually transferring the vendor earnings.
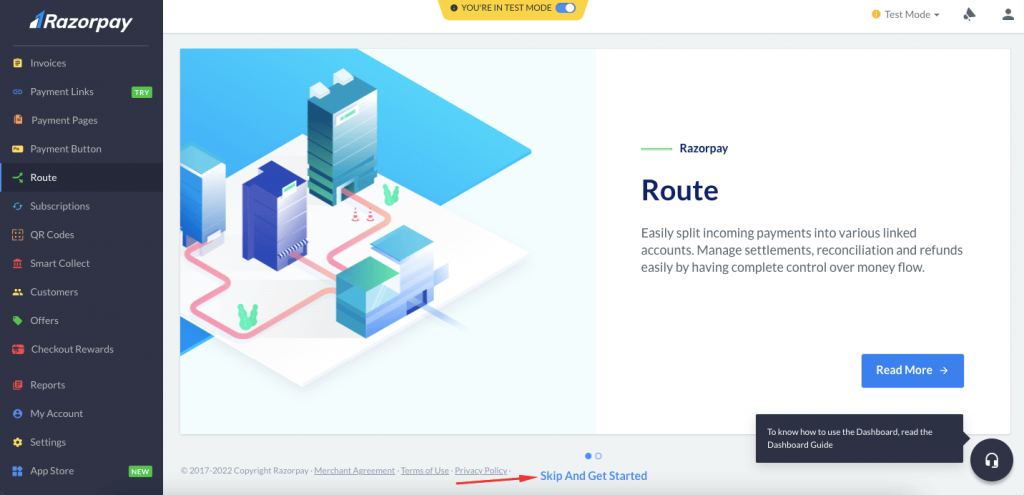
Let’s see how to set up this payment gateway.
Note:
Unregistered Business or SandBox Mode Per Transaction Limit = 40,000/= Rupee
Live Mode or Registered Business e Per Transaction Limit = 5,00,000/= Rupee.
But Admin Can increase the limit by talking to their support.
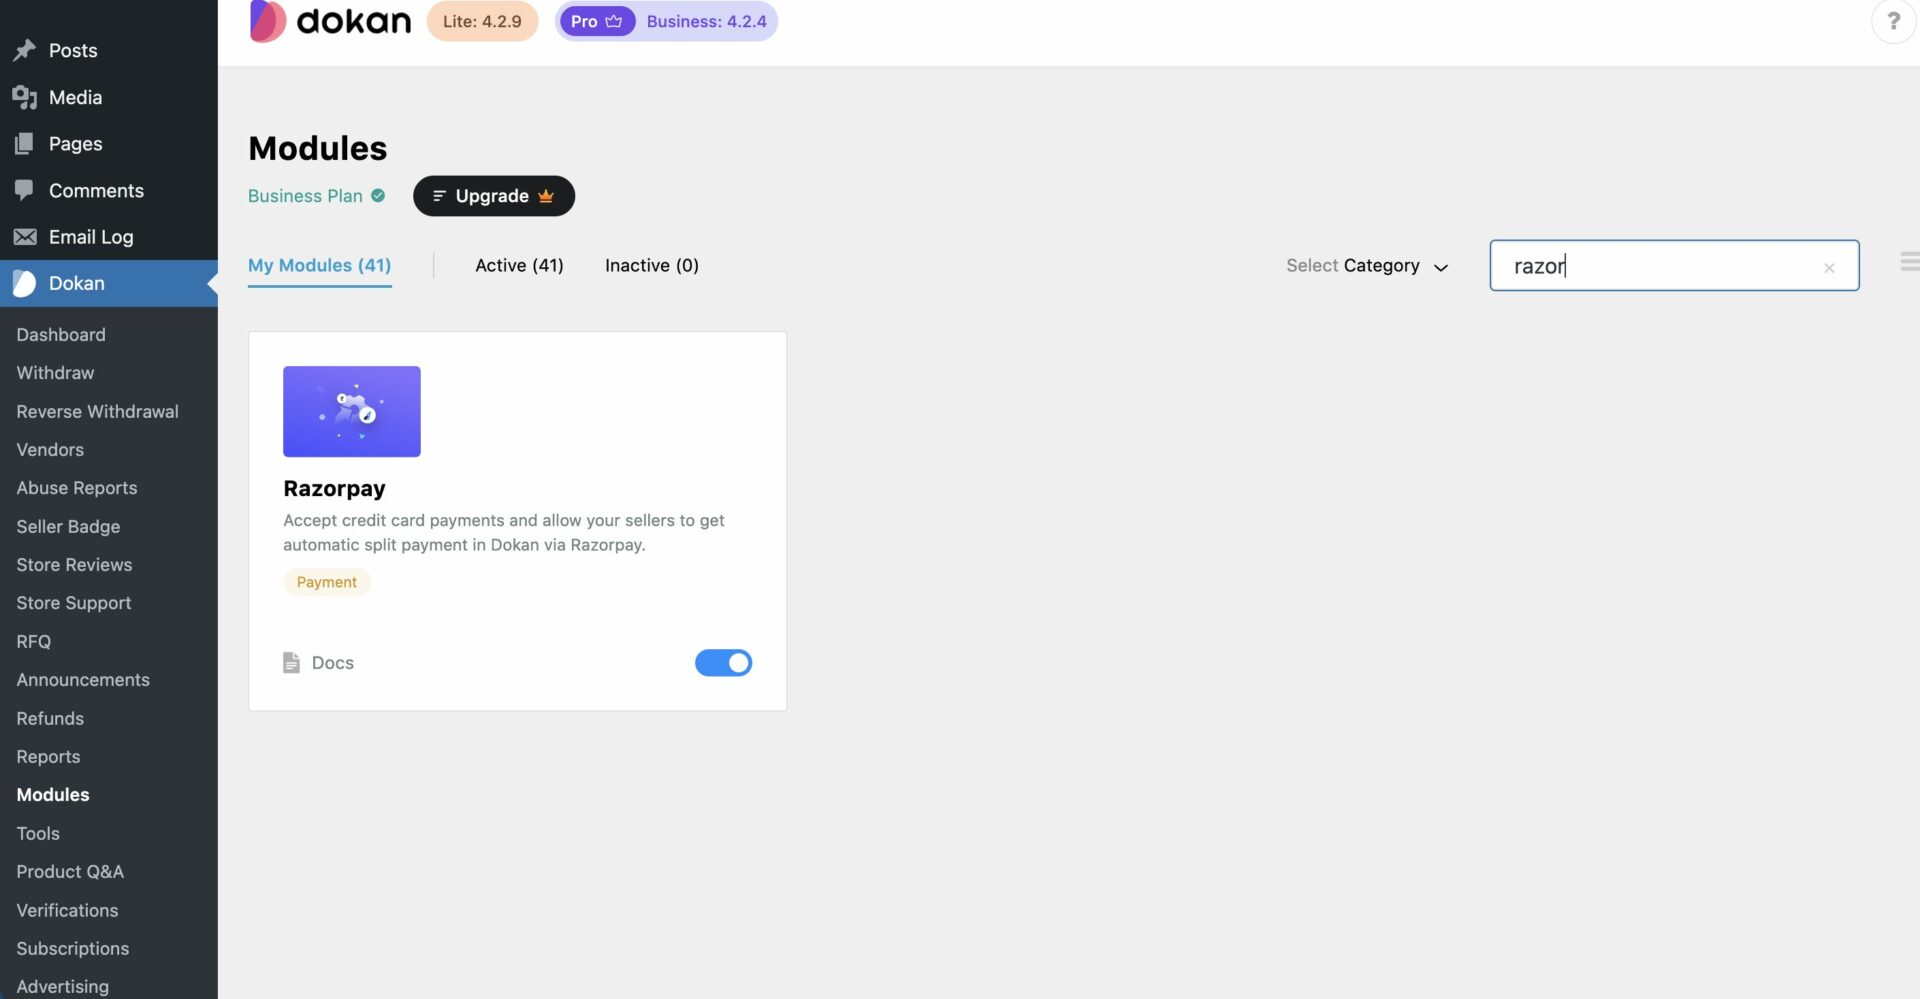
Enable Dokan Razorpay Module
At first, you need to enable the Dokan Razorpay module from WP-Admin–> Dokan–> Modules.
Now, you need to enable the payment gateway from WooCommerce–>Settings–>Payments.
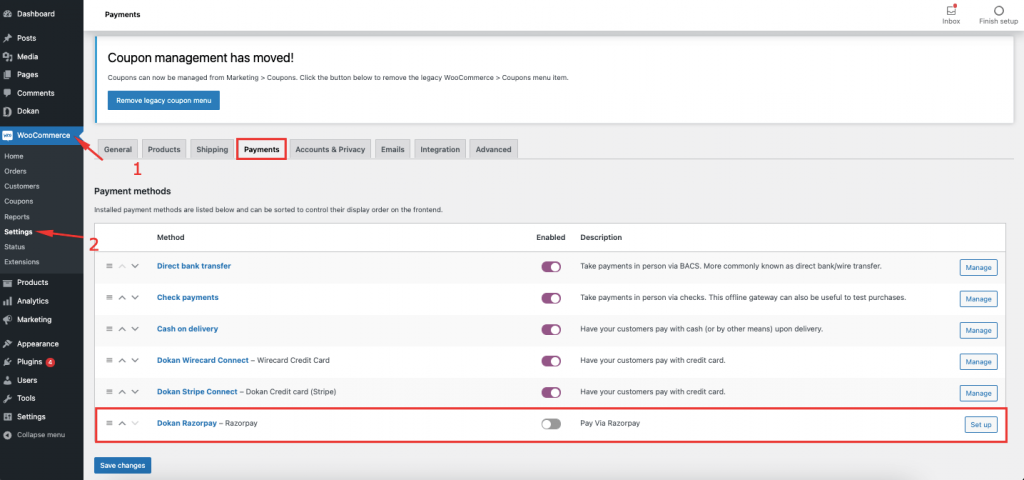
Click on the Set Up button, there you will find all the settings regarding the Dokan Razorpay payment gateway.
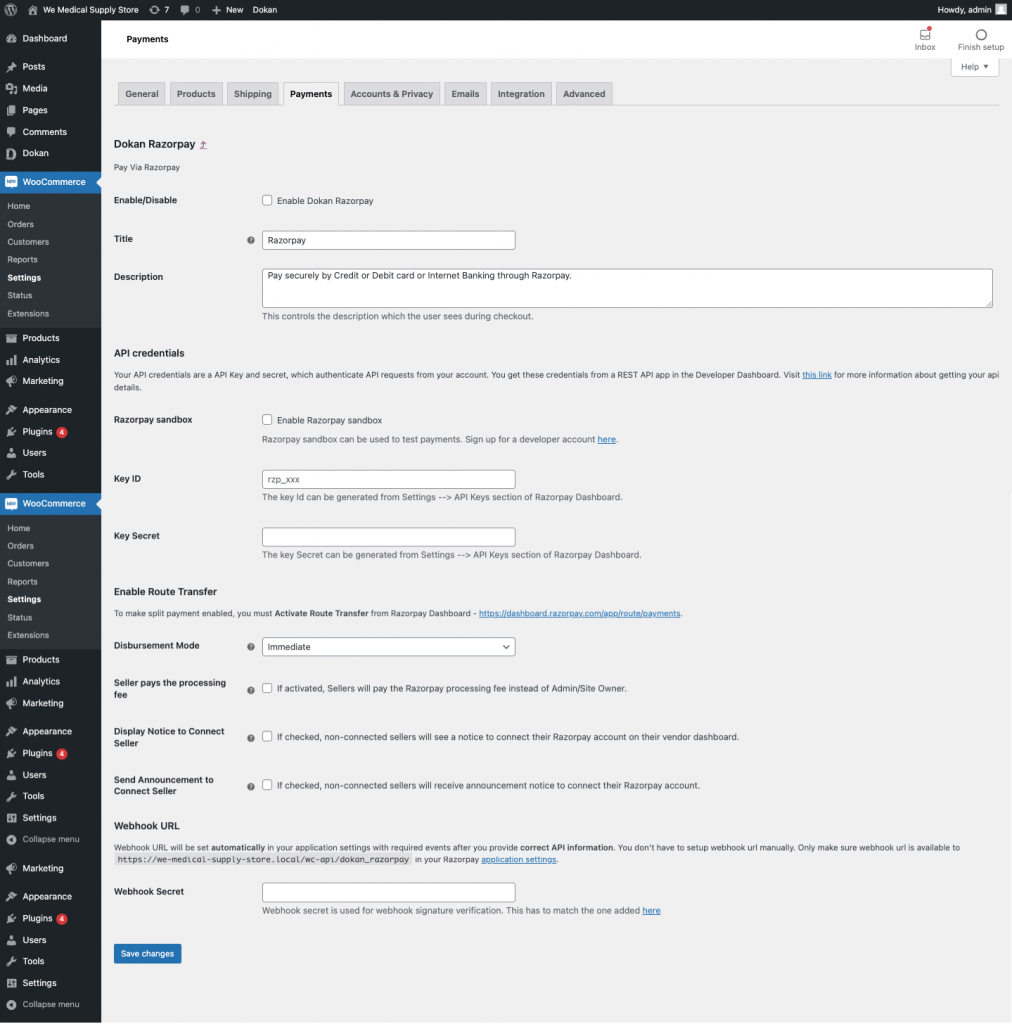
Enable/Disable: Check the box to enable (or disable) the Dokan Razorpay payment gateway.
Title: Give a title or use the default one that the customers will see during the checkout.
Description: Add a description or use the default one, customers will see this on the checkout page
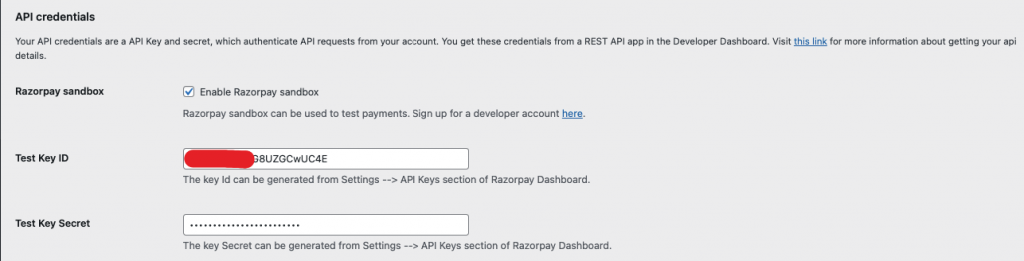
API Credentials
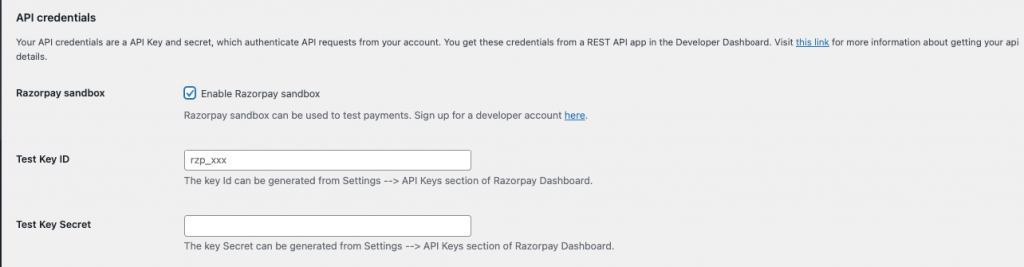
Razorpay Sandbox: If you want to test the integration in Sandbox mode, check this setting.
If you have checked Razorpay sandbox mode, you’ve to provide Test Key ID and Test Key Secret.
Otherwise, you’ve to provide Key ID and Test Secret ID for live account API Credentials.
Enable Router Transfer
Disbursement Mode: Choose whether you wish to disburse funds to the vendors immediately or hold the funds. Holding funds gives you time to conduct additional vetting or enforce other platform-specific business logic. As an admin, you can choose when to disburse the funds to the vendors. You will have 3 options,
- Immediate: vendors will get their money immediately after the order.
- On order complete: vendors will get their money after the order is complete via site admin or vendors based on Settings (either vendor can change order status or not)
- Delayed: You can choose to hold the fund for a specific number of periods of an interval to disburse the funds. After the specified day’s funds will be automatically disbursed to the vendor’s Razorpay account.
Seller pays the processing fee: If activated, Sellers will pay the Razorpay processing fee instead of Admin/Site Owner.
Display Notice to Connect Seller: If you enable this setting your non-connected vendors will see a notice to connect their Razorpay account on their vendor dashboard.
Send Announcement to Connect Seller: If you enable this setting your non-connected sellers will receive an announcement notice to connect their Razorpay account.

Webhook URL
Webhook URL will be set automatically in your application settings with required events after you provide correct API information. You don’t have to set up the webhook URL manually. Only make sure the webhook URL is available to https://your store/wc-api/dokan-razorpay in your Razorpay application settings. Lastly, hit the Save Changes button to finish.
Collect Razorpay API Credentials
Now, in order to connect your Razorpay account to your marketplace, you need to add the Test Key ID (key Id for the live site) and Test Key Secret (key Secret for the live site) from your Razorpay account.
Log into your Razorpay account and go to the Settings–> API Keys option. There click on the Generate Test Key button.
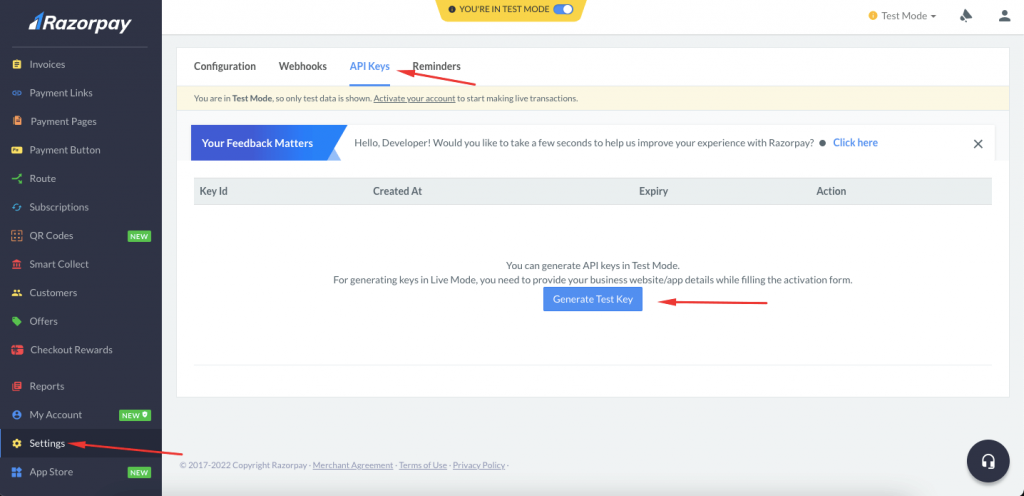
You will see a pop-up containing the necessary credentials. Copy them.
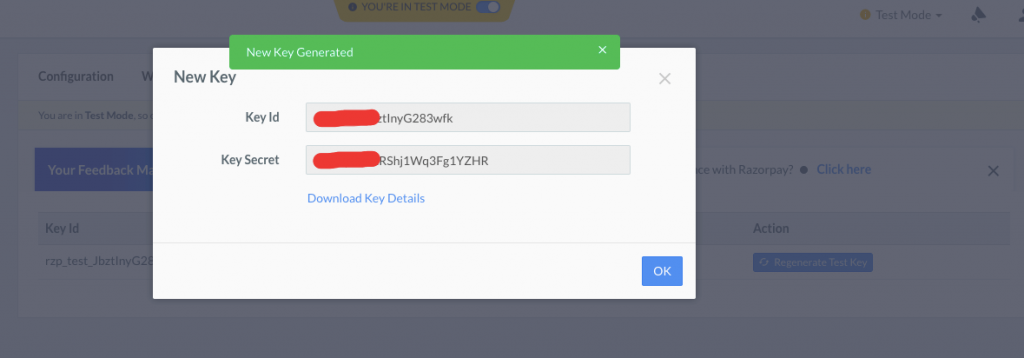
Add Credentials to the Dokan Razorpay Settings
Now, after you copy the Key Id and Key Secret, go back to WooCommerce–>Settings–>Payments and add the credentials. Then hit the Save changes button to finish.
Connect Dokan Razorpay with Vendors Account
Now that you have integrated Razorpay with your Dokan powered marketplace, now it is time to connect the vendor’s account to the Razorpay payment gateway.
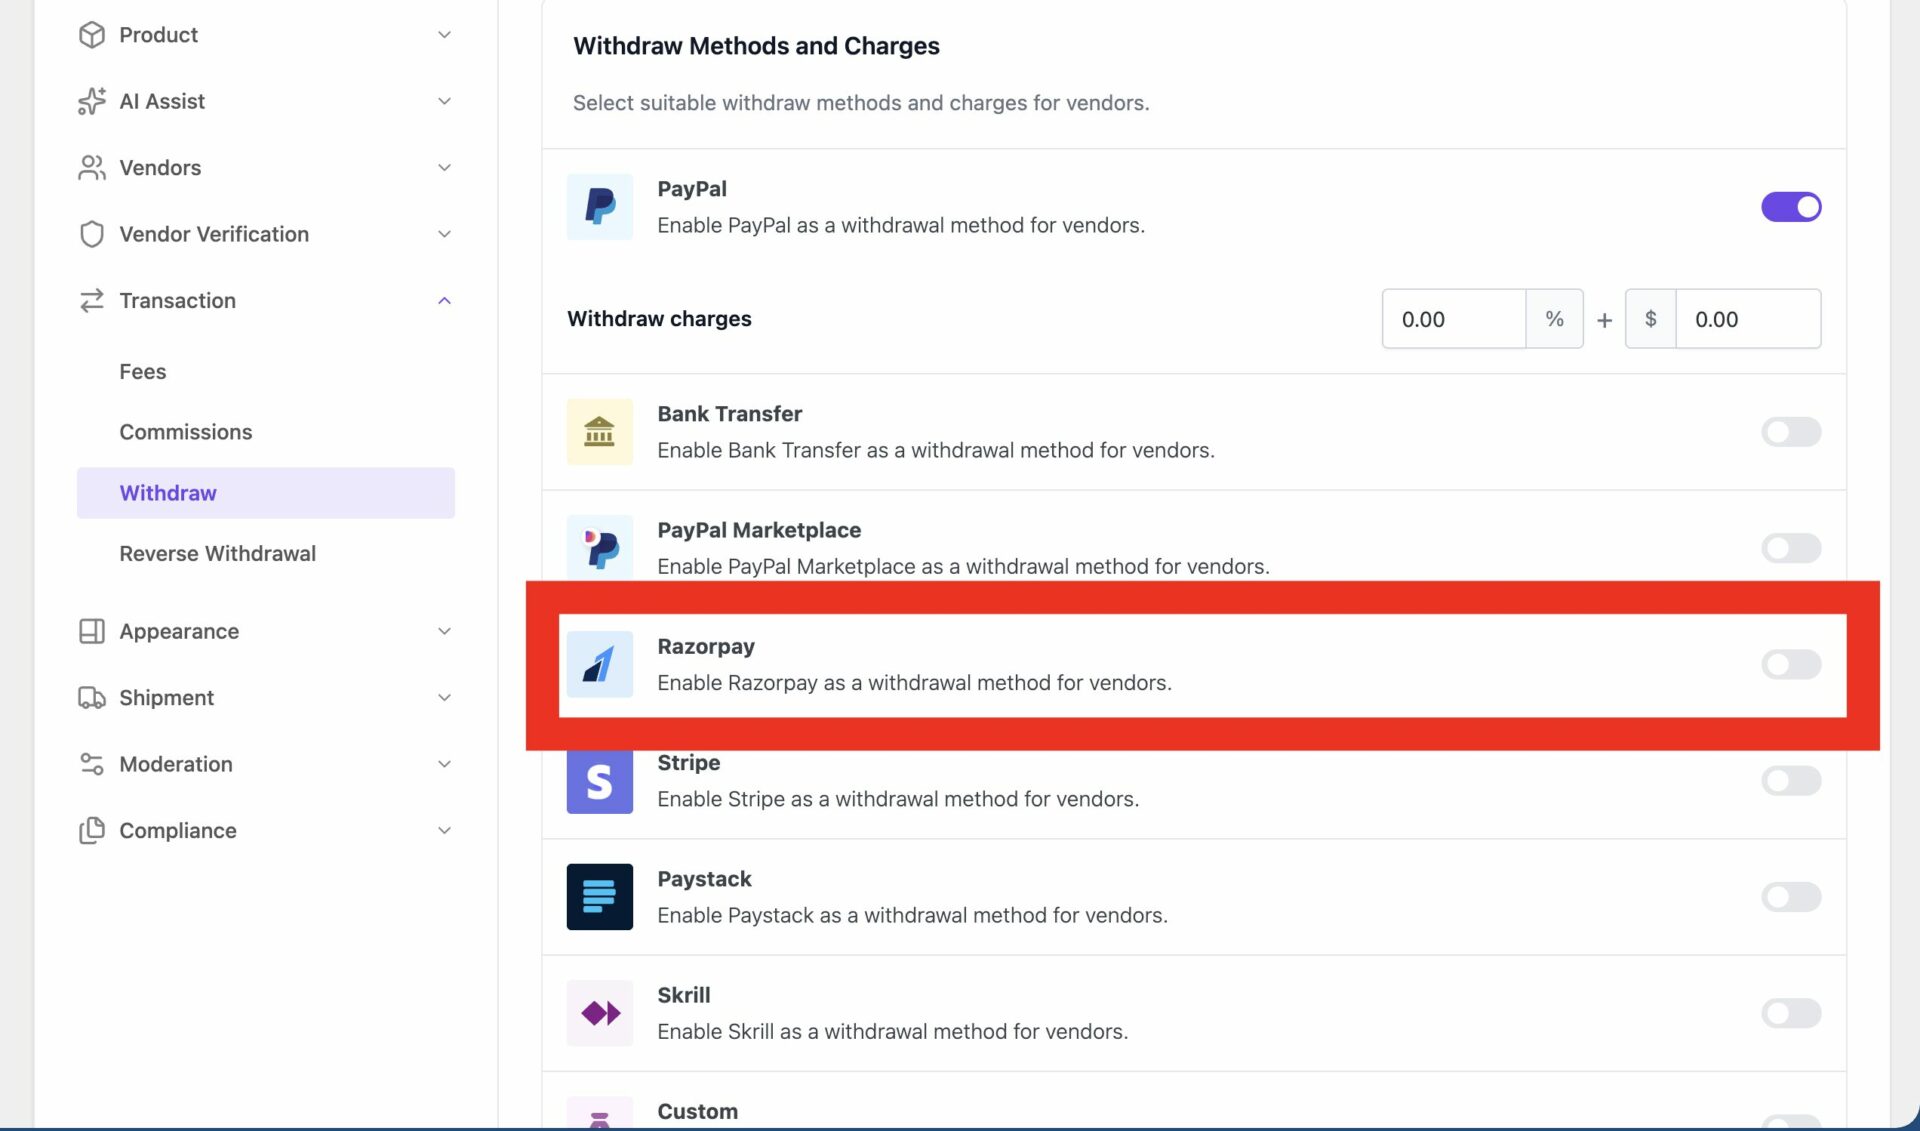
At first, the admin needs to enable the Dokan Razorpay gateway from Dokan–> Settings–> Transaction–>Withdraw,
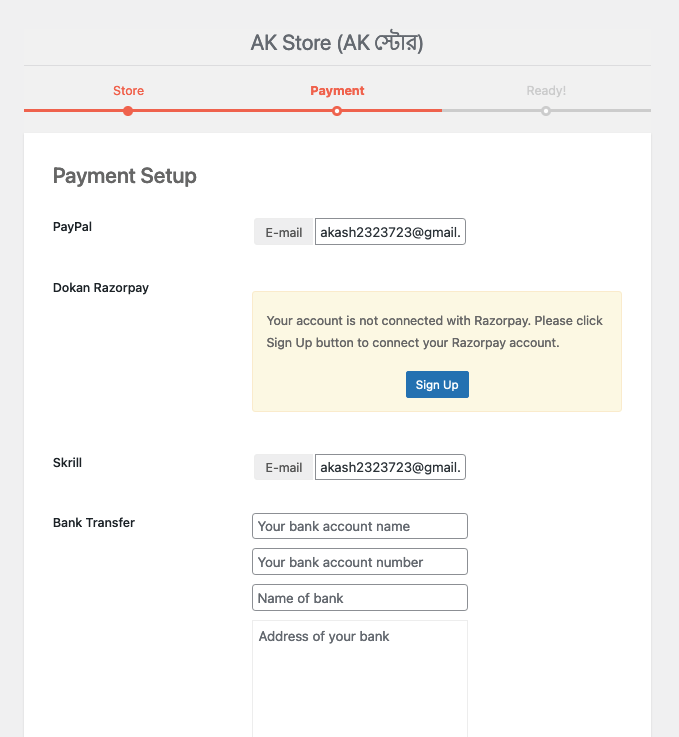
Now, the vendors will see the option “Connect to Dokan Razorpay” account when they navigate to Vendor Dashboard–> Settings–> Payments. They need to hit the Sign Up button to create a account in Razorpay payment gateway.

When they hit the Sign Up button, a pop-up will appear where the vendors need to add their information like account name, account email, bank name, account number, etc.
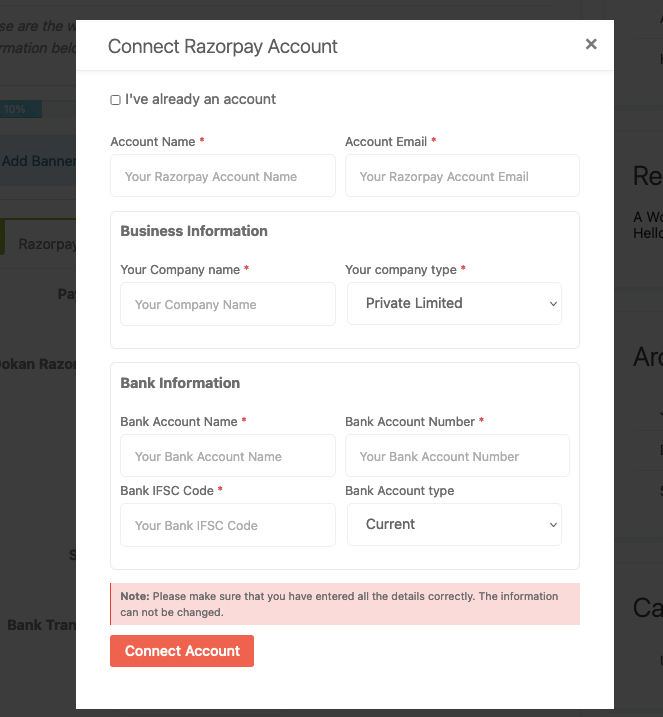
Note: Remember you can’t update your account information once you save it. So be very careful while putting your information in the pop-up.
Now, if you already have an account with Razorpay, just click the “I” ve already an account”. Then you need to add your account number and click on Connect.
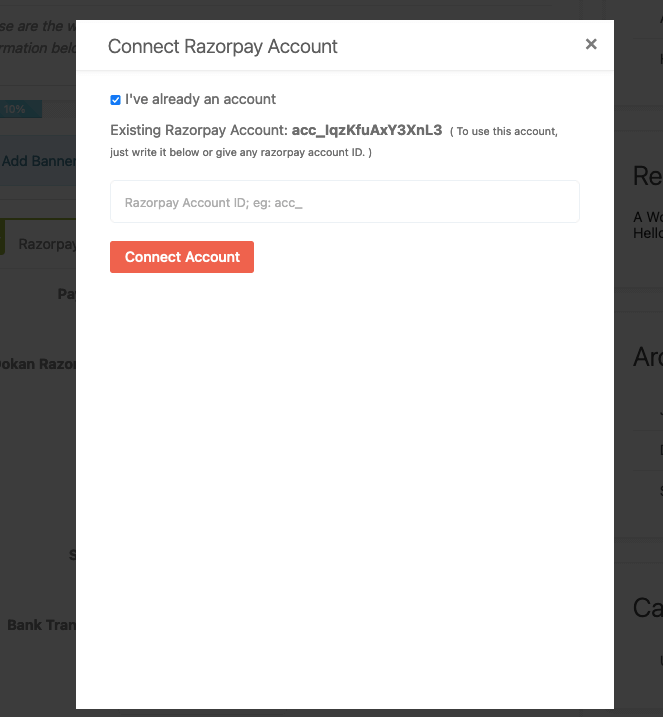
Note: If the vendor has already connected with a Razorpay account before, then all he/she need to copy the account number and click on Connect.
if the information is right, you will get a message that the connection is successful.
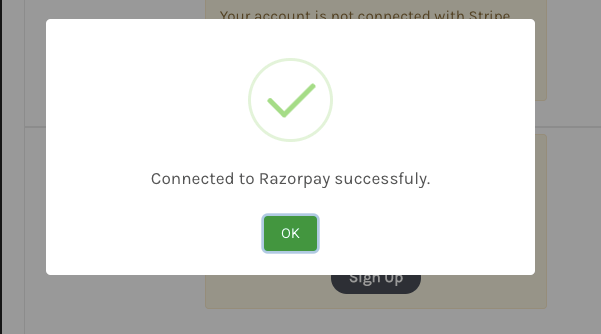
Then the vendors will see their merchant id, and will also receive an email to access their merchant account.

If the vendors want they can connect with a Razorpay account from the setup wizard as well.
How to Complete Payment Using Razorpay
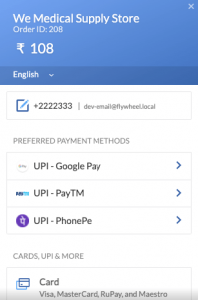
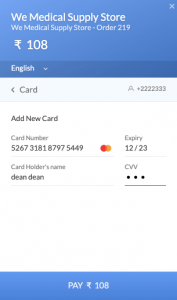
So, when the customers buy products from the marketplace and proceed to checkout, they will see the Razorpay option and use that to pay the amount.
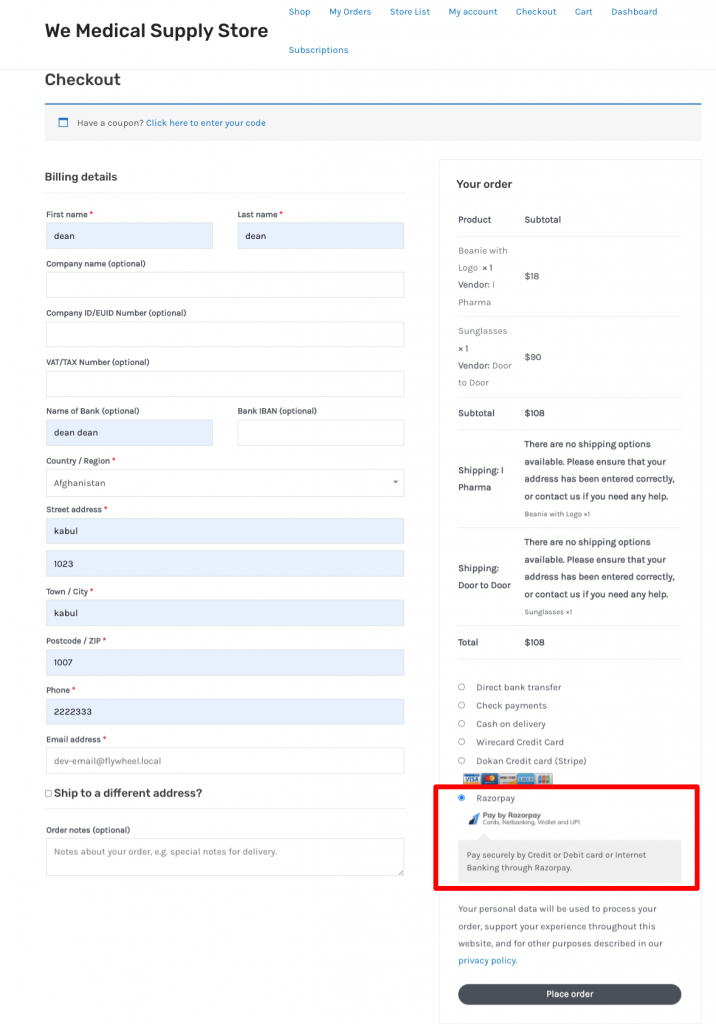
They can use Cards or Paytm, GooglePay, PhonePe to finish their transaction.
When they hit the Pay Now button, they need to hit the Success button to finish.
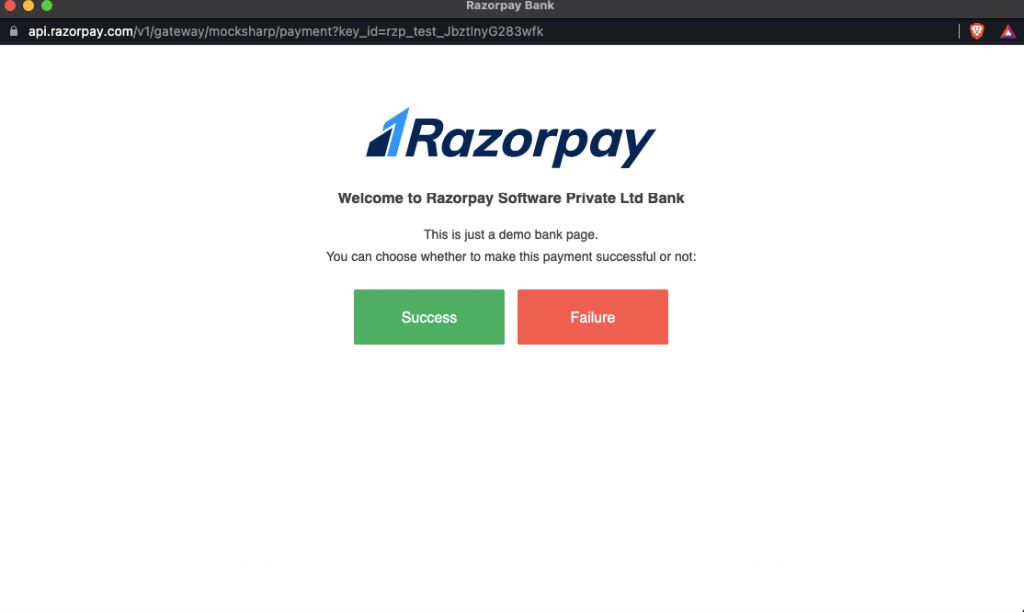
This is how customers can pay using the Razorpay payment gateway.
Split Payment Feature
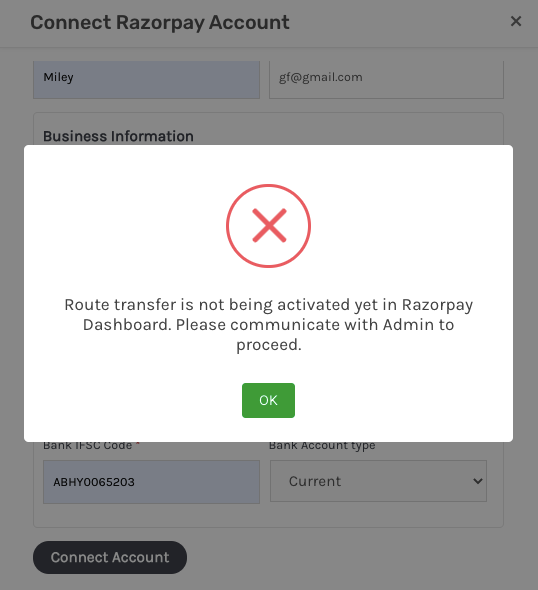
To enable the Split Payment feature, first you need to enable the Route option from your Razorpay account.
Otherwise, vendors will get a warning when they try to connect their account,
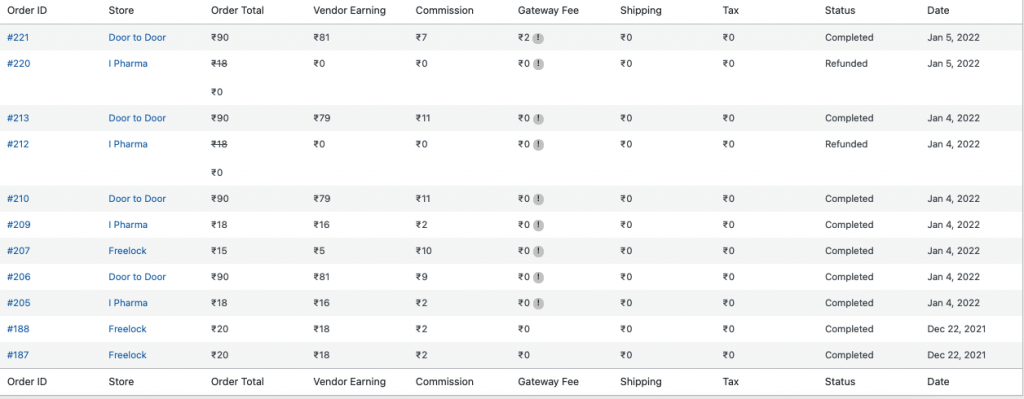
Razorpay handles the split payment system of a multivendor marketplace efficiently. If the customer buys products from two vendors at a time, the money will be automatically split between the vendors minus the admin commission.
If you look at the orders after a transaction, you will find all the details in the note section of a sub-order. In the following screenshot, you can see that the first vendor has got his payment,
the total was $108, he/she got $79 after cutting the admin commission and gateway fee.

The second vendor got $16 from the order,
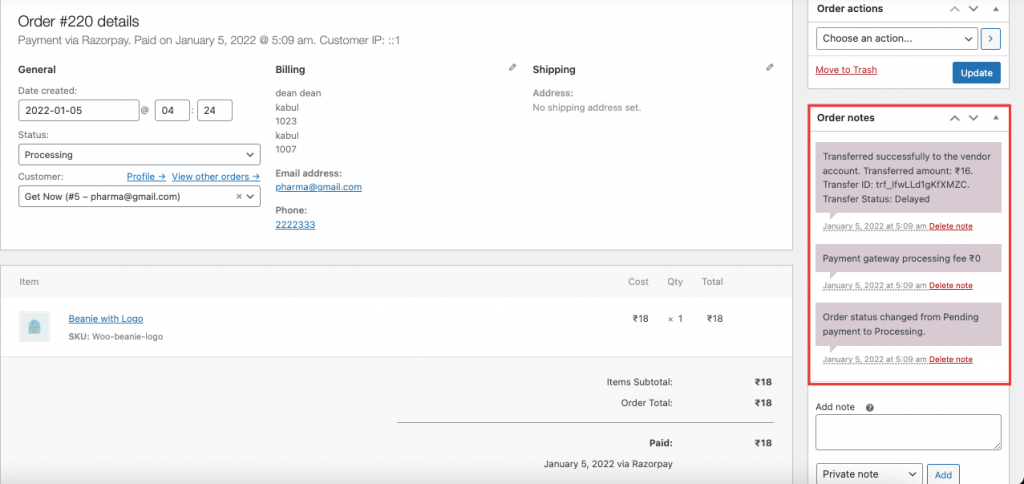
Here is the summary of the whole order,

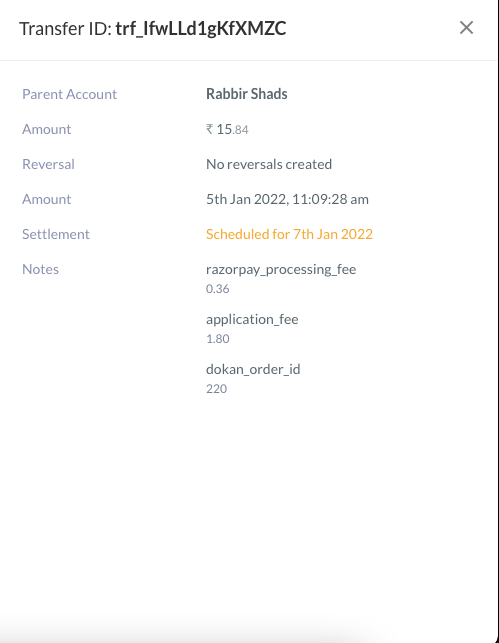
The admin can check his/her Razorpya account to get more details. Go to Razorpay account–> Route–> Payments, there he/she will see the order details. Upon clicking on the order id, he/she will see the details of that order in the sidebar like, transfer details, total amount, payment method, etc.
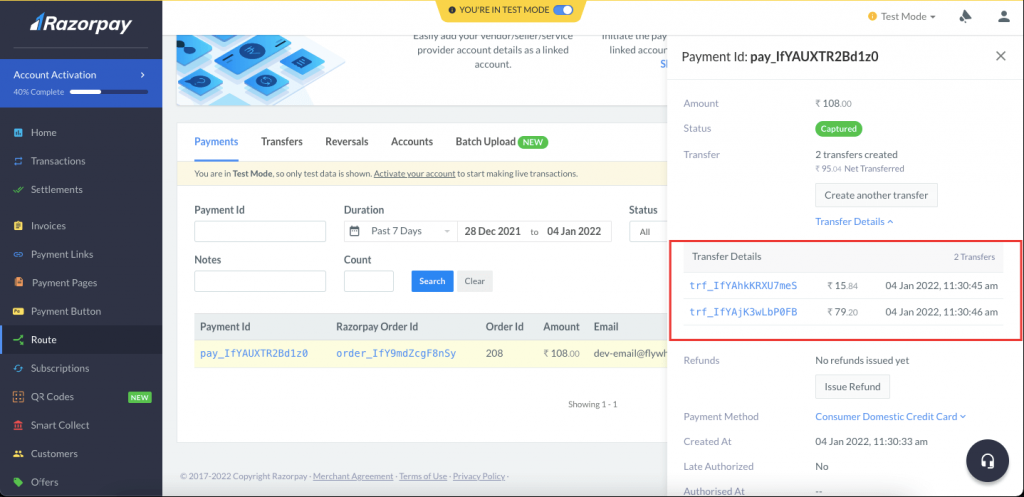
Vendors can also see the order details from the Razorpay account dashboard.
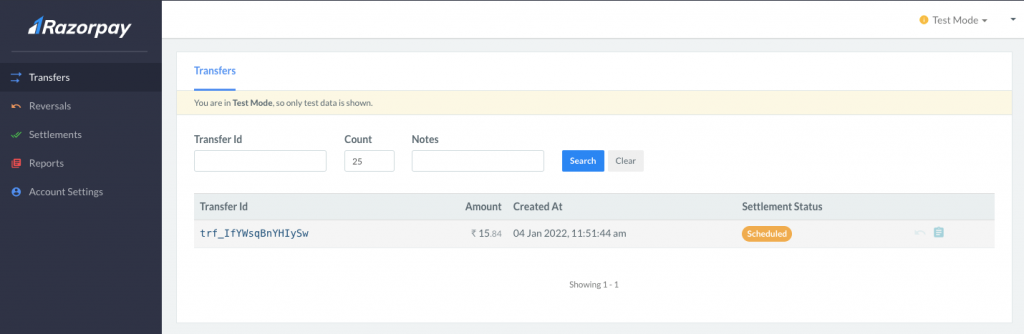
The order details in the sidebar,
Refund Order
With the Dokan Razorpay payment gateway, handling the refunds is easy as well. Navigate to Vendor Dashboard–> Orders and select any order. Click on the Refund $X via the Dokan Razorpay button to refund an order.
Note: The order has to be complete in order to refund.

The order will be refunded. You can see the refunded order from the Razorpay Account. Go to the Transfers section and there you will see that the order is refunded automatically to the customer account.
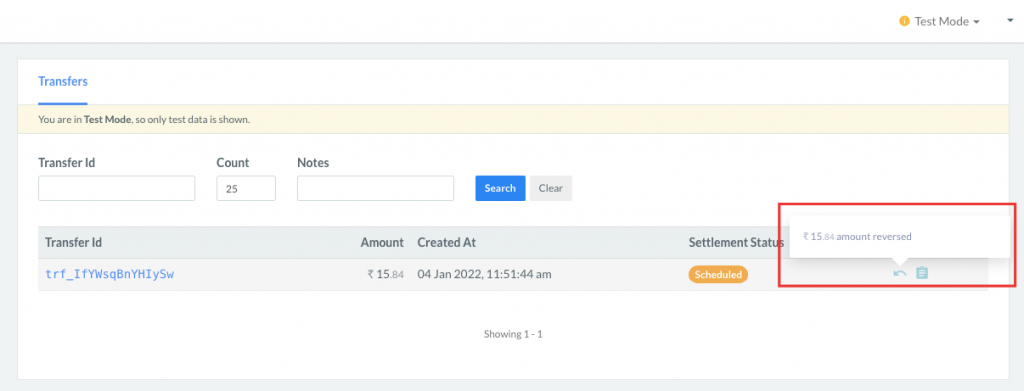
You can also see the details,
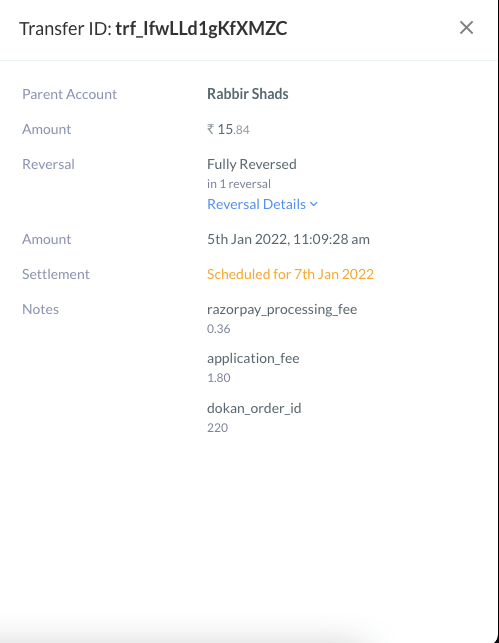
Here’s what the backend looks like for the refunded order,
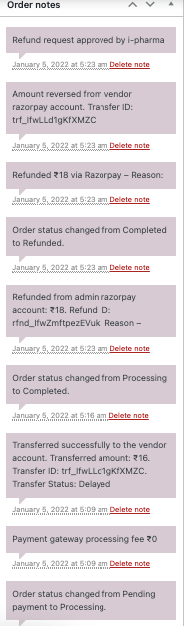
If you navigate to Dokan–> Reports–> All Logs, you will be able to see all the details of every order.
This is how you can use the Dokan Razorpay payment gateway module to manage your marketplace transactions.
You can check out this video tutorial as well-