
To add the Stripe payment gateway to your eCommerce marketplace, follow this documentation. It will help you to install, activate, and configure the Stripe Connect module to your online marketplace.
Dokan supports two types of payment methods. One is adaptive, and another is the non-adaptive payment method.
Dokan Stripe Connect is an adaptive payment gateway.
An adaptive payment gateway splits the admin commission and the vendor revenue automatically after placing an order. So, if a customer purchases a product from the marketplace and pays using Dokan Stripe Connect, that amount will be split between the admin and vendor instantly.
Why use Stripe Connect?
Stripe Connect is for those who want to keep hassle-free paying vendors’ earnings manually after each order or withdrawal request. The admin commission will be kept in the admin’s Stripe account, and the remaining amount will be transferred to the vendor’s Stripe account. Everything will be recorded in the Dokan Reports section.
How to use Dokan Stripe Connect?
The minimum requirement for using the Dokan Stripe Connect payment gateway:
- WooCommerce
- Dokan Lite
- Dokan Pro (Professional/Business/Enterprise)
Configuration (Admin settings):
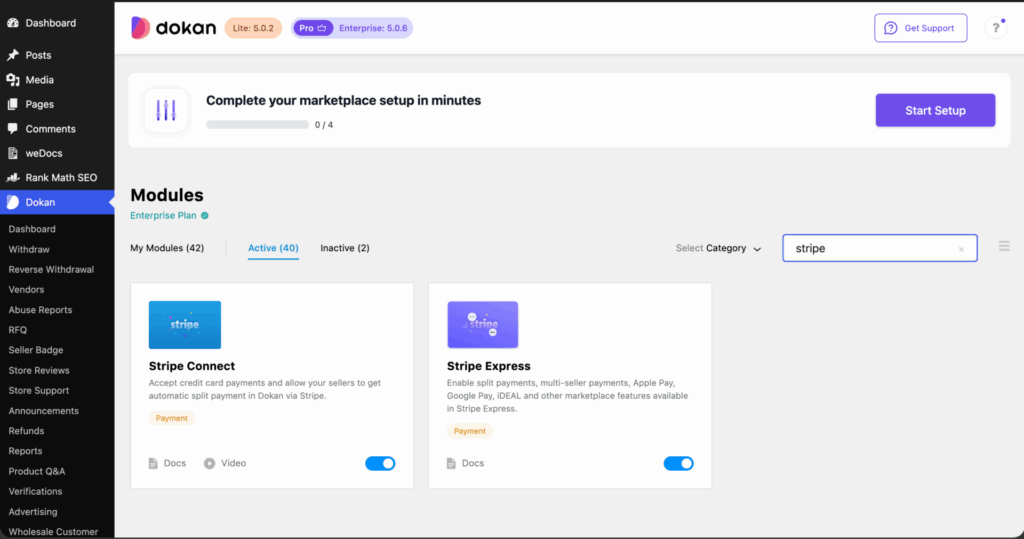
Navigate to your WP Admin Dashboard > Dokan > Modules screen. Find the Stripe Connect and turn on the toggle button at the bottom right to activate the module.
Create a Stripe Connect account:
First, you need to create a Stripe Account.
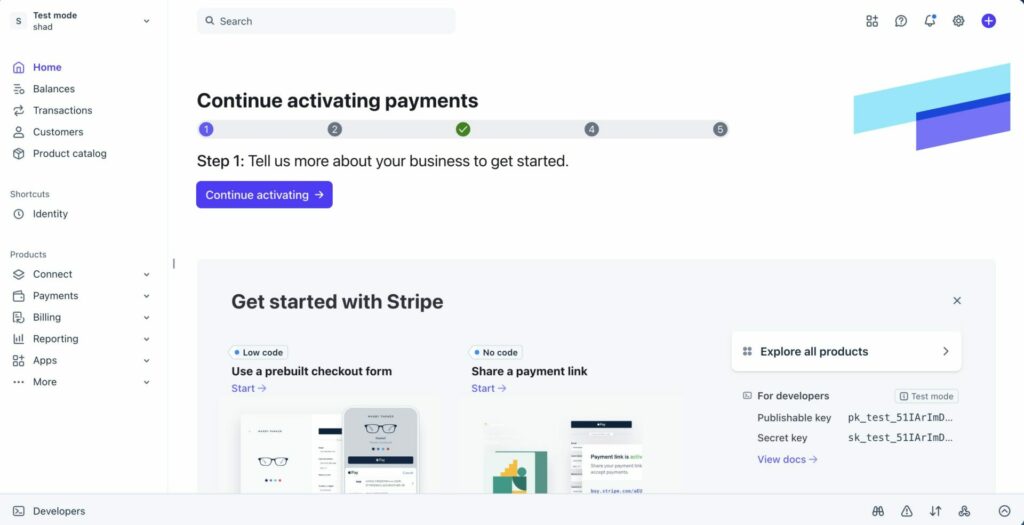
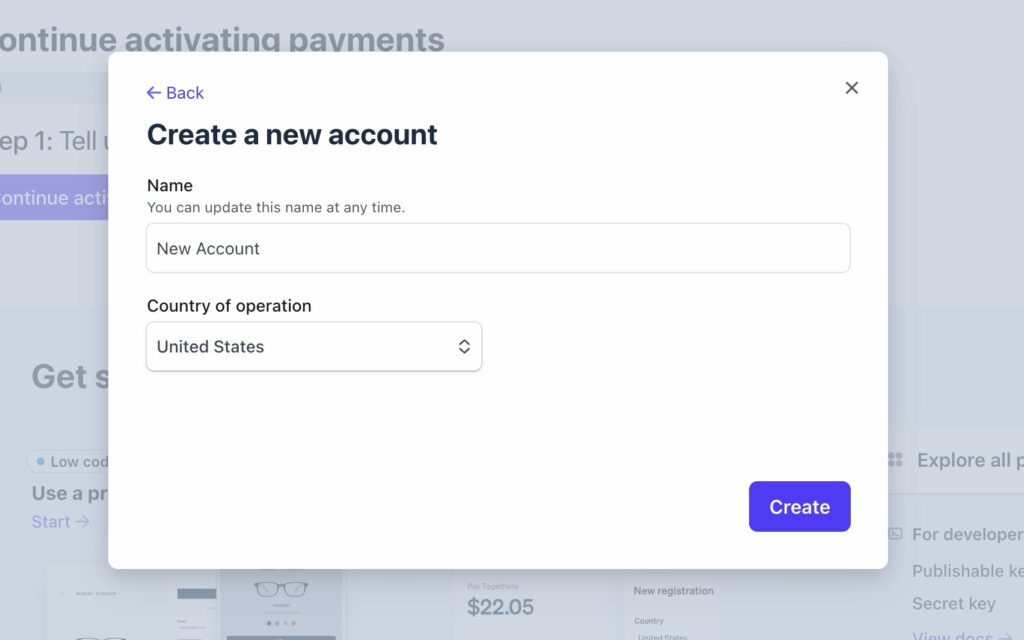
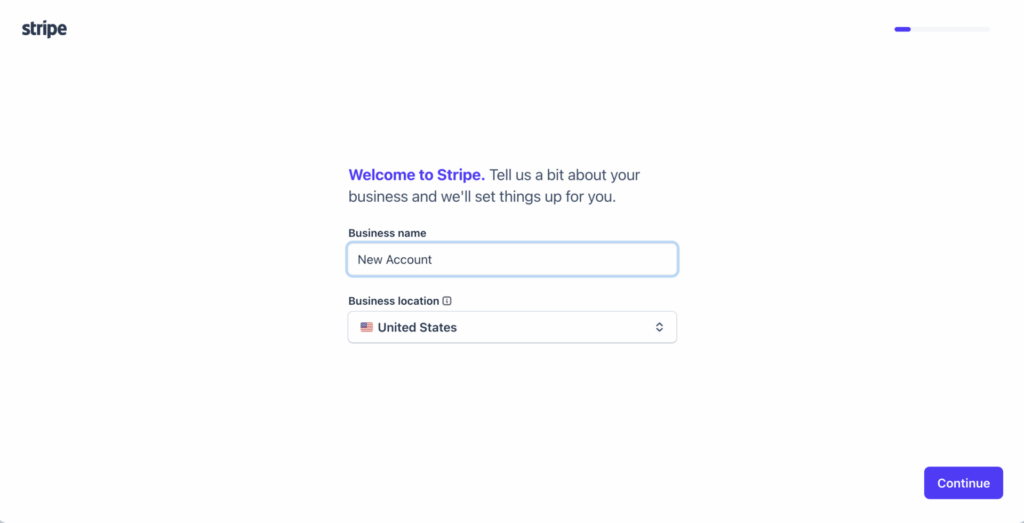
When you create an account first you need to add your business name and location-
After creating the account, you need to add details about your business, like website and description.
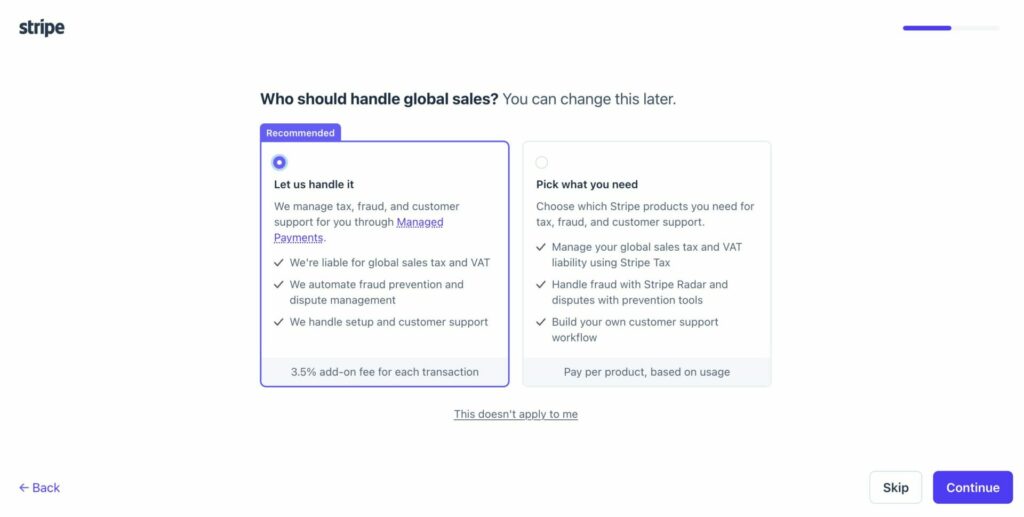
Let Stripe handle the Global Sales, that is what they reccomend-
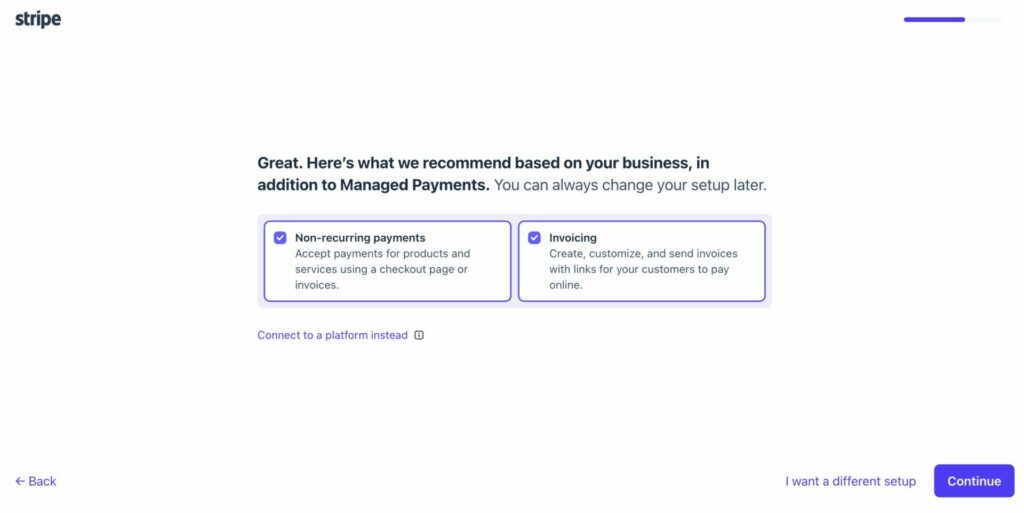
Also, choose these options for payments-
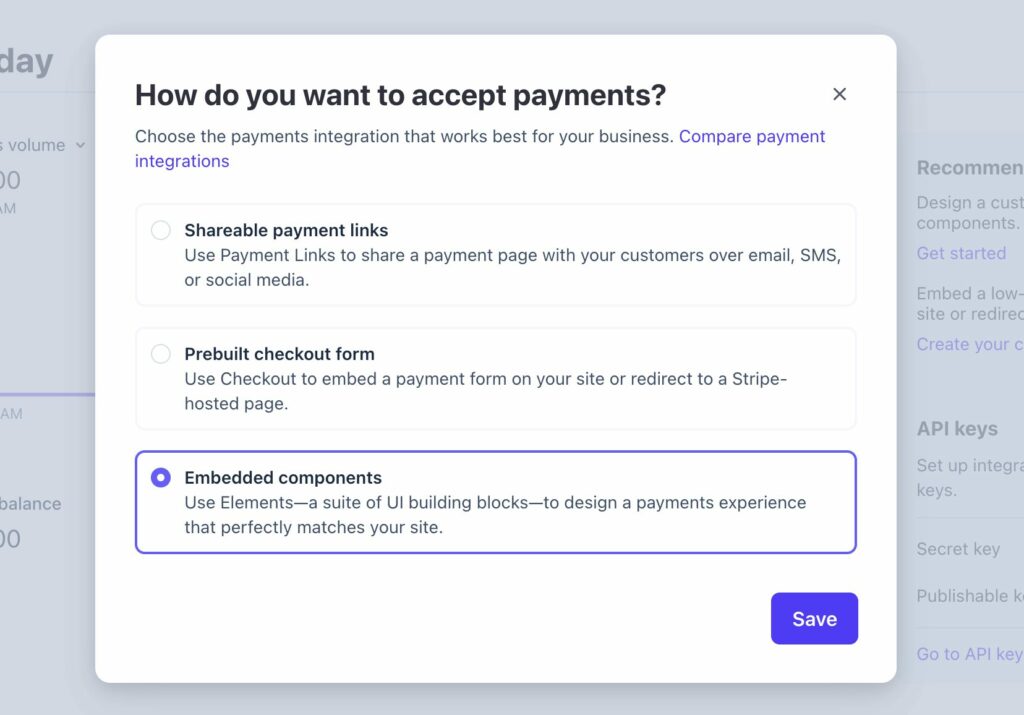
Then, you need to add some more details, like how do you want to accept payments. You can choose anyone-
Your account will be created. You can know more details from here.
Note: Create your account in Sandbox mode, you can swtich to live mode later.
Now, you need to collect your API keys (test mode).
For that, at the bottom of your screen, you will see the Developers Option.
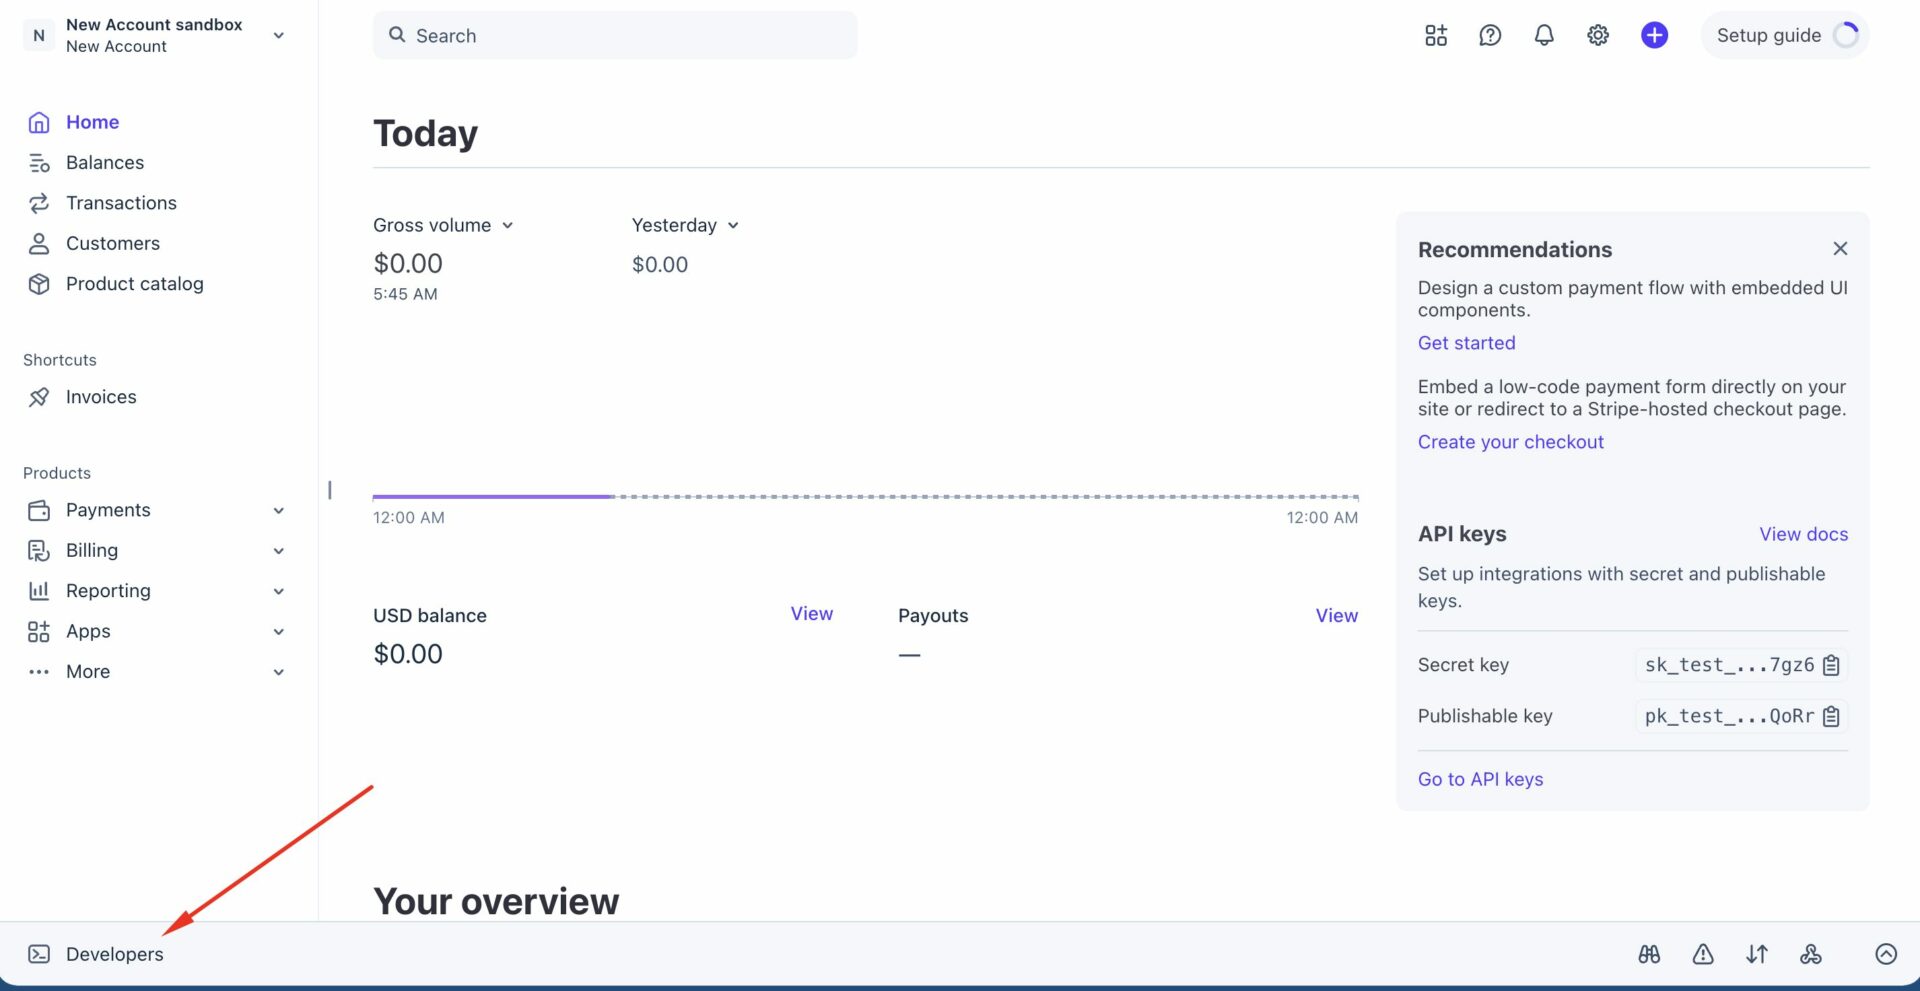
Click on that and select the API keys option-
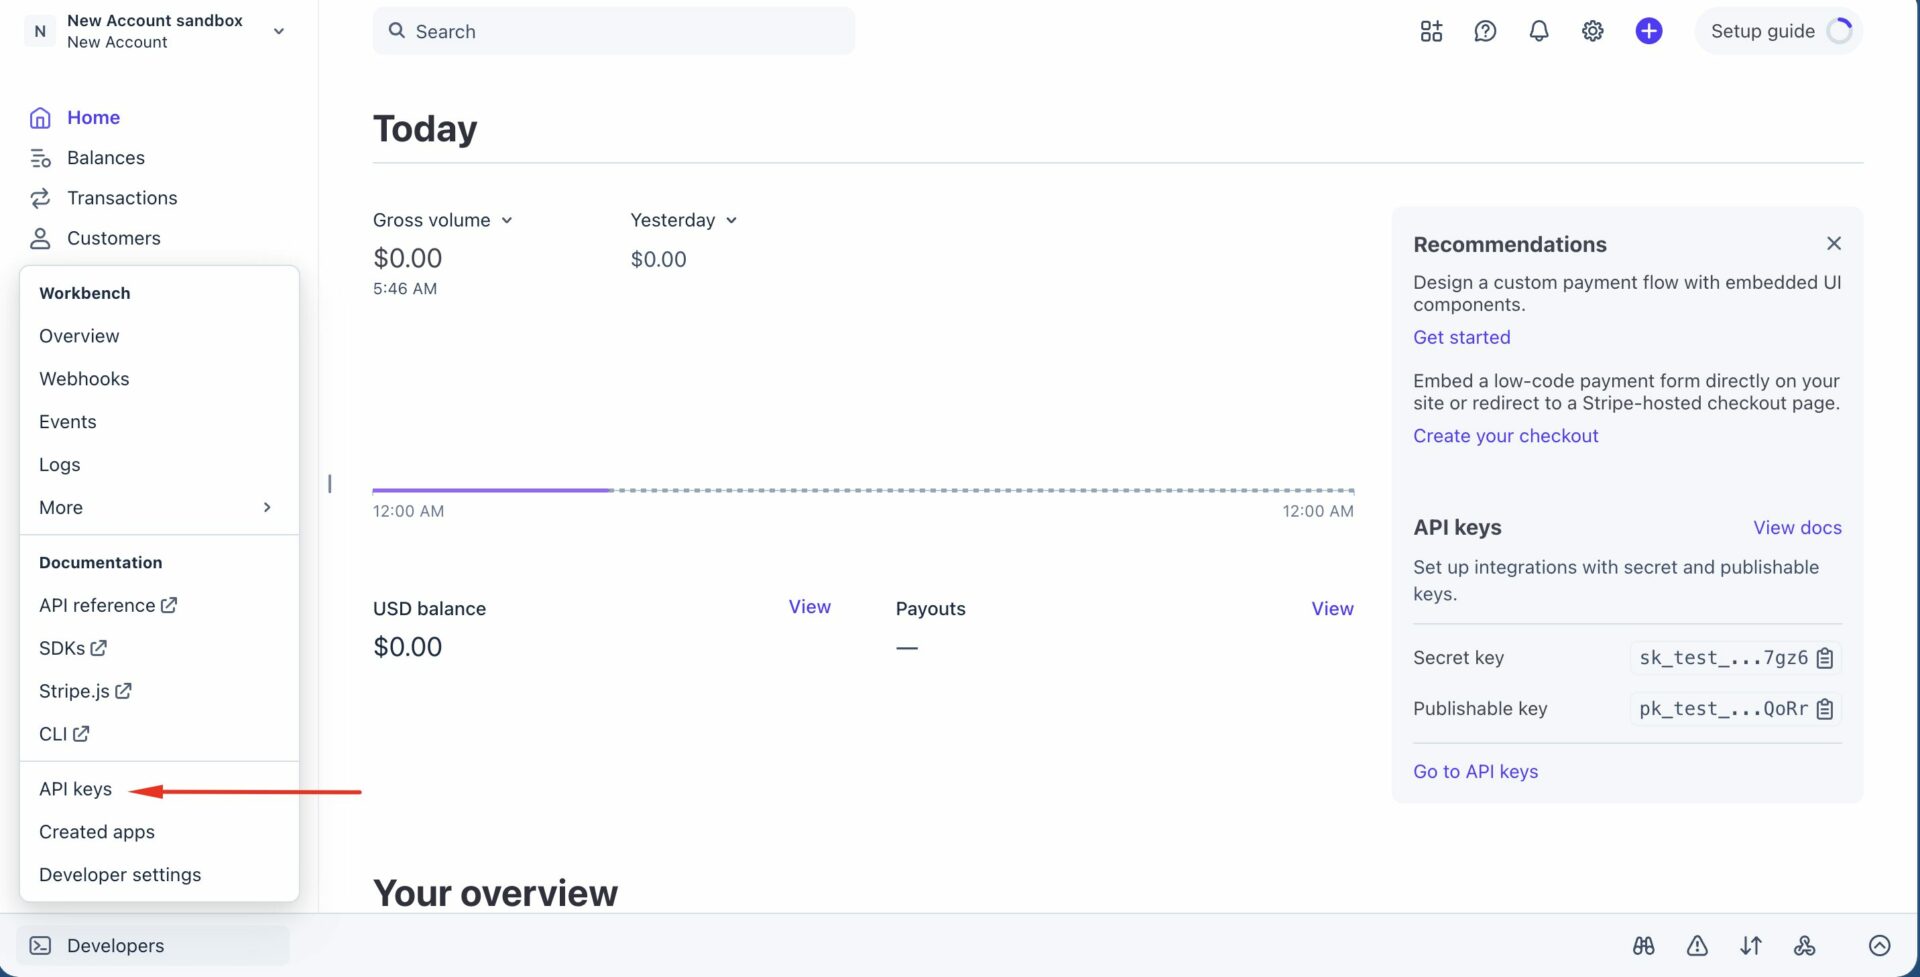
In the next screen, you will find the Test Keys and Publishable Keys. Copy them-
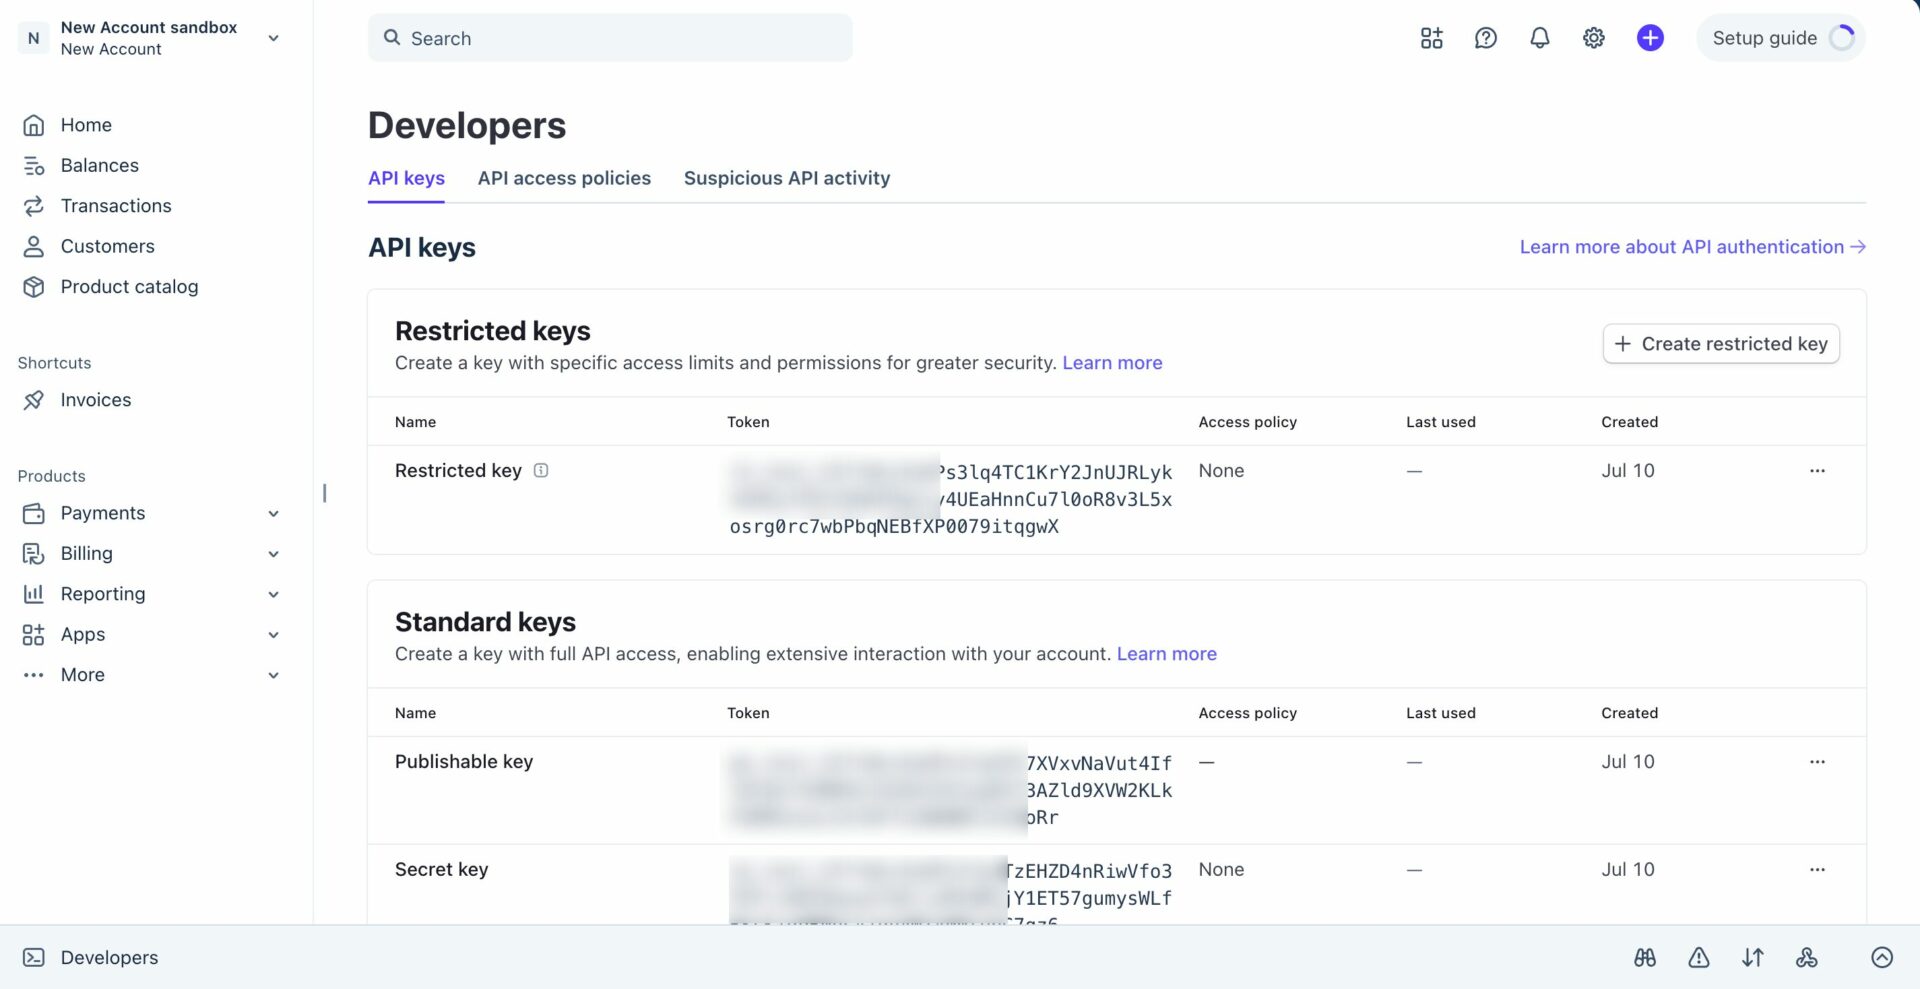
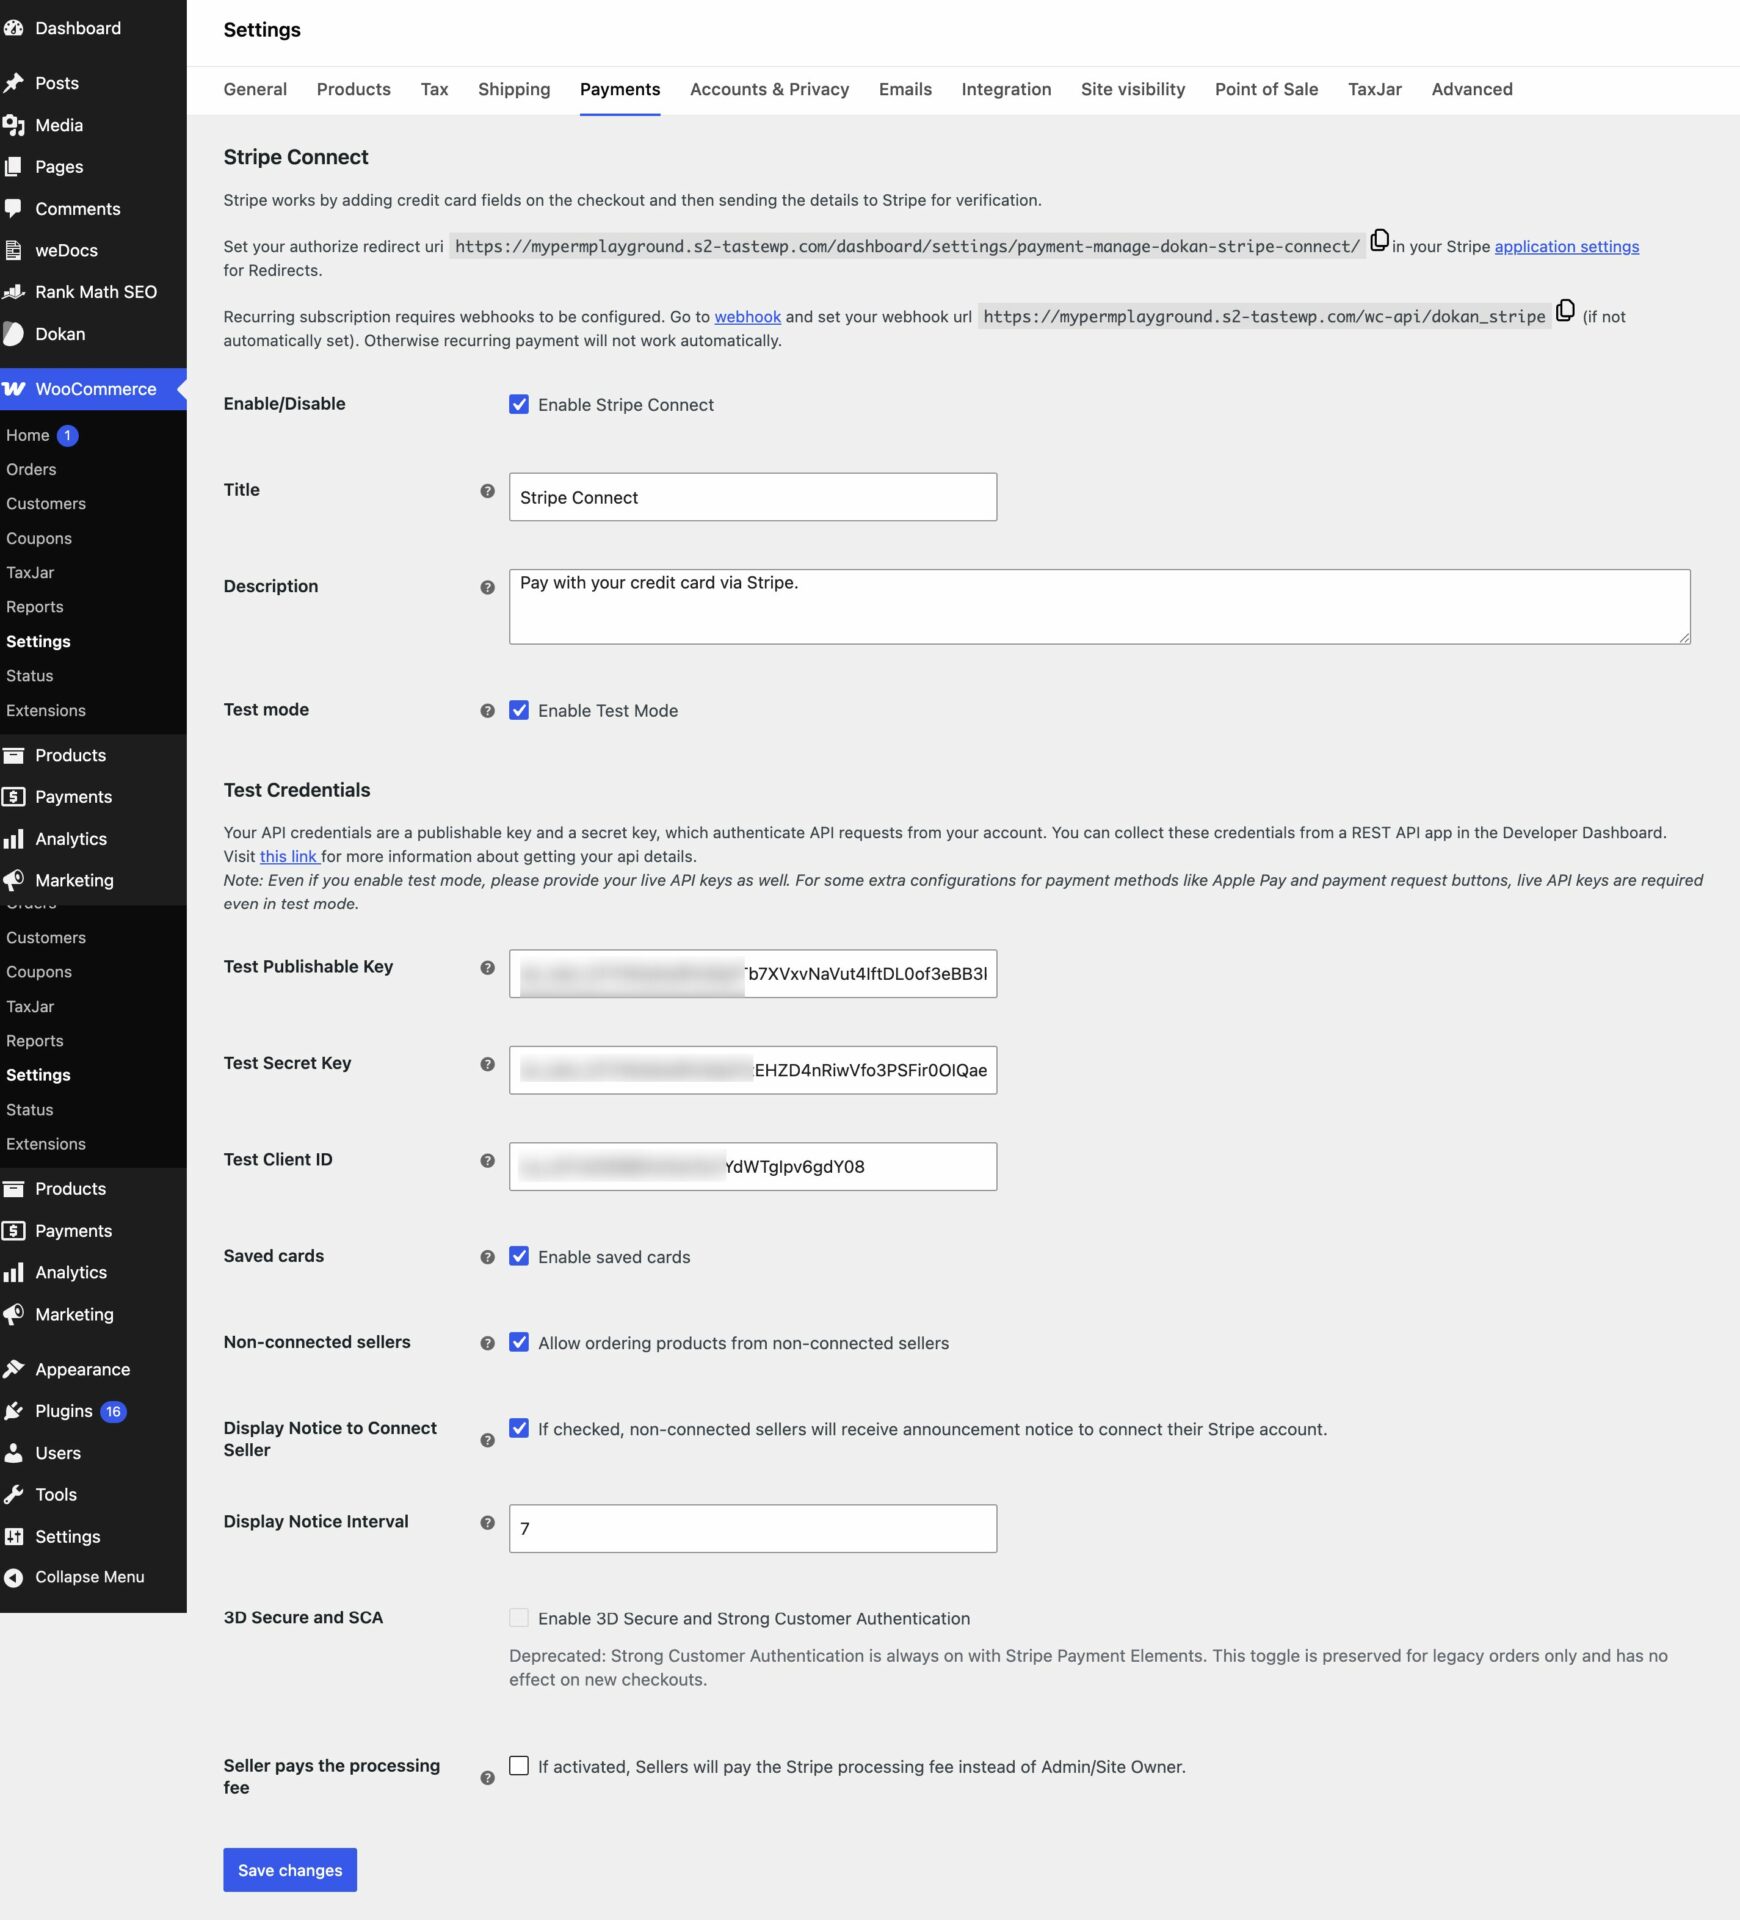
Next, log in to your WordPress dashboard and go to WooCommerce–> Settings–> Payments and click on the Dokan Stripe Payment option-
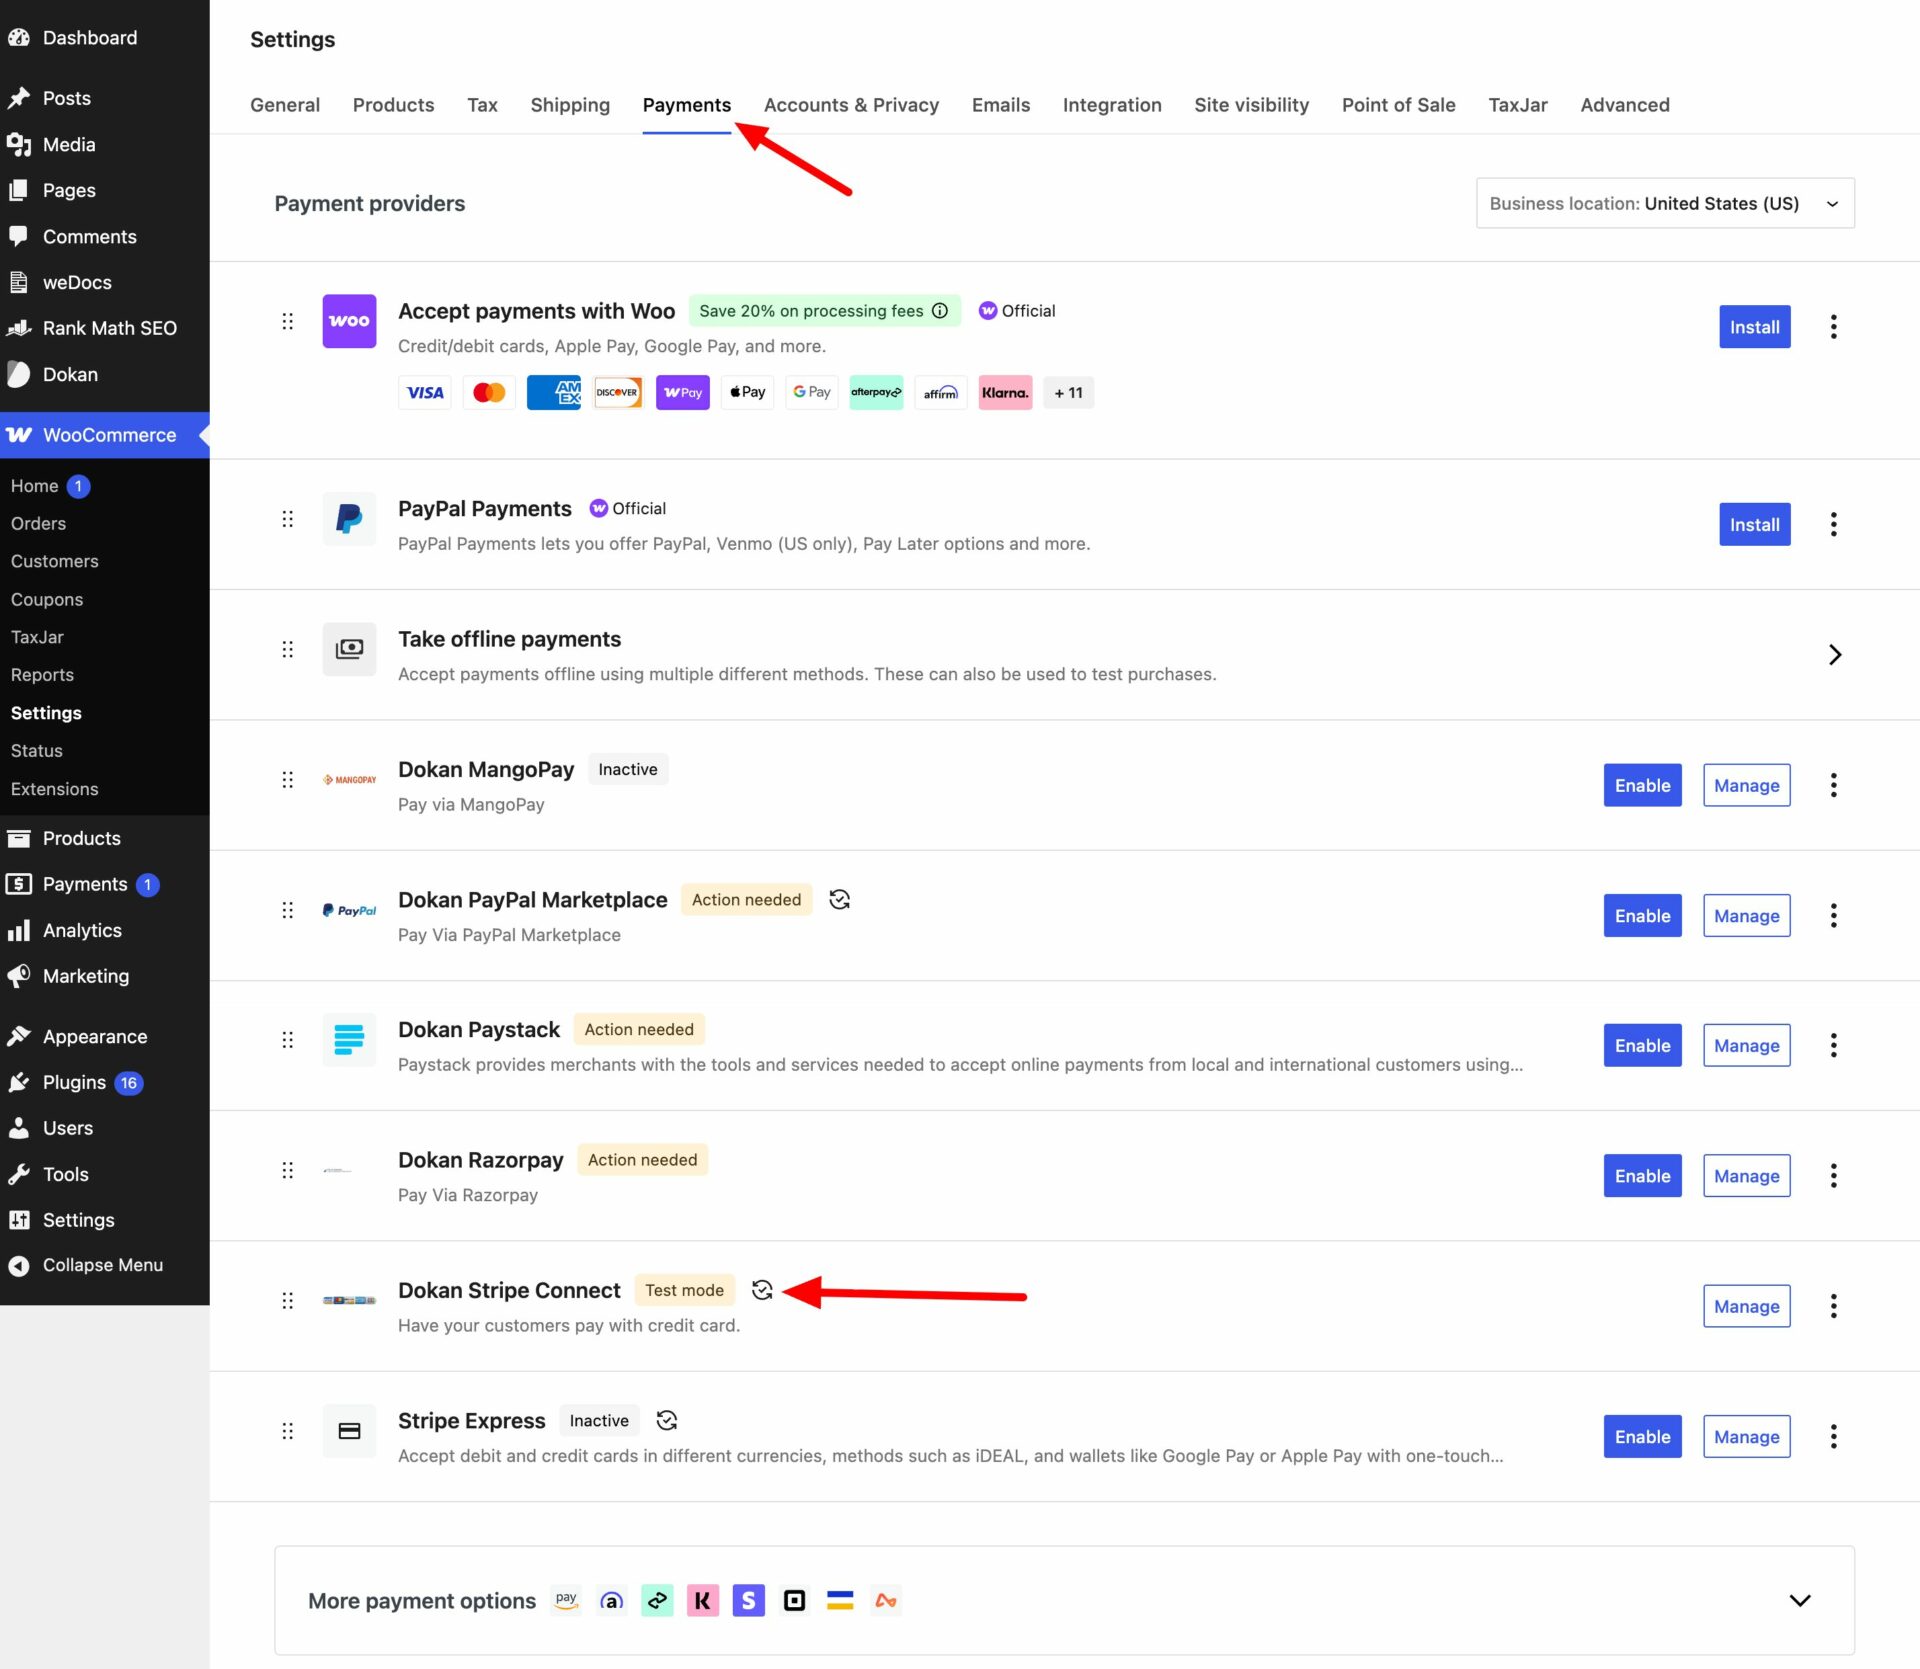
Enter the Title and Description. The plugin already has default text included; you can change it if required.
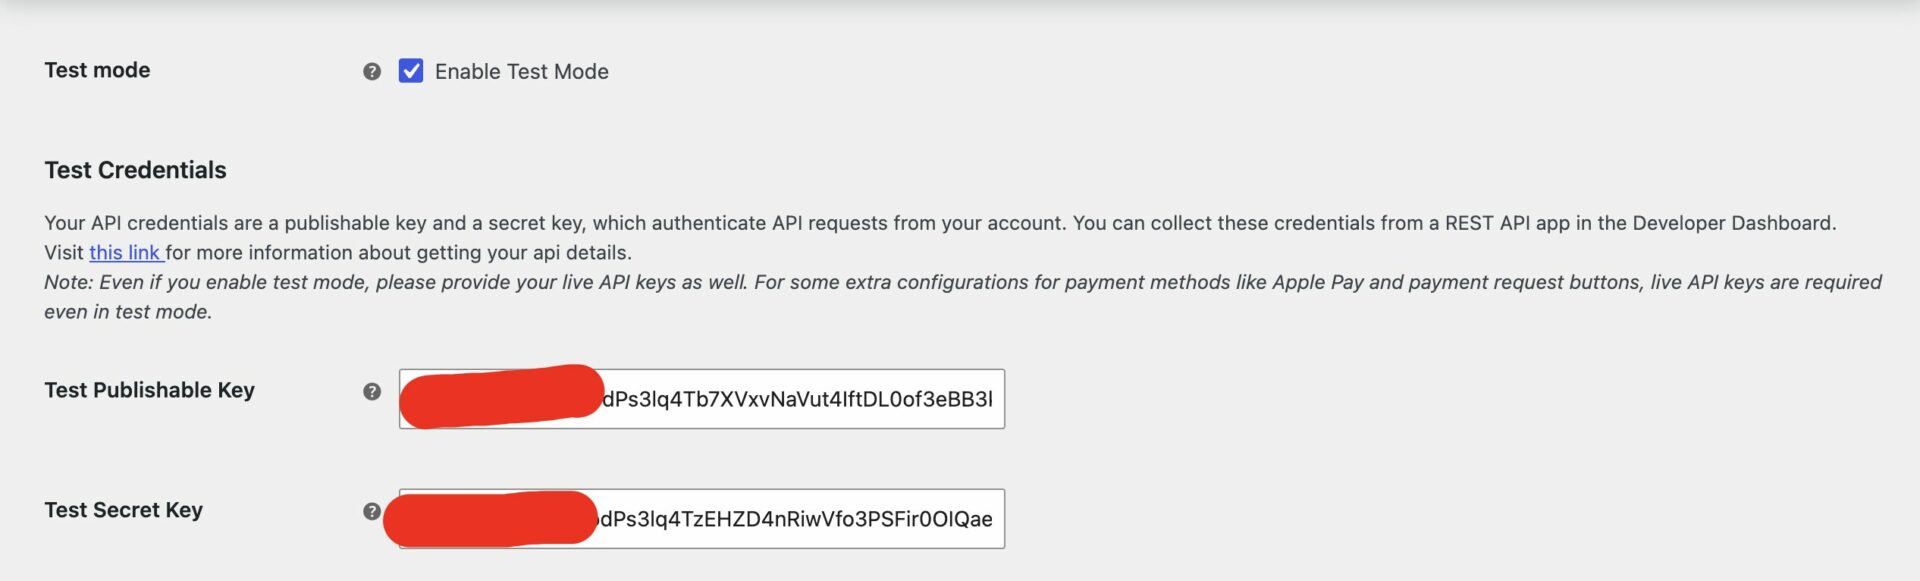
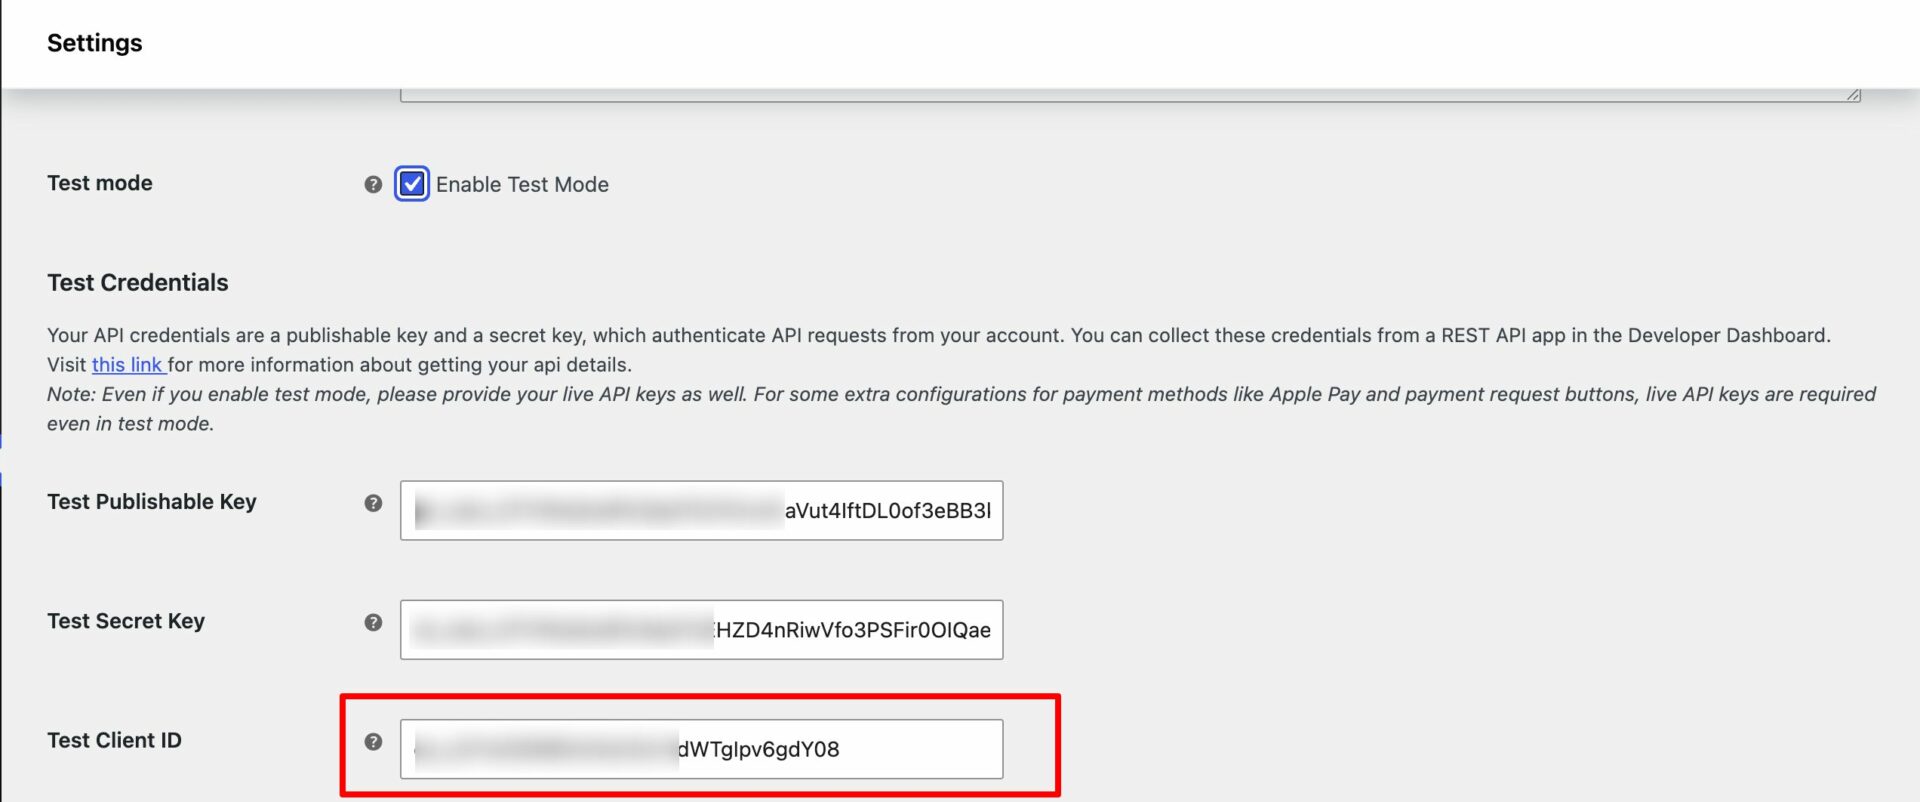
Then, enable test mode and add the keys in the box-
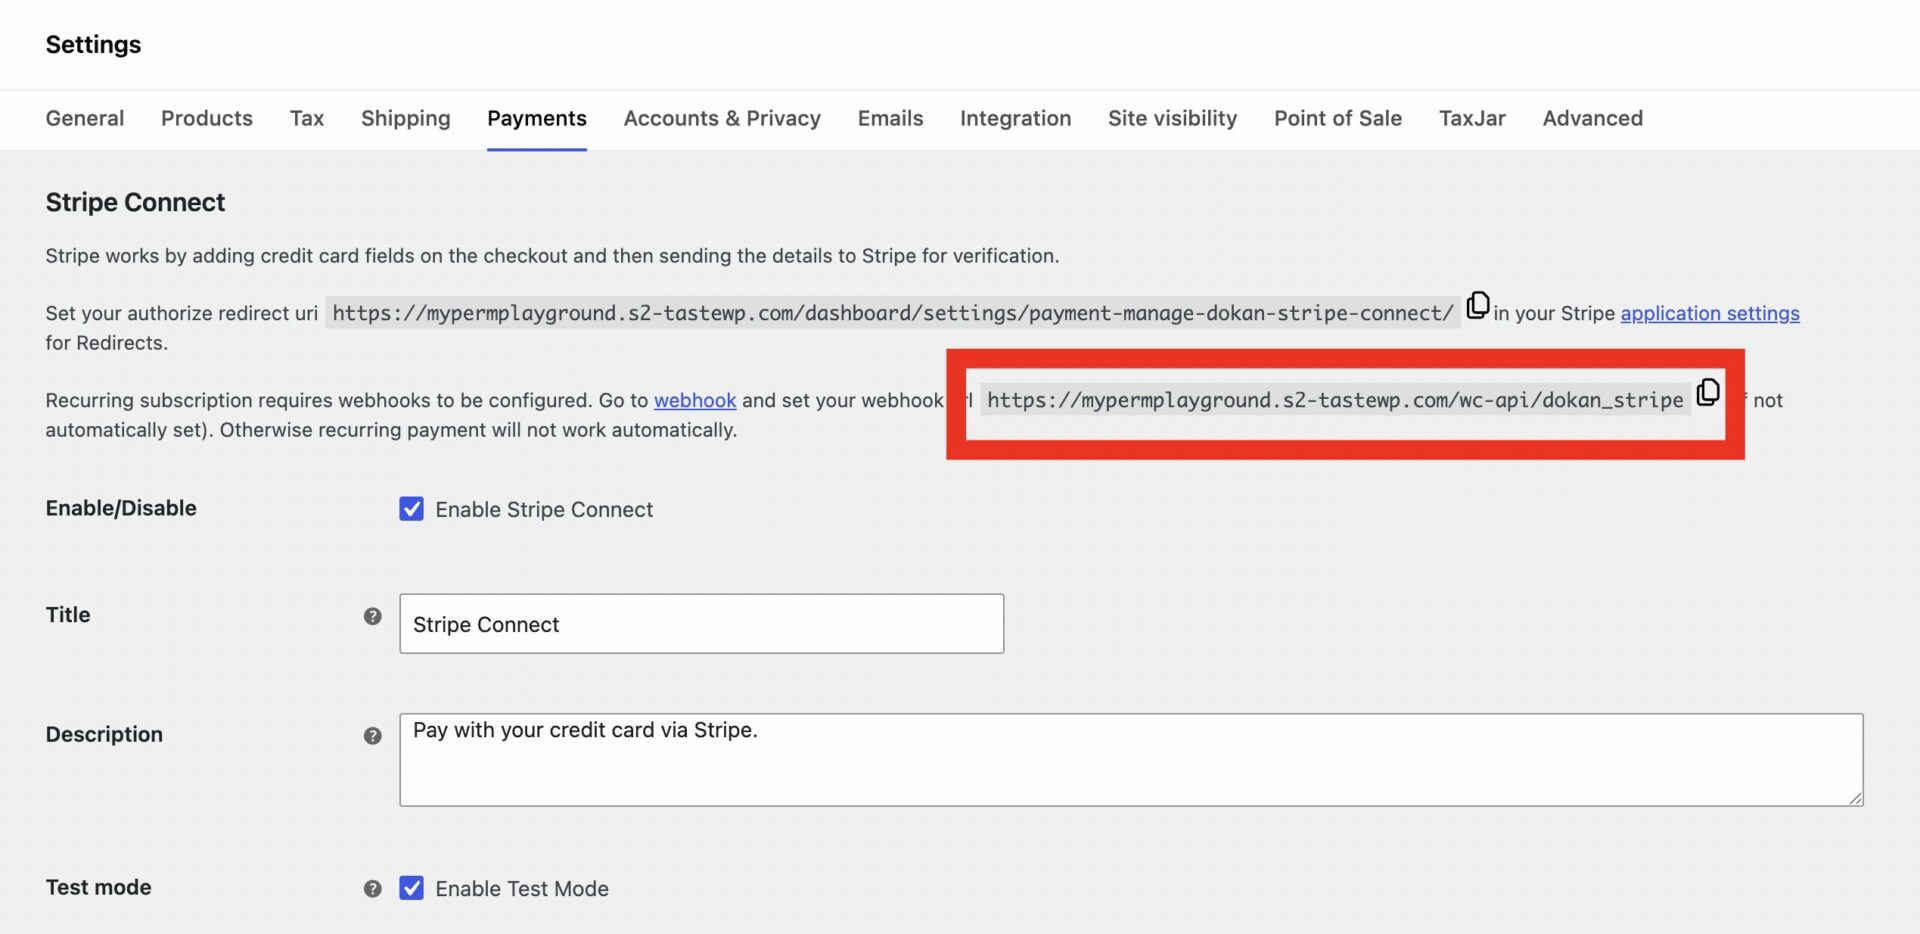
Then, copy the webhook URL from the dashboard-
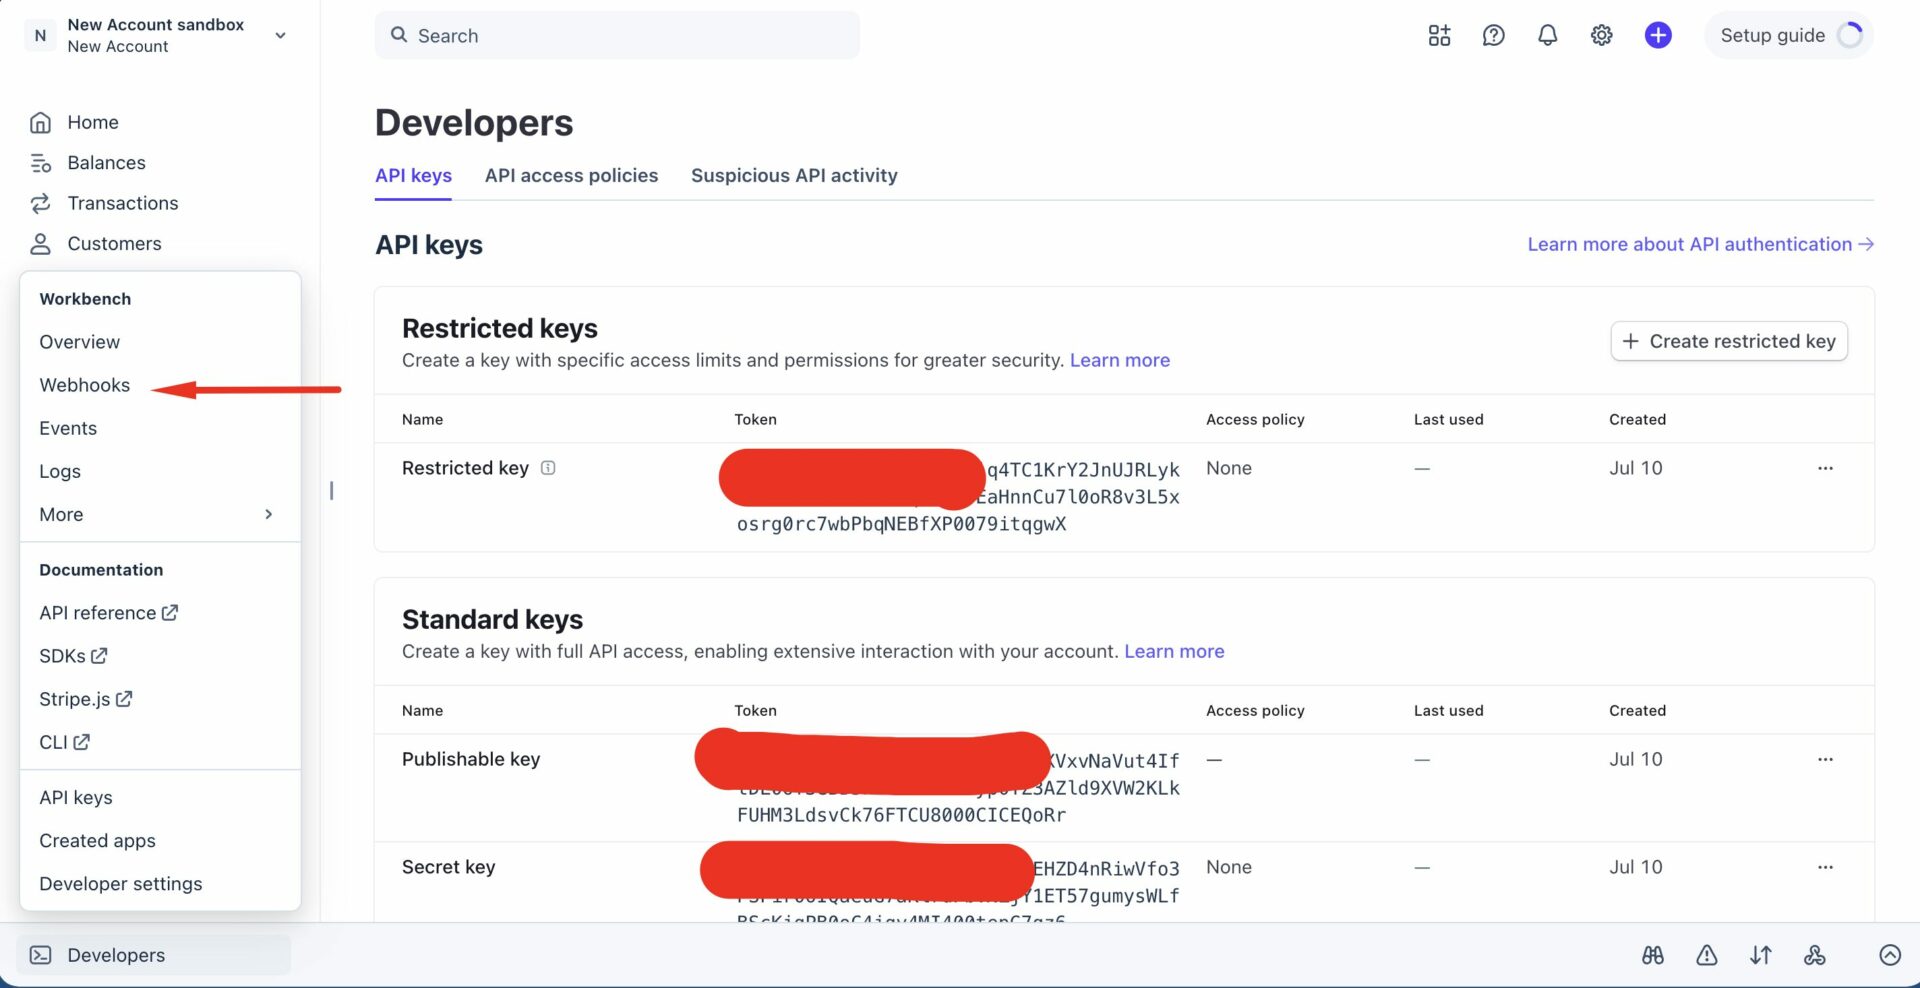
Now, go back to your Stripe Dashboard and from the Developers option, click on the Webhook-
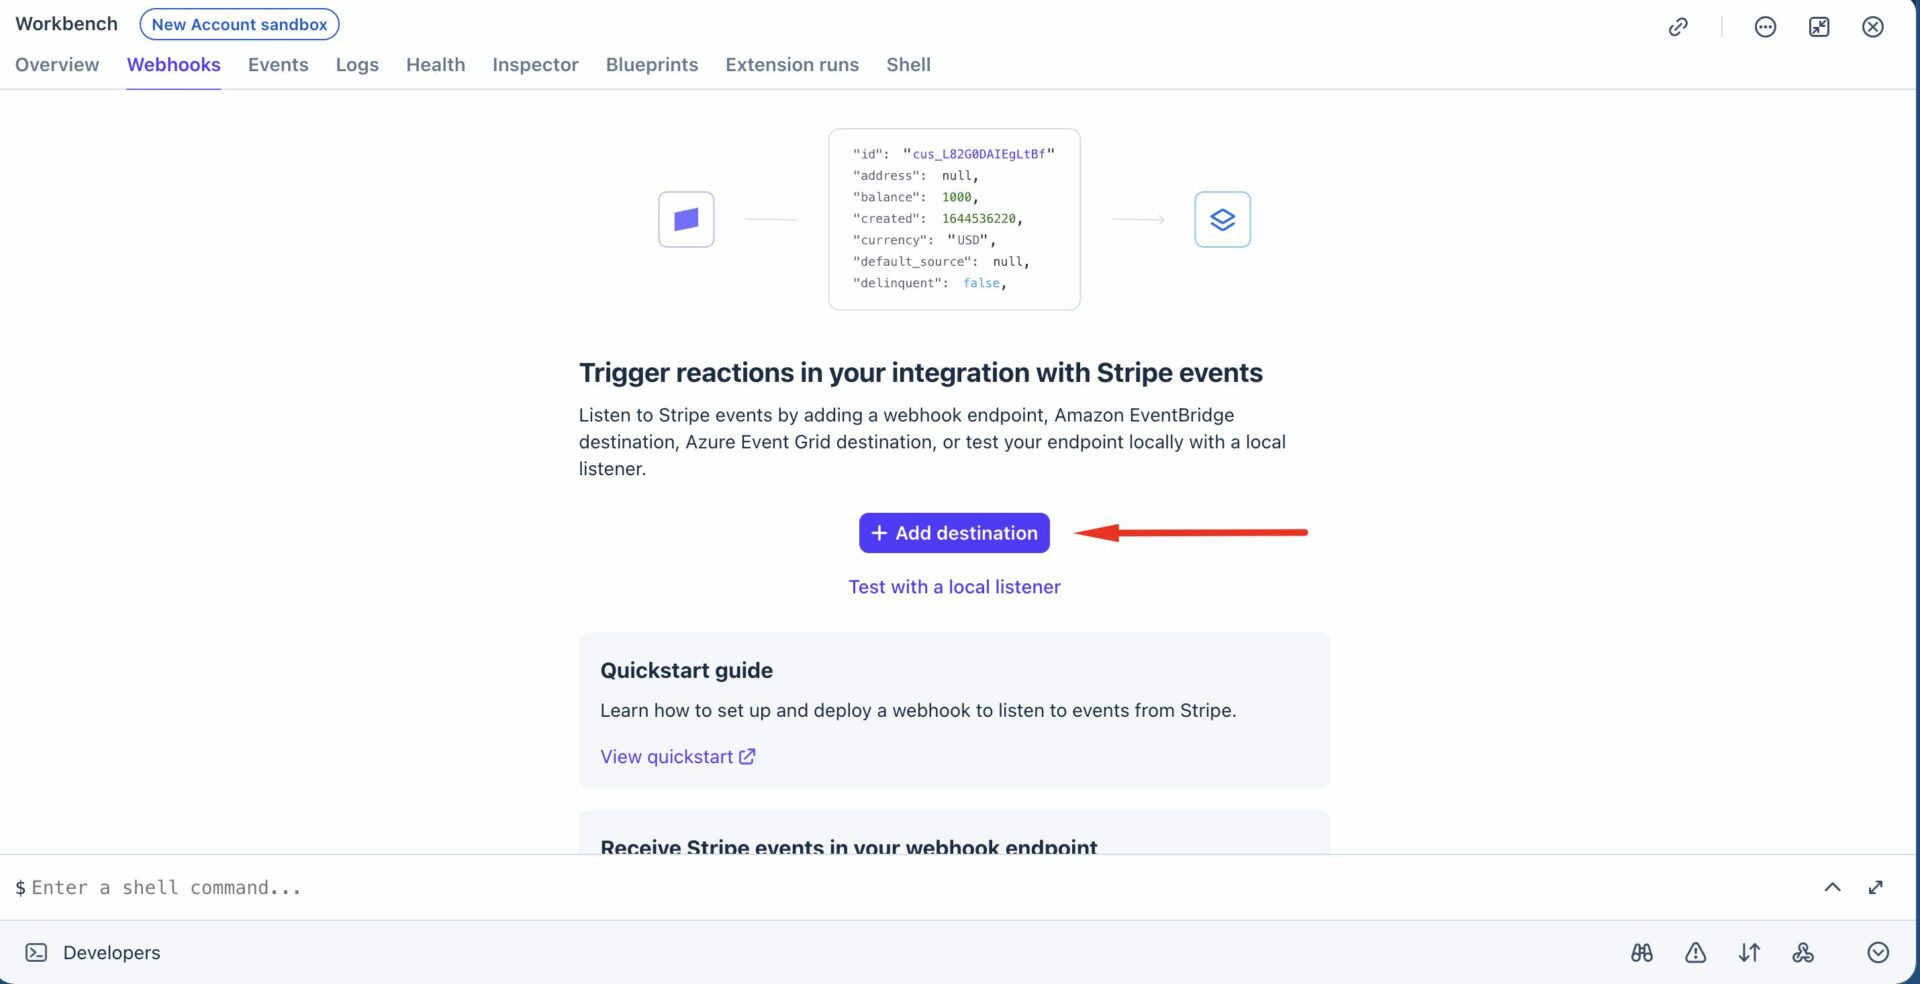
Then, click on the Add Destination button-
Select the Events. If confused, select all the events but these are the main events you need-
charge.dispute.closed
charge.dispute.created
customer.subscription.deleted
customer.subscription.trial_will_end
customer.subscription.updated
invoice.payment_action_required
invoice.payment_failed
invoice.payment_succeeded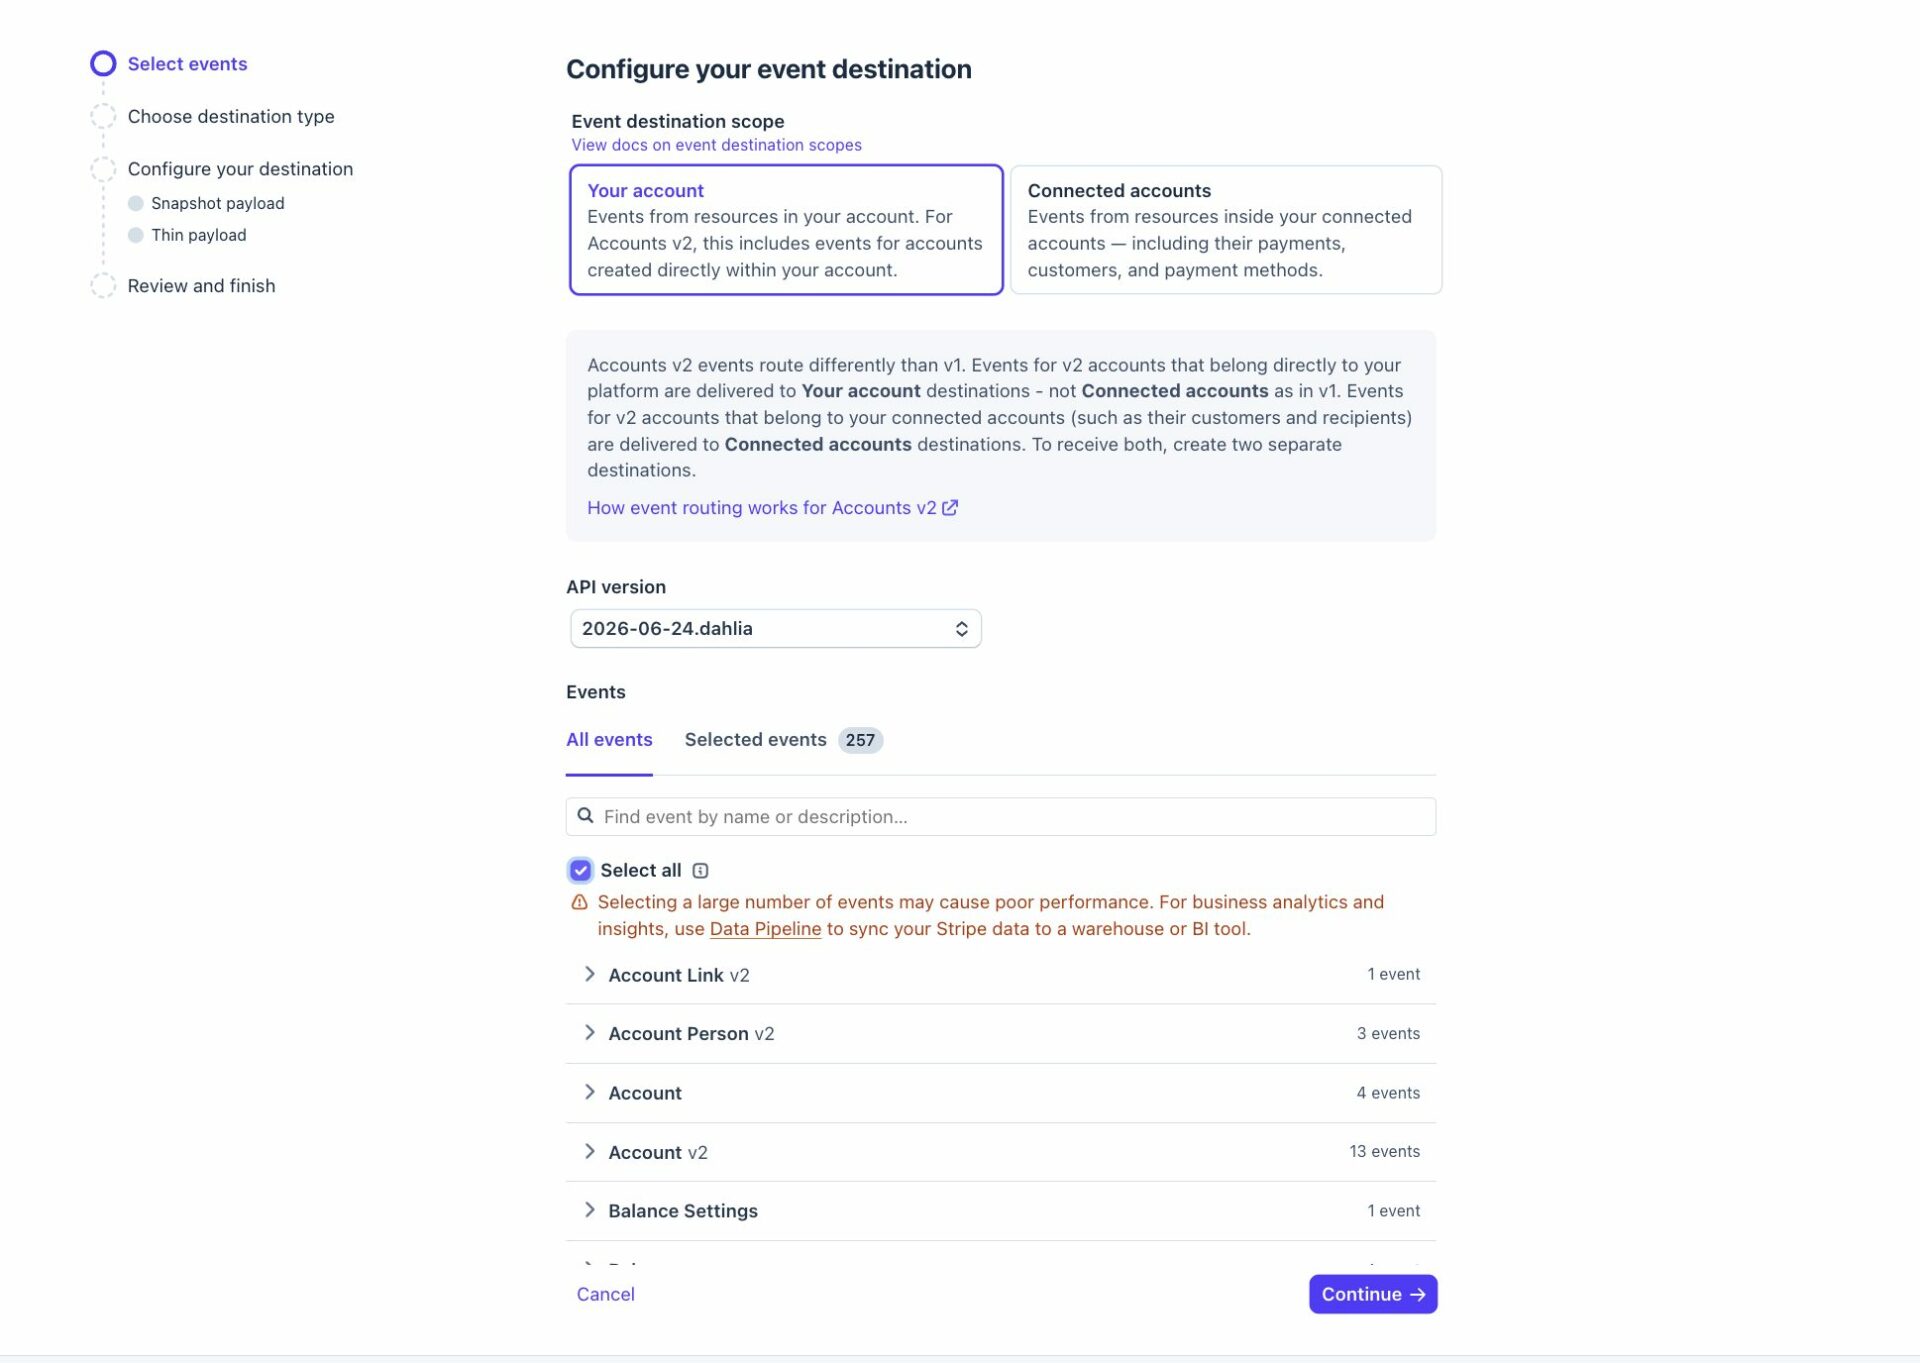
Select the Webhook endpoint option-
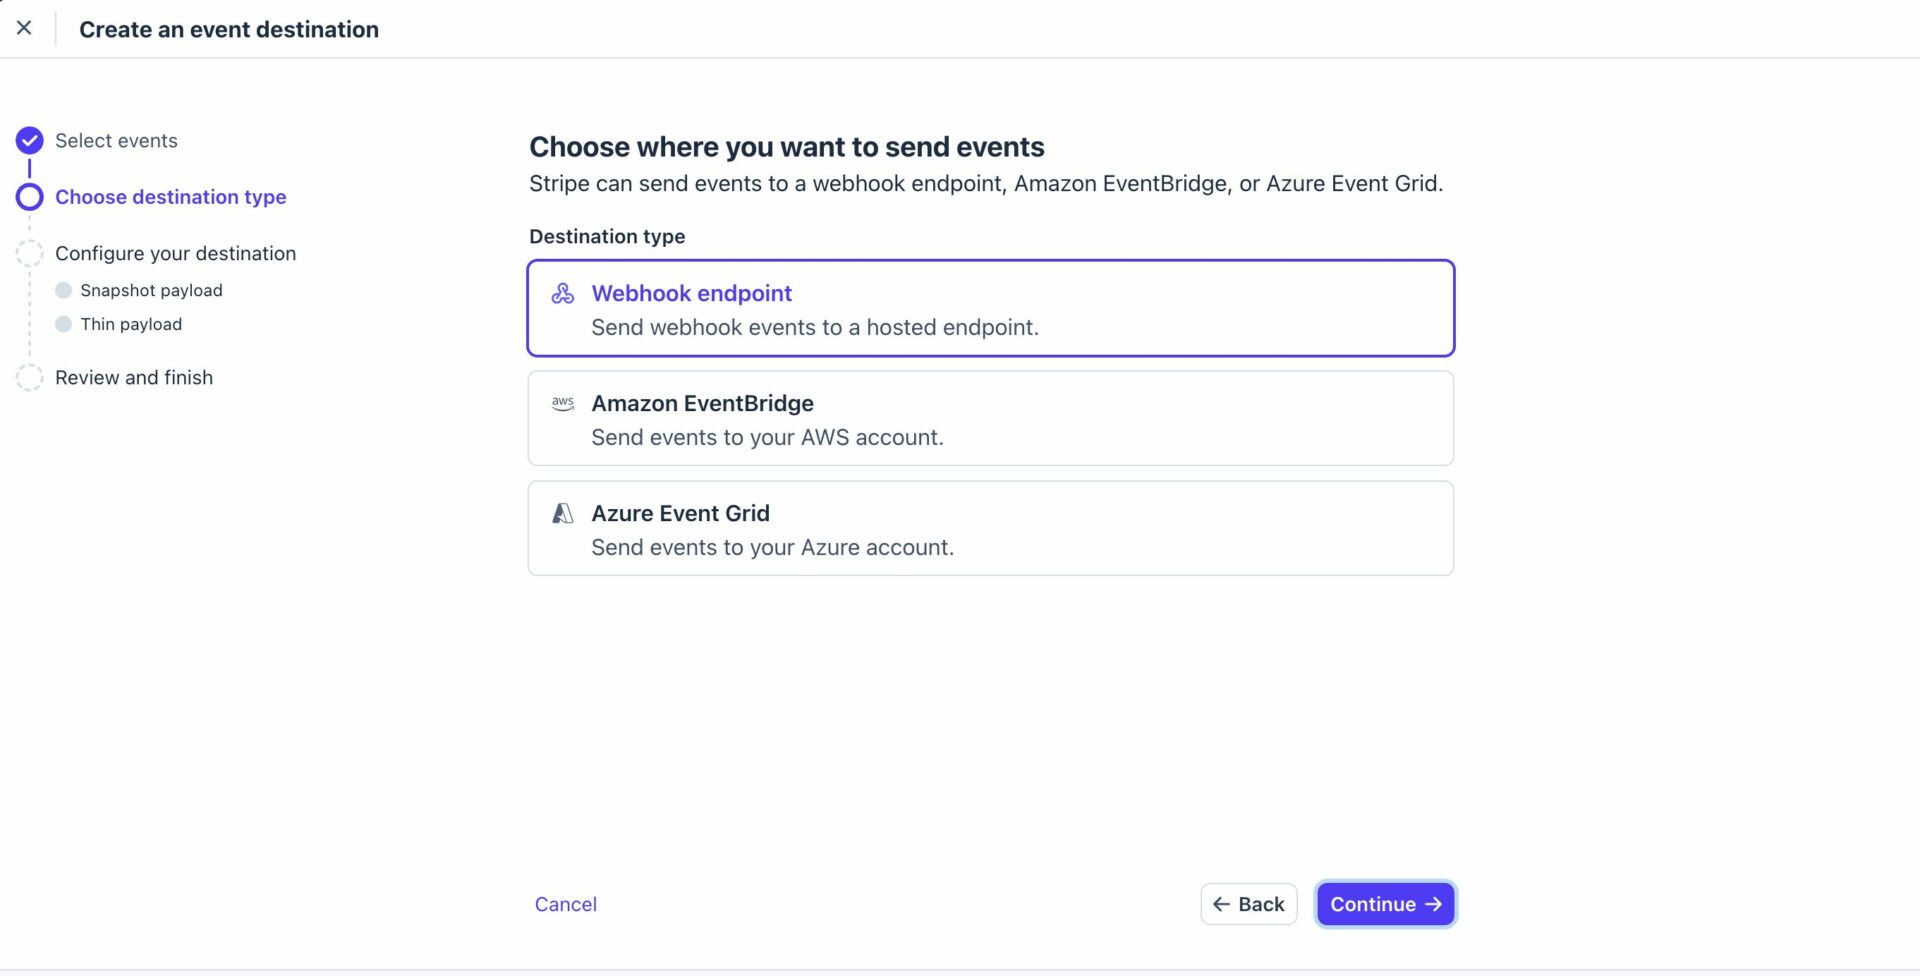
Click on continue-
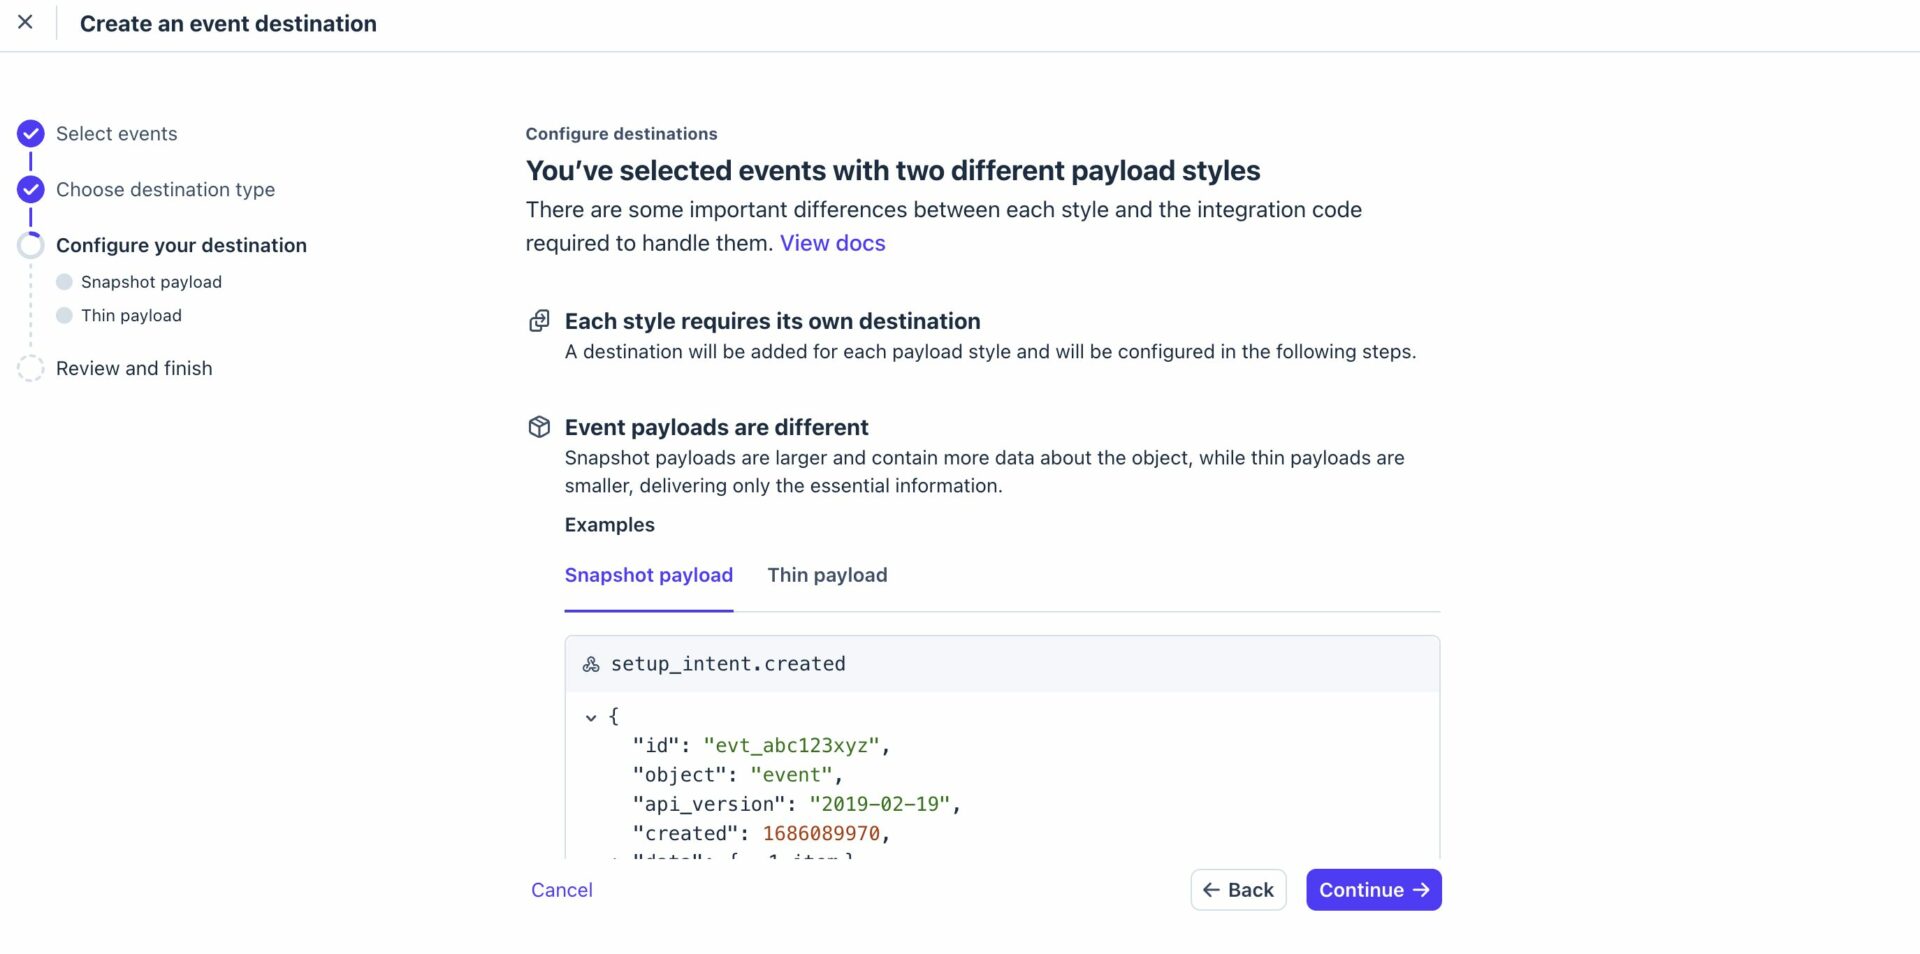
A recurring subscription requires webhooks to be configured. Usually, the Webhook adds automatically to Stripe.
If somehow it does not set automatically, can be configured manually. Go to webhook and set your Webhook URL.
Now you need to add the Webhook URL. Give your destination a name and add the URL-
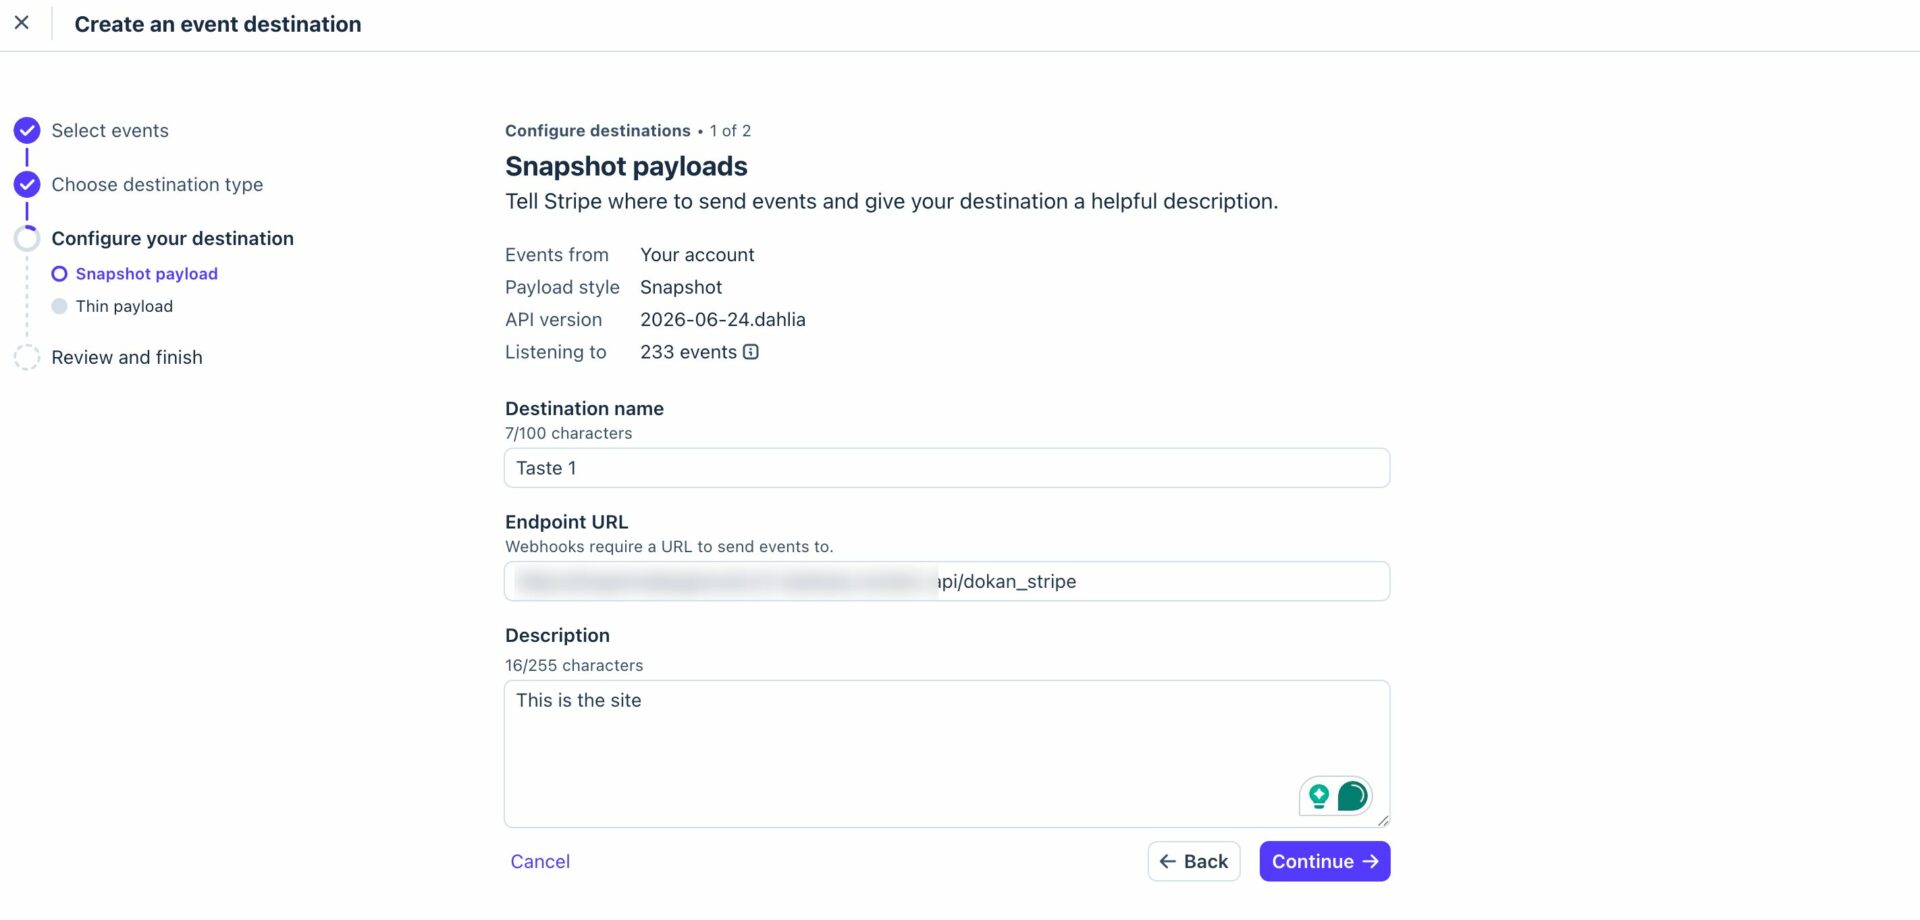
Review and finish-
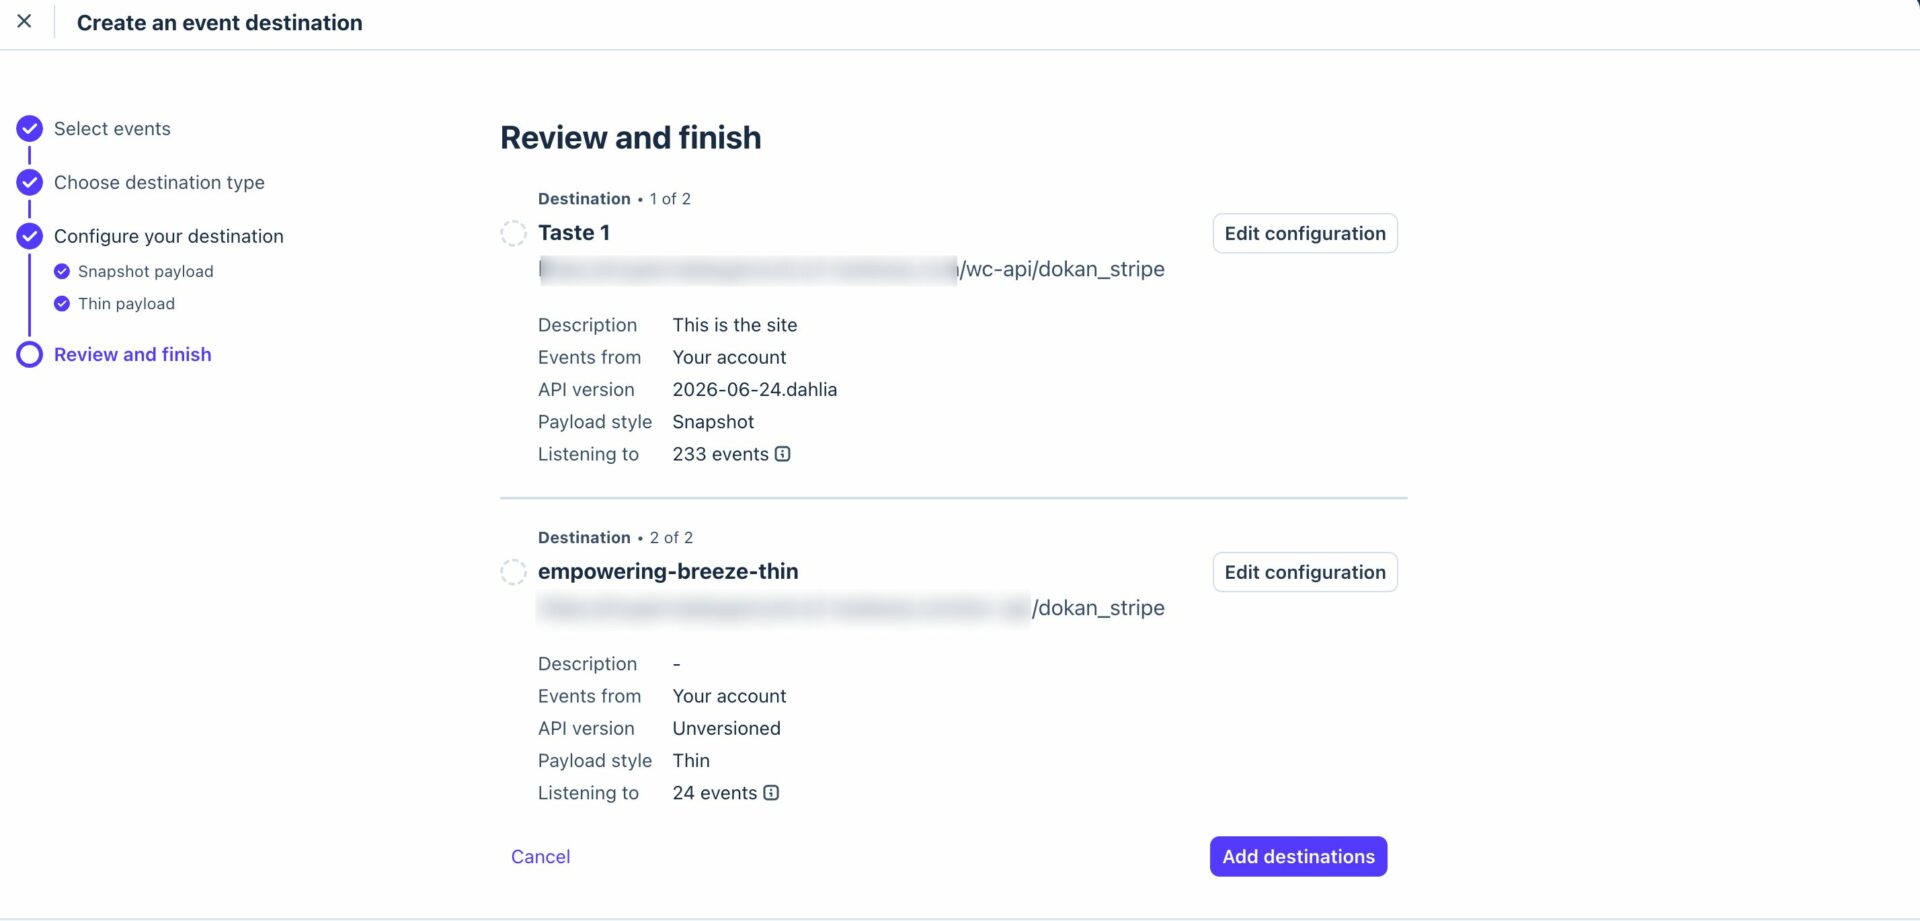
Your webhook will be added-
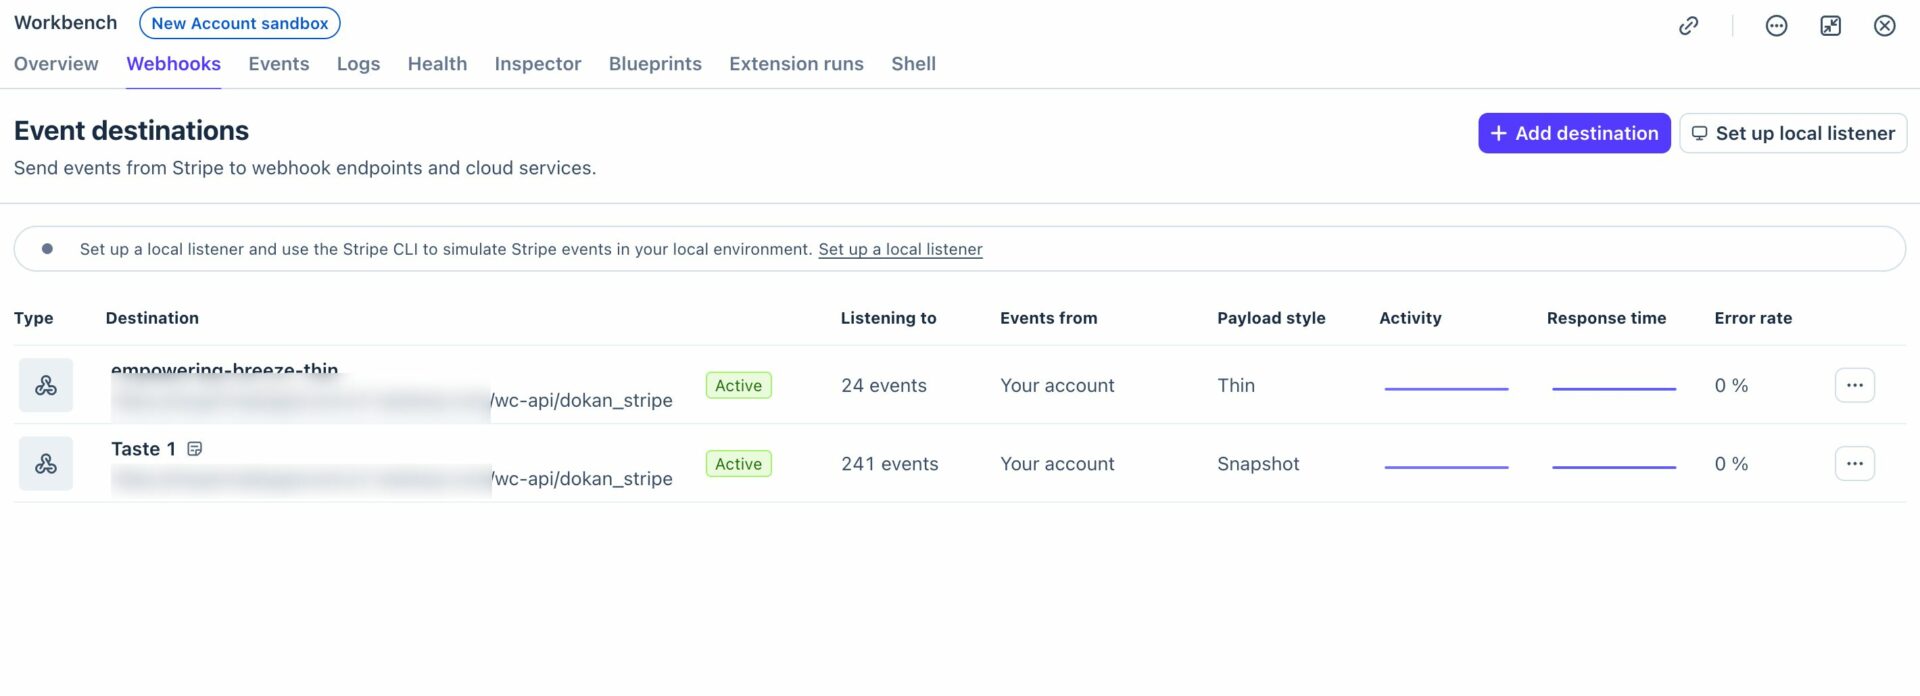
Now, we will add the Redirect URL and get the Client ID.
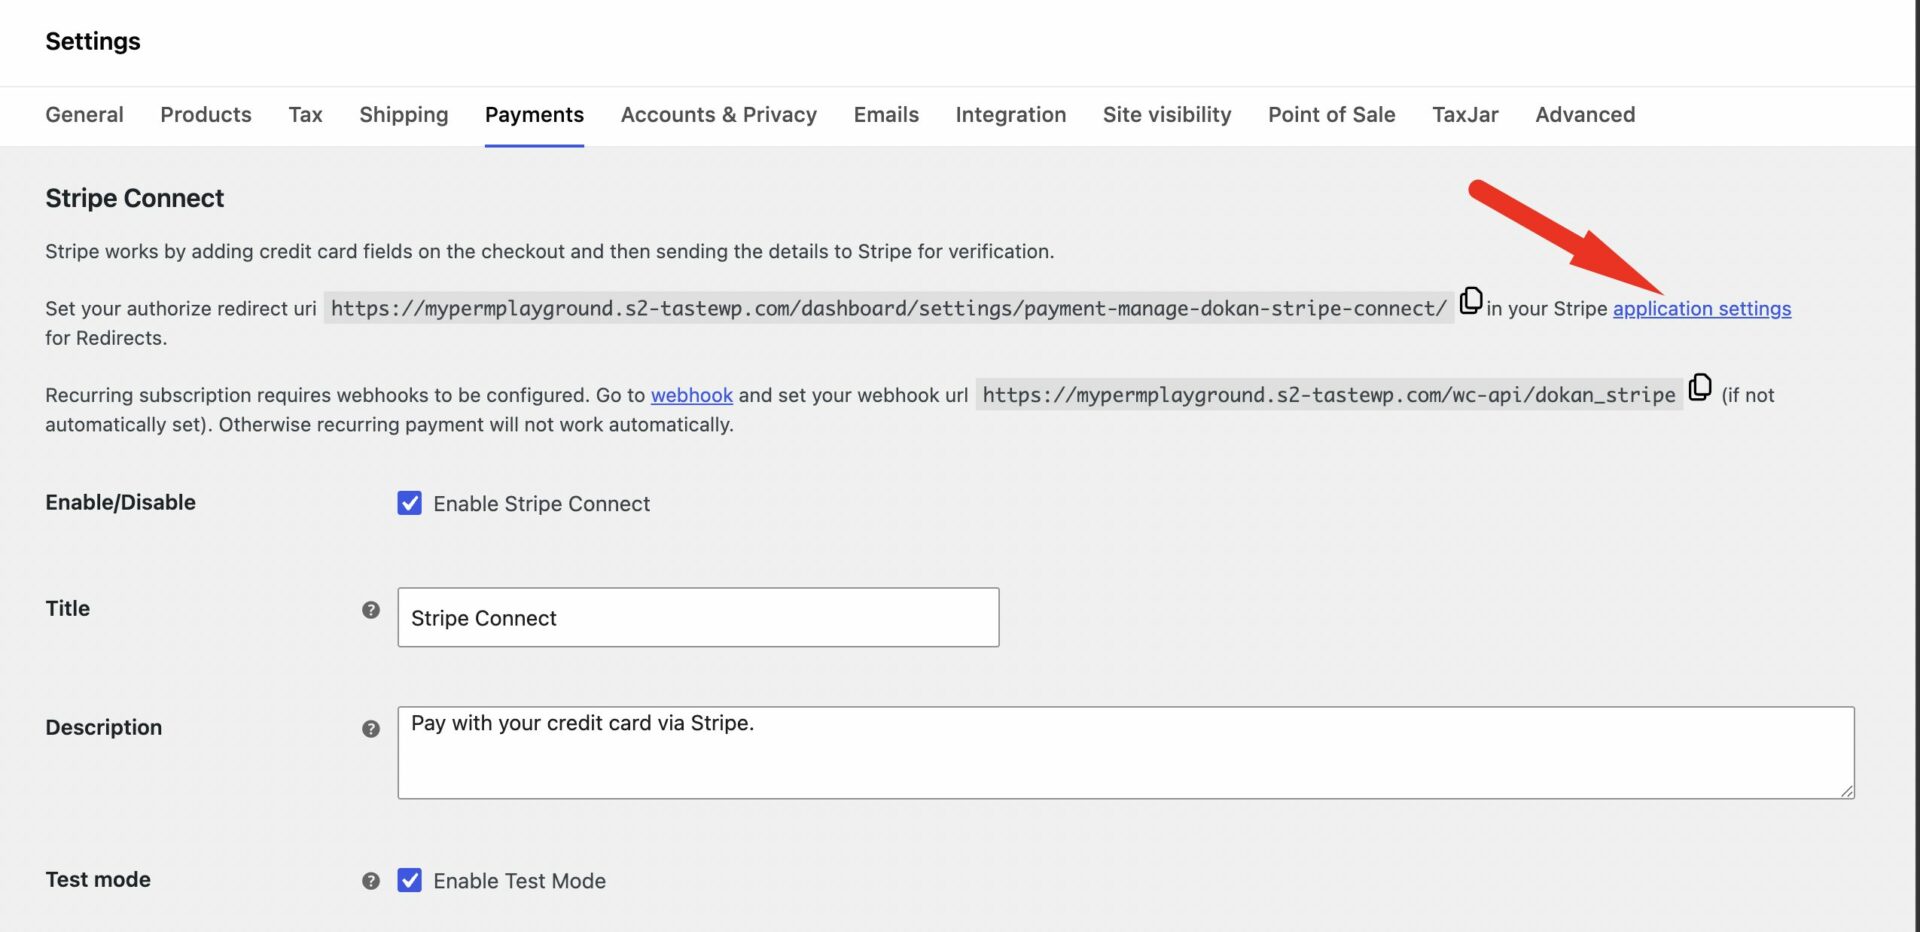
Copy the URL from the Dokan dashboard-
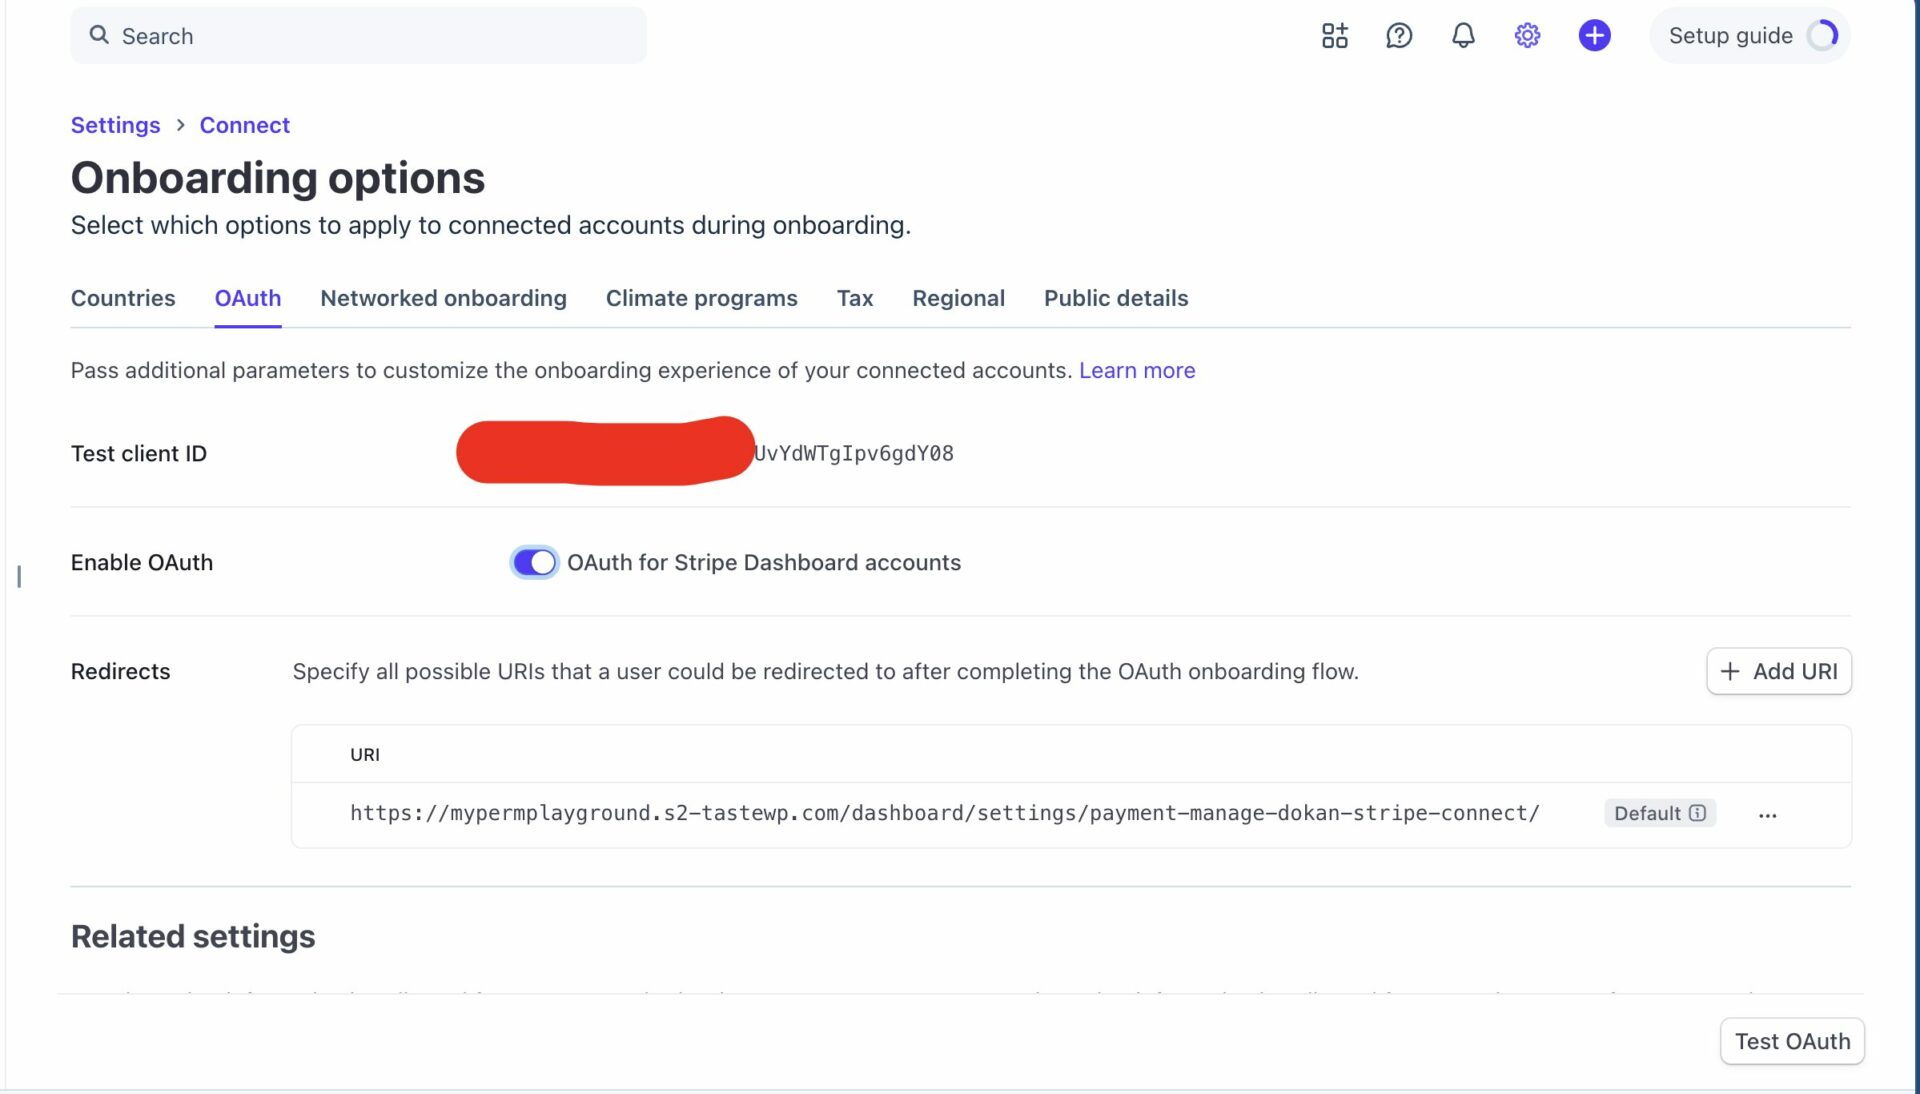
Now go back to your Stripe dashboard and go to Settings–> Connect–> Onboarding Options –> OAuth. There, add the Redirect URL, get your Client ID, and also enable OAuth for Stripe Dashboard accounts-
Then, add the Client ID in the Dokan dashboard-
Additional Settings (Admin):
Non-connected sellers: Allows vendors to sell products without connecting to their Stripe account. If the option is enabled and the vendor is not-connected with their Stripe account, the entire order amount will be transferred to the admin Stripe account after placing an order.
Display Notice to Connect Seller: Enabling that option will send announcement notices to non-connected vendors to connect their Stripe accounts.
Display Notice Interval: It allows the admin to send recurring announcements to vendors for connecting their Stripe accounts. Adding a value to that field will define how many days an announcement will be triggered.
Saved cards: Enabling that option allows customers to save their card on the site during the purchase.
3D Secure and SCA: Strong Customer Authentication is always on with Stripe Payment Elements. This toggle is preserved for legacy orders only and has no effect on new checkouts.
Seller pays the processing fee: If activated, Sellers will pay the Stripe processing fee instead of Admin/Site Owner.
Configuration (Admin settings for vendor):
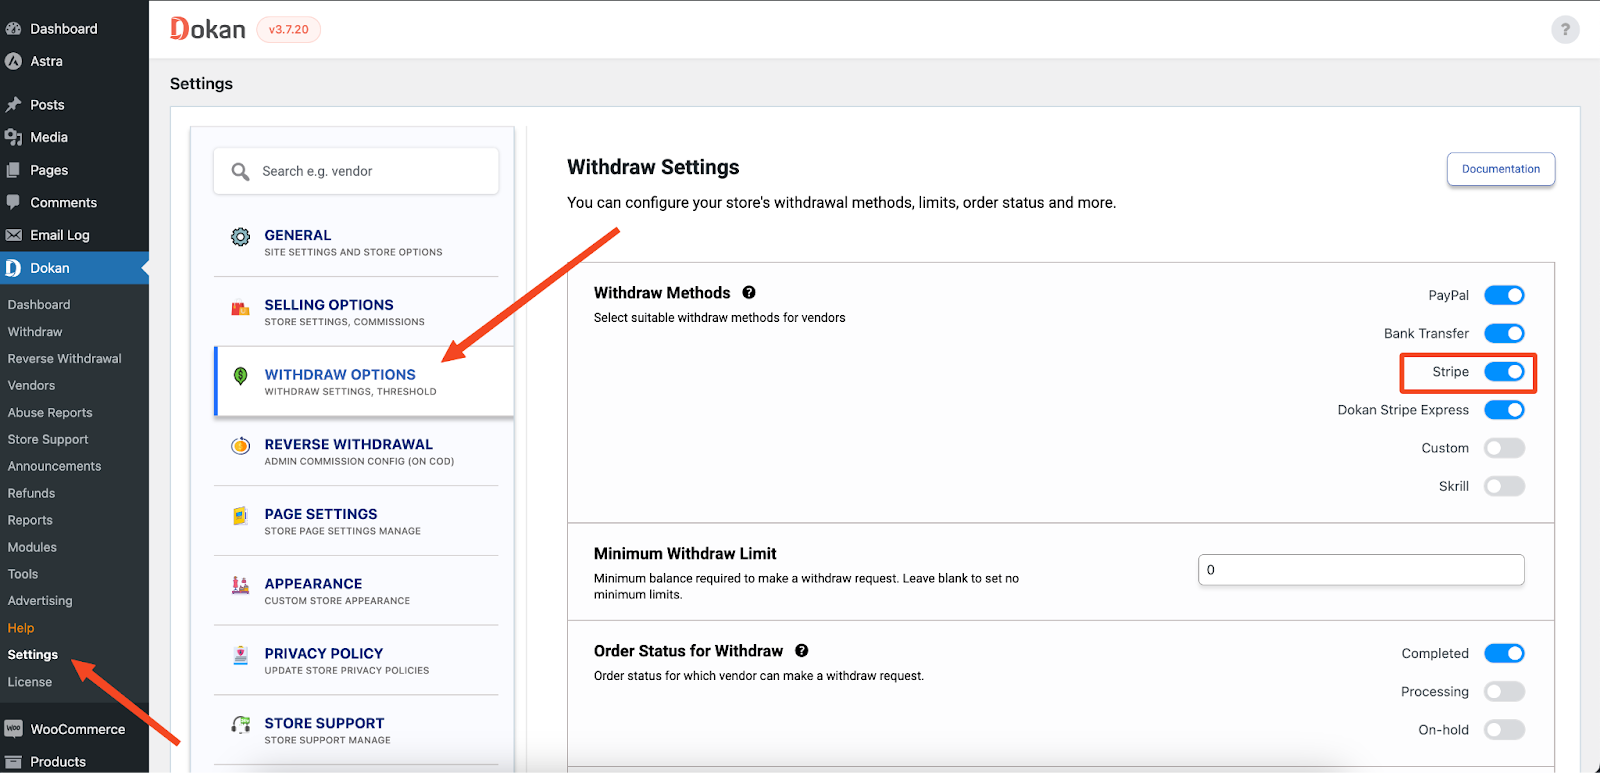
Navigate to WP Admin Dashboard > Dokan > Settings > Withdraw Options > Withdraw Methods screen. Toggle the Stripe switch and hit the Save Changes button.
Settings for Vendors:
As you have installed a new payment gateway, your vendors should connect their stores to Stripe Connect to receive the payments.
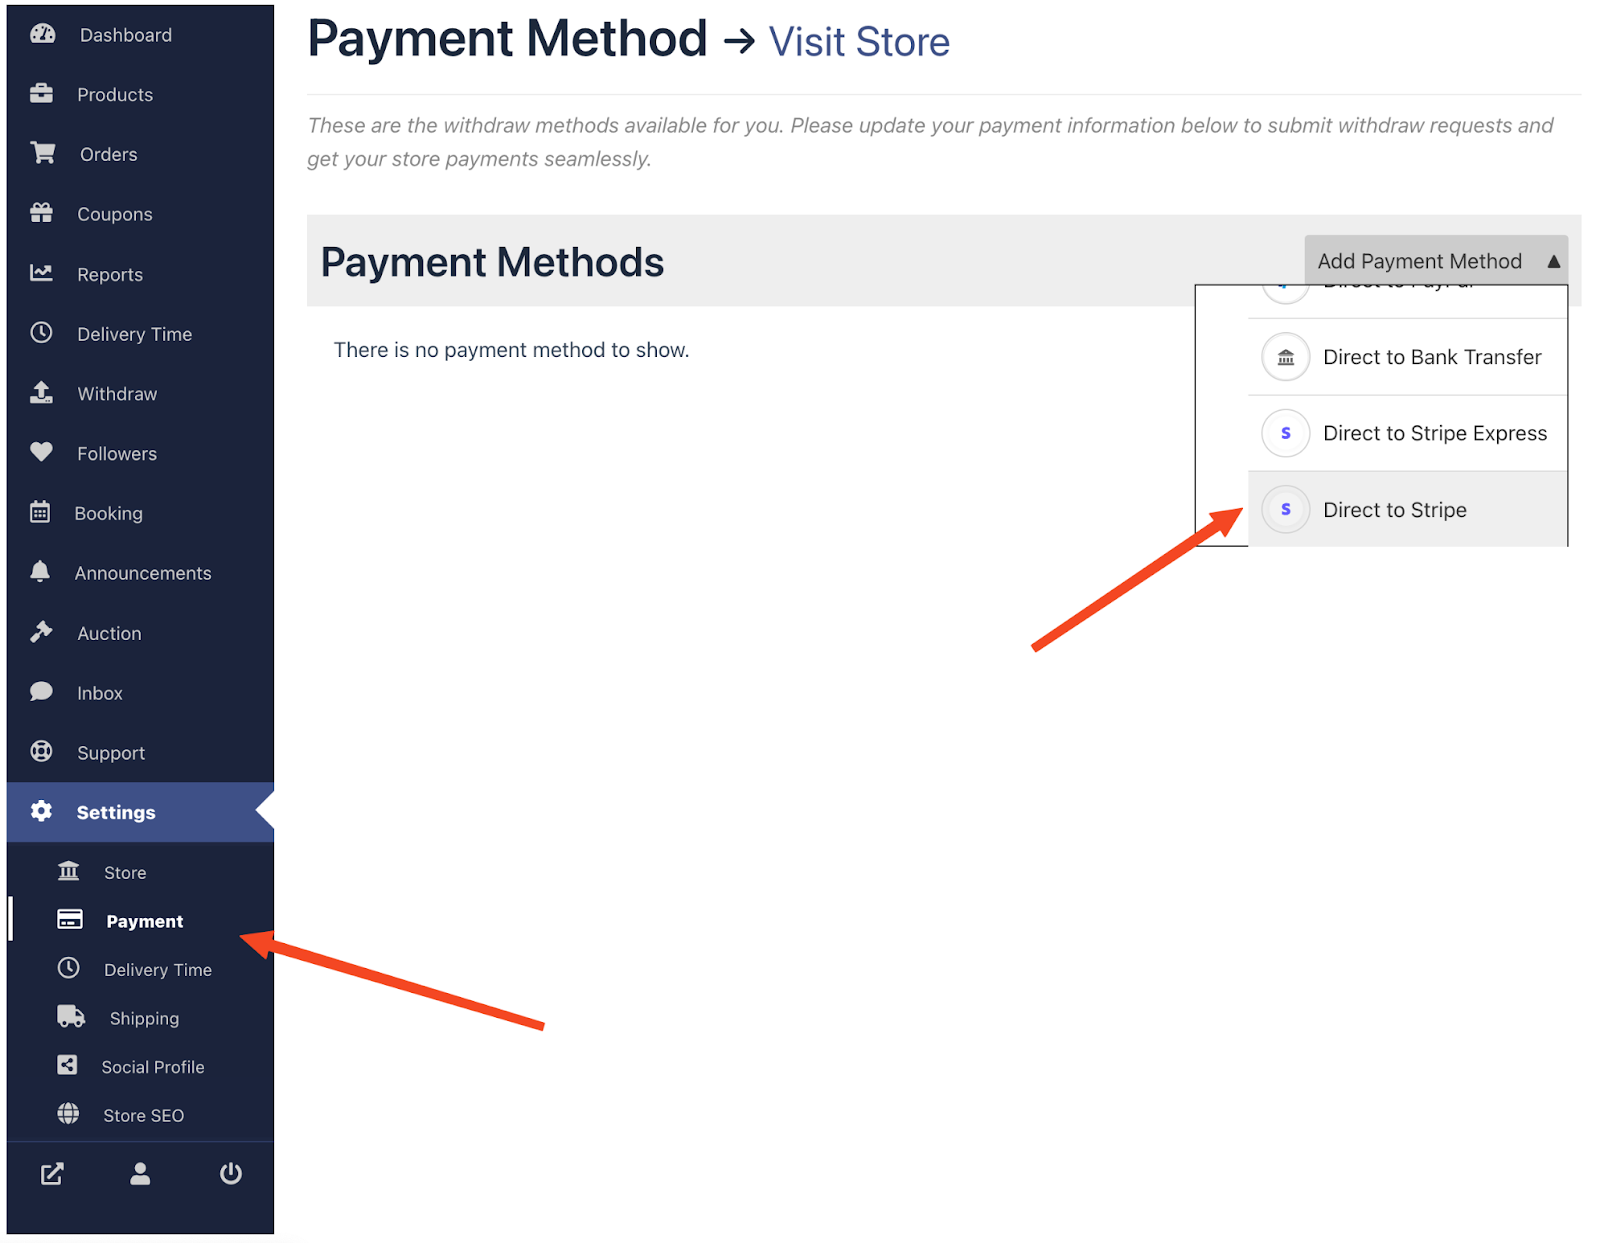
- Navigate to – Vendor Dashboard > Settings > Payment.
- You will see a Add Payment Methods dropdown. Choose Direct to Stripe from the dropdown.
Click on the blue colored Connect with Stripe button, and you will be redirected to the Stripe.com website.
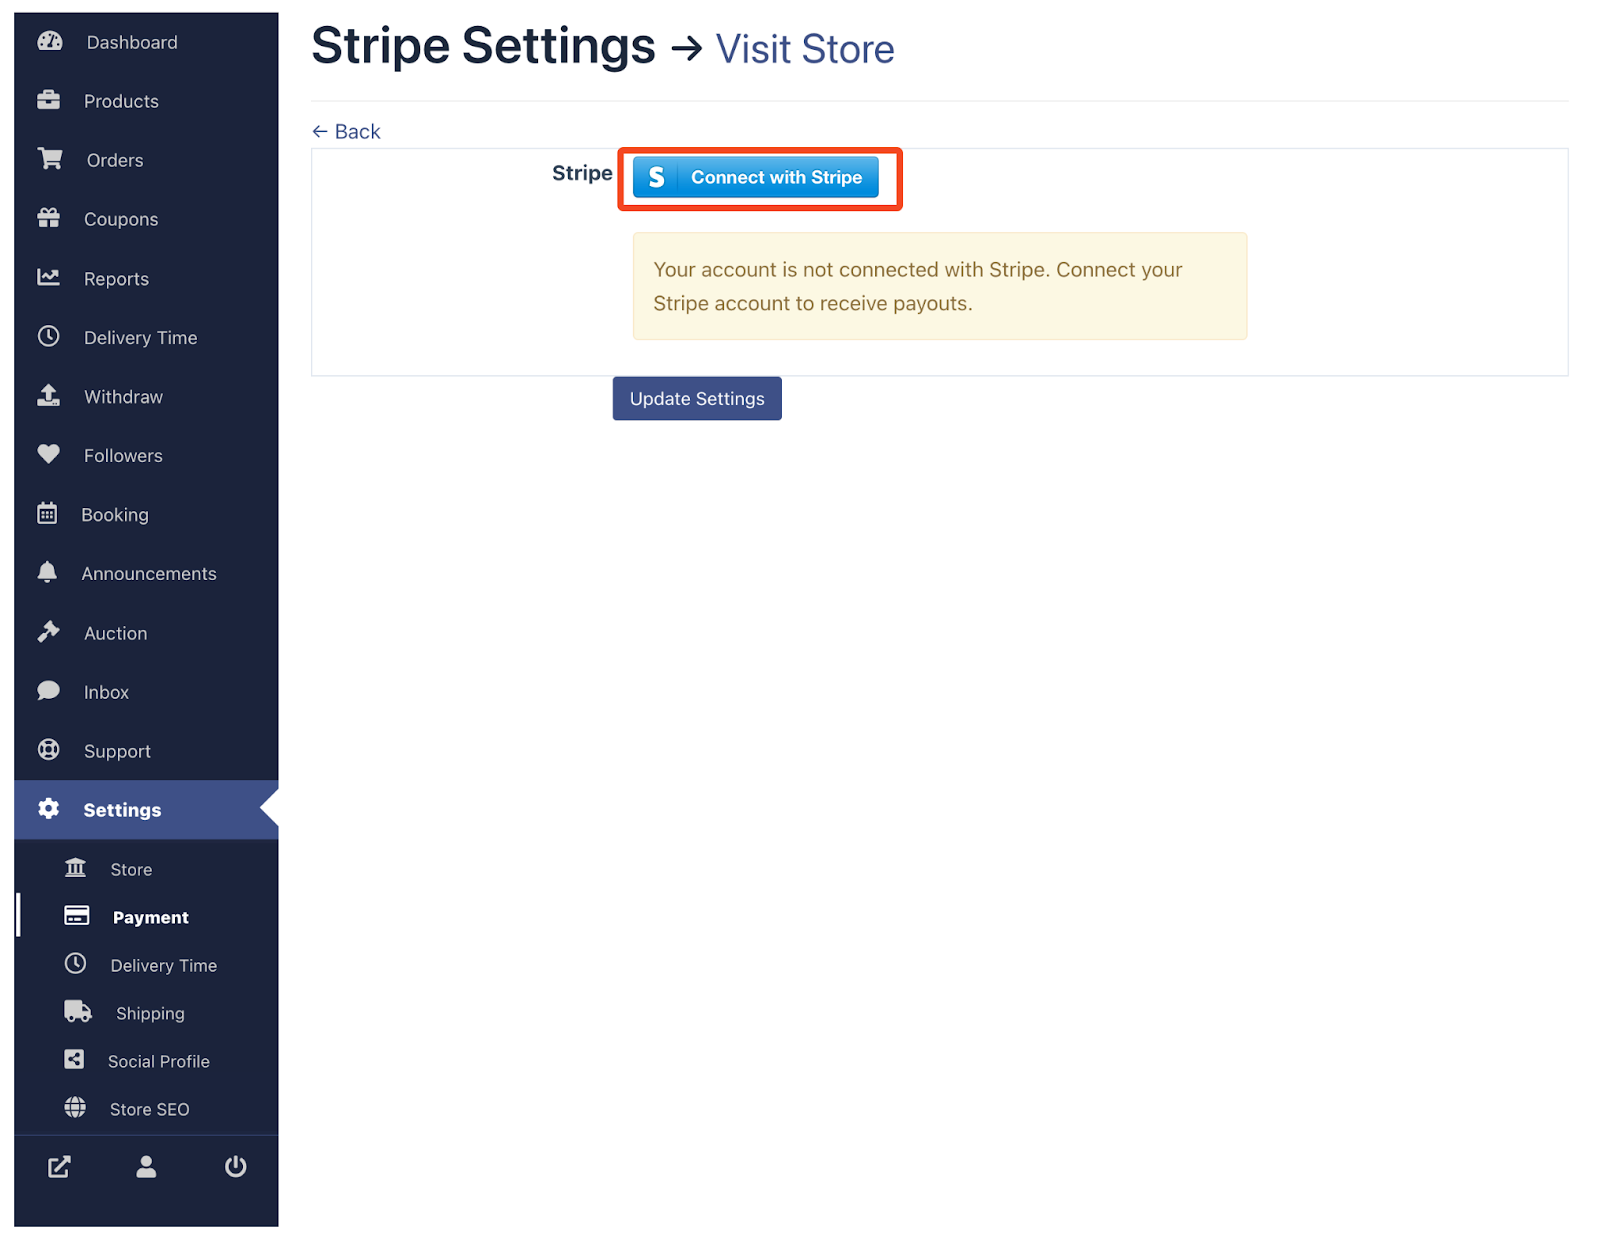
(Vendor) Stripe Login or Signup
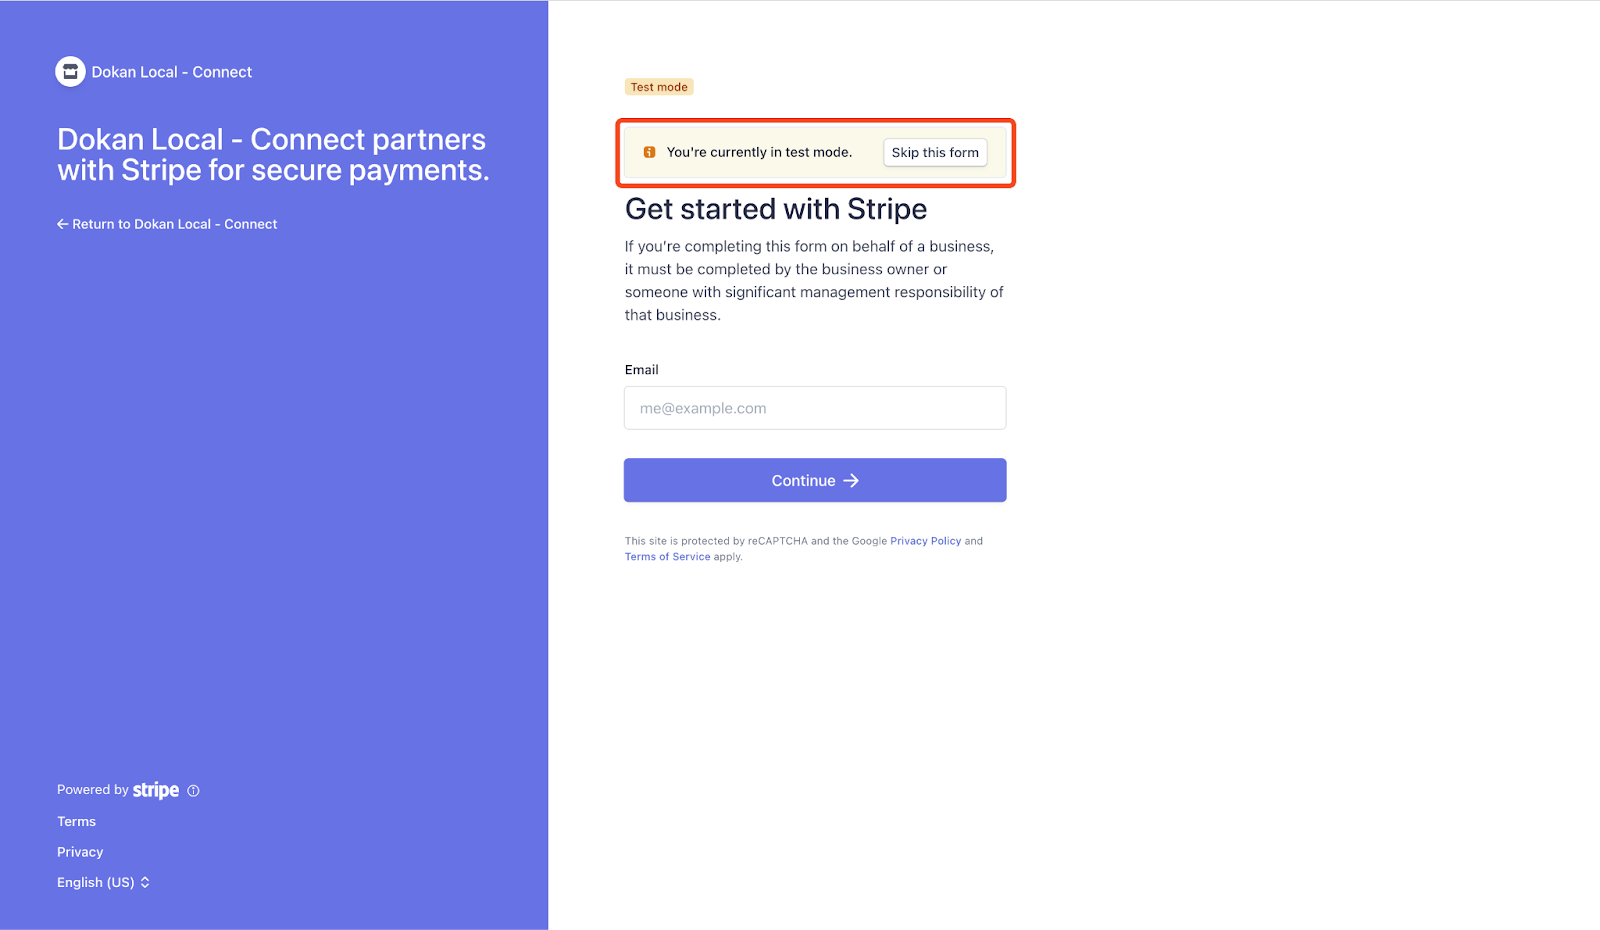
If you are in Test Mode, you will see an option to skip the stripe connect signup/login form.
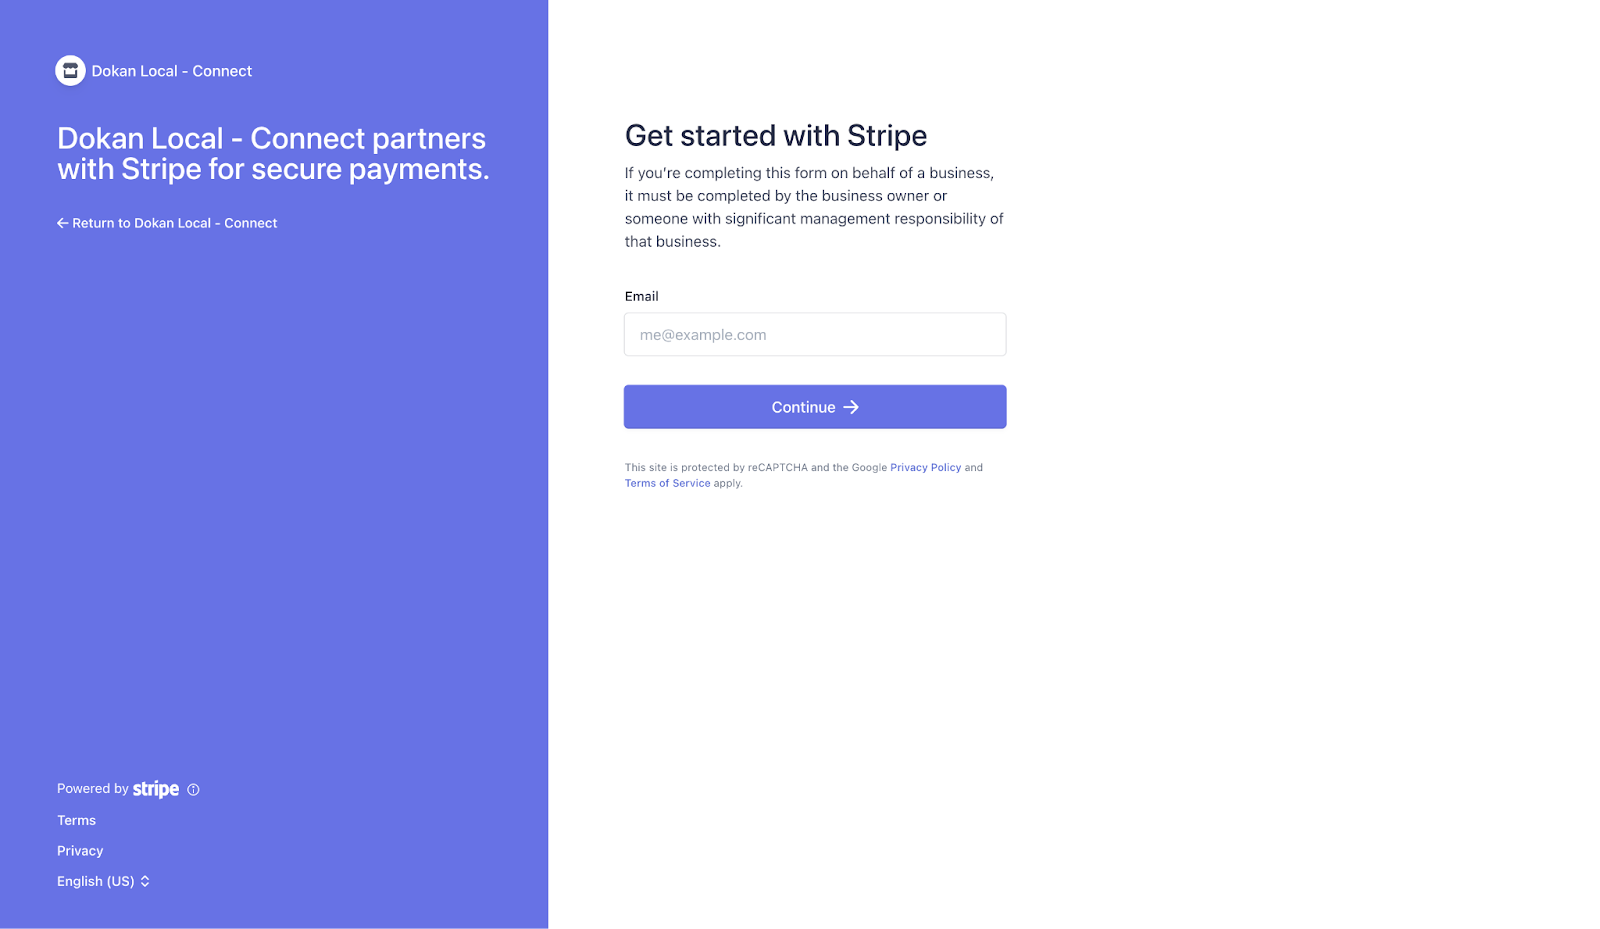
If you are in Live Mode, login with your stripe account or sign up if you don’t have one.
After a successful connection, you will be redirected to your store Payment Settings page.
The Dokan Stripe Connect option will state that it has been connected with Stripe, and you are done with setting up Dokan Stripe Connect to your store.
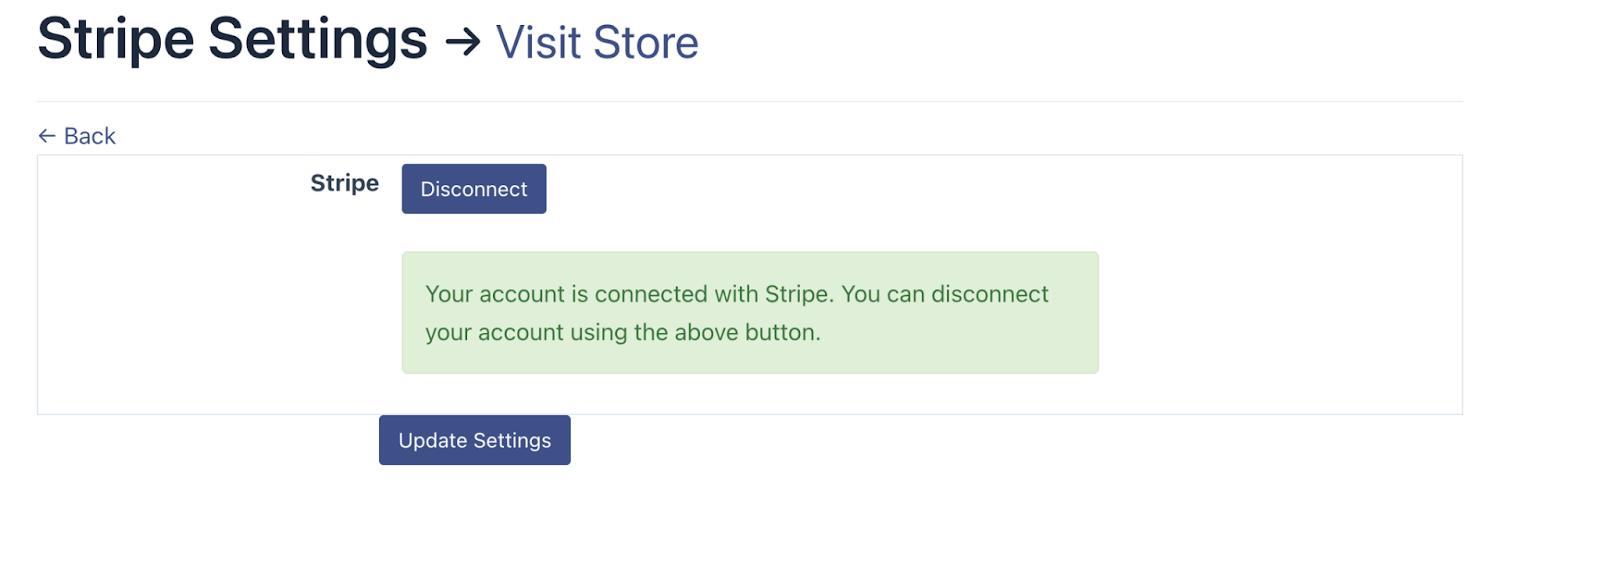
There is a disconnect button, which can be used to disconnect your account from this marketplace any time you want.
How Customers Pay with Dokan Stripe Connect
When a customer adds a product to their cart and continues to checkout, they will see all the available payment methods. If they select Dokan Credit Card (Stripe), a form will appear.
The form will ask for the credit card number, expiry date, and CVC. After entering the credentials, click on the Pay/Place Order button.
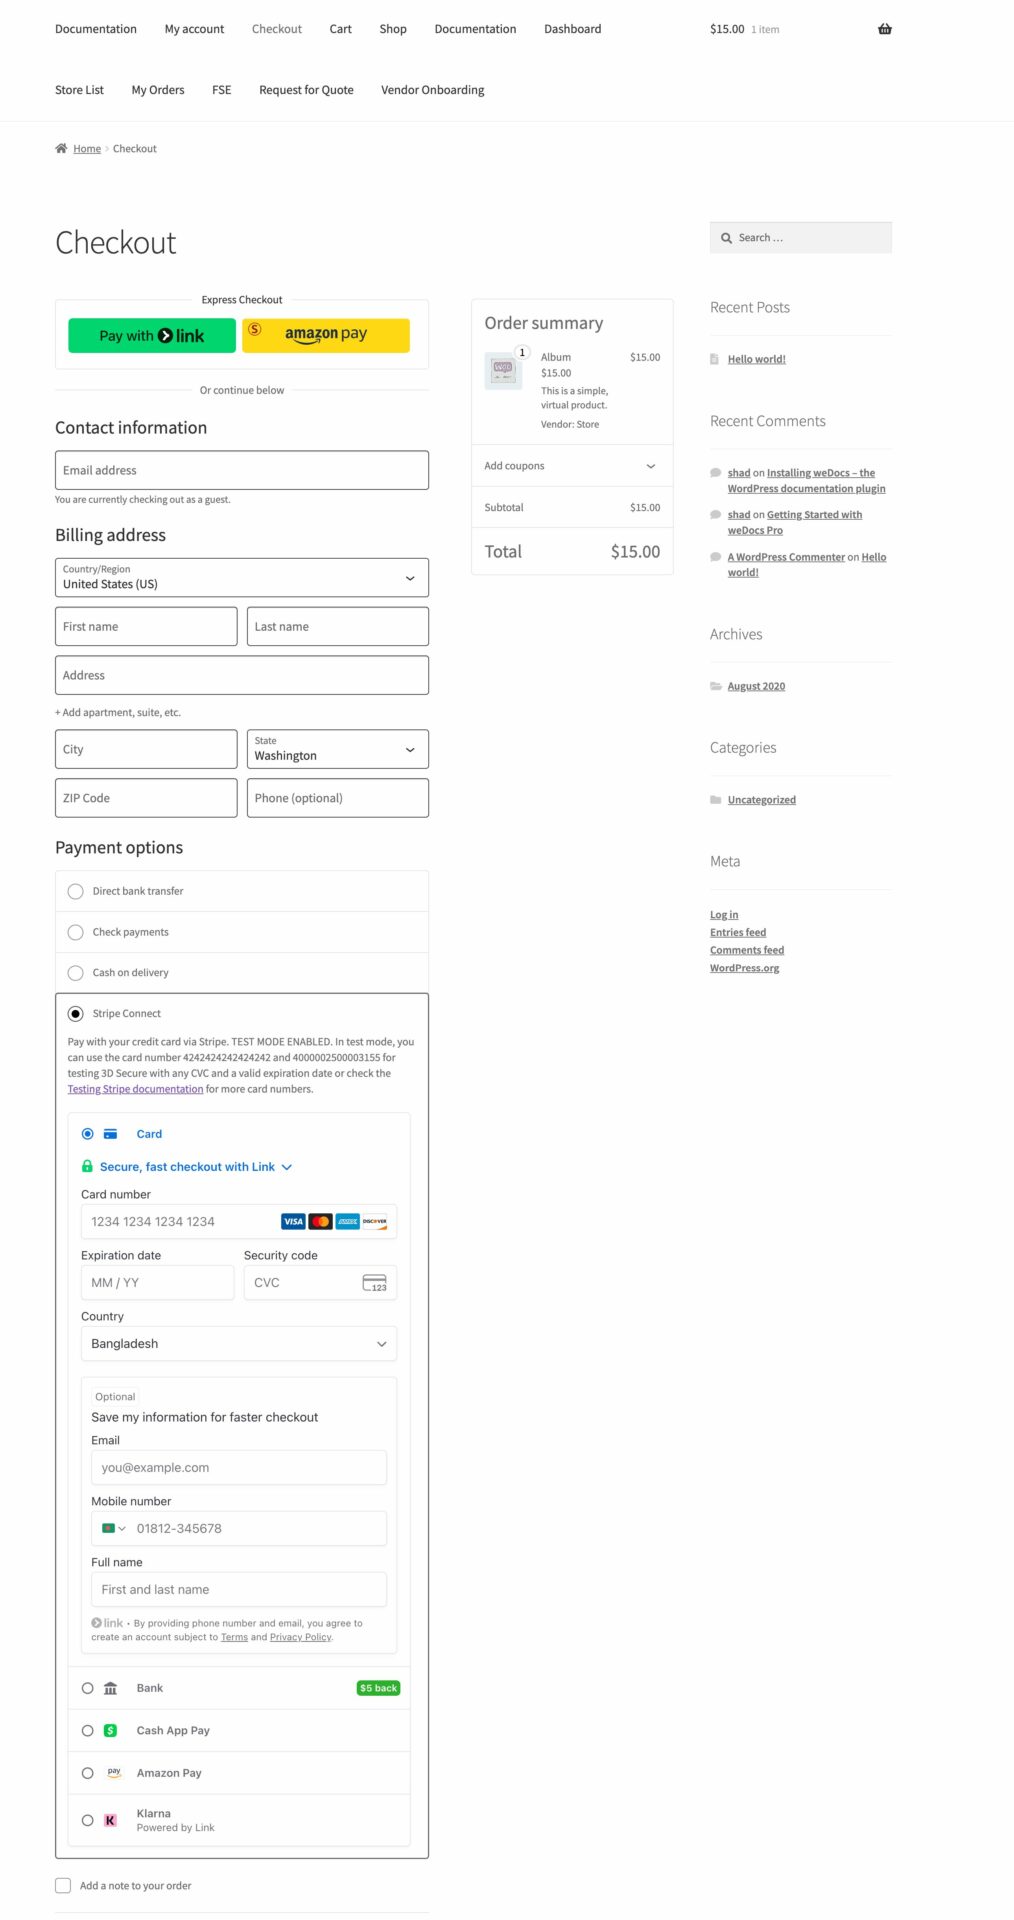
Note: The Dokan Stripe Connect module now supports Stripe Elements. Now you will get access to various payment methods-
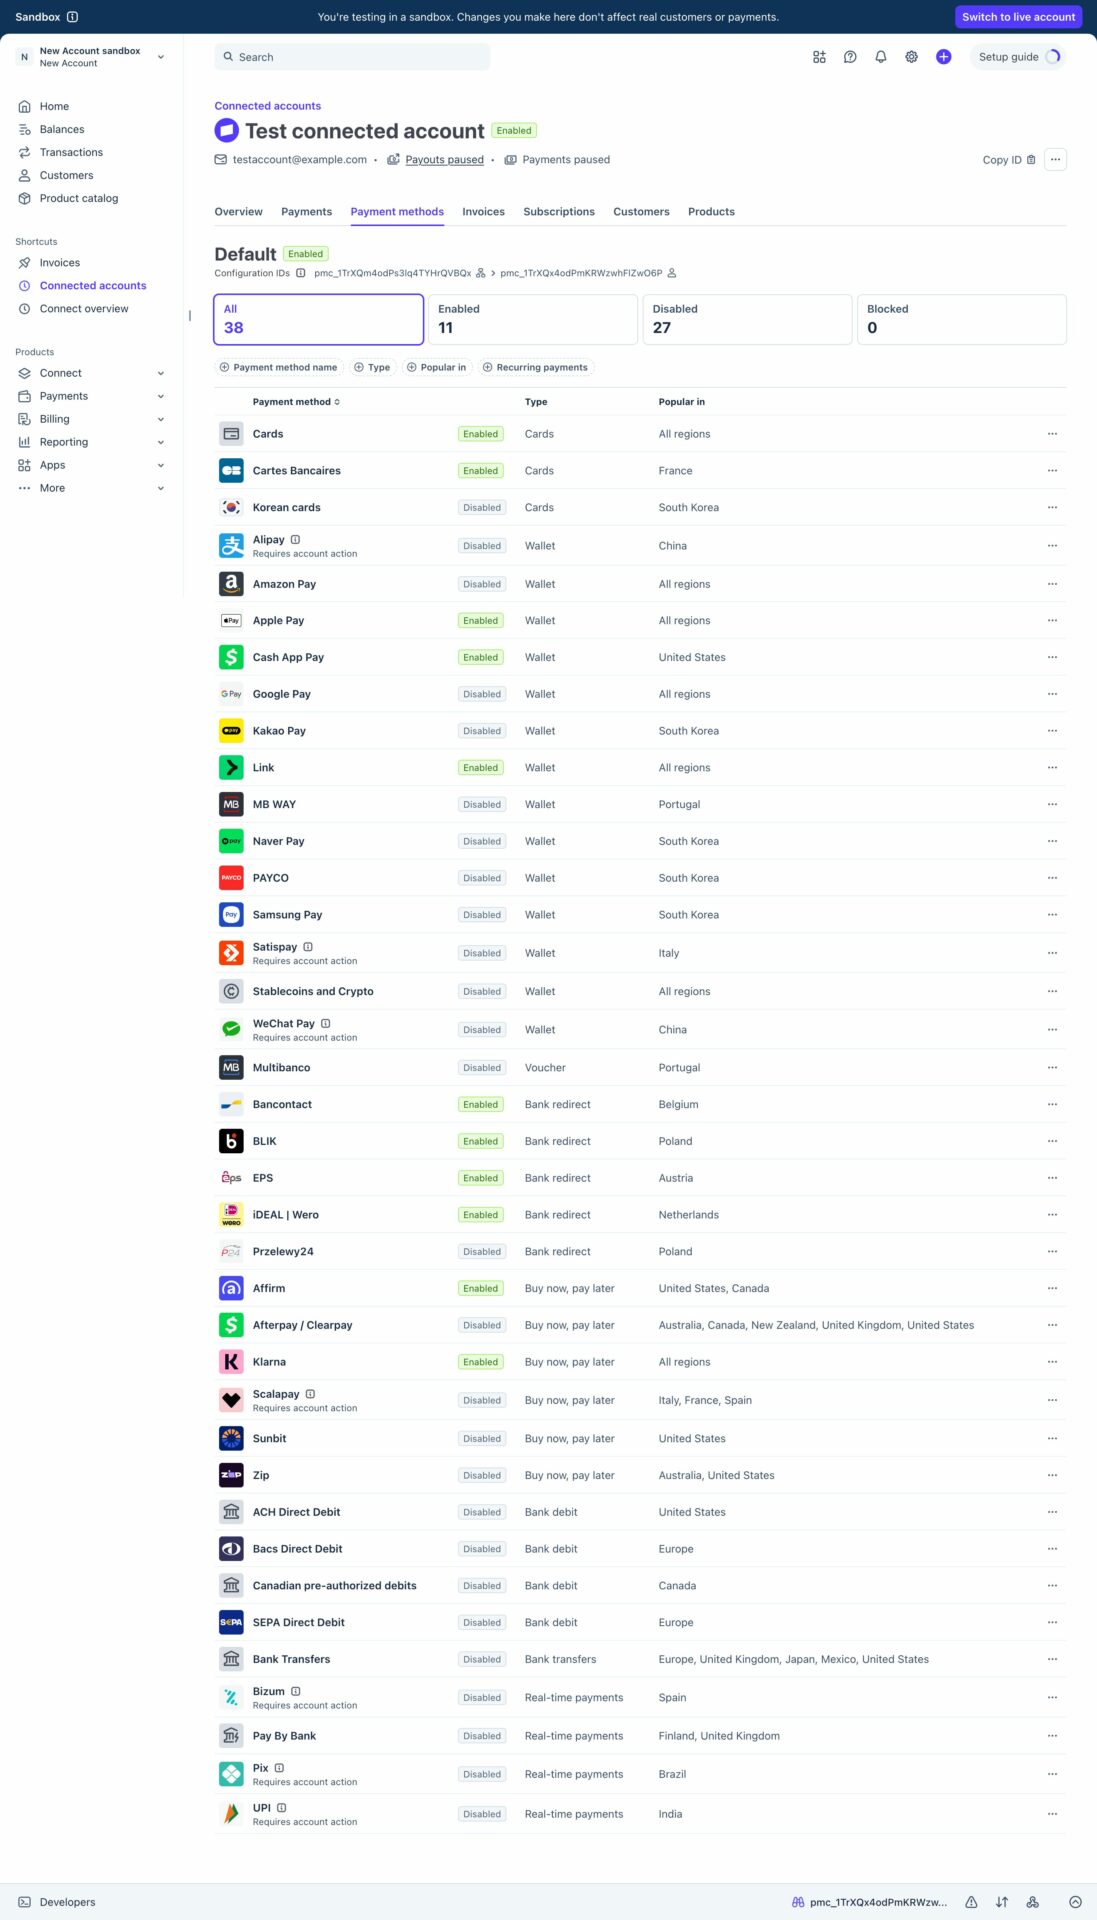
Also, users can use Google Pay, and Apple Pay along with block checkout support-
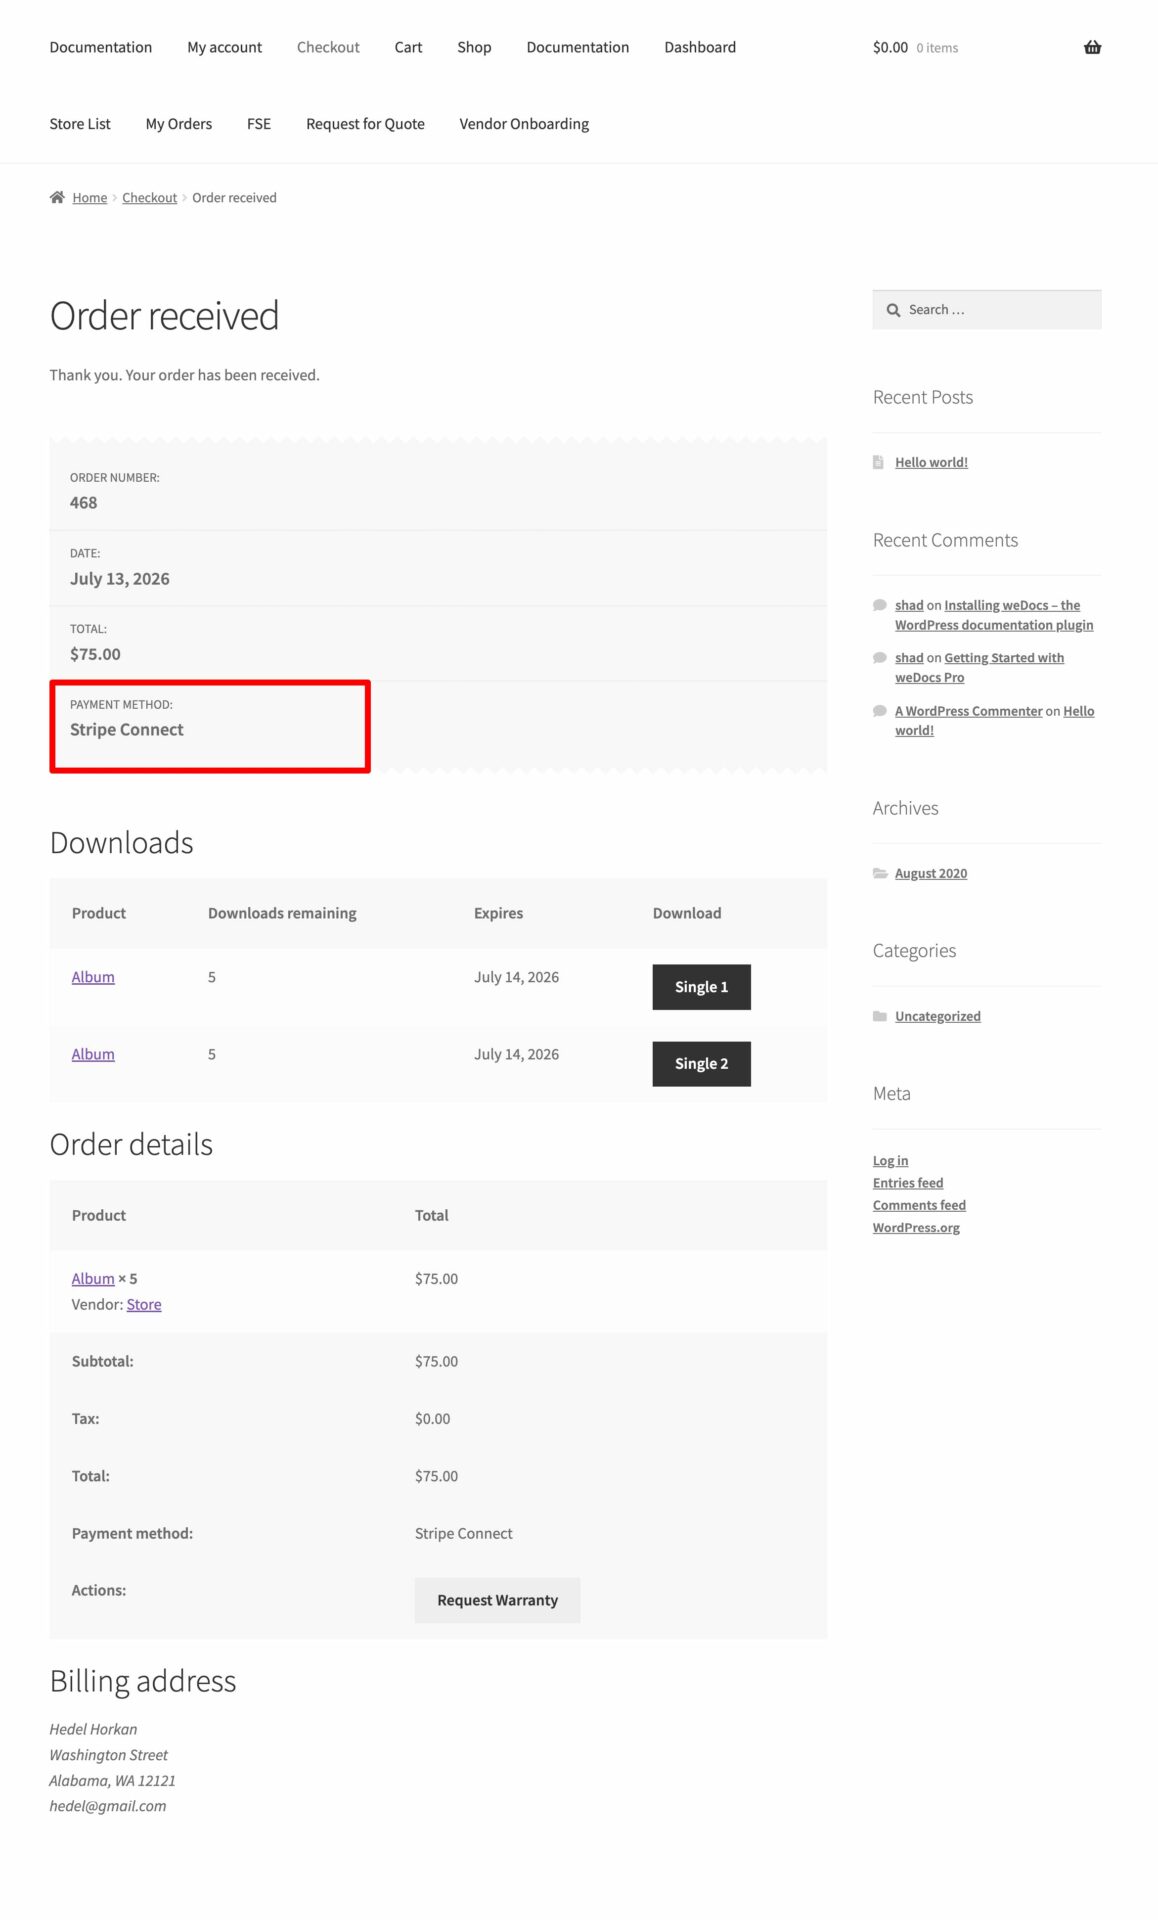
After payment, the order details will show the payment method as Dokan Credit Card (Stripe).
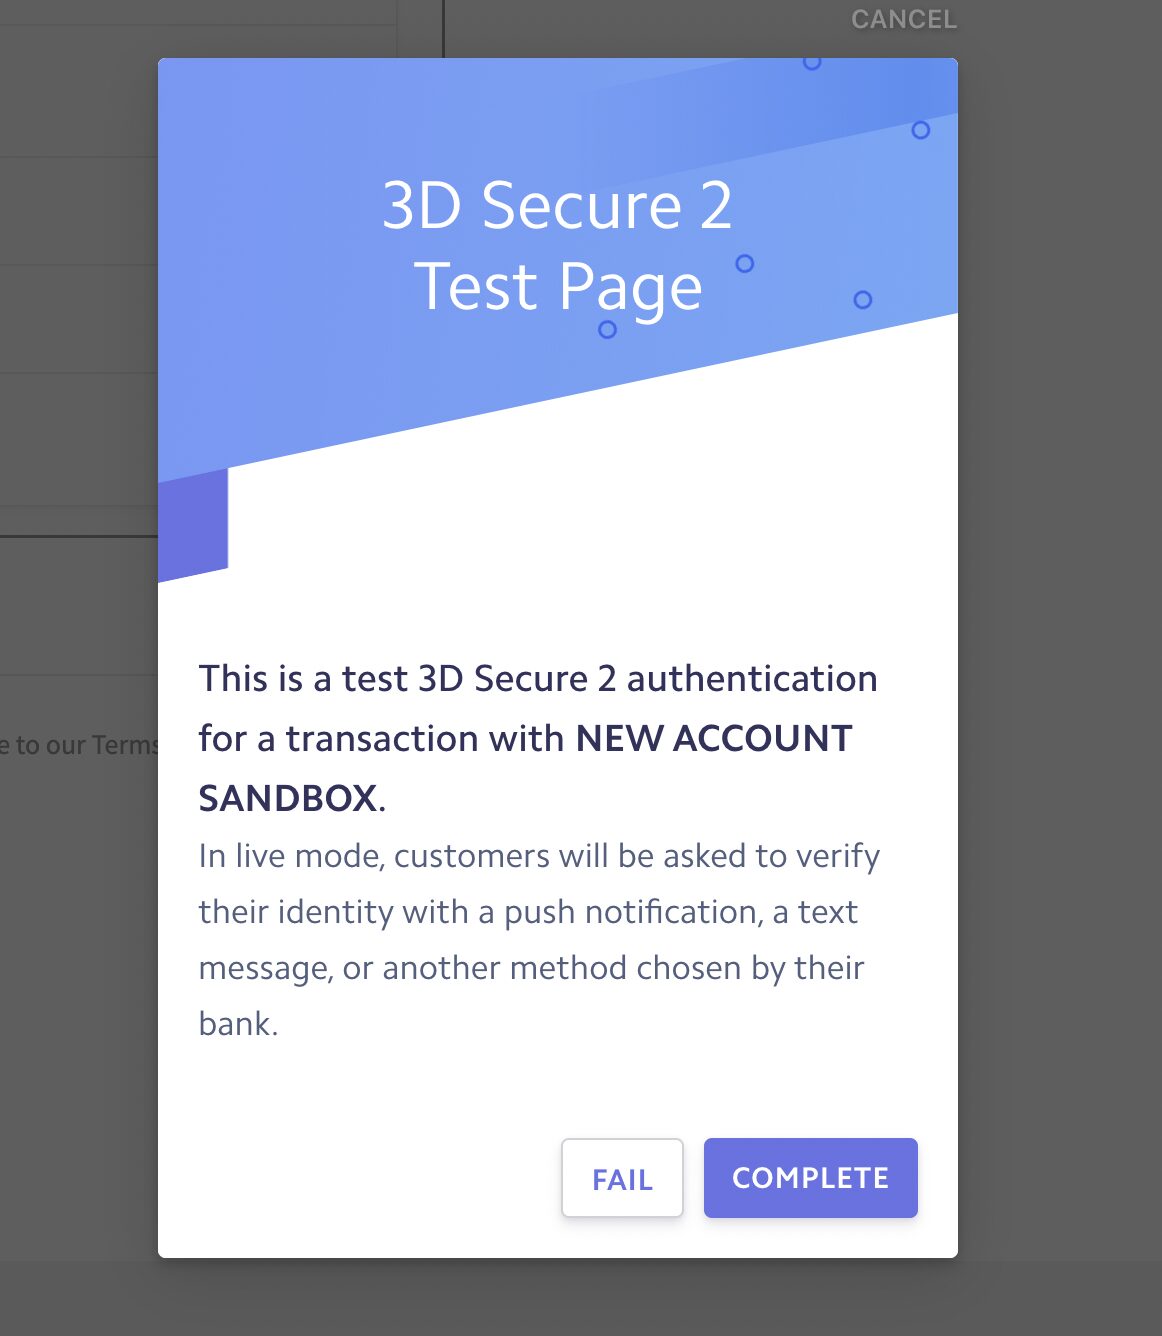
The Stripe 3D Secure & Strong Customer Authentication System (3DS mode)
In Stripe Connect, there are 2 modes. 3DS and non-3DS. For extra fraud protection, 3D Secure (3DS) requires customers to complete an additional verification step with the card issuer when paying. Typically, you direct the customer to an authentication page on their bank’s website, and they enter a password associated with the card or a code sent to their phone. This process is familiar to customers through the card networks’ brand names, such as Visa Secure and Mastercard Identity Check.
The Strong Customer Authentication(SCA) regulation in the European Economic Area (EEA) requires the use of 3DS for online card payments. 3DS is optional in other regions but you can still use it as a tool to reduce fraud.
How customers will pay with the 3DS mode?
If the feature is enabled, the customer will follow the normal purchase process. Customers will add to cart products and proceed to the checkout page to pay. Select Dokan Credit Card (Stripe) and put the card number, expiry date, and CVC.
After clicking on the Place Order/Pay Now button, a pop-up will appear. When the customer is paying, they will be asked to verify their identity with a push notification and a text message in this step. Next, the customer has to hit the “Confirm Payment” button to complete the payment.
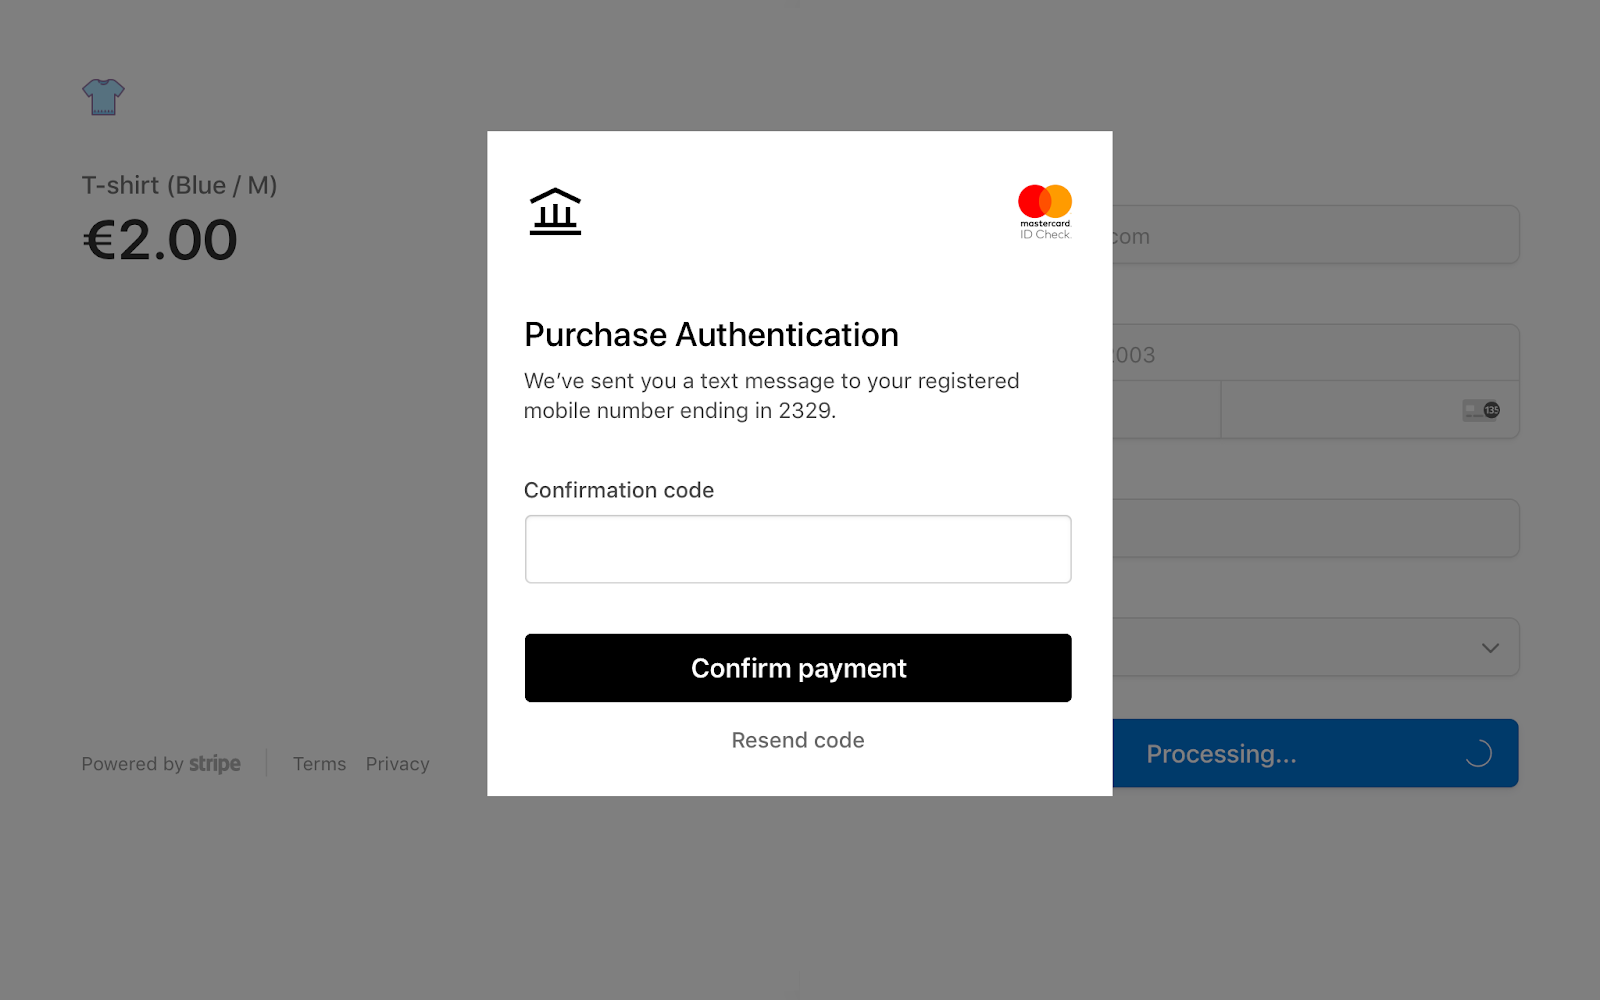
It is required to use a 3DS enabled Card to get/check a popup in the Test Mode.

Note: If somehow the pop-up does not appear in live mode, then you should take a look at this.
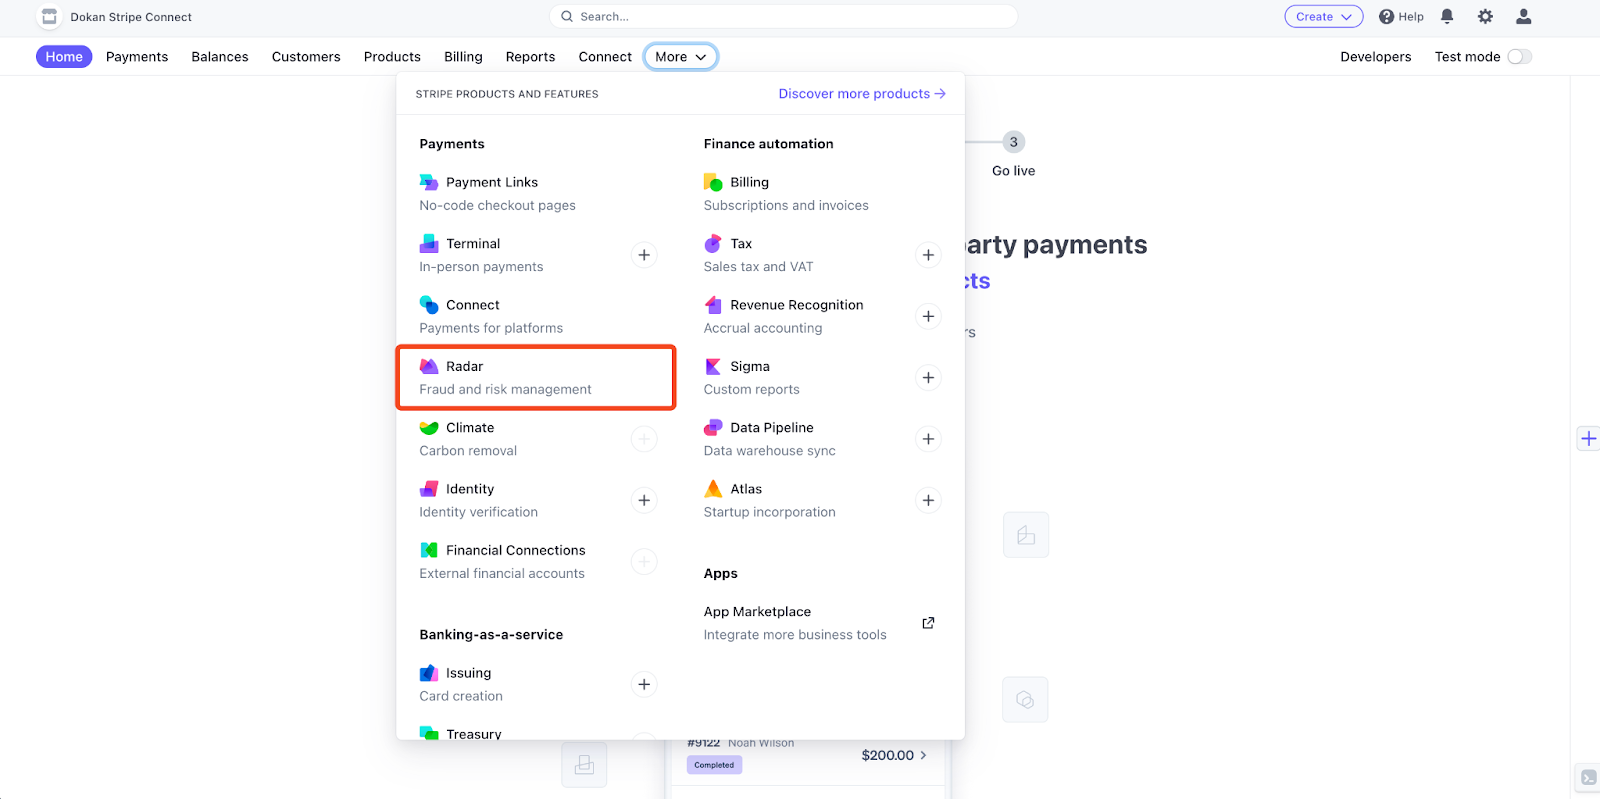
Table https://stripe.com/docs/testing#three-ds-cards. You will find some cards with Supported 3D usage. By default, using this type of card in both test and live modes, you will not have the authentication step during 3D checkout. You need to activate the Radar rules for this from your Stripe Dashboard.
Navigate to your Stripe > Connect dashboard. Click on the Radar option from More.
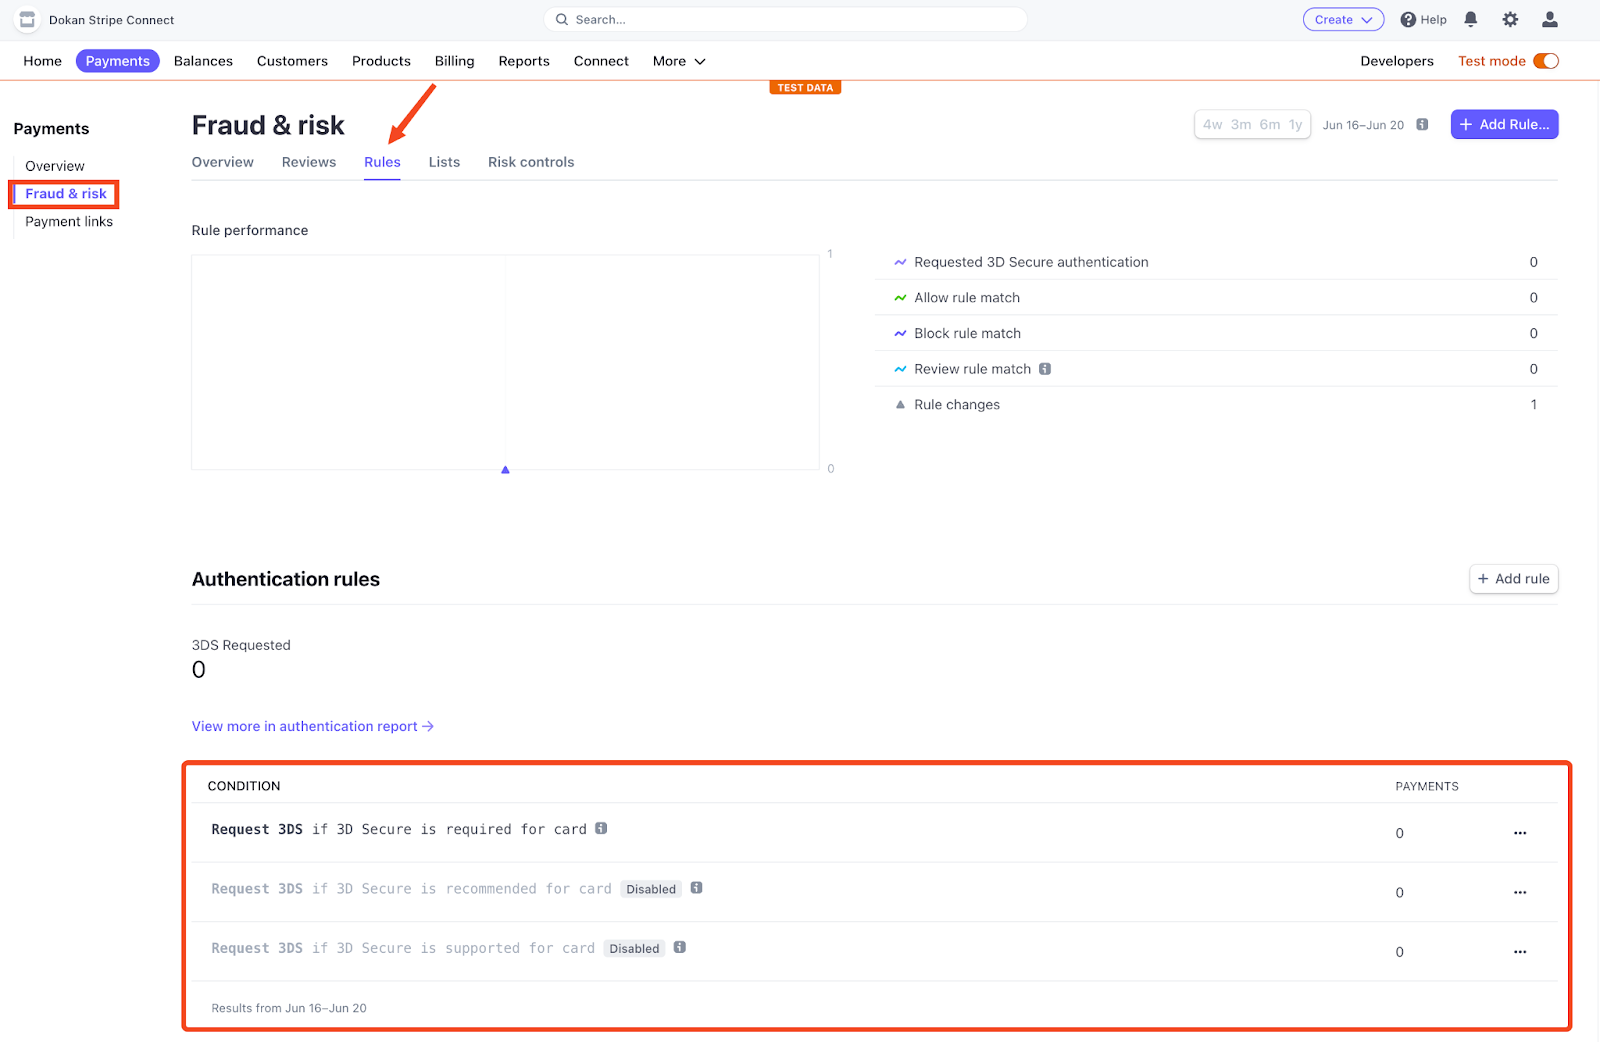
Next, Enable the option.
Finally, the order will be received by the admin as usual.
Automatic Refund for Stripe 3DS Mode
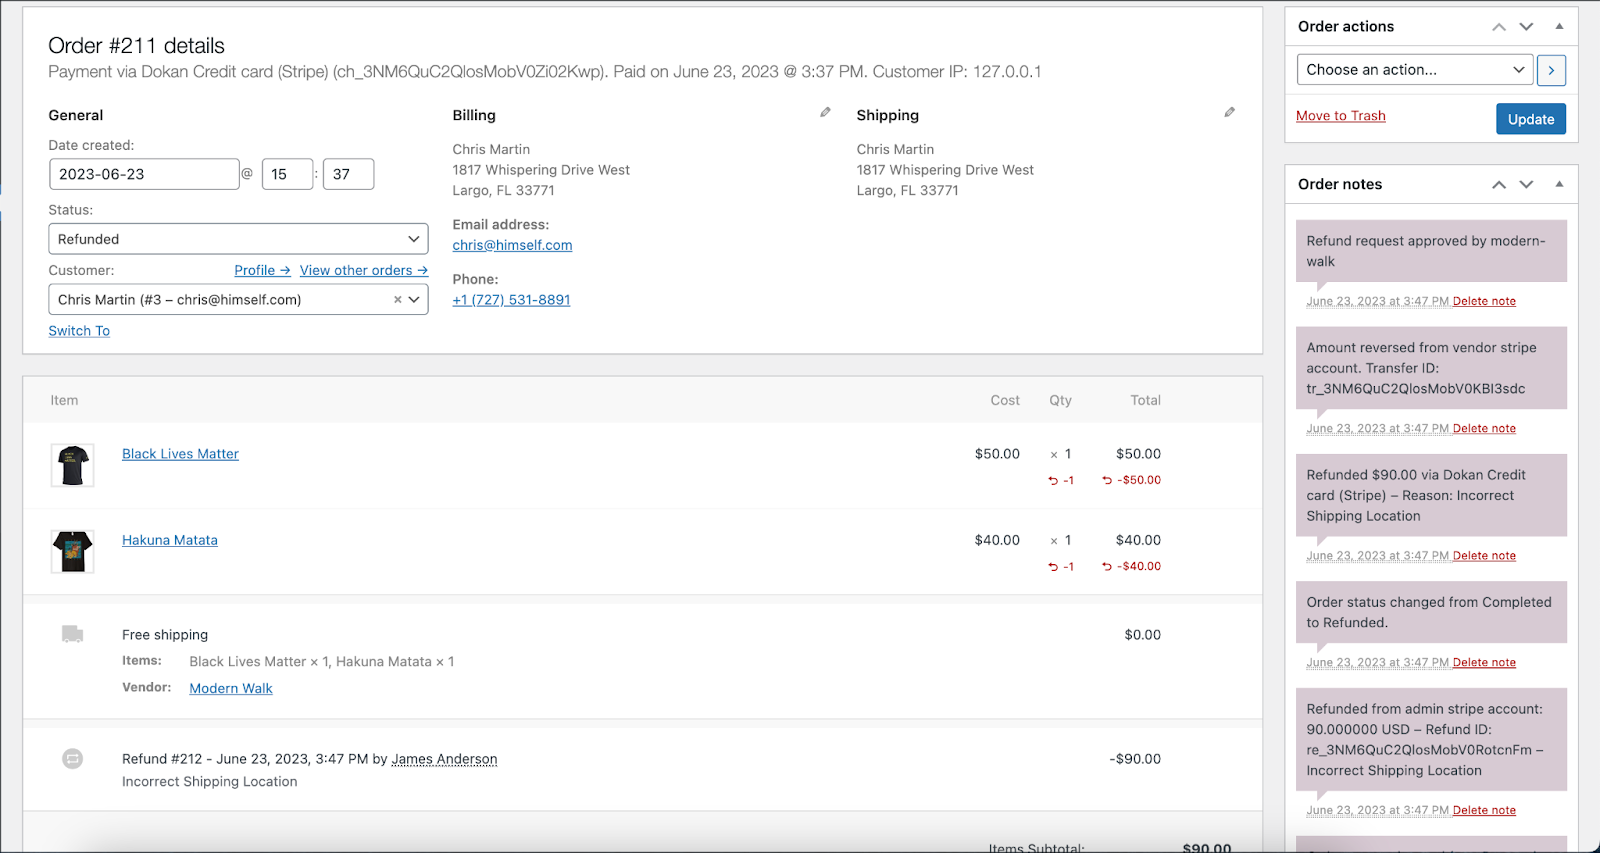
In Stripe 3DS mode, the site admin/marketplace owner is responsible for the customer payments, hence if a customer asks for a refund, this will be processed from the admin Stripe account.
Refunds will be processed in two steps. Firstly, the refund will be processed from the admin Stripe account. Secondly, the amount that was passed to the vendor for the corresponding order, will automatically be reversed to the admin Stripe account.
For example, a customer has bought two products ( $50 + $40) = a total of $90 from a vendor. When the customer completes the payment, that $90 will be added to the admin’s Stripe account.
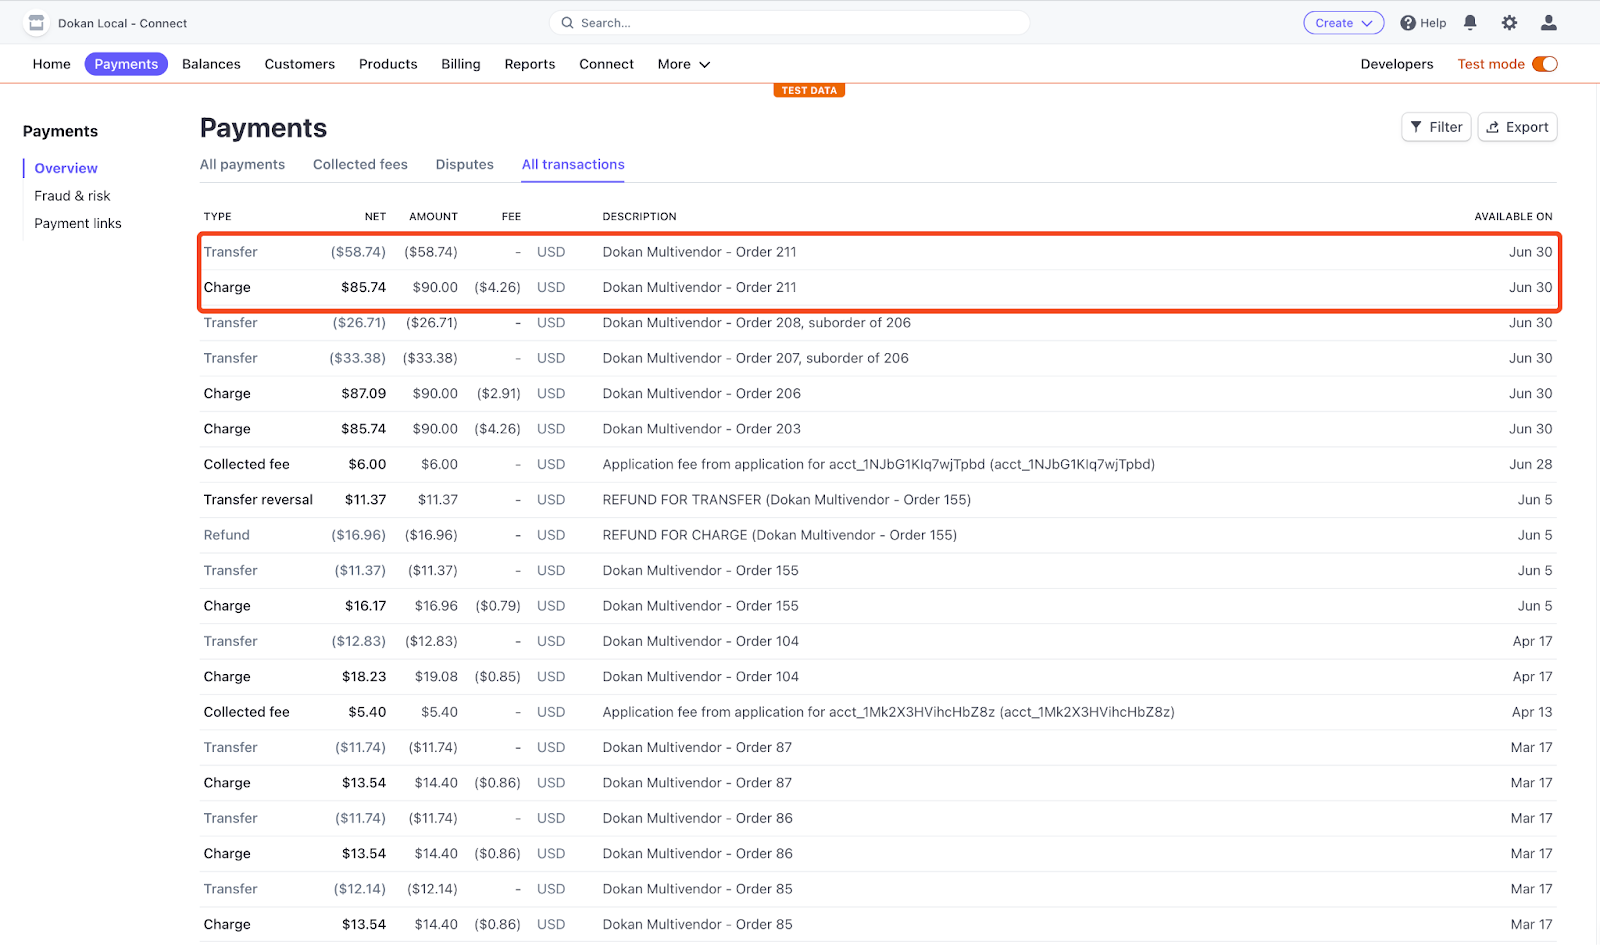
Suppose the admin has a 30% commission. So, after subtracting the admin’s commission ($90 * 0.3) = $27 and Stripe Processing Fee (gateway fee, in settings Gateway fee, will be paid by vendors was selected) ($4.26), $58.74 will be transferred to the vendor’s connected Stripe account.
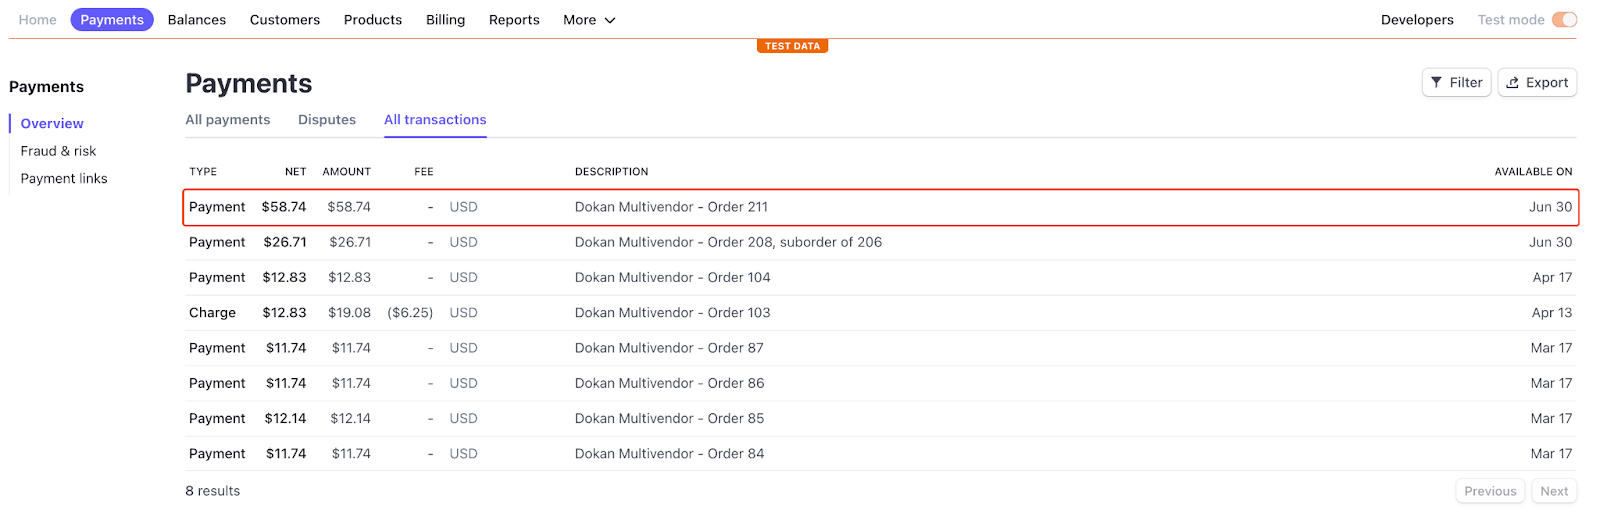
Now, when the customer asks for a refund, initially the amount ($90) will be refunded from the admin’s Stripe account.
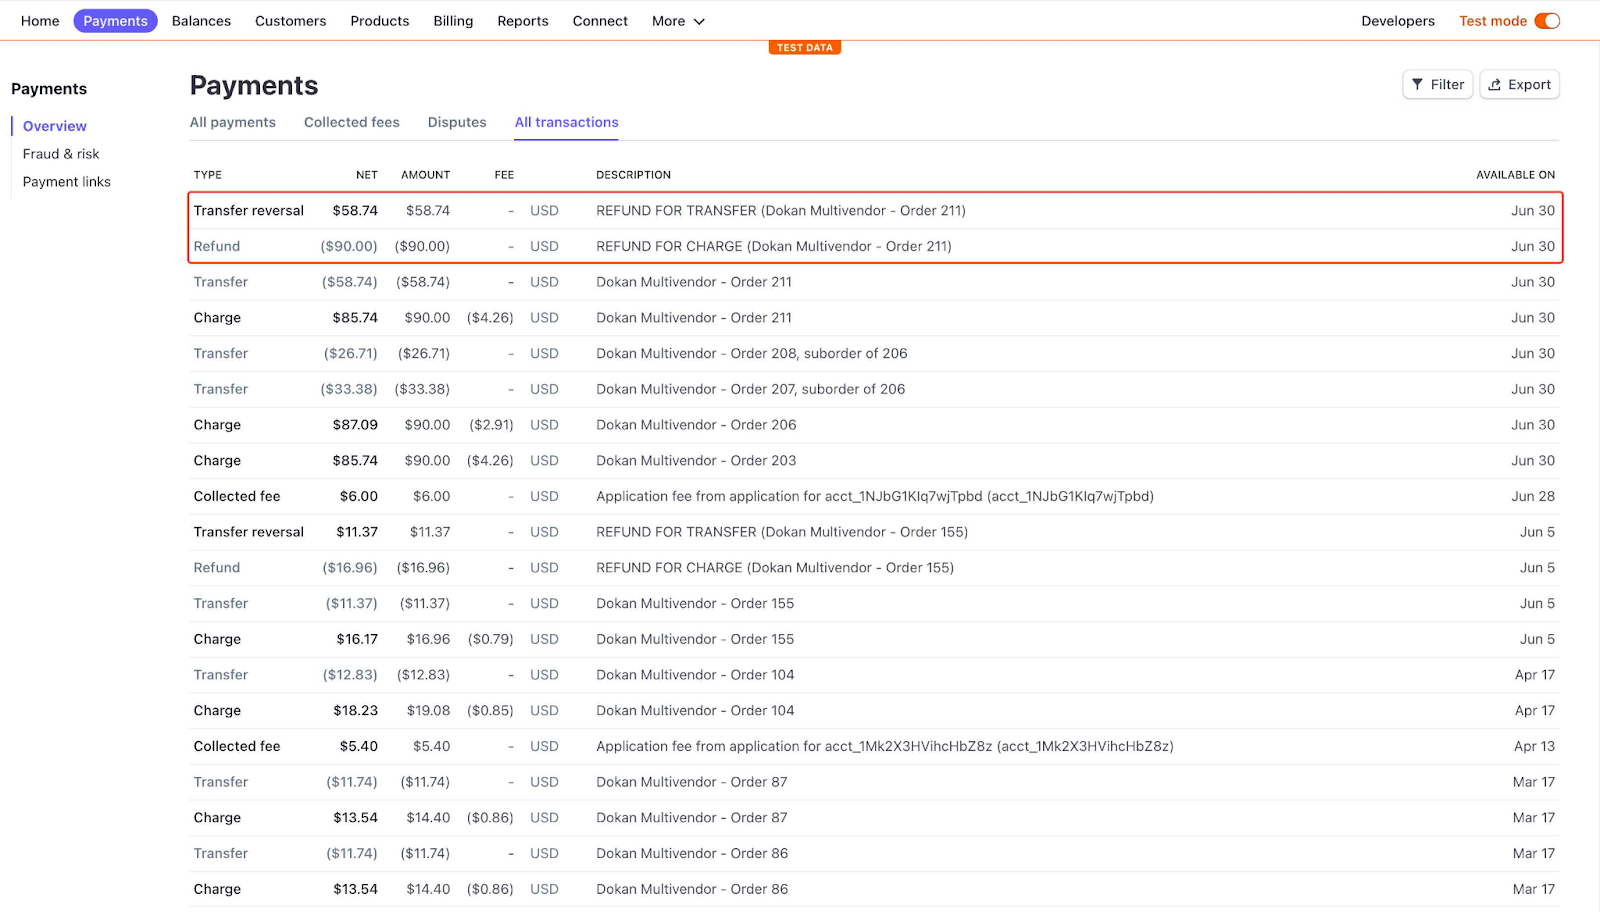
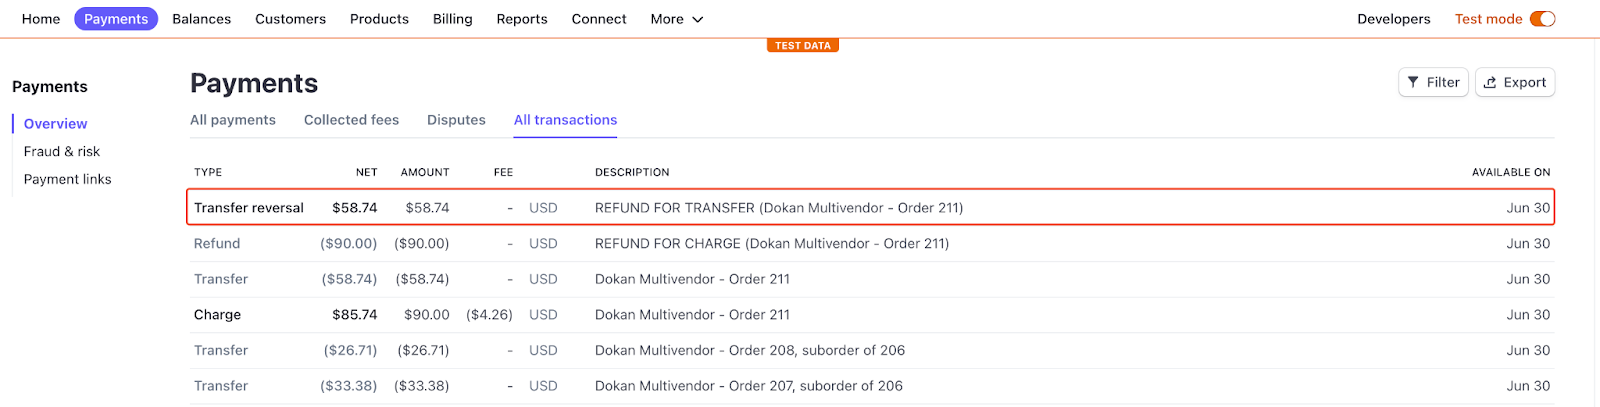
Then the amount will be reversed from the vendor’s Stripe account.
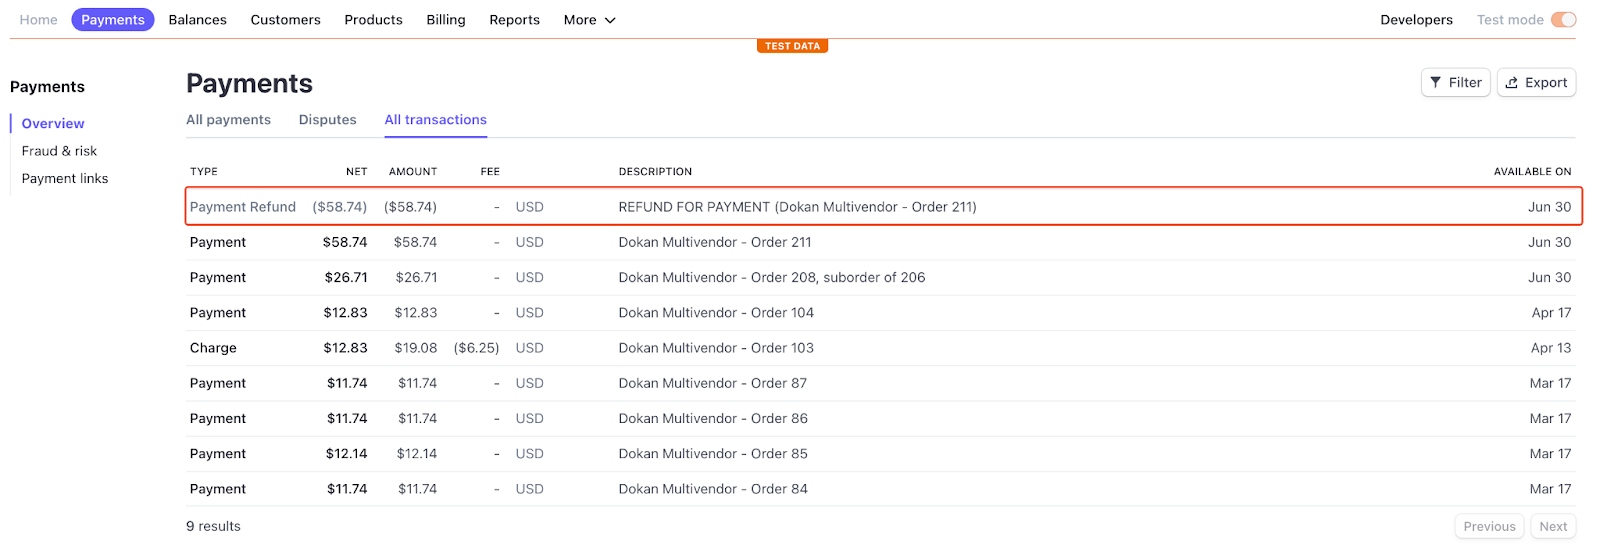
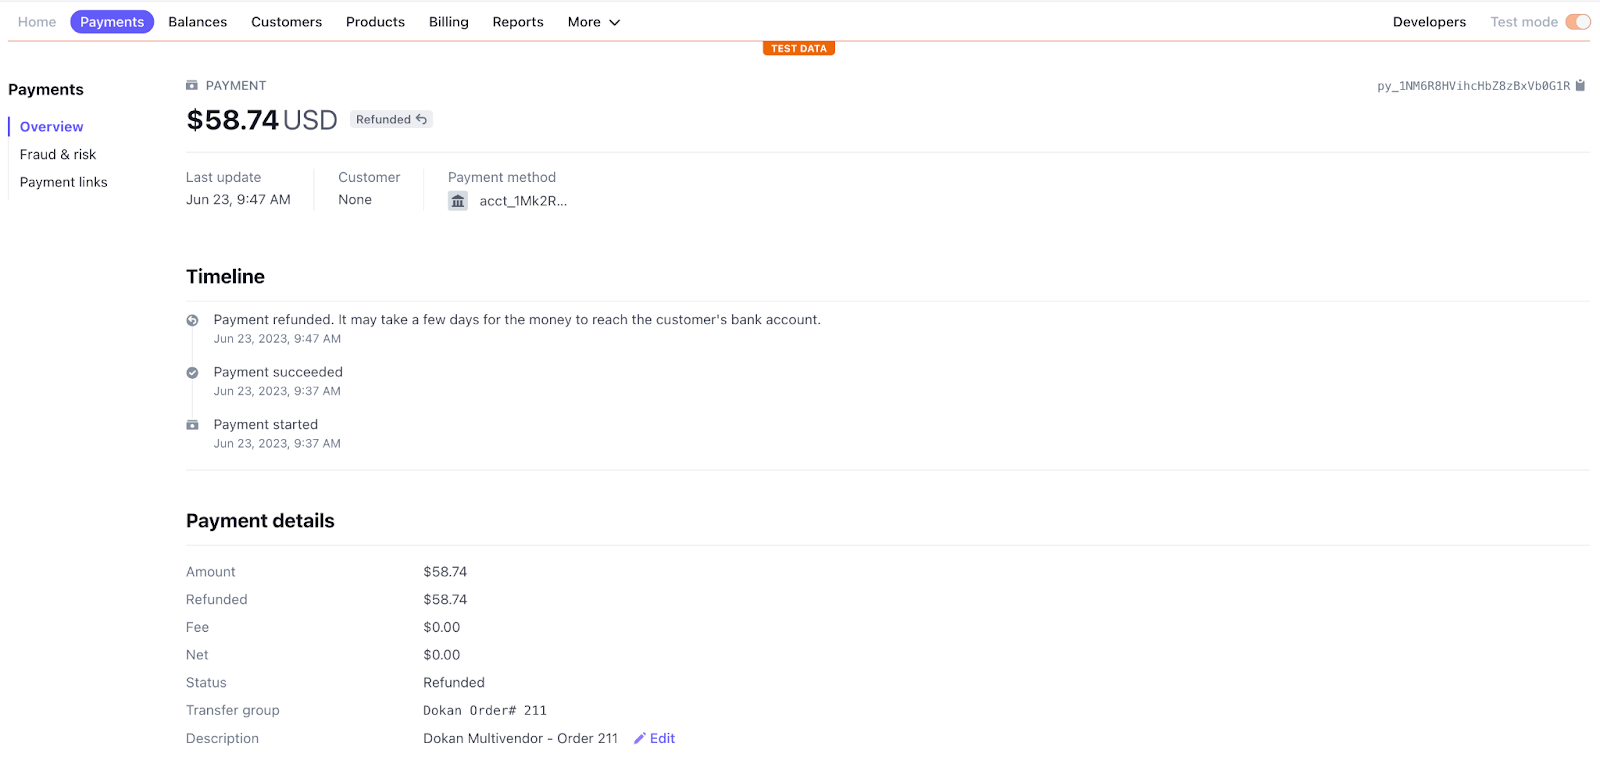
In our case, $58.74, will be automatically reversed from the vendor’s Stripe Account. It will be named withdrawal.
Note: If there are not enough funds available in the admin’s Stripe account, the automatic refund will be failed, and an order note will be added explaining the reason for the failed refund, and admin needs to process this refund manually. As usual, there will be a new record under Dokan > Refund with requested refund details.
In case of insufficient funds in the account of the vendor(s), the refund will be processed from the admin Stripe account. A new order note will be added stating that the transfer reversed was not successful, explaining the failure reason. Also, that amount will stay as a negative amount in the vendor’s balance that will be adjusted with the future orders of the vendor.
Stripe Connect APIs’ and Charges’
There are 2 types of APIs has been used in Dokan Stripe Connect integration.
- Charges API = Used in non-3DS/normal mode
- Payment Intent API = Used in 3DS mode
The Charges API (non-3DS mode) does not have any charge types. It will work as explained in their documentation.
The Payment Intent API (3DS mode) has three types of charges. They are,
- Direct charges,
- Destination charges and,
- Separate charges and Transfers.
In the 3DS mode of Dokan Stripe Connect, we have used Separate charges and Transfers charge type. In a marketplace, multiple users/vendors involvement is an obvious case and only this charge type allows involving multiple users in a transaction.
It is important to note that Direct Charge cannot be used in a marketplace. Moreover, the Destination Charge only supports a single user in a single transaction. Hence, we have utilized the Separate charges and Transfers charge type. A comprehensive detail can be found in the charge type doc of Stripe.
Description & Metadata
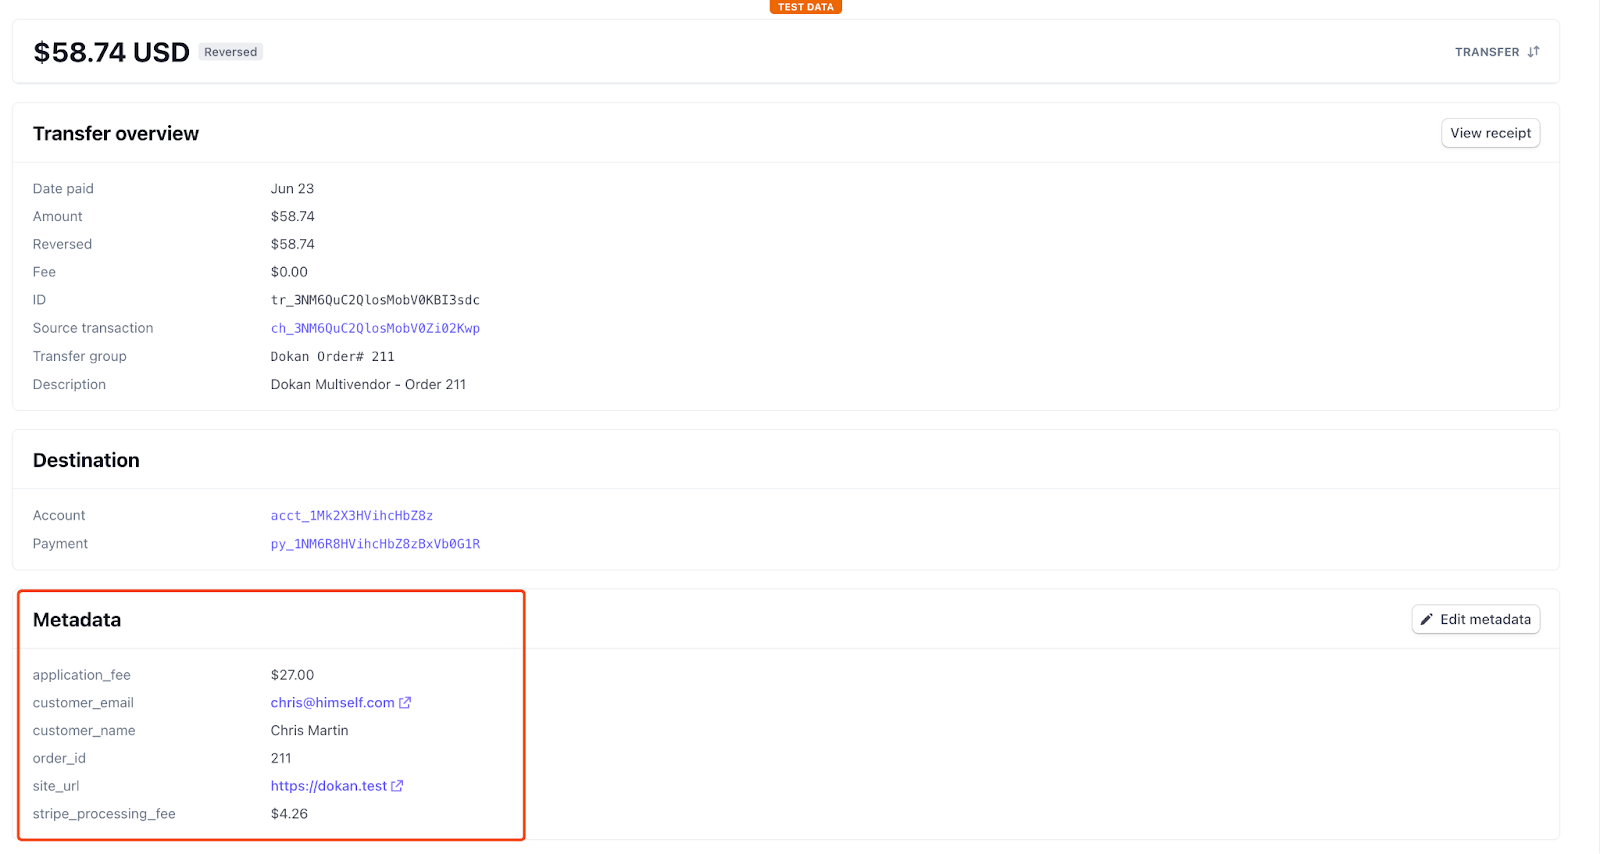
In 3DS mode, we have added descriptions and metadata to each transfer made to the vendors so that the vendors and admins can easily track the orders made on their Stripe accounts.
If you click on an order,
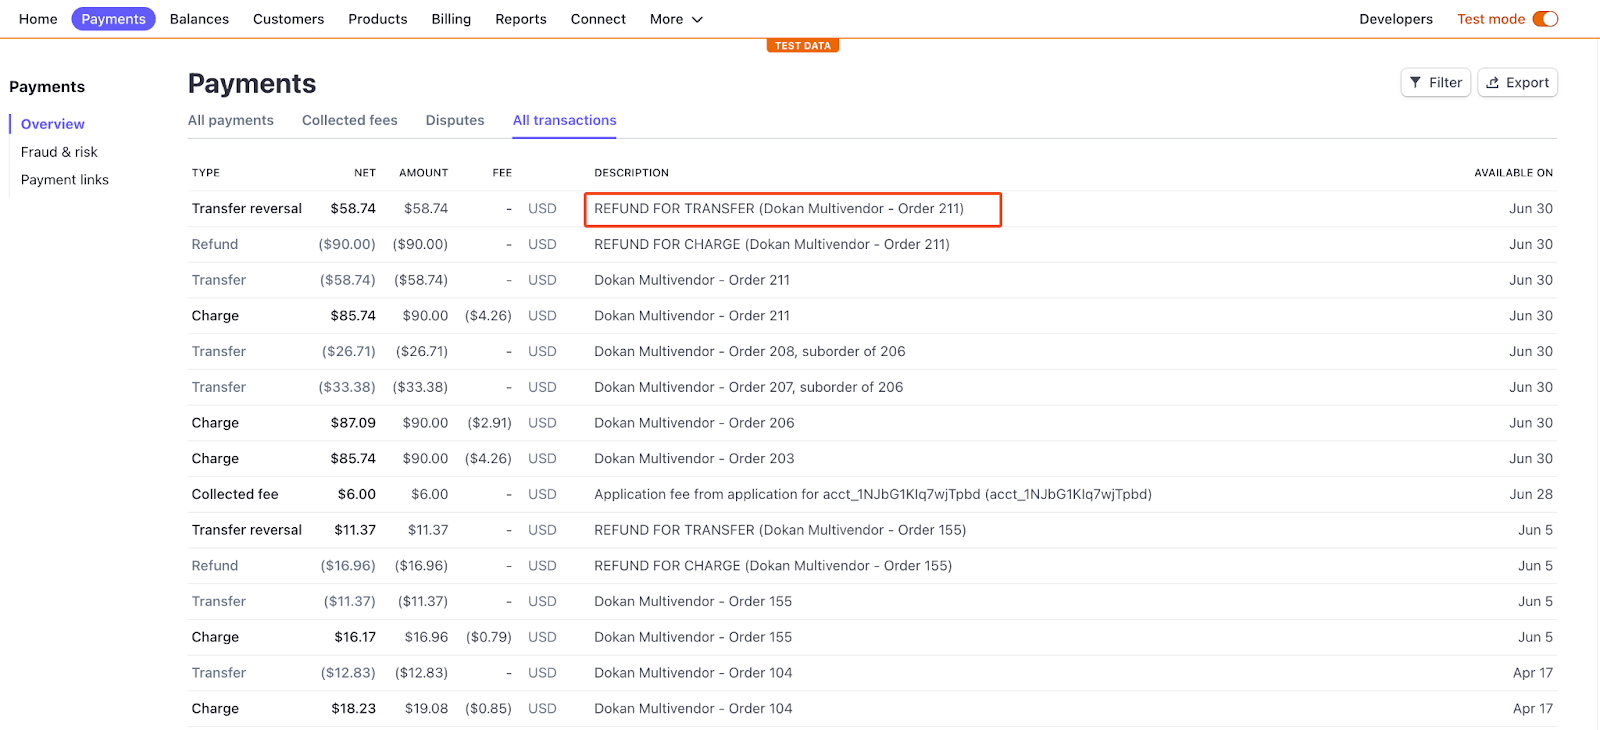
You will find all the order details there.
In the case of a vendor, he/she can search for the same order in their stripe account using the Order ID or Order Number.
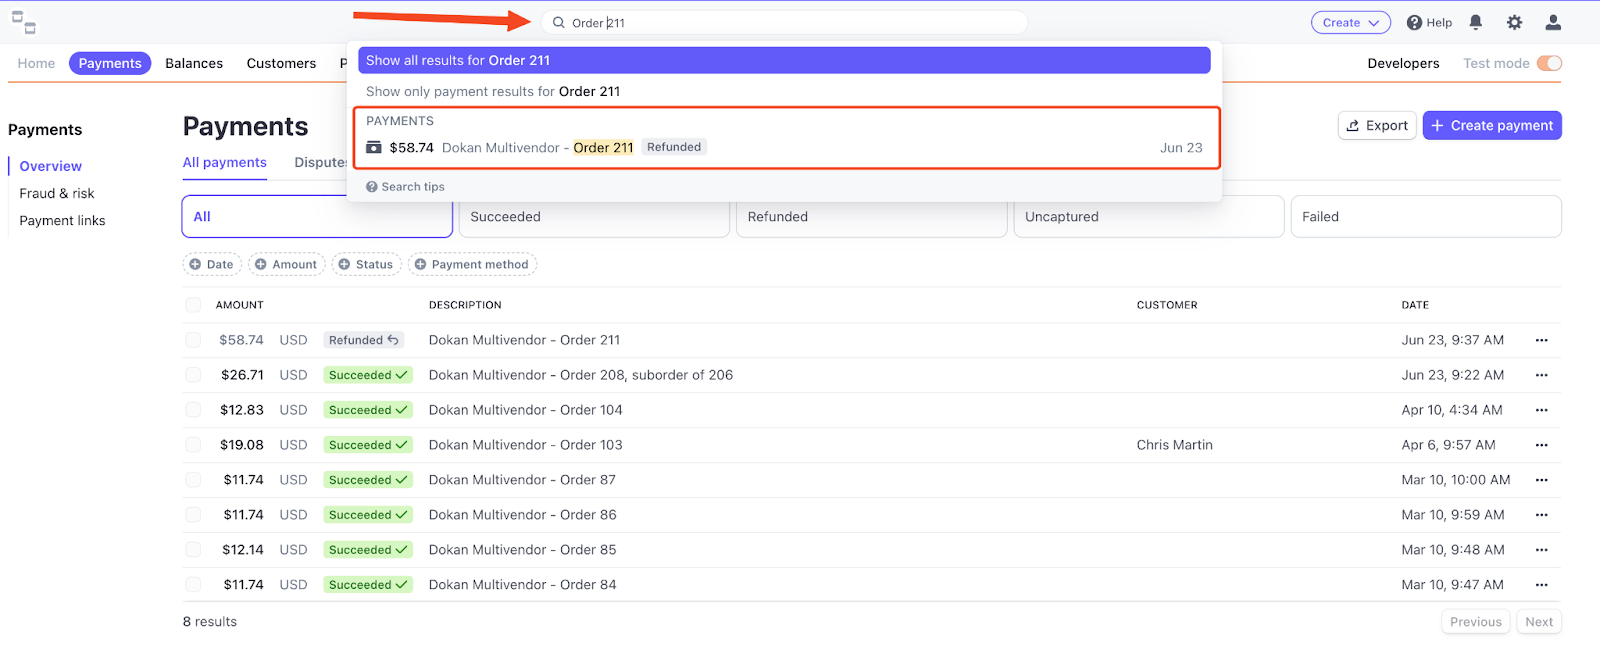
They will see the same details.
This is all about the details of the Dokan Stripe Connect payment gateway.