
Are you thinking of creating an online used items marketplace with WordPress? Great choice!
Online used items marketplaces are becoming increasingly popular, as people look for ways to save money and reduce their environmental impact. Also, WordPress is a great platform to create an online marketplace. It’s easy to use, customizable, and has a large community of developers and users to ask help for.
In this blog post, we will guide you through the exciting process of building a thriving used items marketplace from scratch using WordPress and the Dokan multivendor plugin.
From understanding the market size and possibilities for newcomers to practical tips on setting up your WordPress-powered platform, we’ve got you covered. So, let’s get started!
Used Items Market Size and Possibility for a New Comer
Before you roll up your sleeves and get started with your secondhand products marketplace, it’s essential to understand the size of this market and what’s in it for a newcomer like you.
First things first, let’s talk numbers. The used items market is BIG. Really big. According to a report by Statista,
The global second-hand market is estimated to reach a whopping $64 billion by 2024.
That’s a treasure trove of opportunities waiting to be explored.
Now, you might be wondering, “What’s the possibility for a newcomer in this vast market?” Well, here’s the good news: the second-hand market is incredibly diverse, and there’s room for everyone.
Here’s why:
- Consumer Shift: People are becoming more environmentally conscious and budget-savvy. They’re turning to second-hand items as a sustainable and economical choice. That means a growing pool of potential customers.
- Niche Markets: You don’t have to be a giant corporation to make your mark. Specialize in a niche – vintage clothing, rare collectibles, or refurbished electronics – and you can carve out your own loyal customer base.
- Local Focus: Consider starting small by focusing on your local community. Many buyers prefer dealing with nearby sellers which gives you a competitive edge in your area.
- User-Friendly Platforms: Thanks to platforms like WordPress, creating your marketplace has never been more accessible. You don’t need to be a tech wizard to get started.
- Community Building: Building trust and a sense of community is key in the second-hand market. As a newcomer, you have the advantage of creating a fresh, customer-centric brand that resonates with users.
So, it’s safe to say that with the right approach, a user-friendly WordPress website, and a passion for your niche, you can tap into this thriving market and build a successful second-hand products marketplace.
So, are you ready to get started? Let’s make it happen!

Subscribe to
Dokan blog
Build Your Online Used Items Marketplace in 5 Steps

As we said earlier, WordPress has made the process easier to create online multivendor marketplaces. You can simply follow these 5 steps to create your own online used items marketplace:
- Install and Activate the Dokan Multivendor Plugin
- Choose and Install a Dokan Compatible Marketplace Theme for Your Site
- Configure the Basic Settings of the Dokan Multivendor Plugin
- Set up Your Admin Store
- Allow Vendors to Sell on Your Site
Just a heads up: To continue with this tutorial, you’ll require a ready WordPress website. If you don’t have a ready WordPress site, you can follow these blogs to get your job done:
- Get the Best Hosting to Keep Your Site Performance High and Rocking
- How to Install WordPress on cPanel in 10 Minutes
After choosing a suitable hosting for your site, just install WordPress on your cPanel. That’s all! Now you are ready to follow this tutorial!
Step 01: Install and Activate the Dokan Multivendor Plugin
Dokan plugin is the most popular free multivendor solution for WordPress with 60,000 active installations and 4.6 out of 5 ratings. It’s easy to use and scale. You can convert any kind of WordPress site into a multivendor marketplace using Dokan Multivendor without writing a single line of code.
Moreover, installing Dokan multivendor is as simple as installing any other WordPress plugin. You can install the plugin directly from your WordPress dashboard.
Simply, go to your WordPress dashboard -> Plugin -> Add New. Then use the search box to type the plugin name “Dokan” and click the “Install” button to install the plugin from the search result.
Don’t forget to activate the plugin by clicking the “Activate” button.

When you install the Dokan plugin for the first time on your WordPress-powered website, you get the opportunity to use this setup wizard. It gives you a step-by-step guideline to set up the Dokan multivendor plugin easily.

You can check our admin mult-step setup wizard for a clearer understanding.
Important note: If you have not installed the WooCommerce plugin in the first place, don’t worry. Because when you install the Dokan multivendor plugin, it automatically installs WooCommerce.
If you find it difficult to configure the Dokan plugin, you can watch our video on the Dokan installation guide.
Step 2: Choose a Dokan Compatible Marketplace Theme and Install It
After installing Dokan, you need to install a Dokan-compatible marketplace theme. You can install any theme that is compatible with Dokan. The good news is any theme that is compatible with WooCommerce is also compatible with Dokan.
If you are not sure which theme you should consider for designing your online furniture marketplace, we are recommending the “Dokani” theme for you. This theme is created by the same company behind the Dokan plugin. On top of that, this theme is absolutely free to use.
To install this theme on your marketplace, go to your WordPress dashboard -> Appearance -> Themes -> Add New -> Upload Theme. Don’t forget to activate the theme after uploading it.

That being said, if you want to use any third-party premium theme, we have a backup for that as well. We have compiled a list of the best third-party premium Dokan-compatible marketplace themes for you on our website. Click this button to get the list!
Step 3: Configure the Basic Settings of Dokan Multivendor Plugin
After installing and activating the Dokan plugin, now you need to configure all the basic settings. You will find all the settings options at WP-Admin –> Dokan –> Settings.
You’ll find here:
- General Settings
- Selling Options
- Withdraw Options
- Payment Gateways
- Reverse Withdrawal
- Page Settings
- Appearance
- Privacy Policy

You can select the pages for the vendor dashboard, order page, store listing, and terms and conditions page from here.
Now you need to set the commission type and rate. Go to WP Admin Dashboard -> Dokan -> Settings -> Selling Options. There you’ll find the Commission Type and Admin Commission options.
Set the commission type and rate according to your convenience.

Don’t forget to click the Save Changes button after configuring all the settings. Otherwise, you will lose all the changes that you’ve made now.
Now if you want to set the permalink settings of your product page, you can do that from WP Admin -> Settings -> Permalinks -> Product Permalinks.
For example, using “product” would make your product links like http://yourdomainname.com/store/sample-product/.
This setting affects product URLs only, not things such as product categories.
Select the check box “Custom Base” for product permalinks and write “/product” (or, whatever you want) on the box. Then hit the Save Changes button to save the settings.

Now let’s discuss two basic yet crucial settings of the Dokan multivendor plugin:
a) Configure Payment Gateways
You can’t control your customers which payment gateway they should choose, right? So, it’s always a better decision to ensure several payment gateways on your marketplace.
Dokan supports all WooCommerce-compatible payment gateways. You will get a wide range of choices to make the transaction process easier on your marketplace.
With Dokan Lite you can use non-adaptive payment gateways like PayPal, bank account transfer, cash on delivery, etc. The Pro version supports adaptive payment solutions like Stripe Connect and MOIP.
Go to your WordPress dashboard -> WooCommerce -> Settings, then click on the Payment tab to get the available payment methods.
Note: In case the PayPal option isn’t there, you should install the “WooCommerce PayPal Payments” plugin and you will find the PayPal option here.

b) Enable Withdraw Methods
Another important part of running an interactive online marketplace is to ensure a smooth withdrawal system. Dokan multivendor helps you take care of this section as well.
Go to WP Admin -> Dokan -> Settings -> Withdraw Options. Here you’ll find options to customize the withdrawal method and set the minimum balance a vendor needs to make a withdrawal limit.

You can also customize other Dokan settings following the same process that we have shown here.
We have step-by-step documentation for each Dokan setting. So, if you need any further help, don’t forget to check our documentation for Dokan settings, specially created for beginners.
Step 04: Set up Your Admin Store to Sell As a Vendor
You can sell from your own marketplace as a vendor. Interesting, right? Let’s check how you can do that!
Note: We are assuming you want to create a secondhand clothing marketplace which is why here we are going to show you how to set up a clothing store. The process is quite similar for any used items marketplace, so you can follow these steps regardless of your specific marketplace type.
The first thing you need to do is to enable yourself as a vendor. Go to your WordPress dashboard -> Dokan -> Vendors, then enable yourself as a vendor.

Now you can upload products to your admin store.
As an admin, you can upload products from the frontend and backend. But remember, your registered vendor will only be able to upload products from the frontend.
Let’s check how to upload products from the backend!
Navigate to your WordPress dashboard -> Products -> Add New. There you’ll find options to add the product’s name, description, images, category, tags, etc.
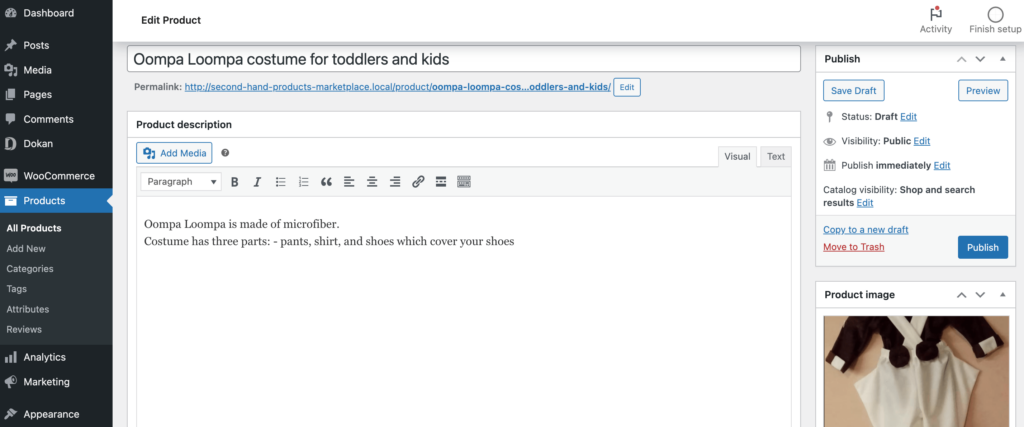
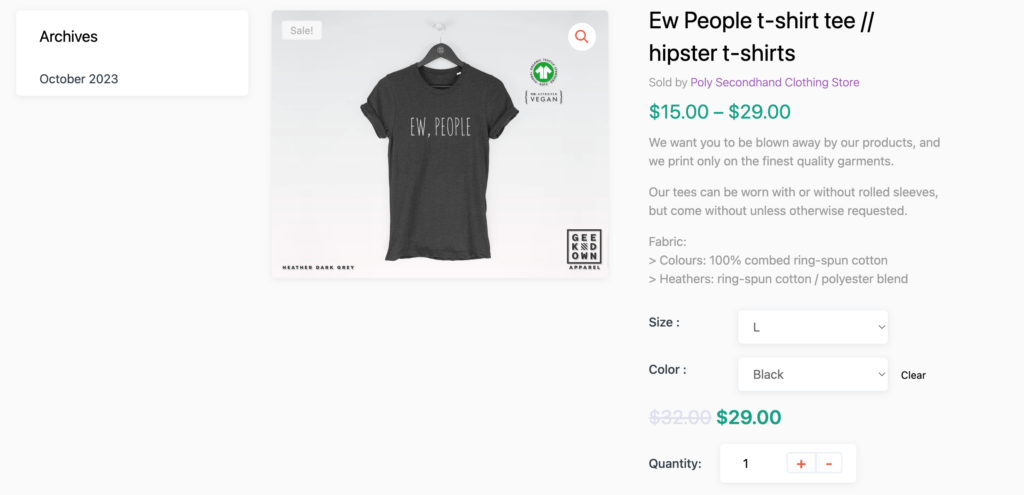
Since it’s a secondhand clothing marketplace, you have to add variable products. If you don’t know what is a variable product, let us explain it to you.
Let’s assume you or your vendor want to add a t-shirt with different sizes like S, M, L, XL, etc., and colors like Green, Black, White, Pink, etc. This is called a variable product.
Include various attributes and variations of the products by selecting the Variable product. You’ll find the options just under the Product description.

When you are done, just click on the “Publish” button to make this product publicly available.
That’s all! That’s how you can add products from your backend.
If you want to upload products from the frontend just like your registered vendors, you can do that as well. Let’s demonstrate that!
In order to add variable products from the frontend, you have to upgrade your Dokan plugin to the premium version. It’ll take only a few minutes to upgrade to the premium version.
Visit the Dokan pricing page and choose a package to buy.
For further assistance follow this documentation on the installation of the pro version of the Dokan plugin.
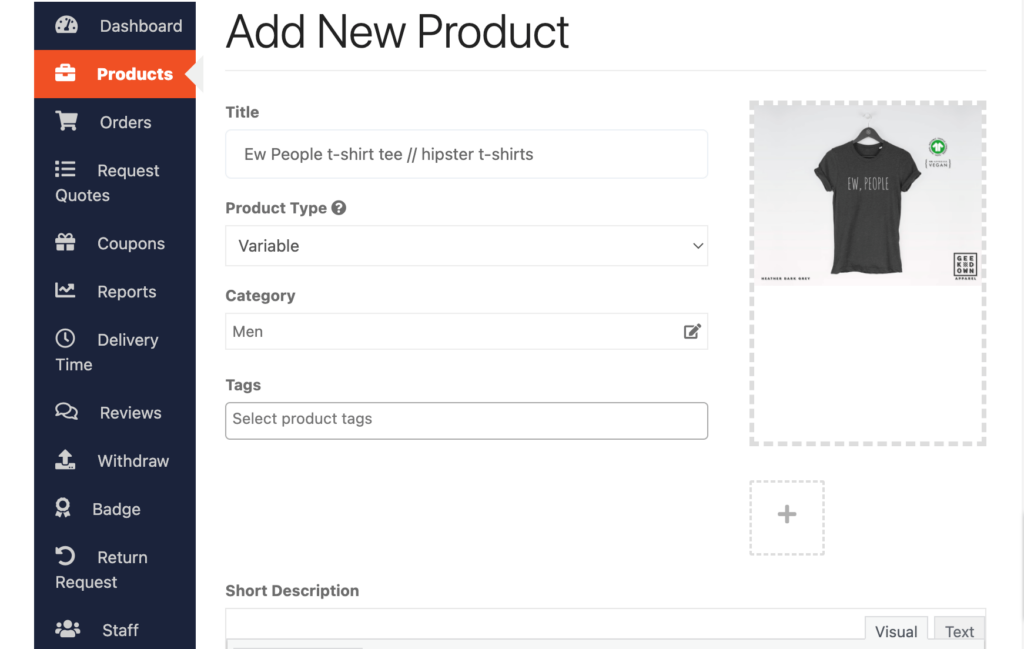
Now go to WordPress Dashboard -> Visit Vendor Dashboard -> Products. Then click on the Add new product.

You will be redirected to a new interface after clicking the “Add new product” button. There you’ll find a few options like product name, gallery, category, tags, and description to add your products.
If you didn’t create Categories and Tags before, you won’t be able to add Categories and Tags from here.
To assign a category and different tags from the frontend, you have to create categories and tags from the backend. So, navigate to your WordPress dashboard -> Products -> Categories to add new categories.
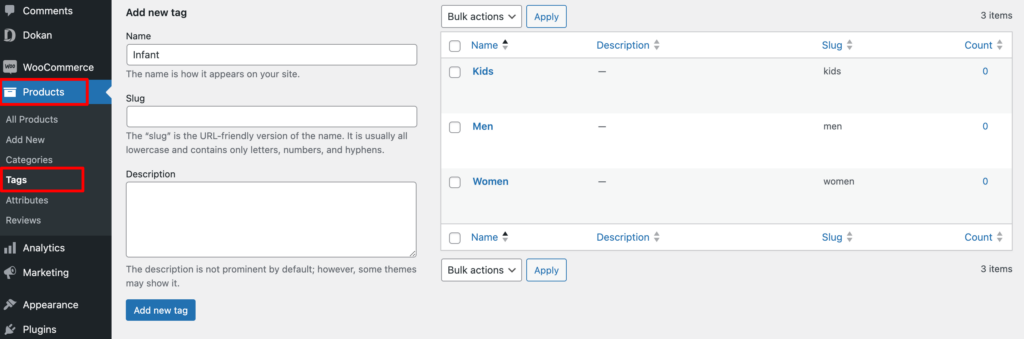
In the same way, go to your WordPress dashboard -> Products -> Tags to add new tags.
Since it’s a variable product, you don’t need to set the price here. But don’t forget to select it as a variable product from the Product Type option.
Now scroll down a bit and you’ll get the attribute and variation option. Click on Add attribute to add different attributes. Give a Name to your attribute, add Values for the attribute, tick the Used for Variations box, and then hit the Save attribute to complete the process.

Then you have to add variations. After adding variations, hit the “Save Product” to save all the changes.
You can check our documentation on how to add variable products to get a more clear understanding.
Now if you visit the Products tab, you’ll find all of your newly added products are with pending status. Because the admin needs to approve these products to make them public.
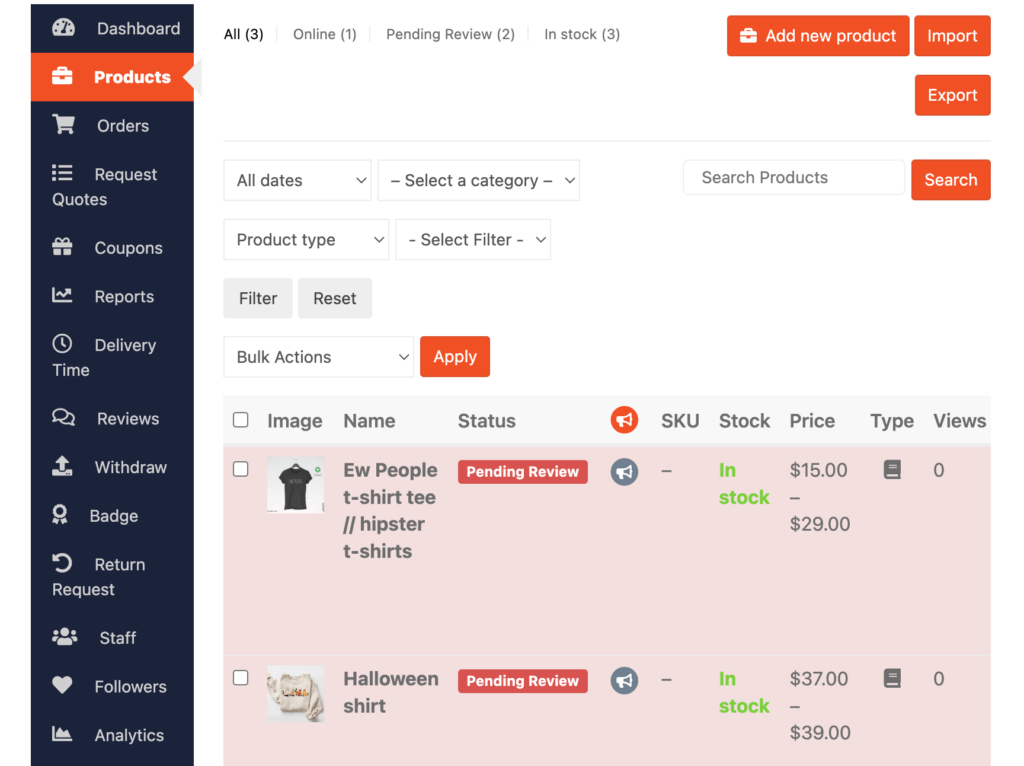
If you don’t enable auto product approval for vendors, you need to manually approve it. Navigate to your WordPress dashboard -> Products -> Edit to approve the product. You can check our selling options doc to know more about it.
After approving the product, if you visit the frontend, you will be able to check the product. This is the product that we have just added:
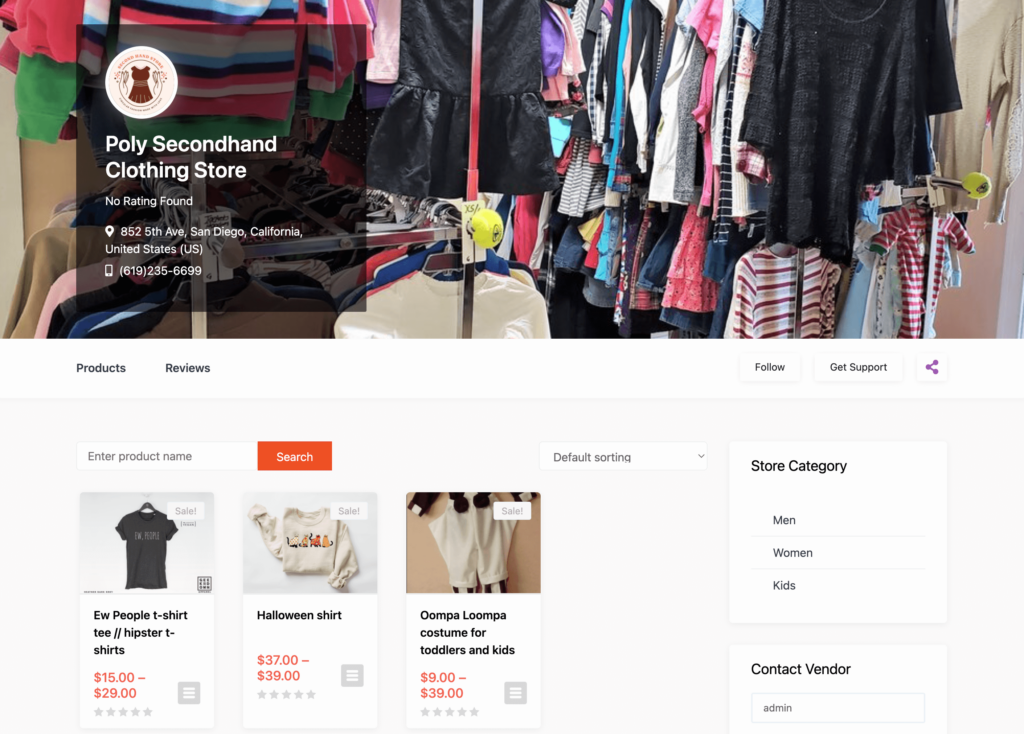
You can customize your store design by going to Vendor Dashboard -> Settings. From here you can update your store name, address, opening & closing time, etc.
Here is the frontend view of your newly created store:
Congratulations! You have successfully created your admin store to sell from your own online used items marketplace.

Step 05: Allow Vendors to Sell on Your Online Marketplace
After adding all the functionalities and configuring your marketplace, you can invite vendors to sign up for your marketplace. To make sure vendors can sign up for your marketplace, enable the “Anyone can register” option from WP Admin –> General –> Settings.

So, it will open the default registration form for vendors to sign up.

Or you can create customized registration forms with the necessary fields, especially for your marketplace.
For vendors to start selling, you need to enable selling status from Dokan –> Vendors.

Also, if you want the vendors to upload their products, then you need to change the product status from Dokan –>Settings –> Selling options. You need to enable the New Vendors Product Upload.

Now navigate to your WordPress dashboard then click on the Visit Stores to check all the registered stores on your used items marketplace.
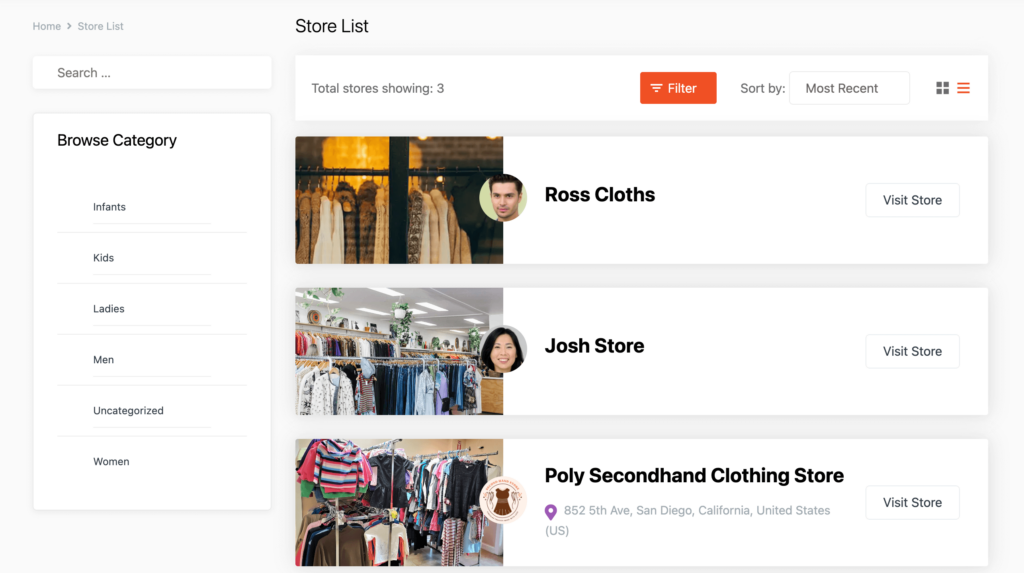
This is the frontend view of our newly created secondhand products marketplace that shows the registered store list. That means when a vendor registers for your marketplace and creates his store will appear in this list.
Bonus: Install Required Plugins to Run Your Marketplace Smoothly
Apart from ensuring a smooth checkout process or user experience on your marketplace, you need to focus on other aspects like backup, security, caching, etc.
Now let’s check which plugin you should use to make your marketplace stand out:
- UpdraftPlus or BackupBuddy: Regular backups are crucial for safeguarding your marketplace’s data. These plugins automate the backup process.
- Wordfence Security: Protect your marketplace from security threats with Wordfence, which provides firewall and monitoring capabilities.
- User Role Editor: Efficiently manage user roles and permissions, especially if you have different user types such as vendors, customers, and administrators.
- WPS Hide Login: Enhance security by changing the default login URL for your WordPress site, protecting against brute force attacks.
- WP Super Cache or W3 Total Cache: Speed up your marketplace by implementing caching to improve page loading times.
- Akismet Anti-Spam: Prevent spam in comments and user registrations to maintain a clean and user-friendly marketplace.
- Email Marketing Plugin- weMail: If you plan to run email marketing campaigns, this plugin integrates your marketplace with Mailchimp for managing email subscribers and campaigns.
All these plugins come with free and premium versions. So, if you want to test the free version before using the premium version, you can do that as well.

Build an Online Used Items Marketplace- A Quick Recap for You
You have come this far which means now you know the process to build an online used items marketplace. Simply, follow the 5 steps that we have discussed above to get your job done.
We have also shown a list of the required plugins that you should use to operate your marketplace without facing any unnecessary errors.
That being said, if you have any confusion regarding this topic, feel free to share your queries in the comment box below. We would love to know your feedback. Good luck!
Subscribe to
Dokan blog
We send weekly newsletters, no spam for sure!


Leave a Reply