Running a multi-vendor marketplace is exciting. Payments? That part can get messy. As your site grows, you start dealing with vendor onboarding, payouts, refunds, and checkout issues. Even a small payment hiccup can turn into a flood of support messages and unhappy sellers.
That’s where Stripe Express with Dokan makes life easier. You can accept cards, Apple Pay, Google Pay, iDEAL, and more. Vendors get their own Stripe dashboard, while you keep control over payouts, fees, and timing. Checkout feels smoother, sellers feel confident, and customers complete purchases with less friction.
In this guide, I’ll walk you through how to set up Stripe Express with Dokan, step by step. You’ll connect Stripe, enable payment methods, and get your marketplace ready for stress-free vendor payouts.
Why Use Stripe Express with Dokan?
Before diving into setup, it helps to understand why Stripe Express is the recommended payment solution for Dokan marketplaces.
Multi-vendor payments are not the same as regular WooCommerce payments. You are not paying one seller; you are managing multiple vendors, split payouts, refunds, disputes, and compliance at the same time.
Let’s see how Stripe Express handles this complexity without turning your marketplace into a finance department.
| What You Get | Why It Matters for Your Marketplace |
|---|---|
| Built for multi-vendor platforms | Stripe Express is powered by Stripe Connect, which is designed for marketplaces. Each vendor connects their own account, so payments stay compliant and scalable. |
| Faster checkout with wallets | Apple Pay and Google Pay enable one-tap checkout. Fewer steps mean fewer abandoned carts and more completed orders. |
| Multiple global payment methods | Accept cards, iDEAL, SEPA, and wallets from a single checkout. Customers pay using familiar options in their region. |
| Full payout control for admins | You choose when vendors get paid. Pay instantly, after order completion, or delay payouts to manage refunds and cash flow. |
| Transparent earnings for vendors | Vendors get their own Stripe Express dashboard to track balance, payouts, transfers, and total earnings without contacting support. |
| Secure and compliant payments | Stripe handles sensitive payment data and compliance. You don’t store card details or manage verification manually. |
| Support for subscriptions | Works with WooCommerce Subscriptions and Dokan Vendor Subscriptions, making it suitable for recurring revenue models. |
| Ready for global marketplaces | Supports cross-border onboarding in EU, SEPA, and US-based marketplaces, helping you scale internationally. |

What You Require Before Setting Up Stripe Express
Before configuring Stripe Express with Dokan, make sure everything below is ready. This saves you from setup errors later. You’ll need:
If your Stripe account is still unverified, complete the business verification first. Stripe restricts features until that step is done.
Also keep this in mind: If your marketplace operates in the EU, SEPA, or the US, Stripe Express supports cross-border vendor onboarding. This is optional, but useful if you plan to work with international vendors.
Once these requirements are in place, you’re ready to start configuring Stripe.
Set Up Your Stripe Account for Express
Start by preparing your Stripe account. This step happens entirely inside the Stripe dashboard. Log in to your Stripe account first. If you’re new to Stripe, the platform will guide you through the initial signup.
Step 1: Complete Your Profile Using the Setup Guide
After signing in, Stripe may ask how you plan to use the platform. This step is optional, and you can change your selection later if needed.
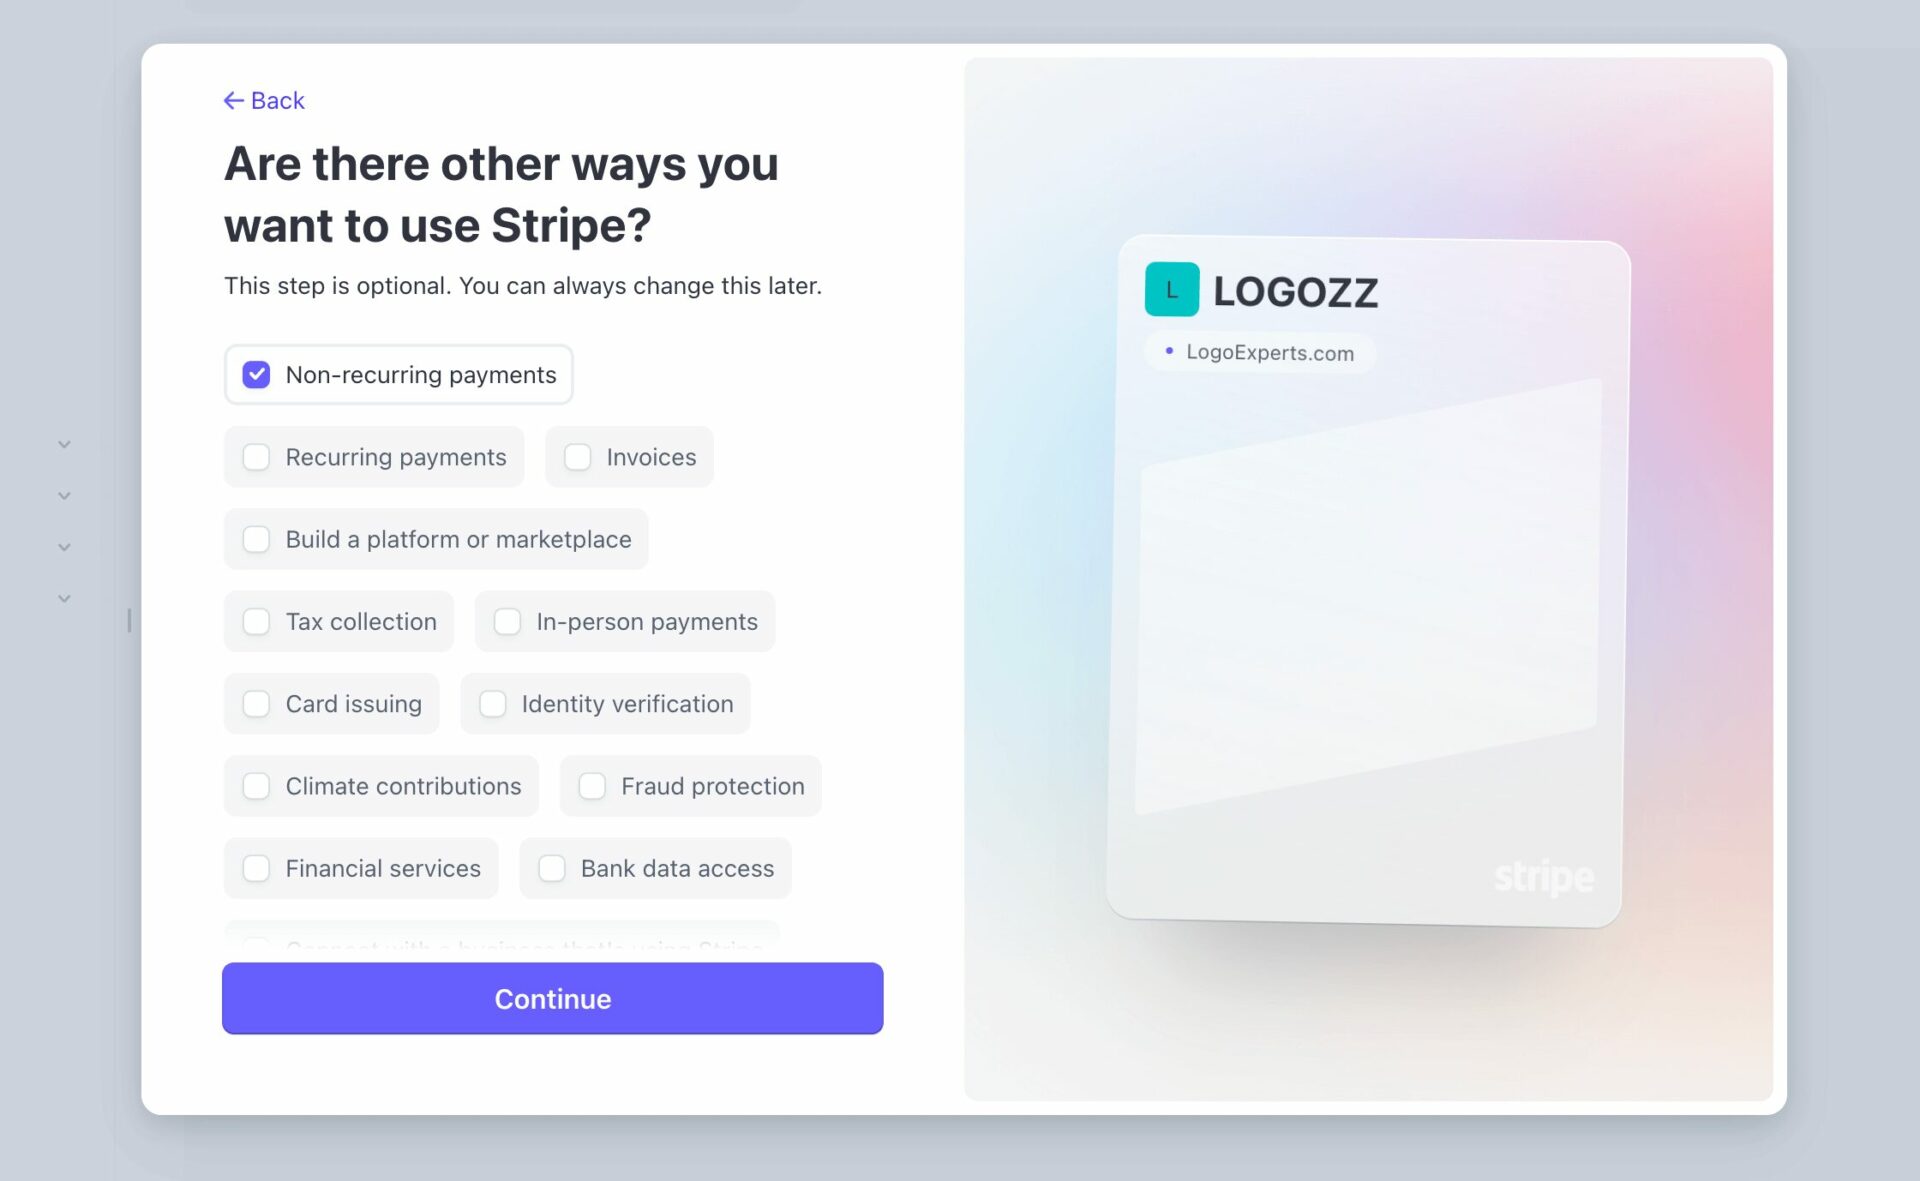
Then, complete setting up your profile by clicking on the ‘Setup guide ‘ button in the top right corner. Provide all required information
Fill in critical information like tax details, business details, and bank information carefully. Incorrect or incomplete details can cause verification delays and may block payments later.
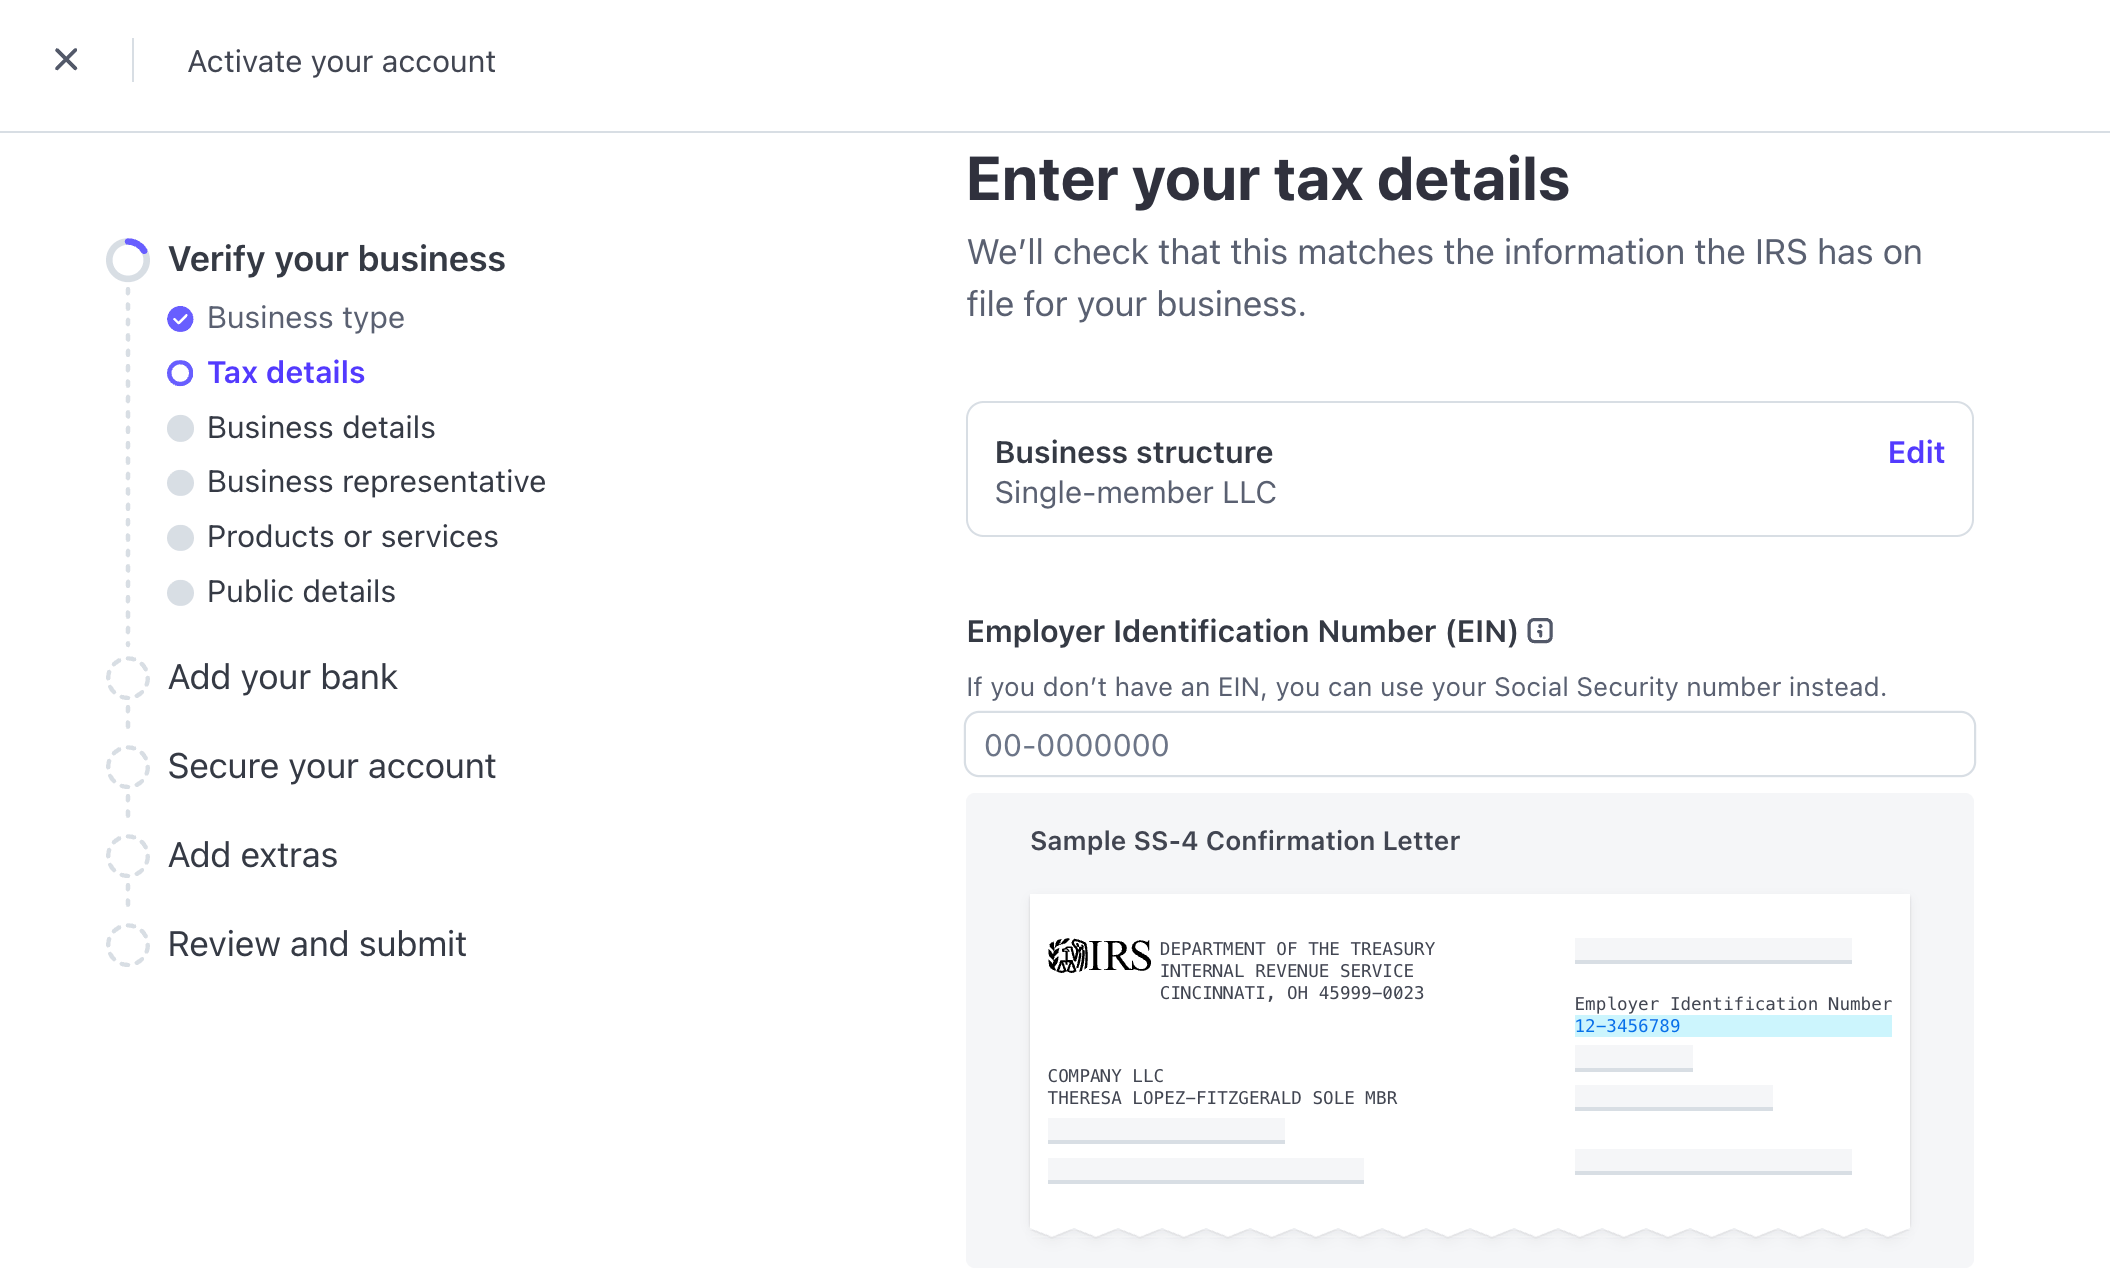
You’ll need to provide:
The “Add your bank” part is very crucial. You need to configure the payout accounts accurately here for future usage.
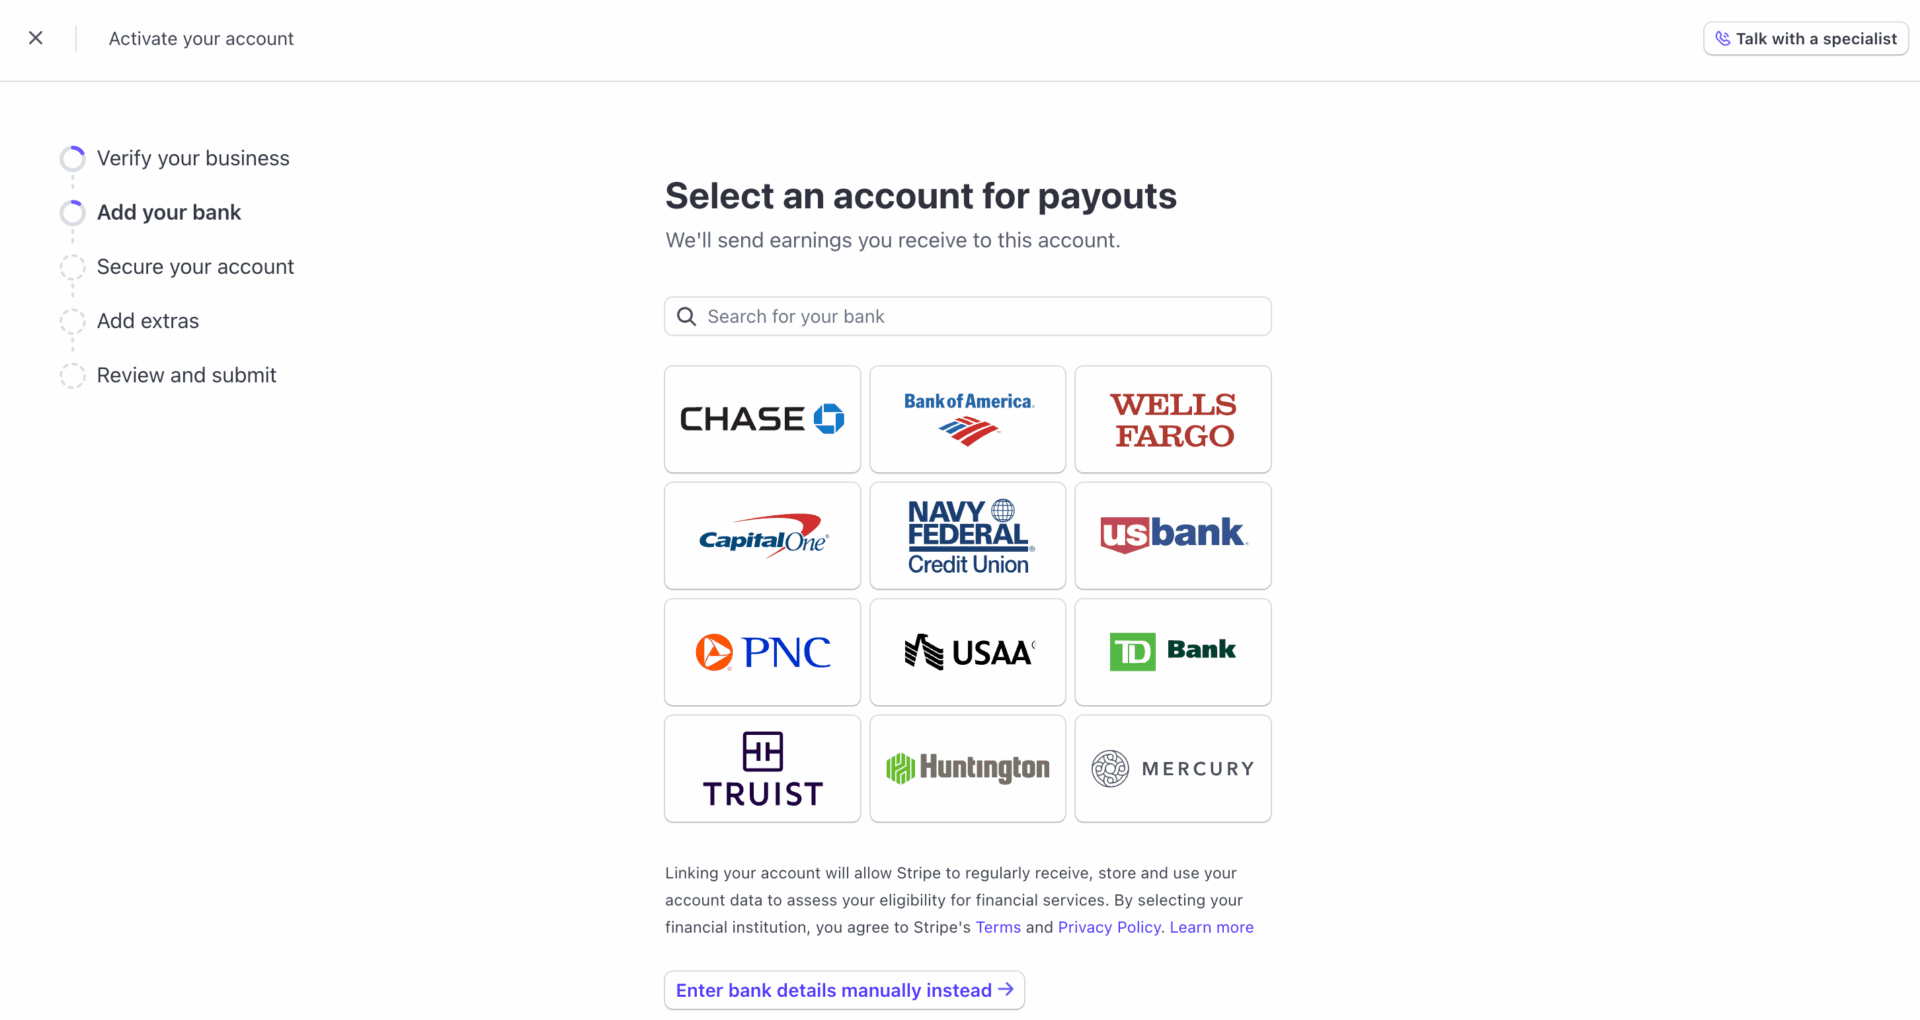
You can also add the bank details manually if you don’t have your bank listed on the Stripe platform.
Before submitting your information in the final setup step, review all details one more time. Incorrect information can delay payouts or limit features. Once everything looks good, submit the form. Your Stripe account is now ready for Express setup.
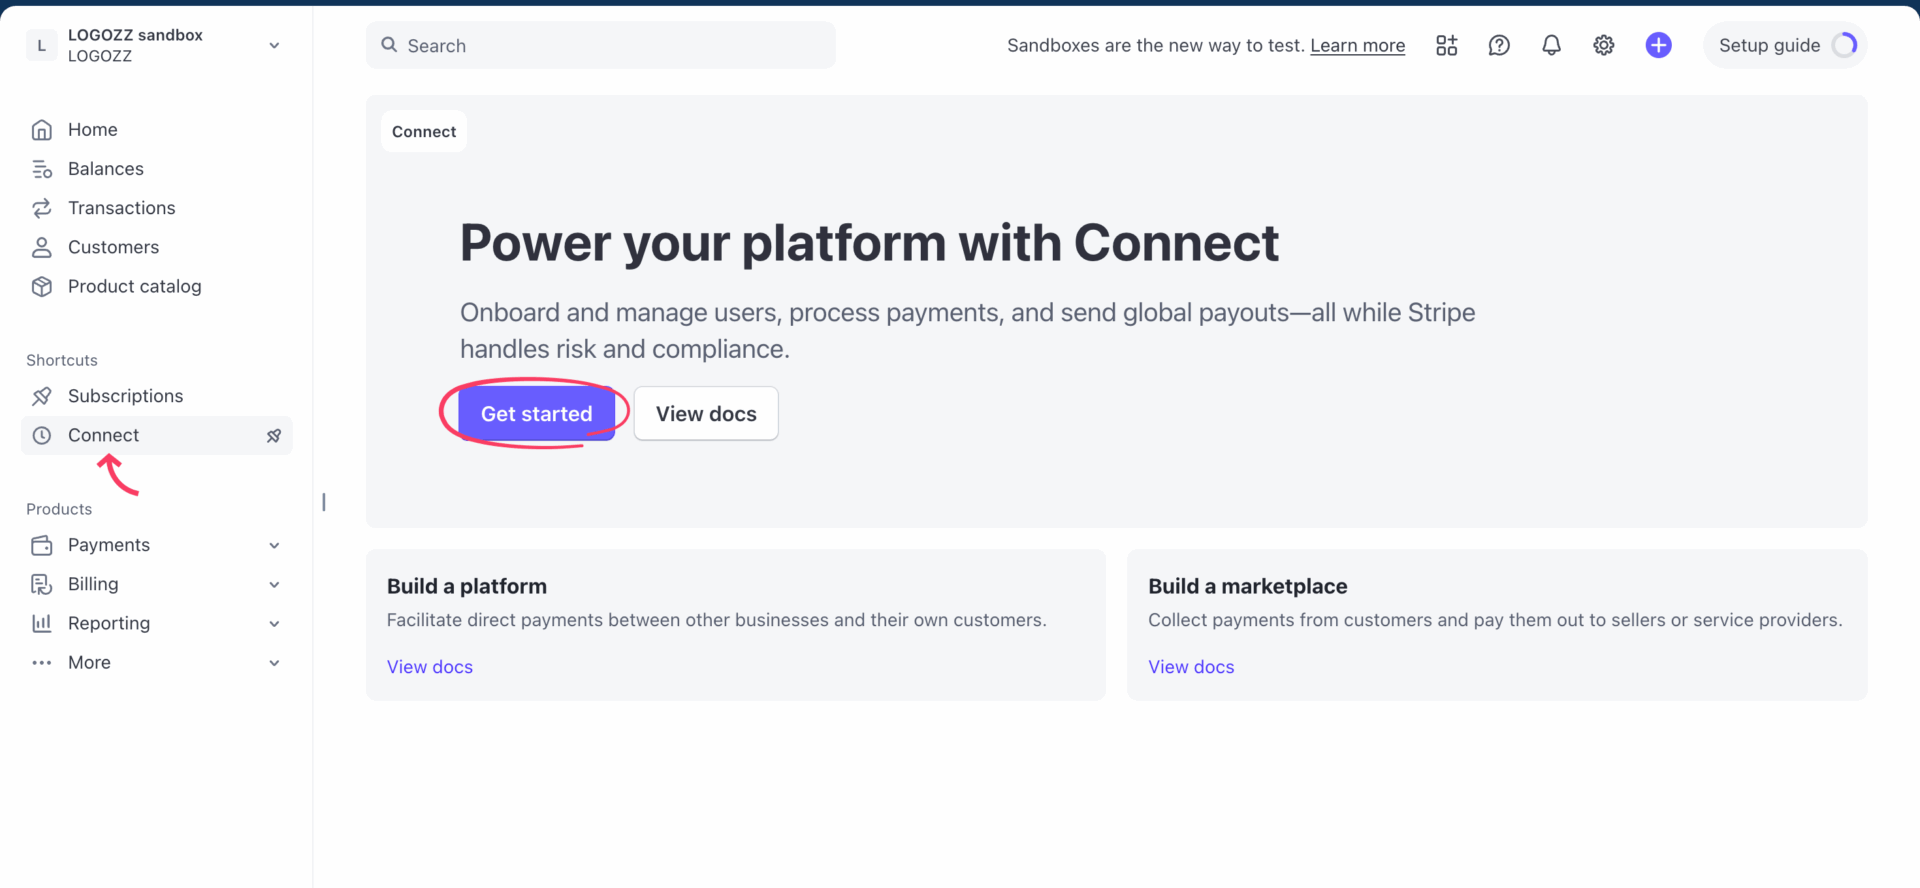
Step 2: Connect Your Account with Stripe Express
After completing the account setup, connect your account to Stripe. From the left sidebar shortcuts, select Connect, then click ‘Get started’ to begin the onboarding process.
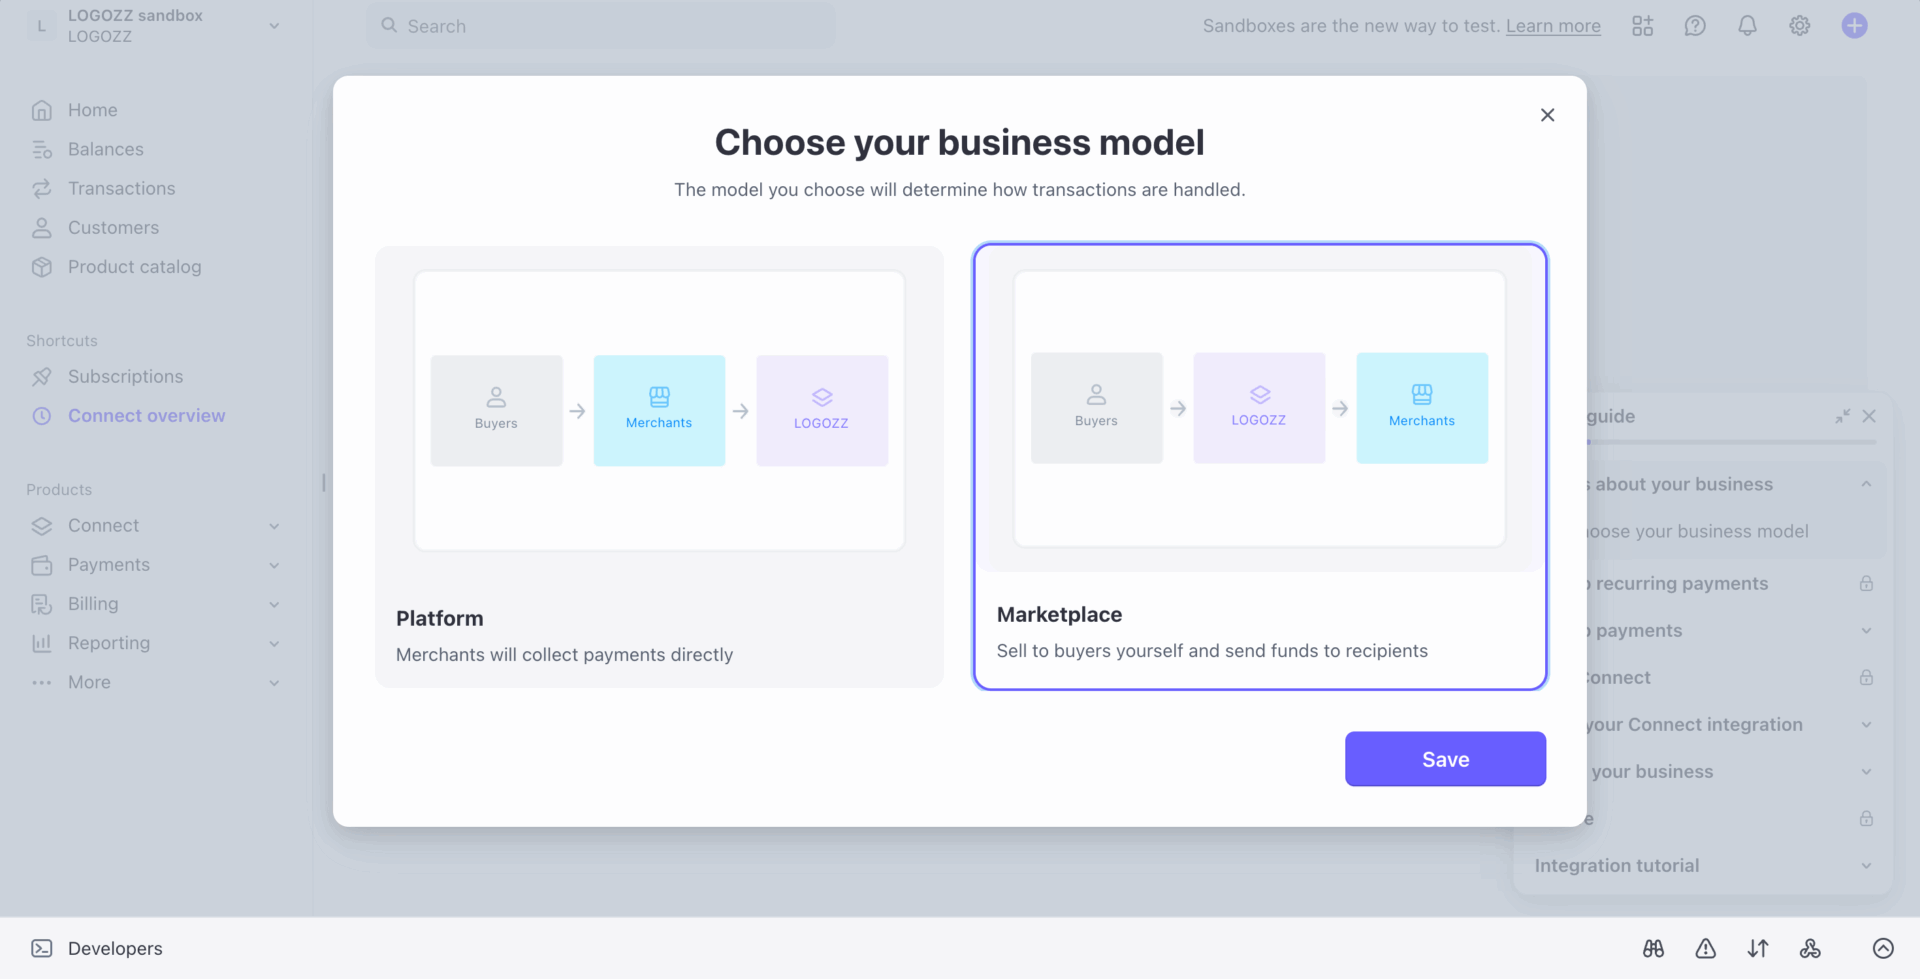
Choose the business model to define how transactions are handled by Stripe. Stripe currently offers two options: Platform and Marketplace. Hit Save to proceed to the next step.
Configure your connected accounts and review all details to make sure everything is correct. Use the top bar tabs to check the current status and spot any missing information.
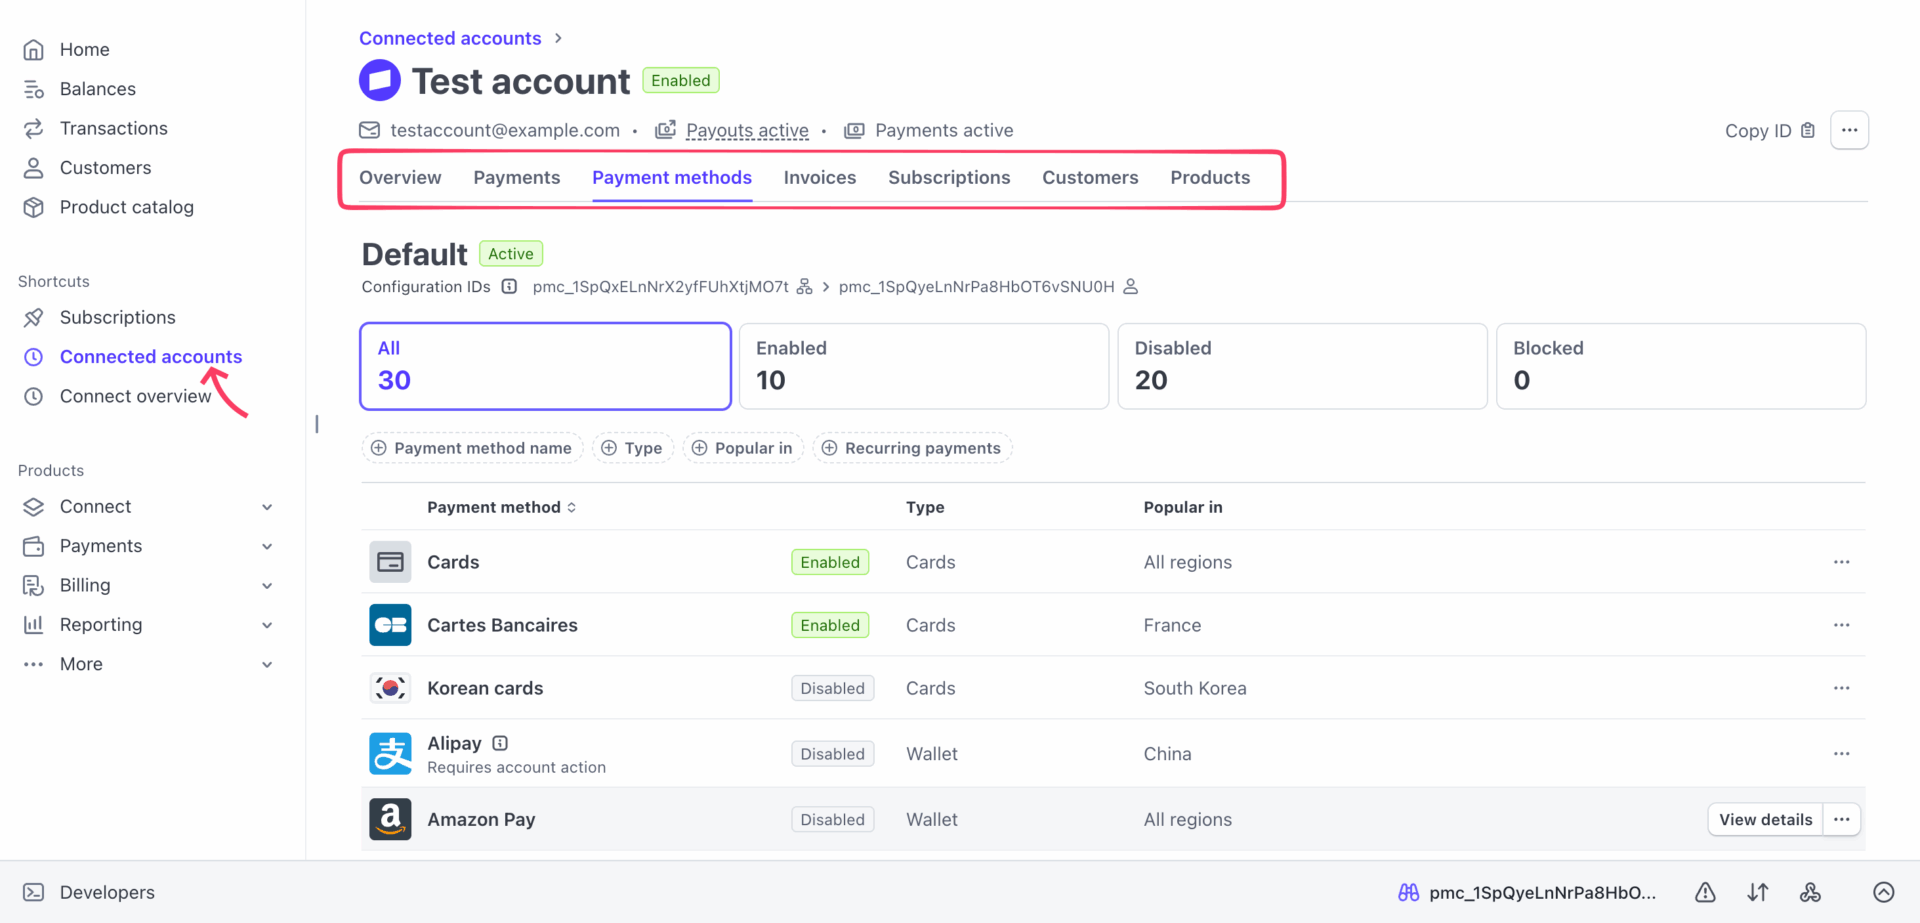
Step 3: Configure Stripe Express Branding
Branding is not just cosmetic here. It directly affects vendor trust and onboarding success.
When vendors connect their Stripe Express accounts, they see Stripe-hosted pages. Proper branding reassures them that they are connecting to your marketplace, not a random third party.
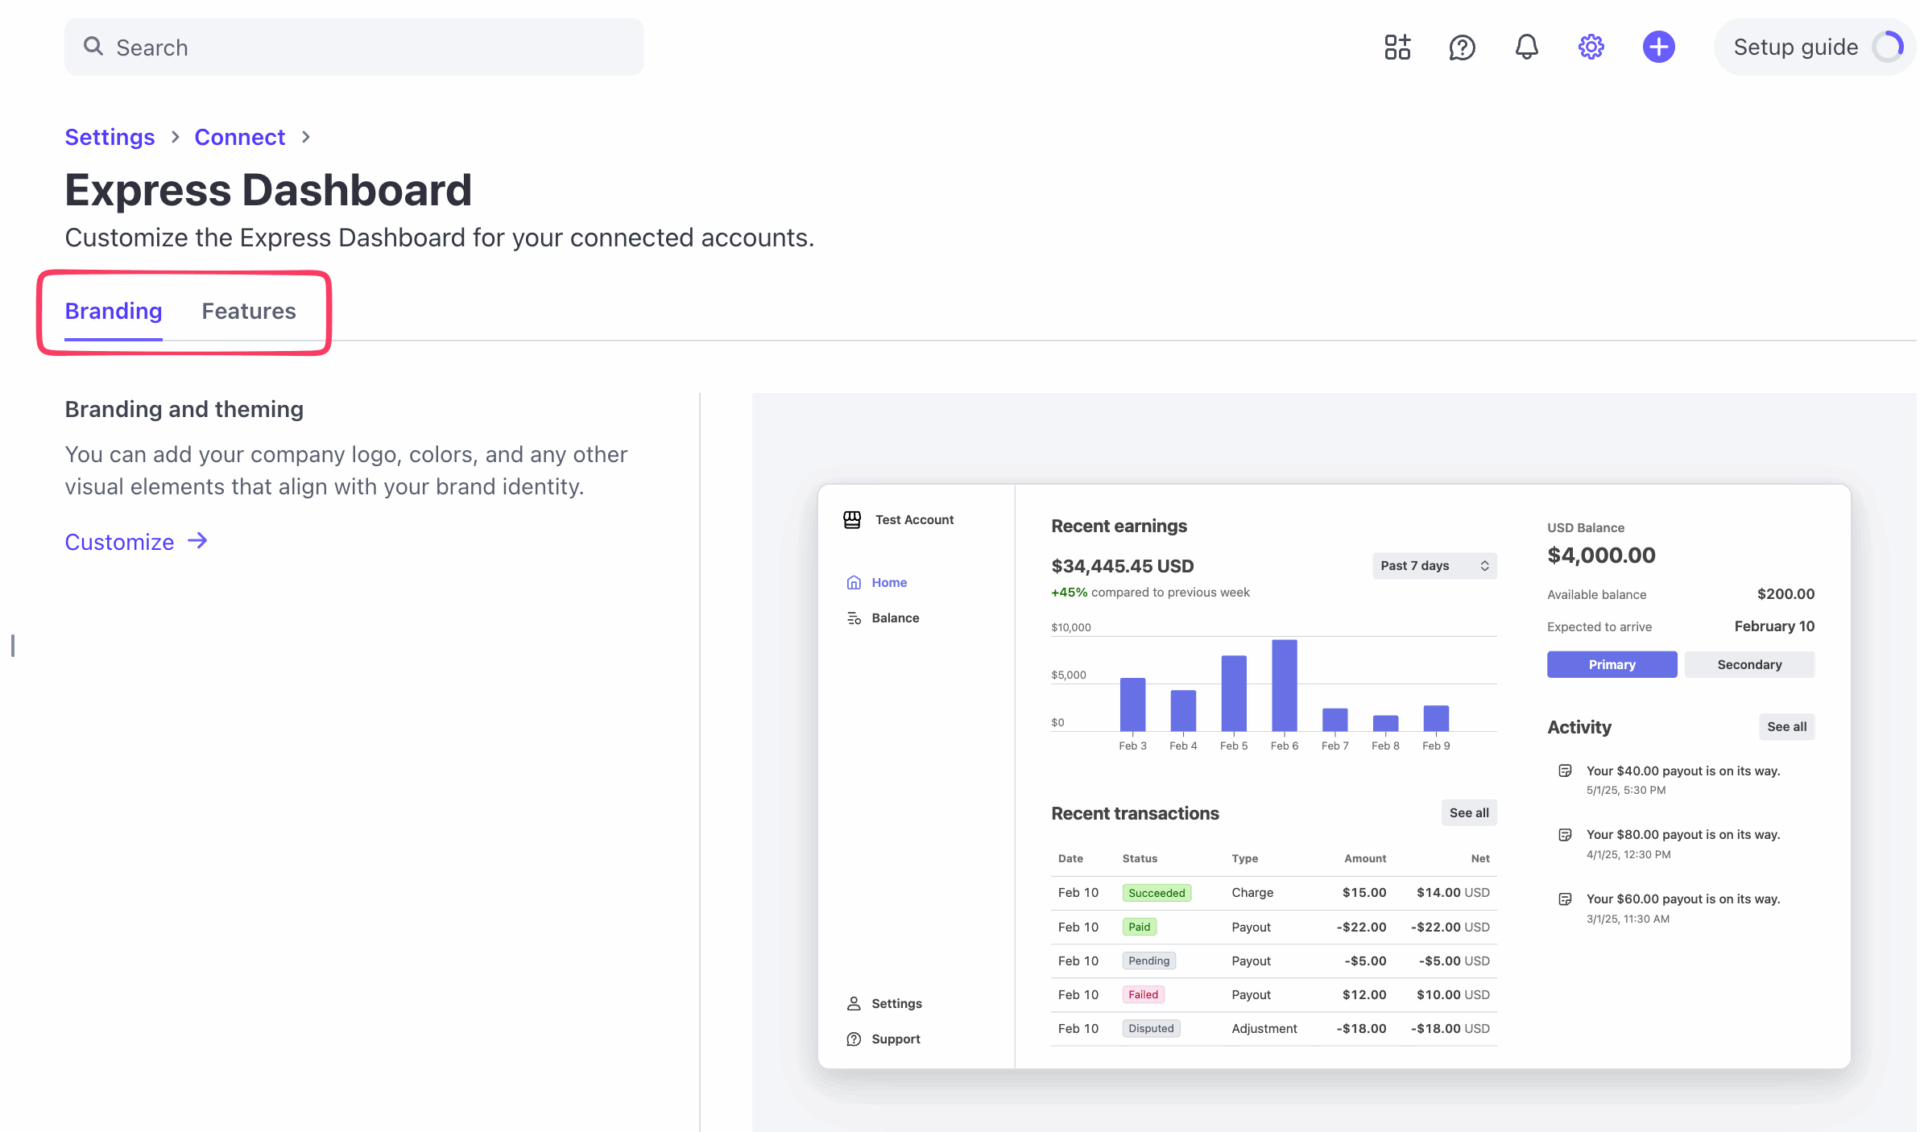
From your Stripe dashboard:
- Click the settings icon in the top-right corner of your Stripe dashboard
- Navigate to Connect and scroll to Manage connected account dashboards
- Select the Express Dashboard option to start customization
- Use the Branding and Features tabs to configure each option
Stripe Express lets you customize key brand elements to match your marketplace. You can update the business name, icon, and theming, and these changes apply across all dashboards and onboarding screens. You can also preview everything safely using a test account before going live.
Step 4: Complete the Payout Settings Carefully
Didn;t configure the payment settings during the account setup? No worry, Stripe lets you configure the payout options later as well. Check if your payout settings are all okay by navigating to Settings > Connect > Payments and payouts. There you’ll see:
Explore each option and configure the settings as per your needs.
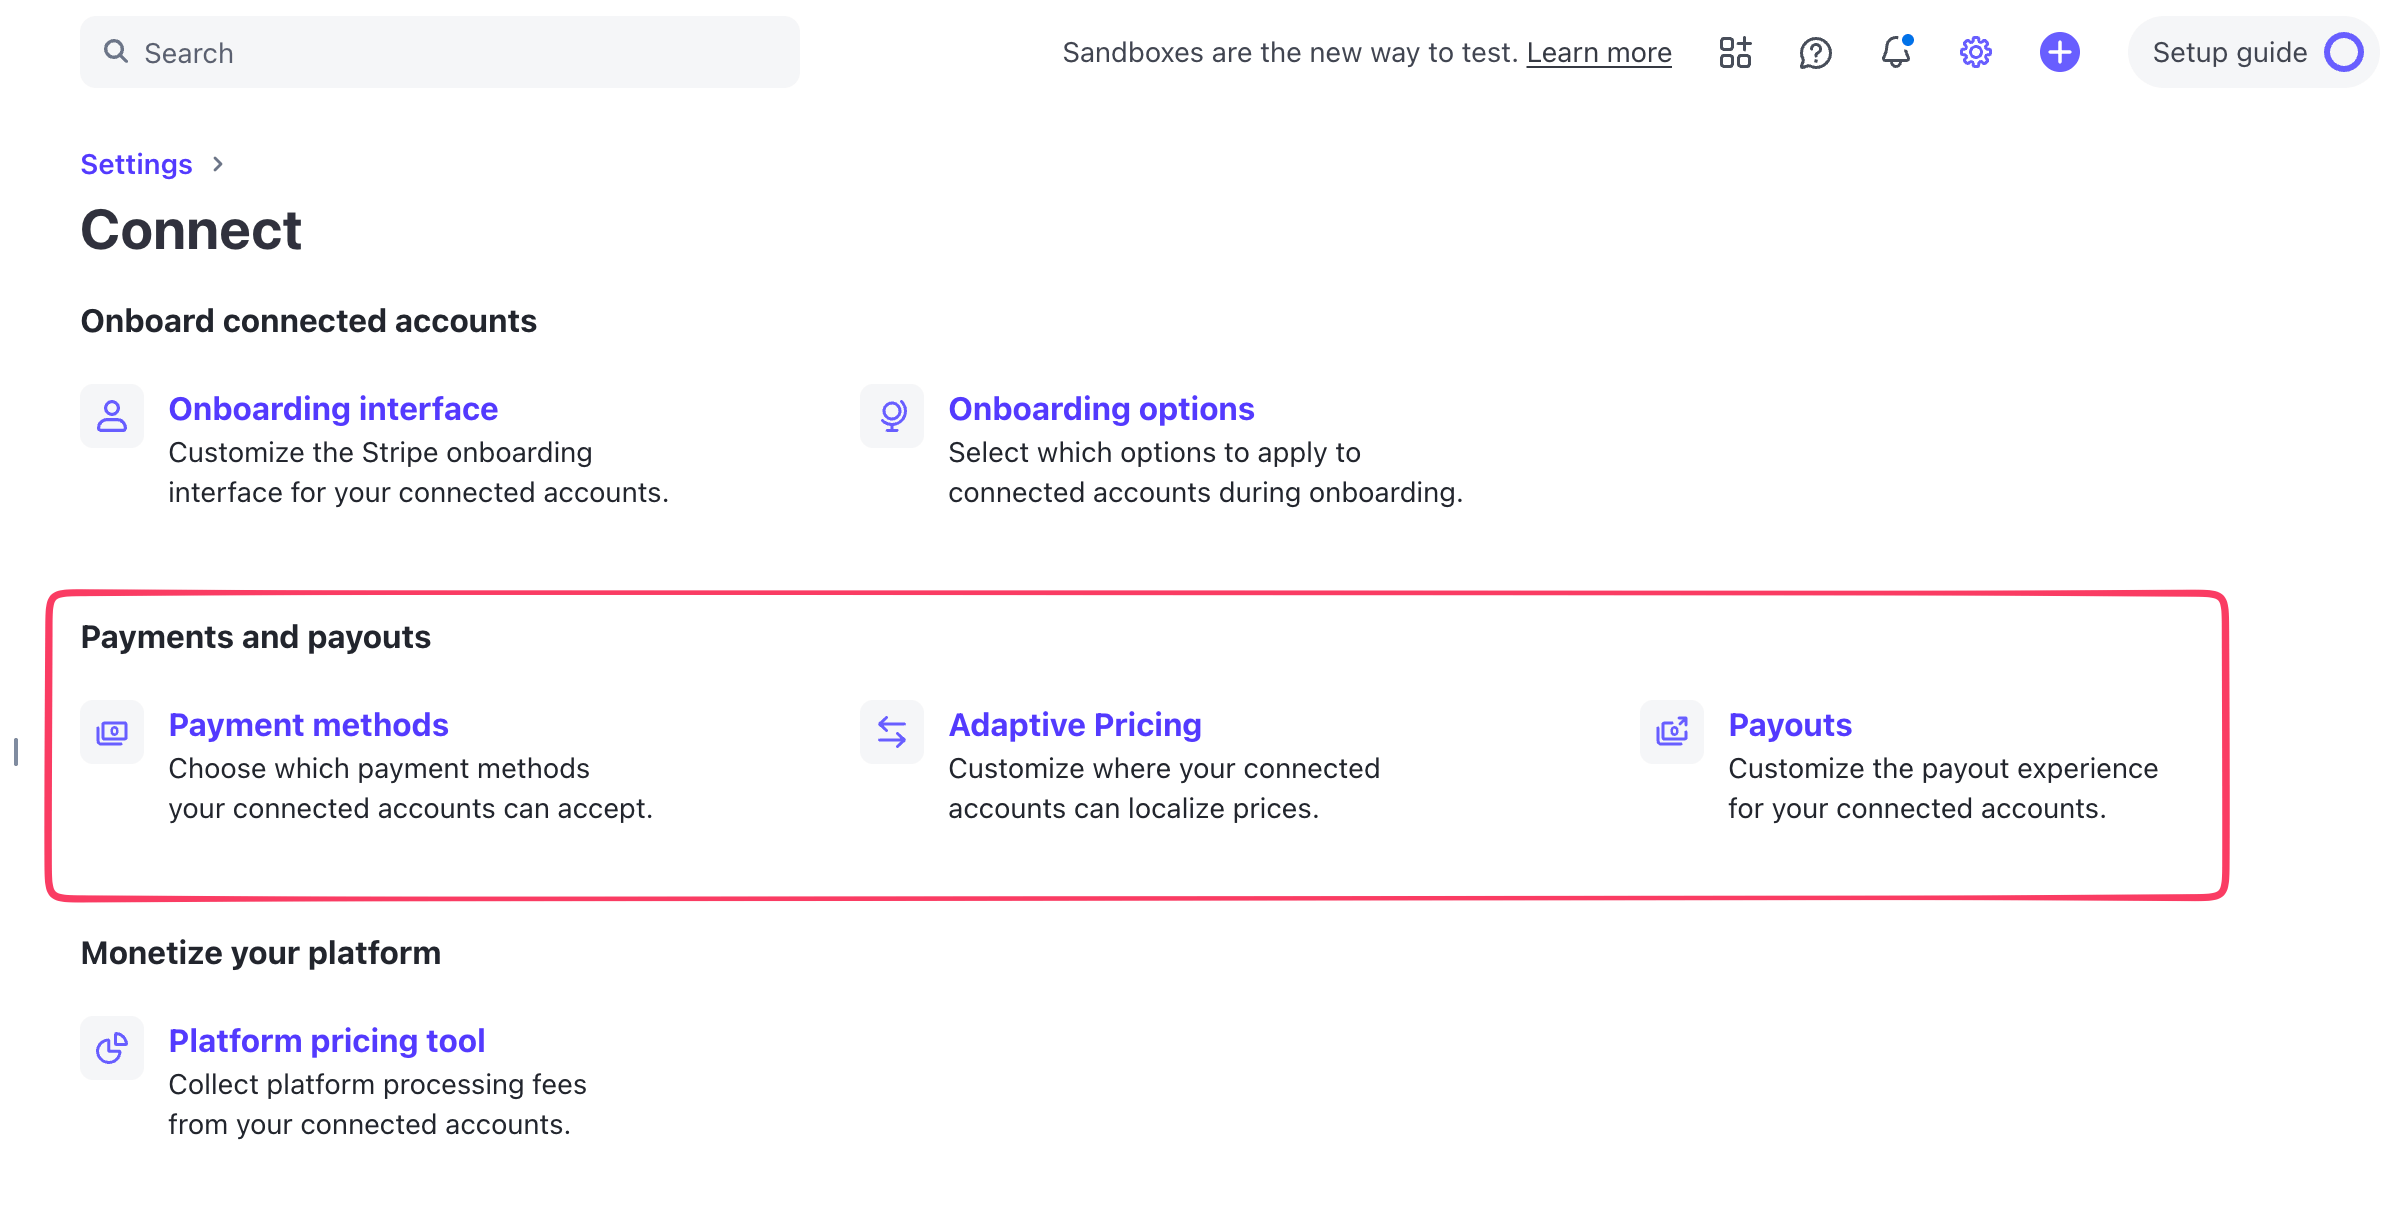
Once you’re done, your Stripe Express account is ready to get integrated with Dokan.
Connect Your Account to the Dokan Stripe Express Module
Now that Stripe is configured, it’s time to connect it with your marketplace. Log in to your WordPress admin dashboard.
Step 1: Enable Stripe Express in WooCommerce
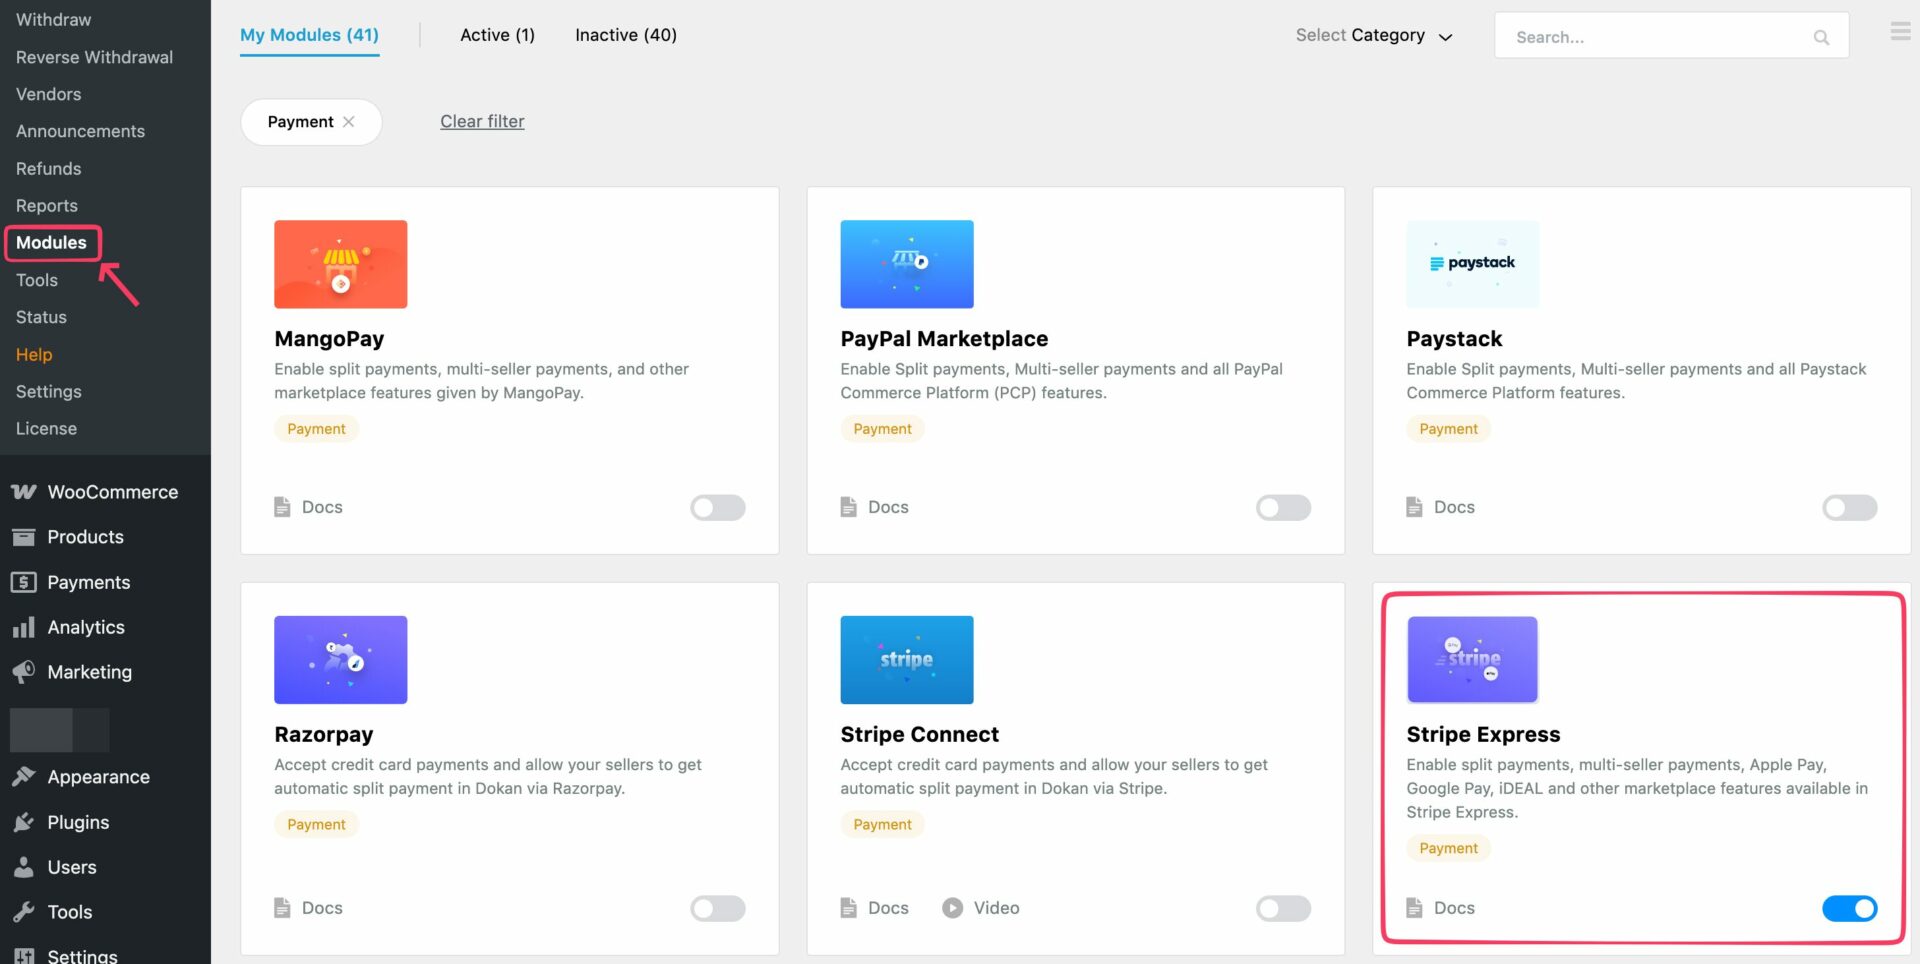
- Go to Dokan → Modules.
- Find Stripe Express.
- Enable the module.
This activates Stripe Express inside Dokan.
Next:
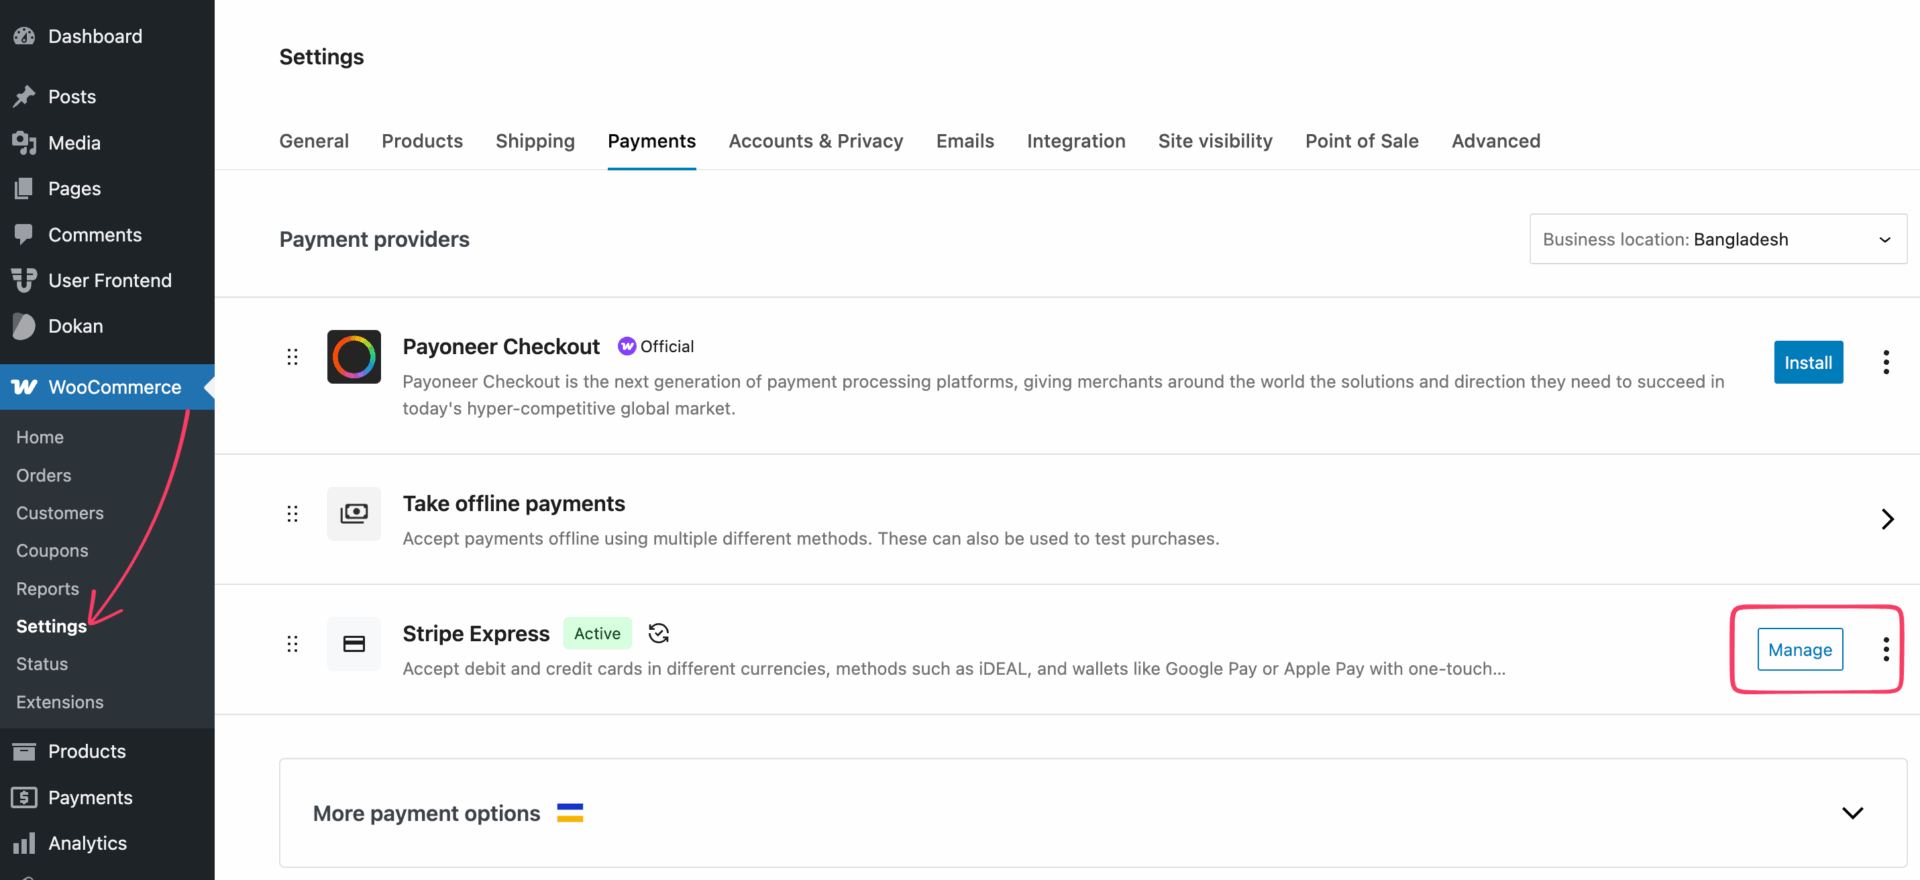
- Go to WooCommerce → Settings → Payments.
- Locate Dokan Stripe Express.
- Click Manage.
This opens the main configuration screen.
Step 2: Configure the Stripe Express Settings for Dokan
Configure the basic options:
Keep the title clear and familiar. Simple works better at checkout.
Don’t forget to set the Authorize Redirect URI in your Stripe app to: https://dashboard.stripe.com/settings/connect/onboarding-options/oauth. This ensures Stripe can properly redirect users during the authorization flow.
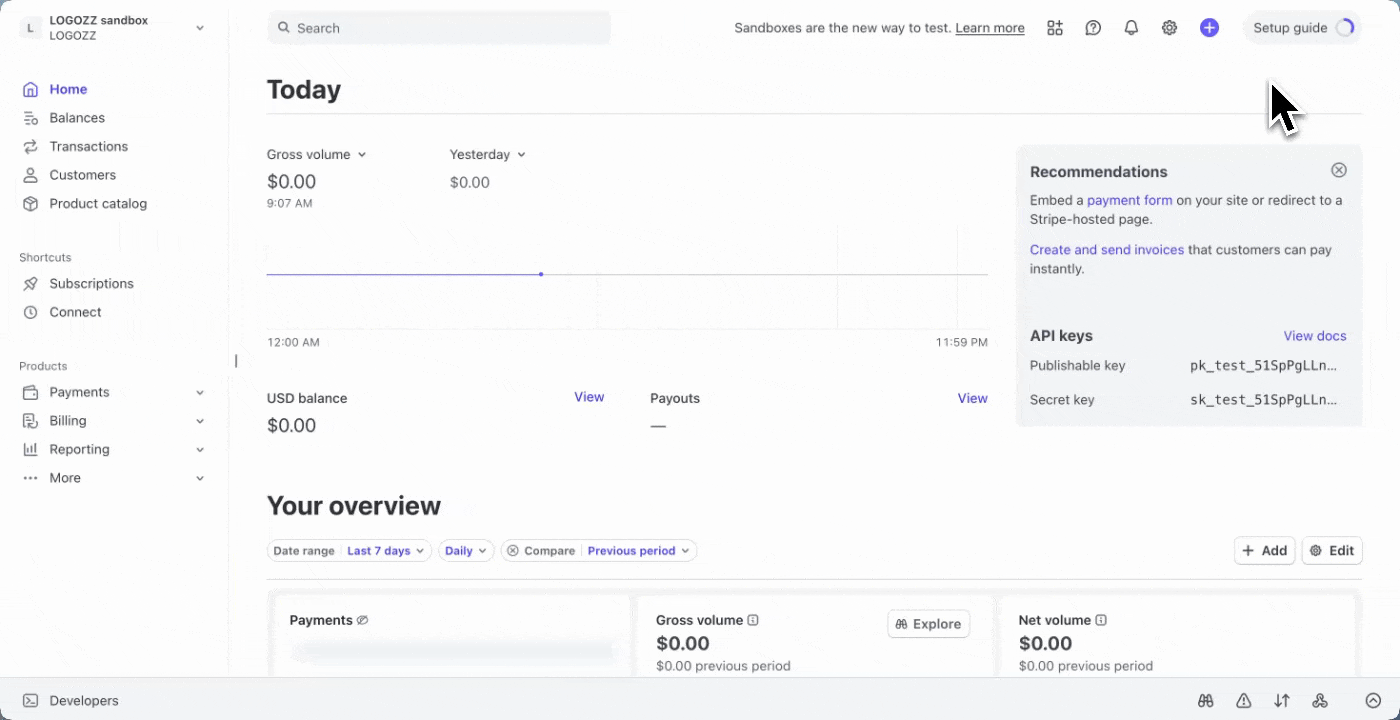
Add Stripe API Keys
Scroll to the API credentials section of the WooCommerce payment configuration screen of the Dokan Stripe Express module.
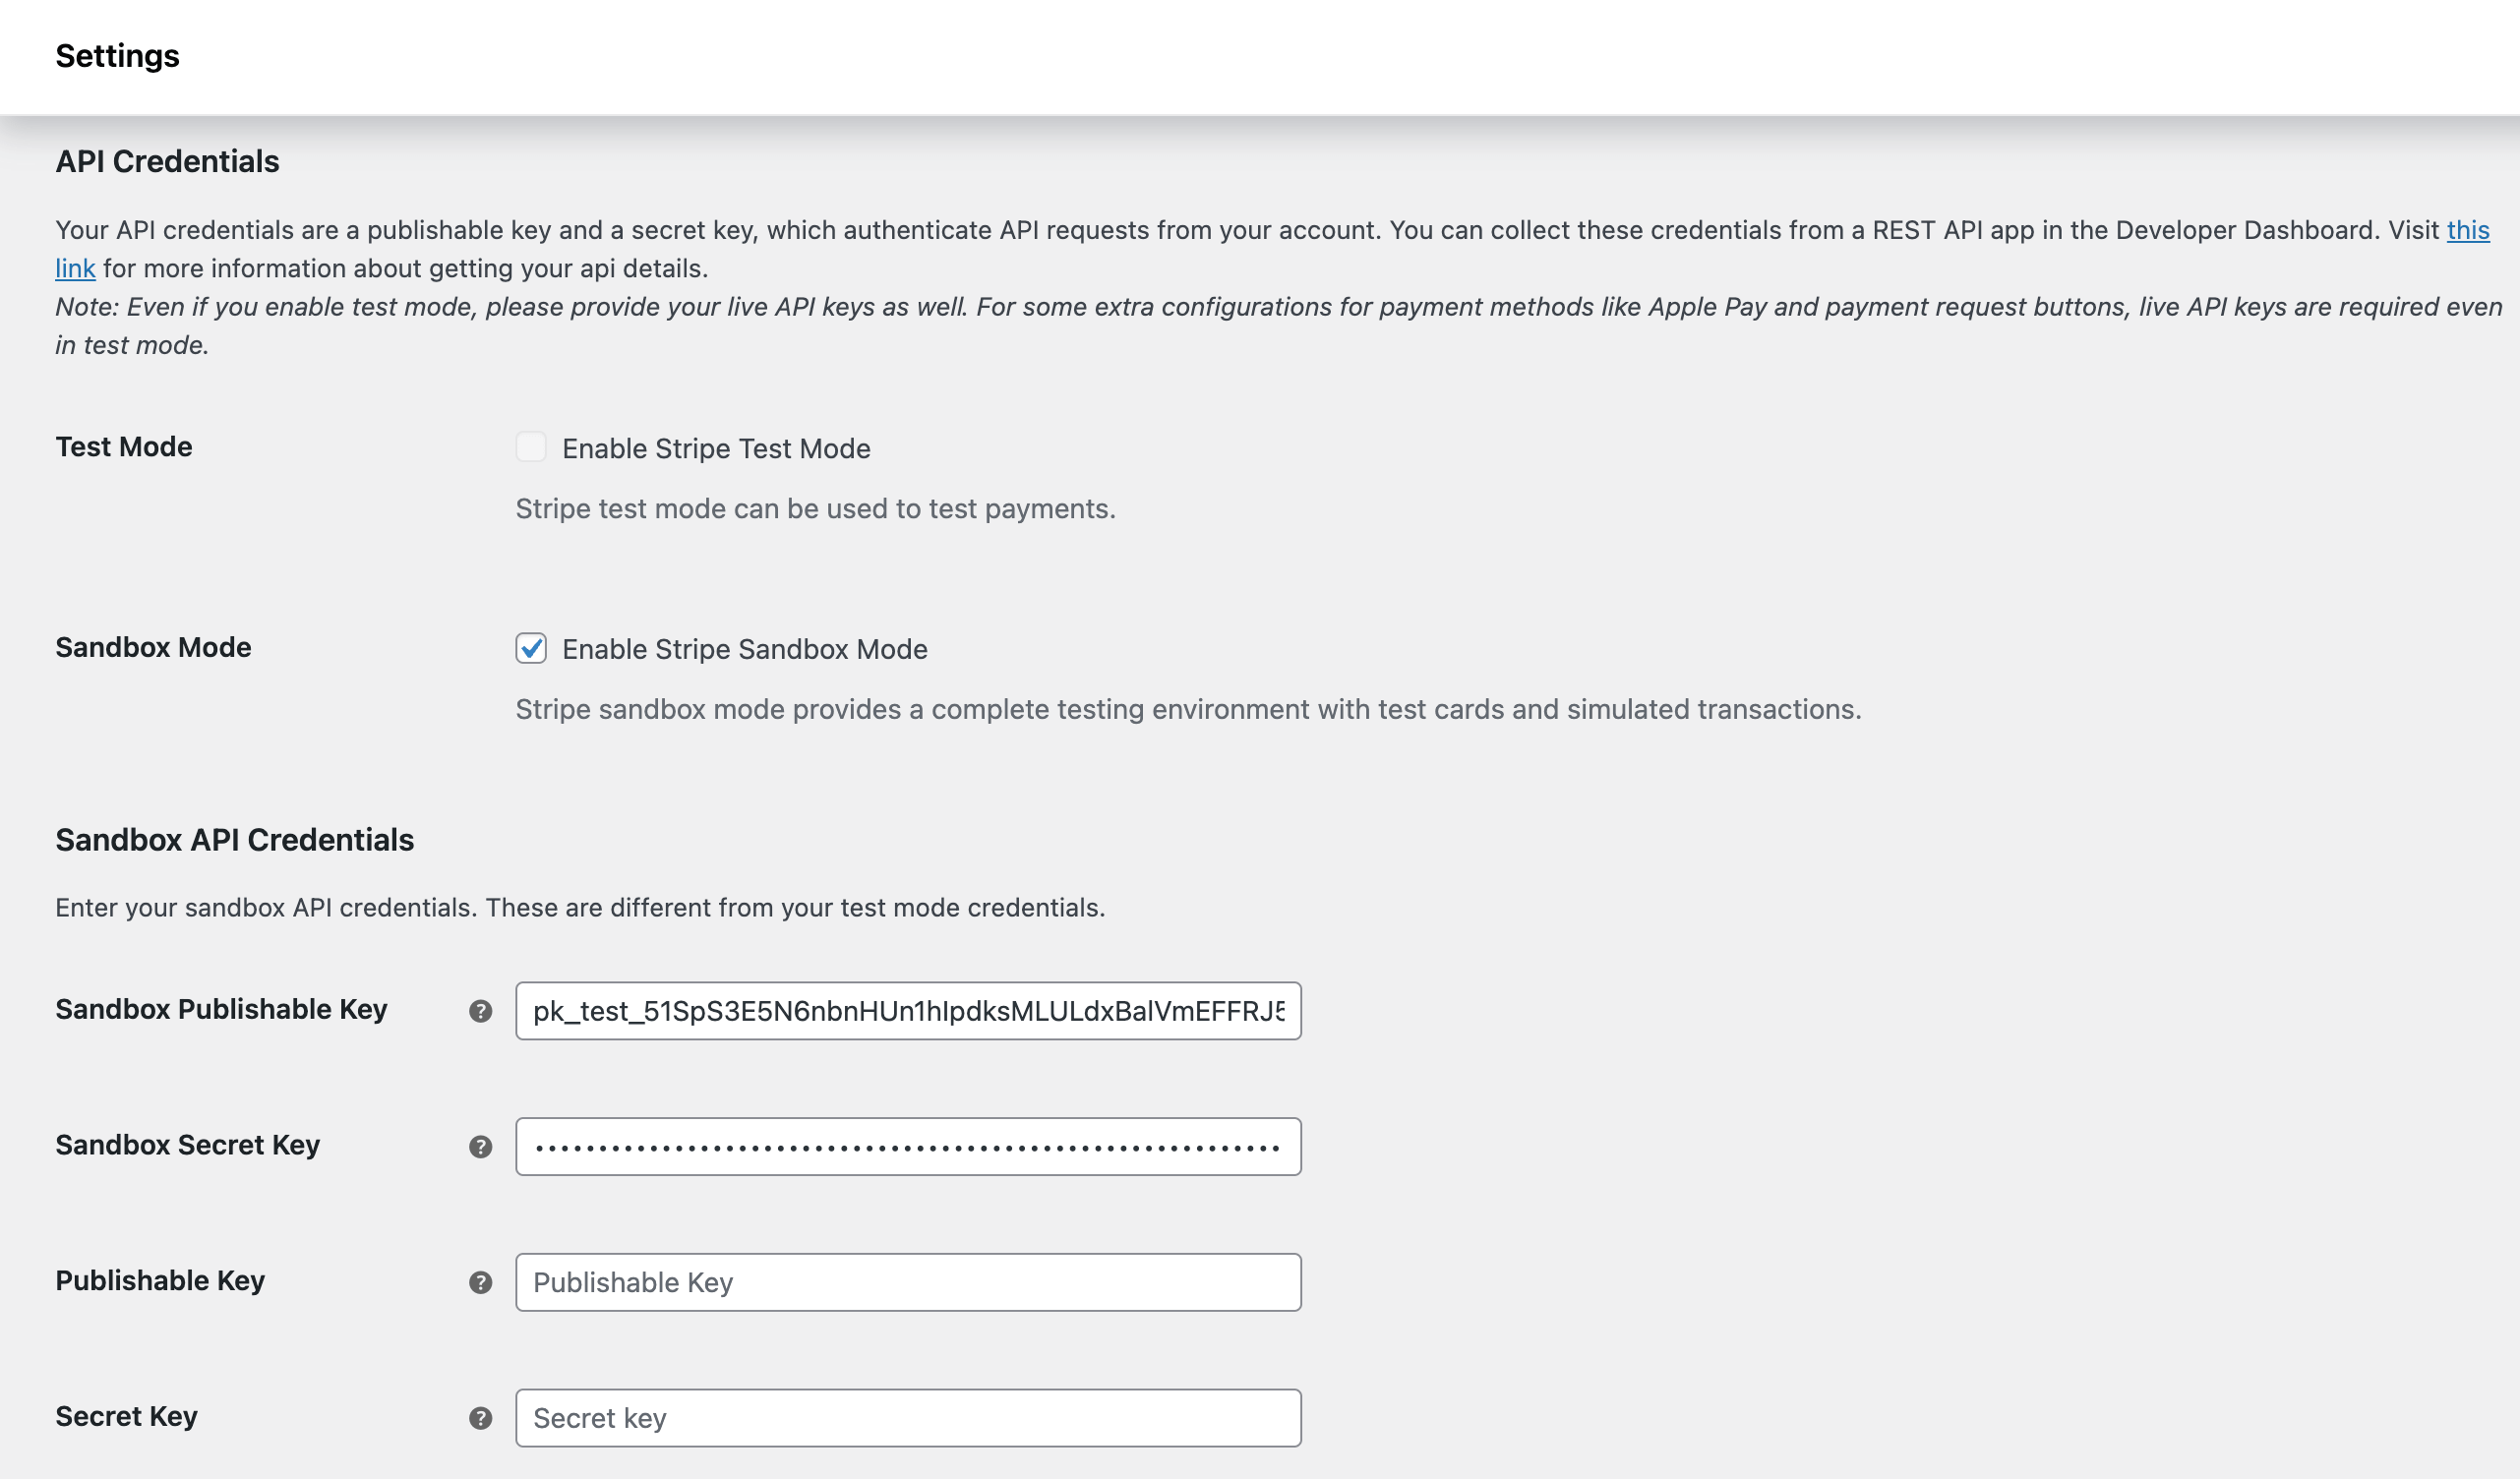
You’ll need:
Get your API keys from https://dashboard.stripe.com/. Copy the publishable key and the secret key and paste it on your WooCommerce payment configuration screen.
As we’re showing the Sandbox Mode, we can’t add the live API keys. You make sure to add the live keys. Stripe requires them for features like Apple Pay and payment request buttons.
Save changes once the keys are added. Stripe Express is now connected to Dokan.
Configure Webhooks Properly
Webhooks allow Stripe and Dokan to communicate in real time. Without them, payments, refunds, and subscriptions can behave unpredictably.
In the Stripe Express settings, find the Webhook Endpoint section.
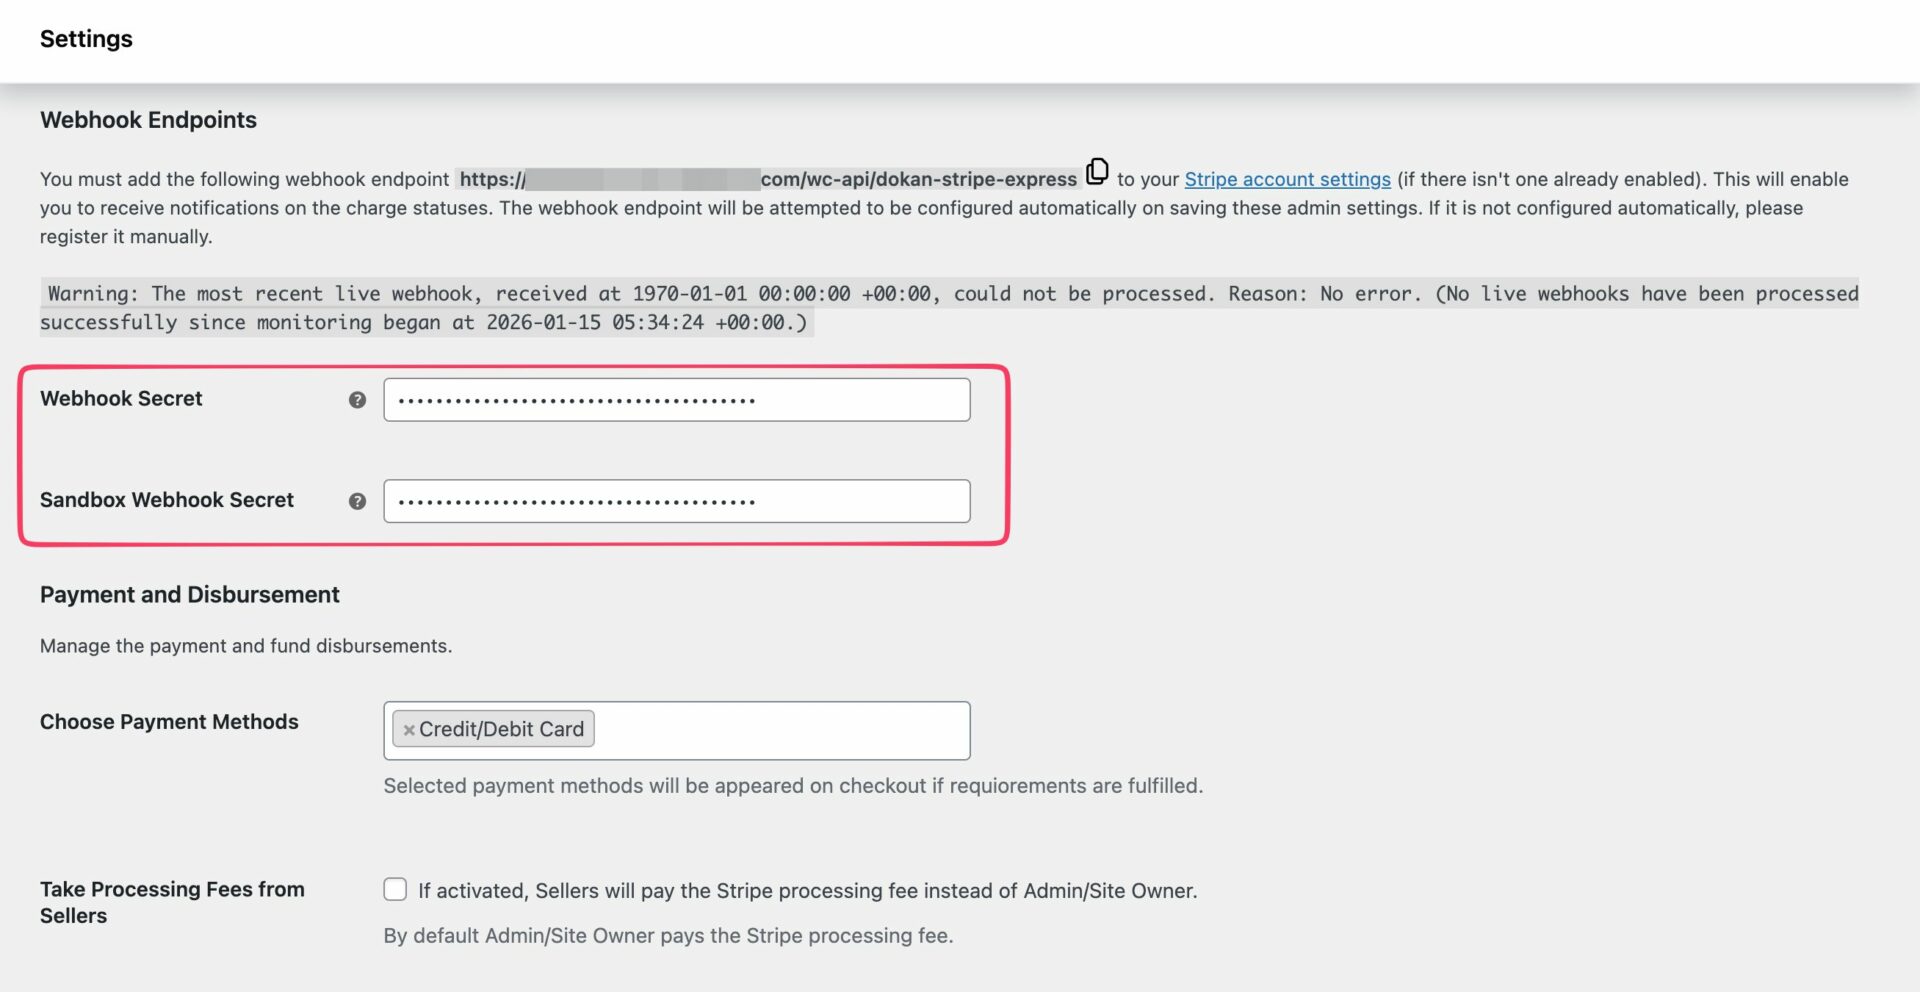
Add your Test Webhook Key after creating the webhook in your Stripe dashboard.
Important: This field should be filled after the webhook exists in Stripe. If it’s missing, save the settings again to retry the request.
Manual Webhook Setup (If Needed)
If Stripe does not create the webhook automatically, you can add it manually from the Stripe dashboard. Go to https://dashboard.stripe.com/webhooks, click ‘Add destination‘.
Choose your account, API version, and required events. Select all the events listed below to avoid missing updates. Make sure these events are selected:
Balance and Charges
- balance.available
- charge.captured
- charge.failed
- charge.succeeded
- charge.dispute.created
- charge.dispute.closed
Payment Intents
- payment_intent.amount_capturable_updated
- payment_intent.requires_action
- payment_intent.succeeded
Setup Intents
- setup_intent.setup_failed
- setup_intent.succeeded
Reviews
- review.opened
- review.closed
Subscriptions and Invoices
- customer.subscription.created
- customer.subscription.updated
- customer.subscription.deleted
- customer.subscription.trial_will_end
- invoice.payment_action_required
- invoice.payment_failed
- invoice.payment_succeeded
After selecting the events, click ‘Continue‘. Then configure your destination and add the Dokan endpoint URL, add an optional description. Then click ‘Create destination.’
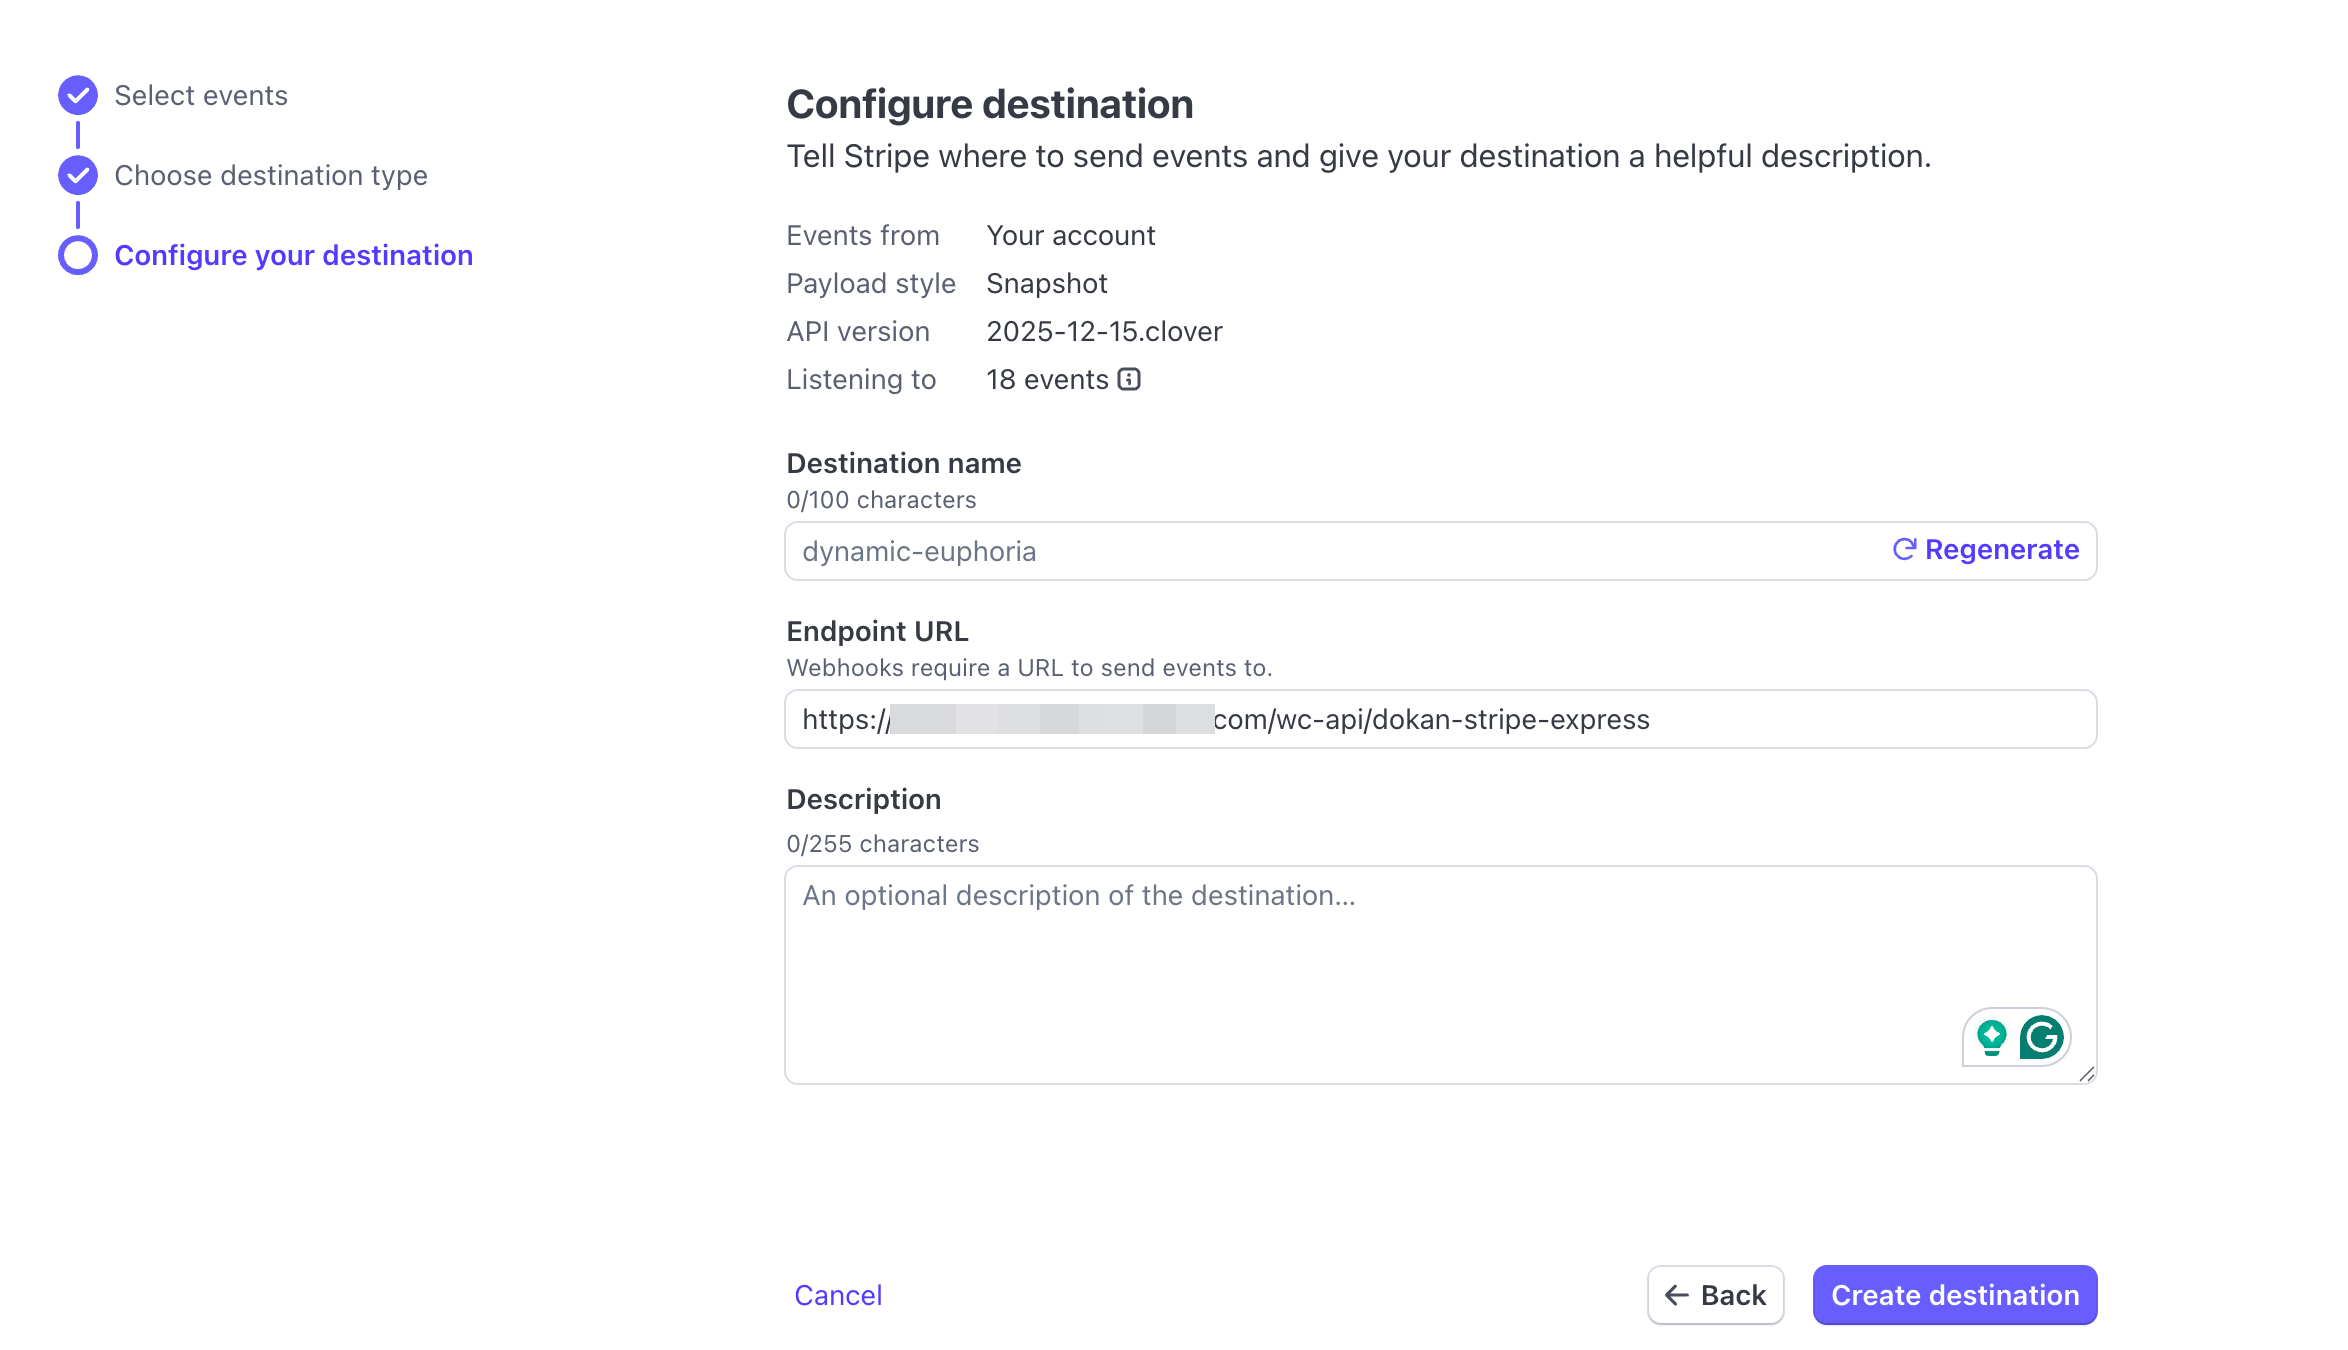
Once configured, you’ll get the ‘Signing secret‘, get the key, and paste it on your WooCommerce configuration screen.
Done! Stripe will notify Dokan about every payment change, refund, and subscription update. Save your settings to finish.
Step 3: Set Up Payment, Fees, and Disbursement Rules
This section decides how money flows through your marketplace. Take a few minutes here. It pays off later.
Choose Payment Methods
From the Stripe Express settings, select the payment methods you want to offer. You can enable:
If you enable manual capture, note this: Only card payments support manual capture. All other methods will be hidden. You must capture the payment within 7 days, or Stripe will cancel the authorization.
Decide Who Pays the Processing Fees
You can choose whether:
If you run a commission-based marketplace, charging fees to vendors often makes more sense.
Enable Saved Cards
Enable Saved Cards if you want faster repeat purchases. Card data is stored securely on Stripe’s servers, not your site. This improves both security and checkout speed.
Set Disbursement Mode
Now choose when vendors receive their payouts. You have three options:
Delayed payouts work well if you sell physical products or need extra review time.
Customer Bank Statement Name
Set the name customers see on their bank statements. Use a clear and recognizable name, like your marketplace brand or website domain. This reduces disputes and chargebacks.
Customize Payment Appearance
Stripe lets you customize the checkout look using themed payment elements. Choose colors that match your brand while keeping contrast high for readability. Save changes once everything is configured.
Step 4: Enable Apple Pay and Google Pay Buttons
Apple Pay and Google Pay reduce checkout friction. When customers can pay with one tap, fewer carts get abandoned. Stripe Express supports both through Payment Request Buttons. From the Stripe Express settings:
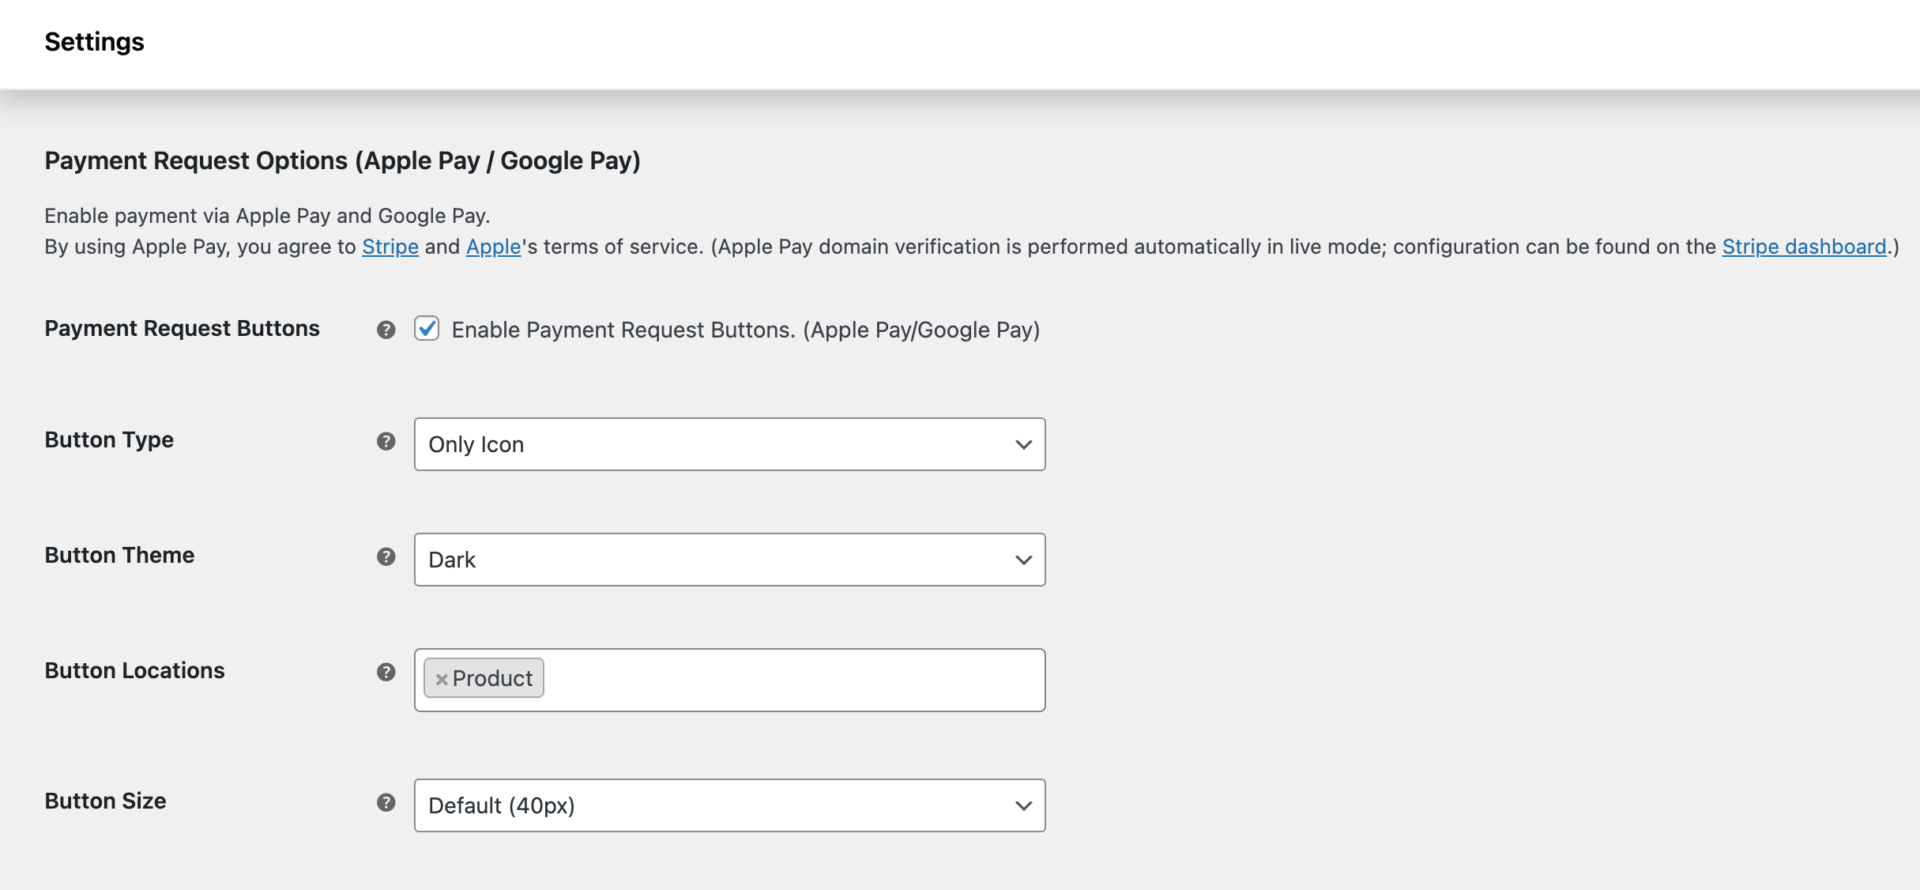
Configure Button Settings
You can customize how the buttons look and where they appear. Set the following options:
Placing the button on product and cart pages often speeds up purchases.
Register Your Apple Pay Domain
Apple Pay requires domain verification. Make sure your domain is registered in Stripe → Settings → Payments →Payment methods. Without this, Apple Pay will not appear.
Step 5: Enable Vendor Withdrawals via Stripe Express
Stripe Express won’t work fully until vendors can withdraw their earnings. This step enables that option. From your WordPress admin dashboard:
- Go to Dokan → Settings → Withdrawal Options.
- Enable Stripe Express as a withdrawal method.
- Save changes.
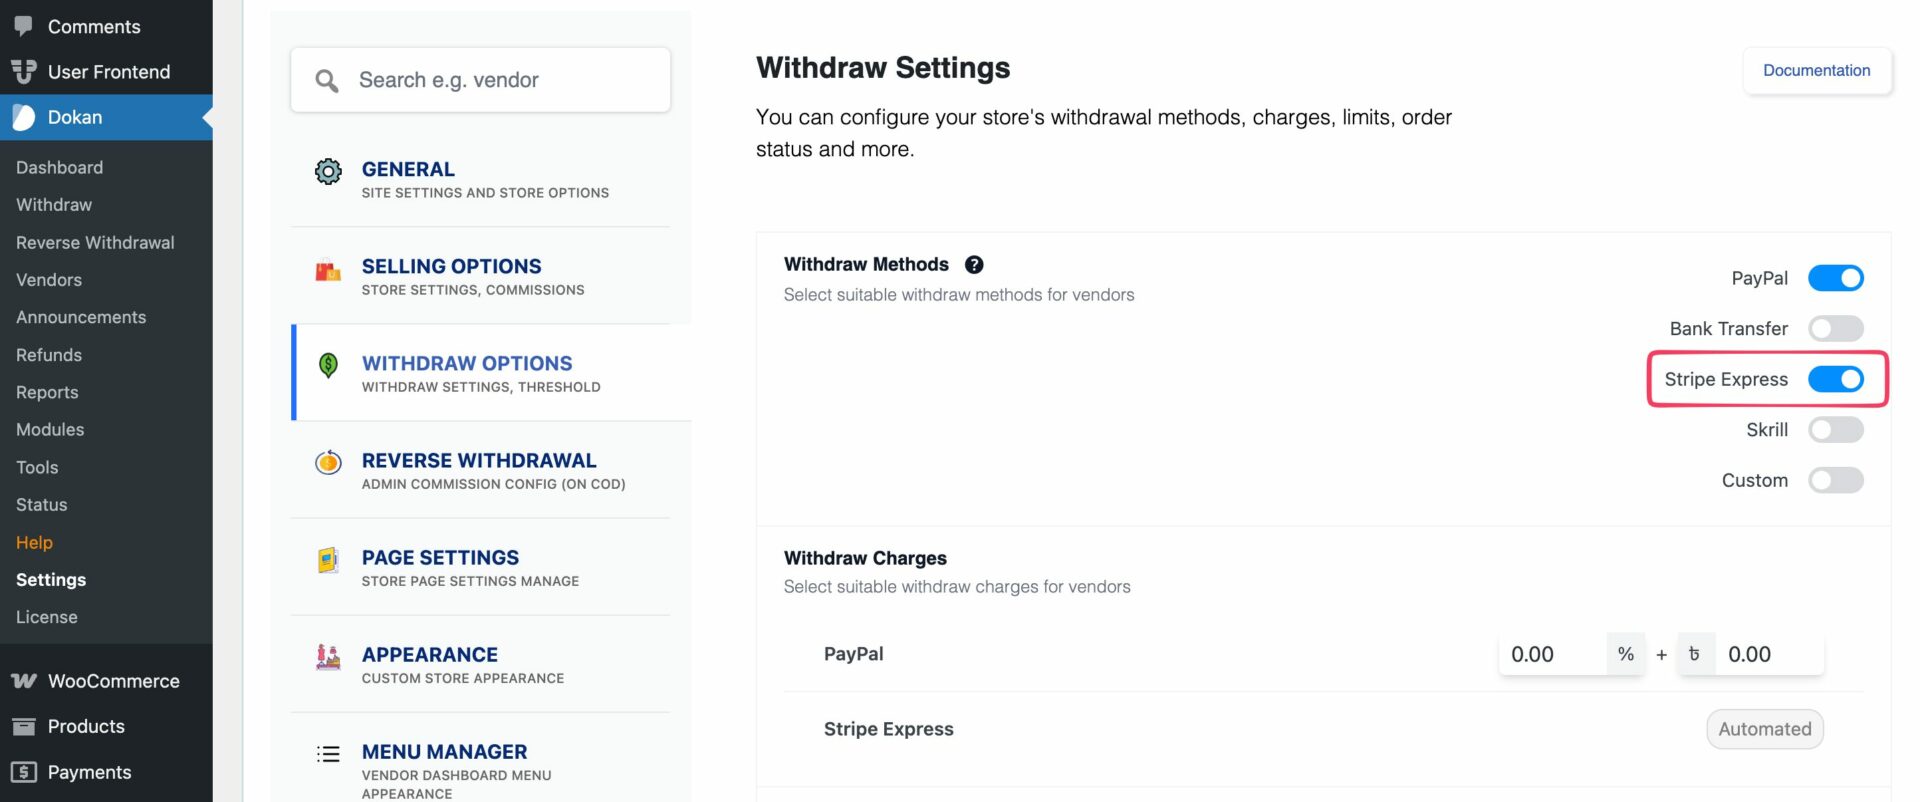
This allows vendors to receive payouts directly through Stripe.
How Vendors Connect Their Stripe Accounts
Vendors connect to Stripe from their own dashboard. They need to go to: Vendor Dashboard → Settings → Payments. From there, they click Connect with Stripe.
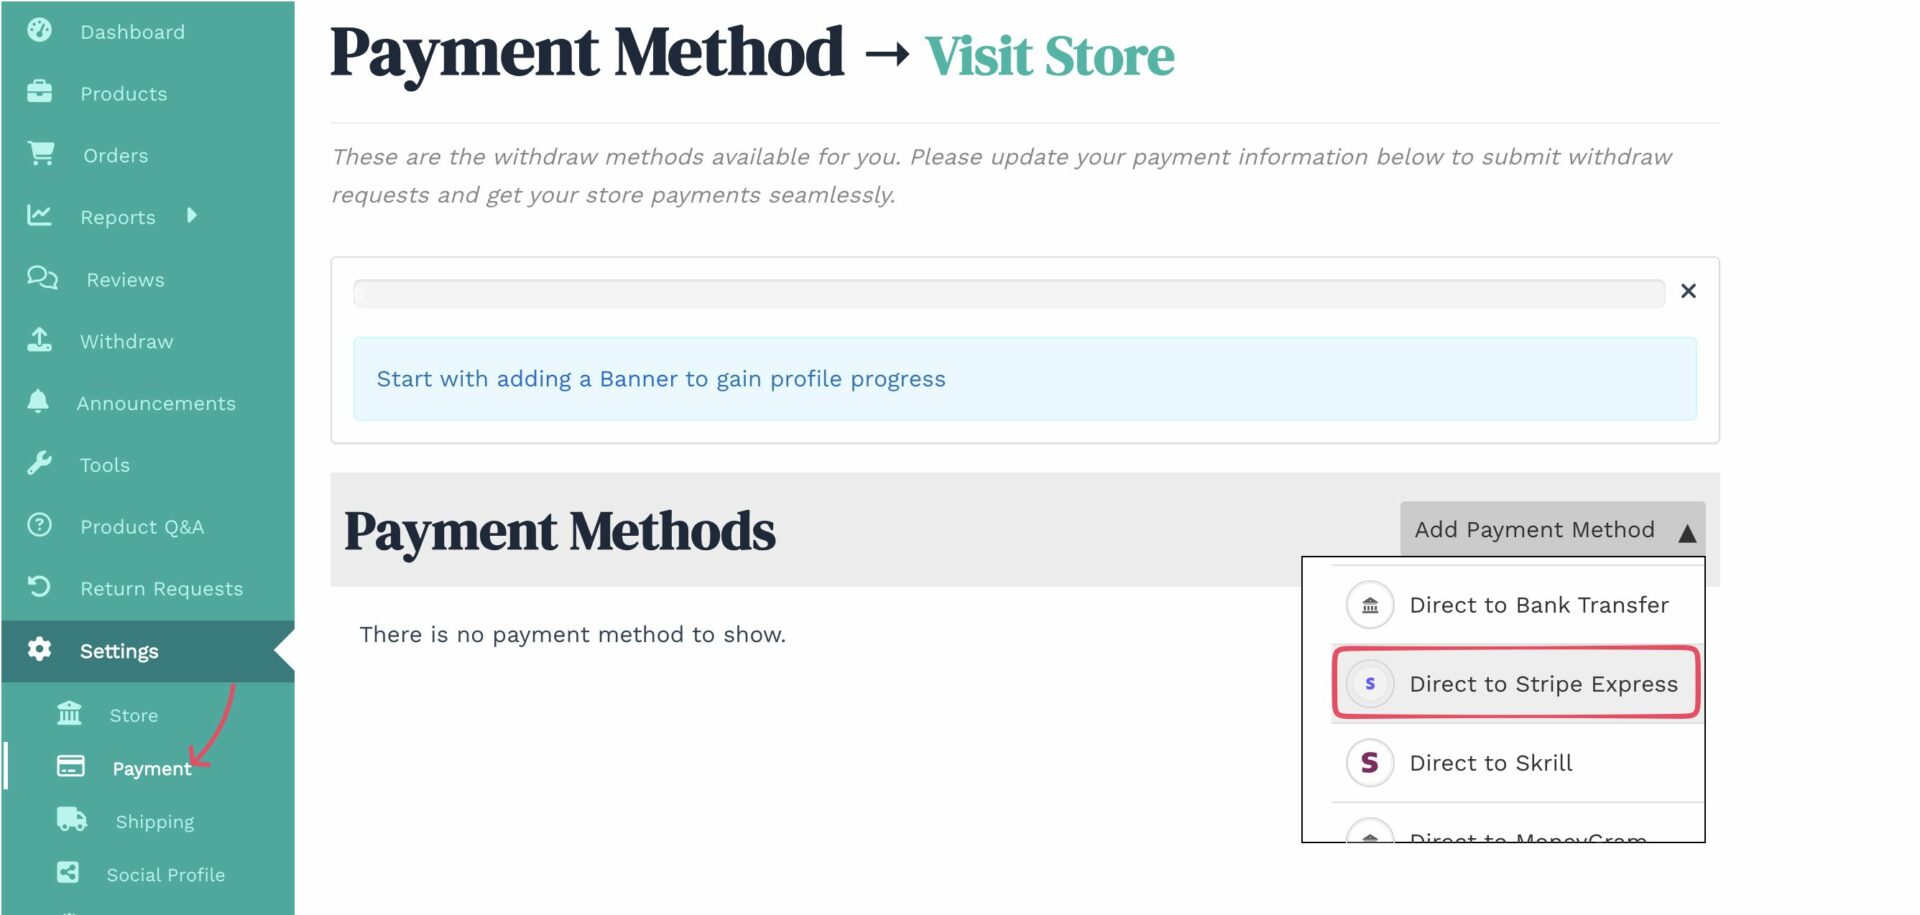
Stripe then guides them through onboarding:
If a vendor leaves the setup halfway, Stripe saves their progress. They can return anytime and click Complete Onboarding to continue.
Vendor Stripe Dashboard Access
Once connected, vendors get access to their own Stripe Express dashboard. From there, they can:
This reduces support requests and gives vendors confidence in your payment system.
Read the detailed guide on configuring Stripe Express with Dokan for a step-by-step setup and best practices.
What Customers Experience at Checkout
Once Stripe Express is configured, the customer side stays simple. That’s the goal. Customers see familiar, trusted payment options based on their device and browser. Customers can pay using:
Stripe automatically shows the best option for each customer.
Common Issues: How to Configure Stripe Express with Dokan
Even with a clean setup, a few issues can pop up. Here are the most common ones and how to fix them fast.
1. Apple Pay or Google Pay Not Showing
Check the following:
If shipping data conflicts with wallet information, the buttons may not appear. Checkout will still work normally.
2. Vendors Are Not Receiving Payouts
This usually happens when:
Ask vendors to complete onboarding and check payout rules from Stripe Express settings.
3. Refunds Fail or Get Stuck
Refund issues often occur when:
Set payouts to Manual, so refunds always have an available balance.
4. Webhook Errors or Missing Payment Updates
If orders do not update correctly:
Webhooks must be active for subscriptions, refunds, and disputes.
5. Vendors Disconnected After Enabling Cross-Border Settings
This happens when: Restricted countries are enabled, the Disconnect Vendors option is active
Review country restrictions before enabling disconnection.
Is Stripe Express Worth Using with Dokan?
If you’re running a serious multi-vendor marketplace, Stripe Express is worth the setup time.
You get faster checkout with Apple Pay and Google Pay. Vendors get their own dashboards and clear payout tracking. You keep control over fees, timing, and compliance. Everyone knows where the money is and when it moves.
Yes, the setup has a few steps. But once configured, Stripe Express runs quietly in the background and scales as your marketplace grows.
Configure it properly once, and you avoid payment headaches later. If you’re building your Dokan marketplace for growth, Stripe Express gives you a payment system that won’t slow you down.
If you need any assistance setting things up, please contact us. Or, you can get instant help from our live chat agents.

Subscribe to
Dokan blog


Leave a Reply