


Setting up a payment gateway is crucial for any online business. PayPal is one of the most popular payment gateways out there. And setting it up in your WooCommerce store ensures the desired customer experience to easily make purchases and payments.
However, setting up a PayPal payment gateway can seem daunting for beginners.
But no worries, in this step-by-step tutorial, we will guide you through the process of setting up a PayPal payment gateway in WooCommerce. We will cover everything from creating a PayPal business account to integrating PayPal into your WooCommerce store.
By the end of this tutorial, you will have a fully functional PayPal payment gateway integrated into your WooCommerce store, ready to accept payments from customers around the world. So, let’s get started!
Why Use PayPal Payment Gateway with Your WooCommerce Store?
PayPal is one of the most popular payment gateways that allows businesses and customers to securely send and receive payments online. If you’re running a WooCommerce store, using PayPal can be a great option for a variety of reasons:
- Trusted and Widely Recognized: PayPal is a well-known payment gateway and is trusted by millions of customers and businesses worldwide. Using PayPal on your WooCommerce store can give your customers confidence in your brand and provide them with a familiar and easy-to-use payment option.
- Easy to Set up: Integrating PayPal with your WooCommerce store is relatively easy and straightforward. WooCommerce comes with a built-in PayPal integration, which means you can quickly set it up without any additional plugins or coding.
- Secure and Reliable: PayPal uses advanced security measures to protect your customers’ payment information, such as encryption and fraud detection tools. This can help reduce the risk of payment fraud and chargebacks, which can be costly and time-consuming for your business.
- Mobile-Friendly: PayPal is also mobile-friendly, which means customers can make payments easily from their smartphones and tablets. This is particularly important as more and more customers are using their mobile devices to shop online.
- International Payments: PayPal supports payments in multiple currencies and operates more than in 200 countries, making it an ideal option if you have an international customer base. It also offers language support for over 20 languages, making it accessible to customers all around the world.
Overall, using PayPal with your WooCommerce store can provide your customers with a trusted, secure, and convenient payment option that can help improve your online sales and customer experience.
How to Set up PayPal Payment Gateway in WooCommerce- 3 Steps Tutorial
So, here we are! In this segment, we will be focusing on the main tutorial part to set up the PayPal gateway to your WooCommerce store. Basically, there are three steps to get your job done.
First, take a quick look at the steps:
- Create a PayPal Business Account
- Enable PayPal As a Payment Gateway
- Connect WooCommerce to PayPal
Now be ready with your computer and follow the below details to set up the PayPal payment gateway for your eCommerce business right away. Let’s get started with the first step-
Step 01: Create a PayPal Business Account
The first step in adding the PayPal payment gateway to your WooCommerce store is to create a PayPal business account. If you already have a PayPal business account, you can proceed to the next step, otherwise follow the below procedures.
a) Choose PayPal Business Account
Go to the PayPal website and click on the Signup button. Then choose the Business account and click on the Next button.
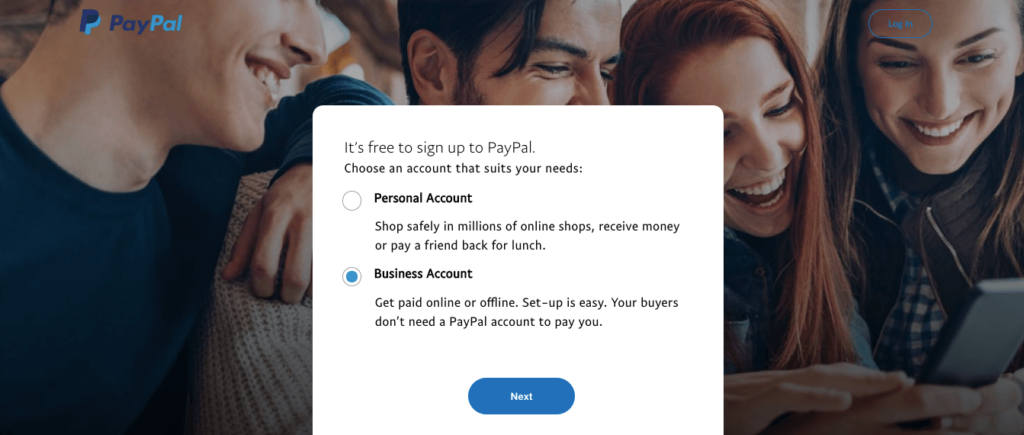
On the next page, you have to input your business email and password. Ensure you have followed their guidelines to make your password strong enough to guess.
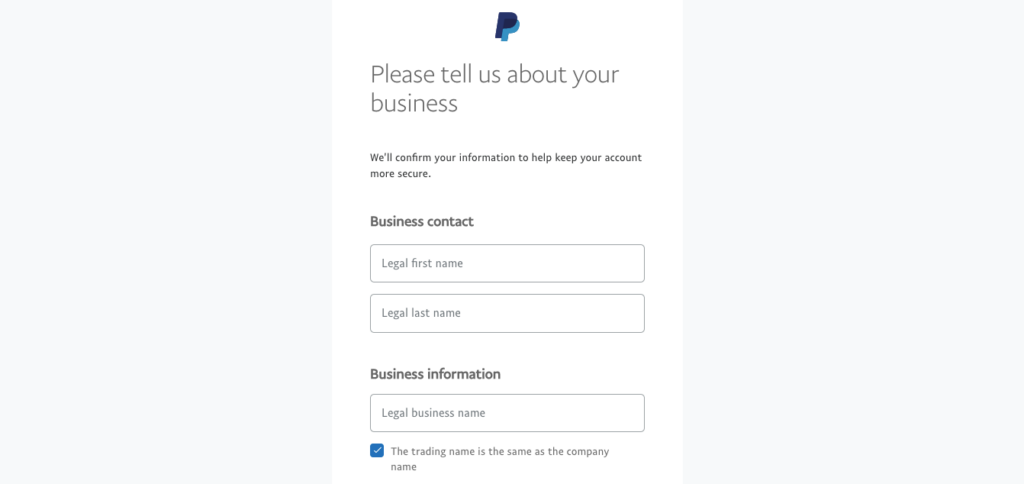
b) Insert Your Business Information
Now you have to put your business information in this step. You will be asked to fill up these fields:
- Legal first name and last name
- Legal Business name
- Business phone number
- Business location
- City & zip code
Make sure all the information that you are going to insert here is accurate.
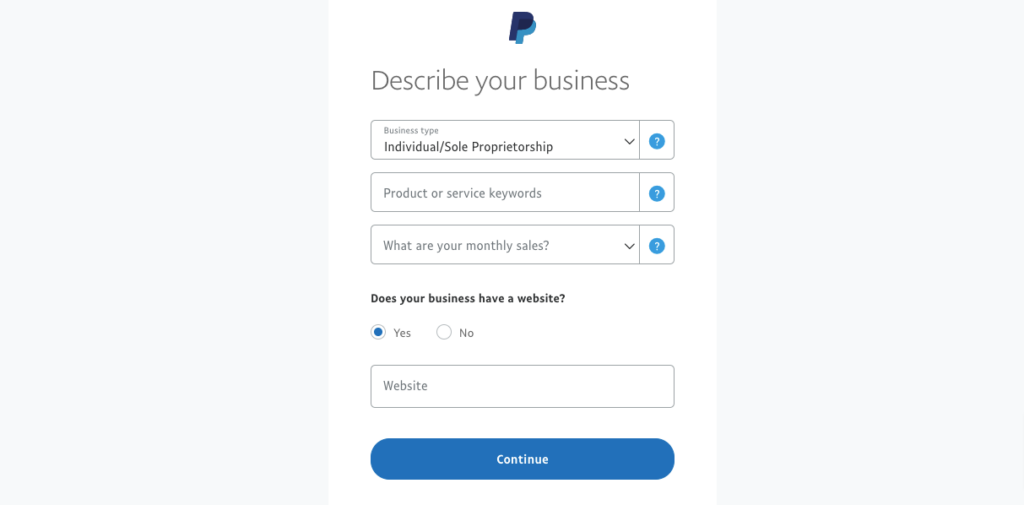
After submitting the above information, you will be redirected to a new page. There you have to fulfill these below fields:
- Business type
- Product or service category
- Monthly sales amount, and
- Website URL (optional)
c) Submit Your Personal Information
In this step, you have to submit your SSN and Date of birth. SSN means your Social Security Number.
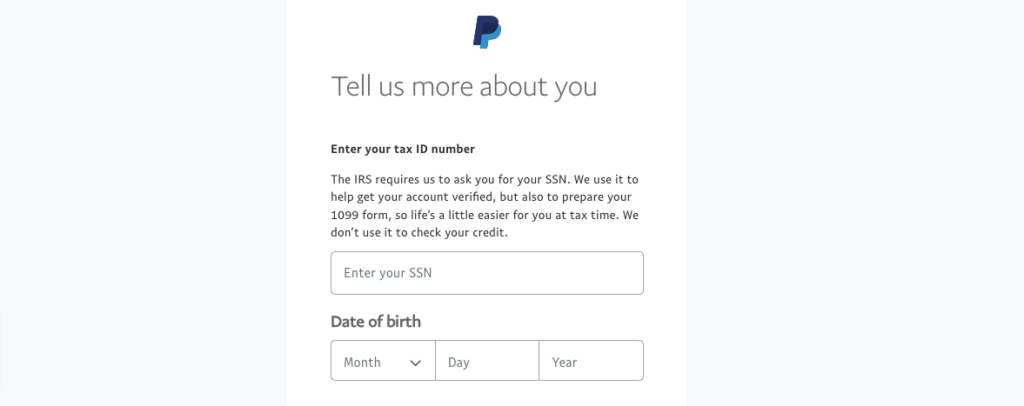
After providing this information, click on the submit button, and your PayPal account creation is done.
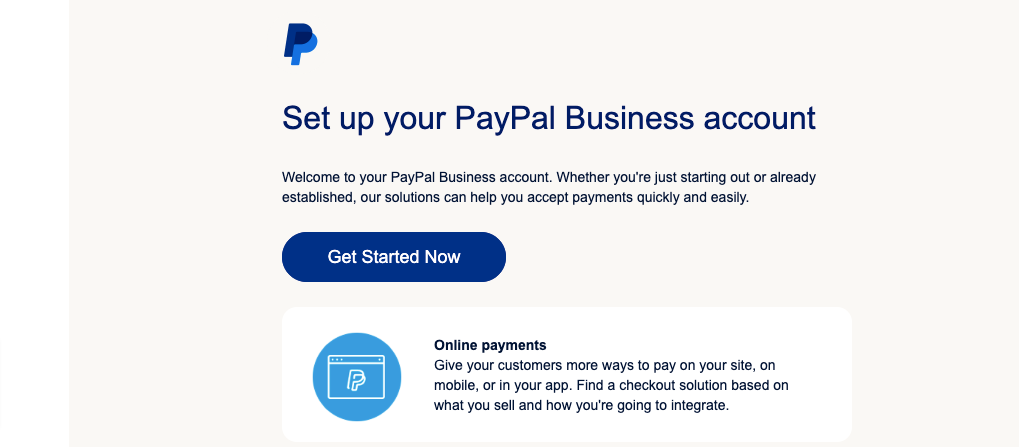
Now it’s time to check your email inbox. If you provide all of this information correctly, you’ll get two different emails from PayPal. The first one will instruct you to activate your account by confirming the email.
On the other hand, the second email will assist you in setting up your PayPal business account. Open the second email, and click on the “Get Started Now” button.
d) Link Your Bank Account
Visit your profile to link your bank account. Click on the “Link a new bank” option, and it will show the PayPal-supported bank accounts from your country.
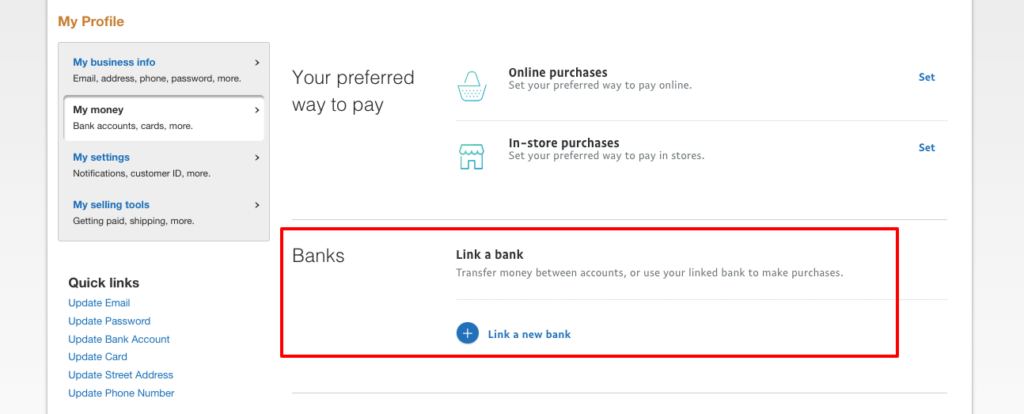
Then, choose your bank and enter the required information like your User ID, Password, and PIN number.
After filling out the form, click on the “Agree and Link” button, and PayPal authority will initiate the linking process. It may take 2 to 3 business days to connect your bank account with PayPal. So, be patient on this step!
Step 02: Enable PayPal As a Payment Gateway
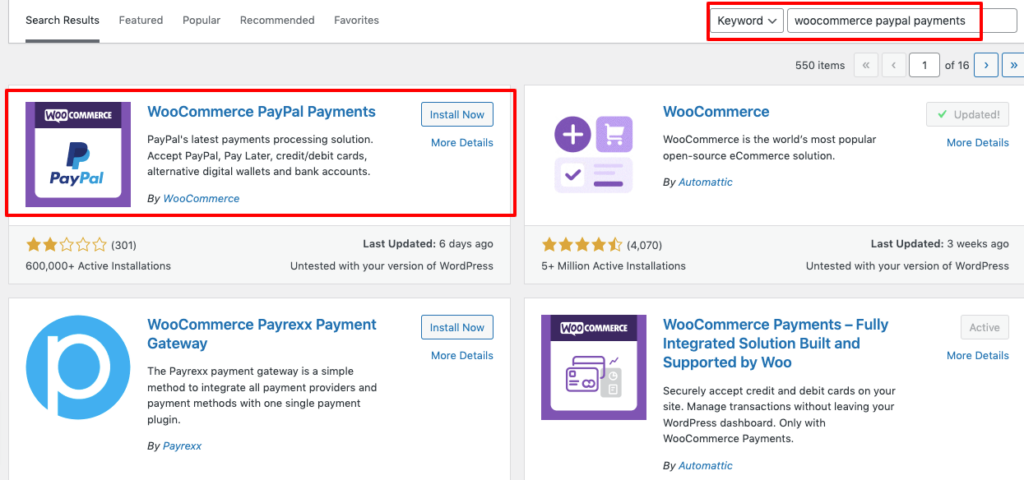
By default, WooCommerce doesn’t support PayPal payments. You need to first install and activate the WooCommerce PayPal Payments plugin for the payment method to be available.
a) Install a WooCommerce Payment Plugin
To do this, navigate to Plugins > Add New within your WordPress dashboard and search for “PayPal”.
Once you find the plugin, click Install Now, then Activate.
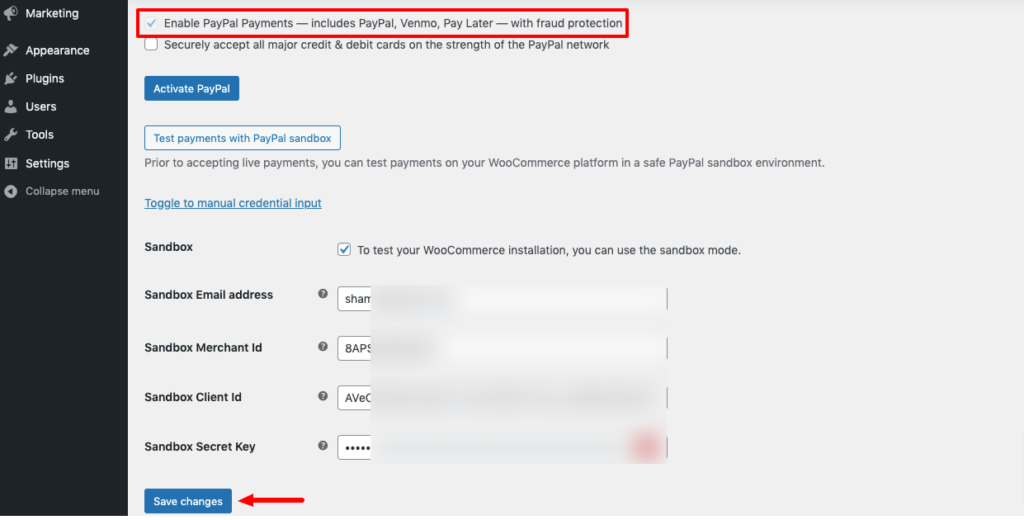
Now, when you go to WooCommerce > Settings > Payments, you’ll see that the PayPal payment method has been added.
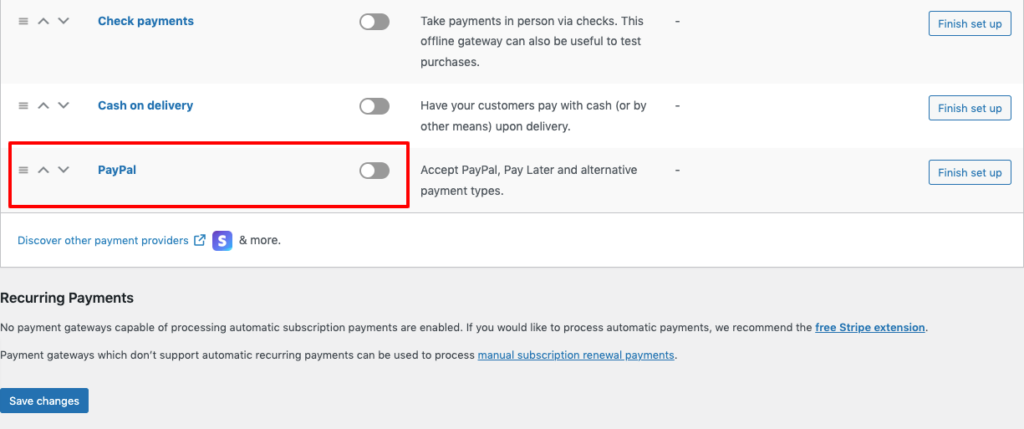
Toggle the switch on to enable this payment method. Then click Save Changes.
Now we will connect PayPal manually to your WooCommerce store. For this, you need to click Toggle to manual credential input. Some new information fields will then be added.
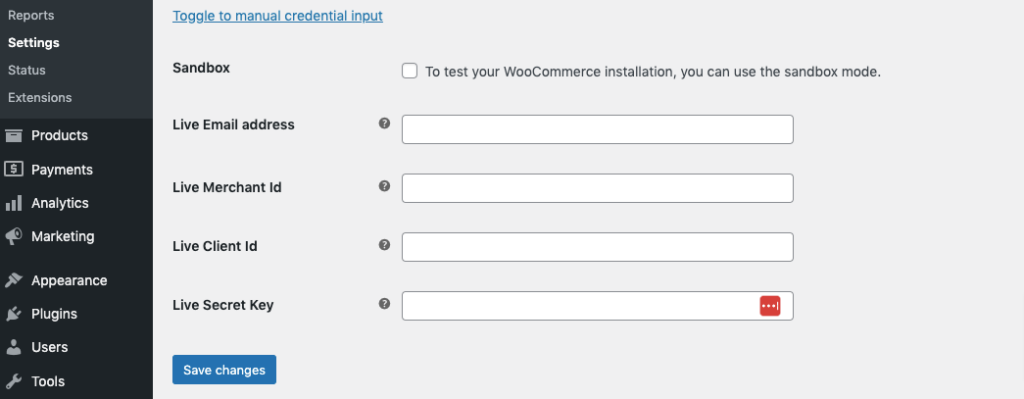
The Sandbox option or mode here allows you to test your WooCommerce PayPal connection before making it available to the public. It’s just a test account. So, you don’t need to worry about losing money while using sandbox transactions. You can skip the Sandbox option and follow the next step:
b) Collect Merchant ID
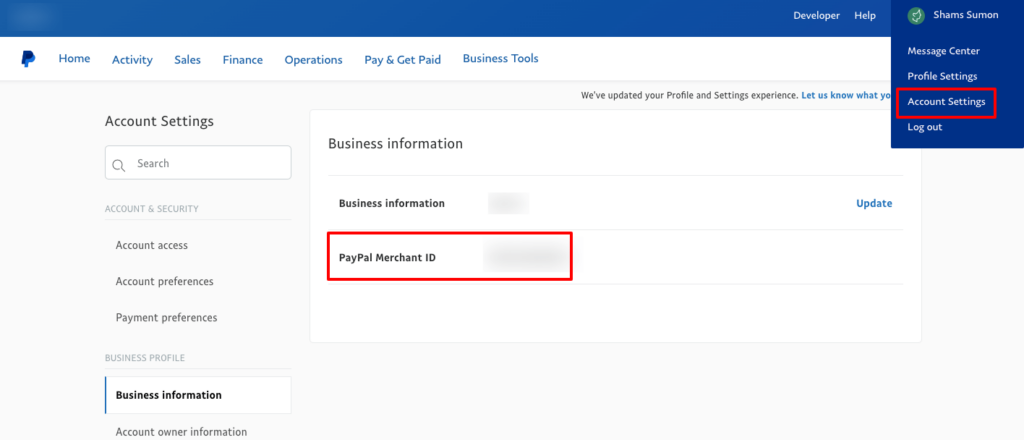
Log in to your PayPal business account and hover over your name in the top right corner of your account dashboard and click Account Settings.
On this page, click the Business information tab to get access to your merchant ID.
c) Collect Client ID and Secret Key
To continue, you also need the client ID and the secret key. To get these details, click Developer in the top panel of your business account dashboard.

Now, go to your developer account dashboard by hovering over your name in the top right corner and clicking Dashboard.
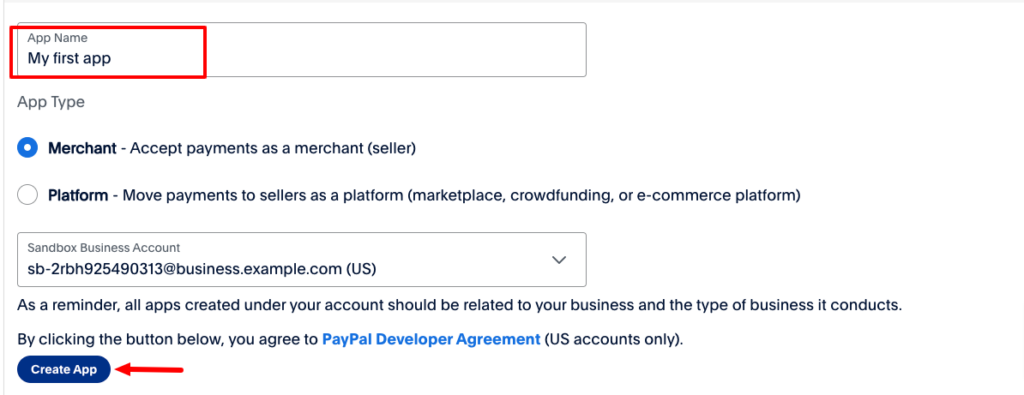
Here, go to the My apps & credentials section. You want to create a new REST API app by clicking Create App.
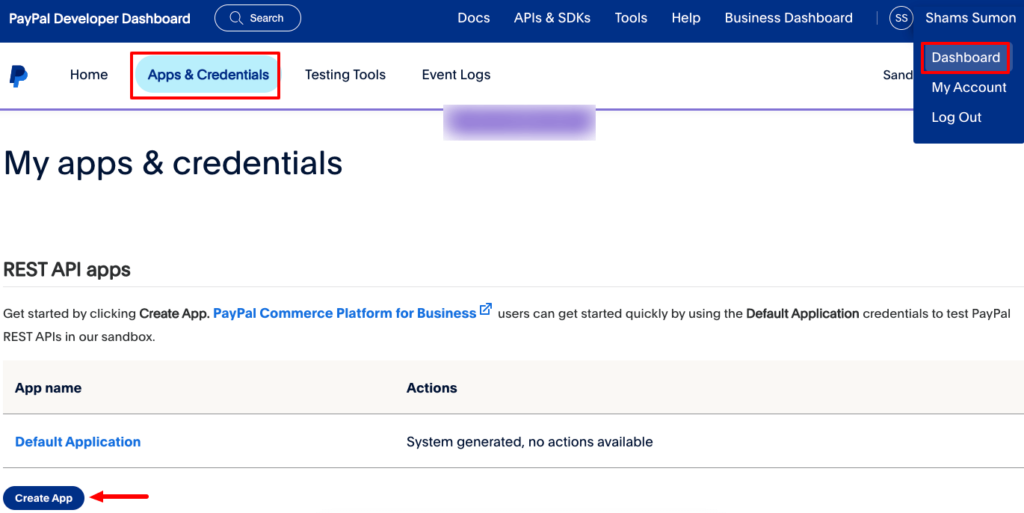
Type an app name of your choice and click Create App again.
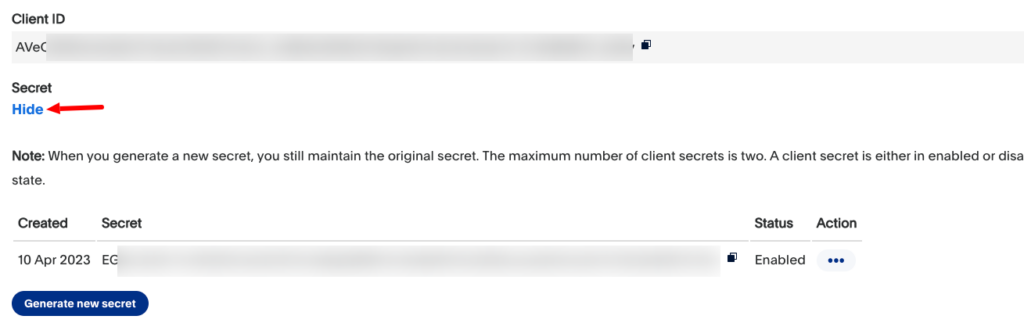
After creating the app, you’ll now be able to see the client ID under the live API credentials. Also, you can click Show under the Secret field to reveal the secret key.
Now follow the last and final step:
Step 03: Connect Your PayPal Account to Your WooCommerce Store
Now that you know where all the necessary credentials are, copy and paste them on the PayPal Checkout page in your WordPress dashboard. Then click Save Changes.
At this point, all you need to do is check the Enable the PayPal Gateway box at the top of the page.
Congratulations, you’ve successfully configured your site’s PayPal checkout!
How Does WooCommerce Process PayPal Payments
WooCommerce processes PayPal payments through PayPal’s standard payment gateway. Here’s an overview of how the payment process works:
- Customer adds items to their cart and proceeds to checkout on the WooCommerce store.
- At checkout, the customer selects PayPal as their payment method.
- The customer is then redirected to PayPal’s website to log in or create an account (if they don’t already have one).
- After logging in, the customer reviews the payment details and confirms the transaction on the PayPal website.
- PayPal processes the payment and sends the customer back to the WooCommerce store’s thank-you page.
- WooCommerce receives the notification of the completed payment from PayPal and updates the order status accordingly.
- The order is then processed and fulfilled by the WooCommerce store.
This payment process is handled securely using SSL encryption to protect the customer’s payment information.
WooCommerce also supports PayPal’s IPN (Instant Payment Notification) feature, which allows WooCommerce to receive real-time payment confirmation from PayPal, ensuring that orders are processed promptly and accurately.
How Much Does PayPal Charge Per Transaction?
PayPal charges a fee for each transaction that varies depending on the type of transaction, the currency used, the country of the recipient, and other factors.
There are two types of transactions in PayPal:
Domestic: A transaction occurring when both the sender and receiver are registered with or identified by PayPal as residents of the same market.
International: A transaction occurring when the sender and receiver are registered with or identified by PayPal as residents of different markets.
Standard Rate for Receiving Domestic Transactions
| Payment Type | Rate |
|---|---|
| PayPal Checkout | 3.49% + Fixed Fee |
| PayPal Guest Checkout | 3.49% + Fixed Fee |
| Send/Receive Money for Goods and Services | 2.99% |
| Standard Credit and Debit Card Payments | 2.99% + Fixed Fee |
*Fixed Fee: Basically, the fixed fee rate depends on the currency that you receive. Hence, it differs from country to country. For instance, a USA-based customer pays a different fixed fee than an Australian-based customer.
Fixed fee for commercial transactions
| Currency | Fee |
|---|---|
| US Dollars | 0.49 USD |
| UK Pounds | 0.39 GBP |
| Euro | 0.39 EUR |
| Australian Dollar | 0.59 AUD |
Standard Rate for Receiving International Transactions
Fee for international commercial transactions = Fee for receiving domestic transactions + 1.50%.
If you are wondering what is the minimum amount for withdrawal from a PayPal account, let us clarify that now.
PayPal has different limits and different withdrawal options based on your location, so it mostly depends on your country. However, in most cases, there should be no withdrawal limit.
Bonus 1- How to Get a PayPal Payment off Hold in WooCommerce
If you are using WooCommerce with PayPal as a payment gateway, it is possible that some payments may be placed on hold by PayPal for various reasons, such as a higher-than-usual transaction amount, a sudden increase in sales volume, or security reasons.
Here are the steps to get a PayPal payment off hold in WooCommerce:
- Log in to your PayPal account and click on the “Activity” tab. Then choose the “All holds” option from the “Transaction Type” menu.

- Locate the payment that is on hold and click on it to view the details.
- Check the reason for the payment being on hold, as this will determine the next steps you need to take.
- If the payment is on hold due to a higher-than-usual transaction amount, you will need to provide additional information to PayPal to confirm that the transaction is legitimate. You can do this by clicking on the “Resolve” button next to the payment on the PayPal website and following the instructions provided.
- If the payment is on hold due to a sudden increase in sales volume or for security reasons, PayPal may release the payment automatically within a few days, depending on their policies and procedures.
- Once the payment has been released by PayPal, it should be automatically updated in your WooCommerce store, and the order status should change from “On Hold” to “Processing” or “Completed”.
It is important to note that PayPal’s policies and procedures for releasing payments on hold may vary, and it is best to check with their support team if you have any questions or concerns about a particular payment.
Bonus 2- How to Have Two WooCommerce Sites with the Same PayPal Payment
If you want to use the same PayPal payment gateway on two different WooCommerce sites, there are a few steps you need to follow:
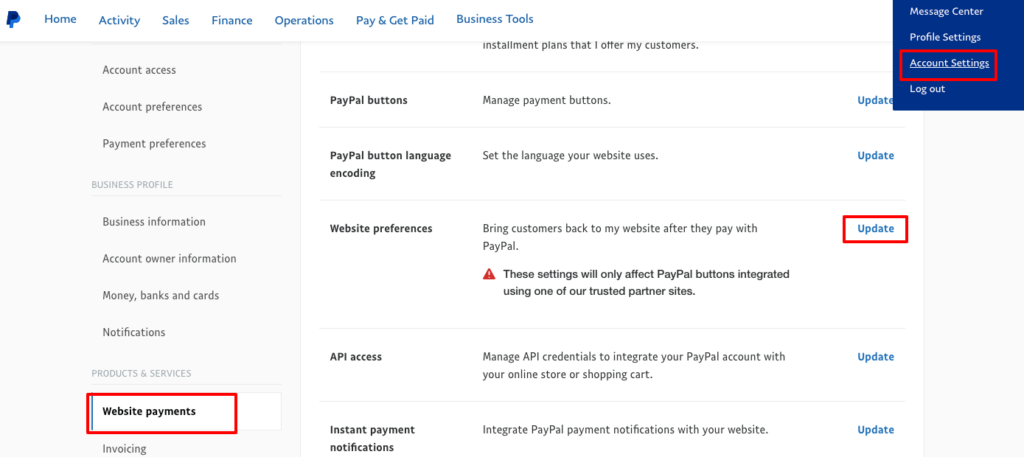
- Log in to your PayPal account and navigate to the “Account Settings” option.
- Scroll down to the “Website preferences” option under the “Website Payment” tab and click on the “Update” button.
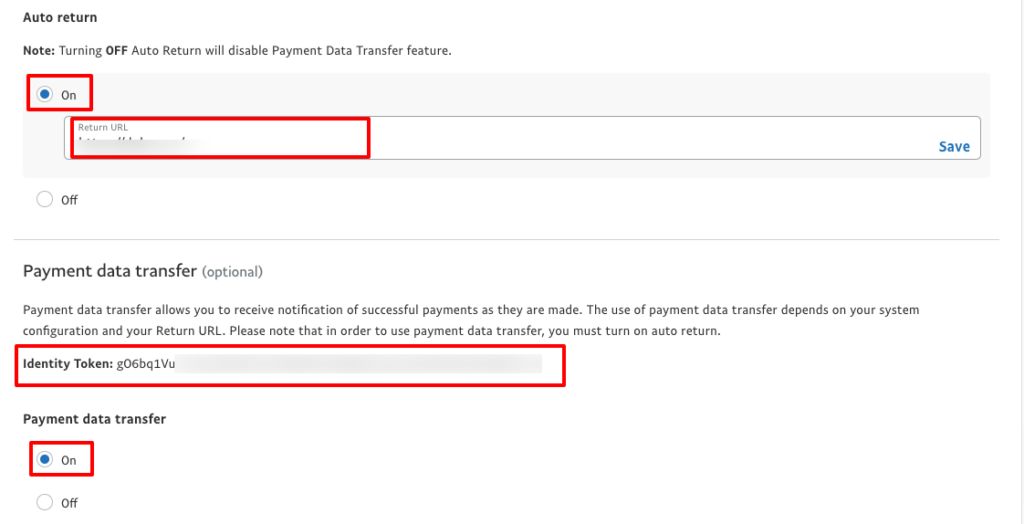
- Under “Auto Return for Website Payments”, make sure the “Auto Return” option is turned on and enter the same URL for both of your WooCommerce sites. This will ensure that customers are redirected to the same page after completing their payment.
- Under “Payment Data Transfer”, turn on the “Payment Data Transfer” option.
- Copy the identity token that is generated and paste it into the WooCommerce settings for both of your sites.
To do this, follow these steps:
- Log in to your WordPress dashboard for the first WooCommerce site.
- Navigate to WooCommerce > Settings > Payments.
- Select “PayPal” as the payment method and enter your PayPal account email address.
- Scroll down to “Advanced Options” and enter the identity token that you copied from your PayPal account.
- Save the settings and repeat the process for the second WooCommerce site.
By following these steps, you will be able to use the same PayPal payment gateway on both of your WooCommerce sites, and customers will be redirected to the same page after completing their payment.
However, it is important to keep in mind that you will need to keep track of your inventory and orders separately for each site, as they are separate instances of WooCommerce.
Does PayPal Freeze or Limit Accounts?
Yes, we have heard some news that PayPal has frozen or limited some accounts. Most of the complaints we have come across seem to indicate that Paypal will rarely hold your funds for longer than 6 months, but 6 months can be a long time if you need access to your money.
And once they freeze your funds, it doesn’t make sense to continue accepting money through PayPal if you can’t access it. In other words, once your account is frozen, you are pretty much screwed.
Here are some reasons behind freezing or limiting your account:
- You’ve received an abnormally large amount of money in your account that is way above your average
- Someone has filed a complaint to Paypal about your business
- A series of chargebacks have been placed against your account
- Your website has questionable content
- You are in violation of PayPal’s use policy. For example, if you sell drugs or anything illegal, you may get banned
- Your account information is not up to date or your account is not fully verified
- Someone has logged into your PayPal account from a strange location.
- Your credit score is low or something with your background history makes you a higher-risk customer
- They have detected fraudulent activity on your account
So, try to avoid the above-mentioned points to keep safe your PayPal account.
Top 5 FAQs on How to Set up PayPal Payment Gateway
How long does it take to set up a PayPal payment gateway?
Setting up a PayPal payment gateway typically takes less than an hour, but it may take longer if you need to set up a PayPal business account or if there are any issues with your website’s integration.
Are there any fees associated with using PayPal?
Yes, there are fees associated with using PayPal. PayPal charges a transaction fee for each payment processed through their payment gateway. The fee varies depending on the payment amount and the currency used.
Is PayPal a secure payment gateway?
Yes, PayPal is a secure payment gateway that uses encryption technology to protect sensitive information. PayPal also offers fraud protection and dispute resolution services to help protect both buyers and sellers.
Can I use PayPal to accept payments in different currencies?
Yes, PayPal supports over 100 currencies, and you can use it to accept payments in many different currencies. However, you will need to enable the currencies you wish to accept in your PayPal account settings.
Do I need a separate PayPal account for each website or online store?
No, you do not need a separate PayPal account for each website or online store. You can use the same PayPal account for multiple websites, but you will need to set up a separate payment gateway integration for each site. You can also use different PayPal API credentials for each site to help you keep track of payments and transactions.
How to Set up PayPal Payment Gateway- Key Takeaways
PayPal is one of the most renowned payment gateways for eCommerce websites. That means if you still don’t ready to set up PayPal as your payment gateway, your competitors will have the edge over you.
That being said adding PayPal gateway to a WooCommerce site isn’t that much-complicated task. It may take a few hours of yours to fully configure the process, but once it’s added, it’s added forever.
These are the three steps that you need to follow:
- Create a PayPal Business Account
- Enable PayPal As a Payment Gateway
- Connect WooCommerce to PayPal
If you still have any confusion related to how to set up PayPal payment gateway in WooCommerce, feel free to ask us using the comment box below. We are always there to address your queries. Take care!


Leave a Reply