Amazon did not start as the everything store. It started as a bookstore. Then it opened its doors to third-party sellers — and that decision changed everything. Today, nearly 60% of everything sold on Amazon comes from independent sellers.
The model where multiple vendors sell their own products is called a multi-vendor marketplace. The platform owner takes a commission from each sale the vendor makes. Are you dreaming of building something like that and owning a marketplace?
Today, building such a multivendor marketplace is no longer a billion-dollar project, nor do you need a massive engineering team. With WordPress and the right plugin, you can build a fully functional multi-vendor marketplace at an affordable cost.
In this tutorial, we’ll walk you through the complete process — from buying your domain to launching your platform. Hope you’ll enjoy it. Let’s get started.
Prerequisites to Build a Marketplace Like Amazon on WordPress
To build and design the marketplace on WordPress, there are a few essential items you must prepare in advance. These are the building blocks of your marketplace. Skipping any one of them will cause problems later.
a. Get a Domain Name and Hosting
Your domain name is your marketplace address on the internet. It is what people will type to visit your website. Choose something short, easy to spell, and related to your niche. For example, craftbay.com, artisanhub.com, etc.
Once you have a domain name, you need hosting. Hosting is the server where your marketplace website lives. For a marketplace, you need hosting that can handle many product pages, vendor dashboards, and customer traffic simultaneously.
Remember that a multi-vendor marketplace is not a simple blog. It will handle vendor accounts, product listings, orders, payments, and much more. So, you need managed WordPress hosting. It offers strong performance, scaling, daily backups, and uptime.
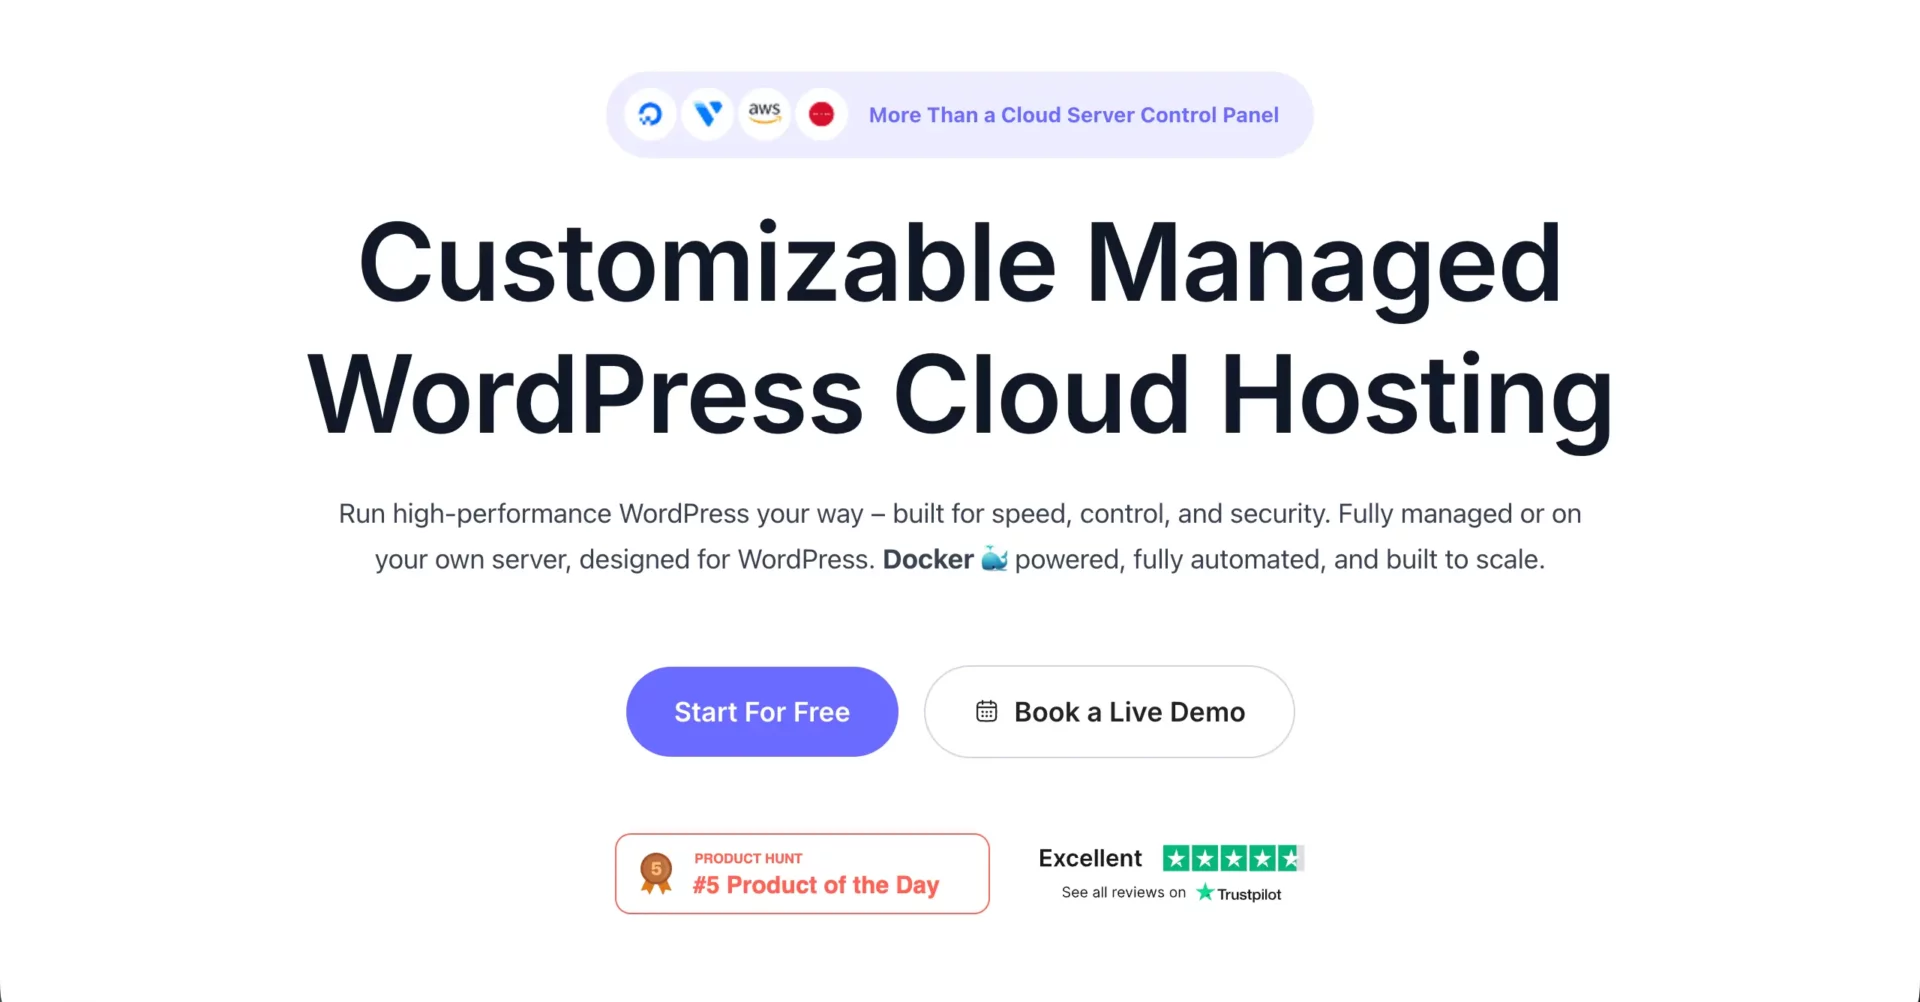
FlyWP is a promising, customizable managed WordPress hosting platform and cloud server control panel. In addition, there are many more popular hosting providers. But whichever you use, avoid shared hosting for multivendor marketplace websites.
b. Install WordPress
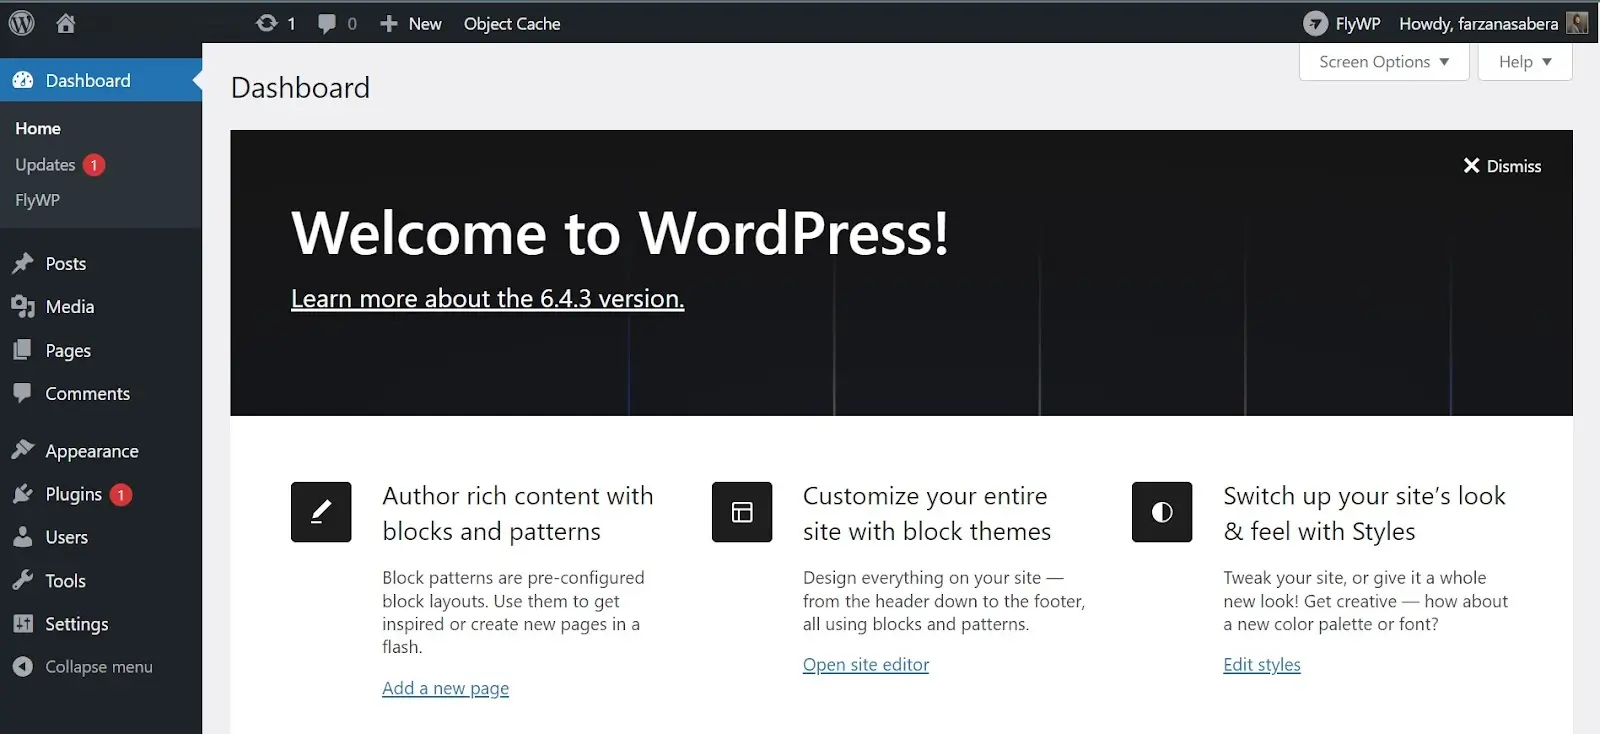
Once your hosting is set up, installing WordPress is a single step. Every major managed hosting provider offers a one-click WordPress installer from their control panel. Click install, set your admin username and password, and your WordPress dashboard is live within a minute.
Here’s a complete guide on how to install and set up a WordPress site with FlyWP.
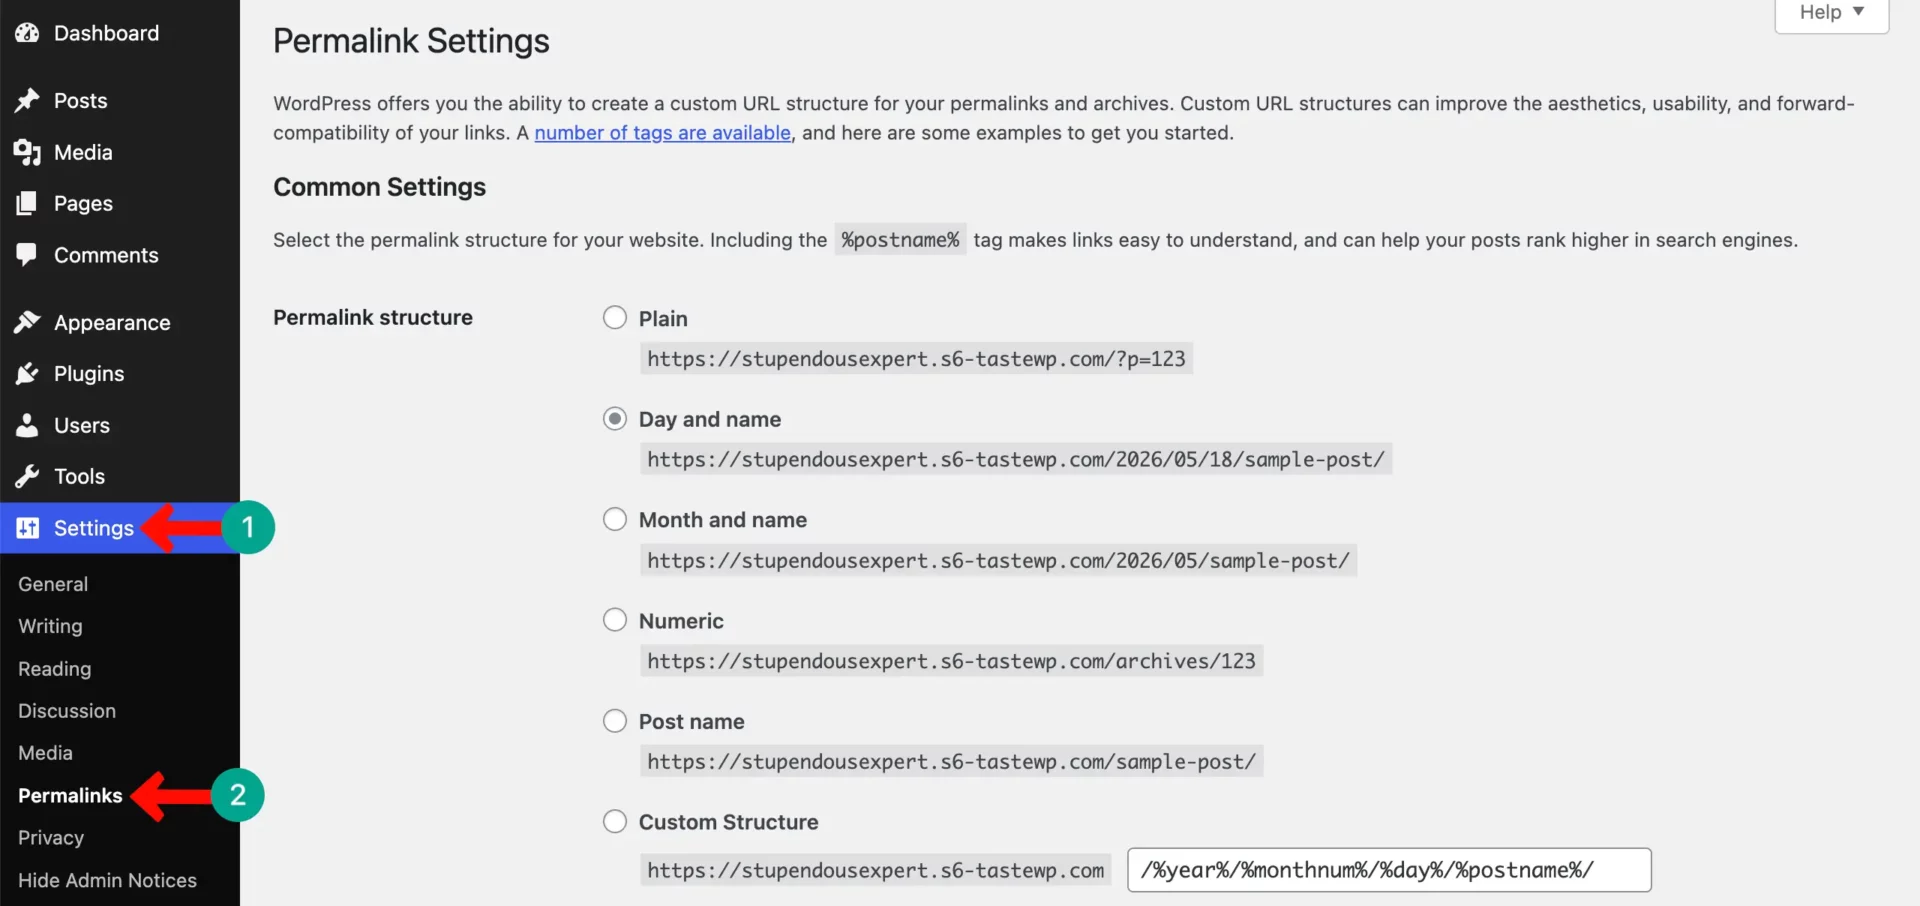
After installation, run through the basic WordPress settings: set your site title, configure your permalink structure (Settings → Permalinks → Post name is recommended for SEO), and set your timezone and language.
That’s all you need before moving to plugins. Without configuring them, it’s impossible to reap SEO benefits.
c. Install WooCommerce
WooCommerce is the plugin that turns your WordPress website into an online store. Dokan works on top of WooCommerce, so you must install WooCommerce first.
To install it, go to Plugins > Add New in your WordPress admin panel. Search for WooCommerce. Click Install Now and then Activate.

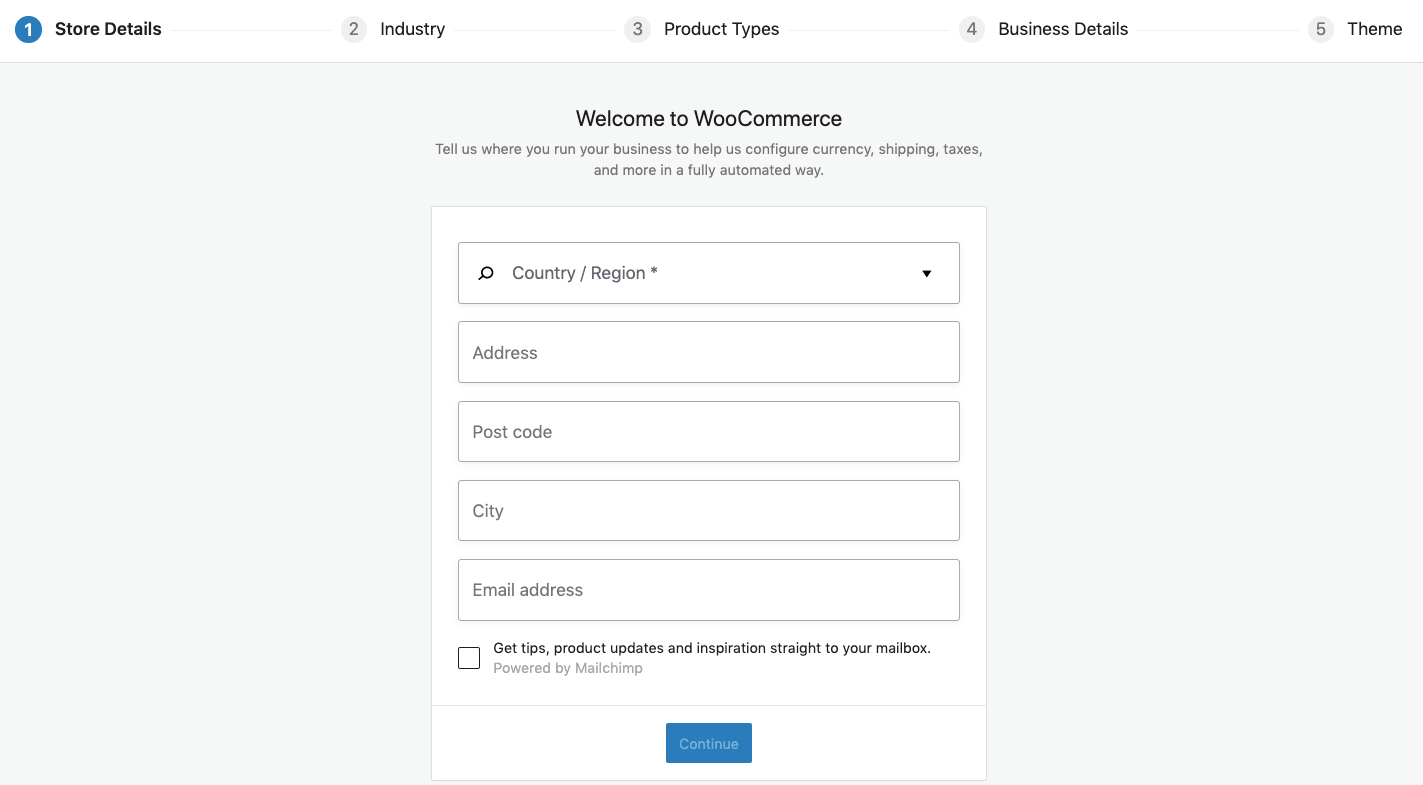
After activation, WooCommerce will launch a setup wizard. Complete the wizard by filling in your store name, location, currency, and payment methods. This sets the foundation for your marketplace.
WooCommerce handles product listings, shopping cart and checkout, payment processing, order management, and inventory tracking. Everything Dokan adds later will work within this WooCommerce system.
Explore the best and essential plugins for WooCommerce stores.
d. Choose an eCommerce-Friendly Theme
Your theme controls how your marketplace looks. A good marketplace theme must be fast, mobile-friendly, and designed for product browsing. It should support vendor shop pages, product grids, search filters, and a clean checkout.
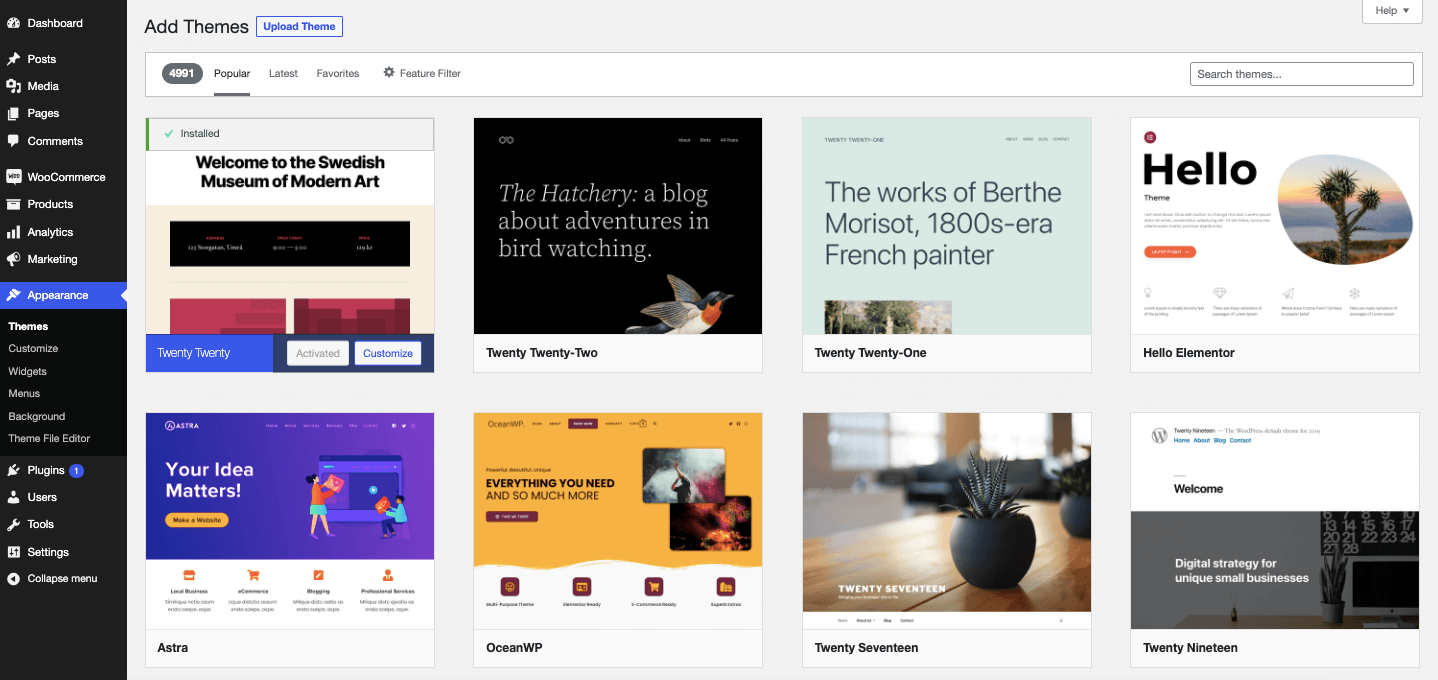
Some popular themes that work well with WooCommerce Dokan are:
- Astra — lightweight, fast, and highly customizable
- OceanWP — great for marketplaces with many products
- Flatsome — a premium theme with a built-in page builder
- Dokan’s own theme — designed specifically for Dokan marketplaces
Install your theme by going to Appearance > Themes > Add New. Search for your preferred theme, install it, and activate it.
When choosing a theme, look for one that is regularly updated, well-reviewed, and compatible with the latest version of WooCommerce. A poorly coded theme can break your checkout or significantly slow down your site.
e. Install the Dokan Multivendor Plugin
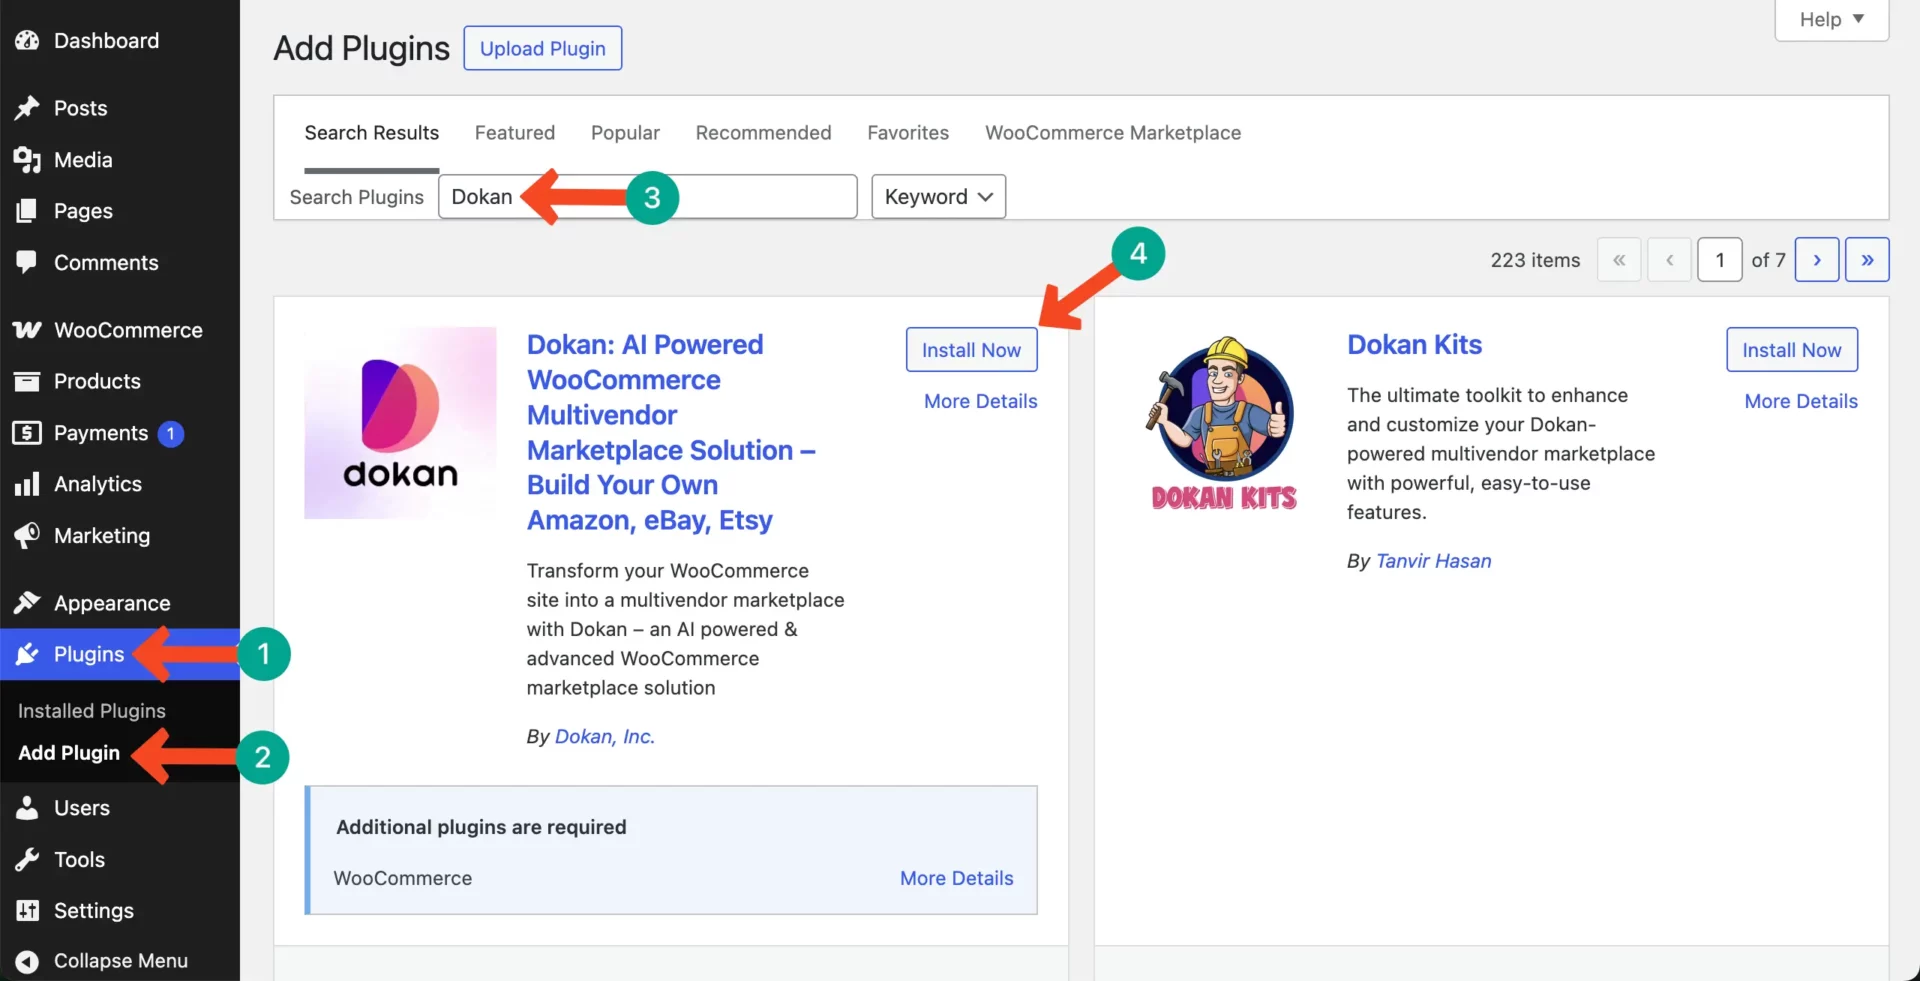
Now it’s time to install the most important plugin — Dokan. This is what turns your WooCommerce store into a multivendor marketplace.
Go to Plugins > Add New. Search for Dokan. You will see the Dokan – Best WooCommerce Multivendor Marketplace Solution plugin. Click Install Now and then Activate.
The free version of Dokan is powerful enough to launch a working marketplace. Later in this guide, we will look at the Pro version and its advanced features.
Dokan adds a vendor registration system, individual vendor dashboards, commission management, vendor product management, withdrawal tools, and much more. These are the musts for creating a real marketplace, which will be discussed below.
Configure Dokan to Create a Real Marketplace
Once Dokan is installed, you need to configure it properly. A misconfigured marketplace will confuse vendors, frustrate customers, and cost you money. Spend time here — it is worth it.
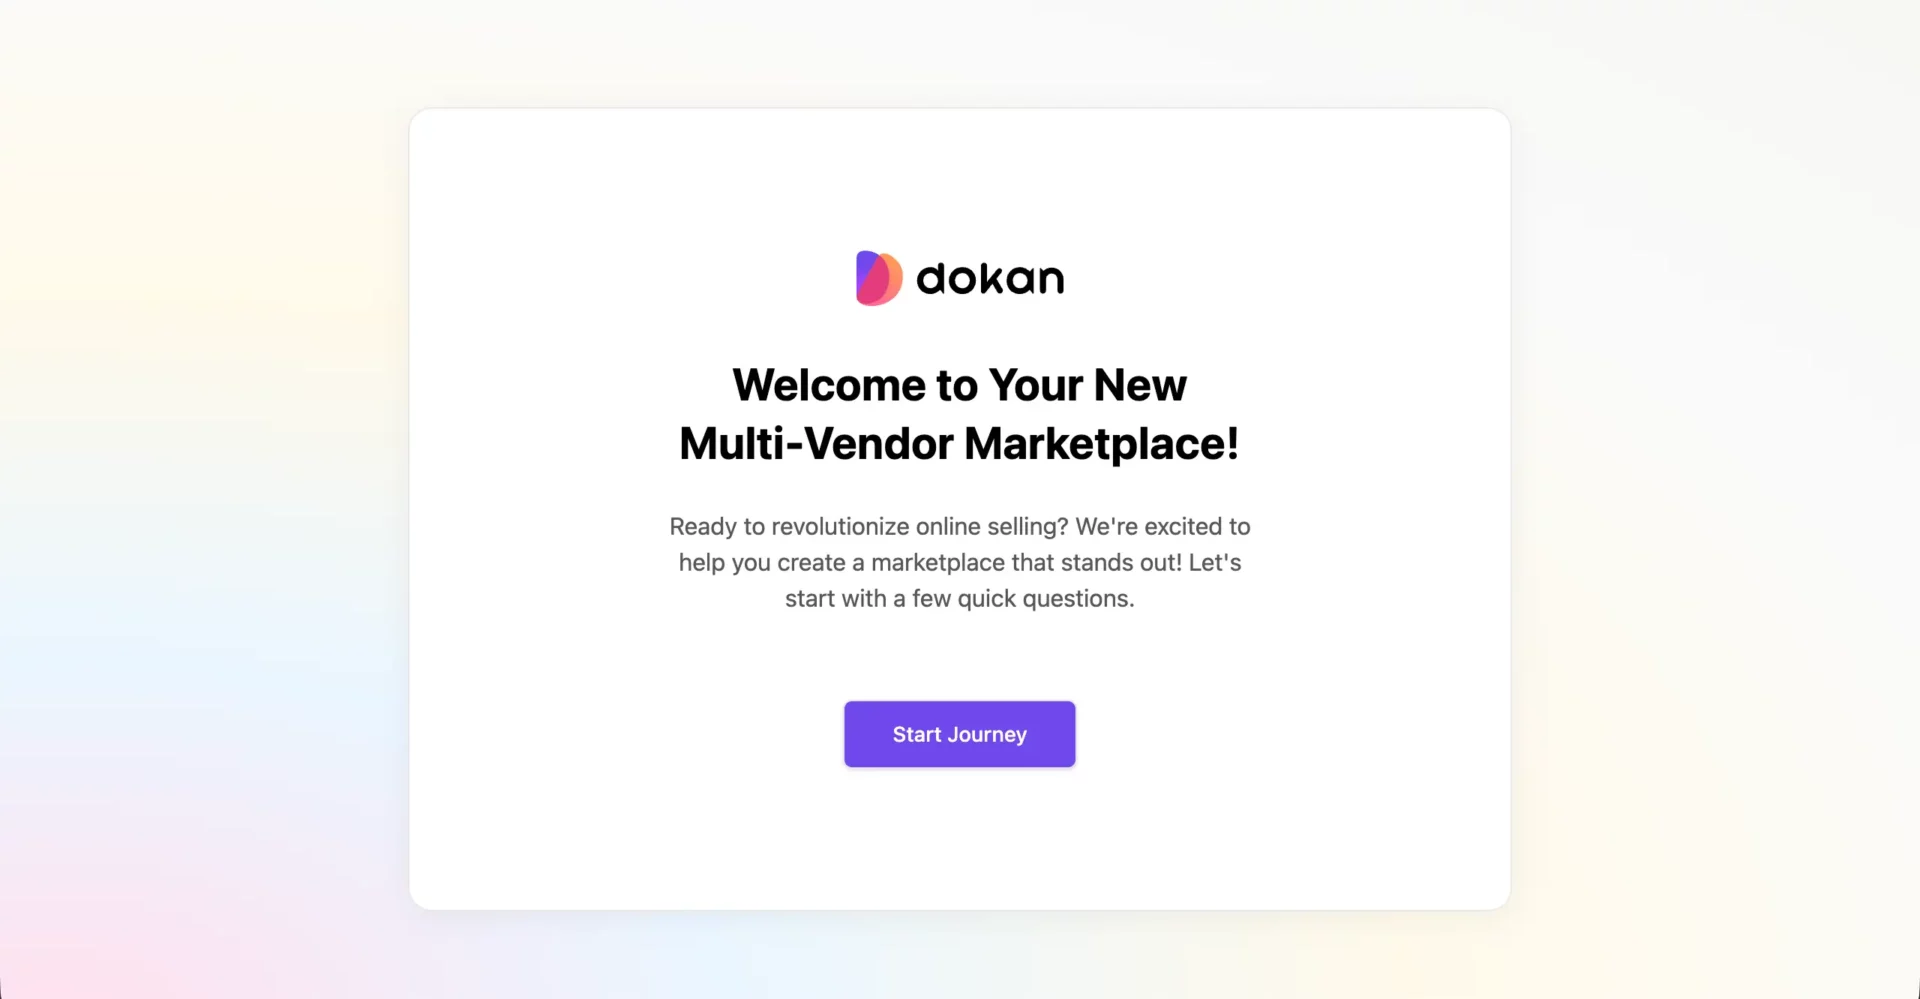
Step 1: Complete the Dokan Setup Wizard
After activating Dokan, a setup wizard will launch automatically. This wizard guides you through the most important settings in a simple, step-by-step way. So, start journey.
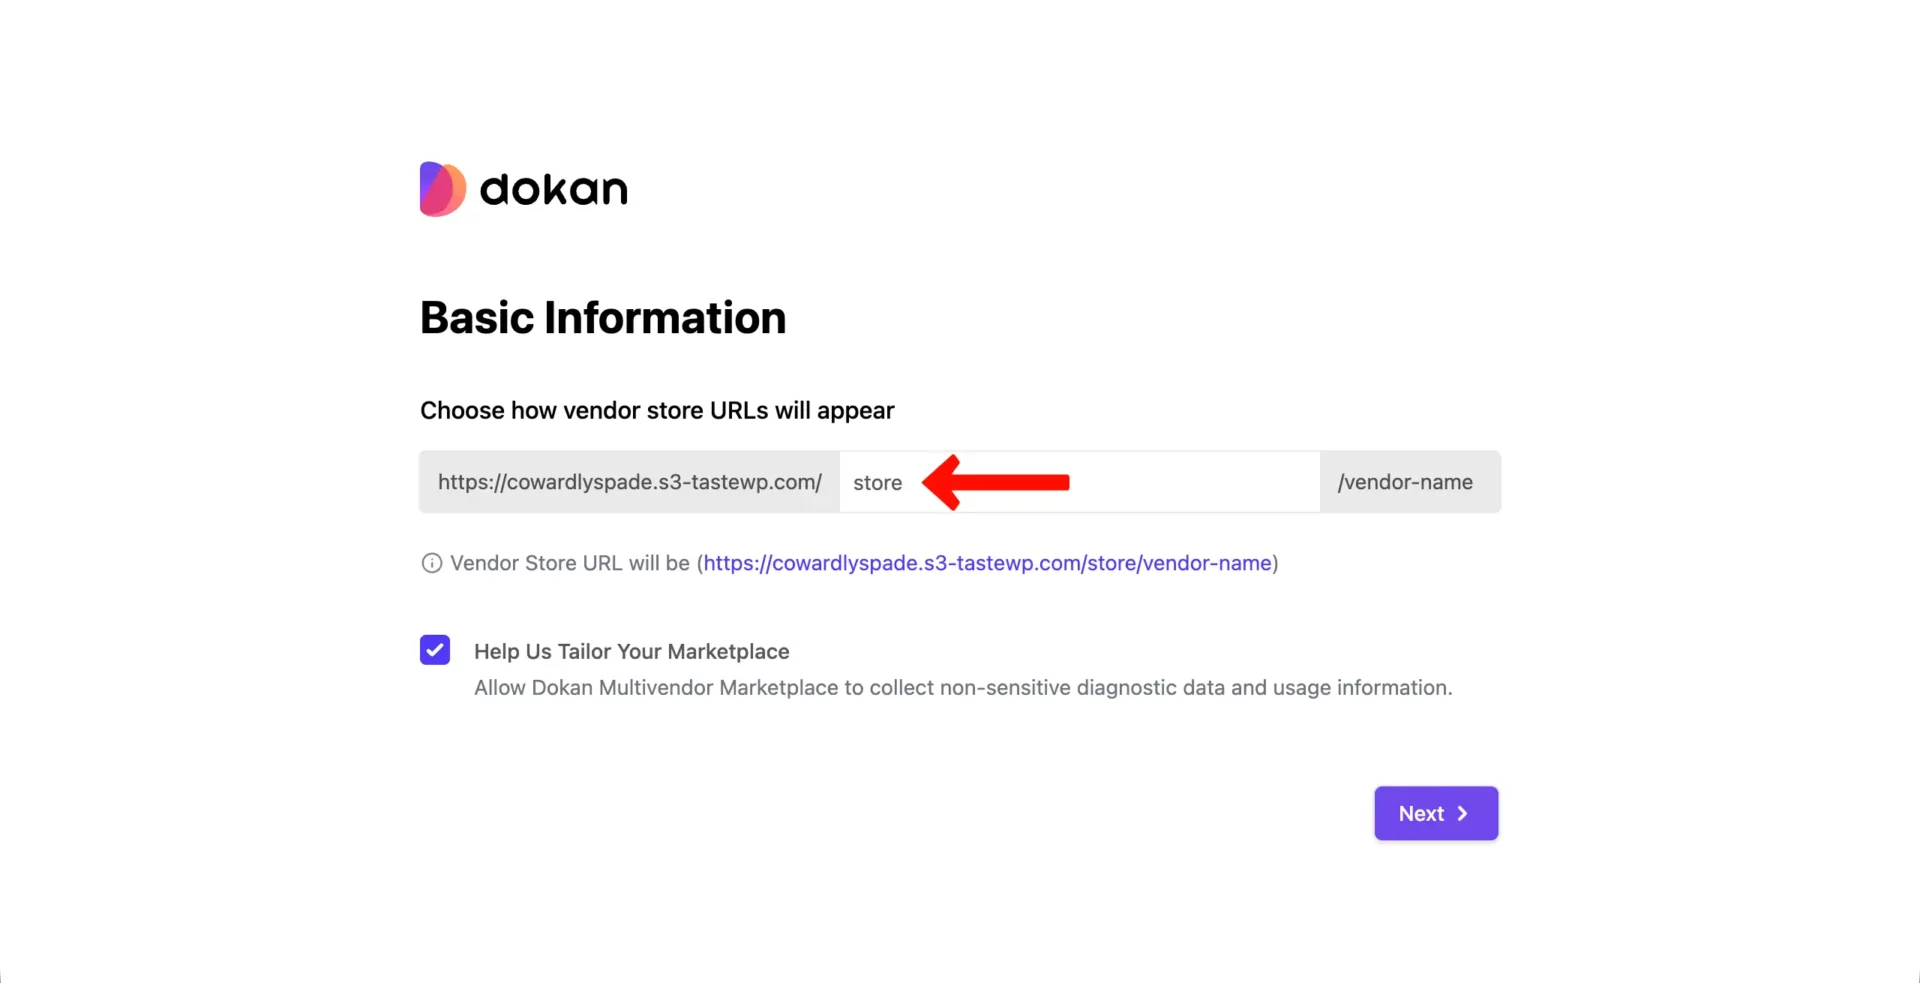
> Store URL Setup
The first thing the wizard asks is how you want to structure vendor store URLs. This is the web address that each vendor’s shop page will use. Choose a base URL structure like: yourdomain.com/store/vendor-name/
Keep this URL short and clean. A simple structure like /store/ works well. Avoid long or complicated paths. Clear URLs are easier to remember, easier to share, and better for search engine rankings.
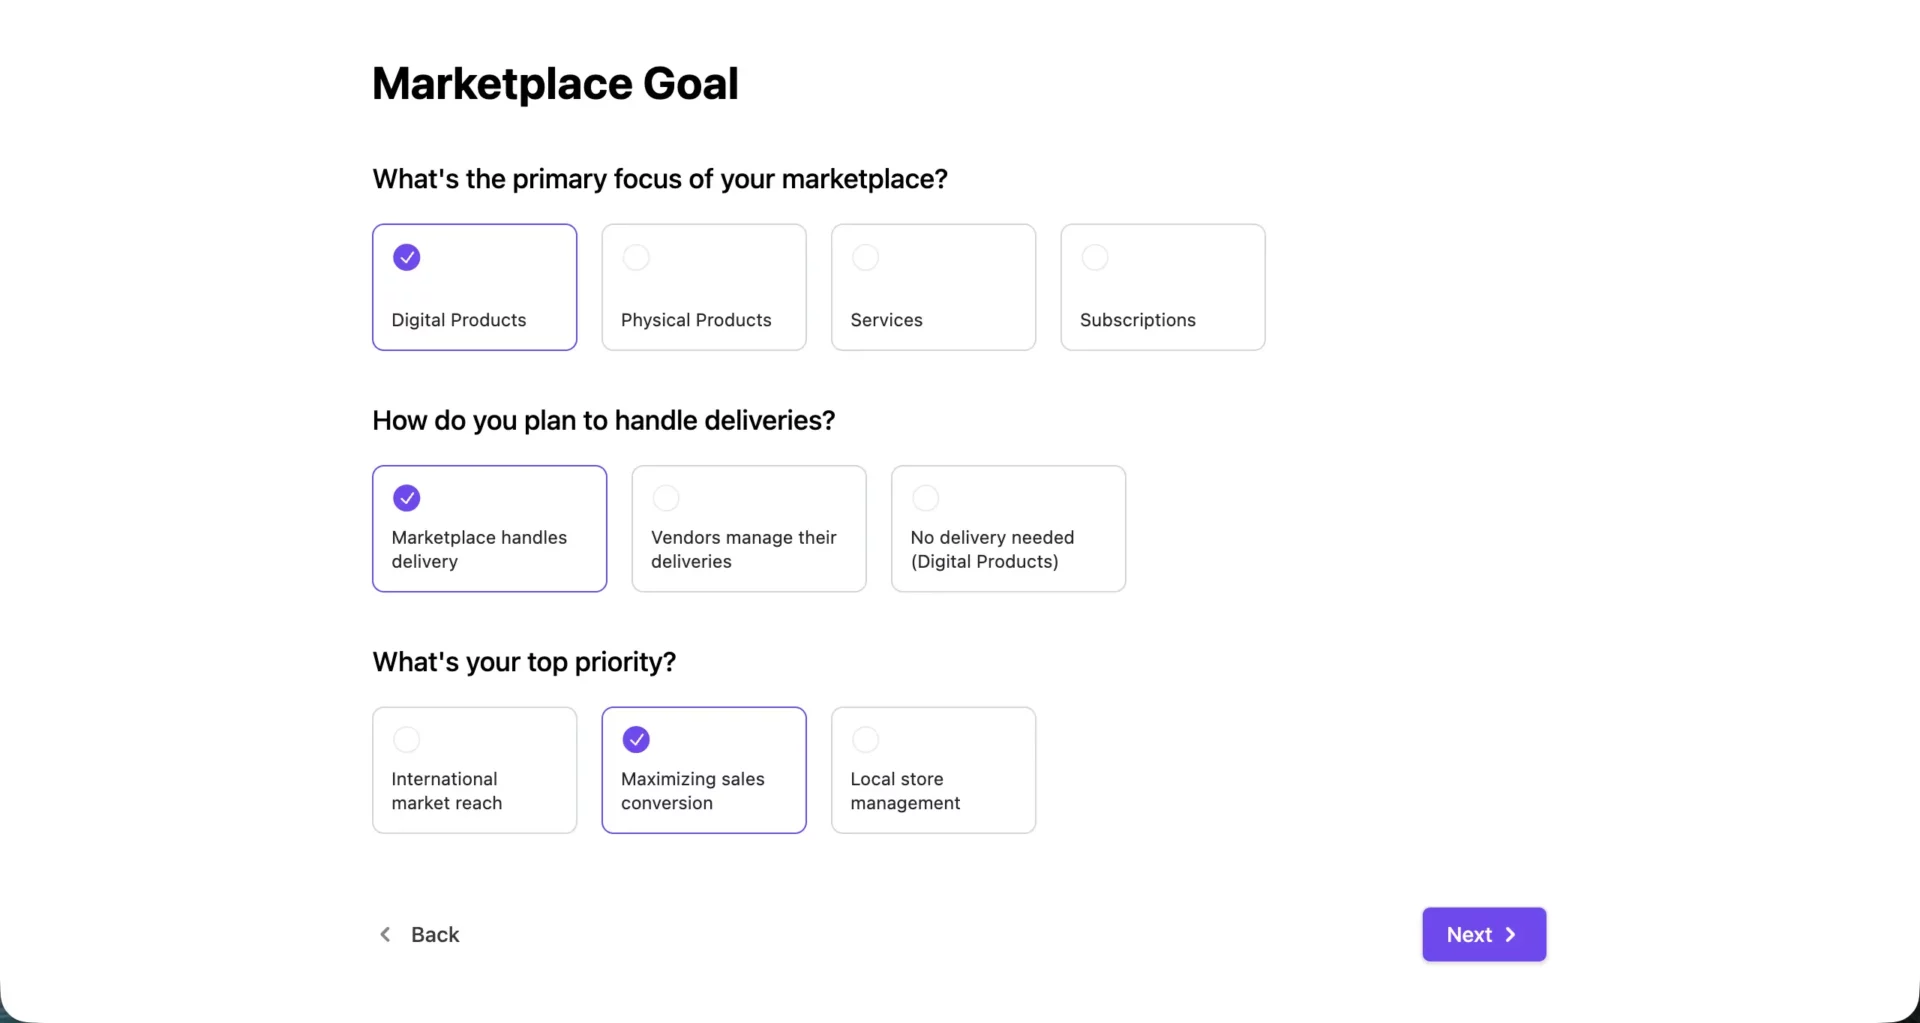
> Marketplace Goal Setup
Next, the wizard asks you to define your marketplace goal. You can tell Dokan:
- What kind of products will be sold (physical products, digital products, or both)
- How shipping will be handled (by vendors, by the admin, or both)
- What is your top priority (vendor growth, customer experience, etc.)
Answer these honestly based on your actual marketplace plans. These settings affect how the platform behaves for vendors and customers.
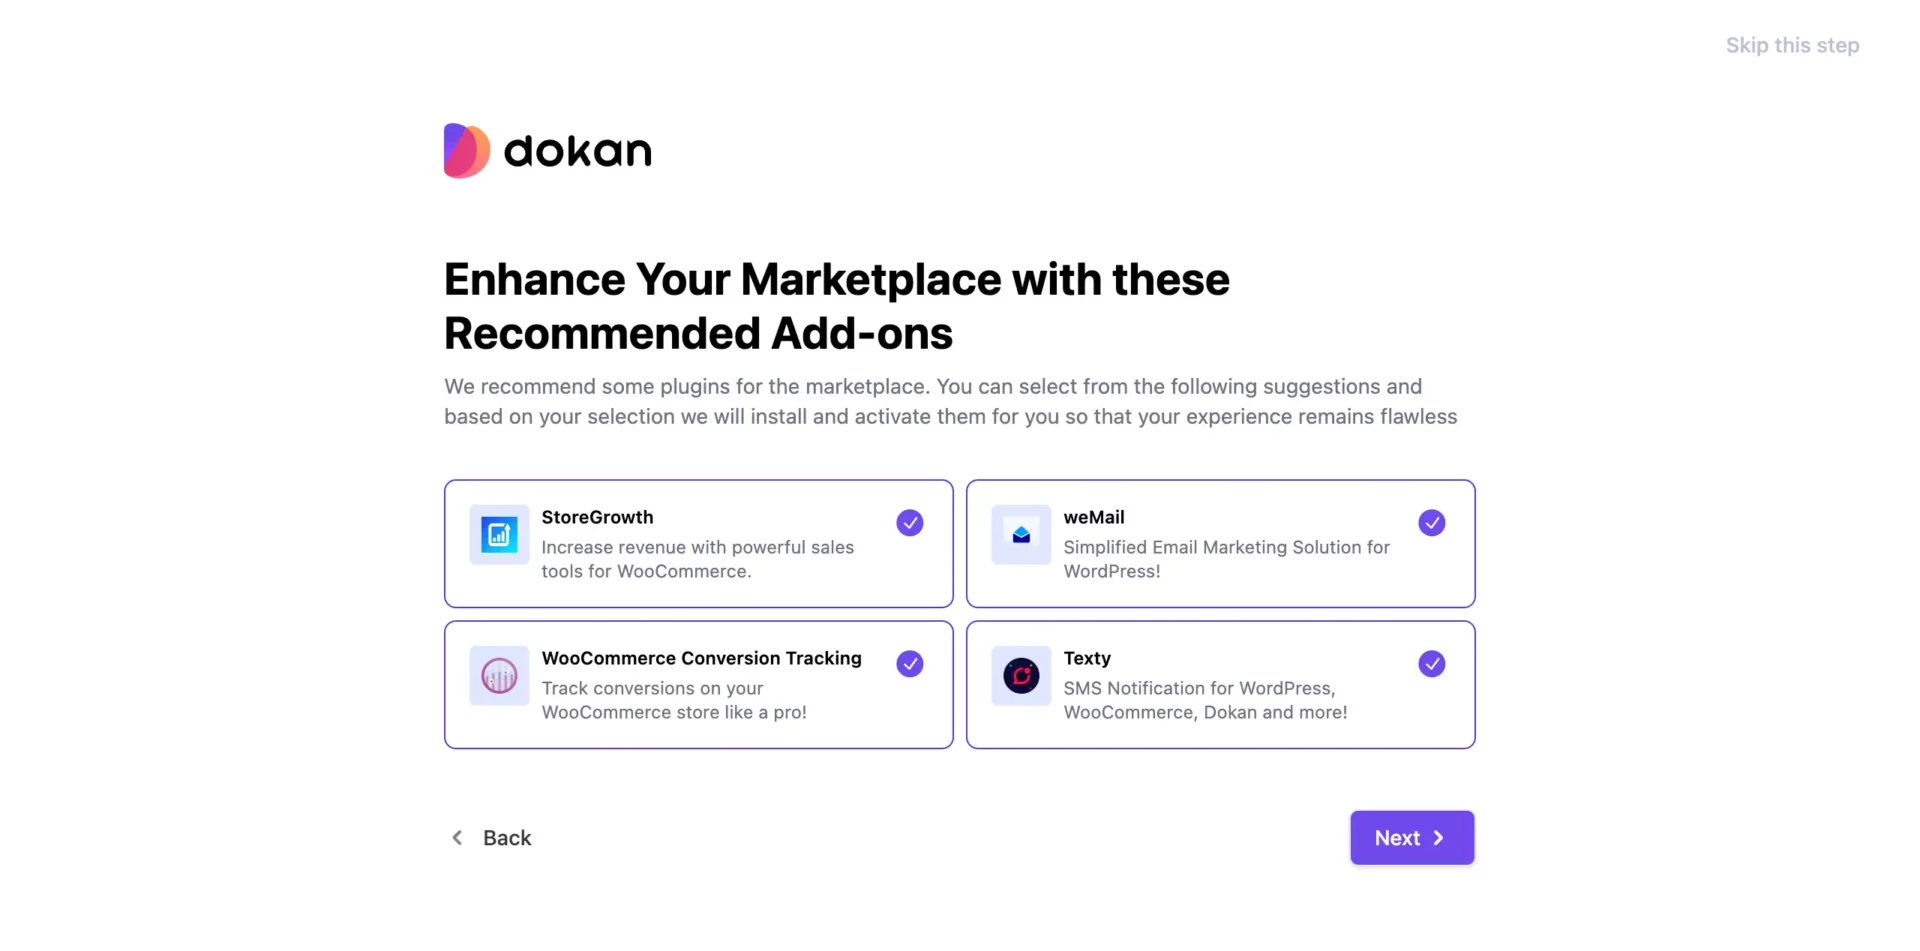
> Recommended Dokan Addons
At the end of the setup wizard, Dokan suggests some additional plugins that work well with the marketplace. These might include tools for analytics, email marketing, and conversion tracking. Review and choose the ones you like.
After completing the wizard, you will land on the Dokan admin dashboard. This is your command centre for managing the entire marketplace.
Step 2: Configure General Marketplace Settings
The setup wizard covers the basics, but you still need to configure additional settings manually. For some settings, you have to depend on WordPress’s default options and for some cases, you have to depend on Dokan options.
Let’s go through them one by one.
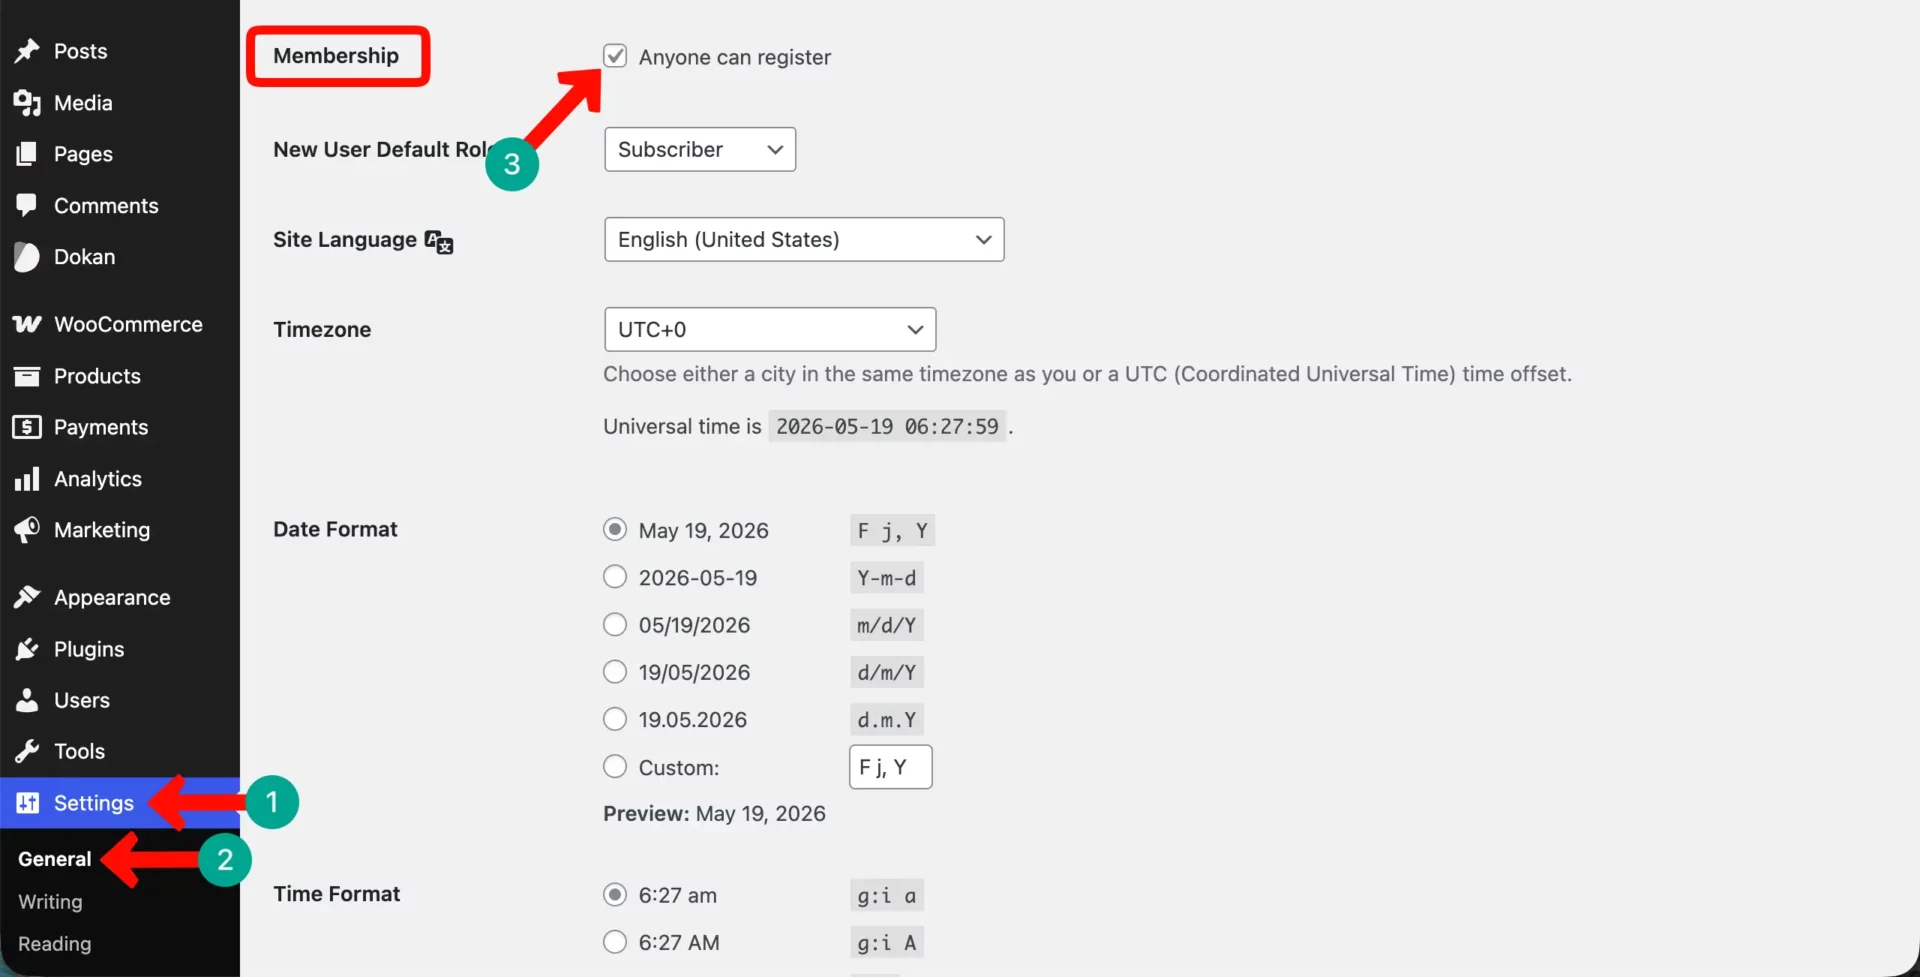
> Vendor Registration Settings
Go to WordPress Dashboard > Settings > General. Find the “Membership” option and check the box that says Anyone can register. This allows vendors to create accounts on your site.
> Product Publishing Rules
Decide whether vendors can publish products directly or whether products need admin approval before going live. Go to Dokan > Settings > Selling Options.

Scrolling down the page, come to the section named Vendor Capabilities. Under this section, you’ll be able to change the settings of Enable Selling, One Page Product Creation, Order Status Change, and select any category.
By these changes, you can limit the capabilities of vendors and exercise your optimum power on the marketplace.
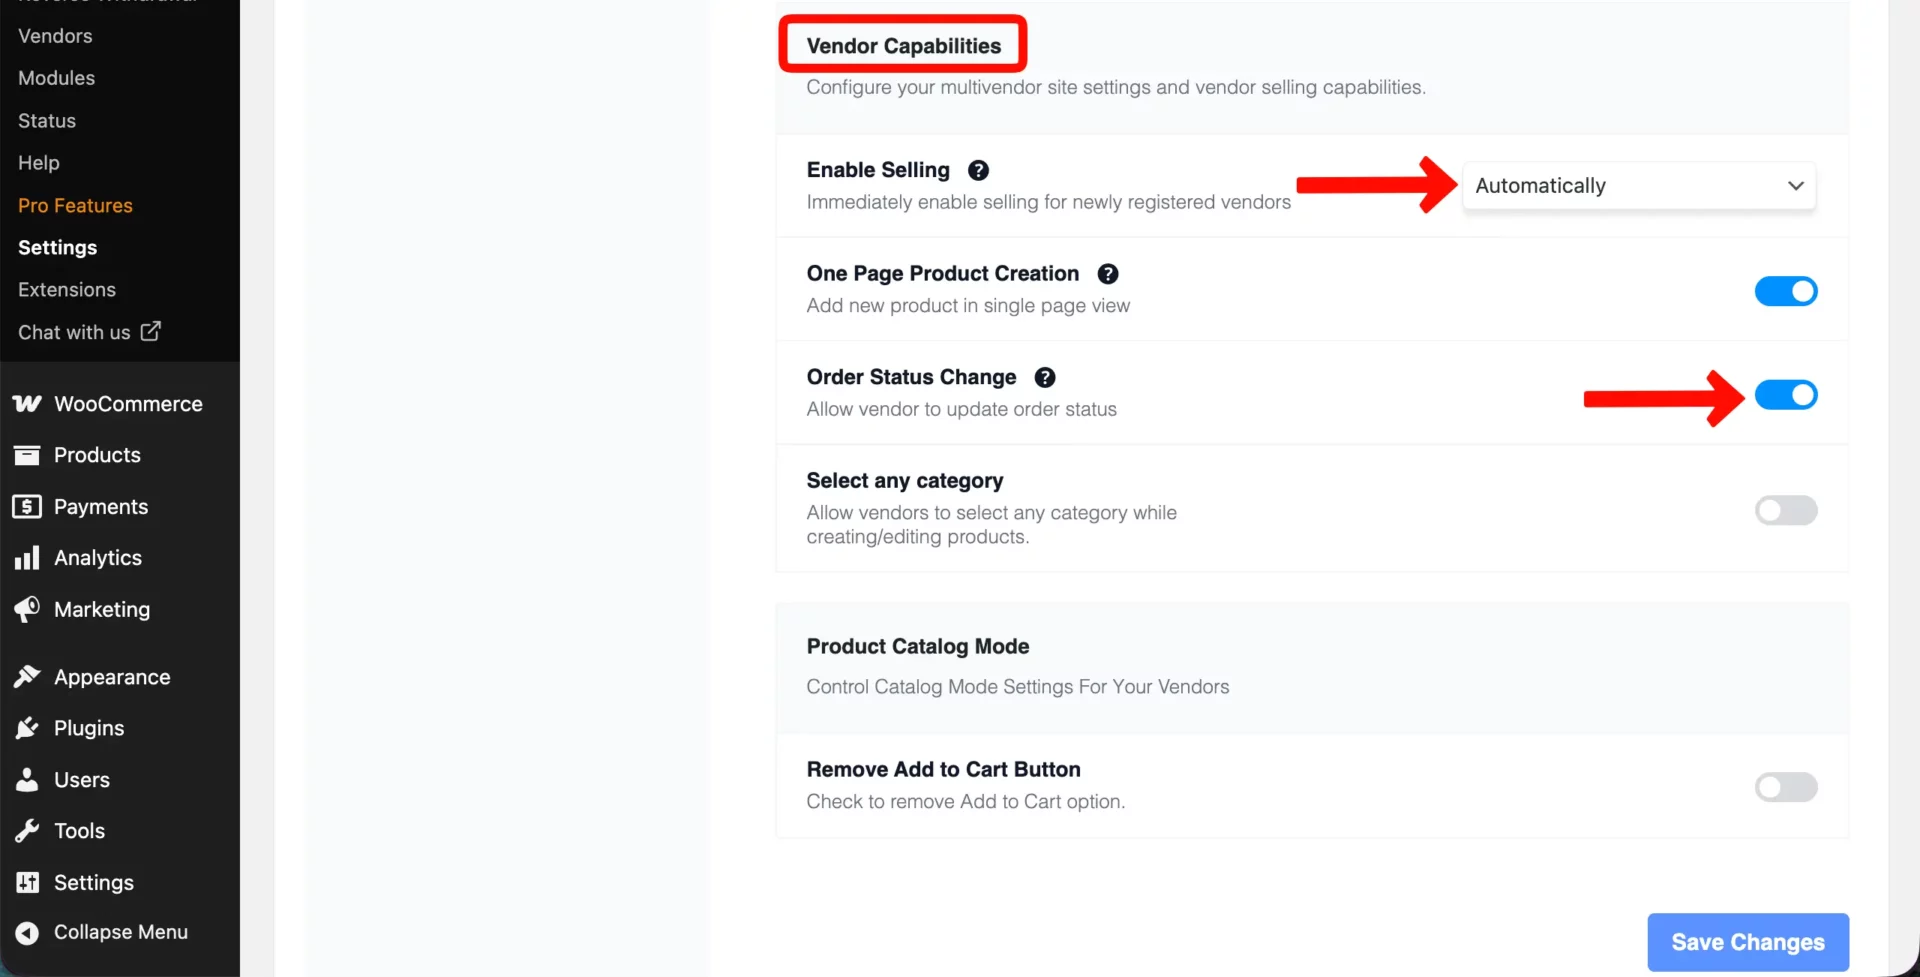
For a new marketplace where you don’t know your vendors well yet, pending review is the safer option. As you build trust with vendors, you can switch to direct publishing.
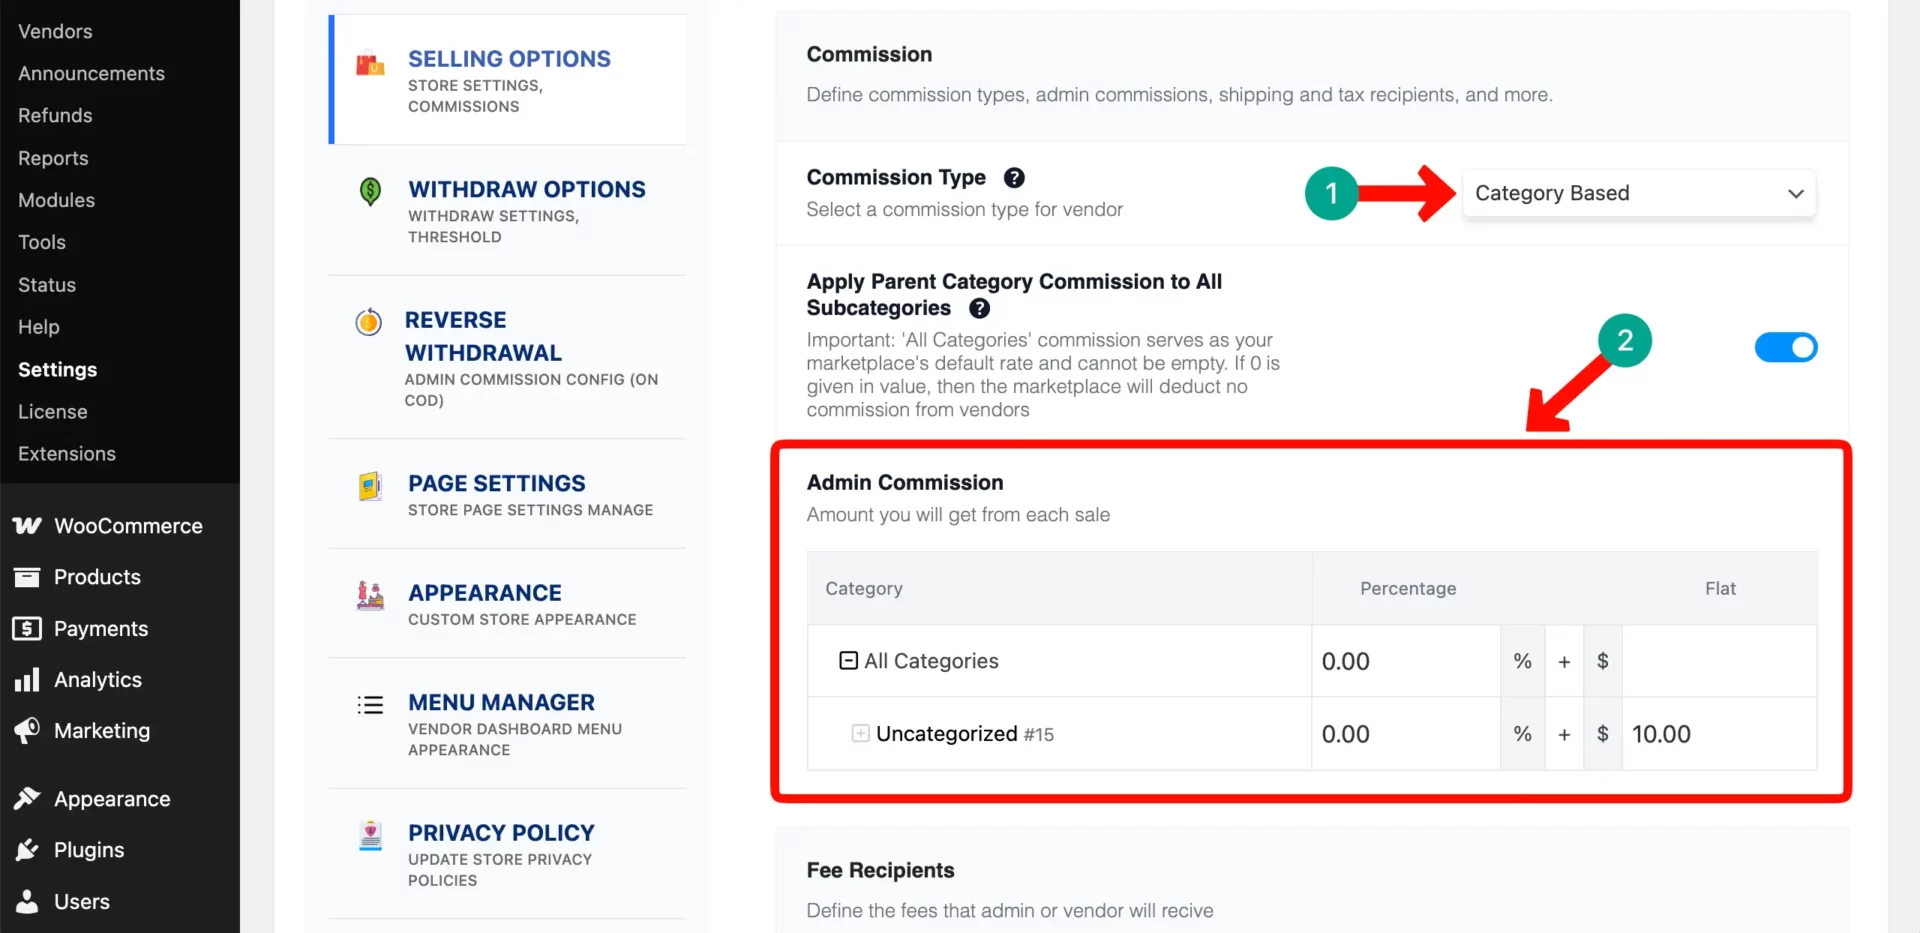
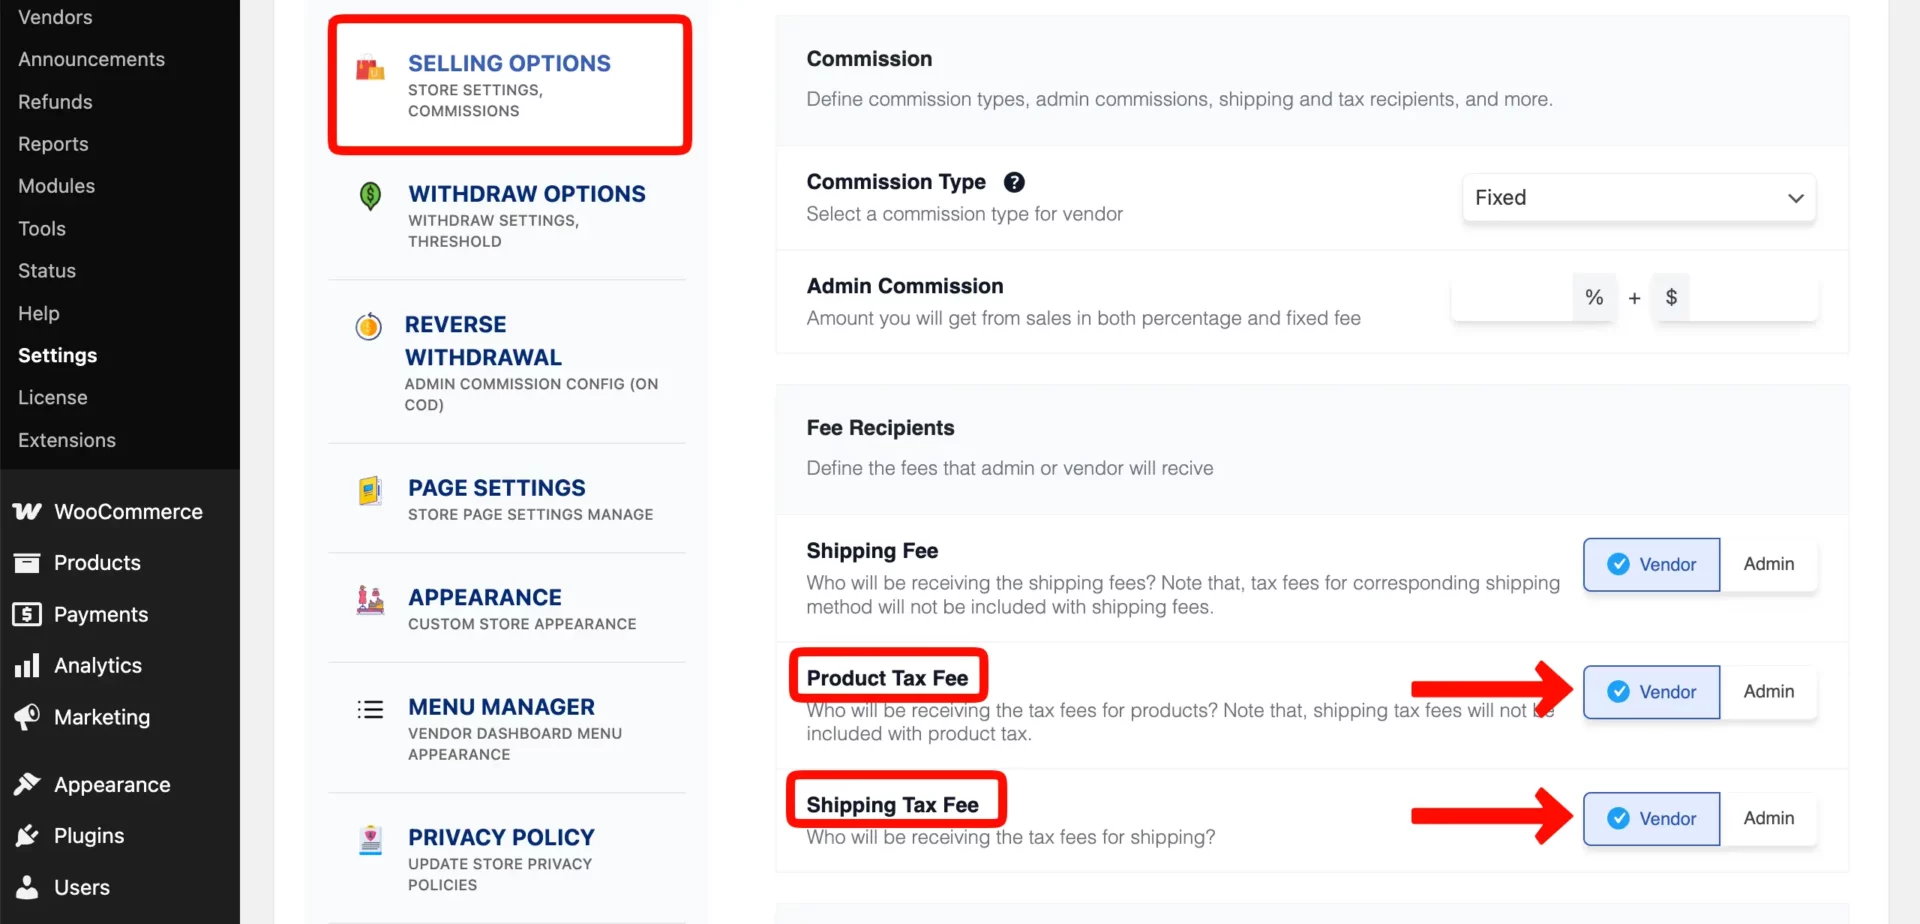
Step 3: Set Up Marketplace Commission Rules
Your commission is how you earn money from the marketplace. Every time a vendor makes a sale, you take a percentage or a fixed cut. Go to Dokan > Settings > Selling Options to configure your commission structure.
Dokan allows you to choose from three commission styles. They are
- Percentage-based commission
- Fixed commission
- Category-based commission
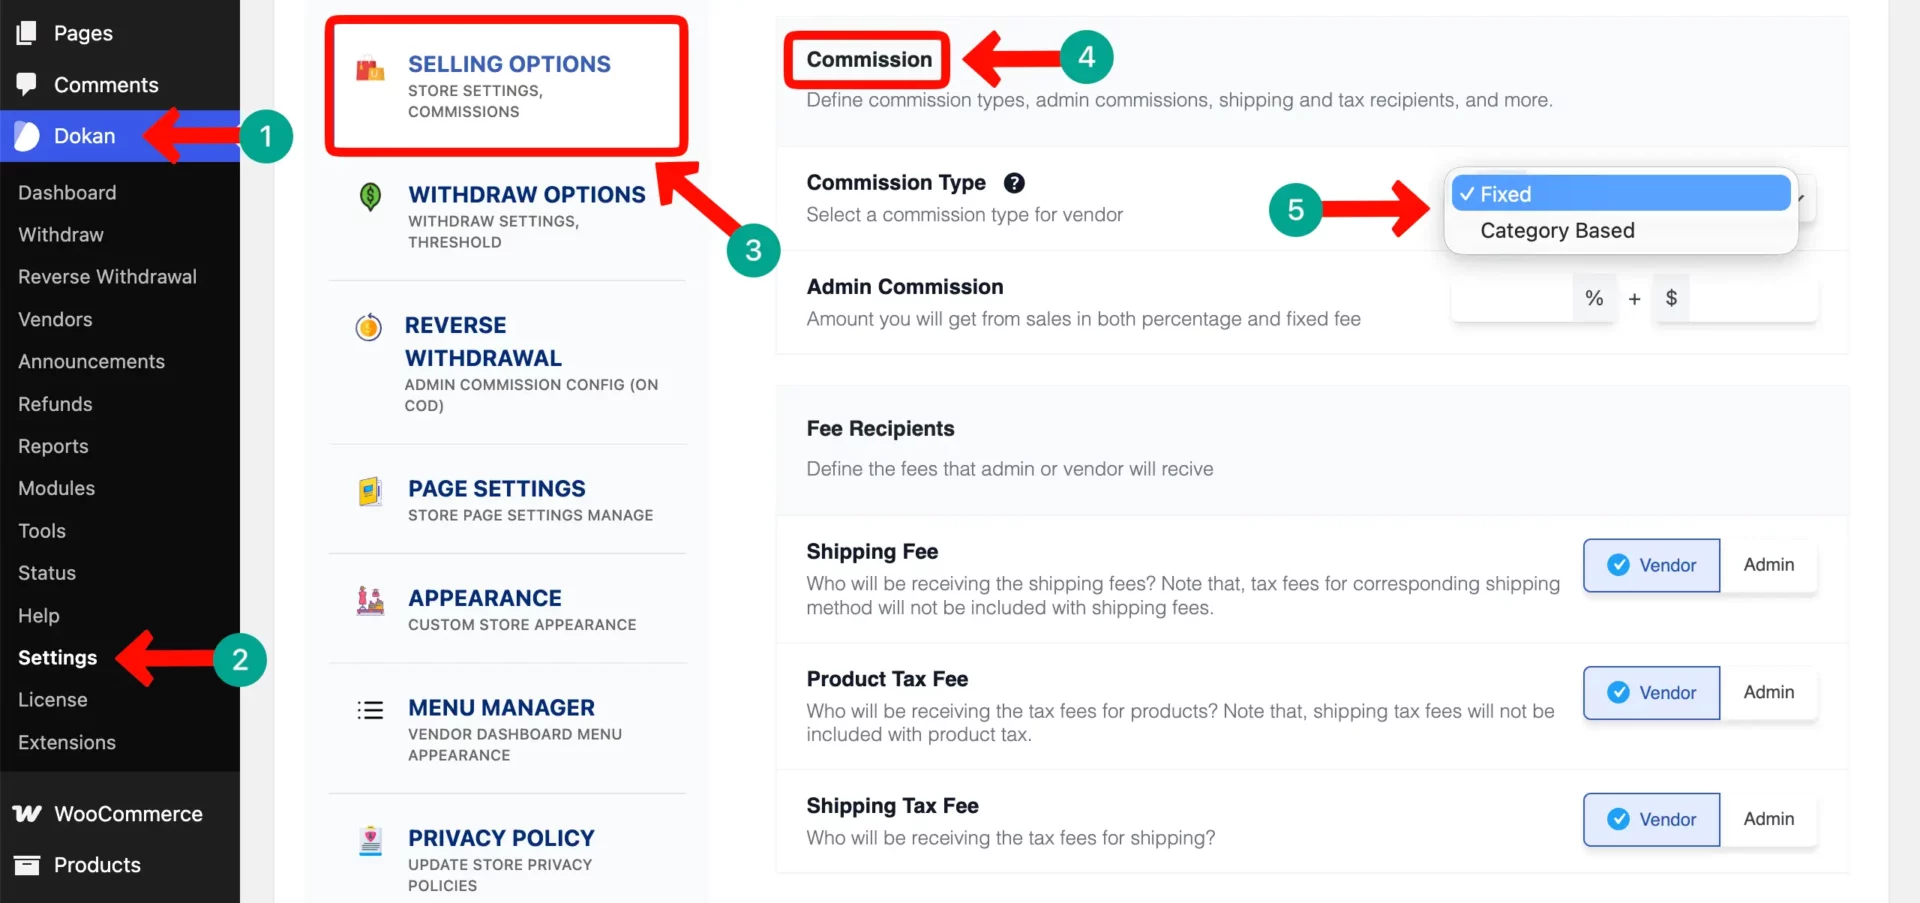
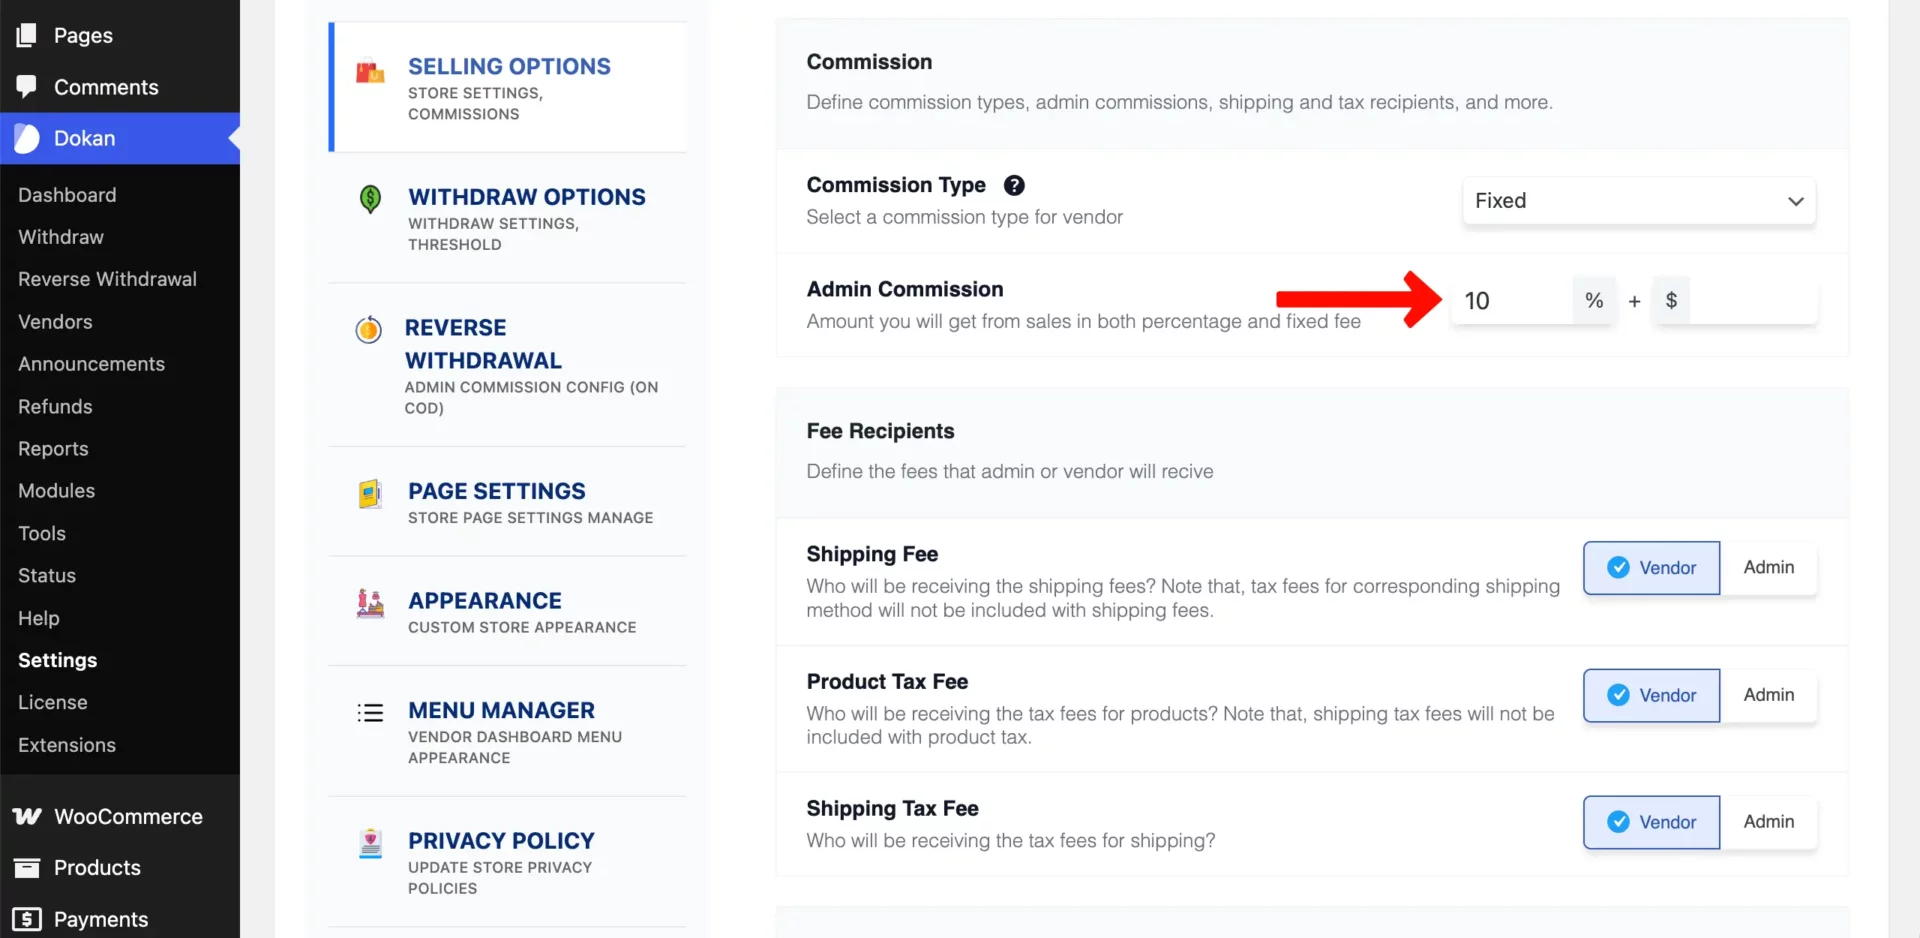
> Percentage-Based Commission
To set up a percentage-based commission, keep the commission type dropdown set to Fixed. Enter your desired percentage rate in the input box marked with the percent sign (%), and leave the box with the dollar sign ($) empty or set to zero.
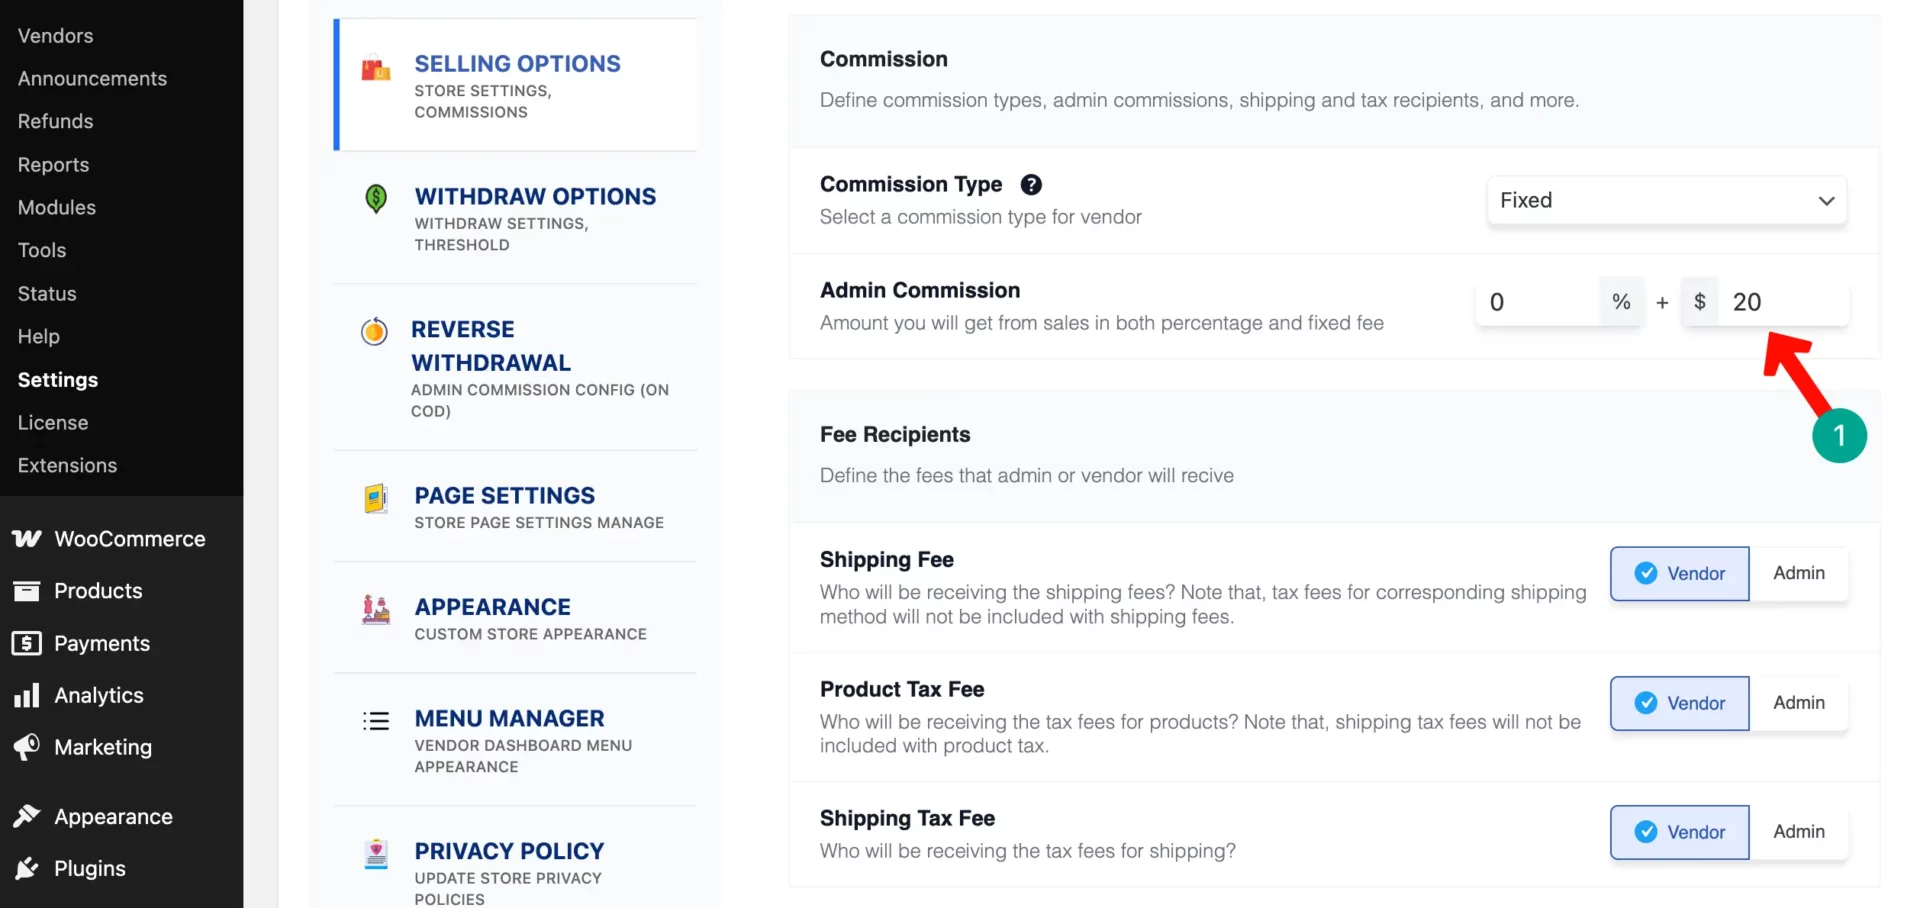
> Fixed Commission
Leave the commission type dropdown on Fixed, input your exact monetary fee into the field marked with the dollar sign ($), and clear or zero out the percentage (%) box.
Under this rule, the marketplace deducts a flat, unchanging cash fee from the vendor’s earnings on every completed checkout, completely ignoring the item’s price.
> Category-Based Commission
Dokan also lets you set different commission rates for different product categories. First, choose the category option from the commission type. Then, select the category to which you want to add your commission rate.
You can set whether a percentage, or flat, or both. The process is the same as explained above.
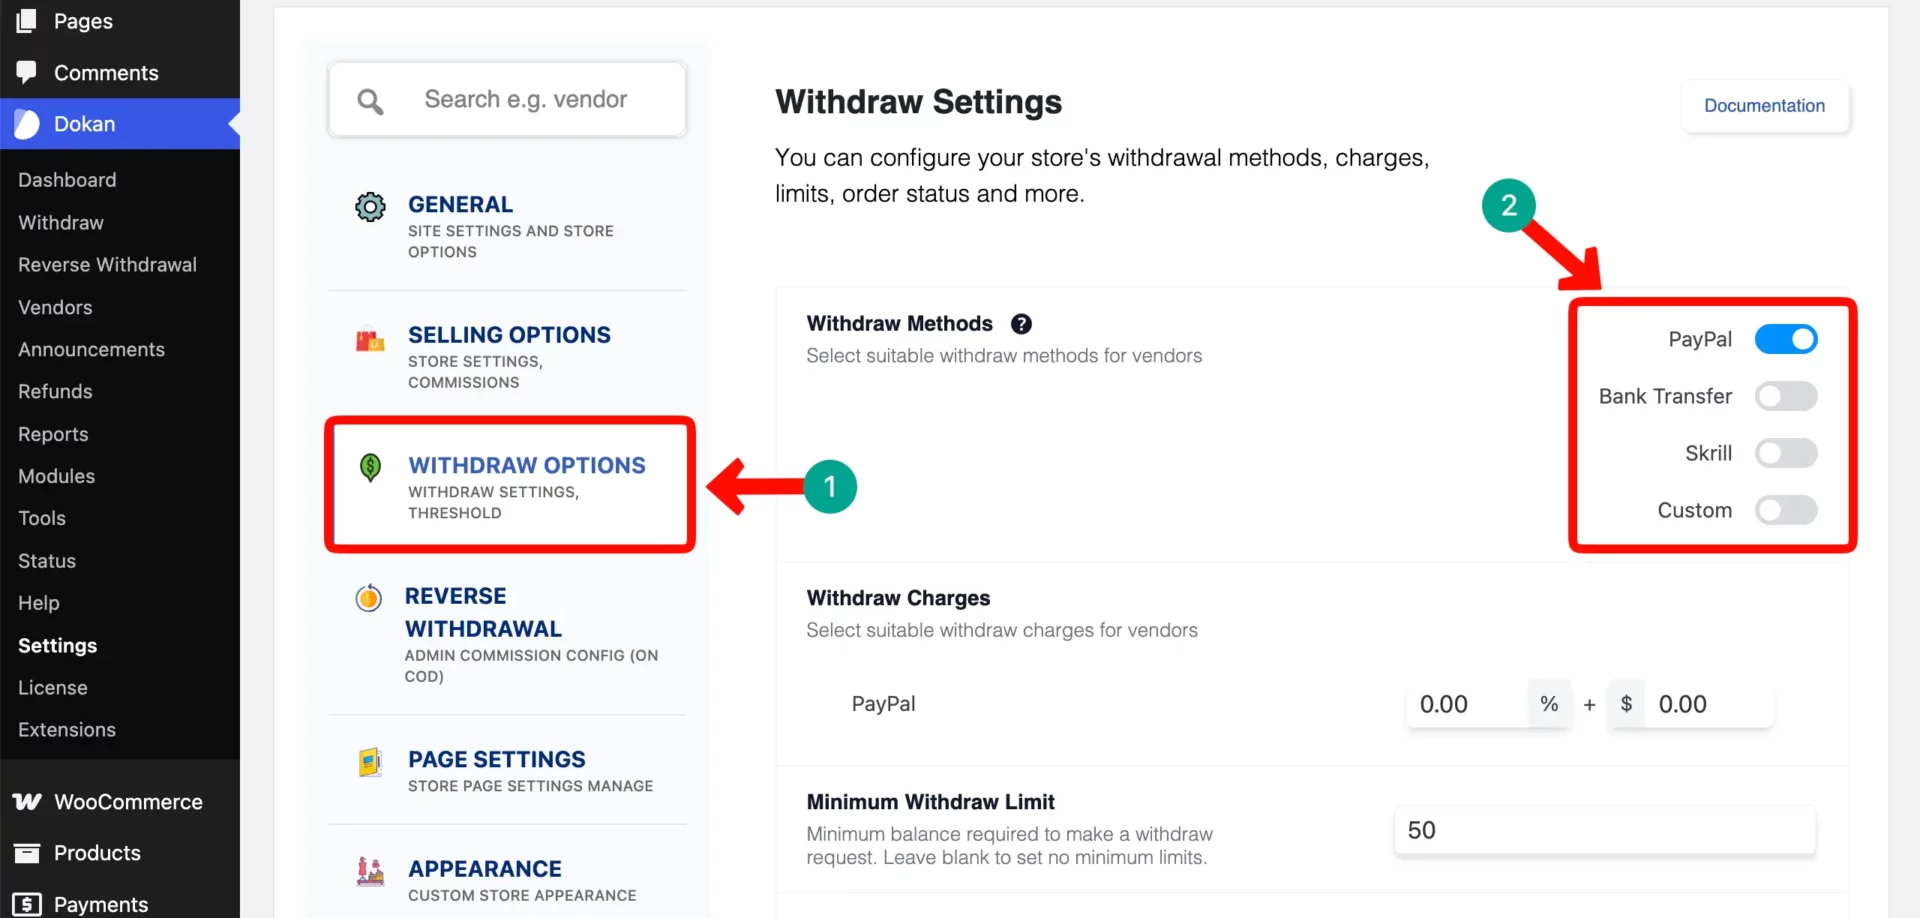
Step 04: Configure Vendor Withdrawal Methods
Vendors need a way to receive their earnings. Dokan supports several payout methods. Configure these by going to Dokan > Settings > Withdraw.
> Bank Transfer
Bank transfer is the most universal method. Vendors provide their bank account details, and you process payments manually or through an automated system. This works well for vendors in countries where PayPal isn’t widely available.
> PayPal
PayPal is popular and trusted worldwide. Vendors simply need a PayPal email address to receive payments. Transactions are fast and relatively simple to manage.
> Skrill
Skrill is a powerful payment processor that supports automatic vendor payouts. With this system, vendors connect their receive payments automatically after each sale. This is the most hands-off option for marketplace admins.
In addition to these, there are two more options – Wirecard and Stripe. But for these two, you have to upgrade to the pro version. You can enable one or more of these methods depending on where your vendors are located and what payment systems they prefer.
Step 05: Configure Shipping Settings
Shipping is one of the most important parts of running a marketplace. Dokan gives you the flexibility to let vendors manage their own shipping or handle it centrally.
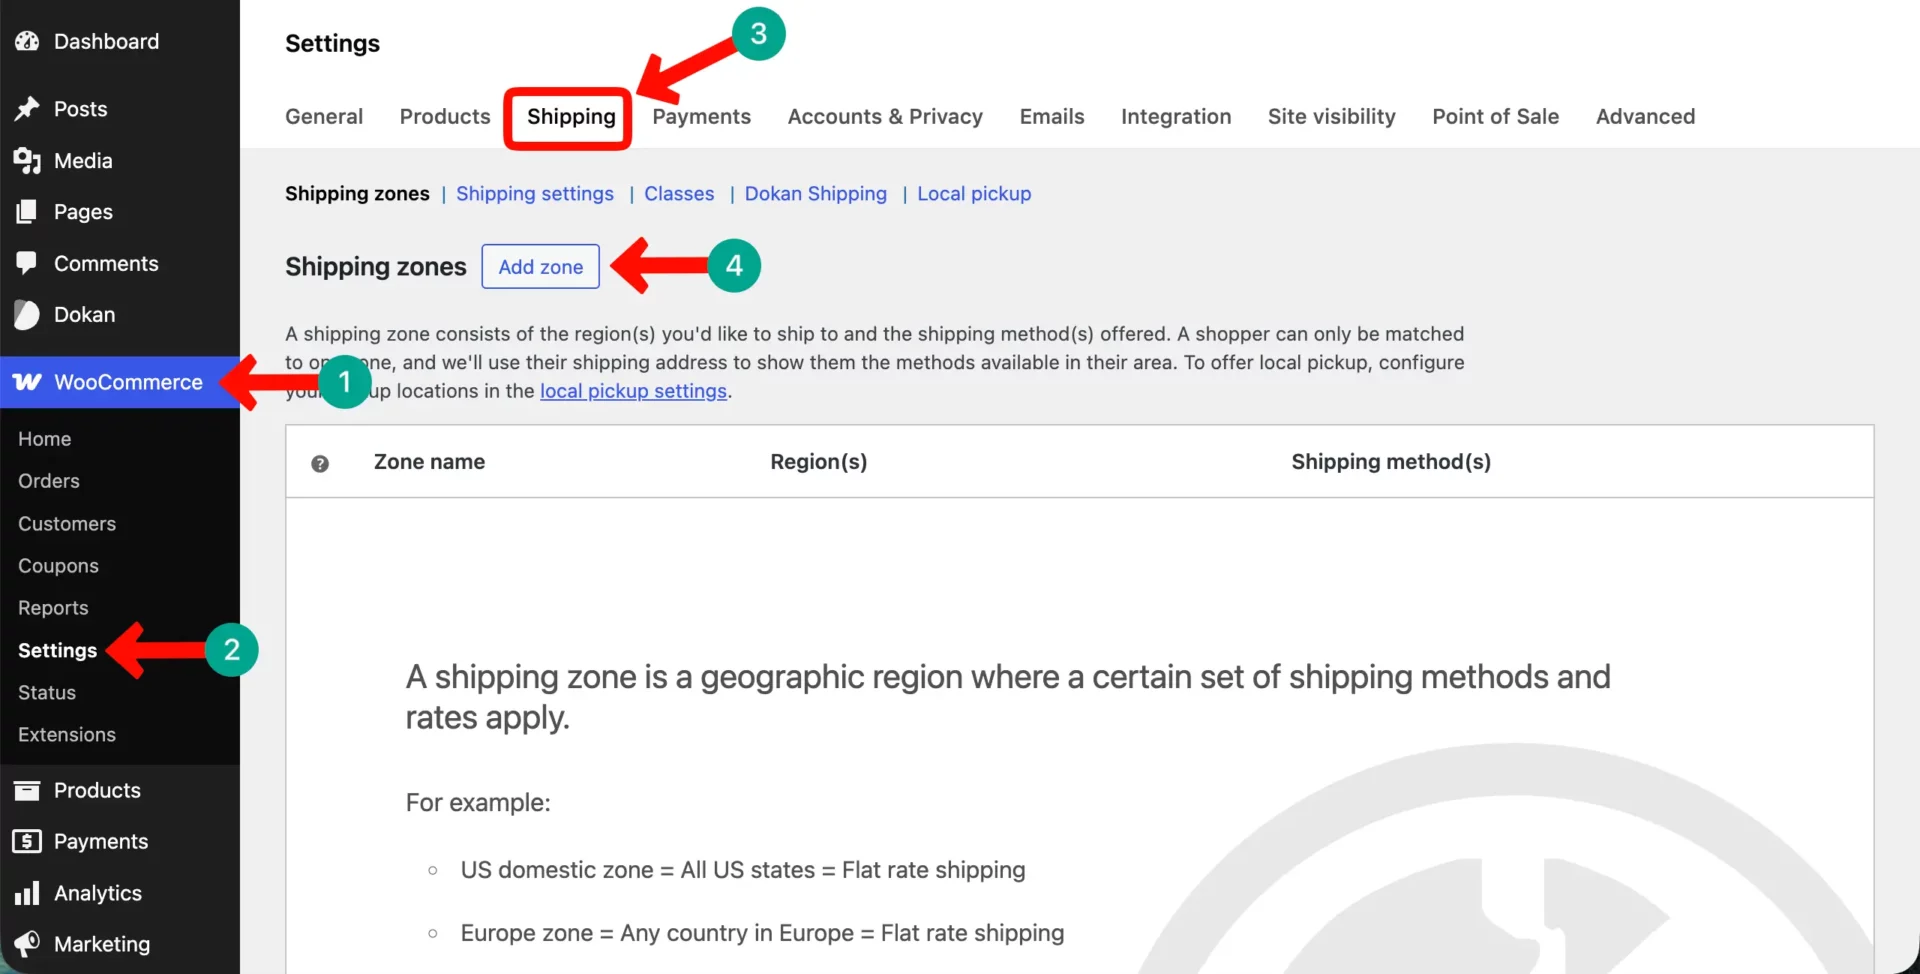
> Shipping Zones
Go to WooCommerce > Settings > Shipping > Shipping Zones. Create zones for the geographic regions you want to ship to. For example, you might create zones for:
- Local delivery (your city or country)
- Domestic shipping (within your country)
- International shipping
Each zone can have its own shipping rates and methods.
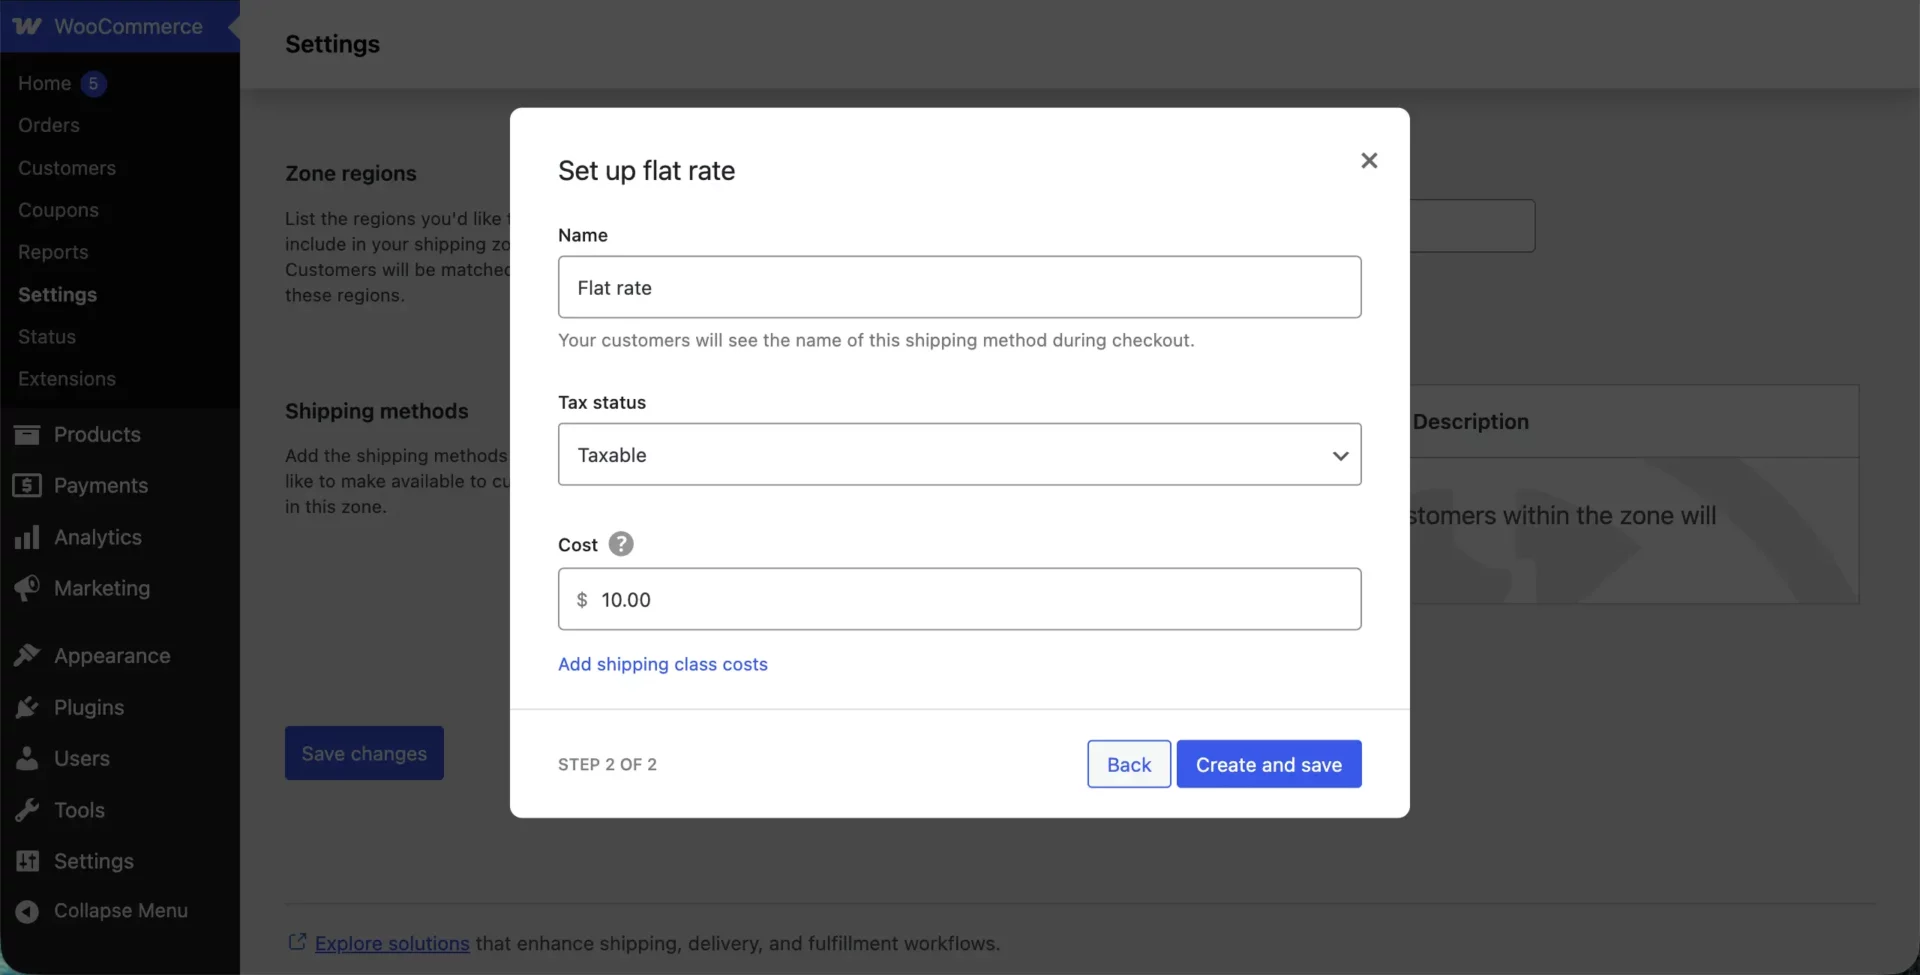
> Add Rate Shipping
For simplicity, set up flat rate shipping for each zone. A flat rate charges customers a fixed shipping fee regardless of the products they buy. For example, $5 for local, $10 for domestic, and $25 for international.
You can refine this later with more complex rules once your marketplace grows.
Step 06: Configure Tax and Currency Settings
Go to WooCommerce > Settings > General to set your store currency. Make sure this matches the currency your vendors and customers will use.
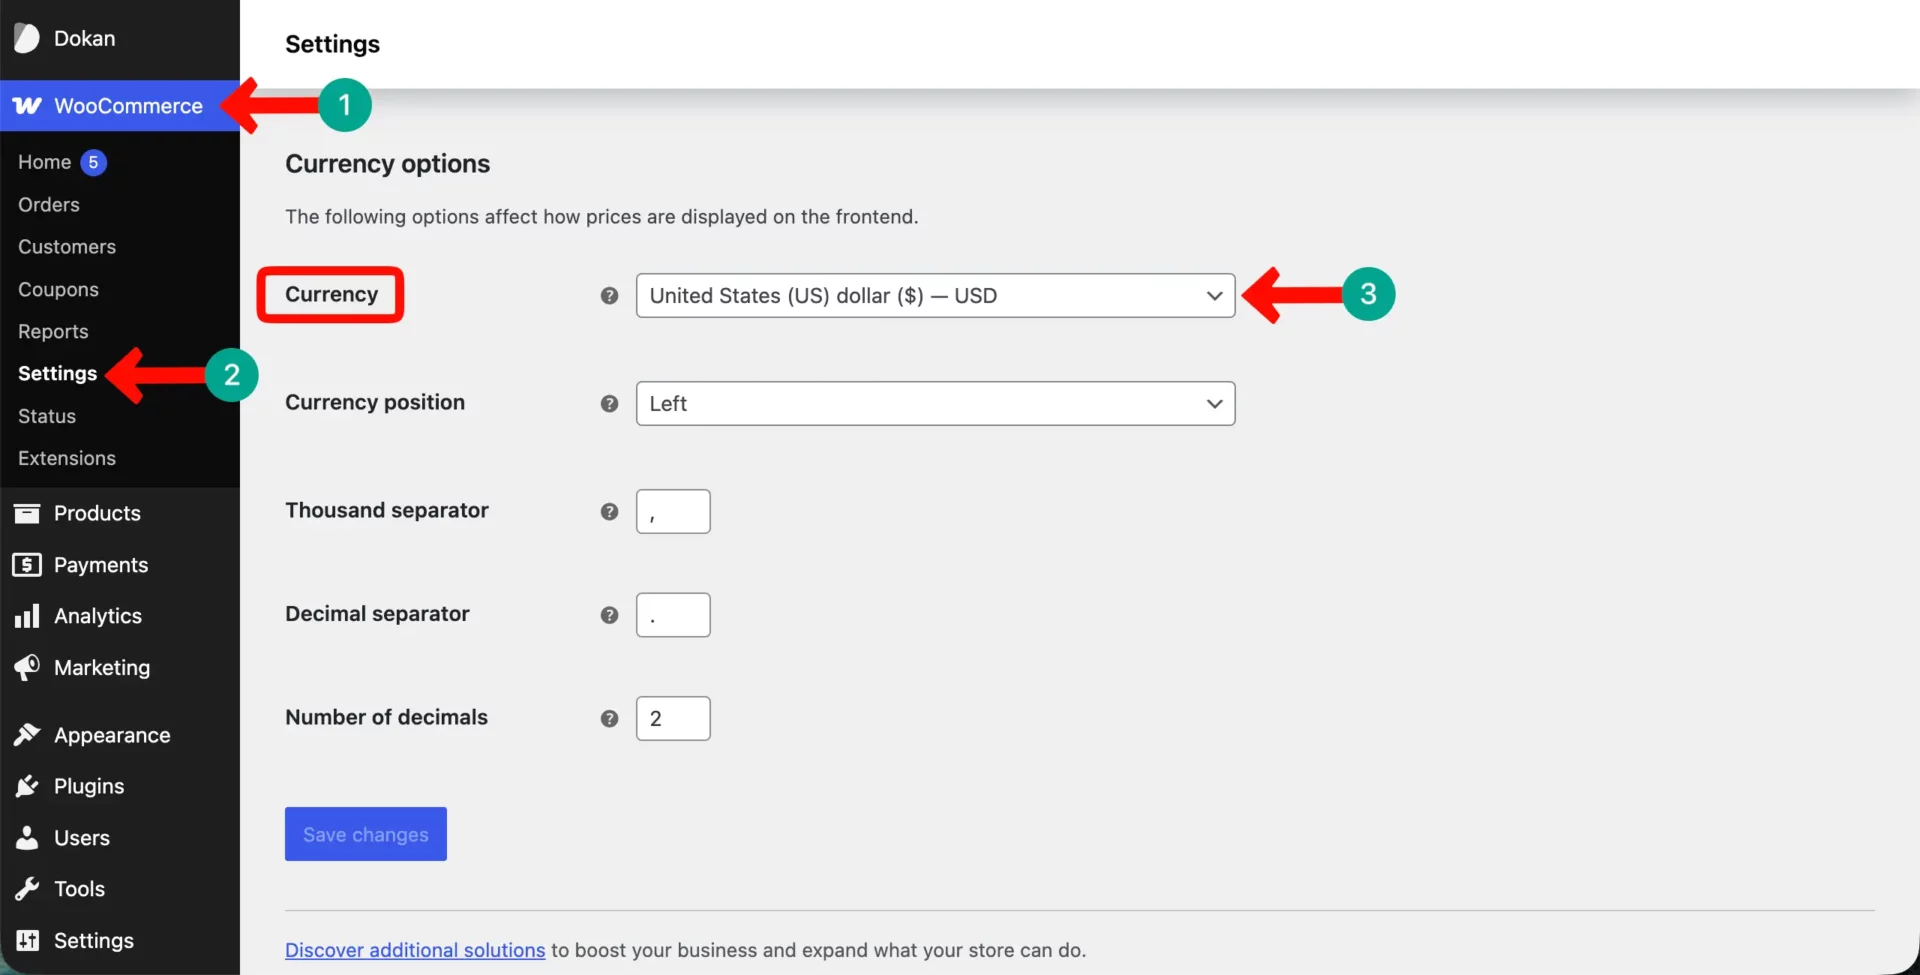
For tax settings, go to WooCommerce > Settings > Tax. Enable tax calculations and decide whether prices are displayed with or without tax. If your marketplace operates across multiple countries, you may need to configure different tax rates for different regions.
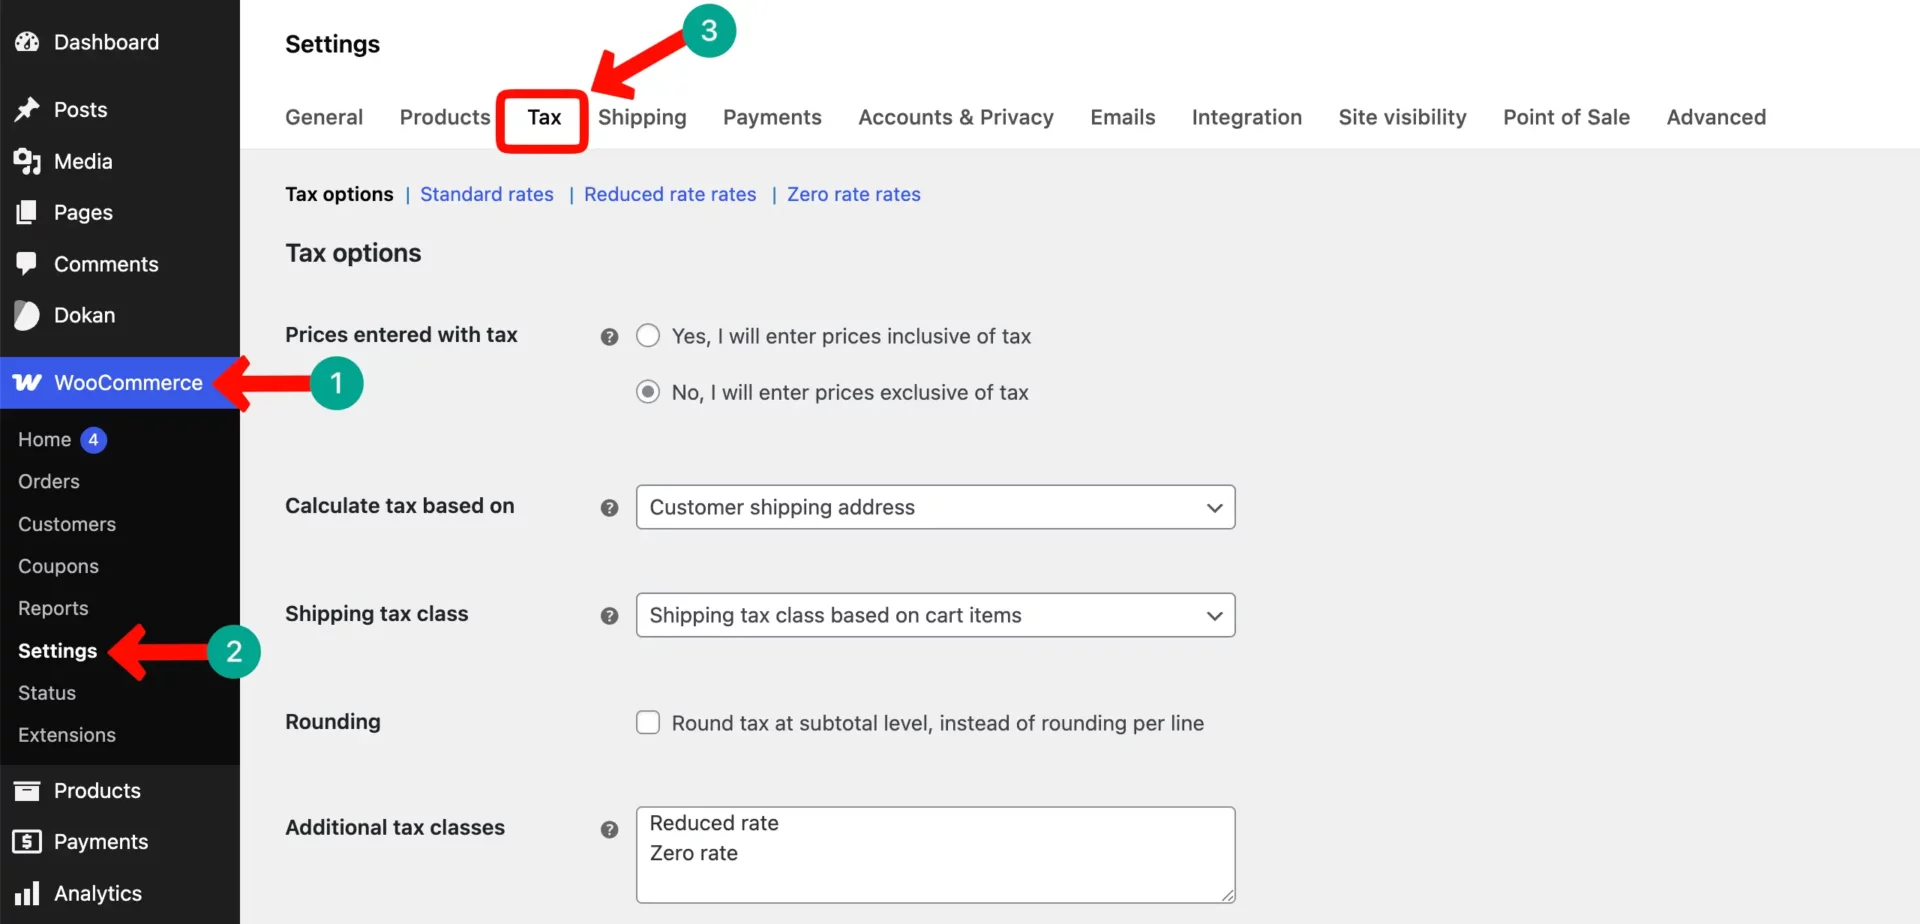
Dokan has tax fee settings under Dokan > Settings > Selling Options where you can define how tax fees are handled within the commission calculation.
Step 07: Configure Store Pages and Marketplace Pages
Dokan needs specific pages assigned to marketplace functions. Go to Dokan > Settings > Pages to assign them. Pages you can configure from here are:
- Dashboard
- My Orders
- Store List
- Select page
- Vendor Onboarding

Configure the Vendor Registration Worflow
Getting vendors onto your marketplace is critical. Without sellers, there are no products, and without products, there are no customers. Dokan makes this process smooth and manageable.
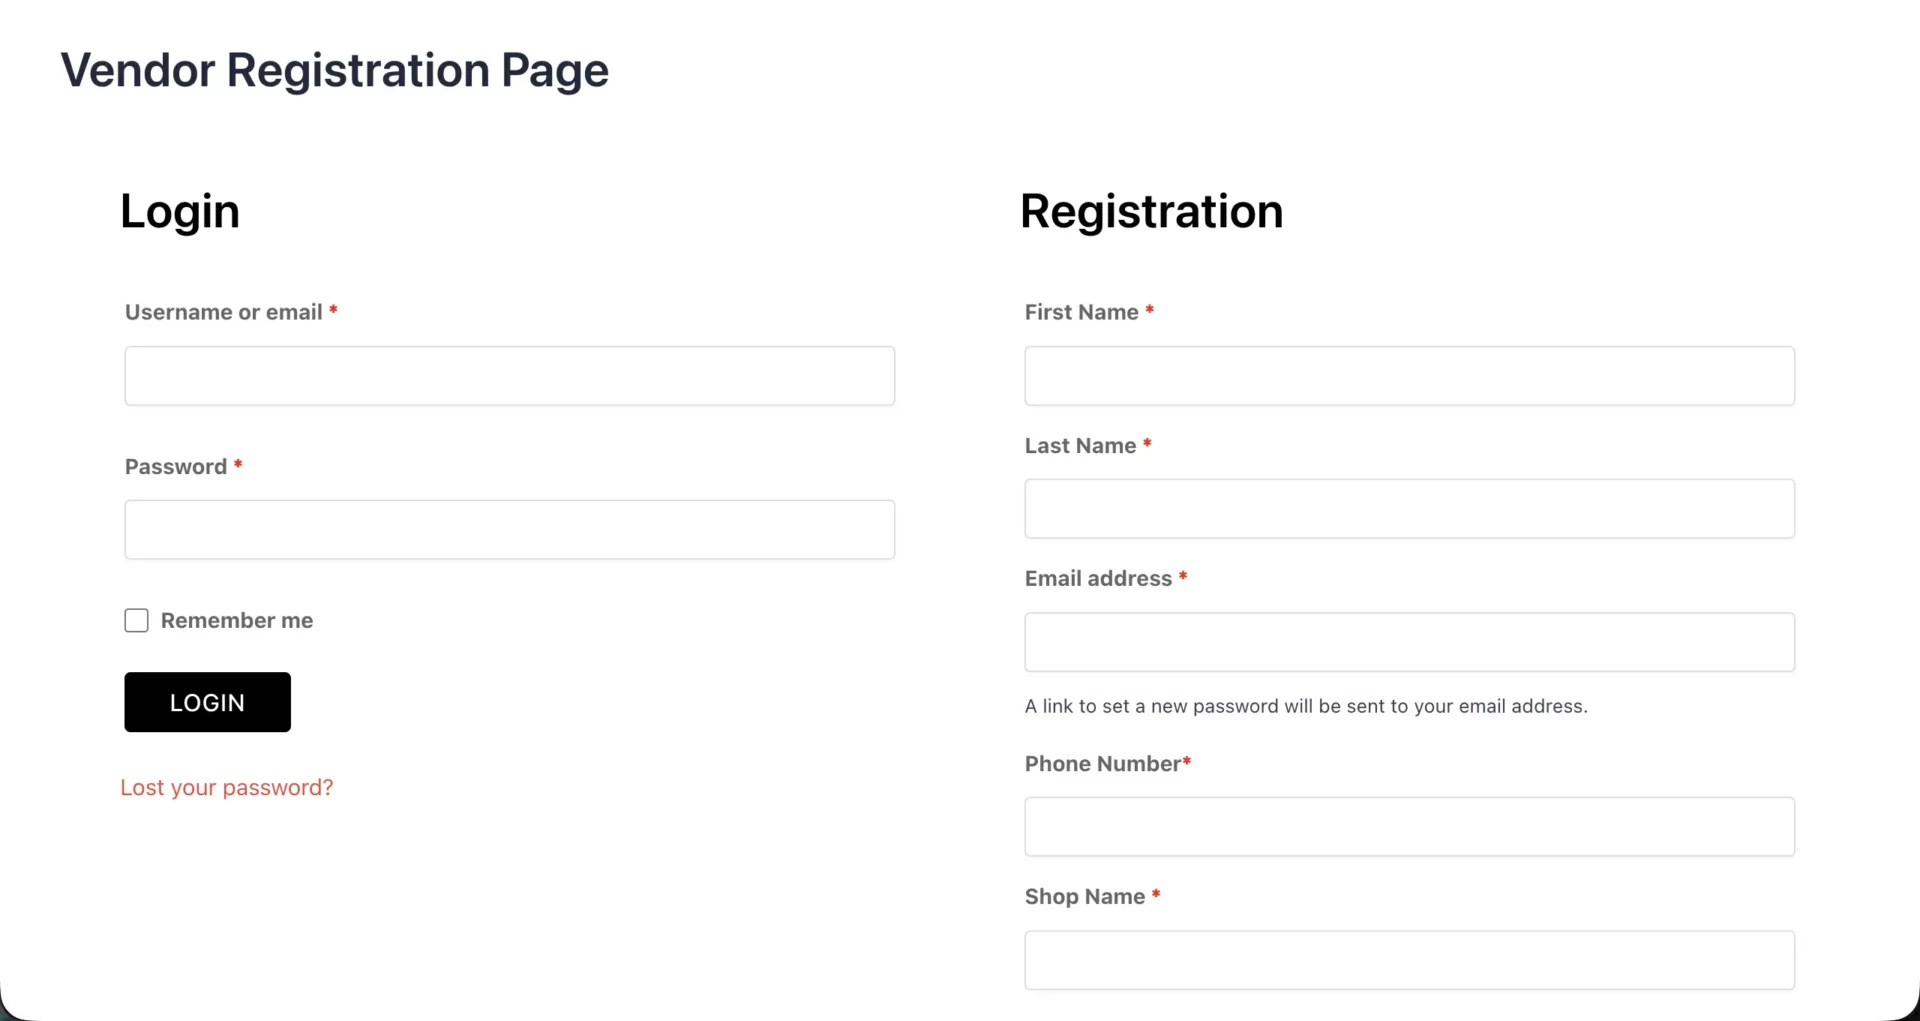
> Create the Vendor Registration Page
To create this, open a new page, and copy-paste the shortcode [dokan-vendor-onboarding-registration] on the page. Once done, publish the page.
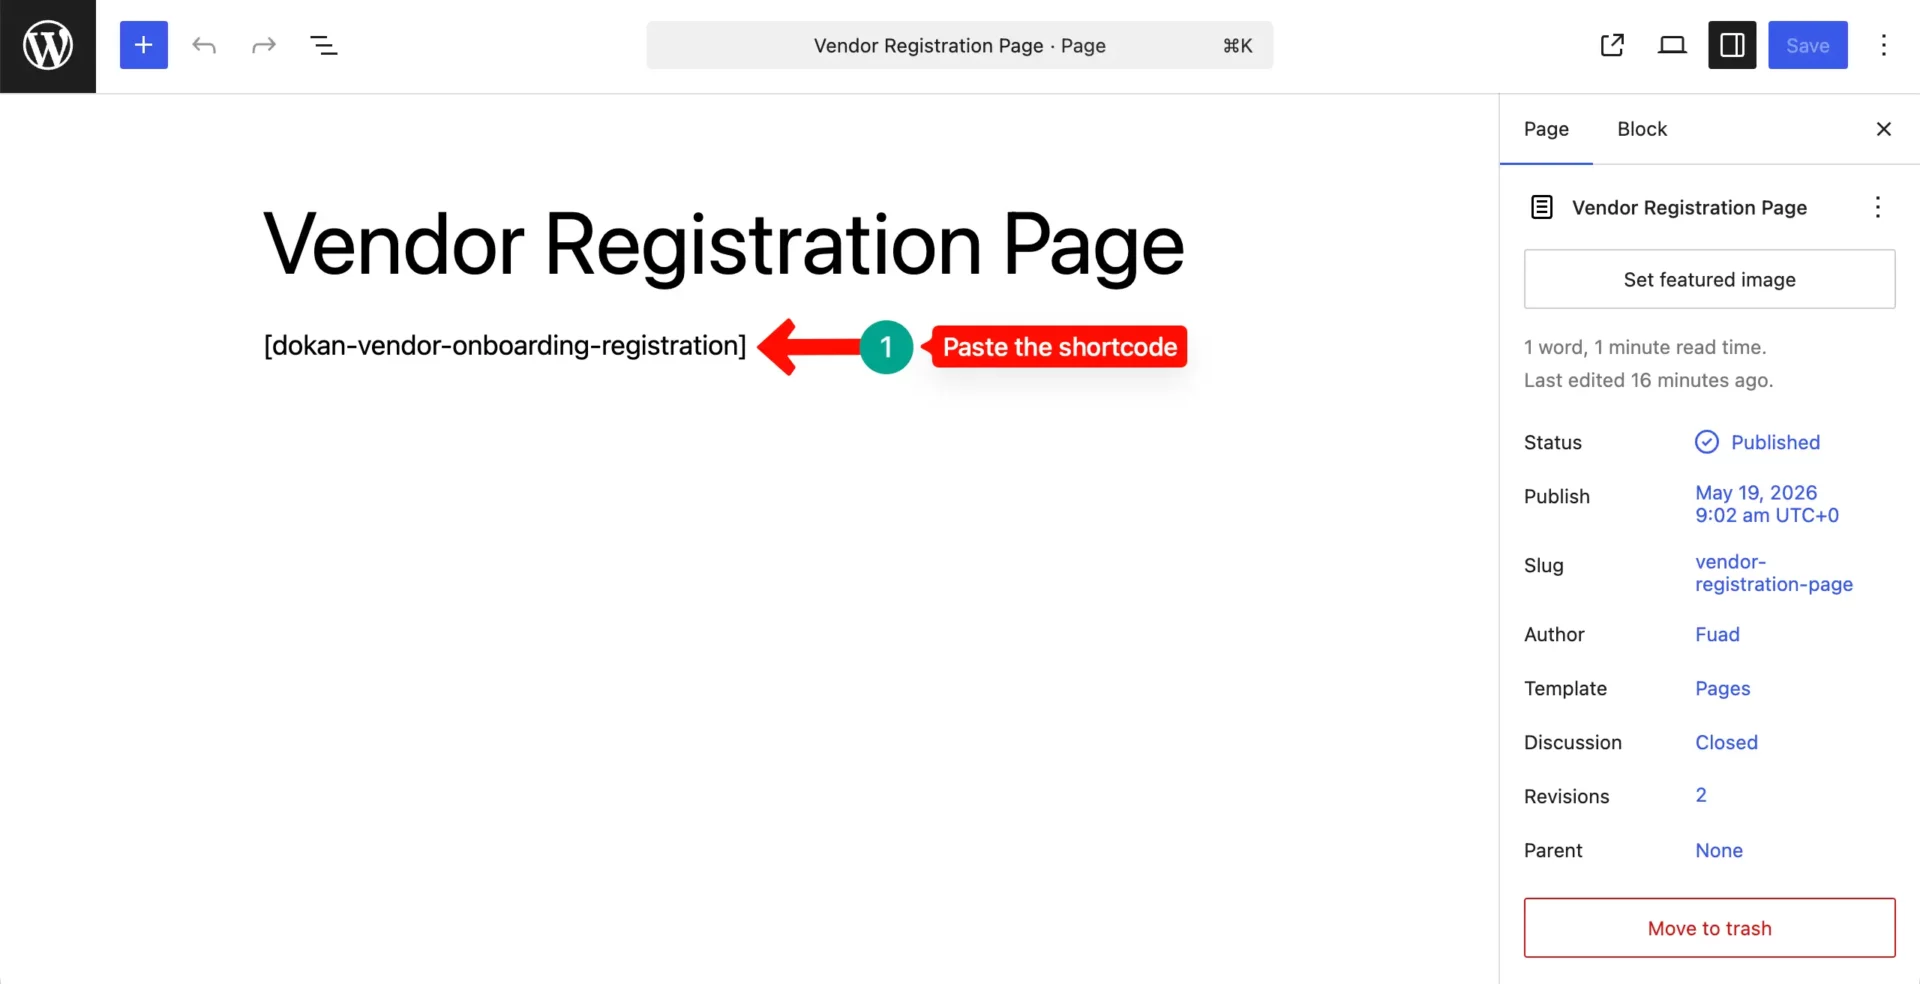
Now, preview the page. Using the page, vendors will be able to apply for registering into your marketplace for selling products. Let’s for the test purpose, apply yourself as a vendor.
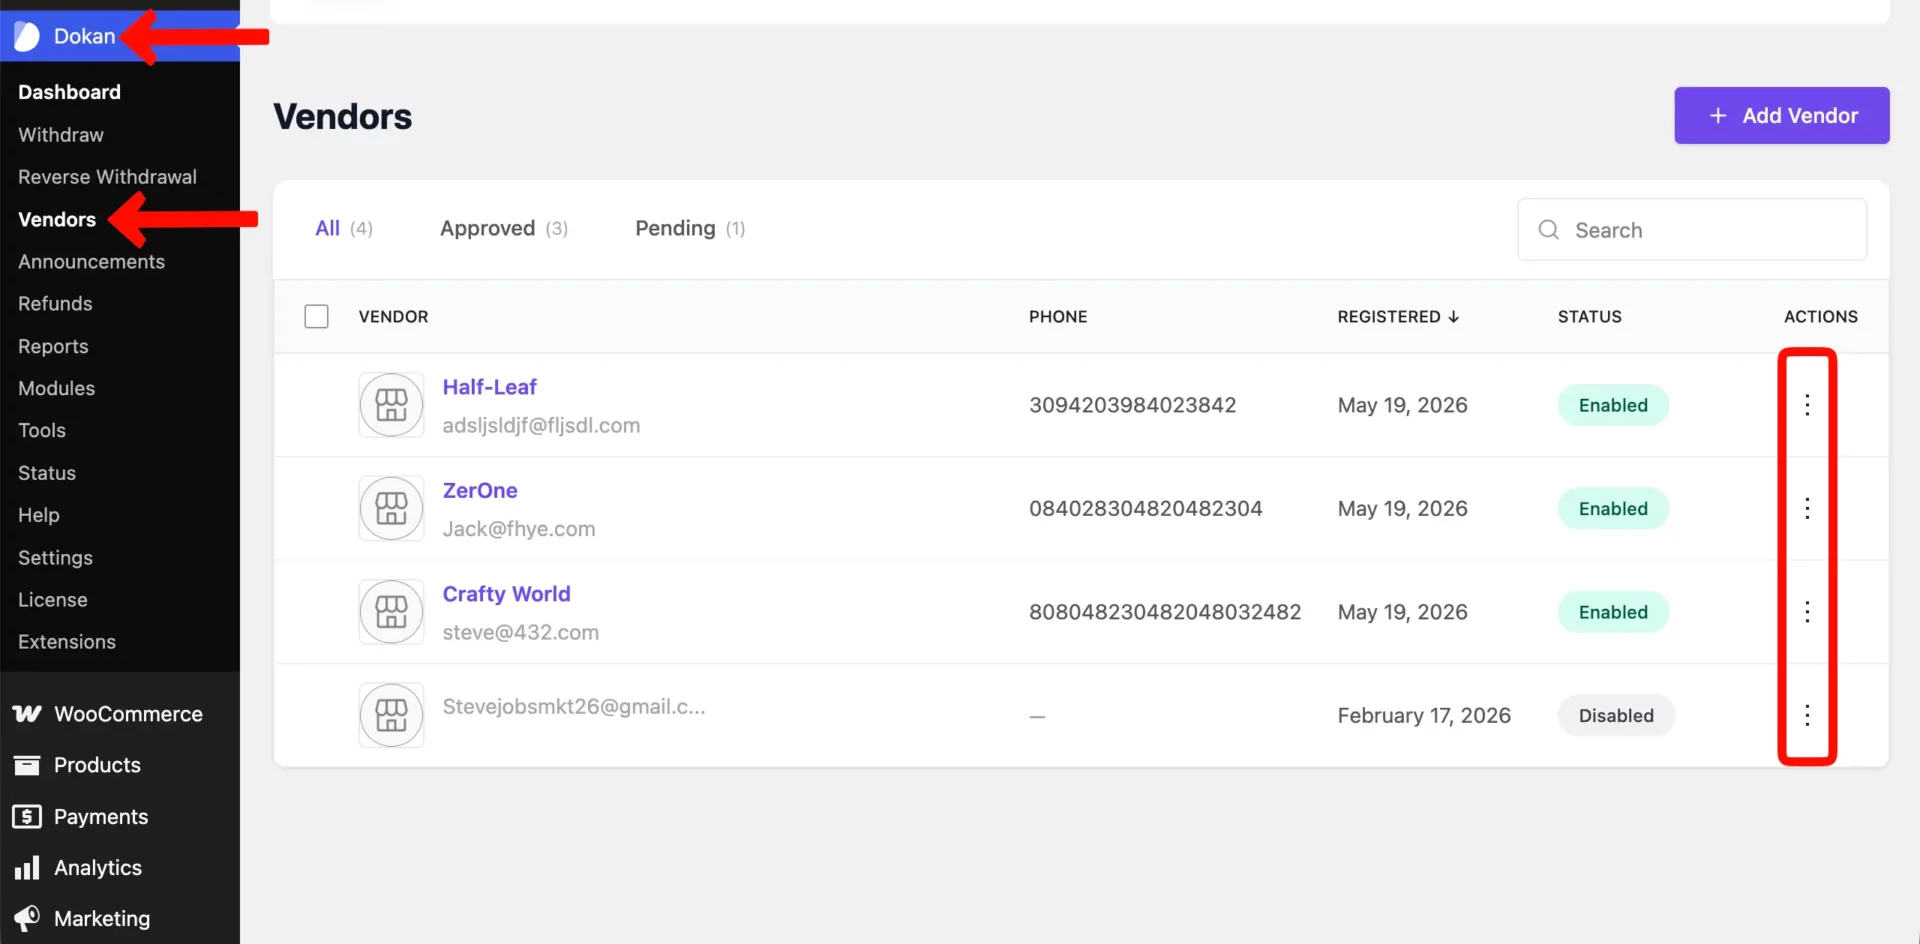
Approve or Disable Vendors
As the marketplace admin, you review every vendor application before approving it. Go to Dokan > Vendors in your admin panel. You will see a list of all pending vendor requests. By clicking the three-dot icons, you can
- Approve — click Edit, enable their account, and save
- Disable — simply do not approve them or delete the account
Before approving a vendor, review their store name, contact details, and any background information they provided. Make sure they are genuine sellers who will add value to your marketplace.
After approval, the vendor will be notified by email and can log in immediately to start setting up their store.
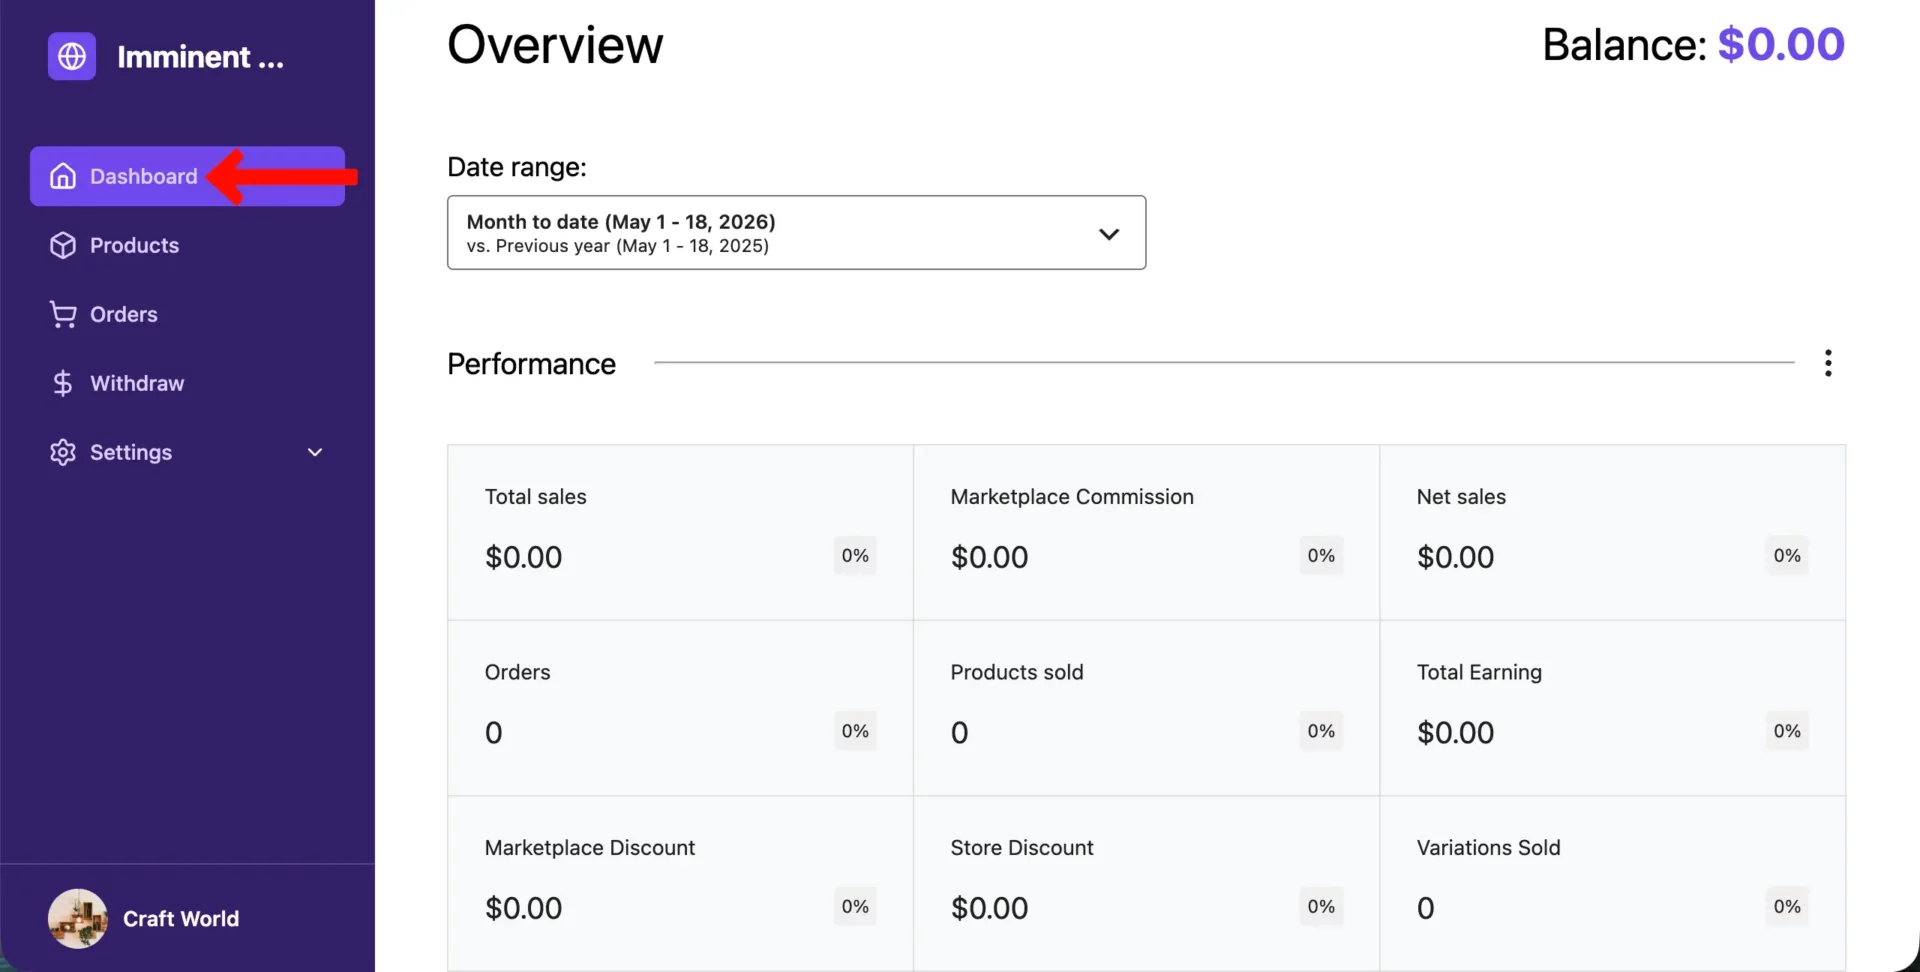
Exploring the Vendor Dashboard Experience
Once approved, vendors will be able to log into their store by adding their user name and password. They will see this interface after they land on this dashboard.
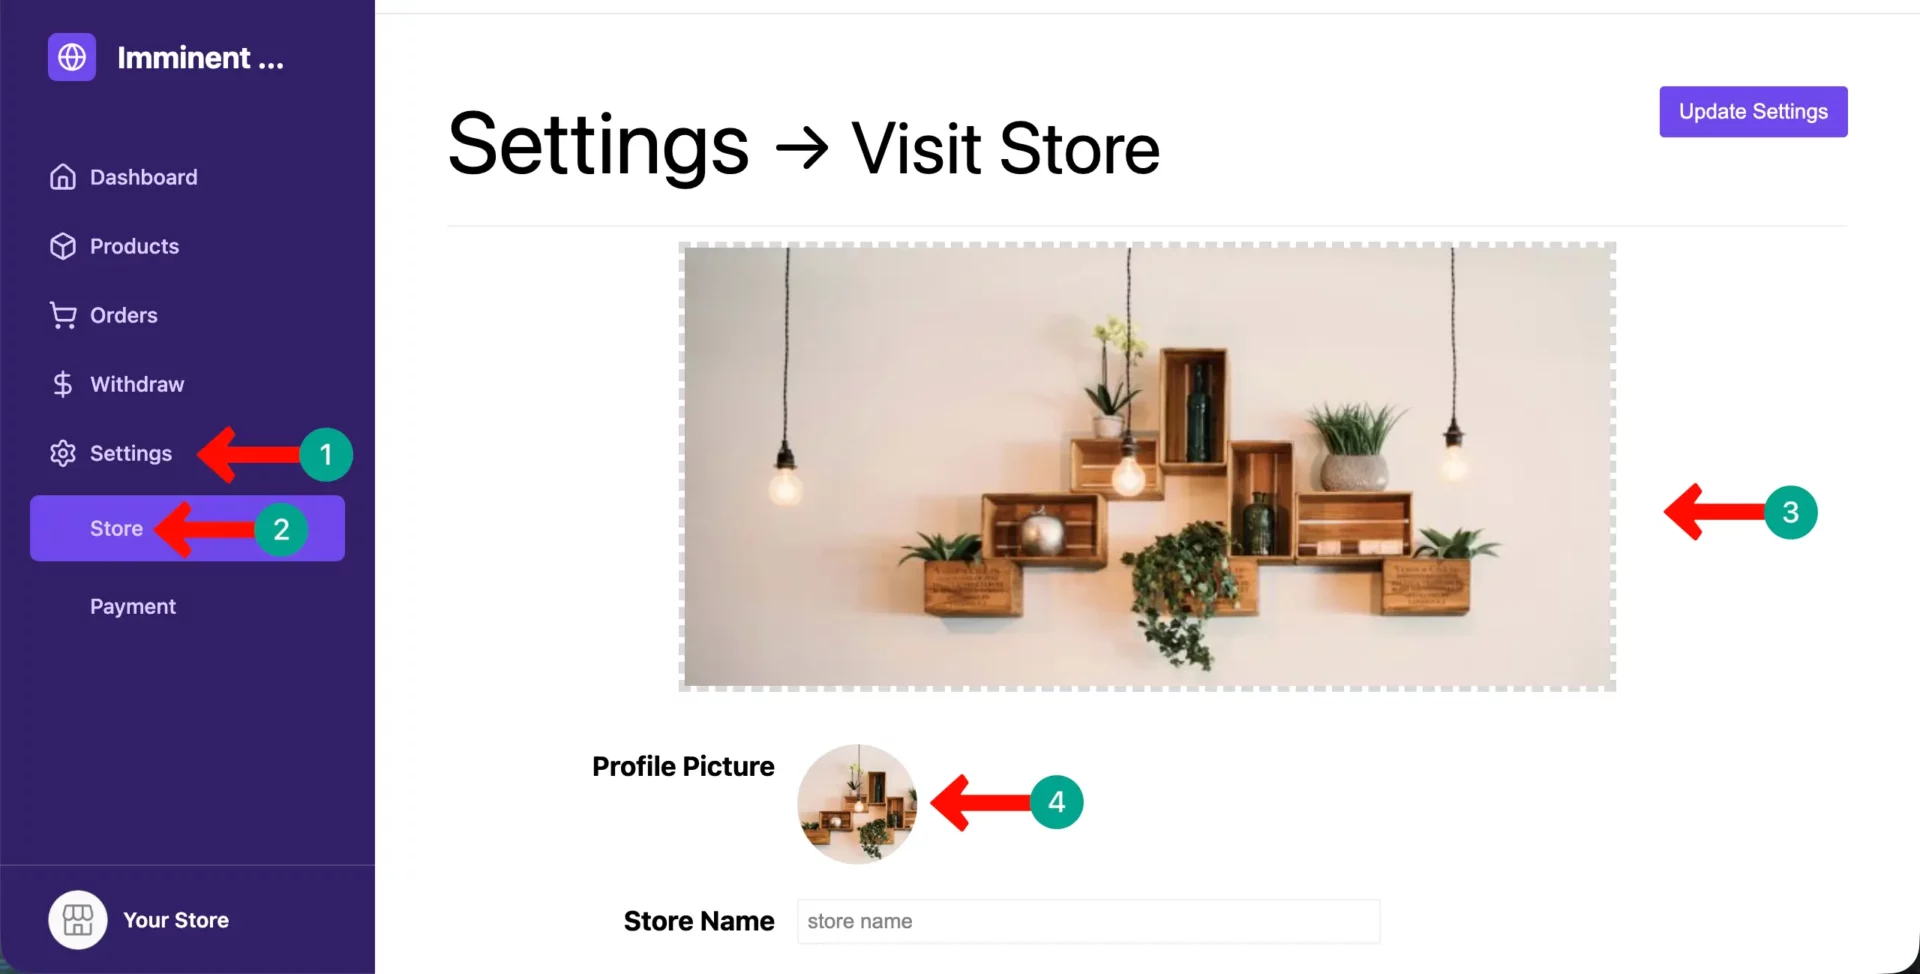
> Customize the Store
From the dashboard, navigate to Settings > Store. You can enter a store name, upload a store banner and profile image, set their store address, and add their contact information.
> Add Products
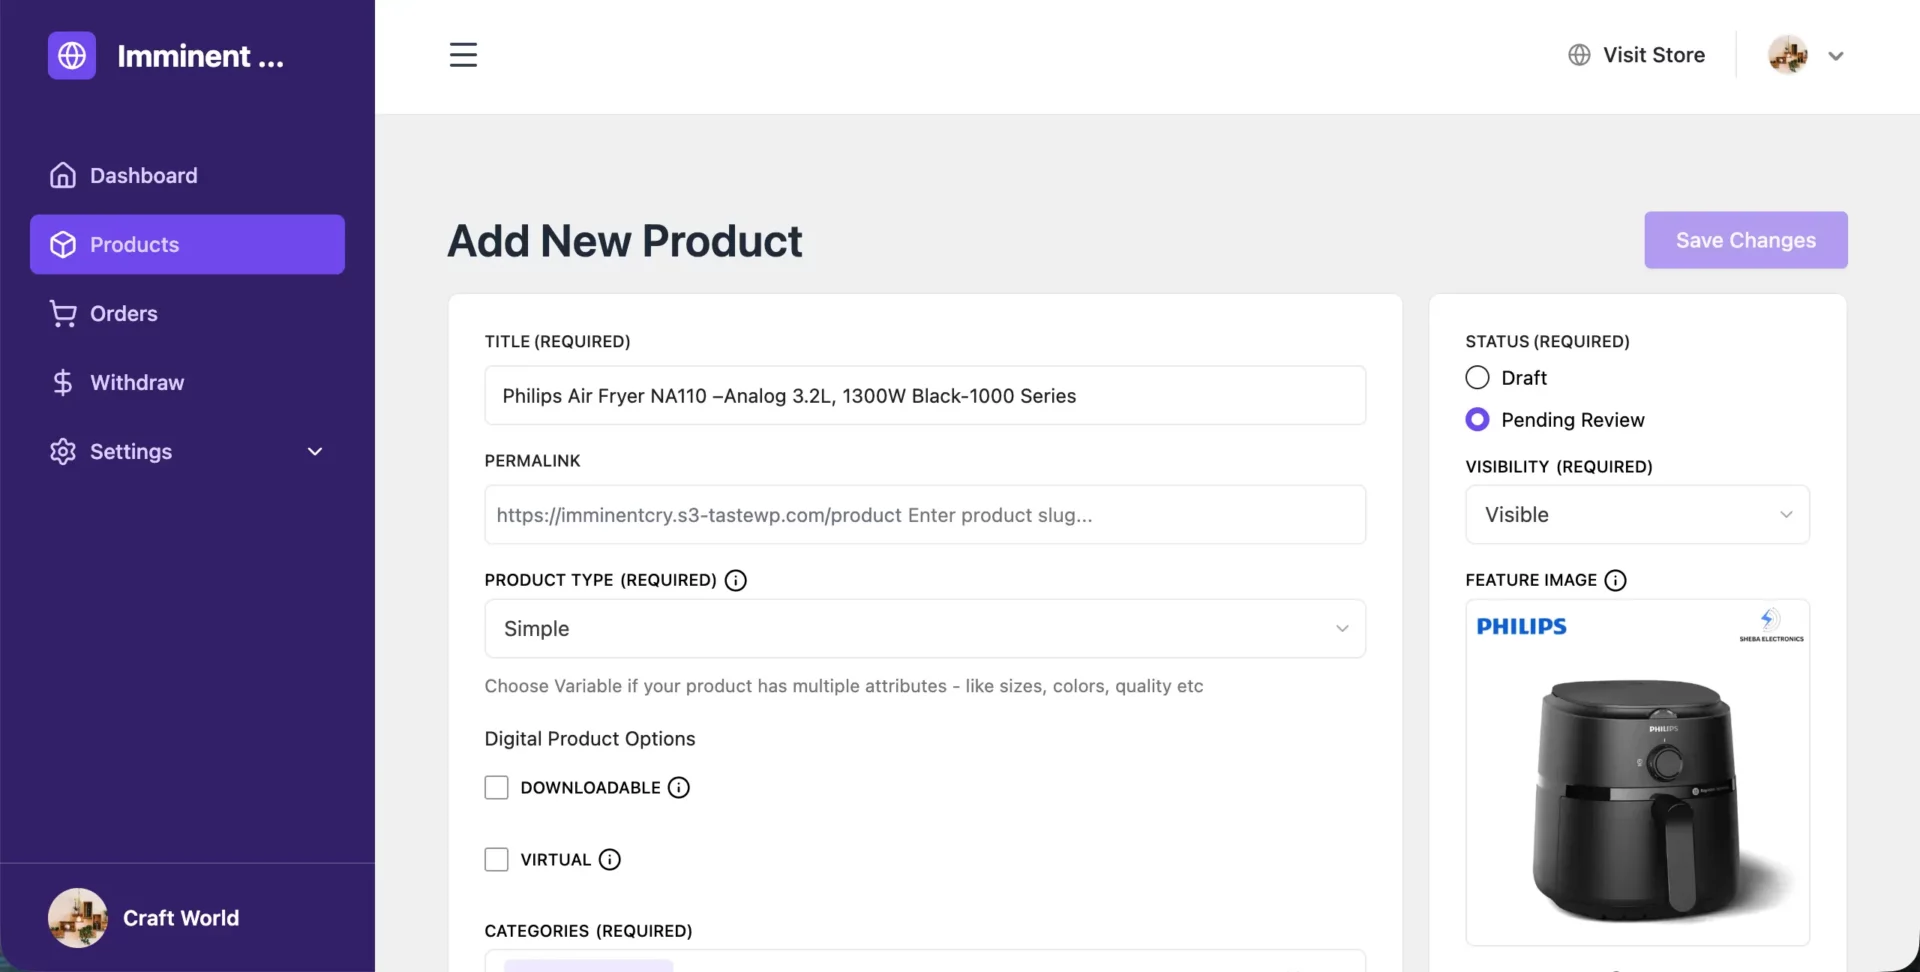
Vendors add, edit, and manage their entire product catalog from the frontend dashboard. Adding a product works through a frontend form that mirrors WooCommerce’s product editor in structure but is simplified for non-technical users.
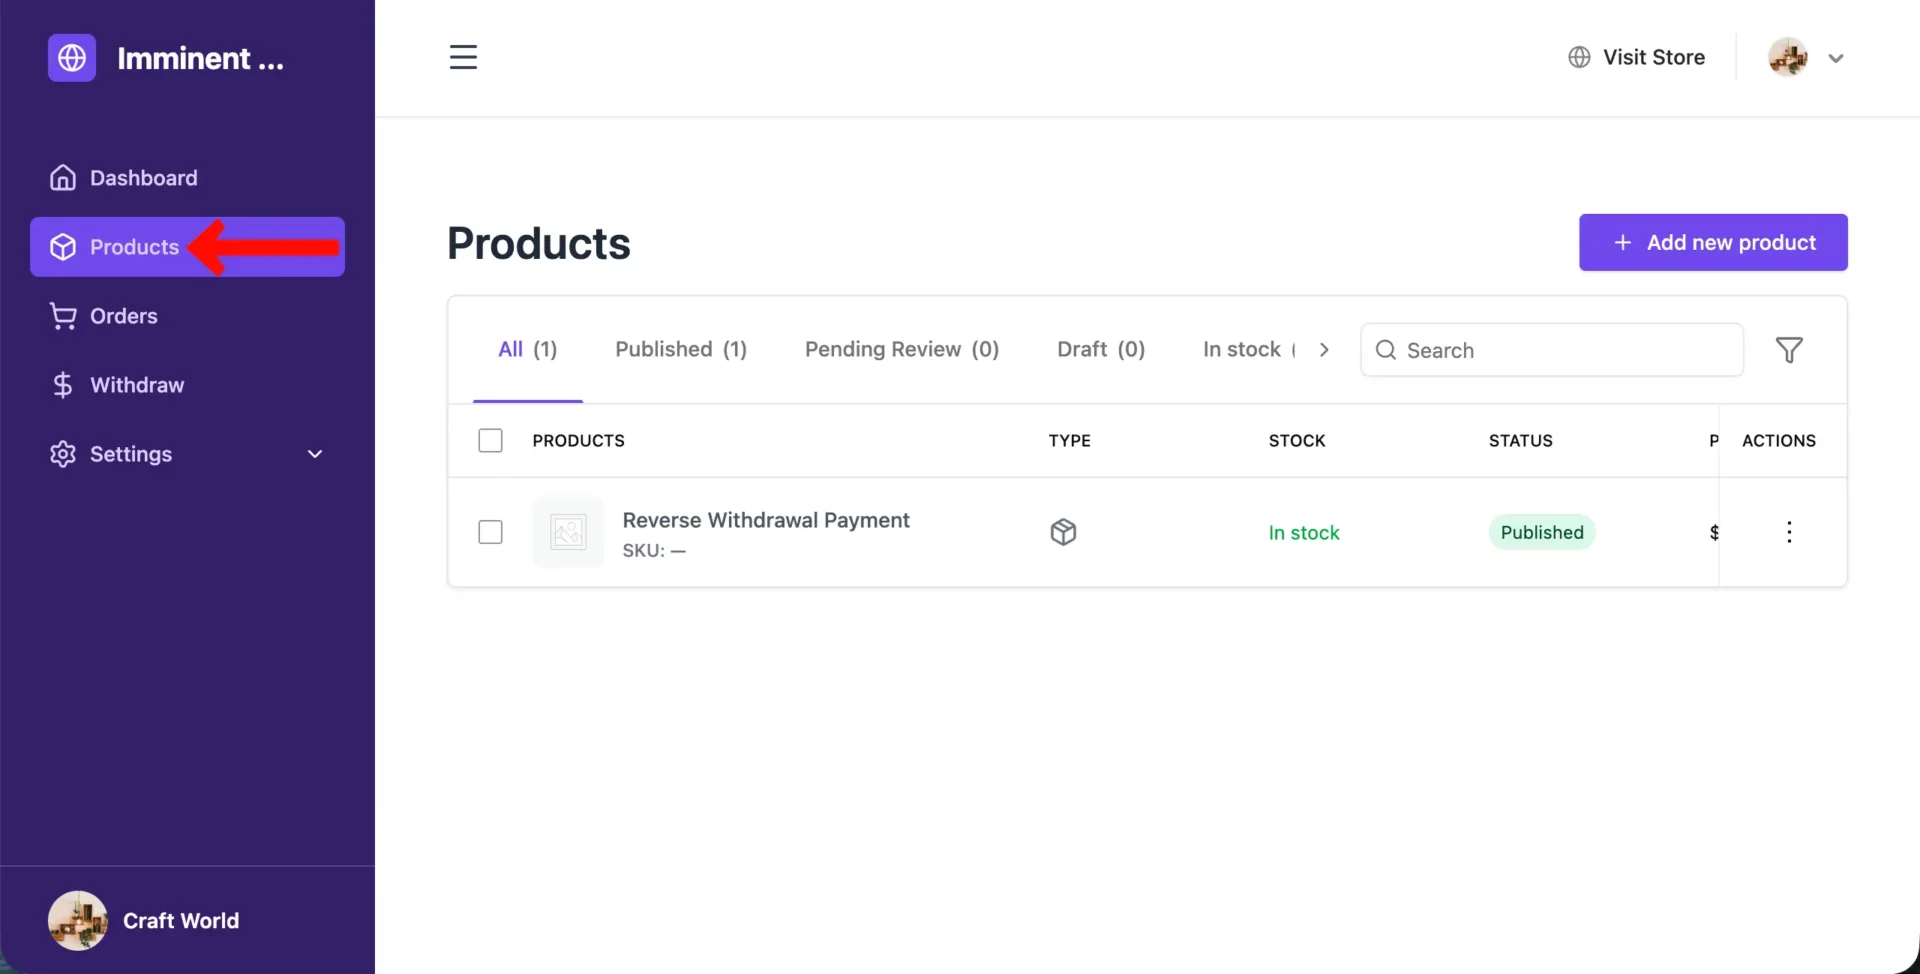
While adding products, fill in the following information. Vendors have to do this:
- Product name and description
- Product images (main image + gallery)
- Category and tags
- Pricing (regular price, sale price, sale schedule)
- Inventory (stock quantity, SKU, backorder settings)
- Shipping weight and dimensions
- Product type (simple, variable, digital/downloadable)
Now, it’s the vendors’ time to add the number of products they want to add. Do this one by one. They must be careful about adding information accurately, keeping the SEO best practices in mind, so these products appear on SEPRs organically.
> Manage Orders
Every order containing a vendor’s products appears in their Orders section. Vendors see the order ID, customer information, products ordered, order total, their earnings from the order (after commission), and the current order status.

Vendors can update order status (processing → shipped → completed), add tracking information, and add order notes visible to the customer. Critically, vendors do not see other vendors’ orders — Dokan’s order routing system automatically separates multi-vendor orders at the database level.
If a customer buys from three different vendors in one cart, each vendor sees only their portion of the order.
> Withdraw Earnings
The earnings section shows vendors a complete transaction history — every sale, every commission deducted, every withdrawal made, and their current available balance.
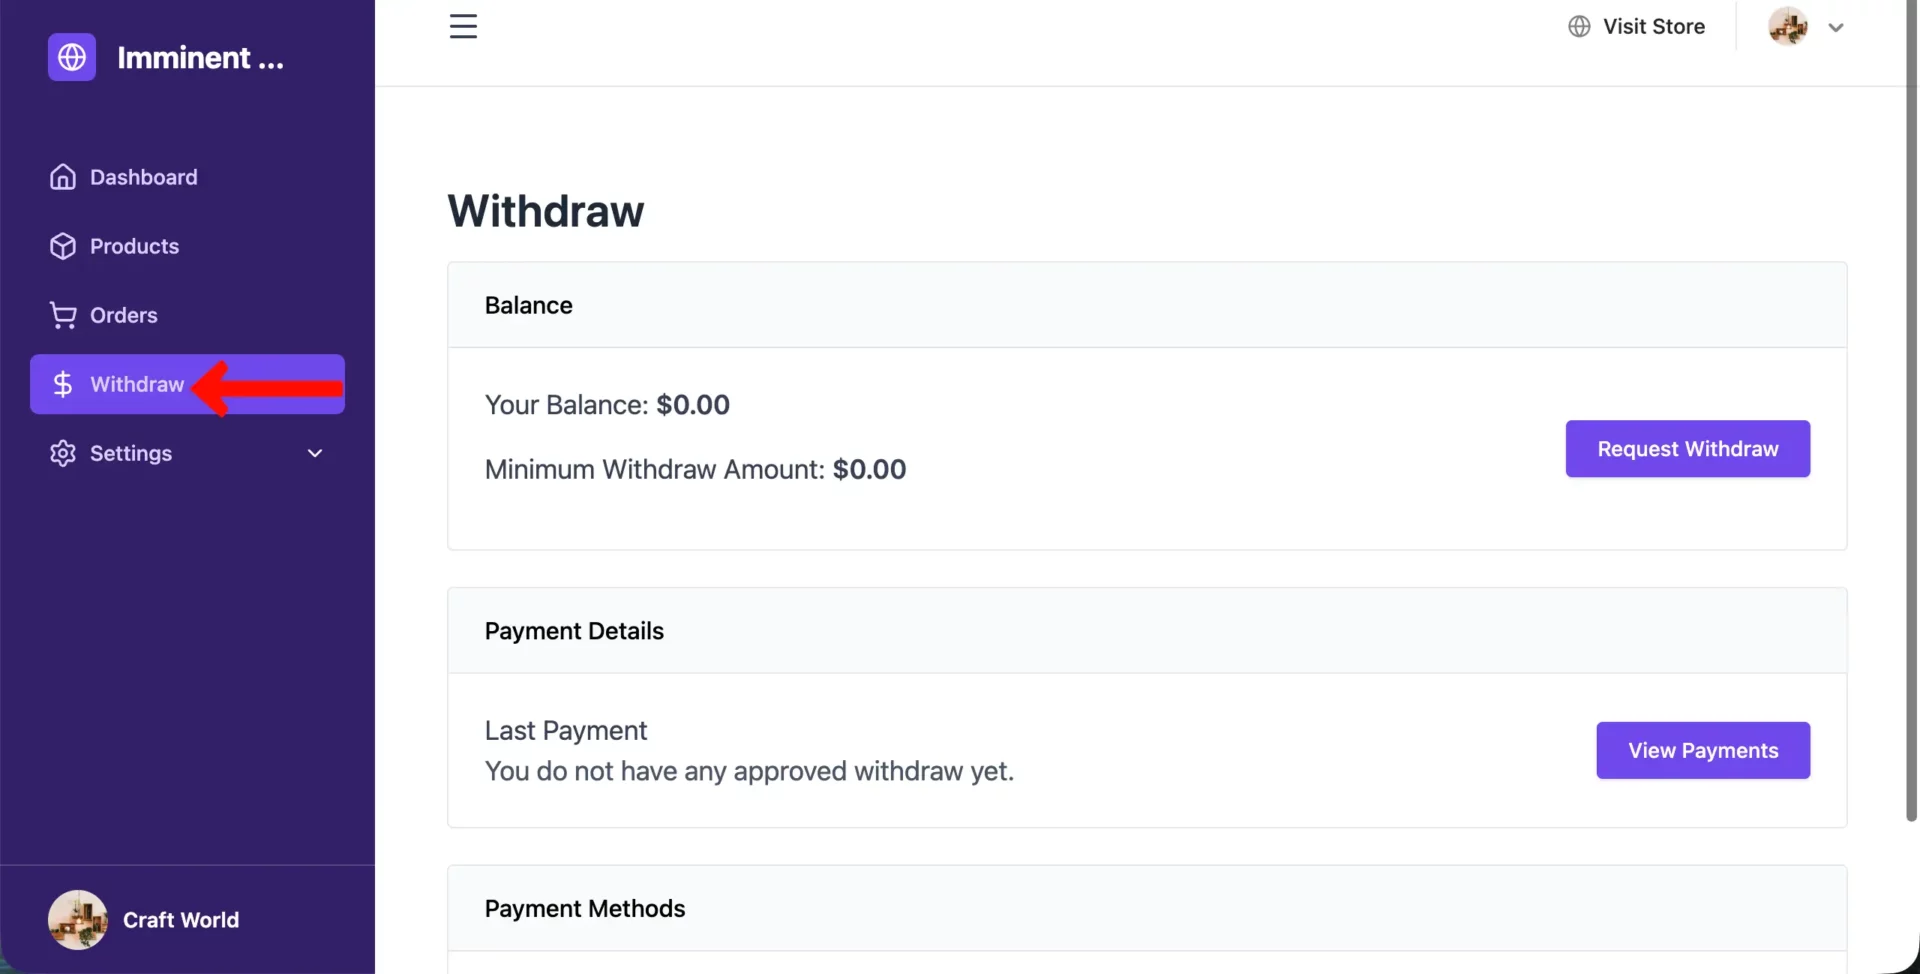
The transparency here is important: vendors can always see exactly how much they’ve earned, how much the marketplace has taken, and how much is available for withdrawal.
Design Pages to Make the Marketplace Look Like Amazon
A great marketplace isn’t just a collection of vendors. It also includes a collection of pages. These pages handle different tasks such as vendor registration, product listing, order tracking, store management, shopping cart, checkout, and customer account management.
Without these pages, vendors cannot manage their stores properly, and customers may face problems while browsing products, placing orders, or communicating with sellers.
As your website has already installed WooCommerce and Dokan, know that there are several pages automatically coming to your website by default. And the rest of the pages are to be built from scratch. Check them below.
| WooCommerce | Dokan | From Scratch |
|---|---|---|
| Shop | Vendor Dashboard | Home Page |
| Cart | Store Listing | About Us |
| Checkout | Vendor Registration | Contact Us |
| My Account | Single Store Page | FAQ Page |
| Terms & Conditions | Vendor Guidelines | |
| Privacy Policy | Return & Refund Policy | |
| Shipping Policy | ||
| Become a Vendor Page |
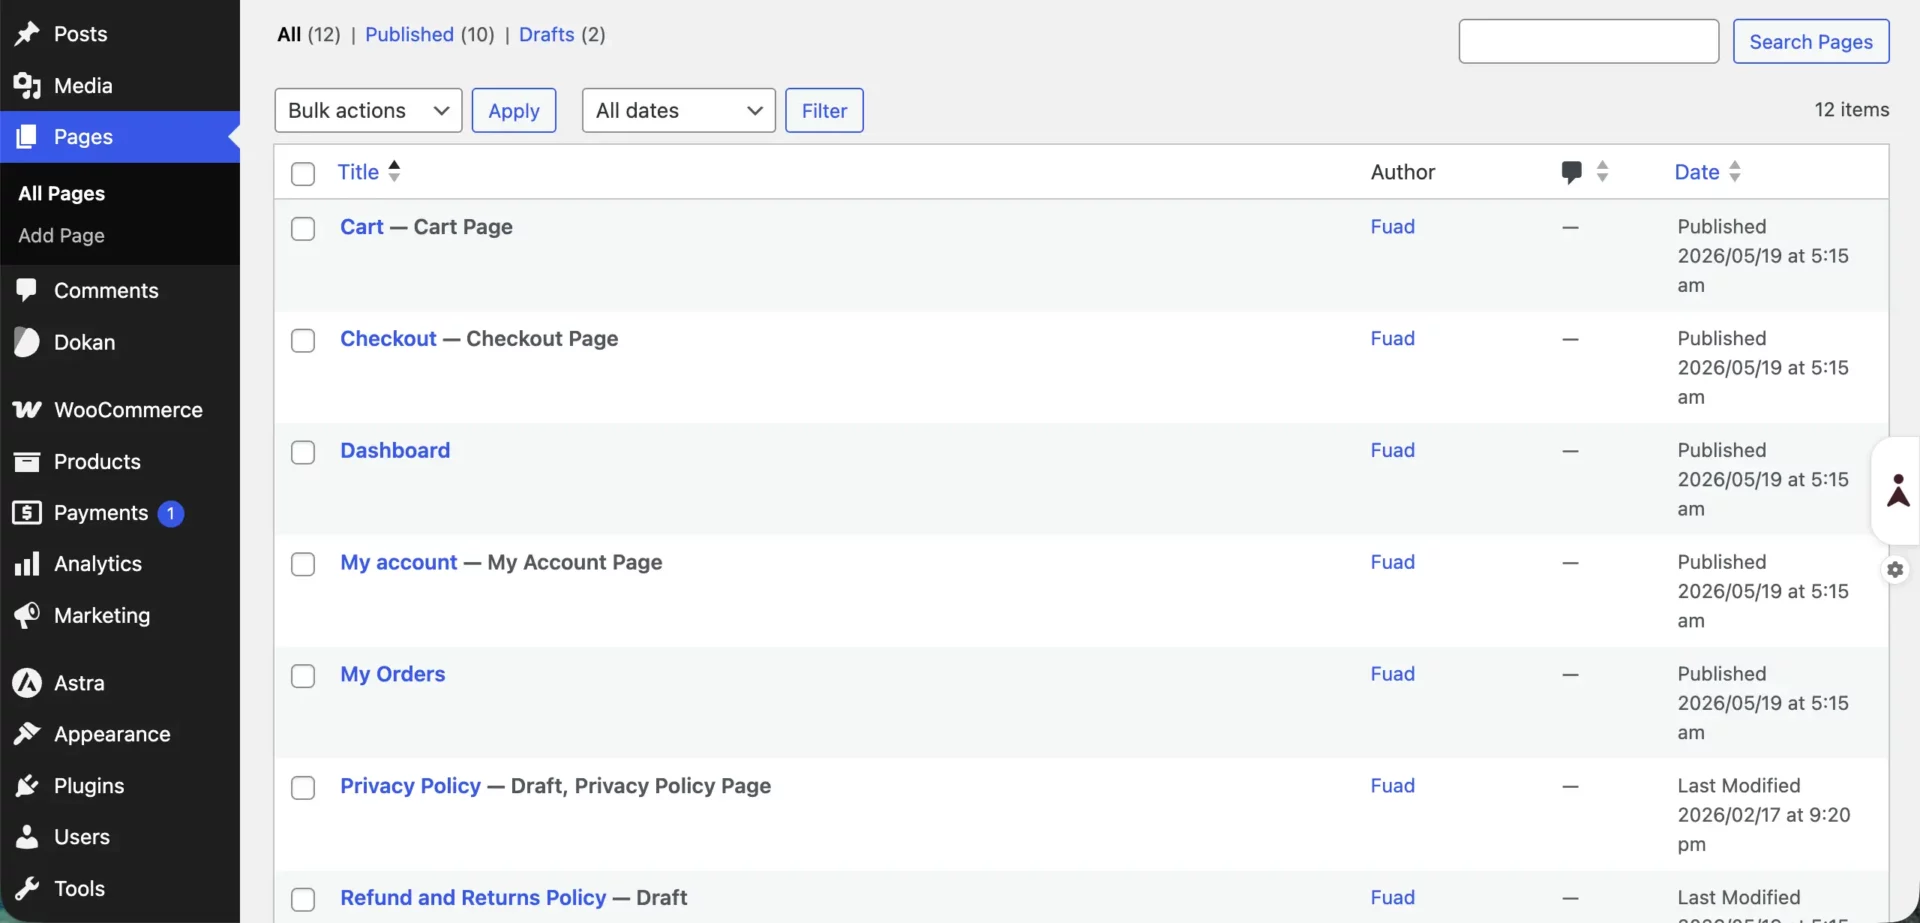
If you come to Pages, you’ll see there are already some pages related to eCommerce. These are the default pages coming with WooCommerce and Dokan. We mentioned them above as well.
As these default pages have already been used on numerous websites, you may definitely want to customize their layouts. Dokan has a dedicated module for Elementor. Here’s how to use the Elementor Module with Dokan.
With the Elementor plugin, you can easily customize the layouts of these pages without any coding. However, if you ever feel like the Elementor plugin alone isn’t enough to meet your needs, you can try HappyAddons as well.
For inspiration, you can visit this tutorial post to learn how to customize the WooCommerce default cart page with Elementor.
After customizing the default pages, you can move forward to create the brand new pages from scratch as mentioned in the table above – Home page, About us, Contact us, Shipping policy, etc., anything you want.
Organizing Product Categories Properly
Categories are how customers find products. Organize them carefully from the start. Go to Products > Categories in WordPress to create and organize your categories. Add clear names and, optionally, a category image for each one.
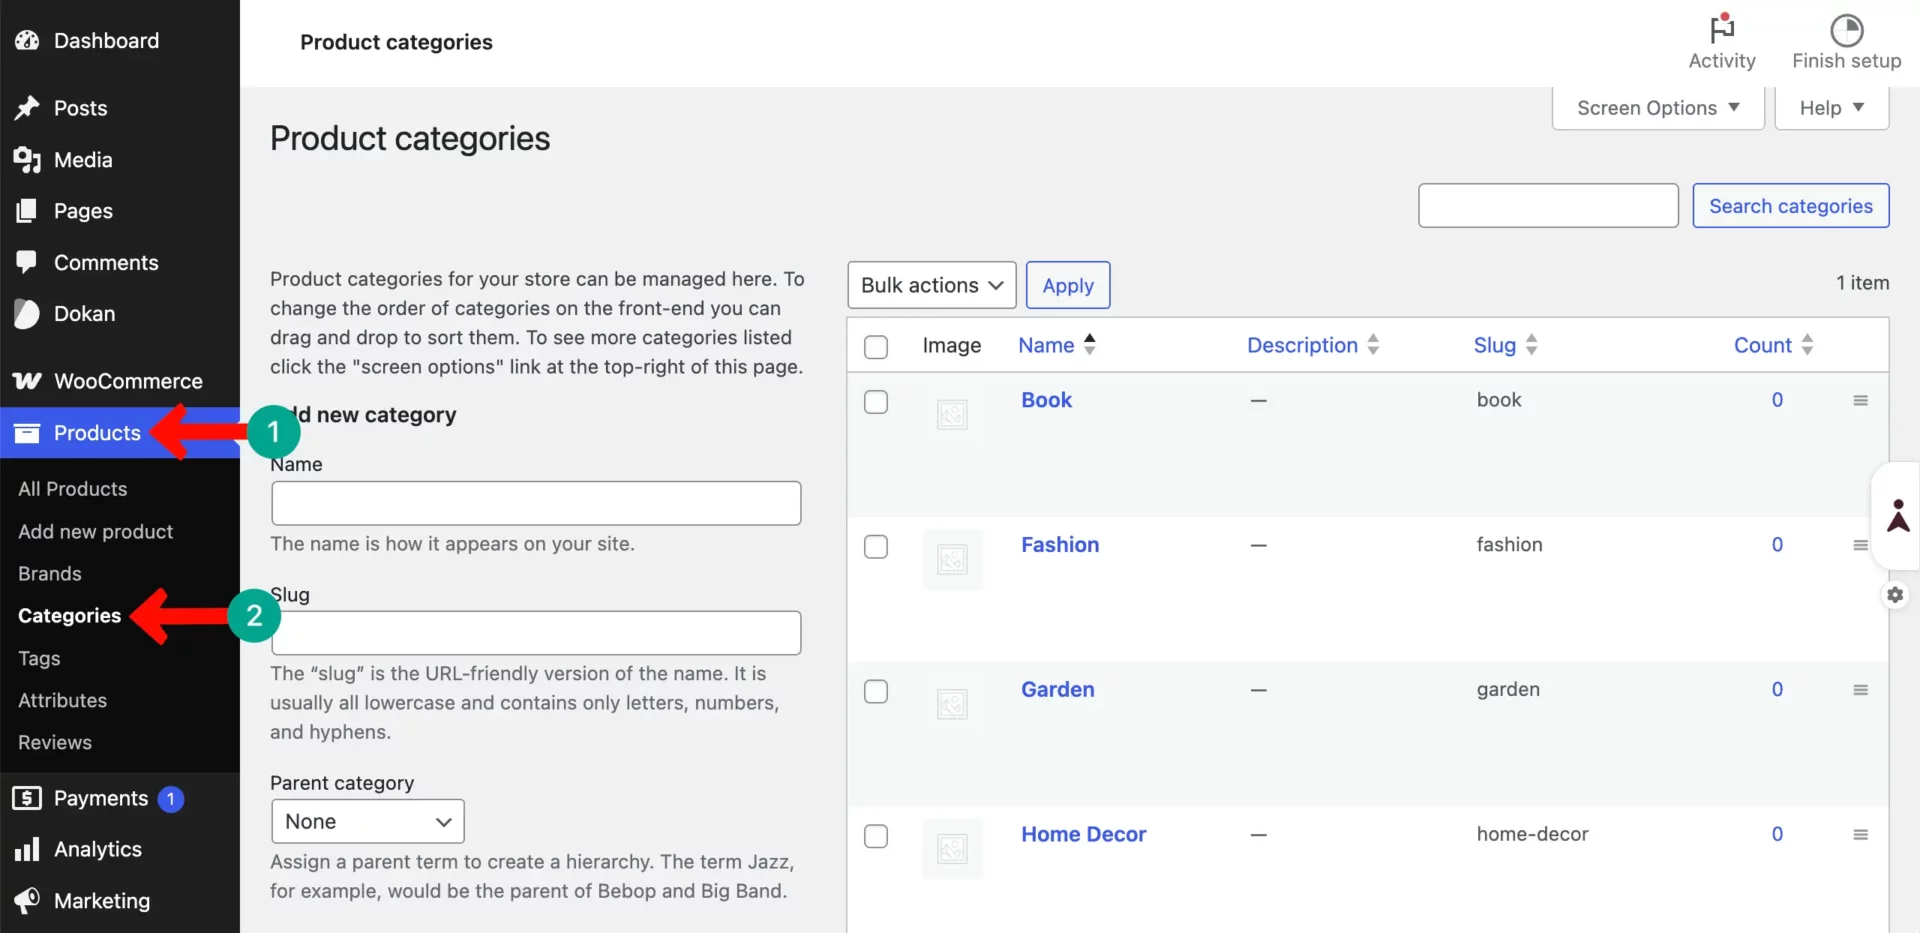
Start with broad, top-level categories like Electronics, Clothing, Home & Garden, and Books. Under each, create subcategories. For example, under Electronics: Smartphones, Laptops, Audio, Cameras.
Keep category names simple and familiar. Customers should immediately understand what’s in each one.
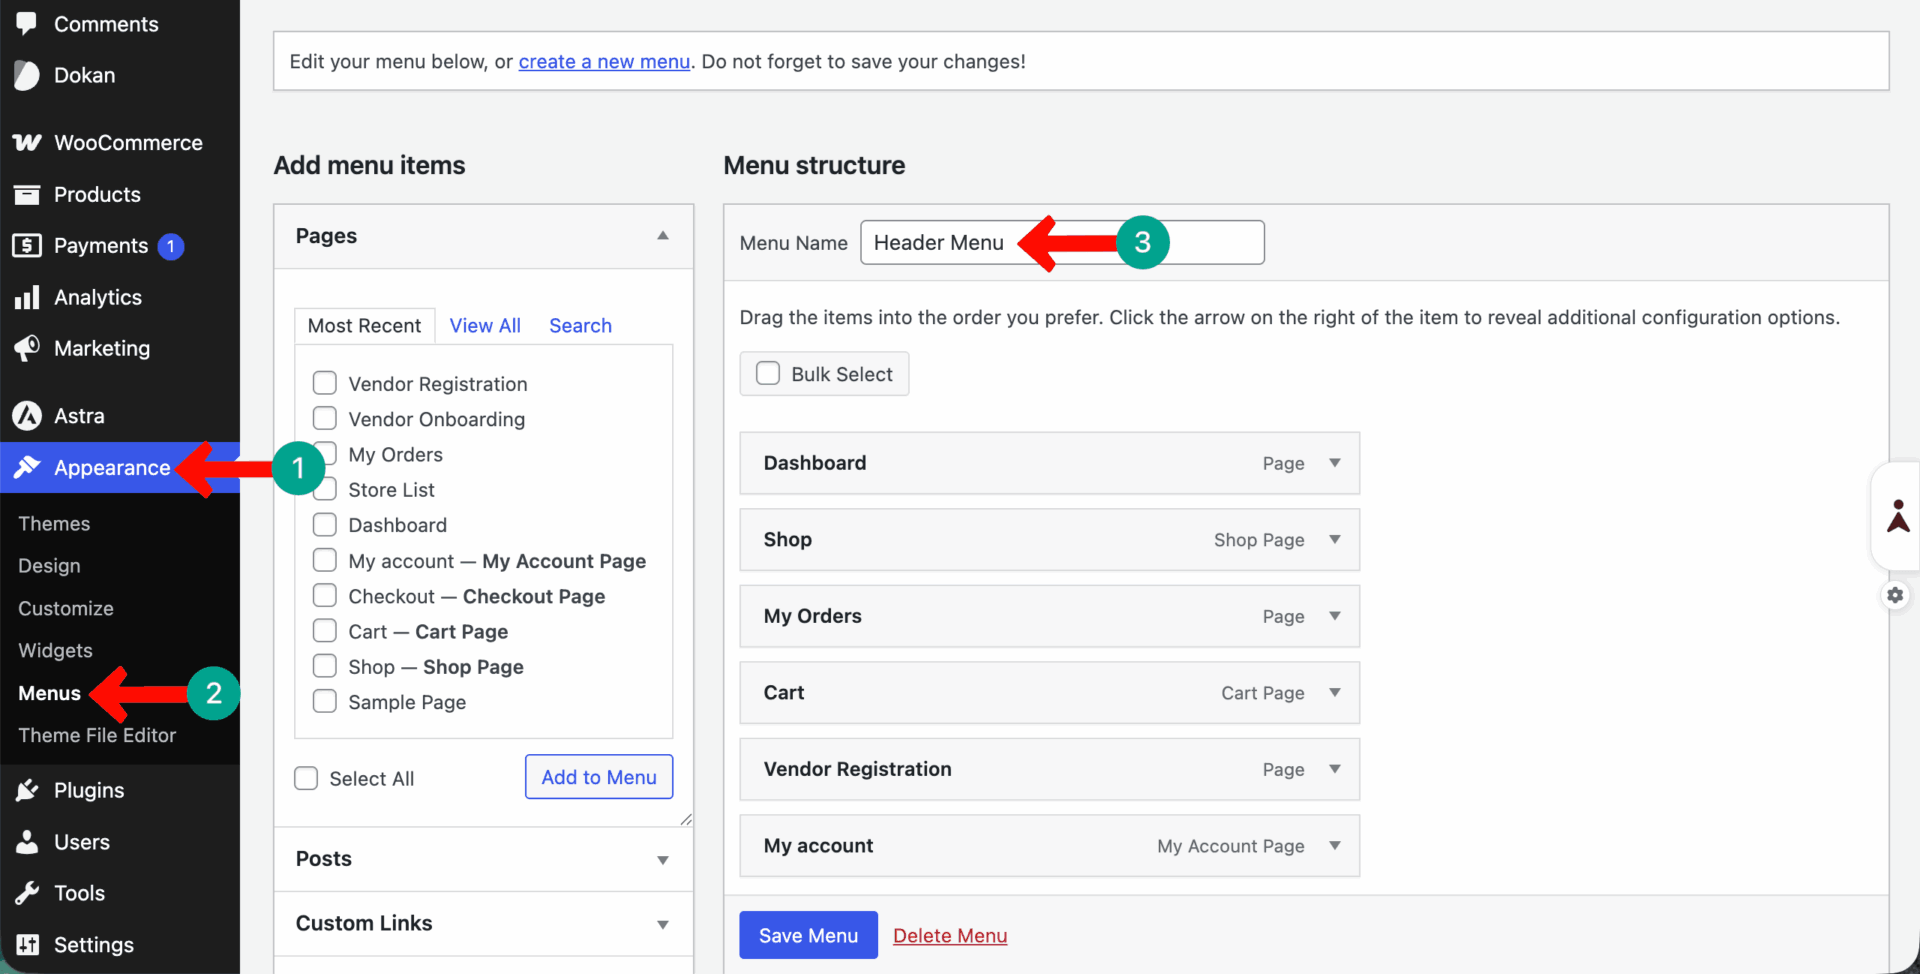
Add a Navigation Menu
Your site navigation should make it effortless for customers to find what they want. Add a top navigation menu with links to your main categories, the shop page, the vendor directory, and account login.
Not necessary that you have to showcase on the pages we mentioned in the screenshot attached below. You can change and add different pages as well.
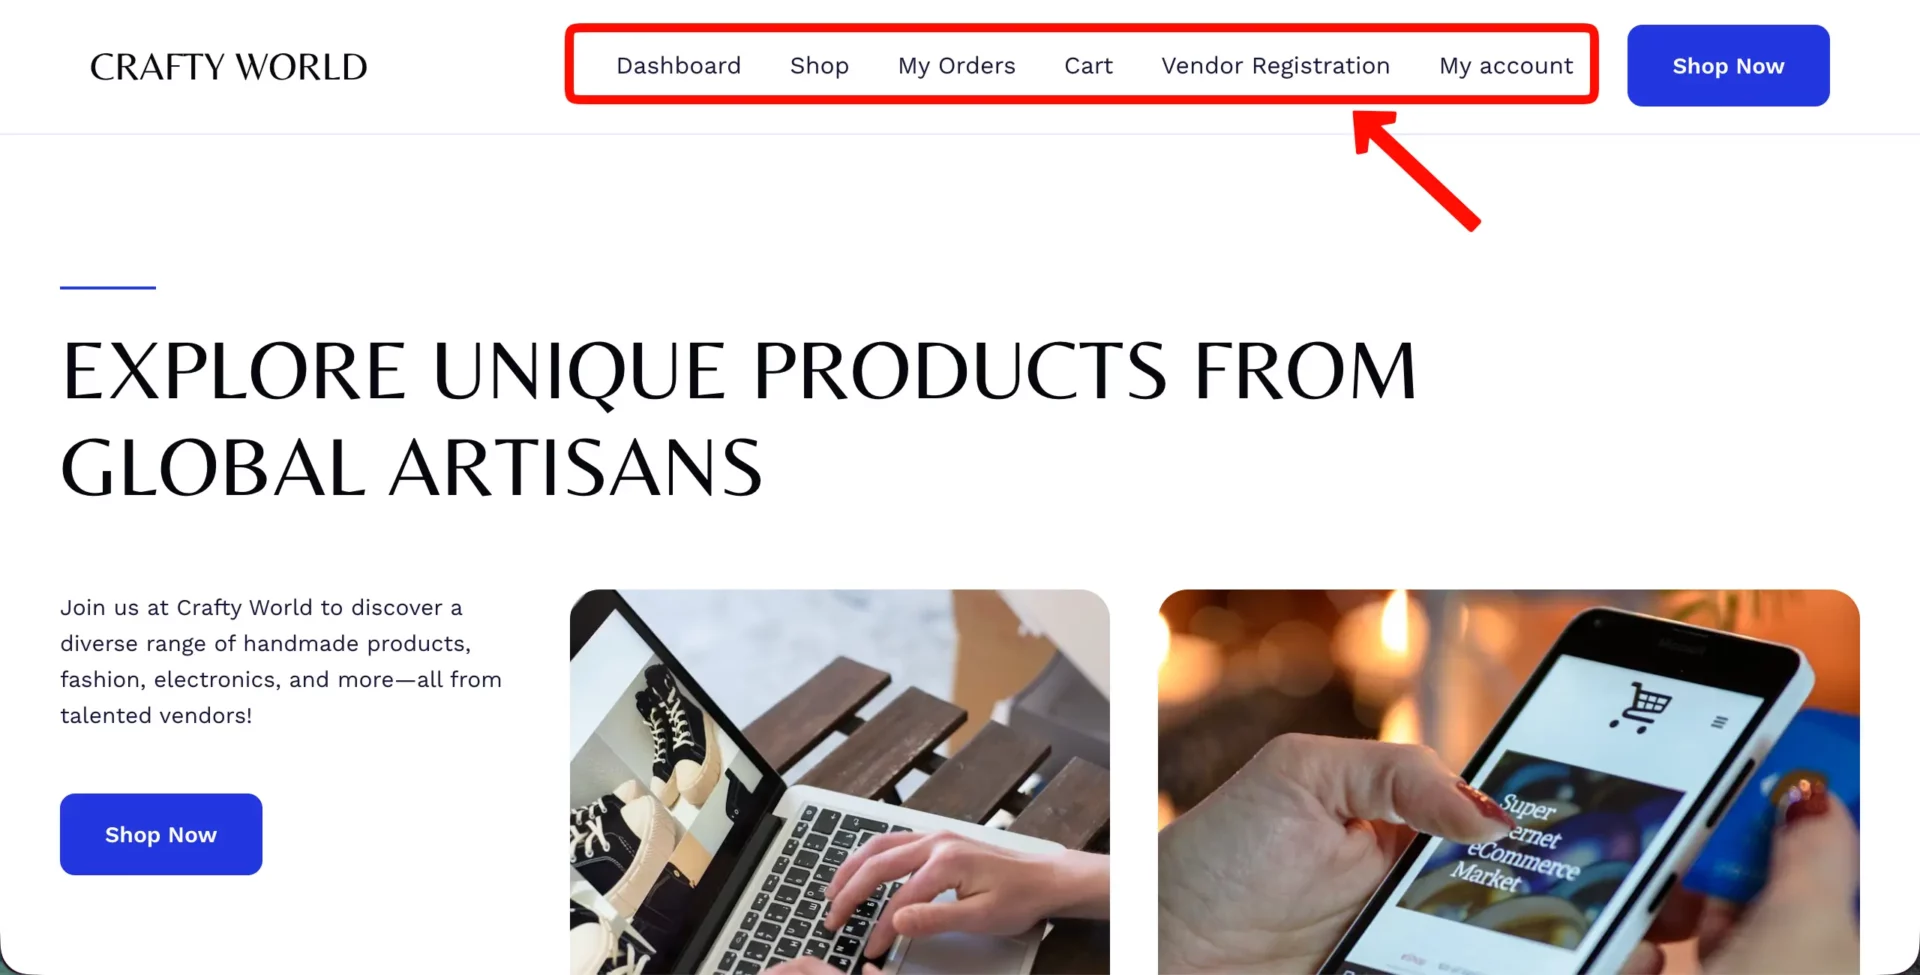
To make the marketplace more engaging, you can add more options to the header, footer, or any other places on the website. They are search bars, product filters, featured products, customer reviews, related products, etc.
Test the Marketplace Workflow From Start to Finish
Once you complete building the marketplace, before making it live, it’s better to do some a/b testing to make sure that the entire process — from vendor registration to customer checkout — works flawlessly. You can do this by checking the following things.
a. Register a Vendor Account
Open your marketplace in a different browser or incognito window so you’re not logged in as admin. Visit the My Account page and register a new account, selecting the vendor option. Fill in all the required fields, including store name and store URL. Submit the registration.
b. Approve the Vendor as an Admin
Log back into your admin panel. Go to Dokan > Vendors and find the new vendor account you just created. Click Edit, enable the account, grant the necessary permissions, and save. The vendor is now approved.
c. Add Products From the Vendor Dashboard
Log in to the marketplace as the test vendor. Go to the vendor dashboard and navigate to Products > Add New Product. Add a test product with a title, description, price, and image. Submit it for publishing.
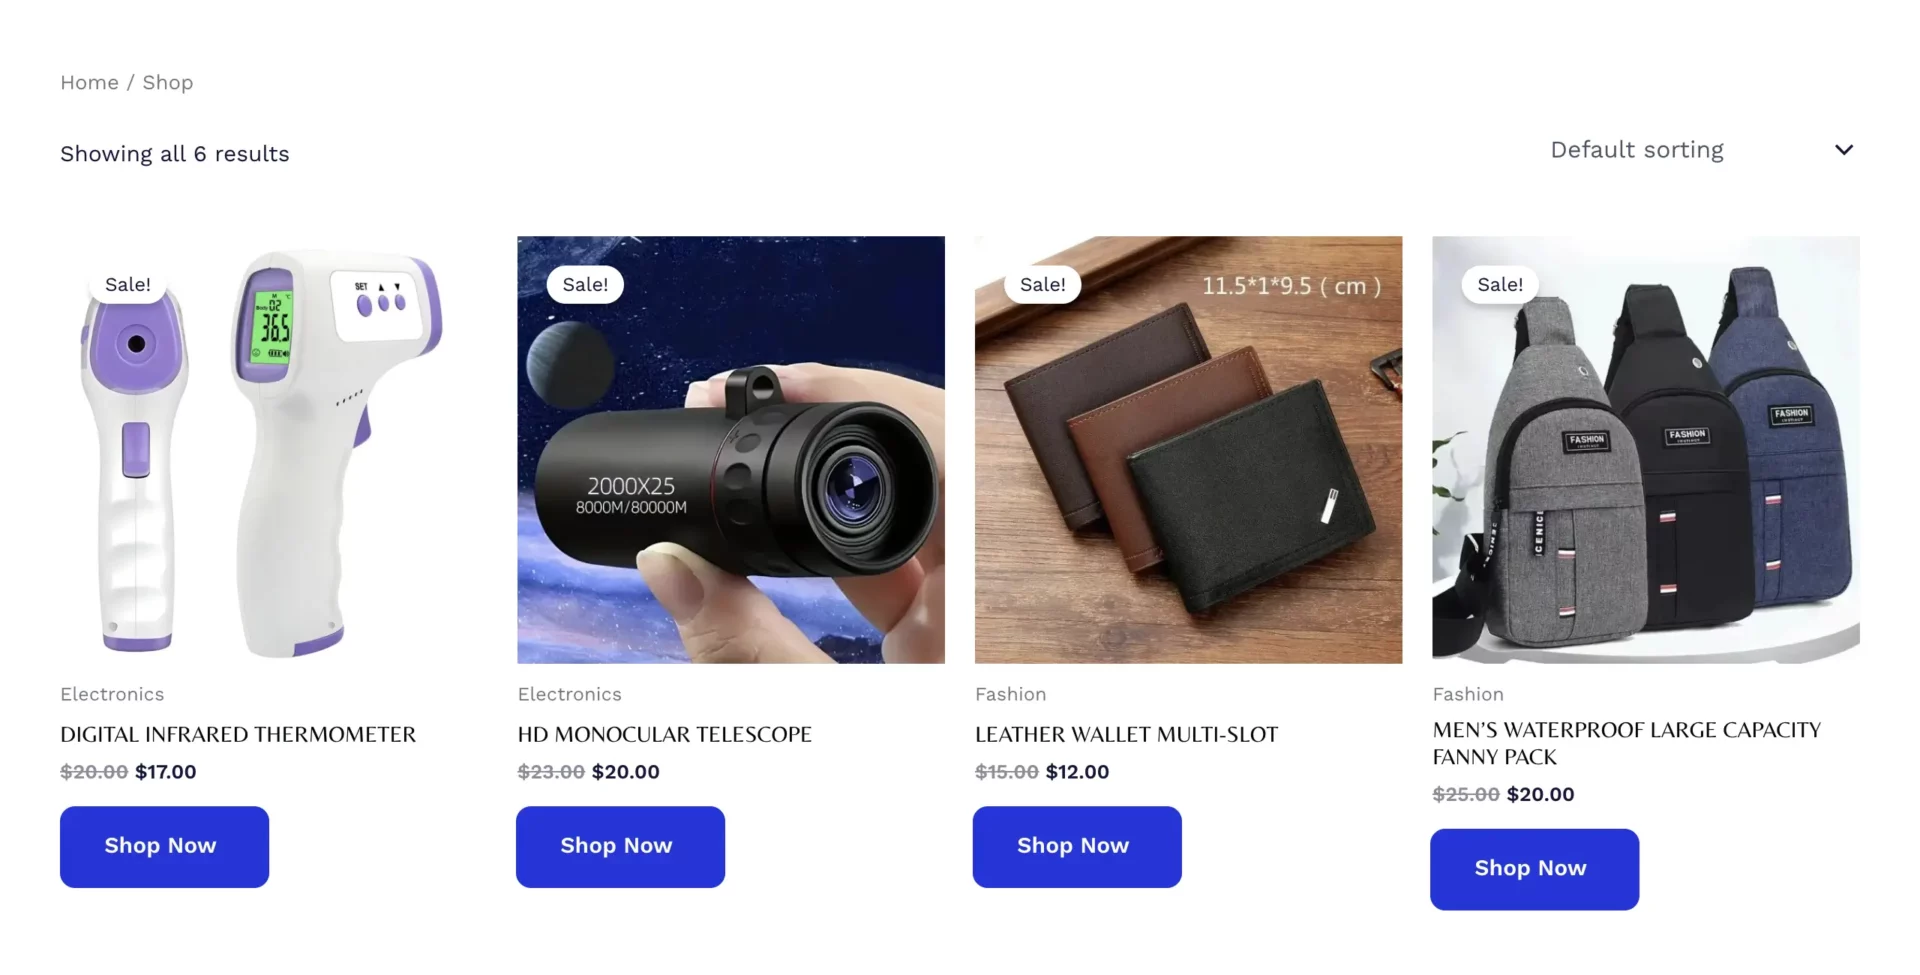
If you have admin approval enabled, go back to the admin panel and approve the product. Then check the frontend to make sure the product appears correctly on the shop page and has its own product page.
d. Place a Test Order as a Customer
Create another test account as a customer. Find the product you just added. Add it to the cart. Go through the checkout process, filling in a test address and using a test payment method (WooCommerce has a “Cheque Payment” option you can use for testing). Complete the order.
e. Check the Order From the Vendor Dashboard
Log back in as the test vendor. Go to the vendor dashboard and click Orders. You should see the order you just placed. Check that all the order details are correct — product, quantity, customer name, and shipping address.
f. Complete the Marketplace Order Workflow
Mark the order as “Completed.” Check the vendor’s earnings — the sale should now appear in the vendor’s withdrawal balance, minus your marketplace commission. If everything worked correctly from registration to completion, your marketplace is ready to go live.
How to Grow and Popularize Your Marketplace
Building the marketplace is only half the job. The harder part is growing it — getting vendors to list products and getting customers to buy them.
1. How to Attract New Vendors
Vendors are the backbone of your marketplace. Without them, there are no products and no revenue. Below are some tips on how to bring vendors to your marketplace:
- Create a Vendor Landing Page — explain the benefits of selling on your marketplace, show the commission rates, and make the registration process visible and easy
- Offer a Low Commission for New Vendors — give early vendors a discounted rate for the first 3–6 months. This removes the financial risk of trying a new platform.
- Reach Out Directly — search for sellers on Etsy, eBay, Facebook Marketplace, or Amazon who sell products relevant to your niche. Send them a personalized invitation.
- List on Vendor Forums and Communities — share your marketplace in seller communities on Reddit, Facebook Groups, and LinkedIn
- Run Social Media Ads — target audiences interested in starting an online business or selling handmade products
2. How to Attract Customers
Customers come when they trust your marketplace and find products they want. To build your customer base:
- Content Marketing — start a blog about topics related to your niche. If you sell outdoor gear, write about hiking, camping, and adventure travel. This brings organic search traffic.
- Social Media — post daily on Instagram, Facebook, Pinterest, and TikTok. Show products, vendor stories, and behind-the-scenes content.
- Google Shopping Ads — WooCommerce integrates with Google Merchant Center, so your products can appear in Google Shopping results.
- Affiliate Program — allow bloggers and influencers to earn a commission for sending customers to your marketplace
- Email Campaigns — collect email addresses from day one and send regular newsletters with new products, deals, and promotions
Check the best marketplace strategies for growth.

Build Trust Like Amazon
Amazon’s biggest advantage is trust. Customers know they will get what they ordered, returns are easy, and their payment is secure. You can build similar trust by:
- Showing a Money-Back Guarantee — display a clear return and refund policy prominently on product pages and during checkout
- Verifying Vendors — show a “Verified Seller” badge on approved vendors who have been manually reviewed
- Collecting and Displaying Reviews — make reviews visible and encourage them through automated follow-up emails
- Using Secure Payment Methods — display payment logos (Visa, Mastercard, PayPal, Stripe) prominently during checkout
- Publishing Vendor Response Times — show customers how quickly vendors typically respond to messages
- Adding Live Chat Support — knowing a real person is available to help instantly removes a major purchase hesitation

Optimize the Marketplace for SEO, GEO, AEO, and LLMO
Modern search optimization goes beyond traditional SEO. Here is what each type means and how to apply it to your marketplace:
SEO (Search Engine Optimization) — optimize product pages, category pages, and blog content with relevant keywords. Use Rank Math or Yoast to set proper meta titles and descriptions. Build backlinks by reaching out to relevant blogs and publications.
GEO (Generative Engine Optimization) — more customers are now using AI tools like ChatGPT and Google AI Overviews to find products. To appear in these results, your content needs to be well-structured, factual, and answer specific buyer questions. Use clear headings, bullet points, and FAQ sections on product pages.
AEO (Answer Engine Optimization) — structure your content to answer specific questions. Add FAQ sections to product pages, category pages, and your blog. This increases the chance of appearing in featured snippets in search results.
Explore the best tips on how to make your marketplace SEO so powerful.

LLMO (Large Language Model Optimization) — as AI assistants become more common, they pull information from well-structured, authoritative sources. Make sure your marketplace has a clear About page, a detailed FAQ, vendor bios, and product descriptions that are thorough and specific. This increases the chance of AI tools recommending your marketplace when users ask for buying advice.

FAQ on How to Build a Marketplace Like Amazon
Thanks for being with us and reading such a long blog post. However, before we end, we want you to spare a few more minutes to check some of the most frequently asked questions on today’s topic that are commonly found on various online platforms.
Final Thoughts
Building a marketplace like Amazon is a real possibility for anyone with the right tools and the right plan. WordPress gives you a flexible, proven foundation. WooCommerce handles your store operations. And Dokan transforms everything into a multivendor platform where any number of sellers can list and sell products independently.
You don’t need to write a single line of code, a large team or a massive budget. What you need is clear thinking, careful configuration, and a commitment to the vendor and customer experience. Start with the free version of Dokan to validate your concept.
Once your marketplace gains traction, upgrade to Dokan Pro, also use the Dokan vendor app and unlock the advanced modules that separate a basic marketplace from a truly professional platform. The marketplace model is one of the most scalable business models in eCommerce.
You earn from every sale without managing inventory. You grow by attracting more vendors, who bring more products, who attract more customers. Each side of the marketplace feeds the other. The biggest marketplaces in the world didn’t become big overnight.
They started with a niche, built trust, delivered a good experience, and grew from there. You can do the same — starting today, with the tools this guide has laid out for you. Your marketplace journey starts now. Build it well.
Before leaving us, you can read our other blog post on the ultimate guide to WooCommerce marketplace analytics.


Leave a Reply