The cosmetics industry is seeing record growth and creating an online marketplace can give you the advantage to get ahead.
eCommerce is the key to the beauty industry’s success as it will account for nearly a third of the category’s total retail sales by 2026 in the US.
Statista
After the Covid-19 era, the buying pattern of people has changed. They are now more comfortable buying products online.
That is why we can see the sale of cosmetic products is shifting from traditional to online purchasing. A marketplace will help you bring different kinds of beauty products under one hood for cosmetics lovers.
Today, we are going to show you how you can create an online cosmetics marketplace using WordPress. We will be using a popular marketplace plugin Dokan multivendor.
Let’s jump right in.
Cosmetics Business Opportunities Across the World
The cosmetics or skincare products business is always on the rise. Other than women, men are also becoming interested in buying cosmetics.
Ranging from antiperspirants, fragrances, make-up, and shampoos, to soaps, sunscreens, and toothpaste, cosmetics play an essential role in all stages of our lives.
Here are some stats about the online cosmetics store industry according to Statista :
- By 2026 cosmetics industry will reach an annual revenue of around 131 billion U.S. dollars.
- The men’s personal care market is projected to hit $276.9 billion by 2030.
- Skincare is projected to generate up to $177 billion by 2025.
- L’Oréal is the leading beauty products company with over $35 billion in global sales.
The opportunity is there. You have to have the right mind and passion to take advantage of it. And if you are looking to get into the beauty care items industry, now is the right time.
6 Easy Steps to Create an Online Cosmetics Marketplace

If you have heard of WordPress then you already know that you can create any kind of site using WordPress. And it’s eCommerce plugin WooCommerce will help you create an online store with ease.
To turn that online store into a marketplace, you need Dokan Multivendor. This is one of the most popular marketplace plugins with 60,000+ active installations. The plugin has 35+ modules and numerous features that will help you create an online cosmetics store marketplace for free. We will show you how.
To start an eCommerce marketplace, you need the following items:
- A WordPress Site (associated with the right domain and hosting)
- WooCommerce plugin
- Dokan multivendor marketplace solution
- A Dokan-compatible theme
You can check these guides to select a suitable domain name for your website or choose the right WooCommerce hosting provider.
Here’s how you can create a cosmetics marketplace in 6 steps:
- Install and Activate Dokan
- Install a Dokan Compatible Theme
- Configure Basic Settings
- Upload Products and Configure Admin Shop
- Allow Vendors to Register
- Start Selling from Your Marketplace.
Let’s dive into the details.
Step 1: Install Dokan Plugin to Create Online Cosmetics Marketplace
As WooCommerce creates a single store for your website, you need Dokan to create a multivendor marketplace for your online book shop.
Installing Dokan is as simple as installing any other WordPress plugin. You can install the plugin from the WordPress dashboard or download the plugin from WordPress.org.
Navigate to Admin Dashboard -> Plugin -> Add New -> Click the search. Then type Dokan -> Install -> Activate.

Dokan will also provide a setup wizard that will help you easily set up your marketplace. Configuring Dokan is very easy by using its own Wizard.
As the Dokan multivendor plugin is powered by WooCommerce, you need WooCommerce to create your marketplace.
However, you don’t need to install WooCommerce separately. When you install Dokan, it automatically installs WooCommerce.
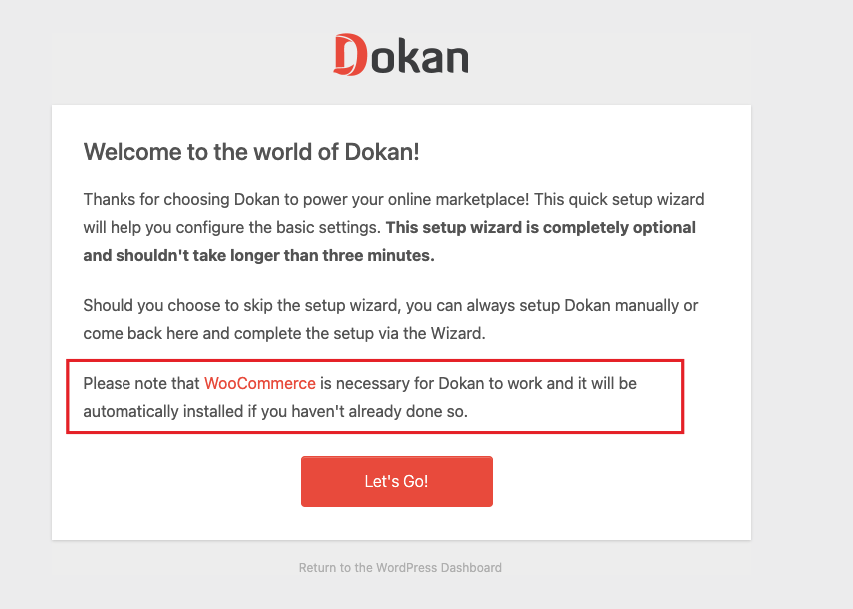
If you still have any confusion go through the video tutorial about installing Dokan.
Step 2: Install a Dokan Compatible Marketplace Theme
After installing Dokan, you need to install a Dokan-compatible theme that compliments your cosmetics marketplace.
Although any WordPress theme that is compatible with WooCommerce is also compatible with Dokan, however, Dokan has its own theme “Dokani” that you can use for your convenience.
You can download the Dokani theme from the official Dokan theme page.
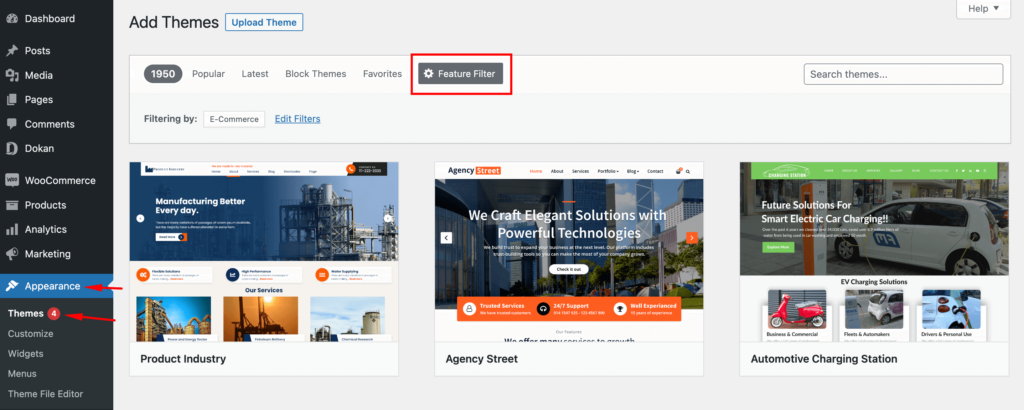
You can find other themes in WP-Admin –> Appearance –> Themes.
Step 3: Configure the Basic Settings of Dokan
After installing and activating Dokan, now you need to configure all the basic settings. You will find all the settings options at WP-Admin –> Dokan –> Settings.
From here you need to:
- Set up your store terms and conditions
- Create store categories for vendors to add different categories
- Allow vendors to upload new products
- Create new tags
- Set new product status
- Enable payment gateways (more on this in the next part)
- Configure withdrawal methods (more on this in the next part)
You can select the pages for the vendor dashboard, order page, store listing, and terms and conditions page.
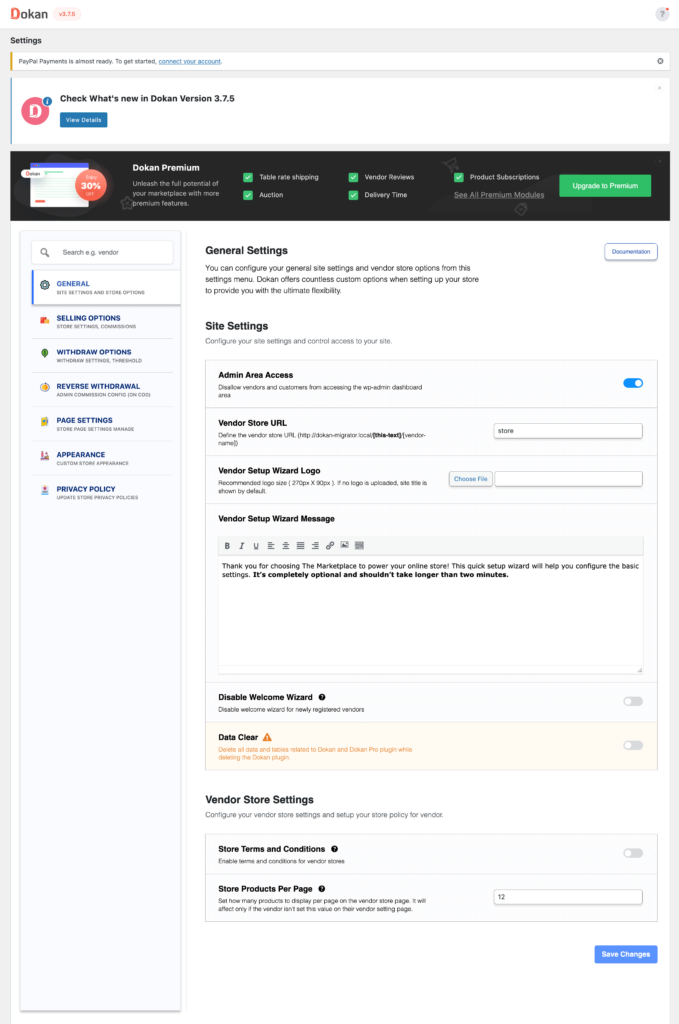
Don’t forget to click the Save Changes button after configuring all the settings. Otherwise, you will lose all your settings.
Also, you need to configure your permalink settings as well. Go to WP Admin -> Settings -> Permalinks -> Permalink Settings -> Product Permalinks.
Select the check box “Custom Base” for product permalinks and write “/product” on the box.
Otherwise, you may get 404 errors on certain pages.

You have to set your commission rate as well. Go to WP Admin Dashboard -> Dokan -> Settings -> Selling Options -> Admin Commission.
You’ll find different options to insert the percentage or fixed amount. Dokan supports various types of vendor commissions.
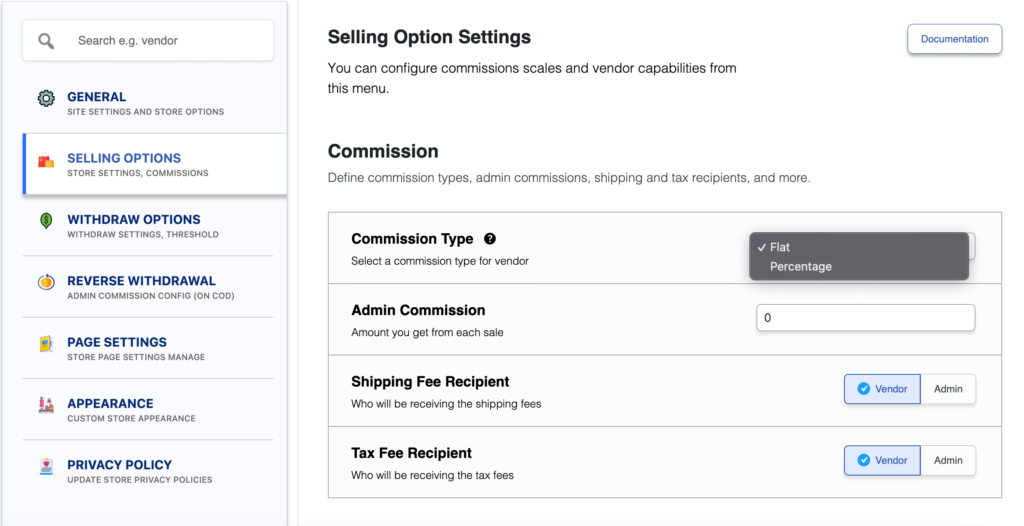
Dokan also enables you to set the category-based commission rate for the vendors. So you can define individual commission rates for different vendors.
Add Payment Gateways
Having various payment gateways is a big bonus. Payment gateways help make the transaction process smooth and build trust among customers.
Dokan supports all WooCommerce-compatible payment gateways. You will get a wide range of choices to make the transaction process easier on your marketplace. You will find the payment methods in WooCommerce–> Settings–> Payments.
With Dokan Lite you can use non-adaptive payment gateways like check payments, bank account transfers, cash on delivery, etc.
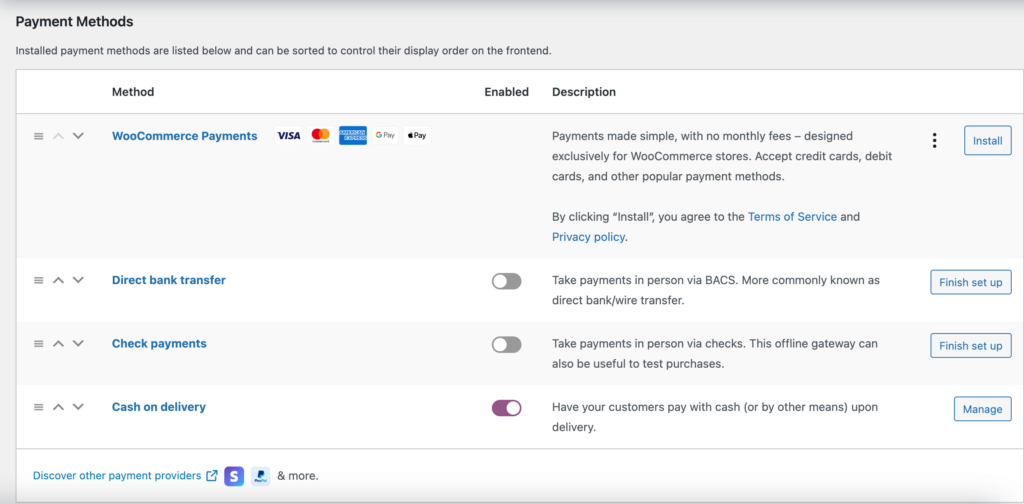
The Dokan Pro version supports adaptive payment solutions like Stripe Connect and MOIP.
Enable Withdraw Methods for Vendors
Another important part of running an interactive online marketplace is to ensure a smooth withdrawal system. Dokan helps you take care of this section as well.
Go to WP Admin -> Dokan -> Settings -> Withdraw Options. Here you’ll find options to customize the withdrawal method and set the minimum balance a vendor needs to make a withdrawal limit.
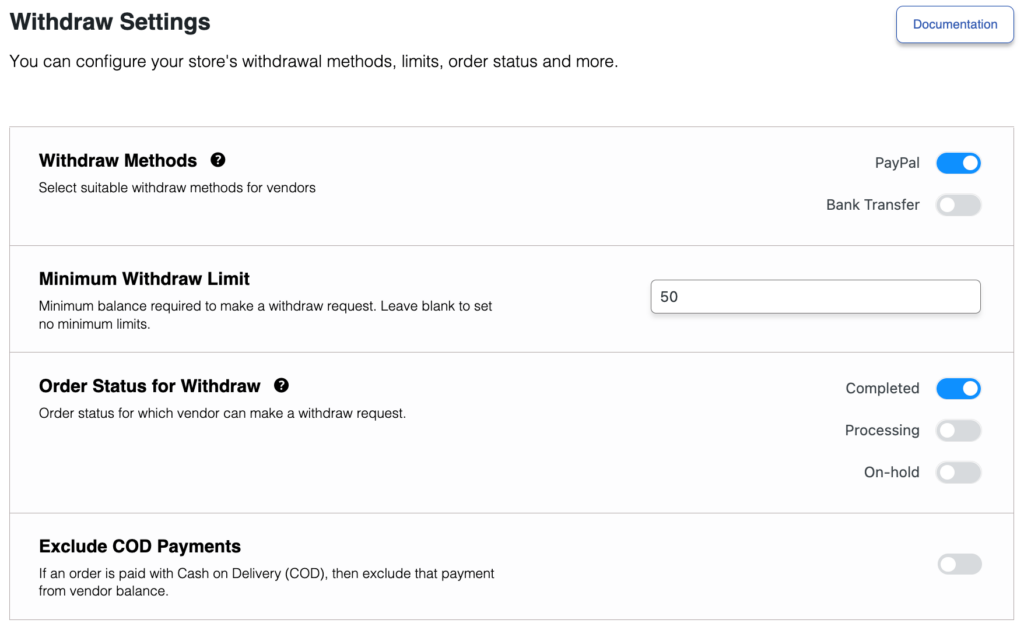
This way you can define other attributes of your cosmetic marketplace from the Dokan settings page. For further assistance, you can check our documentation on Dokan Settings.
Step 4: Upload Products and Setup Admin Shop
You can create your own store on your marketplace if you want to earn some extra money. All you need to do is enable yourself to sell.
Go to Dokan –> Vendors. There you need to enable selling by toggling the button. You can upload your products by navigating to WordPress Backend -> Products -> Add New.
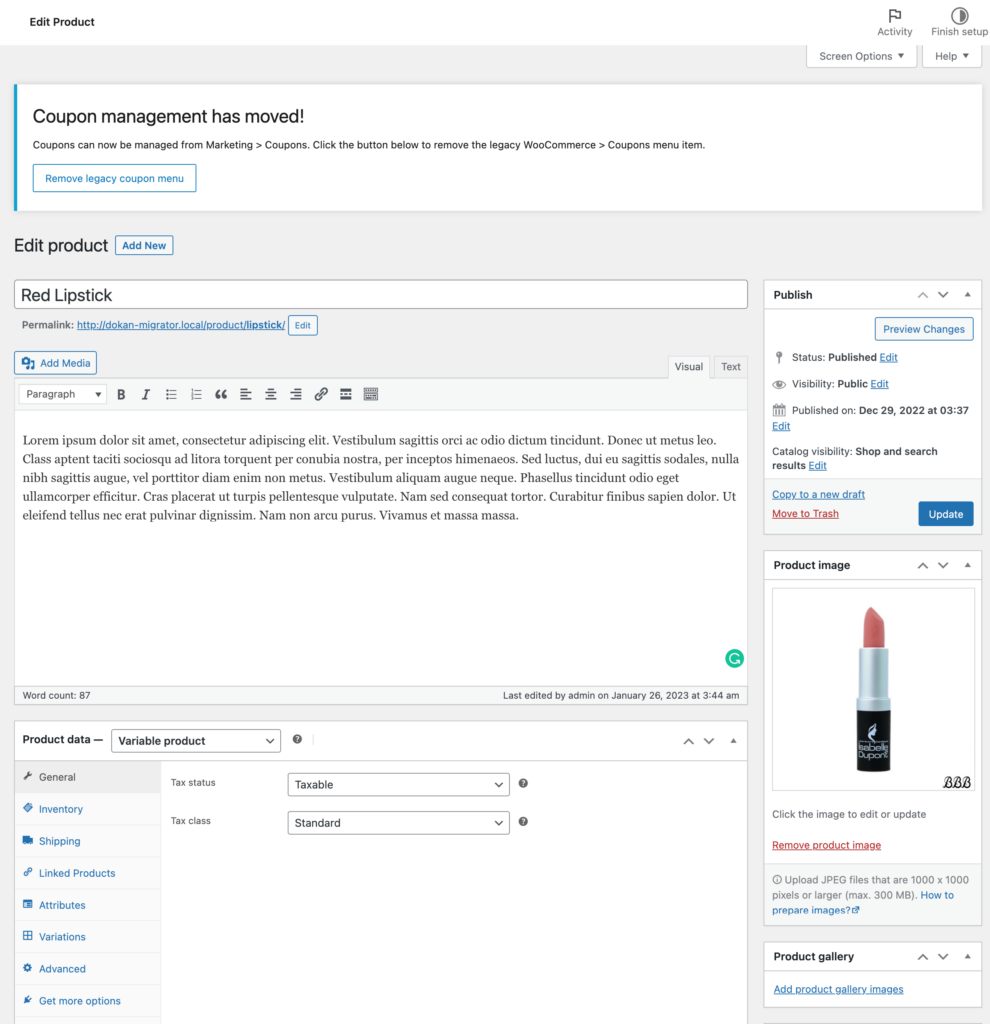
Note: In most cases, cosmetics products come in different colors. So you need to be able to show all the variations on the product page.
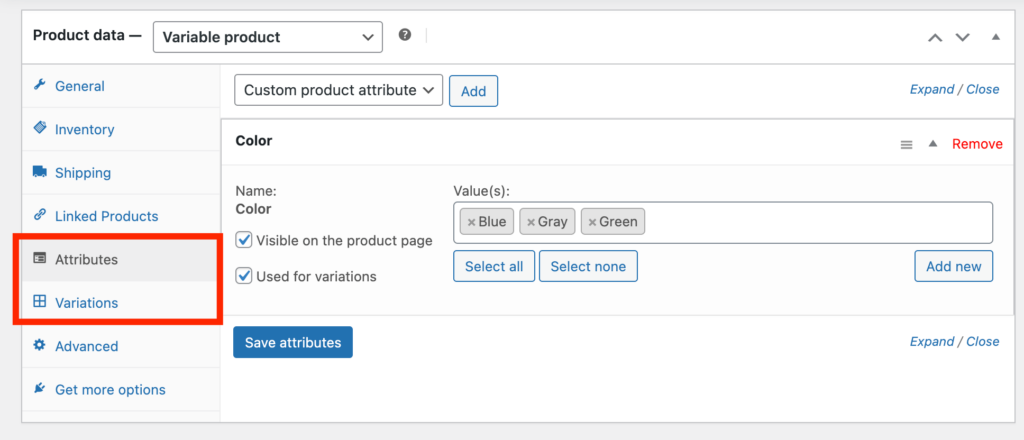
You can add attributes and variations on the product edit page. Here’s what the product page will look like,
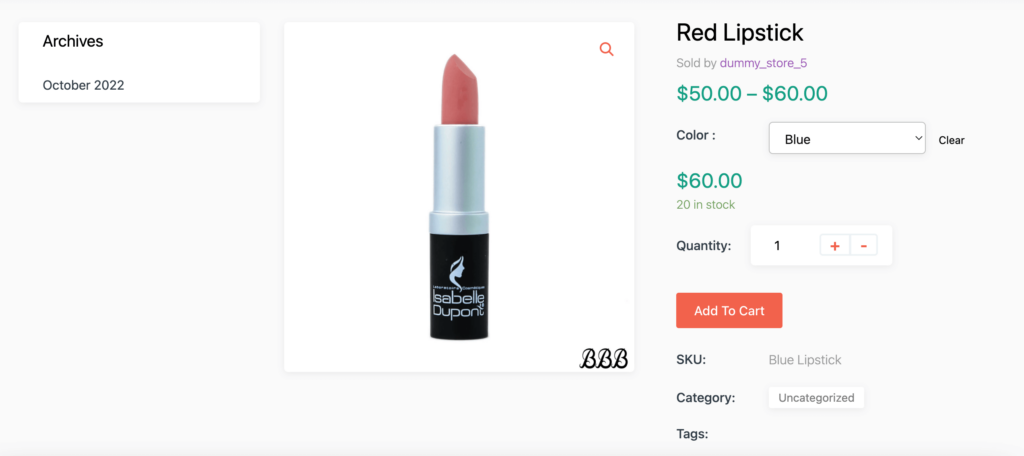
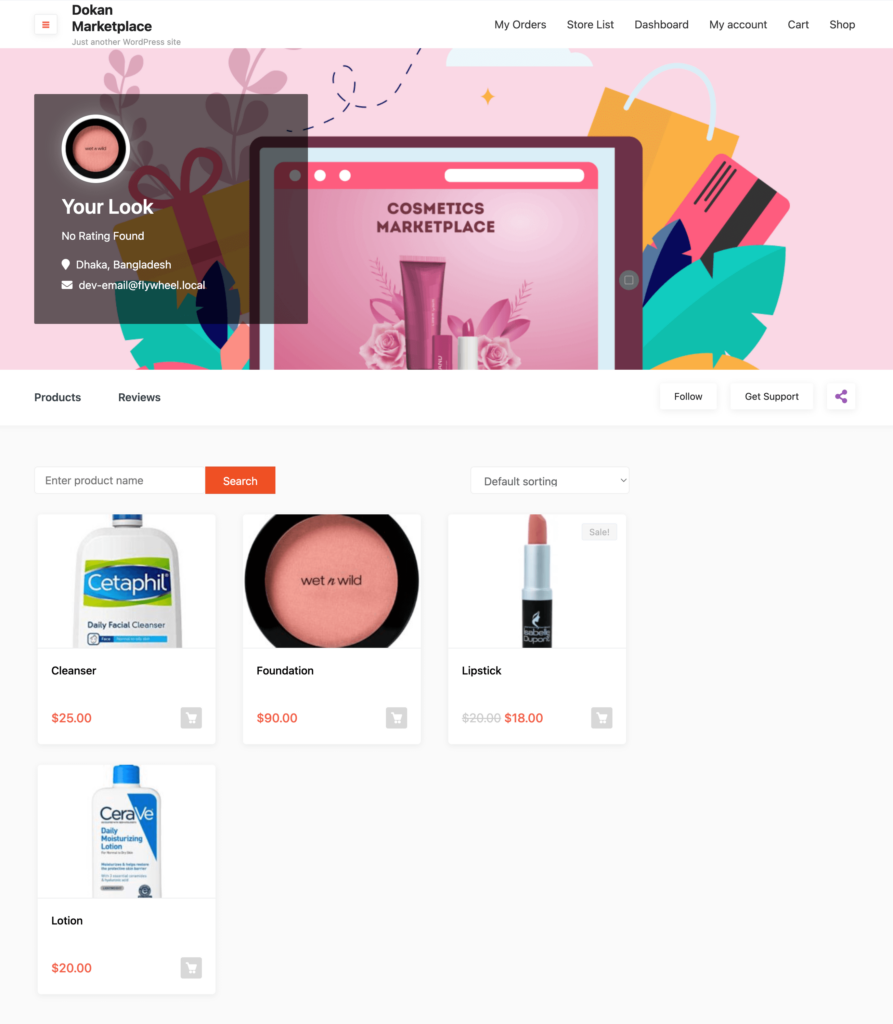
This is what the shop page may look like-
Vendors need to upload products from the front end. They need to navigate to, WordPress Dashboard -> Visit Site -> Vendor Dashboard -> Setting. Your registered vendors will upload products this way.
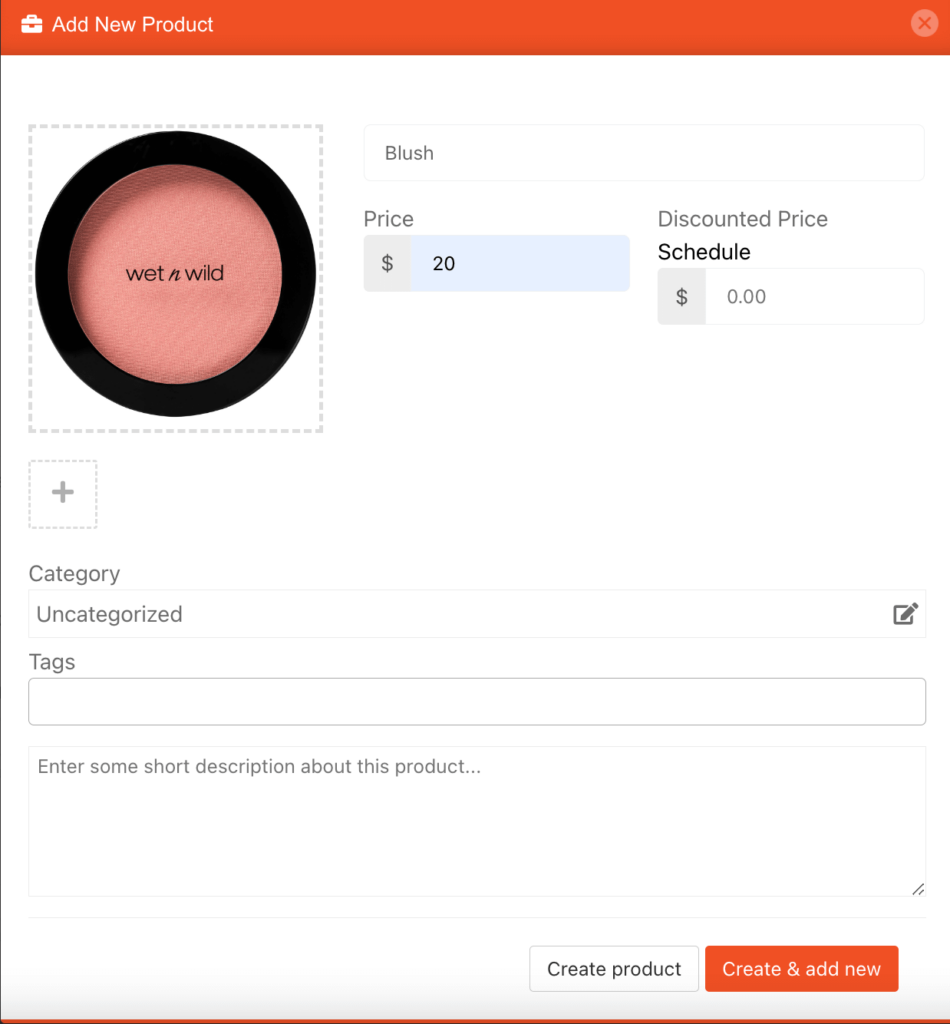
You can allow vendors to upload variable products from the vendor dashboard by purchasing the Dokan multivendor pro version. Other than that you can also add other advanced features with the pro version as well.
Step 5: Allow Vendors to Register on Your Marketplace
After adding all the functionalities and configuring your marketplace, you can invite vendors to sign up for your marketplace.
To make sure vendors can sign up for your marketplace, enable the “Anyone can register” option from WP Admin –> General –> Settings.
So, it will open the default registration form for vendors to sign up.
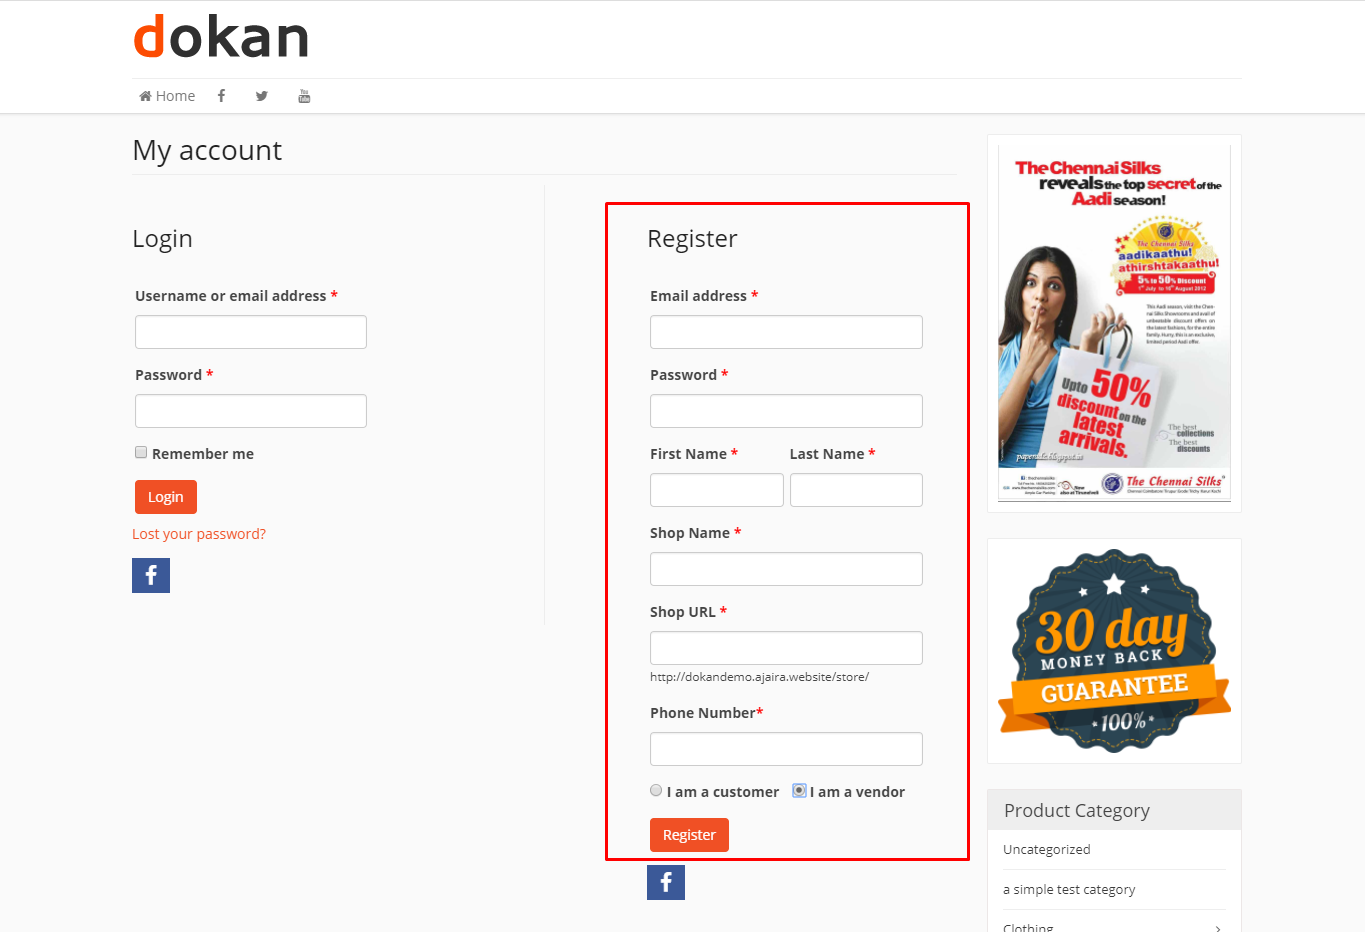
Or you can create customized registration forms with the necessary fields, especially for your marketplace.
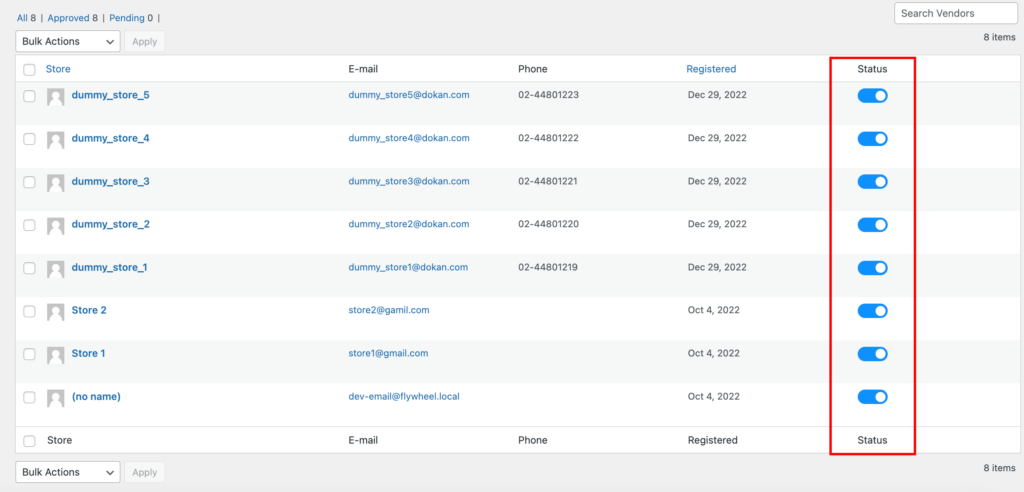
For vendors to start selling, you need to enable selling status from Dokan –> Vendors.
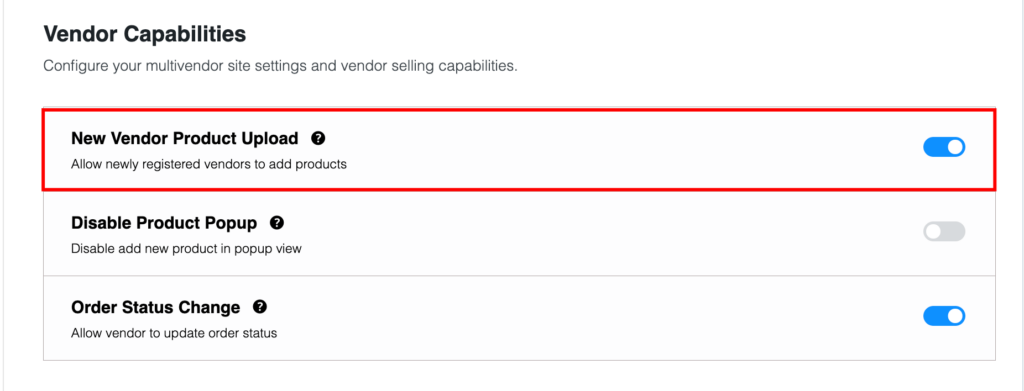
Also, if you want the vendors to upload their products, then you need to change the product status from Dokan –>Settings –> Selling options.
You need to enable the New Vendors Product Upload.
You are almost there. But before you launch, make sure you have all the security measures taken and prepared if there is any attack from the hackers.
Read: How to Protect Your Marketplace from Hackers
Step 6: Start Selling from Your Marketplace!
Your marketplace is ready. Below you can find a quick preview of your cosmetic marketplace-
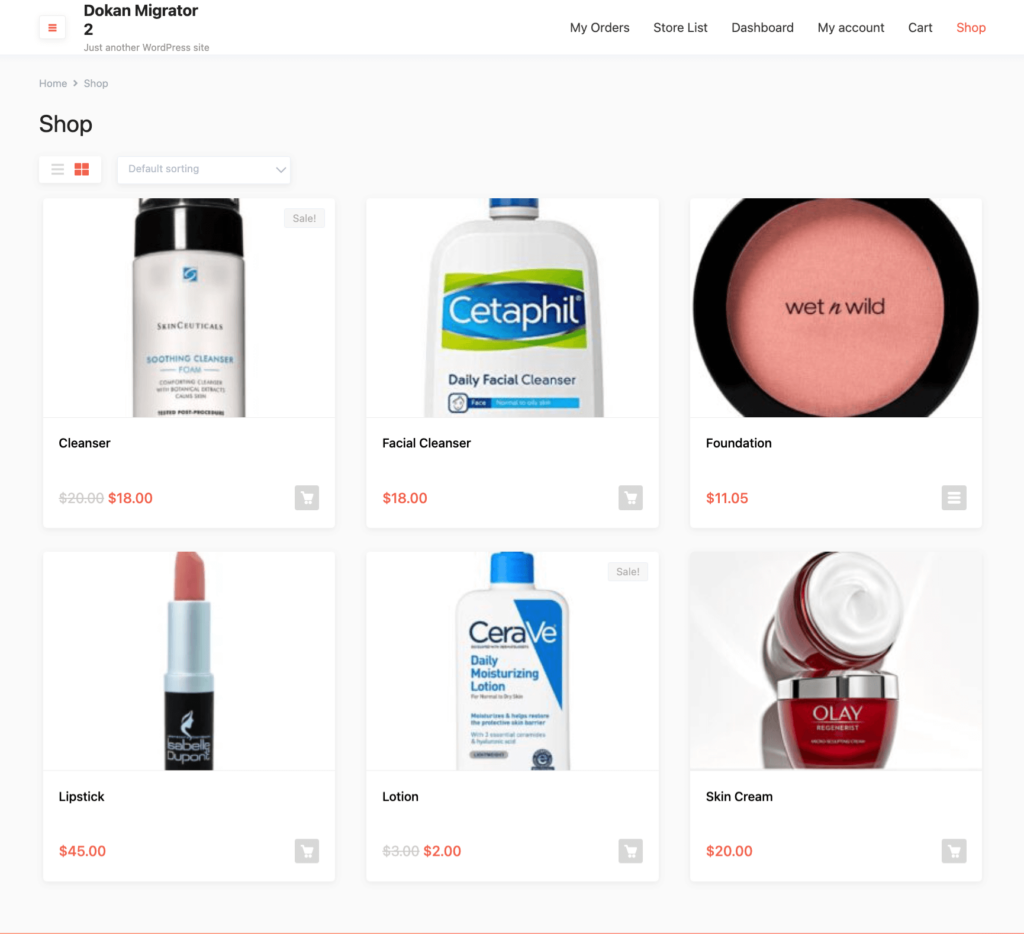
Now you need to promote your marketplace so that more and more vendors can sign up for your marketplace.
Here are some basic tips to promote your cosmetic marketplace:
- Use email marketing
- Look for potential vendors and customers on different platforms and forums
- Publish blogs and informational content
- Take the help of promotional videos and more.
You need to add and install some other plugins like security plugins, and caching plugins in order to run your marketplace smoothly and protect your marketplace.
Top Online Cosmetics Store Marketplaces for You to Check Out!
In order to get ahead of the competition, you first need to know who is in the competition. That is why we have come up with a list of the top cosmetics marketplaces.
Not only that, you can easily create these types of marketplaces using the Dokan multivendor plugin. And with the right marketing and advertisements, you can even compete with them.
Here is the list of the top 5 cosmetics marketplaces online:
- Sephora
- Ulta Beauty
- Walmart
- Amazon
- YesStyle.
Get inspiration from them and make your marketplace stand out.

Create Your Dream Online Cosmetics Marketplace
Creating an online cosmetics marketplace has become easier thanks to WordPress and plugins like Dokan multivendor. You just need to follow the steps we have mentioned and you will learn how to create an online cosmetics marketplace in no time.
The beauty, skincare, and personal care industry is booming. More people are buying these products than ever. This trend doesn’t appear to be slowing down any time soon as beauty buyers indulge in retail therapy and crave all the endorphins they deserve.
As we said earlier, now is the right time to enter the industry and make your mark. We have already provided the steps. All you need to do is follow these steps and launch your cosmetics marketplace.
