There are different types of vendor commissions available in the Dokan Plugin free version. They are,
- Product Wise Commission: This commission can be set up from the Product Edit Page and applies to individual Products.
- Vendor Wise Commission: This commission can be set up from the Vendor Profile Edit Page and applies to individual Vendors.
- Global Commission: You can Fixed and Category wise commission from Dokan Settings page.
This means you can set up these types of vendor commissions using Dokan Plugin. Now, Follow the step-by-step guide to configure your vendor commission.
Note: We have restructured the commission system of the Dokan plugin. You need to run the updater to enable the new structure. If you have any prior commission rate set, then it will be adjusted. Now Dokan supports zero commission setup, so if you have set 0 commission then it will show 0% commission rate for Each vendor (Before 0 meant no commission. But now it will mean 0% commission rate so no commission will be deducted from the vendor). You need to update the commission rate of every vendor to enable commission.
Note: If you select “Multiple” Product category in WP-Admin -> Dokan -> Settings -> Selling Options, the commission will be applied for the first category.
How to Setup Global Commission
If you have already configured your Dokan Plugin, then you have set up the Global Commission at the initial Step. For rechecking purposes and for those who are new to Dokan.
Go to your WordPress Dashboard>Dokan>Settings>Selling Options. There you will find two types of commission.
- Fixed
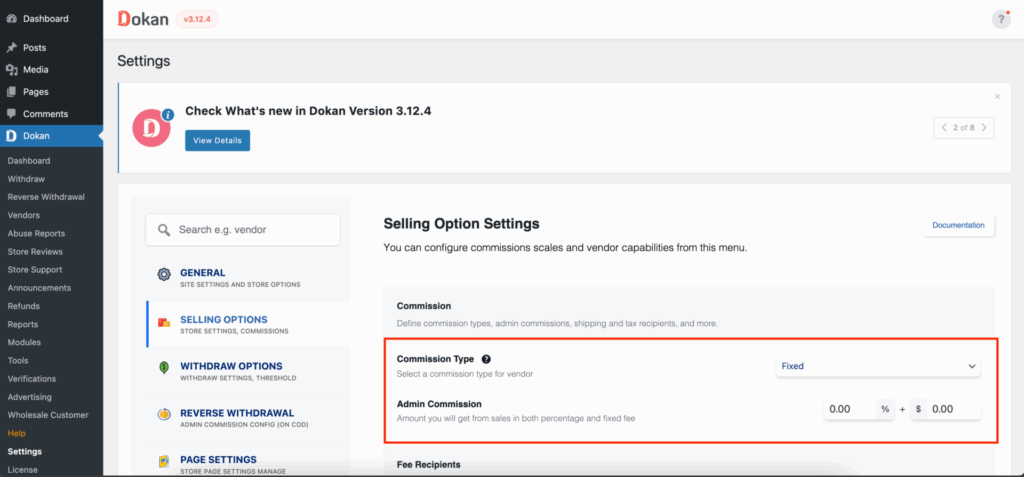
You will get options for both percentage and flat commission. So if the price of a product is $1000, and the flat rate is $15, the percentage commission is 10% equals to $100, then you have to pay $115 as commission to the admin.
Calculation= $115 ($100 percentage commission + $15 flat commission).
- Category Based
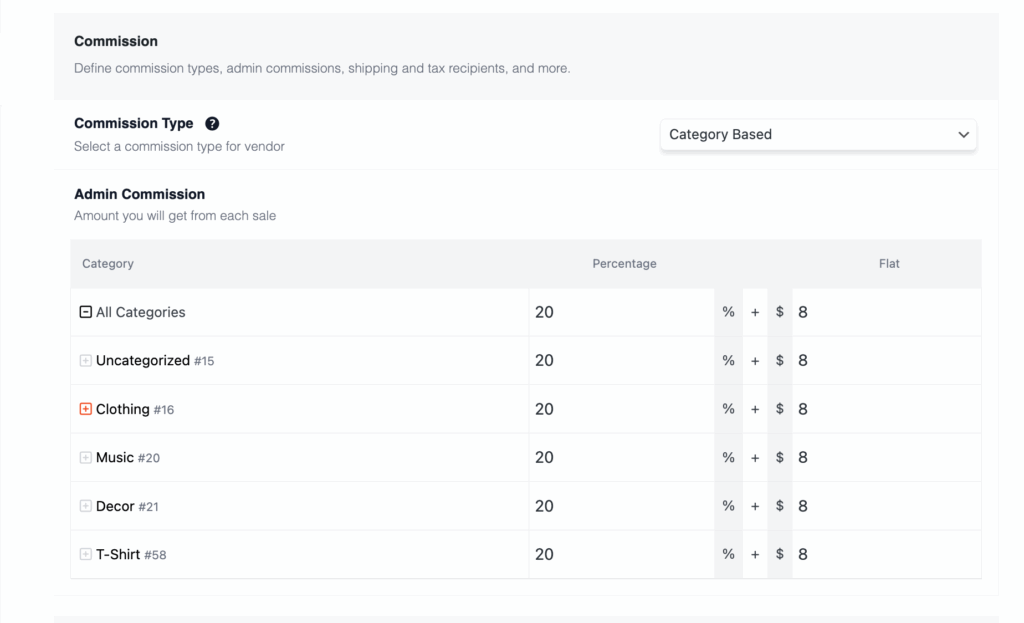
You can select different commissions for all the categories or select a global commission rate for all the categories.
You can set up category wise commission from here, vendor edit page, and subscription product.
Set up the value and Save Changes.
How to Setup Vendor Wise Commission
If you have already configured your Dokan Plugin, then you have set up the Global Commission at the initial Step. For rechecking purpose and those who are new to Dokan:
- Go to your WordPress Dashboard>Dokan>Vendors.

2. Click on the vendor which you want to edit from vendor Listing. You can add fixed or category based commission for each vendors
3. At the bottom of the Vendor Edit Page, you will find the vendor Commission % section.
4. Put in the amount of commission you want to set up for this vendor.

5. Click on the Save Changes button to save it.

Note: Vendor commission can be set both fixed or category-wise. It will override the global commission rate only for that particular vendor’s product.
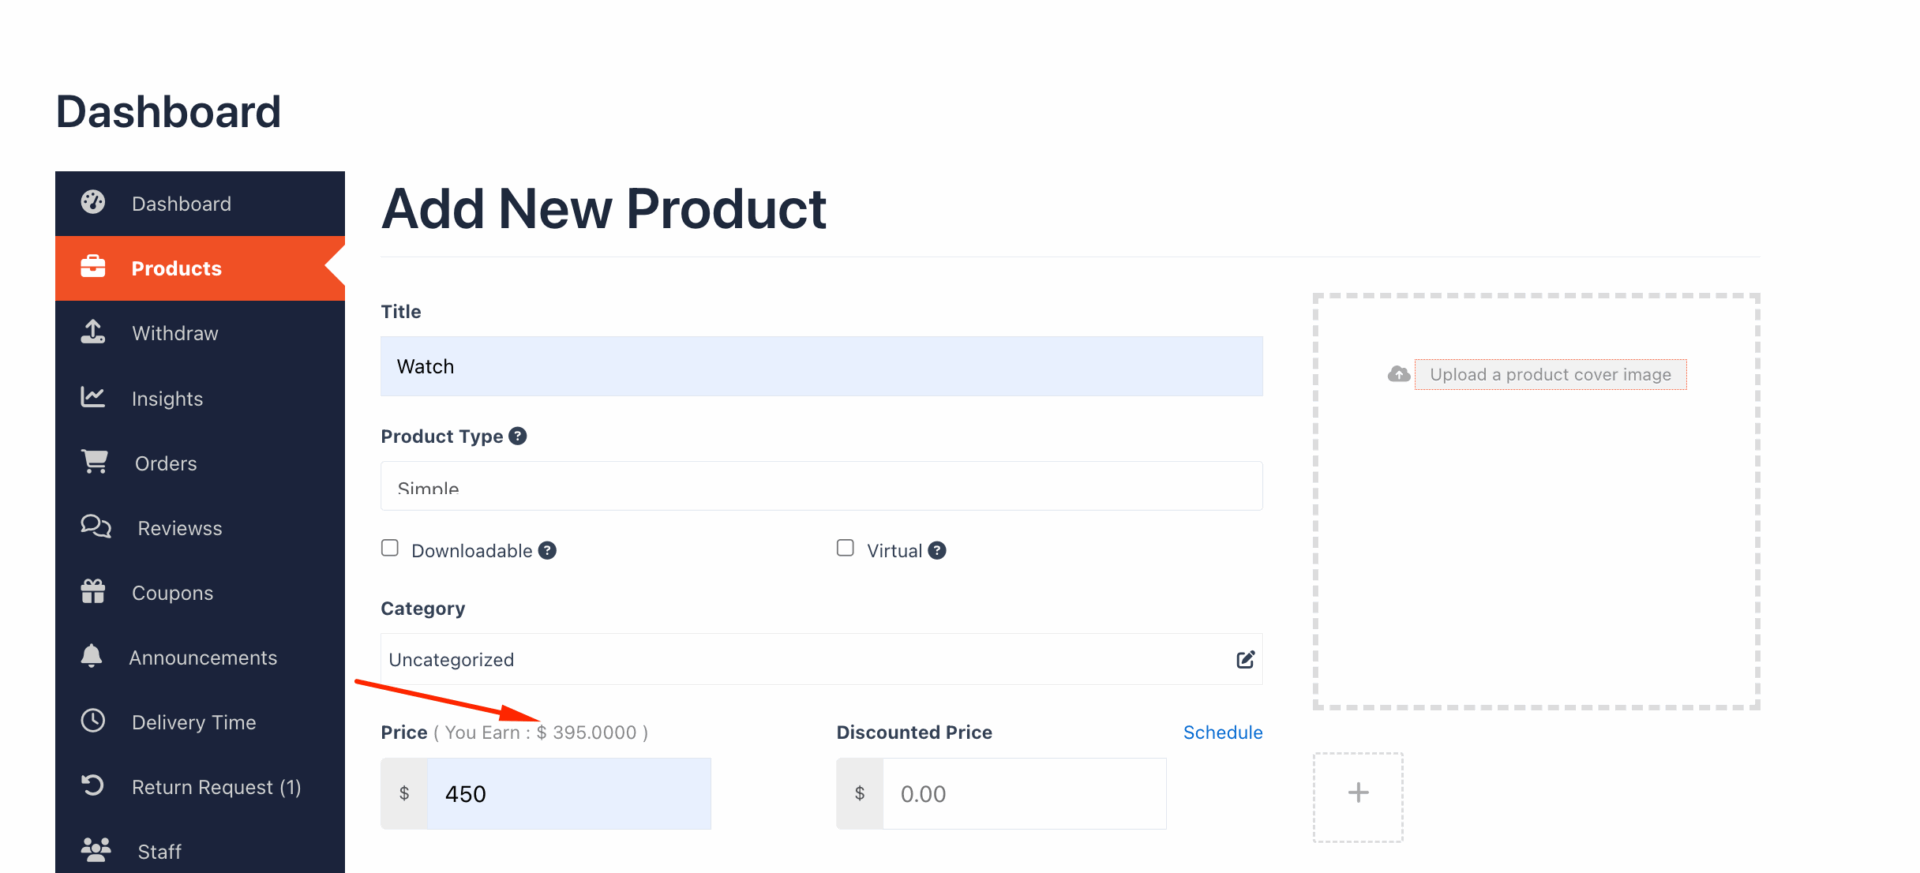
How to Setup Product Wise Commission
Now, Dokan Plugin offers you a commission on products. You can set up fixed commissions for specific products and keep adding variations to your business. The following steps show how you can set up product wise commission.
Go to your WordPress Dashboard> Products.
Click on the product that you want to set a specific commission from the drop-down named Product Data.

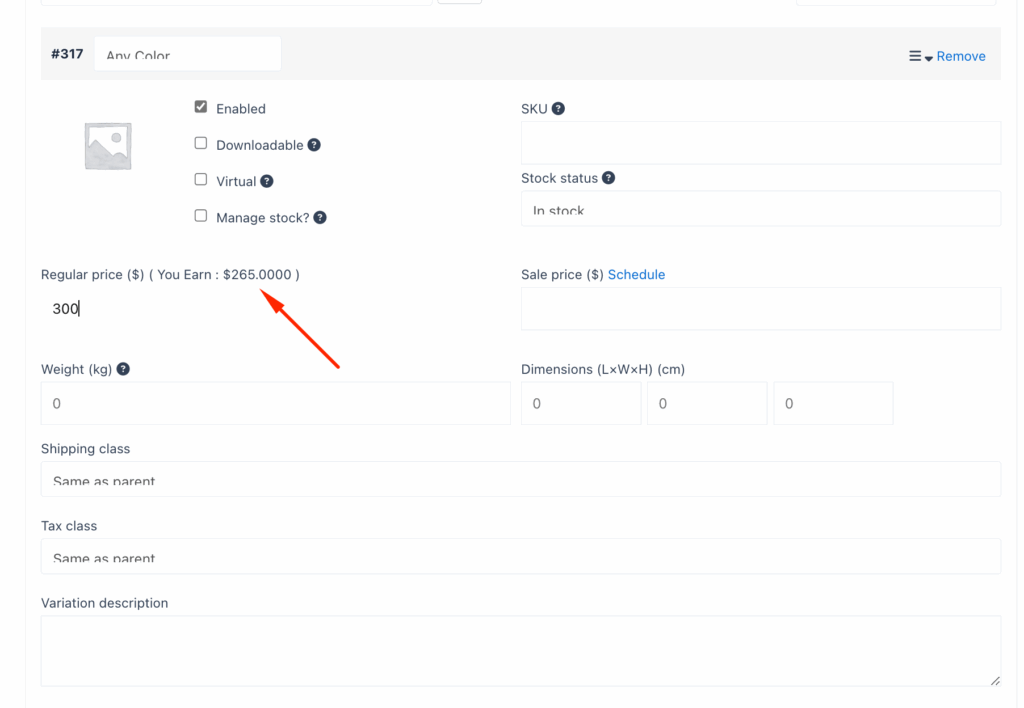
Scroll down and under the Advanced Options, you will find Commission (flat + %). Enter the commission the seller will get from this specific product. There is no category-based commission as the single product does not affect other products.
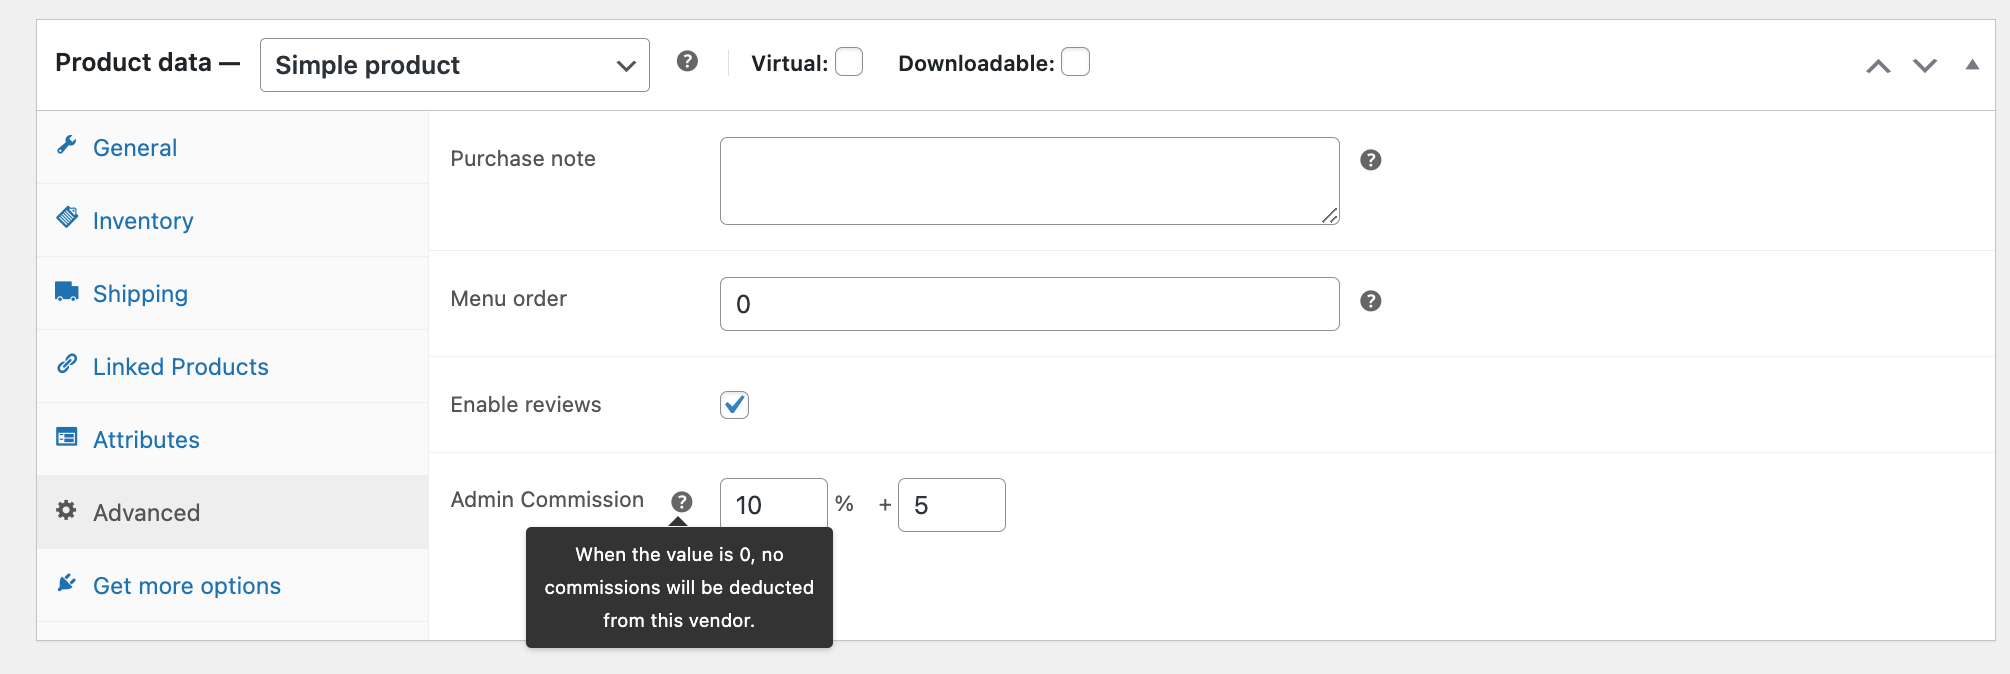
Update the product using the Update button.
You can set up different commissions for variable products as well. Here how it looks from the vendor dashboard-
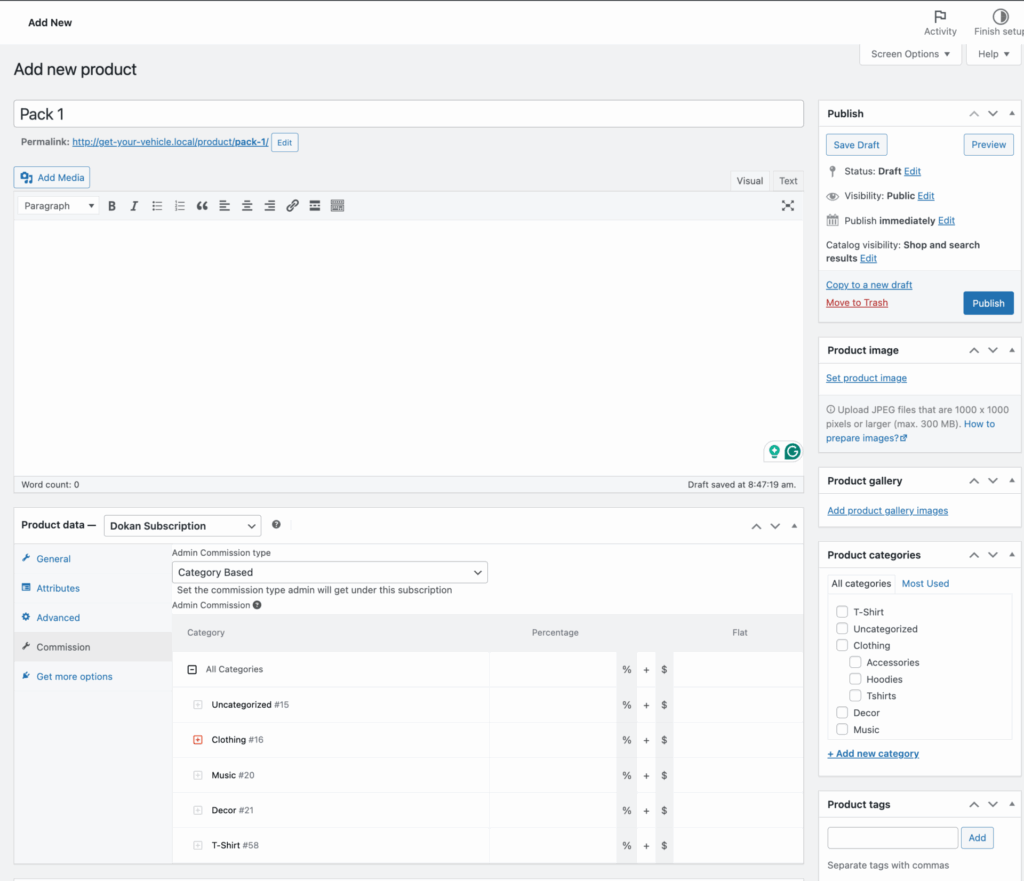
How to Set up a Commission for a Subscription Packs
You can set up different commission rate for subscription packs for as well. For that you need to enable the Vendor Subscription module from the Dokan module section.
Then, create a subscription pack from Products–> Add New and select Dokan Subscription from the dropdown. In the commission section, you can add the commission. You can select both fixed and category based commissions,
If you add a subscription pack to any vendor then the commission added to the pack will automatically added to the vendor-
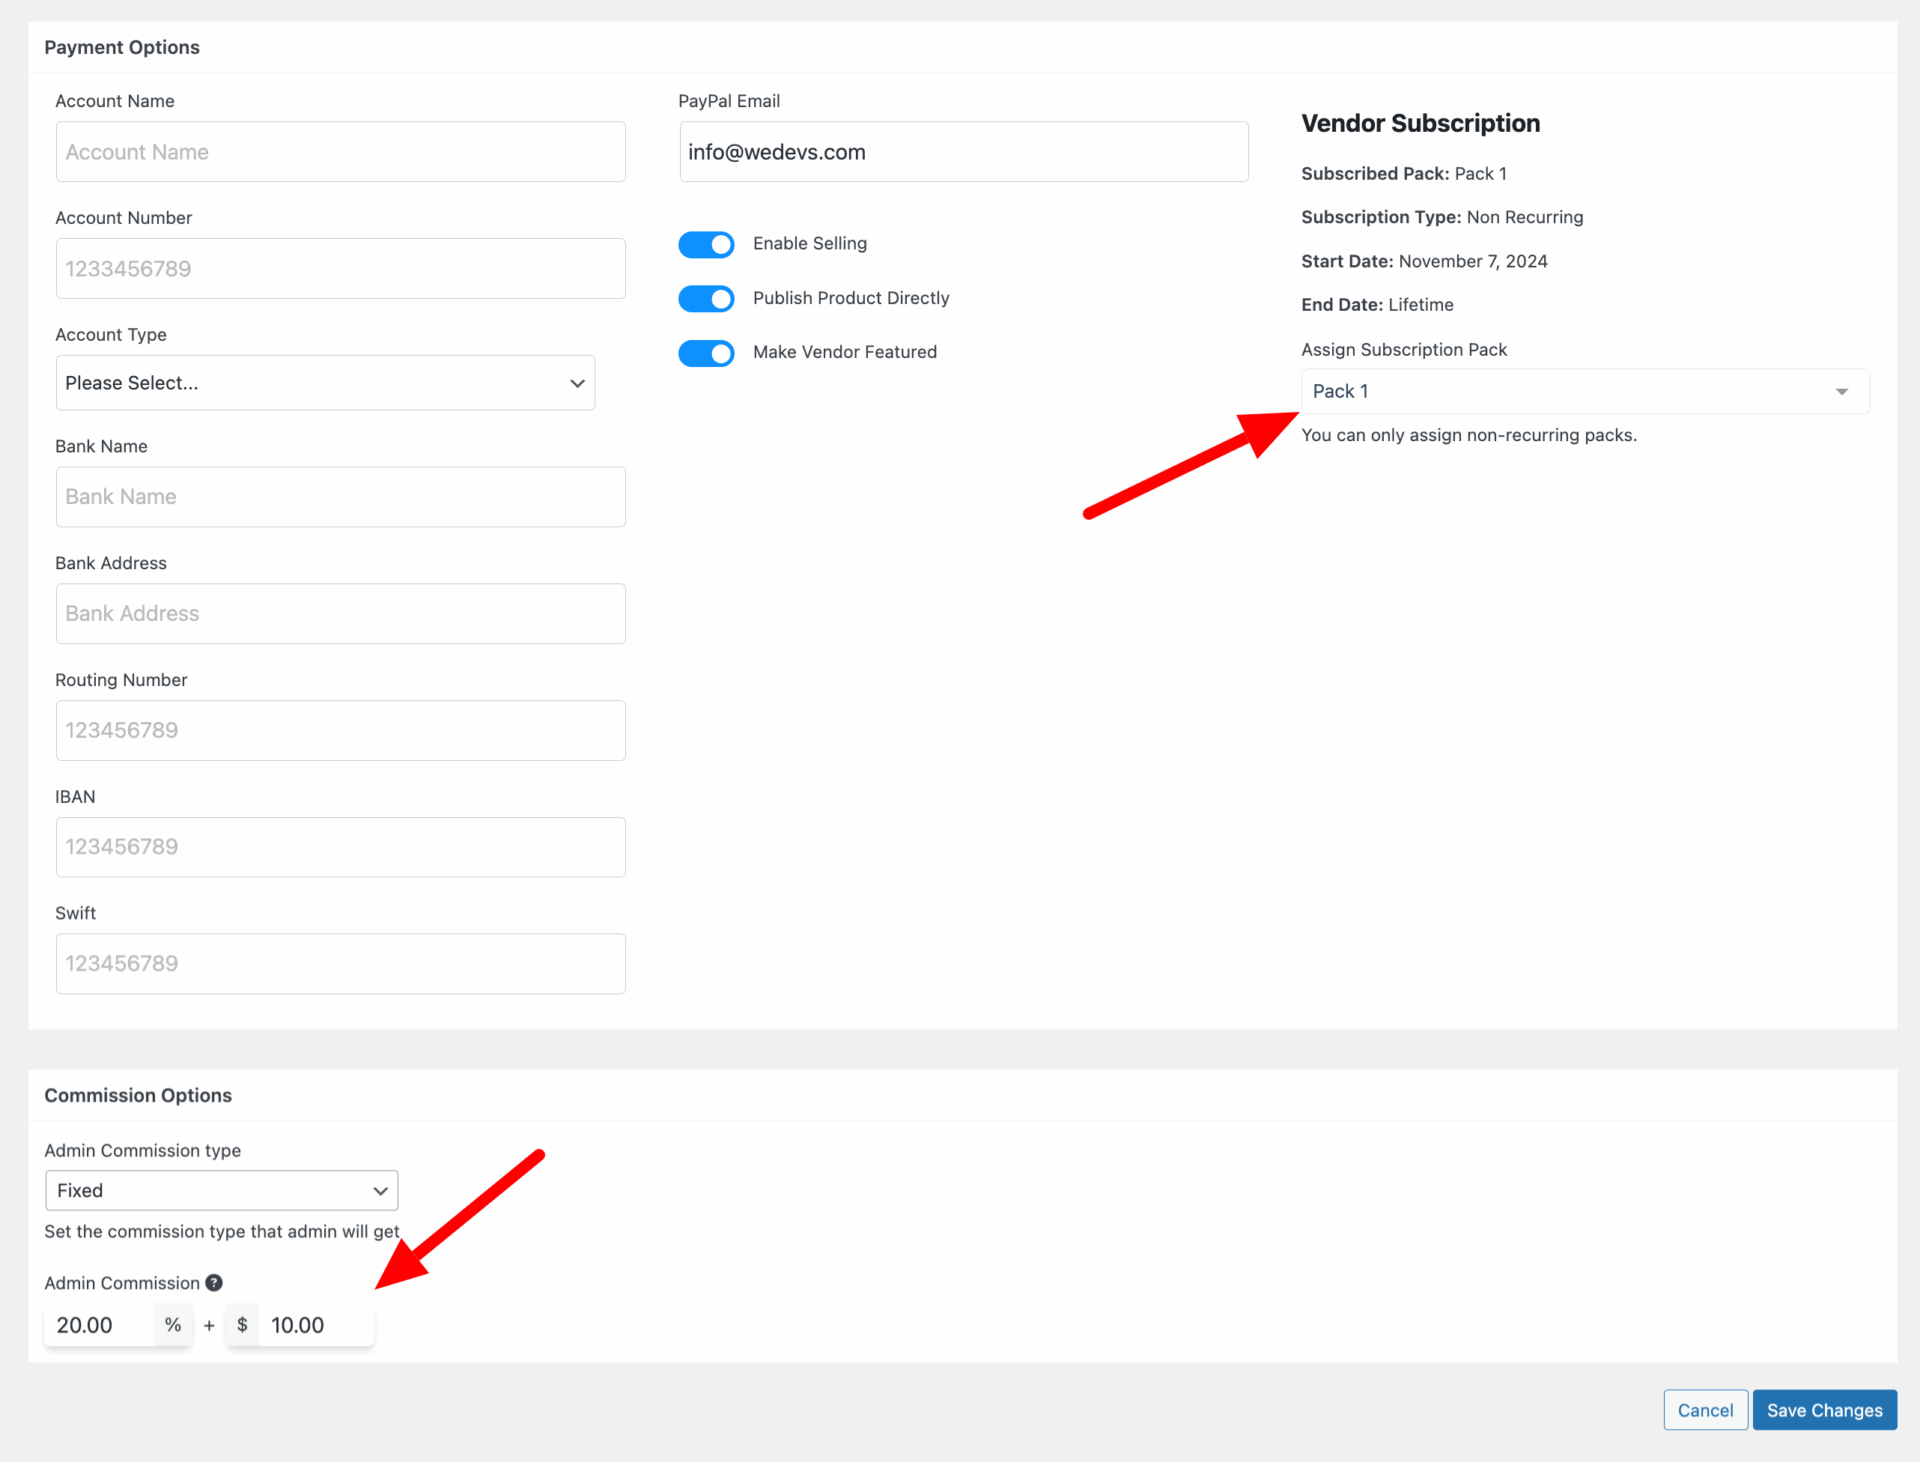
This is how you can add commission for subscription packs.
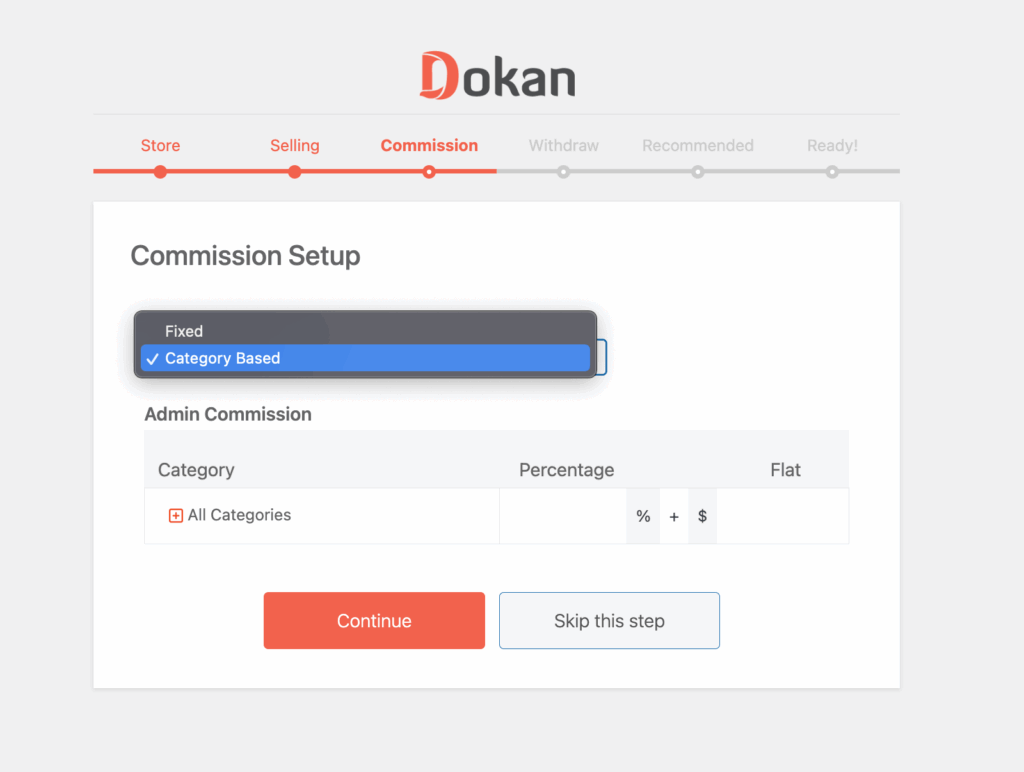
Commission Configuration from Setup Wizard
As an admin, when you are setting up your marketplace through the setup wizard, you can configure your commission from there as well-
Commission System for Vendors
Vendors can’t configure any commission settings. However, when they are adding a new product, they can see how much they will earn after paying commission-
Admin can see the commission calculation in the meta box from WooCommerce orders section-
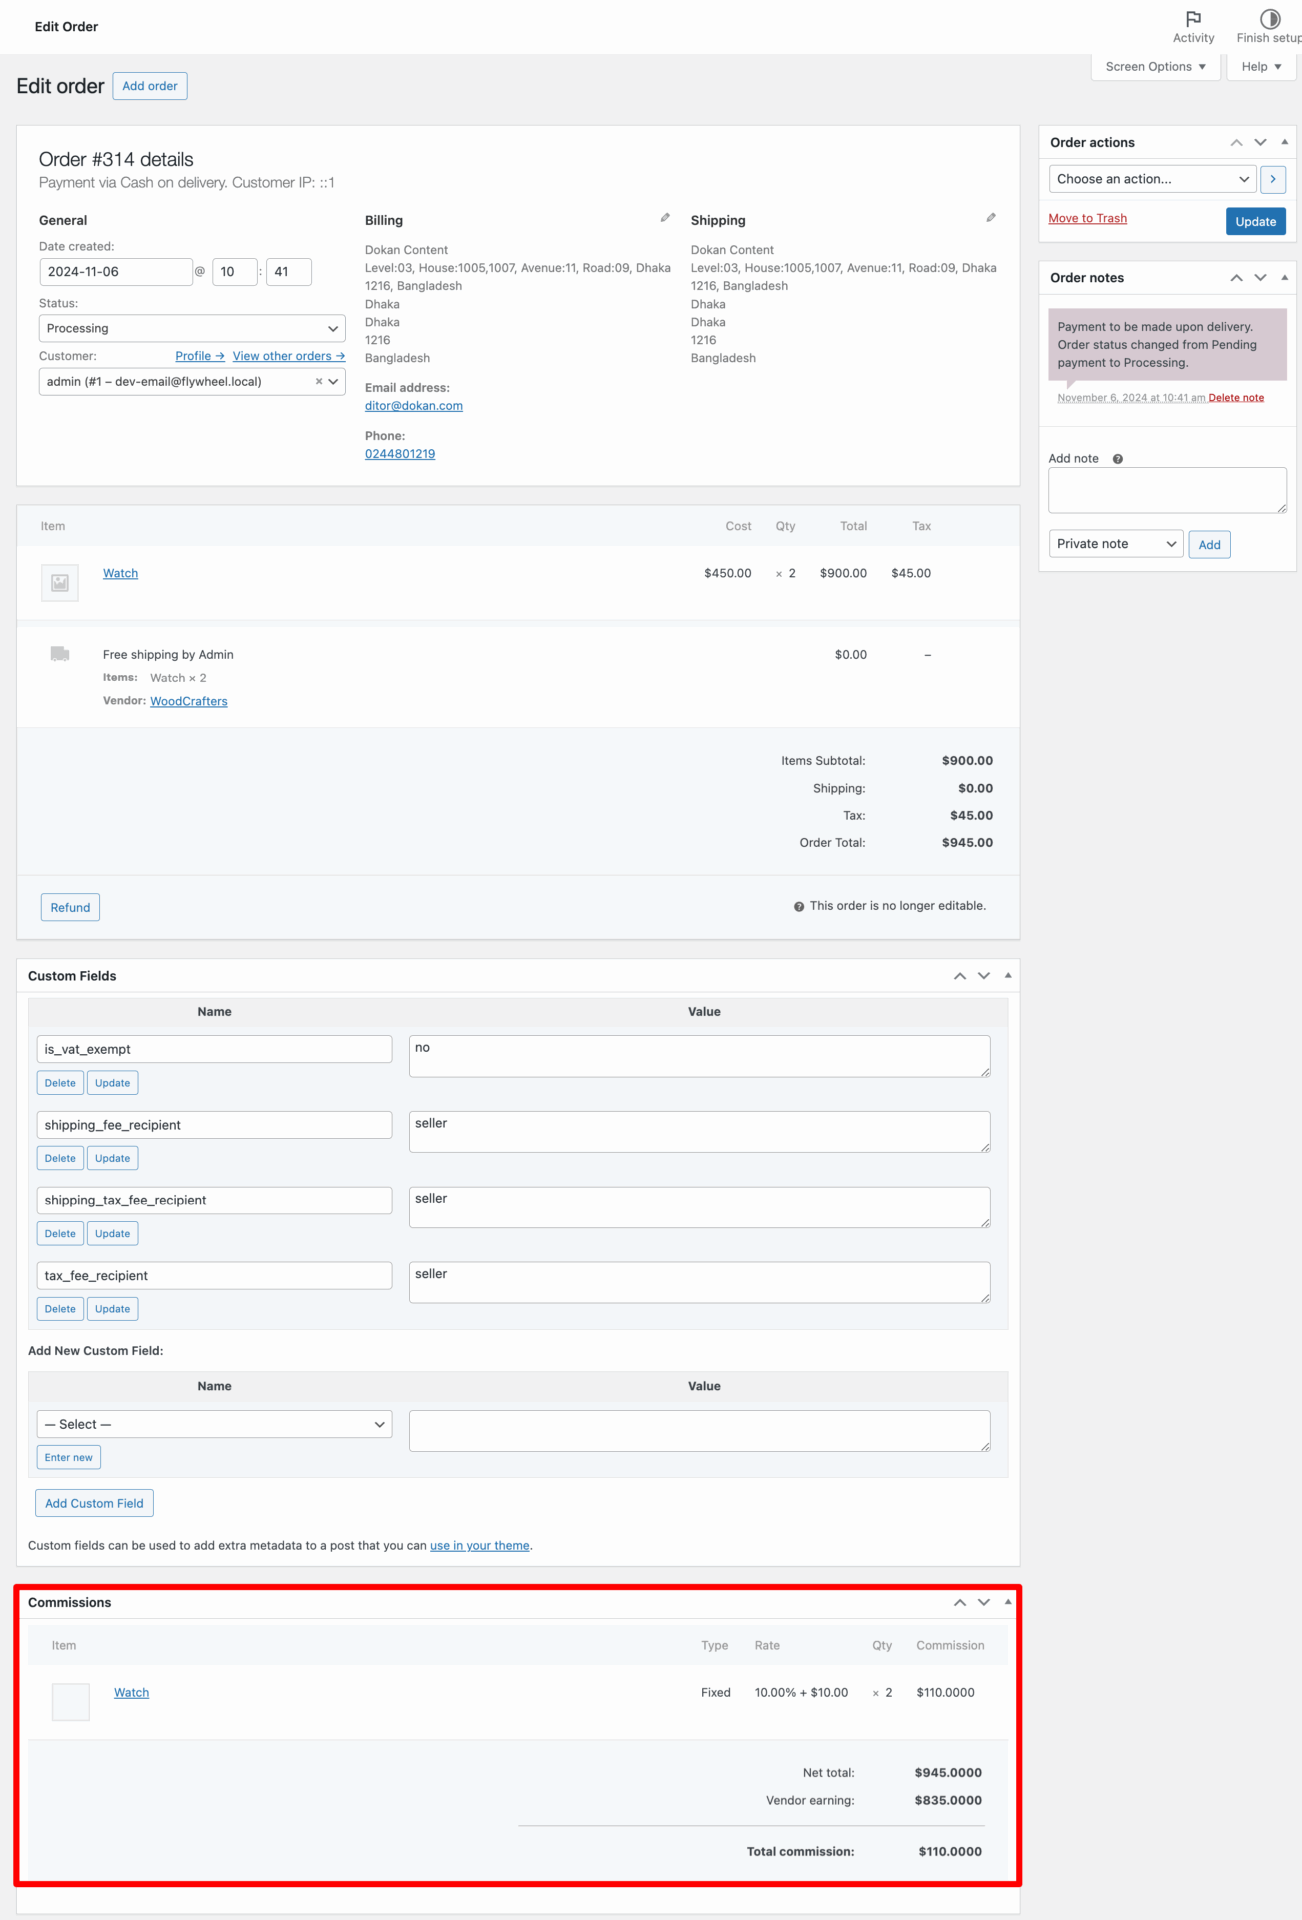
Dokan Commission Calculation Example
Here is an example of how each commission category works-
Product price: 45
Quantity: 2
Combined Commission (to be deprecated in the next release):
Order Total: $90 ( $45*2)
Percentage Commission (10% of $90): $9
Flat Commission: $5
Total Commission: $9 + $5 = $14
Fixed Commission:
Order Total: $90 ( $45*2)
Percentage Commission (10% of $90): $9
Flat Commission: $5
Total Commission: $9 + $5 per item (5+5=10) = $19
Per Item Commission: $9.50
Fixed commission calculation:
Commission: 10% + $5
Percentage Commission (10% of $45): $4.5
For 2 item : $4.5 *2 = $9
Flat Commission ($5 per item * 2): $10
Total Commission: $9 + $10 = $19
Per line item commission: ($19 / 2) = $9.50
Category based commission calculation:
Commission: 20% + $5
Percentage Commission (20% of $45): $9
For 2 item : $9 *2 = $18
Flat Commission ($5 per item * 2): $10
Total Commission: $18 + $10 = $28
Per line item commission: ($28 / 2) = $14
Dokan Vendor Commission Workflow
If you have set up different types of vendor commissions, you might become confused about the workflow. This means you may not figure out which type of commission will work in different situations. Here is the explanation.
First Priority: Product Wise Commission
Dokan prioritizes the commission from smaller segments starting with the Product. If you have set up Product Wise commission and also vendor-wise commissions, then Dokan will count the product wise commission first. If there is no product-wise commission, then the vendor commission will be used.
Second Priority: Vendor Wise Commission
If you have vendor Wise commission set up in your multivendor marketplace, it will be considered as the second priority. If there is no product Wise or product category Wise commission set up, Dokan will use this commission.
Also, you can set category wise commission from the vendor edit page.
Third Priority: Global Commission
If there is no other commission available, then Dokan will use the Global Commission. You can set category wise commission from the vendor edit page.
Note: Global commission can not be empty value. if 0 is given in value, then the marketplace will deduct no commission from vendors.
If you have more technical knowledge, then you can follow this flowchart-
Basic Commission Calculation:
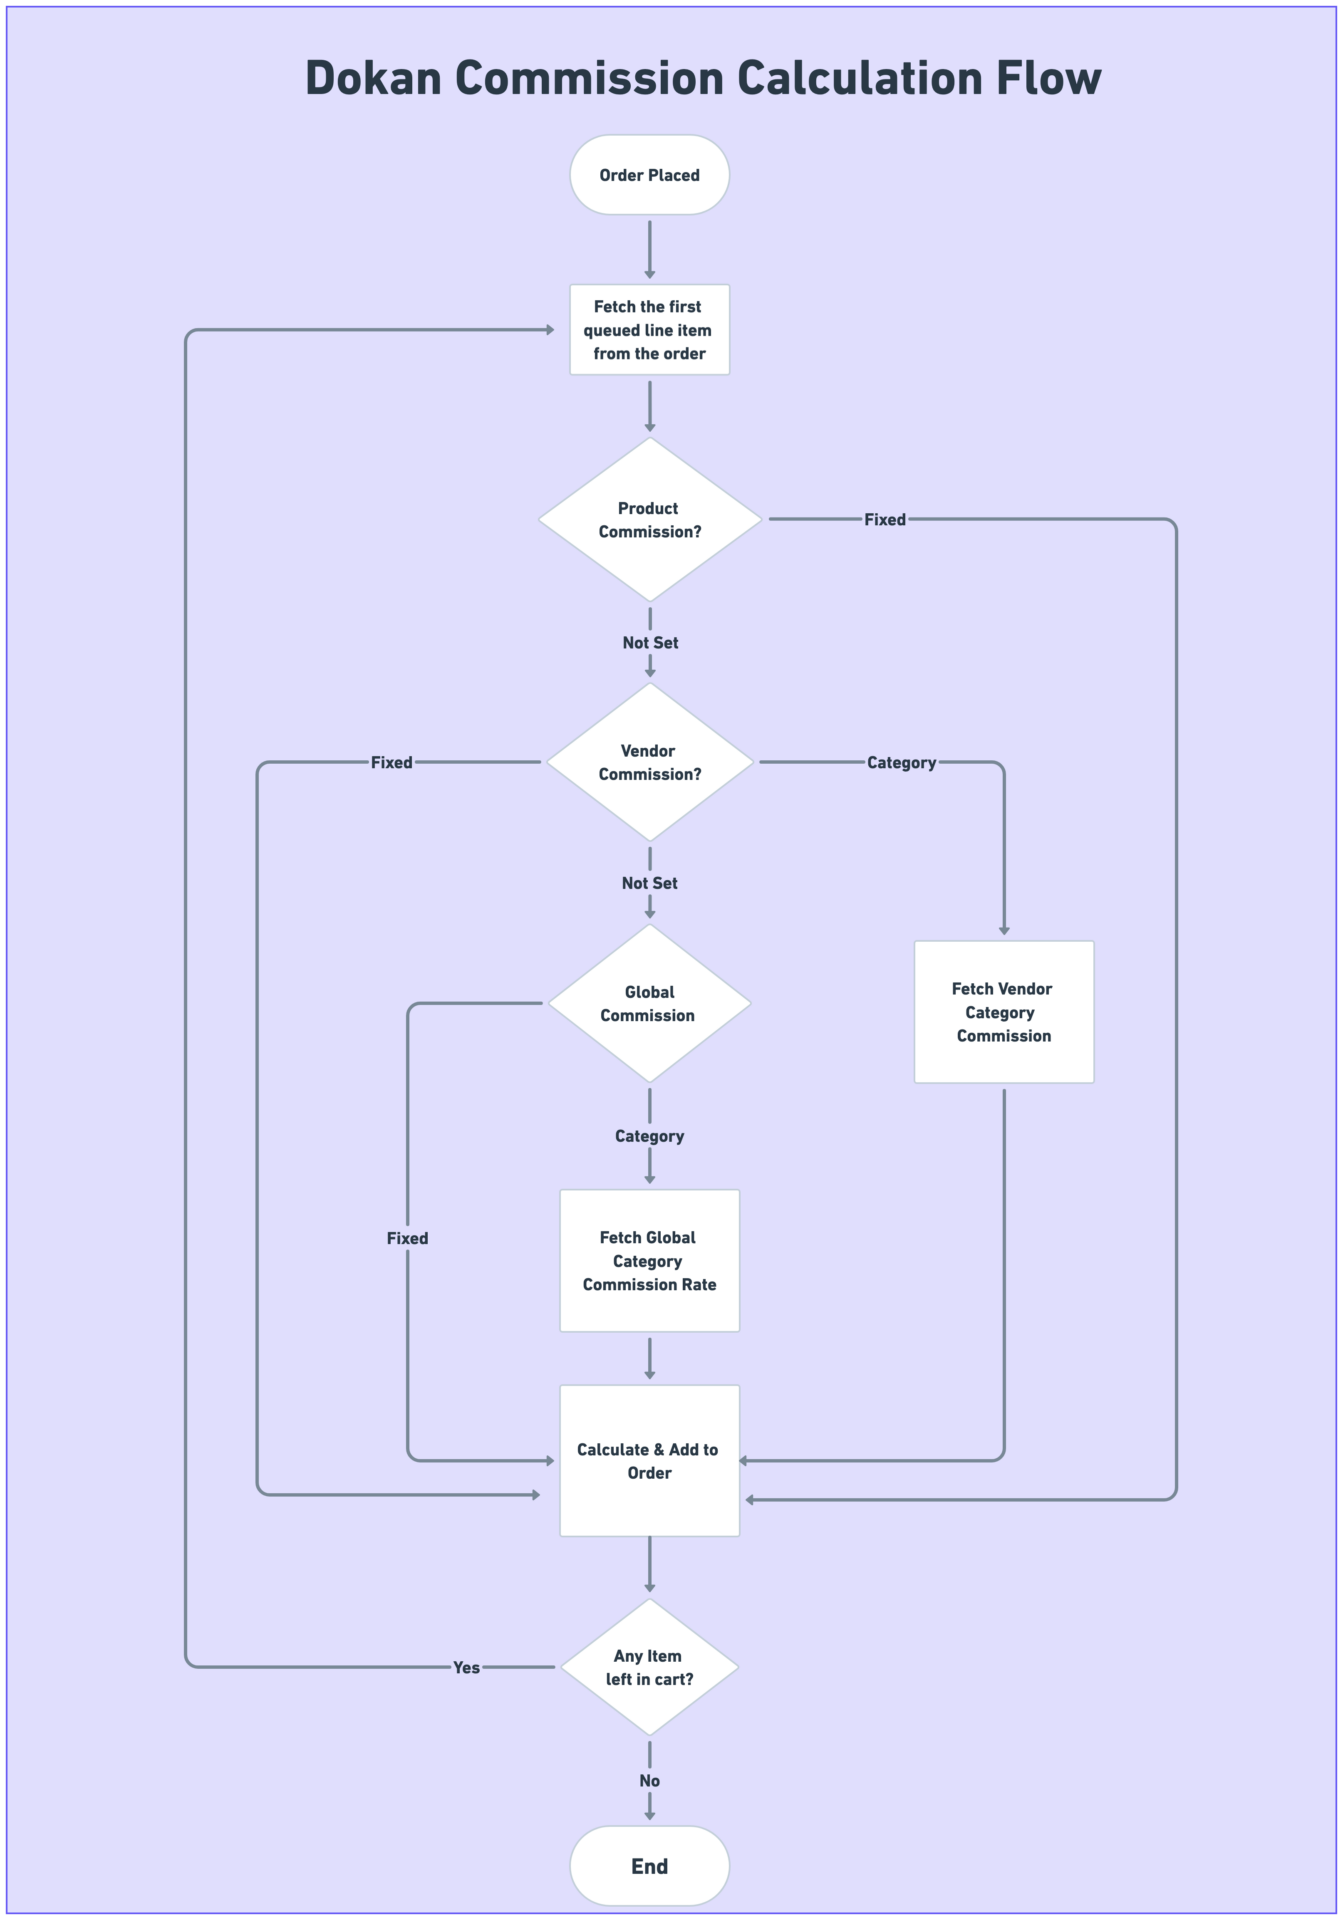
- Order Placed: The process starts when an order is made.
- Get First Item: The system picks the first item from the order.
- Check Product Commission:
- If a specific commission is set for this product, it uses that rate.
- If not, it moves on to check for a vendor-specific commission.
- Check Vendor Commission:
- If the vendor has a set rate (either a flat rate or category-specific), it uses that.
- If not, it moves to a global commission.
- Apply Global Commission:
- Uses a global rate (either a flat rate or category-specific) if no other commission is found.
- Calculate & Add Commission: Adds the calculated commission to the order.
- Check More Items:
- If there are more items in the order, it repeats the process.
- If no more items are left, the process ends.
This is how the new commission system works.
How Commission Works with Multiple Product Categories
When vendors list products under multiple categories in Dokan, then they need to understand the commission calculation logic becomes crucial for both vendors and marketplace administrators.
Here is the category prioritization works-
Category Prioritization Rules:
- First Category Takes Precedence: The system automatically uses the commission rate of the first category selected during product creation
- Selection Order Matters: The sequence in which categories are added directly affects the final commission calculation
- Single Rate Application: Only one category’s commission rate applies—the system never combines or averages rates from multiple categories
Example:
Imagine your marketplace has established these category-specific commission rates:
- Electronics: 15% commission
- Home Goods: 10% commission
- Sale Items: 20% commission
Scenario 1:
A vendor creates a smart home thermostat and selects categories in this order: “Home Goods, Electronics, Sale Items”
Result: 10% commission applies (based on “Home Goods” being first)
Scenario 2:
For the same product, if the vendor instead selects: “Electronics, Home Goods, Sale Items”
Result: 15% commission applies (based on “Electronics” being first)
This simple prioritization ensures transparent and predictable commission calculations throughout your marketplace.
This also ensures commission calculation stays the same when toggling multiple or single product categories.
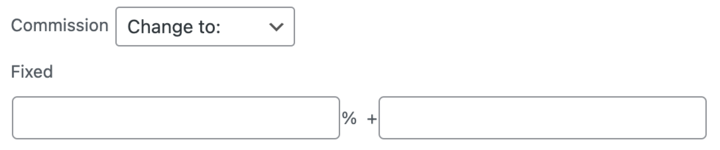
How to Bulk Edit Product Commission
For marketplace owners managing multiple products, Dokan offers a convenient way to edit commission rates in bulk. Here’s how you can efficiently update commission rates for multiple products at once:
1. Navigate to WordPress Dashboard -> Products
2. Select the products you want to update the commission for
3. From the Bulk Actions dropdown, select Edit and click Apply
4. In the bulk edit panel, locate the Commission section
5. By default, “No Change” will be selected in the dropdown
6. Select “Change to” from the dropdown to reveal the commission input fields:
– Enter the percentage and flat amount of components
– The new commission values will be applied to all selected products
Note: This bulk edit action will override any existing product-specific commission rates for the selected products. The new commission structure follows the same calculation method as individual product commissions.
After setting the desired commission values, click **Update** to apply the changes to all selected products. This feature significantly reduces the time needed to manage commission rates across multiple products in your marketplace.
Remember that these product-specific commission rates will take priority over vendor-wise and global commission settings in the commission calculation hierarchy.