
Nowadays, eCommerce has become an essential part of our lives. It enables us to shop for the products we need from our homes. When it comes to essential household items like kitchen utensils and appliances, having a dedicated online marketplace can be a win-win situation for both buyers and sellers.
So, if you’ve ever dreamt of creating your own platform where people can browse, buy, and sell high-quality kitchen gear, you’re in the right place.
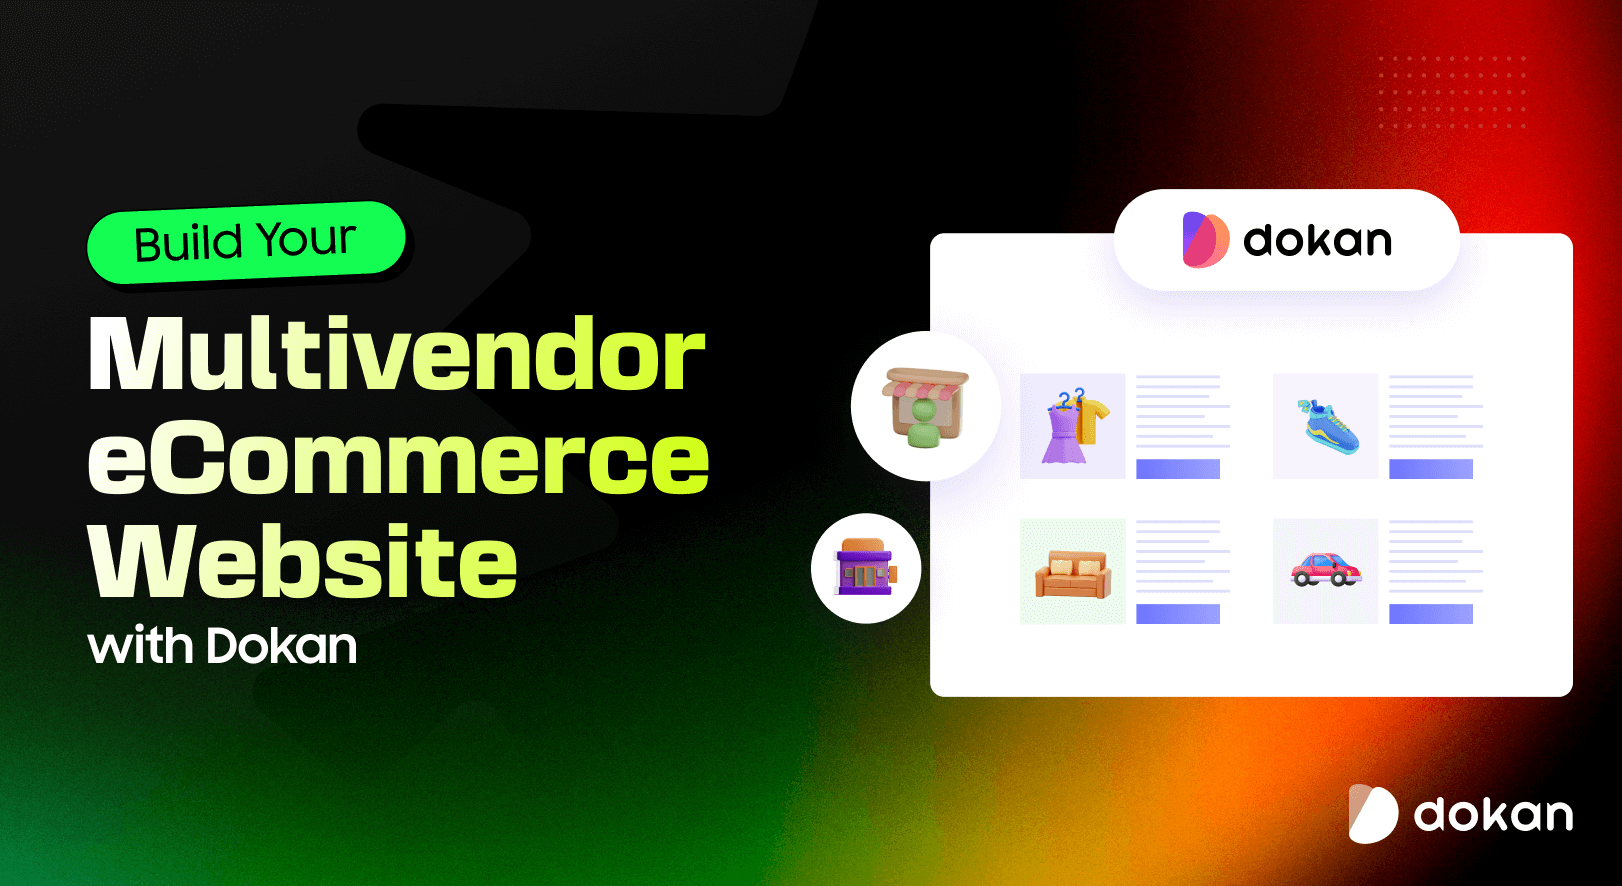
In this step-by-step tutorial, we will show you how to create a kitchen utensils and appliances marketplace using two powerful tools: WordPress and Dokan multivendor plugin.
We’ll cover everything from setting up your WordPress website to configuring the Dokan plugin, adding products, and optimizing your marketplace for success.
So, without any further ado, let’s get down to business!
Is It Profitable to Create a Kitchen Utensils and Appliances Marketplace
According to a report by Research and Markets, the smart kitchen appliance market is forecast to grow between 2020 and 2028.
In 2020, the size of this market amounted to around 13.79 billion U.S. dollars, and it is forecast to reach a revenue of over 47 billion U.S. dollars by 2028, growing at a CAGR of 19.2 percent.
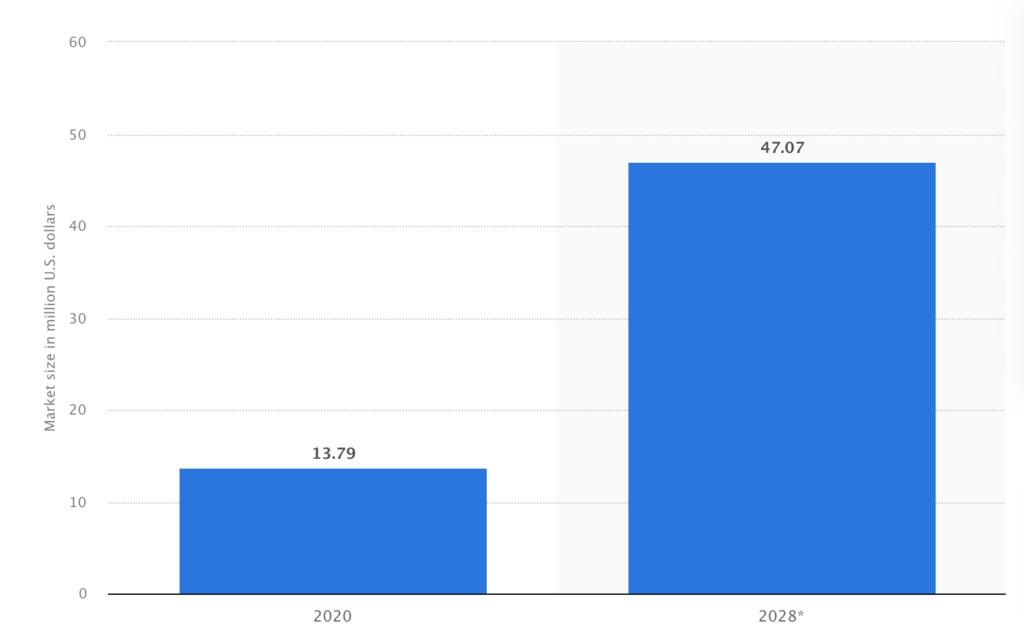
This indicates that the market is growing rapidly and presents a significant opportunity for businesses to enter and capture market share.

Creating an online kitchen utensils and appliances marketplace can be a lucrative business opportunity for several reasons:
- High Demand: Kitchen utensils and appliances are always in high demand, as people are always looking for new and innovative tools to make their cooking experiences easier and more enjoyable. An online marketplace can offer a wide range of products to cater to this demand.
- Convenience: With the rise of online shopping, customers are increasingly looking for convenient ways to shop. An online marketplace for kitchen utensils and appliances offers customers the convenience of shopping from the comfort of their own homes.
- Increased Reach: An online marketplace can reach a global audience, allowing you to tap into markets beyond your local area. This can help you to increase your customer base and grow your business.
- Scalability: An online marketplace has the potential to scale rapidly, as you can add new products and vendors to your platform easily. This can help you to grow your business quickly and efficiently.
Overall, creating an online kitchen utensils and appliances marketplace can be a profitable and scalable business opportunity that offers convenience, increased reach, and competitive advantage.
5 Steps to Build a Kitchen Utensils and Appliances Marketplace

Creating an online kitchen utensils and appliances marketplace has become easier than ever before. Because there is WordPress which makes the process a lot easier, it doesn’t matter if you know coding or not.
So, let’s check these 5 easy steps to turn your dream into a reality!
- Install and Activate the Dokan Multivendor Plugin
- Install a Dokan Compatible Marketplace Theme
- Configure the Basic Settings of the Dokan Plugin
- Upload Products and Configure Your Admin Shop
- Allow Vendors to Register to Your Marketplace
These are the steps!
Before starting with this tutorial, let us show you a list of the prerequisites that you’ll be required to follow throughout this tutorial. So, let’s get started!
Prerequisites to Create an Online Kitchen Utensils and Appliances Marketplace
Here is the list of prerequisites that you’ll require to create your first-ever kitchen utensils and appliances marketplace:
- An easy-to-remember domain name and a good hosting package
- A ready WordPress website
- WooCommerce plugin
- Dokan multivendor plugin
- A Dokan-compatible marketplace theme
Choosing a domain name and a hosting plan to launch your marketplace requires extensive research. Because if you mistakenly choose the wrong hosting plan, it will slow down your site. Thus you’ll lose traffic and that will impact your bottom line.
If you don’t know which hosting package will be the best solution for your marketplace, you can check our blog on the best hosting solutions for running a marketplace.
After buying a domain and hosting, all you need to do is install WordPress on your cPanel. That’s how you can ensure a ready WordPress website.
As for the rest of the prerequisites e.g., WooCommerce plugin, Dokan multivendor plugin, and a marketplace theme, we will show you in the tutorial how you can manage them. So, keep reading!
Step 1: Install and Activate the Dokan Multivendor Plugin
Dokan multivendor is the most popular and effective solution to create any type of online multivendor marketplace. It has more than 60K active installations and 4.6 out of 5 user ratings to date.
You can easily install this plugin from your WordPress dashboard.
Simply, go to your WordPress dashboard -> Plugin -> Add New. Then use the search box to type the plugin name “Dokan” and click the “Install” button to install the plugin from the search result.
Don’t forget to activate the plugin by clicking the “Activate” button.

When you install the Dokan multivendor plugin for the first time on your WordPress-powered website, you get the opportunity to use this setup wizard. It gives you a step-by-step guideline to set up the Dokan plugin easily.

You can check our admin mult-step setup wizard for a clearer understanding.
Important Note: If you have not installed the WooCommerce plugin in the first place, don’t worry. Because when you install the Dokan multivendor plugin, it automatically installs WooCommerce.
If you find it difficult to configure the Dokan multivendor plugin, you can watch our video on the Dokan installation guide.
Step 2: Install a Dokan Compatible Marketplace Theme
After installing Dokan, you will need to install a Dokan-compatible marketplace theme. You can install any theme that is compatible with Dokan. The good news is any theme that is compatible with WooCommerce is also compatible with Dokan.
If you are not sure which theme you should consider for designing your kitchen utensils and appliances marketplace, we are recommending the “Dokani” theme for you. This theme is created by the same company behind the Dokan plugin. On top of that, this theme is absolutely free to use.
To install this theme on your marketplace, go to your WordPress dashboard -> Appearance -> Themes -> Add New -> Upload Theme. Don’t forget to activate the theme after uploading it.

That being said, if you want to use any third-party premium theme, we have a backup for that as well. We have compiled a list of the best third-party premium Dokan-compatible marketplace themes for you on our website. Click this button to get the list!
Step 3: Configure the Basic Settings of the Dokan Plugin
After installing and activating the Dokan plugin, now you need to configure all the basic settings. You will find all the settings options at WP-Admin –> Dokan –> Settings.
You’ll find:
- General Settings
- Selling Options
- Withdraw Options
- Payment Gateways
- Reverse Withdrawal
- Page Settings
- Appearance
- Privacy Policy

You can select the pages for the vendor dashboard, order page, store listing, and terms and conditions page from here.
Now you need to set the commission type and rate. Go to WP Admin Dashboard -> Dokan -> Settings -> Selling Options. There you’ll find the Commission Type and Admin Commission options.
Set the commission type and rate according to your convenience.

Don’t forget to click the Save Changes button after configuring all the settings. Otherwise, you will lose all the changes that you’ve made now.
Now if you want to set the permalink settings of your product page, you can do that from WP Admin -> Settings -> Permalinks -> Product Permalinks.
For example, using “product” would make your product links like http://yourdomainname.com/store/sample-product/.
This setting affects product URLs only, not things such as product categories.
Select the check box “Custom Base” for product permalinks and write “/product” (or, whatever you want) on the box. Then hit the Save Changes button to save the settings.

Now let’s discuss two basic yet crucial settings of the Dokan multivendor plugin:
a) Configure Payment Gateways
You can’t control your customers which payment gateway they should choose, right? So, it’s always a better decision to ensure several payment gateways on your marketplace.
Dokan supports all WooCommerce-compatible payment gateways. You will get a wide range of choices to make the transaction process easier on your marketplace.
With Dokan Lite you can use non-adaptive payment gateways like PayPal, bank account transfer, cash on delivery, etc. The Pro version supports adaptive payment solutions like Stripe Connect and MOIP.
Go to your WordPress dashboard -> WooCommerce -> Settings, then click on the Payment tab to get the available payment methods.
Note: In case the PayPal option isn’t there, you should install the “WooCommerce PayPal Payments” plugin and you will find the PayPal option here.

b) Enable Withdraw Methods
Another important part of running an interactive online marketplace is to ensure a smooth withdrawal system. Dokan helps you take care of this section as well.
Go to WP Admin -> Dokan -> Settings -> Withdraw Options. Here you’ll find options to customize the withdrawal method and set the minimum balance a vendor needs to make a withdrawal limit.

You can also customize other Dokan settings following the same process that we have shown here.
If you need more help configuring the Dokan general settings, you are in luck! We have step-by-step documentation for every Dokan setting. Just check our Dokan settings documentation and set up your multivendor with ease!

Subscribe to
Dokan blog
Step 4: Upload Products and Setup Admin Shop
Since you are an admin, you have two options to earn from your marketplace. You can earn through commissions which means when any of your vendors make a sale, you will get a commission. There is another way to earn that is selling products from your admin shop.
Now we are going to show you how to create your admin shop and sell from your own marketplace. If you don’t want to set up your admin shop, you can simply skip this step and proceed to step 5.
First, you need to enable yourself as a seller. To do that go to Dokan –> Vendors and enable selling by turning on the Status button.

As an admin, you’ll get two ways to upload products. You can upload products from frontend or backend.
Let’s check how to upload products from the backend:
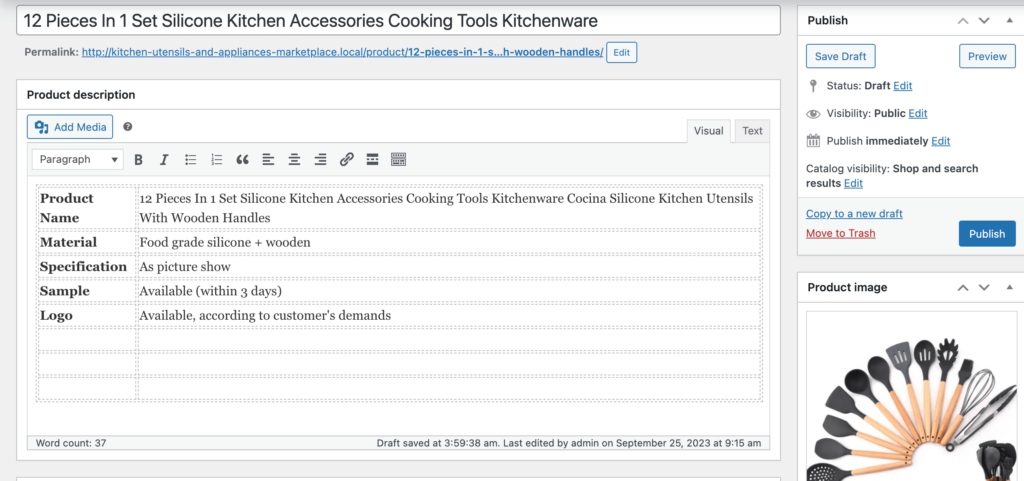
Go to your WordPress Backend -> Products -> Add New. There you’ll find options to add the product’s name, description, image, category, tags, and so on.
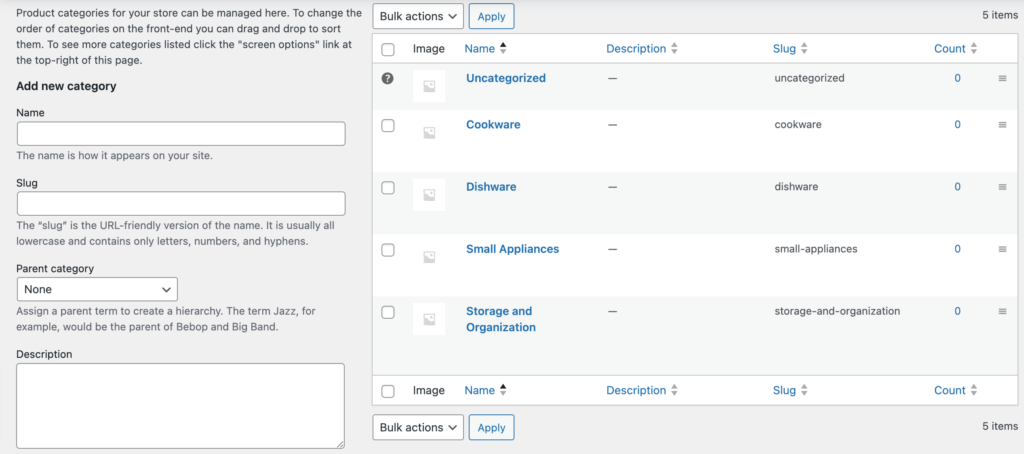
If you haven’t created Categories and Tags before, navigate to your WordPress dashboard -> Products -> Categories to add new categories.
In the same way, go to your WordPress dashboard -> Products -> Tags to add new tags.
Then configure the rest of the options for adding a new product.
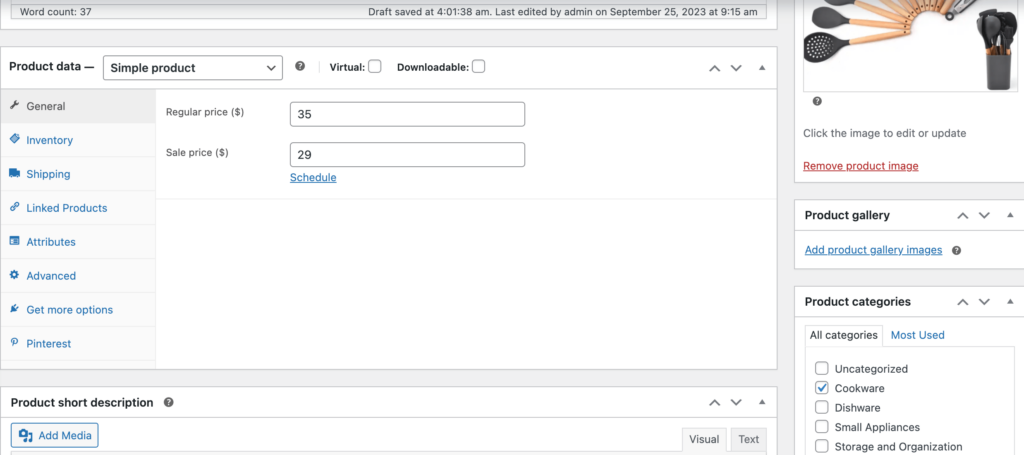
After completing all the customizations, click on the “Publish” button to publish the newly added product.
That’s how you can add products from the backend.
Now let us how you how to add products from the frontend. Your registered vendors will also add products following this same process.
Go to your WordPress Dashboard -> Visit Vendor Dashboard -> Products. Then click on the Add new product.

There you’ll find options to add the product title, image, price, description, and more.
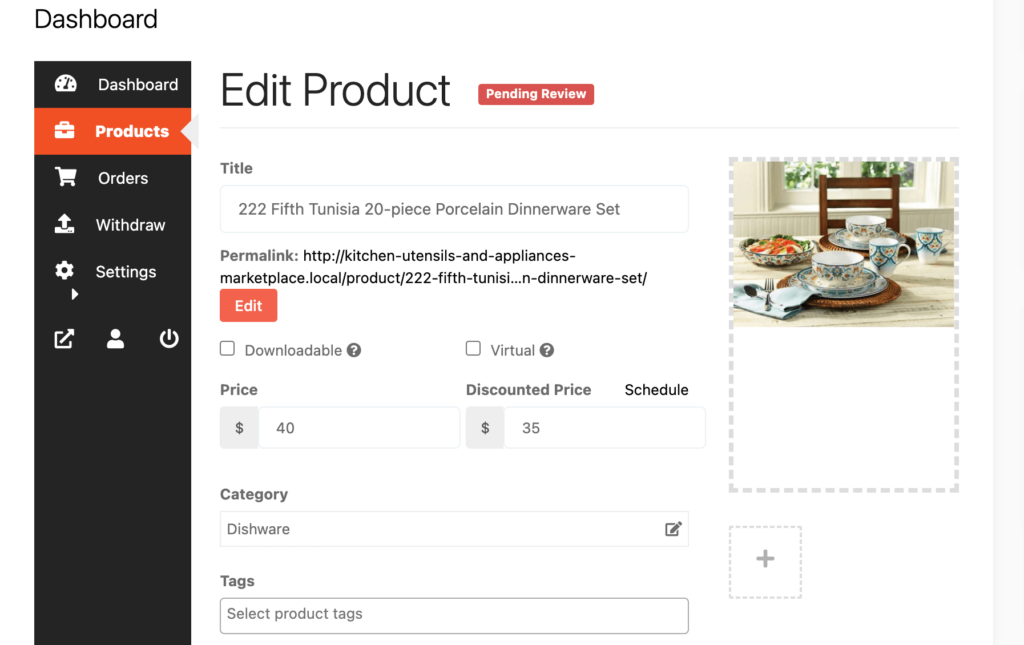
After adding all the information for the product, hit the “Save Product” to complete the process.
But this product won’t be publicly available unless the admin which is you approves it. That means you’ll find the product with pending review unless you approve it.
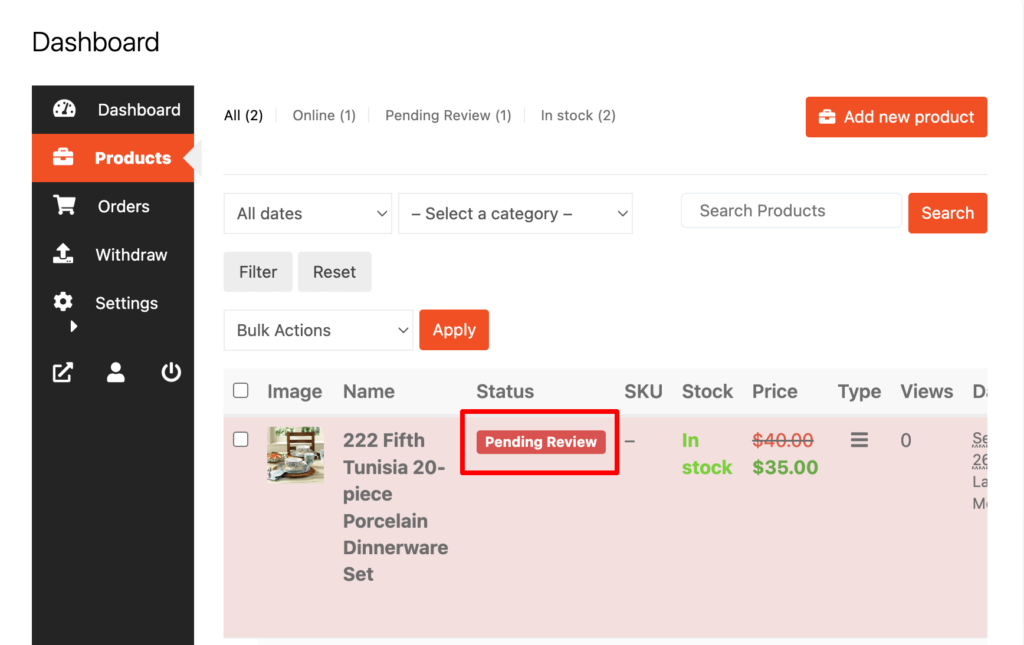
To approve this product, go to your backend and click on the Products option, then click on the Quick Edit. There you will find the Status option. Choose the Published option and click the Update button to approve and publish the pending products.
That’s all!
You can customize your store design by going to Vendor Dashboard -> Settings. From here you can update your store name, address, opening & closing time, etc.
After customizing your store, visit the store to check the front-end view.
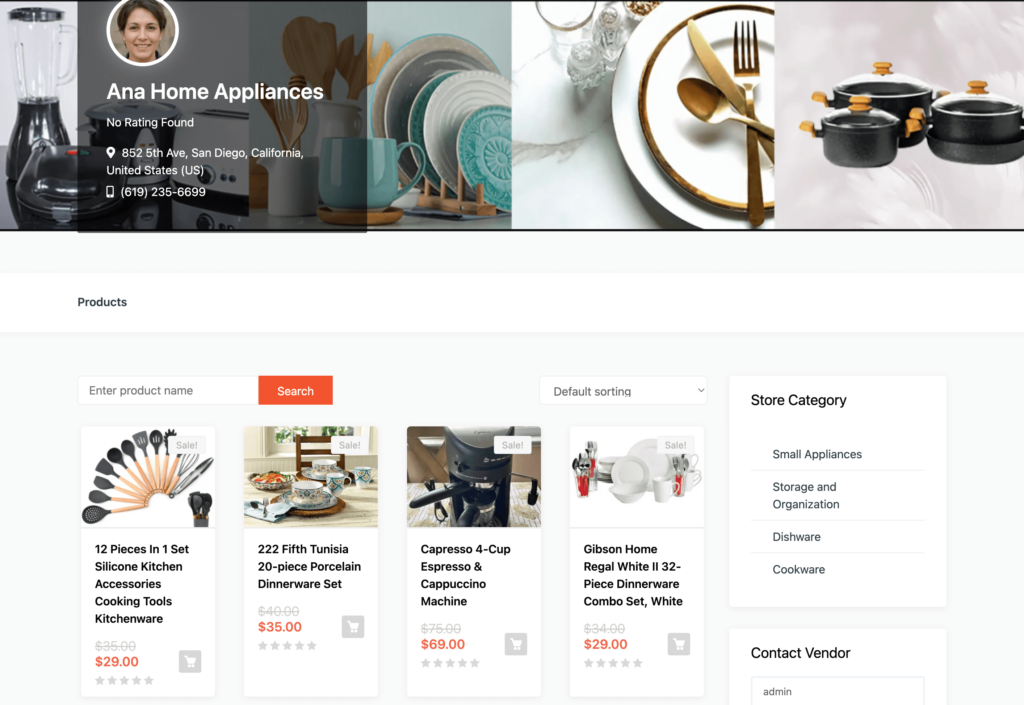
This is how you can upload products from the front end and customize your store front end.
Step 05: Allow Vendors to Register to Your Marketplace
After adding all the functionalities and configuring your marketplace, you can invite vendors to sign up for your marketplace. To make sure vendors can sign up for your marketplace, enable the “Anyone can register” option from WP Admin –> General –> Settings.

So, it will open the default registration form for vendors to sign up.

Or you can create customized registration forms with the necessary fields, especially for your marketplace.
For vendors to start selling, you need to enable selling status from Dokan –> Vendors.

Also, if you want new vendors to upload their products directly, then you need to change the product status from Dokan –> Settings –> Selling options. You need to enable the New Vendors Product Upload.

Now navigate to your WordPress dashboard then click on the Visit Stores to check all the registered stores on your kitchen utensils and appliances marketplace.
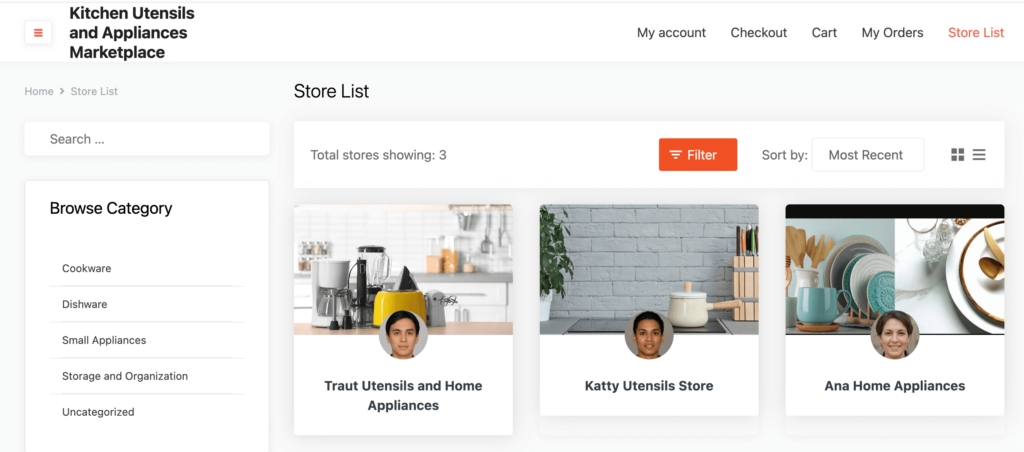
Once approved by the admin, vendors gain the freedom to create their own stores with unique URLs. Dokan also provides each vendor with an individual vendor dashboard, empowering them to effortlessly upload, manage, and successfully sell their products.
The store customization process for vendors is the same as we’ve shown above for an admin. From the front dashboard, a vendor can easily set up his shop.
This is how you can simply create and manage your kitchen utensils and appliances marketplace with WordPress and Dokan multivendor plugins. But once your marketplace starts growing, you’ll require more advanced features to tackle and satisfy increased traffic, vendors, and customers.
Luckily, Dokan multivendor comes with 35+ advanced modules to take your marketplace to a whole new level. Let’s check them out!
Bonus: A Case Study of Williams-Sonoma Kitchenware for Your Inspiration

Williams-Sonoma is a renowned American retailer specializing in high-quality kitchenware, cookware, and home furnishings. Founded in 1956 by Chuck Williams, the company has transitioned from a brick-and-mortar store to a highly successful online marketplace.
Key Factors Behind Williams-Sonoma’s Success
Williams-Sonoma’s success can be attributed to five key factors:
- Commitment to Quality: Williams-Sonoma has consistently prioritized high-quality products. By curating a selection of premium kitchenware and cookware, they have earned a reputation for reliability and durability, attracting customers seeking long-lasting and functional items.
- Customer-Centric Approach: The company places a strong emphasis on customer satisfaction. Exceptional customer service, easy returns, and personalized experiences, such as wedding registries, enhance the overall shopping experience and build customer loyalty.
- Innovation: Williams-Sonoma has embraced technology and innovation. They continuously evolve their online presence, offering features like virtual cooking classes and augmented reality for product visualization. This commitment to staying at the forefront of eCommerce trends has helped them adapt and thrive in the digital age.
- Educational Resources: By providing valuable content through its blog, cooking classes, and product guides, Williams-Sonoma empowers customers with culinary knowledge. This educational approach not only enhances the customer experience but also positions them as experts in their field.
- Strong Branding: The company has successfully built a strong and recognizable brand. Their marketing efforts, both online and offline, have contributed to their brand’s trustworthiness and popularity among consumers. Consistent branding and a cohesive image have been key to their success.
Success and Future Outlook of Williams-Sonoma
Williams-Sonoma’s transition from a small hardware store to a global online marketplace is a testament to its adaptability and commitment to quality. The company has achieved consistent growth and profitability.
Their strong brand reputation, exceptional product selection, and customer-focused approach have contributed to their success. Looking ahead, Williams-Sonoma continues to expand its online presence and explore new ways to enhance the shopping experience for kitchen enthusiasts worldwide.
This real-life example of Williams-Sonoma demonstrates how a company can evolve with changing consumer preferences and technology while maintaining a commitment to quality and customer satisfaction in the kitchenware industry.

Start Building Your Own Kitchen Marketplace Now!
You have come this far which means now you know the full process of building an online kitchen utensils and appliances marketplace.
Was this complicated? Nah, right?
So, what are you waiting for? Be prepared with your computer and start building your first-ever online multivendor marketplace.
We have also shared a successful study of turning a brick-and-mortar store into a full-fledged online marketplace for your inspiration. You can check their success factors to understand what should be on your priority list to be a successful entrepreneur in this sector.
If you still have any confusion related to this tutorial, feel free to share that with us using the comment box below.
Subscribe to
Dokan blog
We send weekly newsletters, no spam for sure!


Leave a Reply