
Big opportunity awaits for bike and car rental marketplaces in the future. Check the stats below-
The Global Car Rental Market is expected to reach a value of USD 141.93 Billion by 2030. While the global bike rental market is estimated to reach $11.3 Billion by 2031.
After staying indoors for quite a while because of COVID-19, people’s thirst for traveling has become greater. People book cars and bikes to travel conveniently and that is why we are seeing a boom in this sector. People often book cars and bikes to cover their daily routes as well.
So, the future is looking bright. If you want to jump in the wagon, then you have come to the right place.
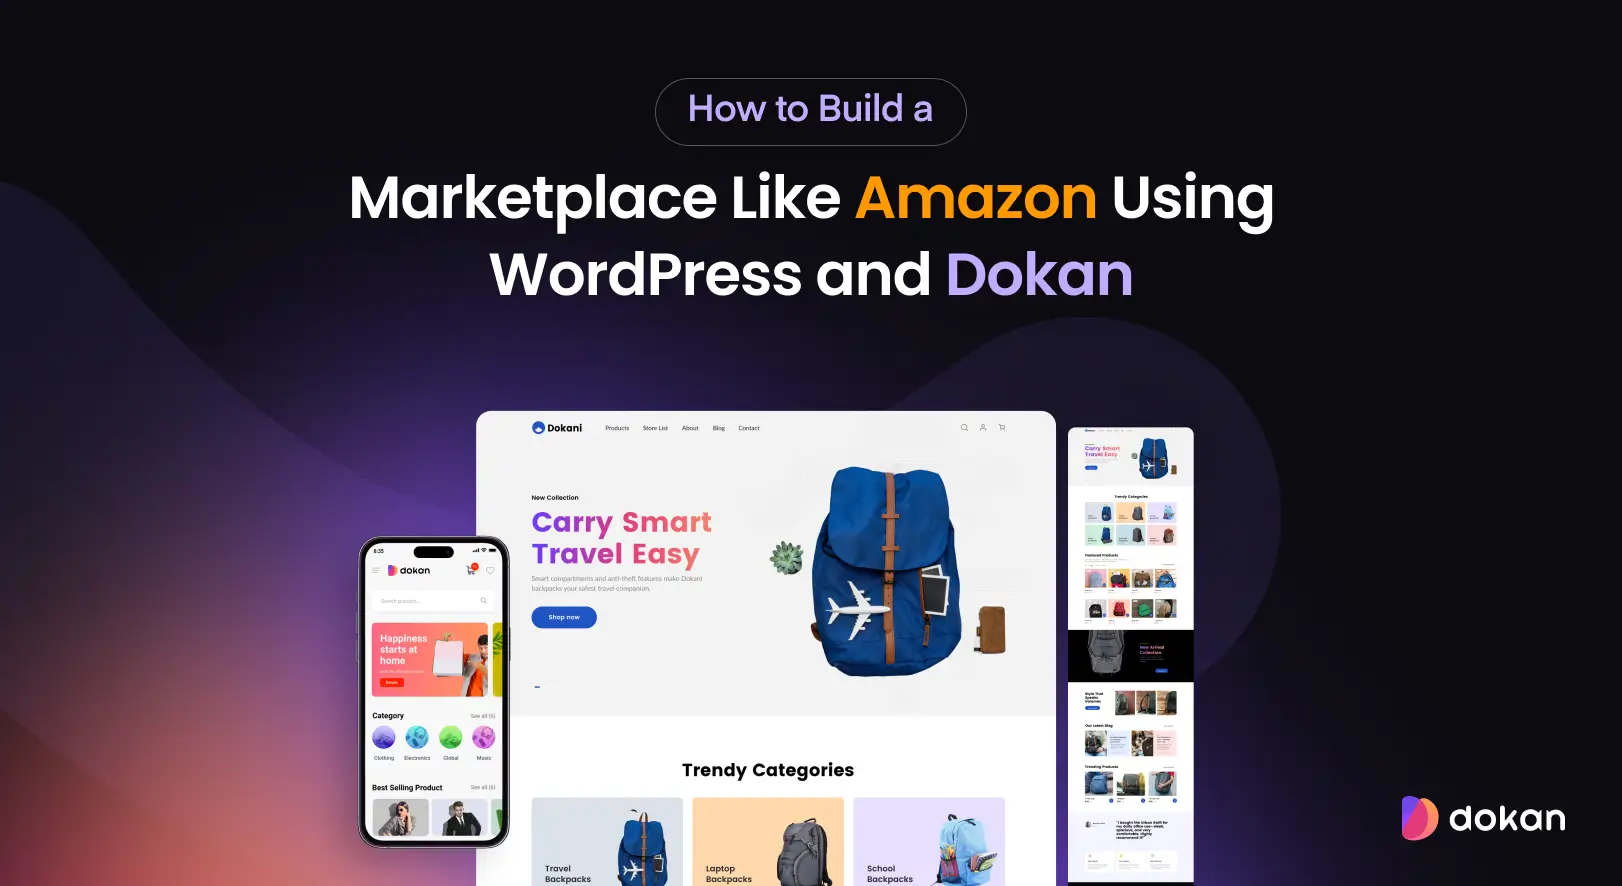
In this write-up, we are going to cover how to create a bike and car rental marketplace using WordPress and Dokan multivendor.
Let’s start with-
8 Must-Have Features for a Rental Marketplace

Before we get to creating a bike and car rental marketplace, you need to know what features you must have on your rental marketplace to compete with the big boys.
1. Online Booking
This is a must for any booking or renting marketplace. Users should be able to book vehicles directly through the marketplace website or app.
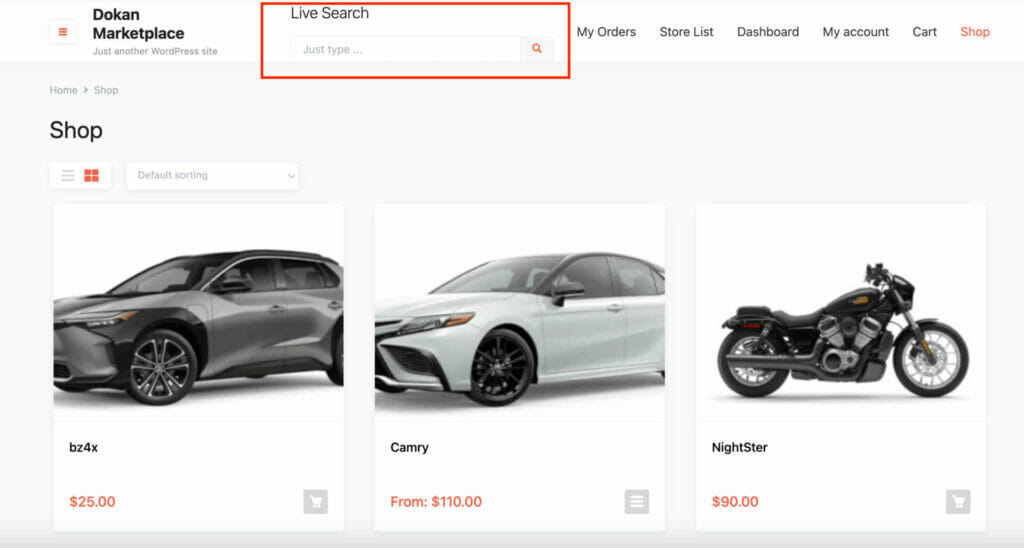
2. Live Search
This is a very important feature for any marketplace. Most customers don’t have the patience to go through all the products one by one. They search for a product using the search bar to find the product they are looking for.
Up to 30% of visitors to a website will use the search box, and 43% will immediately use it.
Klood
That is why it is important to have a search bar option on your marketplace.
3. Live Chat Support
Customers will have many queries when they are buying or booking products. They may want to know about the availability of a slot or the product they are looking for. And quick answers will not only solve their problems but will also motivate them to buy from the site.
Live chat will help you do that. Because 60% of customers expect an immediate response when initiating a live chat.
4. Detailed Listings
Listings should include clear and concise information about the vehicle, such as model year, mileage, features, and amenities.
5. Review and Ratings
As a car and bike rental marketplace, reviews and ratings matter. People need to know whether the store they are booking/renting a car or bike is trustworthy or not. They will surely check what other customers are saying about the store and also what ratings they got.
6. Simplified Commission System
This is for the marketplace admin. The most popular business model for marketplaces is the commission system. Admin earns money every time a sale occurs on the platform.
Now the commission can be based on a flat amount or a percentage of the sale. As a marketplace admin, you need to decide that.
7. Multiple Payment Gateways
This goes without saying that you need to integrate payment gateways to accept orders even from overseas. Also, people prefer to pay using credit/debit cards rather than cash.
Also, most countries are embracing the cashless policy to reduce the waste of paper. This is also one of the reasons why you should use payment gateways that are capable of accepting different payment methods. Ex: PayPal, Stripe, Wirecard, etc.
8. Dedicated User Dashboard
It is not wise to give your vendors access to the backend of your WordPress dashboard. Other than security issues, there are also some settings and features that the vendors should not bother with.
That is why you need to provide a vendor dashboard so that vendors can manage their store from there without having to visit the backend.
So, these are the important features you need to add to your bike and car rental marketplace to compete with the big boys!

Create a Bike & Car Rental Marketplace in 6 Steps
Thanks to WordPress, creating an online eCommerce store has become quite easy. With plugins like WooCommerce, anyone can start their eCommerce store and earn.
And with the help of Dokan, you can turn that eCommerce store into a multivendor marketplace with a few clicks. Dokan Multivendor is a popular marketplace plugin with 60000+ active installations and has all the features to get your marketplace off the ground.
Here are two images that show how a renting marketplace works-
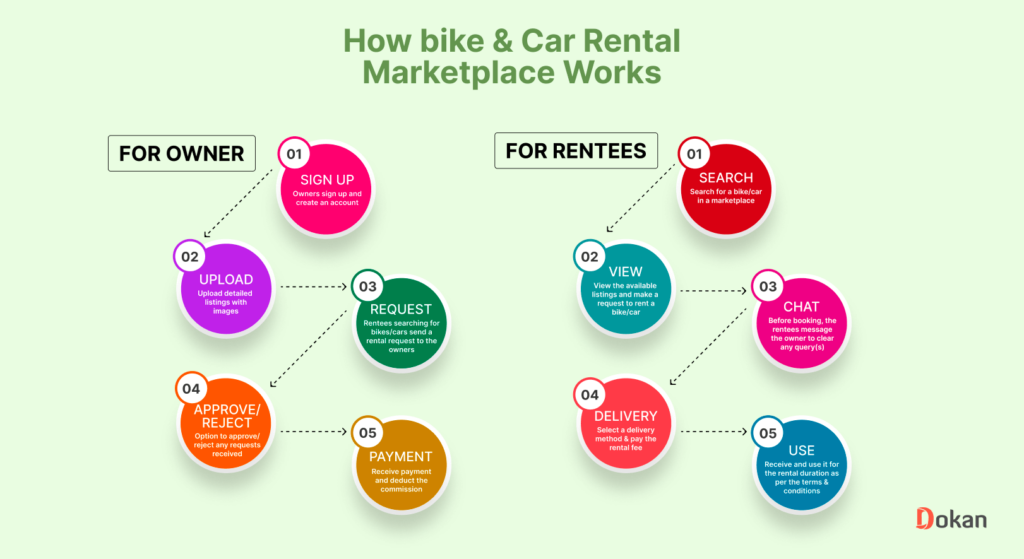
We will show you how to build an online booking marketplace for cars and bikes using Dokan. Let’s jump right into it.
What You Need To Set Up Your Rental Marketplace
To start an eCommerce marketplace, you need the following items:
- A WordPress Site with Domain and Hosting
- WooCommerce and Dokan Multivendor
- WooCommerce Booking (Pro)
- Dokan Booking Extension (Pro)
- A Compatible Dokan theme
We are hoping that you already purchased your domain and hosting. Now you need to follow these steps to create your grocery marketplace,
- Install & Activate Dokan Multivendor Marketplace Solution
- Install a Dokan Compatible Theme
- Configure the Basic Setting of Dokan
- Activate and Configure Dokan Booking
- Upload Products and Setup Admin Shop
- Allow Vendors to Register
Let’s see the details of these steps-
Step 1: Install Dokan and Start Creating Your Marketplace
As WooCommerce creates a single store for your website you need Dokan to create a multivendor marketplace for your bike and car rental marketplace.
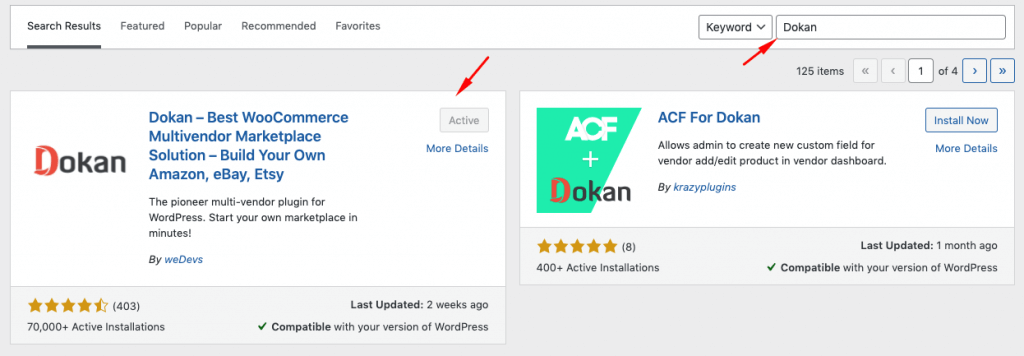
Installing Dokan multivendor is as simple as installing any other WordPress plugin. You can either install the plugin from the WordPress dashboard by,
- Navigating to Admin Dashboard -> Plugin-> Add New-> Click the search
- Type Dokan -> Install -> Activate.
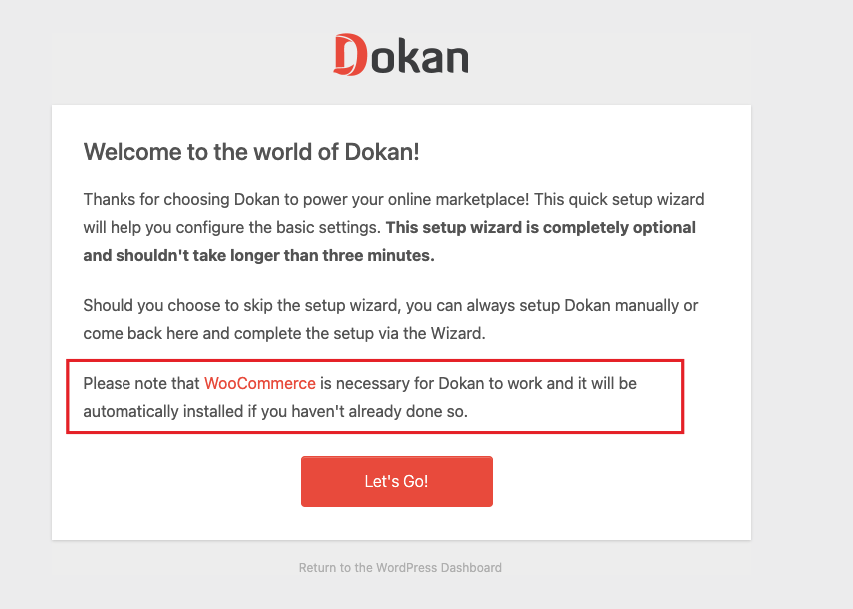
Dokan multivendor will also provide a setup wizard that will help you easily set up your marketplace. Configuring Dokan is very easy by using its own Wizard.
As the Dokan multivendor plugin is powered by WooCommerce, you need WooCommerce to create your marketplace.
The good news is you don’t need to install WooCommerce separately. When you install Dokan, it automatically installs WooCommerce.
If you are still confused, go through the video tutorial on Dokan installation.
Before you install Dokan, you need to configure all the basic WooCommerce settings. So you can read the guide on how to fully customize WooCommerce to configure the plugin correctly.
Step 2: Choose a Dokan Compatible Theme
After installing Dokan, you need to install a Dokan-compatible theme that compliments your cosmetics marketplace.
Although any WordPress theme that is compatible with WooCommerce is also compatible with Dokan, however, Dokan has its own theme “Dokani” that you can use for your convenience.
You can download the Dokani theme.
You can find other themes in WP-Admin –> Appearance –> Themes.

Don’t forget to customize the theme to make it compatible with Dokan multivendor.
Step 3: Configure Dokan General Settings
After installing and activating the Dokan multivendor plugin, now you need to configure all the basic settings. You will find all the settings options at WP-Admin–> Dokan–> Settings.
From here you need to:
- Set up your store terms and conditions
- Create store category (so that vendors can add different categories for their stores )
- Enable payment gateways (more on this in the next part)
- Configure withdrawal methods (more on this in the next part)
- Allow vendors to upload new products
- Create new tags
- Set new product status
You can select the pages for the vendor dashboard, order page, store listing, and terms and conditions page.
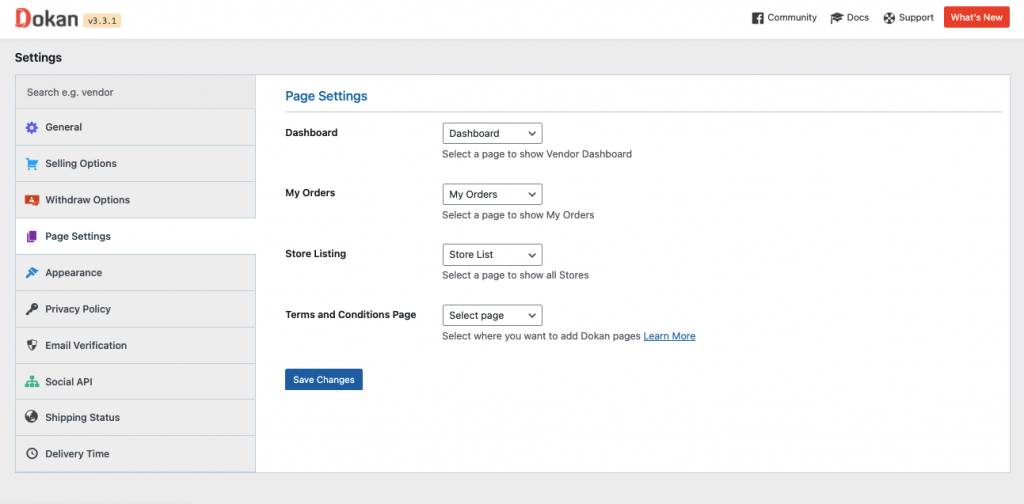
Don’t forget to click the Save Changes button after configuring all the settings. Otherwise, you will lose all your settings.
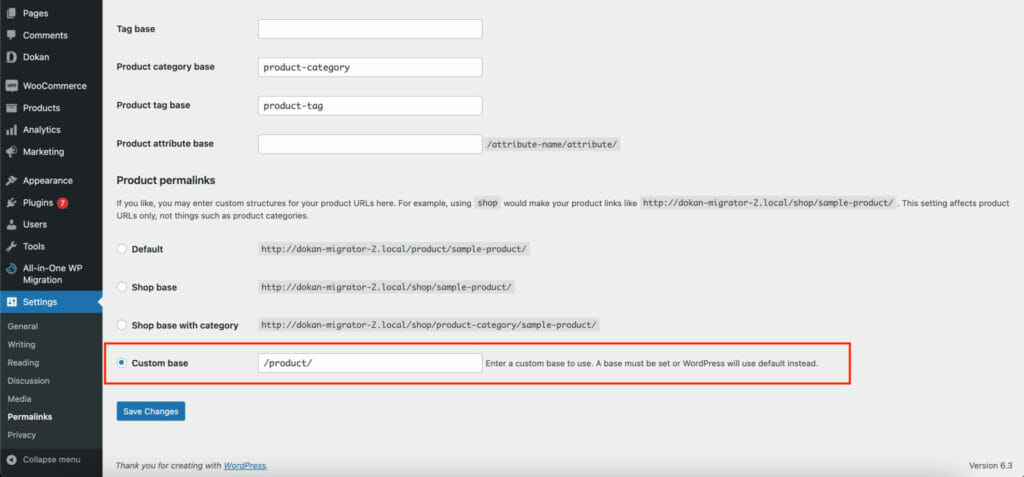
Also, you need to configure your permalink settings as well. Otherwise, you may get a 404 error on certain pages.
Go to WP Admin -> Settings -> Permalinks -> Permalink Settings ->Product Permalinks. Select the check box “Custom Base” for product permalinks and write “/product” on the box.
You have to set your commission rate as well. Go to WP Admin Dashboard -> Dokan -> Settings -> Selling Options -> Admin Commission.
You’ll find different options to insert the percentage or fixed amount. Dokan supports various types of vendor commissions.
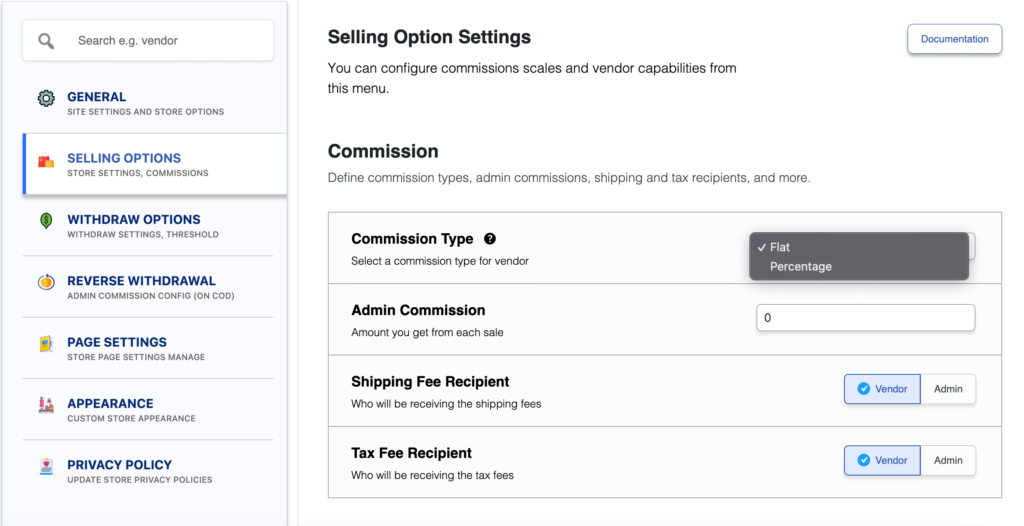
Dokan also enables you to set the category-based commission rate for the vendors. So you can define individual commission rates for different vendors.
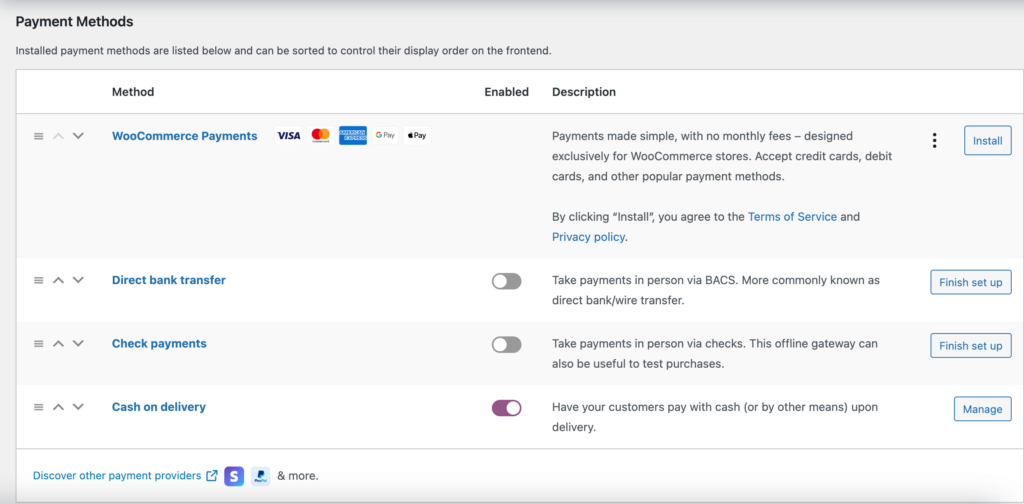
Configure Payment Gateways
The Dokan multivendor plugin supports all WooCommerce-compatible payment gateways. This means you get a wide range of choices to make the transaction process easier on your marketplace.
With Dokan Lite you can use non-adaptive payment gateways like check payments, bank account transfers, cash on delivery, etc. You can install the WooCommerce Payments plugin to get support for credit cards, debit cards, and other payment methods.
However, if you want your marketplace to support adaptive payment solutions like Stripe Connect and MOIP you need to install the Dokan Pro version.
Enable Withdraw Methods
Another important part of running an interactive online marketplace is to ensure a smooth withdrawal system. The Dokan multivendor plugin helps you take care of this section as well.
Go to WP Admin -> Dokan -> Settings -> Withdraw Options. Here you’ll find options to customize the withdrawal method and set the minimum balance a vendor needs to make a withdrawal limit.

You will get more withdrawal options with the Dokan Pro version. Read our official documentation if you require further help to configure other basic settings of Dokan.
Step 4:Install Dokan Pro Version to Add Booking Features
Now, you are done with the basic configurations. Now to add an advanced feature like booking, you need to activate the the Dokan Pro version.
For that, you need to purchase the Dokan multivendor pro version from the Dokan site. You can get the Starter pack to get you started.
You can read this documentation on how to activate the license of the Dokan multivendor pro version after purchasing.
After that, you need to purchase the Dokan WooCommerce Booking extension. However, as it is a WooCommerce integration, you need to activate the WooCommerce Booking Extension beforehand for the extension to work.
Activate and Configure Dokan Booking Extension (+ WooCommerce Booking Extension)
After you have purchased both WooCommerce Booking and Dokan WooCommerce Booking integration, it is time to activate and configure them.
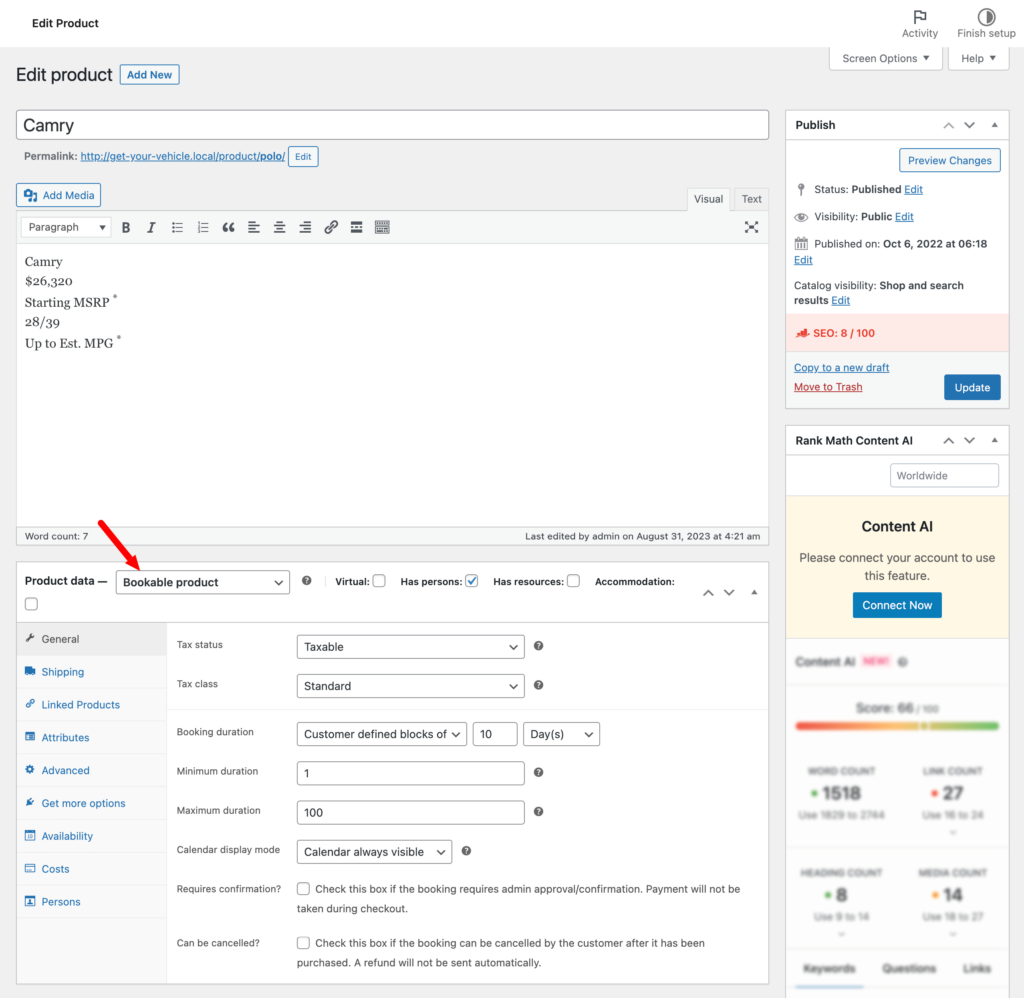
You can read this documentation on how to configure the WooCommerce Booking Extension. The configuration will add the “Bookable Product” option while adding/editing new products from the backend.
As for the Dokan WooCommerce Booking module, you need to go to Dokan–> Modules and activate the module from there.
After that, you and your vendors will find the “Bookable Product” option on the vendor dashboard.
Then add the necessary details regarding the bookable product and finally publish the product.
Learn all about how to create and add bookable products in Dokan from this documentation.
Step 5: Upload Products and Setup Admin Shop
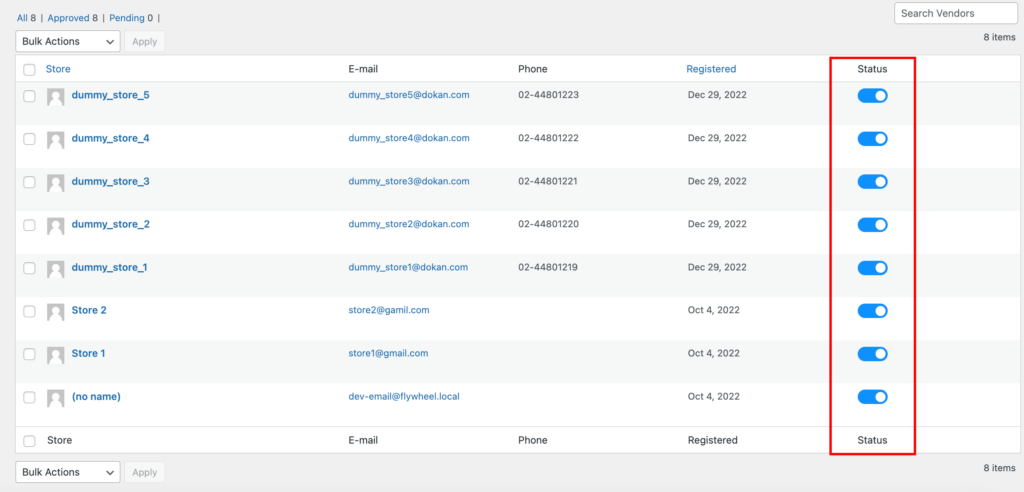
If you want to earn some extra money, you can create your store on your marketplace. All you need to do is enable yourself to sell.
Go to Dokan-> Vendors. There you need to enable selling by toggling the button. You can upload your products by navigating to WordPress Backend -> Products -> Add New.
Remember to choose Bookable Product while choosing the product type.
To upload products from the front end navigate to, WordPress Dashboard -> Visit Site -> Vendor Dashboard -> Booking.
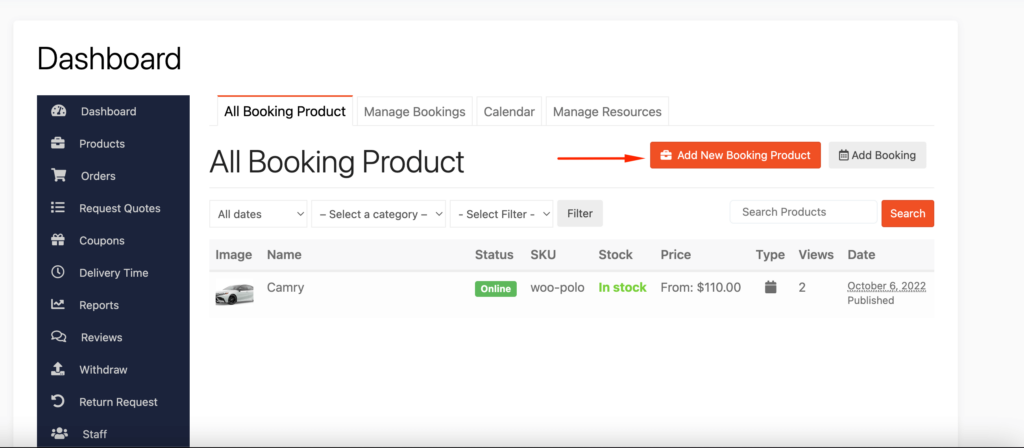
Your registered vendors will upload booking products this way.
Note: This is an optional step. You need to setup your store only if you intend to sell from your marketplace.
Step 6: Allow Vendors to Sign up to Your Marketplace
Now that you have added all the functionalities to your marketplace, you can invite vendors to sign up for your marketplace. To make sure vendors can sign up to your marketplace, enable the “Anyone can register” option from WP Admin–> General–> Settings. So, it will open the default registration form for vendors to sign up.
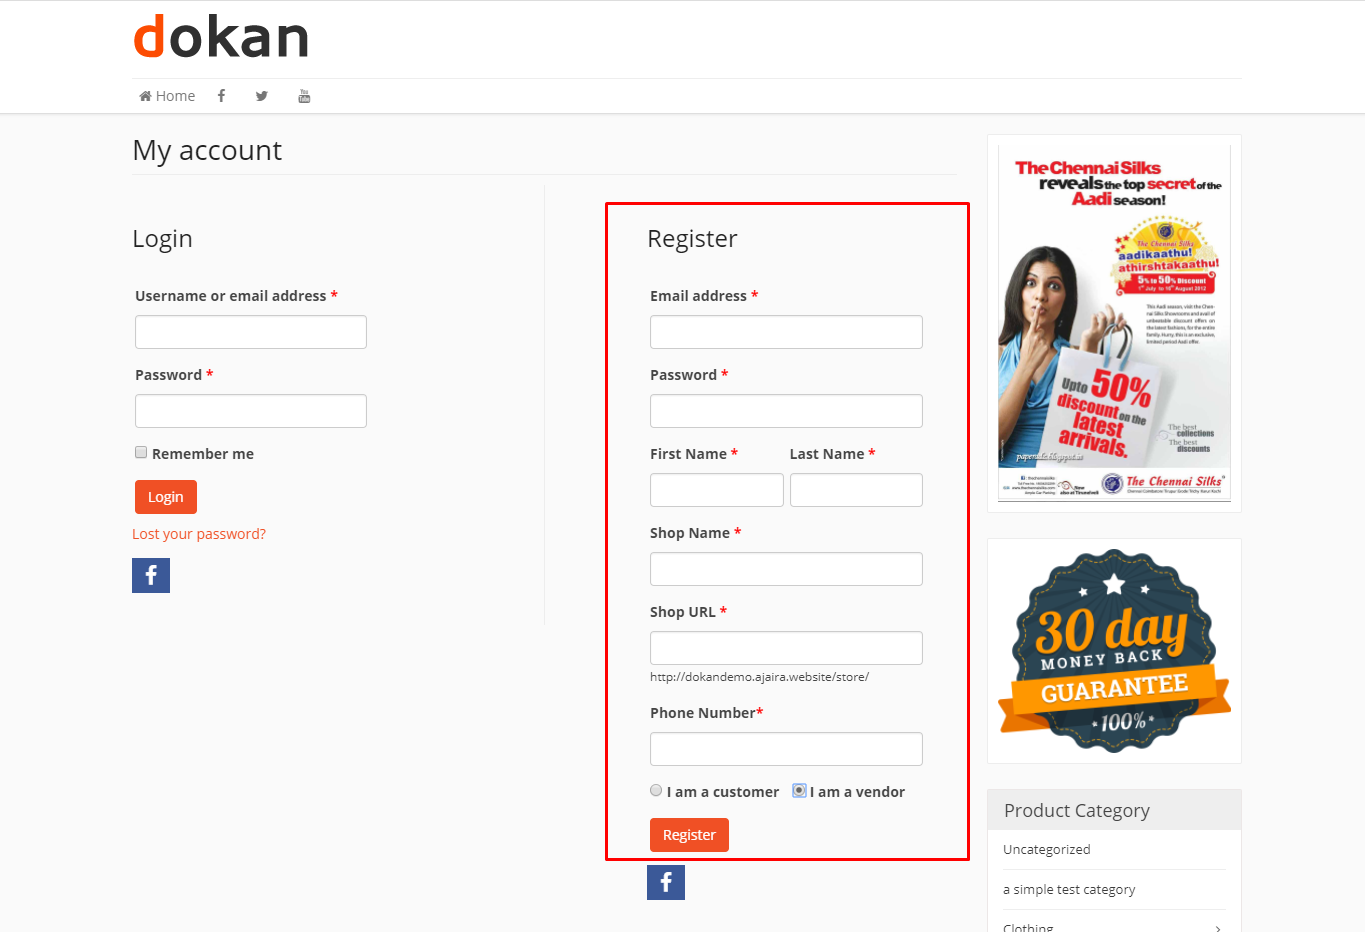
Or you can create customized registration forms with the necessary fields, especially for your marketplace.
For vendors to start selling, you need to enable selling status from Dokan-> Vendors.
Also, if you want the vendors to upload their products, then you need to change the product status from Dokan->Settings-> Selling options. You need to enable the New Vendors Product Upload

You Are Ready to Take Bookings!
Your marketplace is ready. Here is a preview of what your marketplace may look like-
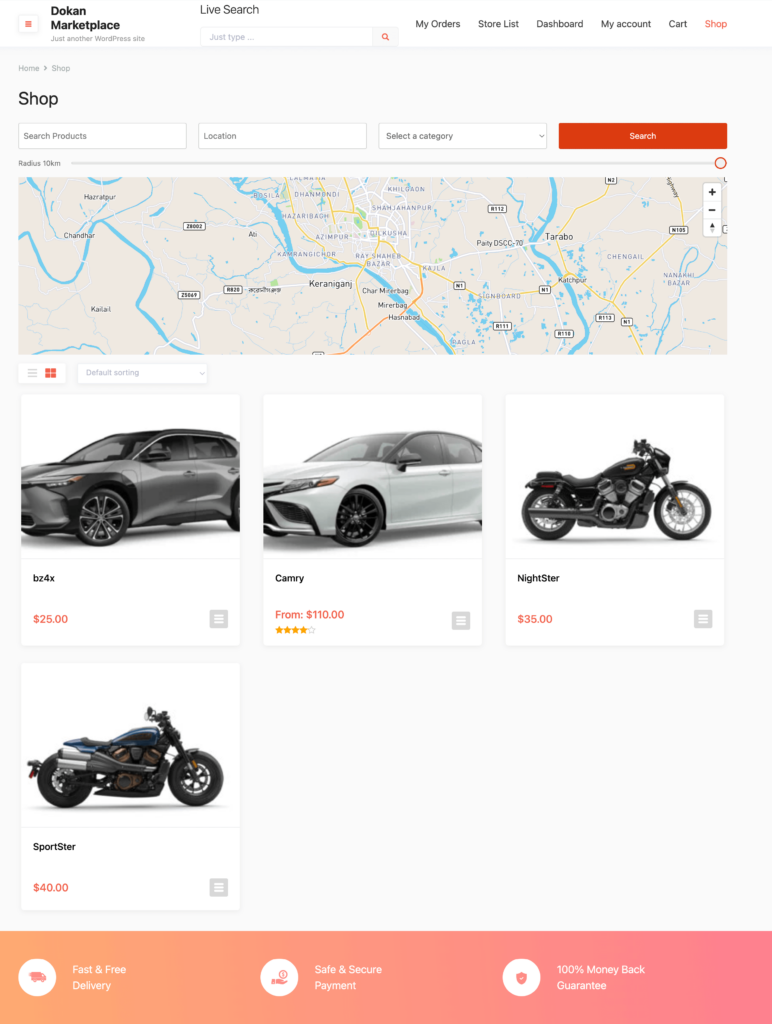
You can see there are some extra features on the homepage of the marketplace including a Search bar and Google Map. We have added some advanced features to make the marketplace look more professional.
We will discuss more on the features in the next section.
Don’t forget to add and install some other plugins like security plugins, and caching plugins to run your marketplace smoothly.
Use Dokan Modules to Make Your Marketplace Standout from The Crowd
As you are using the Dokan Pro version, why not take full advantage of it? The Dokan multivendor has some amazing modules along with features that will help your bike and car rental marketplace to life.
Here are the modules you need to use to add the advanced functionalities required for a booking marketplace-
Dokan Live Search Module
As we said earlier, live search is an important part of any marketplace. Customers can easily find the car or bike they are looking for and see if that vehicle is available for rental.
Using the Dokan Ajax Live Search module, you can easily a regular search bar into a live search bar.
Just go to the Dokan–> Modules section and activate the Dokan Ajax Live search module. Then you need to configure the module to add a search bar on your marketplace.
You can read the guide on how to configure the Dokan Ajax Live Search Module.
Geolocation
In the case of a rental/booking marketplace, location matters. Customers would want to book a car or a bike from a store that is located near them. The Geolocation module of Dokan will help you add the location of every store.
Customers can find stores based on location and book their vehicles from nearby stores. Just go to the Dokan–> Modules section to activate the Dokan Geolocation module and configure it.
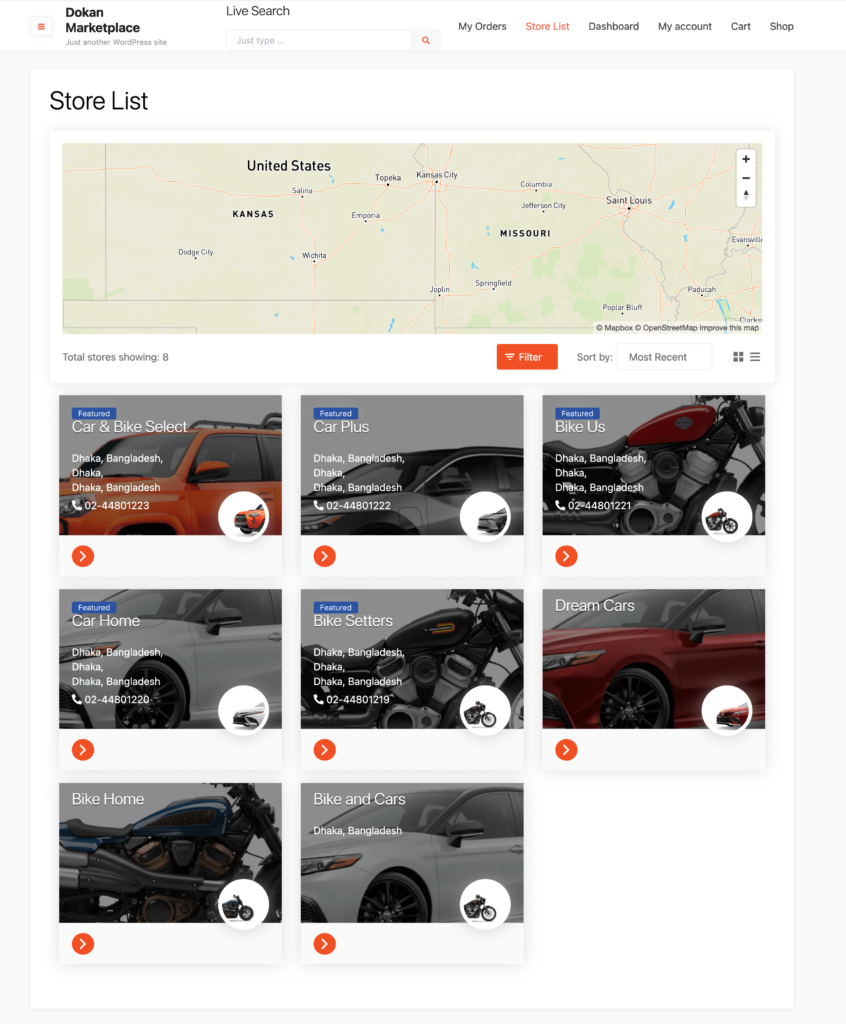
Read the guide on how to configure the Dokan Geolocation module.
Dokan Multivendor Live Chat
The Dokan Live Chat module will help you add a live chat option to your marketplace. The module has integrations with Tawk.to, TalkJs, WhatsApp, and Facebook. That means you can use these platforms to integrate your live chat and talk with your customers directly.
Activate the module from Dokan–> Modules and configure it to use it on your marketplace.

Read this guide on how to configure the Dokan Live Chat module.
Dokan SEO Tools
Doka has integration with two of the most popular WordPress SEO plugins, Rank Math and Yoast SEO.
For Yoast SEO you don’t need to activate any module as it has direct integration with Dokan multivendor. All you need is the Yoast SEO plugin.
But if you are using the Rank Math plugin, then you need to activate the Rank Math module of Dokan. Then you can configure the module and make your marketplace SEO-optimized.
You can read this guide on how to configure the Rank Math SEO module.
Dokan Combined Commission System
In the tutorial, you have already seen that you can use flat and percentage commission types. But the Dokan pro version lets you use the combined commission type as well.
That means you can charge both the flat and percentage commission types together.
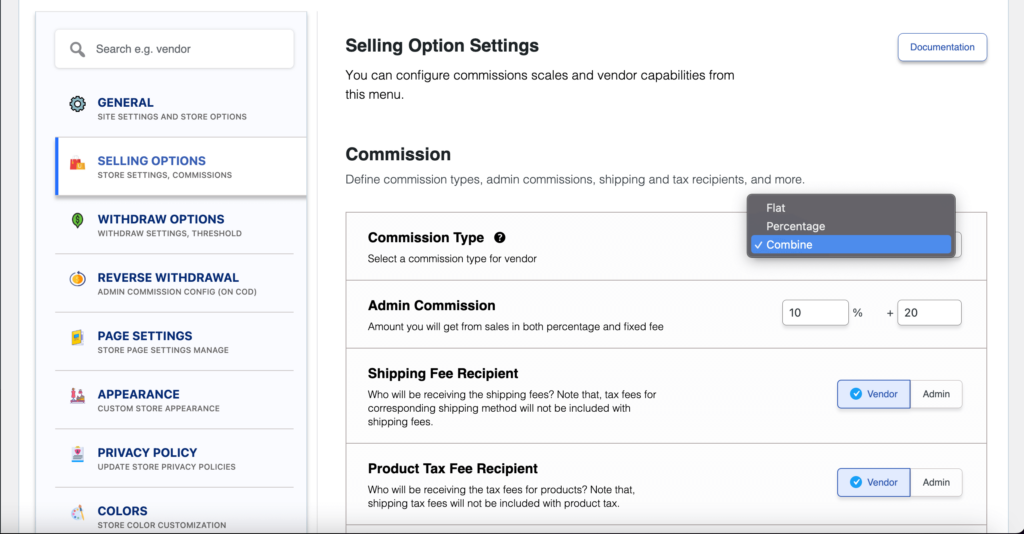
You can configure this commission type by reading the guide on combining commission types.
Dokan Vendor Review
Give the customers the option to add ratings and reviews to the vendor store by adding the vendor review feature. The Dokan Vendor Review module will help you do that.
Just activate the module from Dokan–> Modules and configure the settings so that customers can add reviews to the vendor’s store.
Here is the guide on how to configure the Dokan Vendor Review module.
Integration with Popular Payment Gateways
Other than the default payment gateways, Dokan has integration with other popular payment gateways. You can use PayPal Marketplace, Stripe Express, WireCard, Mangopay, and RazorPay to accept payments from customers.
You can activate these payment gateways from Dokan–> Modules. Then configure them to add these integrations to your marketplace.
Bonus: The Cost of Creating a Bike & Car Rental Marketplace with WordPress
Here is a rough estimate of what it would cost to start a bike and car rental marketplace using WordPress-
| Items | Pricing/Year |
| Domain | $9/year |
| Hosting | $25-$50/year |
| WooCommerce | $0 |
| Dokan | $0 |
| WooCommerce Booking Extension | $249/year |
| Dokan Starter | $149/year |
| Dokan Booking Module | $49/year |
| Marketing-Advertisement | $500-$1000/year |
| Total Pricing Starts | $982/year |
The costs may vary depending on how much you want to spend on development and marketing.
Create Your Dream Marketplace Today!
If you have zero knowledge of WordPress, then you may struggle with starting your own car and bike rental marketplace. So, it is better to have some basic knowledge of WordPress before starting.
And when it comes to creating a booking marketplace, you may face challenges while setting up the booking options and conditions. So we suggest you read through the documentation very carefully.
But if you still struggle then you can take the help of our support team. This is a dedicated team that will help you set up and manage your marketplace quite easily for you.
And if you have any questions, don’t forget to write them in the comments section.
Subscribe to
Dokan blog
We send weekly newsletters, no spam for sure!


Leave a Reply