

If you want to build an online clothing marketplace, you are in the right place. We are going to show you how to build an online clothing marketplace using WordPress and Dokan multivendor plugin in 5 easy steps.
The buying patterns of consumers have dramatically changed nowadays. People now feel more comfortable buying online rather than visiting different stores physically by wasting time and energy. As a result,
It is expected that by the end of 2025, the global fashion eCommerce market could reach just over 1.2 trillion U.S. dollars.
If you want to take a small slice from this pie and earn your bread and butter through the online clothing business, it’s high time to kickstart your business. And to help you in this journey, today, we are here with this tutorial. So, let’s begin the show!
Online Fashion Industry- Growth and Opportunities in 2023 and Beyond
Fashion is constantly evolving. Digital innovation, rising globalization, and changes in consumer spending habits have significantly impacted the fashion industry.
More people than ever are using online retailers for their fashion purchases. The amount of revenue created by those people has allowed businesses to grow and is now integral to their success.
Statistics show that eCommerce is now an essential tool for the fashion industry. In 2018, the industry generated worldwide revenue of $481 billion. In 2023, the global fashion eCommerce market is forecast to reach a value of over 820 billion U.S. dollars.
By 2027, it could reach just over 1.2 trillion U.S. dollars.
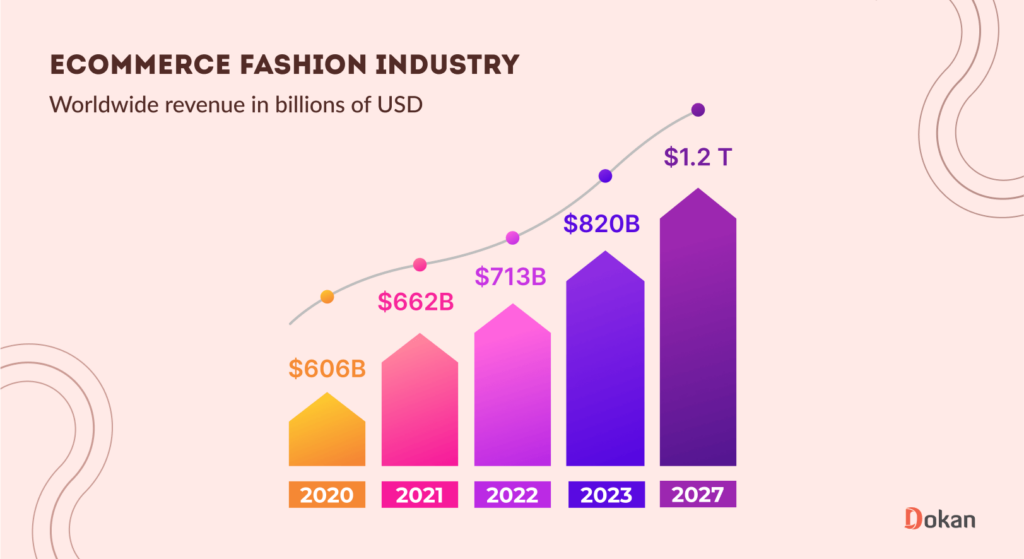
This is the picture of the whole eCommerce fashion industry. Now if we zoom in on the eCommerce clothing segment, we will see this is the most profitable segment followed by the shoes, bags, and jewelry segment.
After seeing all these data, it’s safe to say that there is certainly growth and opportunities for you in the online clothing business.
How to Build an Online Clothing Marketplace Using WordPress- 5 DIY Steps
Creating an online clothing marketplace is super easy. You don’t need to be a tech-savvy person to create your own marketplace if you’re using WordPress.
Also, WordPress offers eCommerce solutions like WooCommerce and marketplace solutions like Dokan multivendor plugin to turn any WordPress website into an online marketplace.
On top of that, WordPress lets you launch your marketplace with the minimal possible budget. So, let’s check out how you can build your own online clothing marketplace using WordPress.
Prerequisites to Building an Online Clothing Marketplace
To build a multivendor marketplace, the only prerequisite you’ll need to make sure is a live WordPress website.
If your WordPress website isn’t ready yet, nothing to be worried about. You can create a WordPress website by following these steps:
- Buy a domain name and a hosting plan
- Install WordPress on your cPanel
That’s all! We have a series of blog posts to get these things done. So, follow these blogs if you need any help:
- How to Choose The Best Domain Name for eCommerce Website
- Get the Best WooCommerce Hosting to Keep Your Site Performance High
- How to Install WordPress
After ensuring a live WordPress website, now follow these 5 steps to get your clothing marketplace ready:
- Install and Activate the Dokan Multivendor Plugin
- Install a Dokan Compatible Marketplace Theme
- Configure Dokan Basic Settings
- Upload Products and Setup Admin Shop
- Allow Vendors to signup
Now let’s get started with the tutorial:
Step 01: Install and Activate the Dokan Multivendor Plugin
Installing the Dokan plugin is as simple as installing other WordPress plugins.
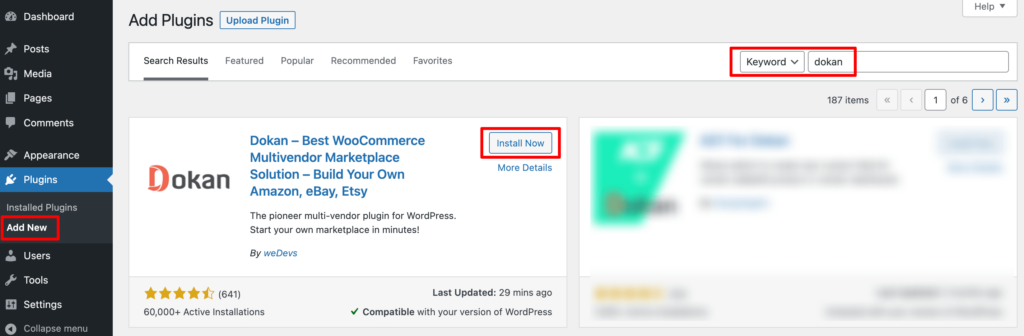
To install Dokan right from your dashboard, navigate to your WordPress dashboard -> Plugins -> Add new.
Then type the plugin name- “Dokan” in the search box and install the plugin from the search result.
After installing the plugin, click on the Activate button to activate the plugin.
After activating the plugin, follow Dokan Wizard to complete the configuration. It’s a very easy process. Then again you can follow this video on Dokan installation if you face any kind of hassle.
Note: If WooCommerce has already not been installed on your site, you don’t have to install WooCommerce separately. Because when you install Dokan, it will automatically install WooCommerce.

If you find it difficult to configure the Dokan plugin, you can watch our video on the Dokan installation guide.
Step 02: Install a Dokan Compatible Marketplace Theme
You can use any WooCommerce-compatible theme for your website. And by default, any theme that is compatible with WooCommerce is compatible with Dokan as well.
However, we recommend using the “Dokani” theme with the Dokan plugin. Because this theme is dedicatedly designed to use the Dokan plugin.

The Dokani theme isn’t available on WordPress.org. You have to download the Dokani theme from the weDevs website and install it from your WordPress dashboard.
Navigate to your WordPress dashboard -> Appearance -> Themes –> Add New, then click on the “Upload Theme” option to upload and install a theme.
Or, you can search and install your preferred WooCommerce theme from your WordPress dashboard -> Appearance -> Themes -> Feature Filter as well.

That being said, if you want to use any third-party premium theme for your marketplace, you can do that as well. Just check our handpicked list of the most-suited marketplace themes for Dokan multivendor and choose a theme for your marketplace.
Step 03: Configure Dokan Basic Settings
After installing and activating Dokan, now you need to configure all the basic settings. You will find all the settings options at WP-Admin -> Dokan -> Settings.
From here you need to:
- Set up your store terms and conditions
- Create store category (so that vendors can add different categories for their stores )
- Allow vendors to upload new products
- Create new tags
- Set new product status
You can select the pages for the vendor dashboard, order page, store listing, and terms and conditions page.

Don’t forget to click the Save Changes button after configuring all the settings. Otherwise, you will lose all your settings.
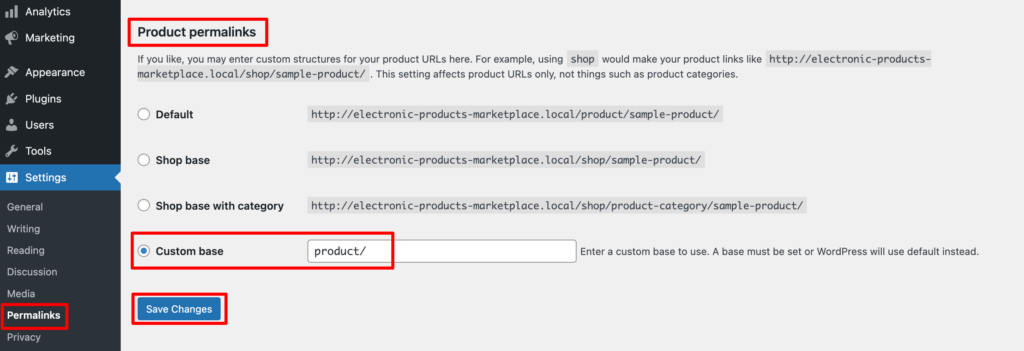
Also, you need to configure your permalink settings as well. Go to WP Admin -> Settings -> Permalinks -> Product Permalinks.
Select the check box “Custom Base” for product permalinks and write “/product” on the box.
Step 04: Upload Products and Setup Admin Shop
Dokan multivendor solution lets you sell as a vendor from your own marketplace. That means as an admin of your marketplace, you’ll get commissions from your registered vendors, and also you’ll have the chance for income by selling products from your store as an admin.
If you want to sell products as a vendor, you should follow this part. Otherwise, you can skip this step.
All you need to do is enable yourself to sell.
Go to Dokan -> Vendors. There you need to enable selling by toggling the button.

After enabling your selling capability, go to your WordPress dashboard -> Products -> Add New.
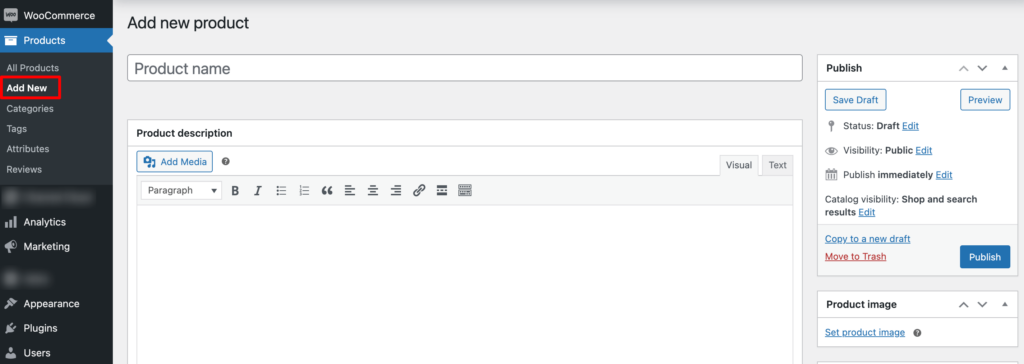
There you’ll find options to add product names, descriptions, images, categories, tags, and a few more options.
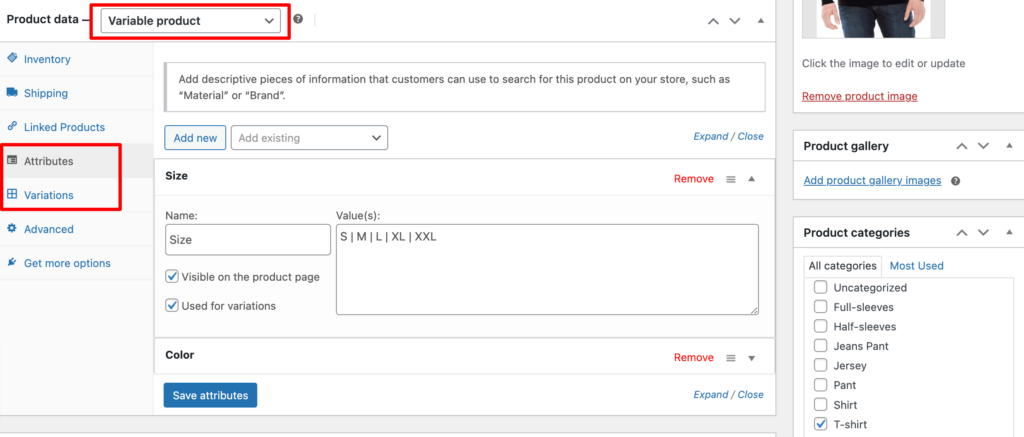
Since it’s a clothing marketplace, you have to add variable products. If you don’t know what is a variable product, let us explain it to you.
Let’s assume you or your vendor want to add a t-shirt with different sizes like S, M, L, XL, etc., and colors like Green, Black, White, Pink, etc. This is called a variable product.
Include various attributes and variations of the products by selecting the Variable product. You’ll find the options just under the Product description.
When you are done, just click on the “Publish” button to make this product publicly available.
You can also upload products from the front end.
Important Note: If you want to upload variable products from the front end, you have to upgrade your plan from the Dokan free to Dokan premium. Also, your registered vendors will only get the option to upload products from the front end. So, you need to use the premium version to make the process easier for everyone.
It’ll take only a few minutes to upgrade to the premium version. You can check our documentation on Dokan Pro installation to get your job done with ease.
Now navigate to WordPress Dashboard -> Your site name -> Vendor Dashboard -> Products. Then click on “Add new product” to upload products from frontend. Your registered vendors will upload products this way.
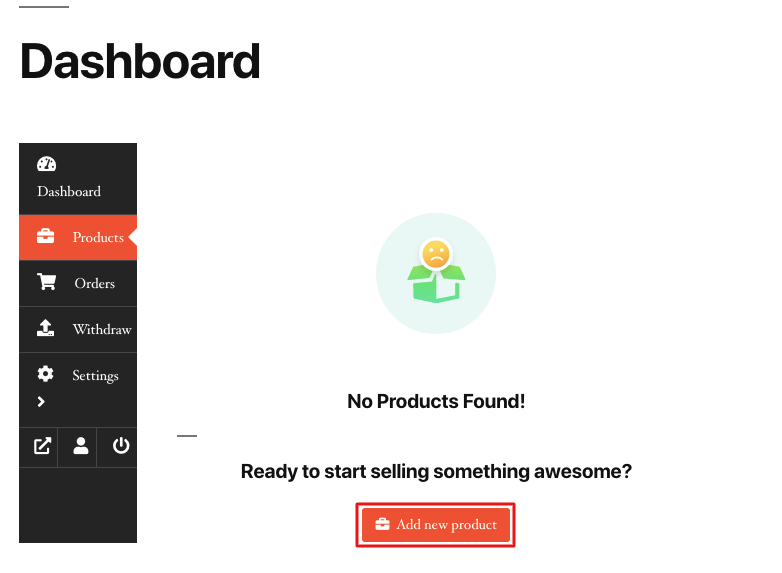
After clicking the “Add new product” button, you will be redirected to a new interface. There you’ll find a few options like product name, gallery, category, tags, and description to add your products.
Since it’s a variable product, you don’t need to set the price here.
If you didn’t create Categories and Tags before, you won’t be able to add Categories and Tags from here.
To assign a category and different tags from the frontend, you have to create categories and tags from the backend. So, navigate to your WordPress dashboard -> Products -> Categories to add new categories.
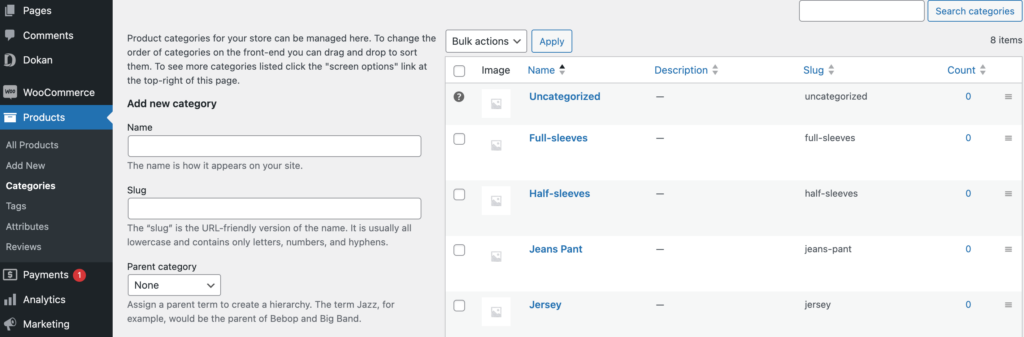
In the same way, go to your WordPress dashboard -> Products -> Tags to add new tags.
After inserting all the information, hit the “Create product” option.
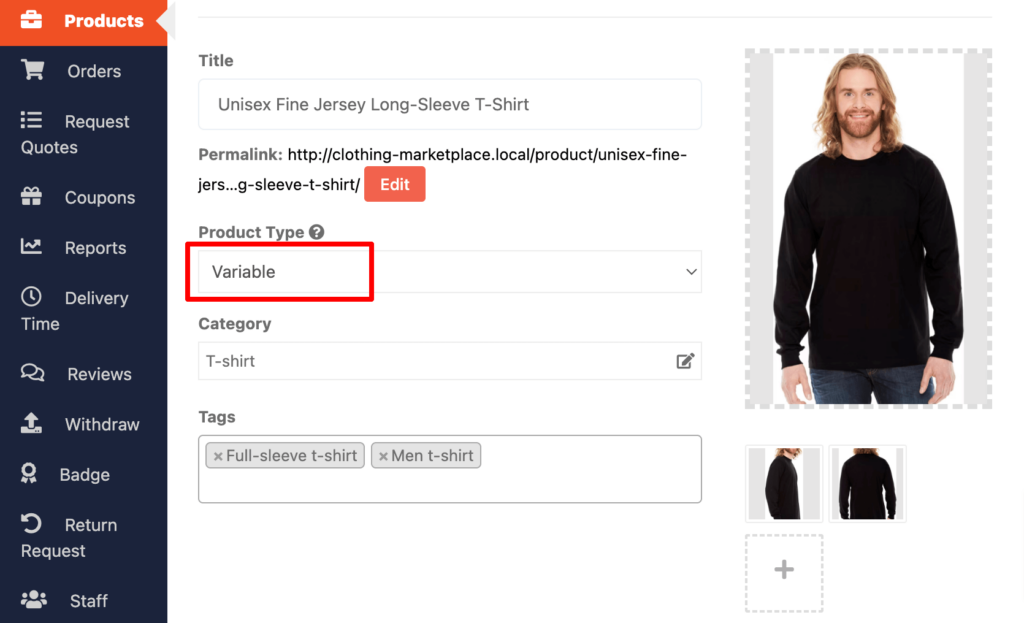
Now you will be taken to a new interface, where you have to add a few more information for your newly added product.
The first thing that you need to do is to set this product type as a variable product. You can do it from the drop-down list.
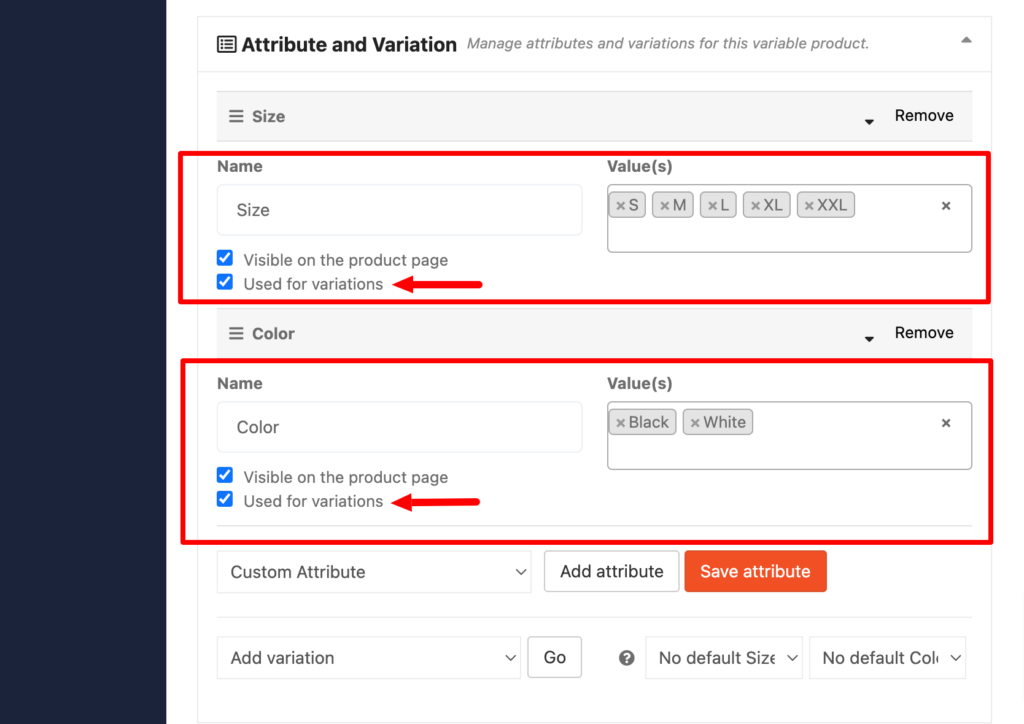
Now scroll down a bit and you’ll get the attribute and variation option. Click on Add attribute to add different attributes. Give a Name to your attribute, add Values for the attribute, tick the Used for Variations box, and then hit the Save attribute to complete the process.
Then you need to add variation. You will get the “Add Variation” right after the Attribute option. Press the Go button and you’ll get options to add variations.
Here we have added a variation with S (small size), Any Color, and a $9.99 selling price. That means Any Color for Small size T-shirt will cost $9.99 to buy.
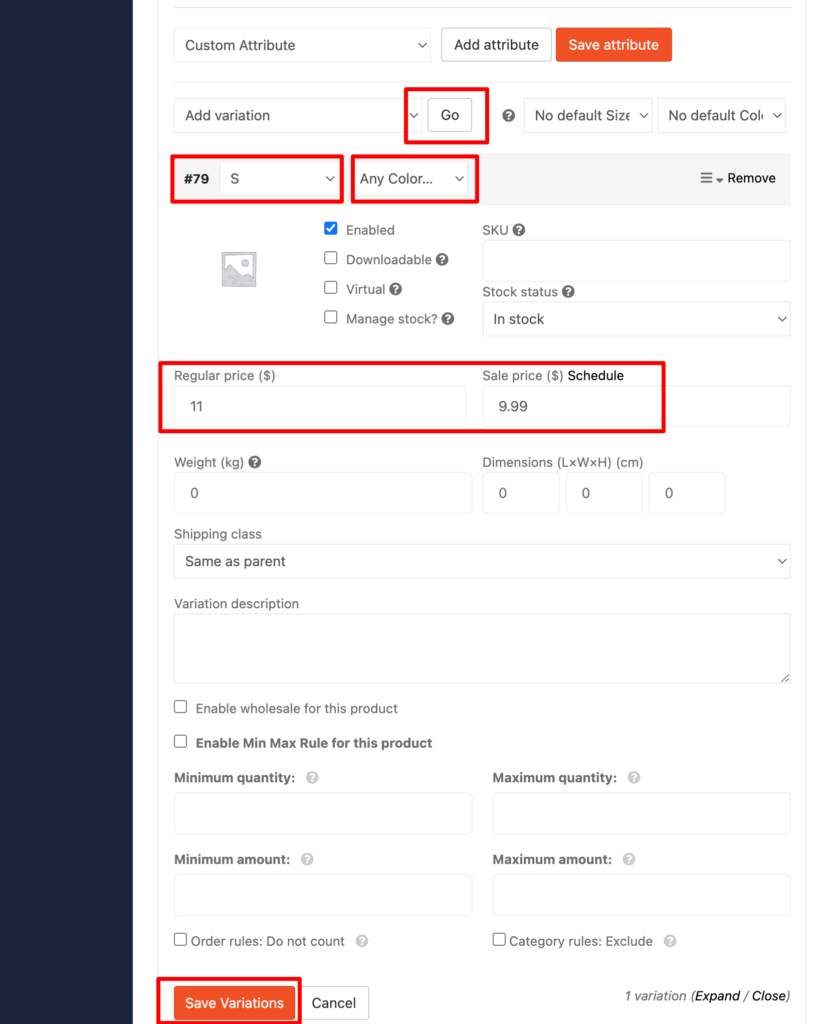
You can set different prices for the different colors of the same T-shirt. Just don’t forget to click the “Go” button every time you want to add a different variation. Follow the below screenshot.
Here we have set different prices for the different colors of the same M (medium size) T-shirt.
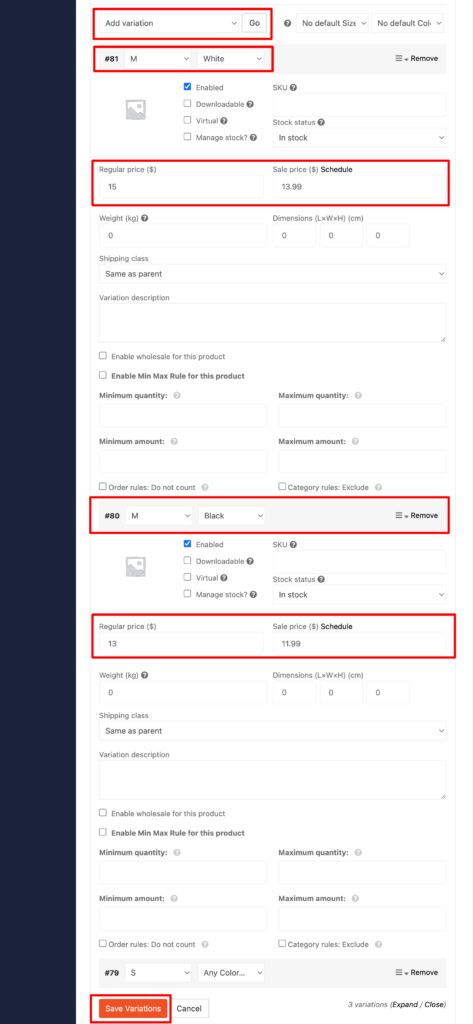
After adding variations, hit the “Save Product” to save all the changes.
Now if you visit the Products tab, you’ll find all of your newly added products are with pending status. Because the admin needs to approve these products to make them public.
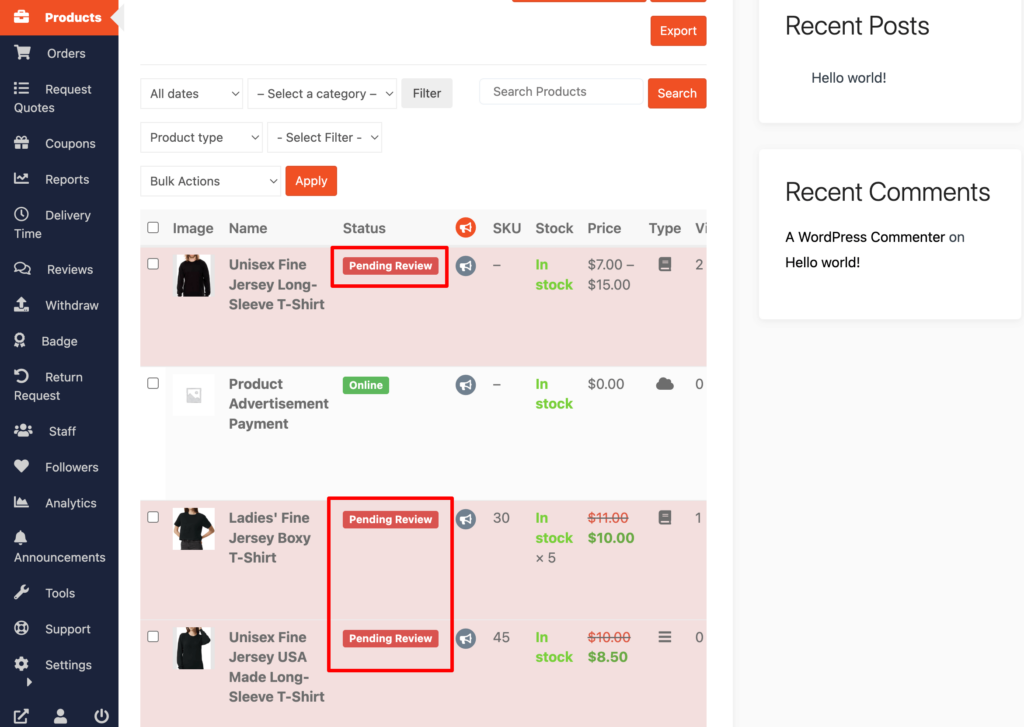
Now as an admin, visit your backend and approve these products to make them public. Click on the Products option, then click on the Quick Edit. There you will find the Status option. Choose the Published option and click the Update button to approve and publish the pending products.
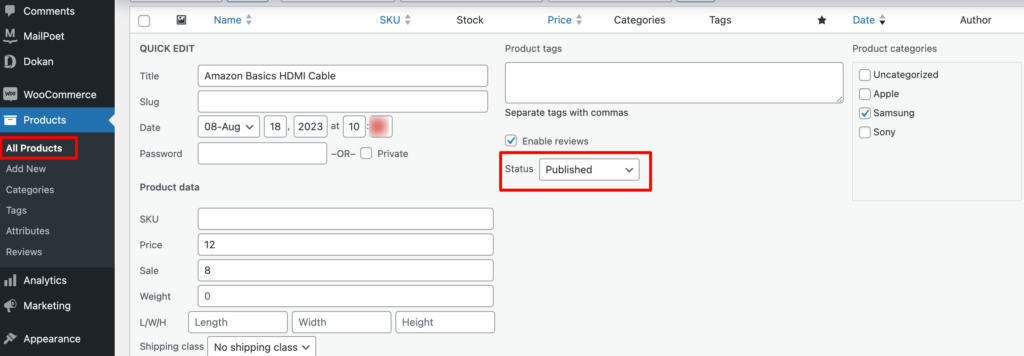
That’s how you can add and publish products to your admin shop.
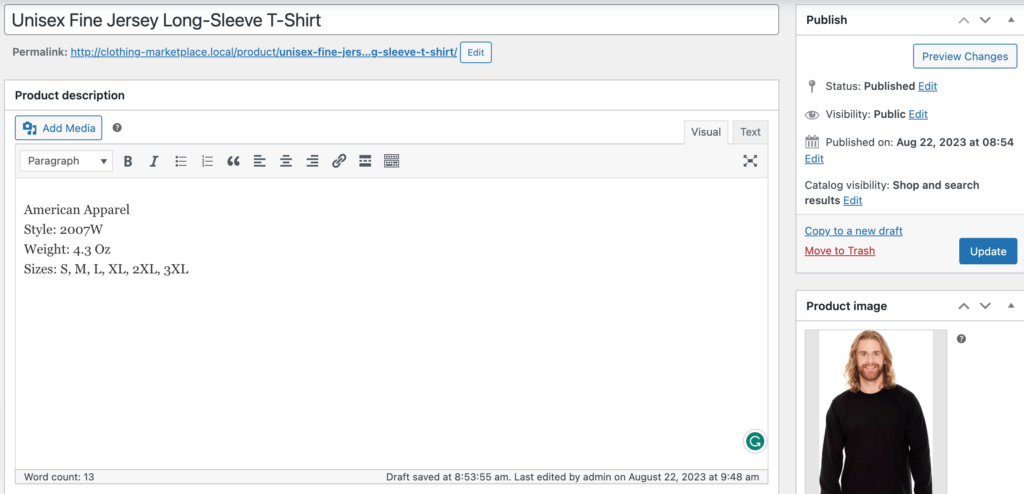
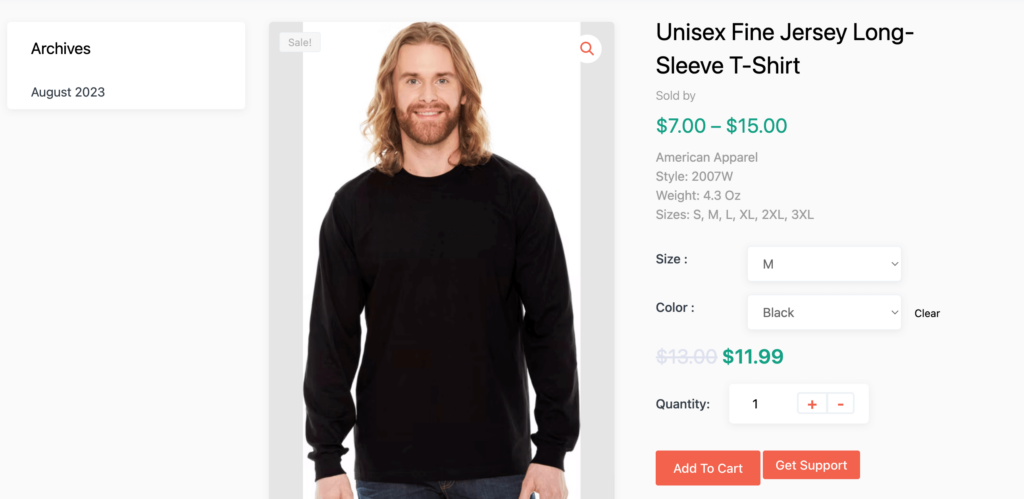
Here is the product preview that we have just added:
You can customize your store design by going to Vendor Dashboard -> Settings. From here you can update your store name, address, opening & closing time, etc.
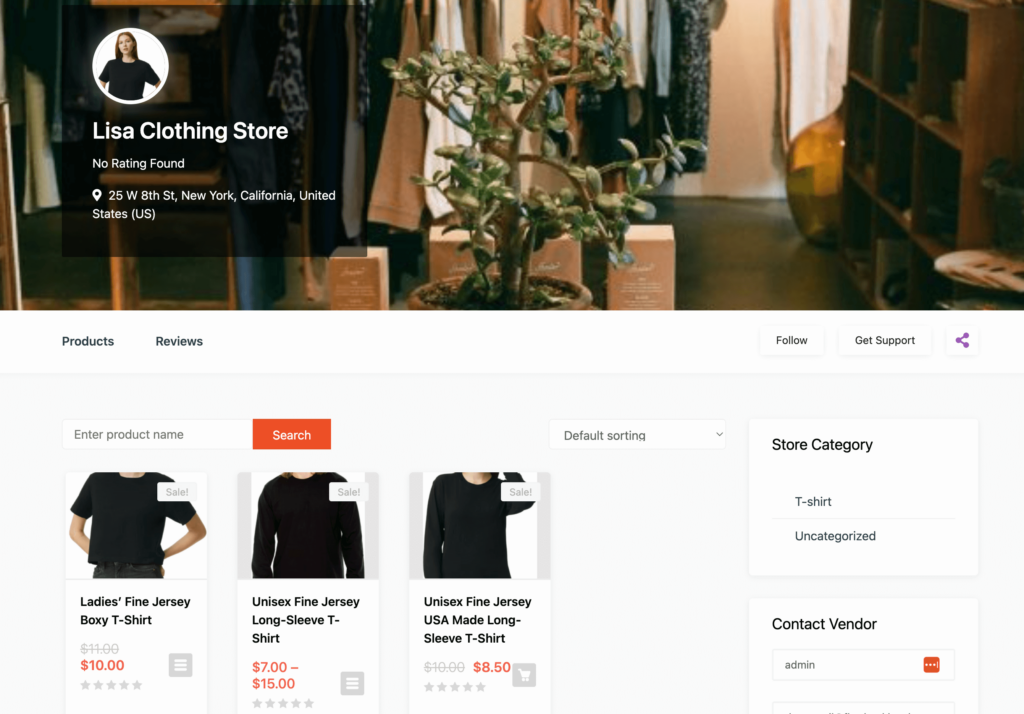
Here is the frontend view of your newly created store:
Step 05: Allow Your Vendors to Sign up and Start Selling
Now that you have added all the functionalities to your marketplace, you can invite vendors to sign up for your marketplace.
To make sure vendors can sign up for your marketplace, enable the “Anyone can register” option from WP Admin -> General -> Settings.
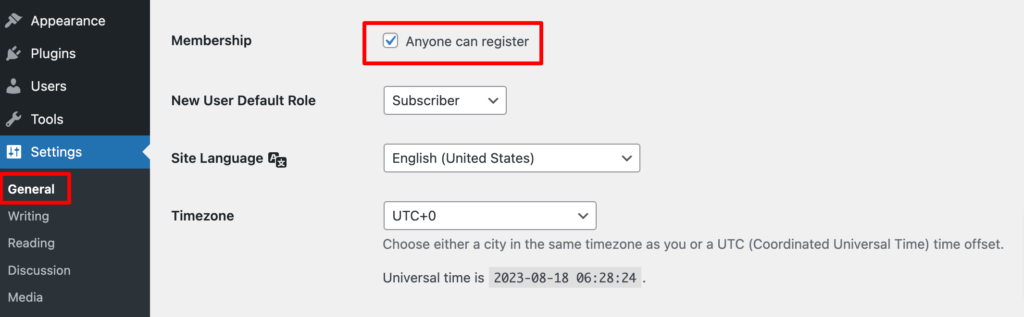
So, it will open the default registration form for vendors to sign up.

Or you can create customized registration forms with the necessary fields, especially for your marketplace.
For vendors to start selling, you need to enable selling status from Dokan -> Vendors.

Also, if you want the vendors to upload their products, then you need to change the product status from Dokan -> Settings -> Selling options.
You need to enable the New Vendors Product Upload.

Now navigate to your WordPress dashboard then click on the Visit Stores to check all the registered stores on your clothing marketplace.

Once approved by the admin, vendors gain the freedom to create their own stores with unique URLs. Dokan also provides each vendor with an individual vendor dashboard, empowering them to effortlessly upload, manage, and successfully sell their products.
The store customization process for vendors is the same as we’ve shown above for an admin. From the frontend dashboard, a vendor can easily set up his shop.
Bonus: Configure Your Marketplace to Ensure a Smooth Vendor Journey
After allowing vendors to sign up for your marketplace, now it’s time to configure some rules for them like commission rate and withdrawal system. First, let’s discuss the commission rate then we will configure the withdrawal system.
a) Define Commission Rate from Vendor Sales
As an admin or marketplace owner, you will get a commission every time a vendor sells a product from his store. Now, you need to set up a commission rate that you want to get from each sale.
To set the commission rate go to WP Admin Dashboard -> Dokan -> Settings -> Selling Options -> Admin Commission.
Here you’ll find different options to insert the percentage or fixed amount. Dokan supports various types of vendor commissions.

Dokan also enables you to set the category-based commission rate for the vendors. So you can define individual commission rates for different vendors.
b) Configure the Universal Payment and Withdrawal System for Vendors
Dokan supports all WooCommerce-compatible payment gateways. This means you get a wide range of choices to make the transaction process easier on your marketplace.
With Dokan Lite you can use non-adaptive payment gateways like PayPal, bank account transfer, cash on delivery, etc. The Pro version supports adaptive payment solutions like Stripe Connect and MOIP.
Another major concern of running an interactive online marketplace is to ensure a smooth withdrawal system. Dokan helps you take care of this section as well.
Go to WP Admin > Dokan > Settings > Withdraw Options. Here you’ll find options to customize the withdrawal method and set the minimum balance a vendor needs to make a withdrawal limit.

You’ll find a lot of customization options with Dokan multivendor to make your marketplace feasible for both vendors and customers.
Online Clothing Marketplace FAQs
We have made a list of the most common FAQs about online clothing marketplace and answered them in this section. So, check this segment to know what most people want about the online fashion marketplace.
How do I start selling clothes online?
You can start selling clothes online by launching an eCommerce store. Determine which clothes you will sell, add the products to your website, and set up your payment portal so customers can make and pay for purchases.
Or, you can register in an online clothing marketplace, and start selling products from there.
Online clothing store vs. marketplace- which one is profitable?
Both are profitable, but both have some differences. If you have an online clothing marketplace, you can earn two ways. For example, you can sell as a vendor from your own marketplace. Also, you can earn commissions from your vendors. So, creating and selling from an online marketplace is more profitable than selling from an online store.
Why do most clothing brands fail?
One of the main reasons why retail brands fail is because they’ve launched poor-quality products that customers aren’t willing to pay for. Also, high prices, slow-loading websites, bad delivery processes, etc. can be the reason for unsuccessful clothing businesses.

Ready to Create Your Own Online Clothing Marketplace Now?
Now you know how to build clothing marketplaces. So what are you waiting for? Jump into the building process of an online clothing marketplace and become a successful entrepreneur with your hard work and creativity.
Sometimes it takes a bit longer time to be successful with the plan, but don’t lose hope. Because the fashion industry is a pretty big industry and already there are established brands available.
At the same time every year, the number of online shoppers is getting insanely high. So, keep working hard, and you will be successful for sure.
Having said that if you face any kind of problems while building your own online clothing marketplace, don’t hesitate to let us know through the comment box below. We would love to help you out at your earliest convenience. Good luck!
You can also check:


Leave a Reply