People who prefer to eat more healthily are looking to buy fresh groceries directly from the farm. But that is not possible. So what is the next best alternative? Buying groceries from online stores or marketplaces selling organic and fresh produce.
That is why online grocery marketplaces have become so popular. Maybe these stats from Statista will help you get a clear picture-
- The Grocery Delivery market worldwide is set to achieve a staggering revenue of US$785.60bn by the end of year 2024.
- This market is expected to display a compound annual growth rate (CAGR) of 11.80% between 2024 and 2029, resulting in a projected market volume of US$1,372.00bn by 2029.
As this is a popular niche, we have already covered how to create an online grocery marketplace using Dokan Multivendor marketplace plugin. But today we will show you how you can add the delivery feature to your grocery marketplace as the use of grocery delivery services in 2024 has risen by 56% compared to 2022 and it is an upward trend.
Along with Dokan, we are going to use the Dokan Delivery Driver plugin and app as well.
Let’s get started-
How to Start an Online Grocery Delivery Marketplace
With the help of Dokan multivendor, you can turn that eCommerce store into a multivendor marketplace with a few clicks. And to add the delivery feature to your marketplace, you can use the Delivery Driver plugin and app.
With this plugin and app, you can assign drivers to transport vendor goods from
vendor pick-up points right to customer doorsteps. You can track the live location of the drivers to track orders, and driver verification, and most of all, it is compatible with WooCommerce as well. The app supports both IOS and Android so, you don’t worry about device support.
Want to know more about the features of this platform? Read our guide on the features of Dokan Delivery Driver.
Now, lets see how you can build an online grocery delivery marketplace.
What You Need To Set Up an eCommerce Marketplace
To start an eCommerce marketplace, you need the following items:
- Domain and Hosting
- A WordPress Site
- WooCommerce
- Dokan Multivendor Marketplace Solution
- Dokan Delivery Driver Plugin and App
- A Compatible Dokan theme
To keep the development process easier, we’re assuming that you’ve already both domain-hosting and configured your WordPress site. Also, you need to configure WooCommerce as well.
You can read the guide on how to fully customize WooCommerce to configure the plugin correctly.
Now you need to follow these steps to create your online marketplace,
- Install & Activate the Dokan Multivendor Marketplace
- Install a Dokan Compatible Theme
- Configure the General Setting of Dokan Multivendor
- Upload Products and Setup Admin Shop
- Allow Vendors to Register
Step 1: Activate Dokan to Create Your Multivendor Marketplace
After configuring WooCommerce, you need to install Dokan to create a multivendor marketplace for your products.
Installing Dokan multivendor is as simple as installing any other WordPress plugin.
You can install the plugin from the WordPress dashboard by,
- Navigating to Admin Dashboard -> Plugin-> Add New-> Click the search
- Type Dokan -> Install -> Activate.
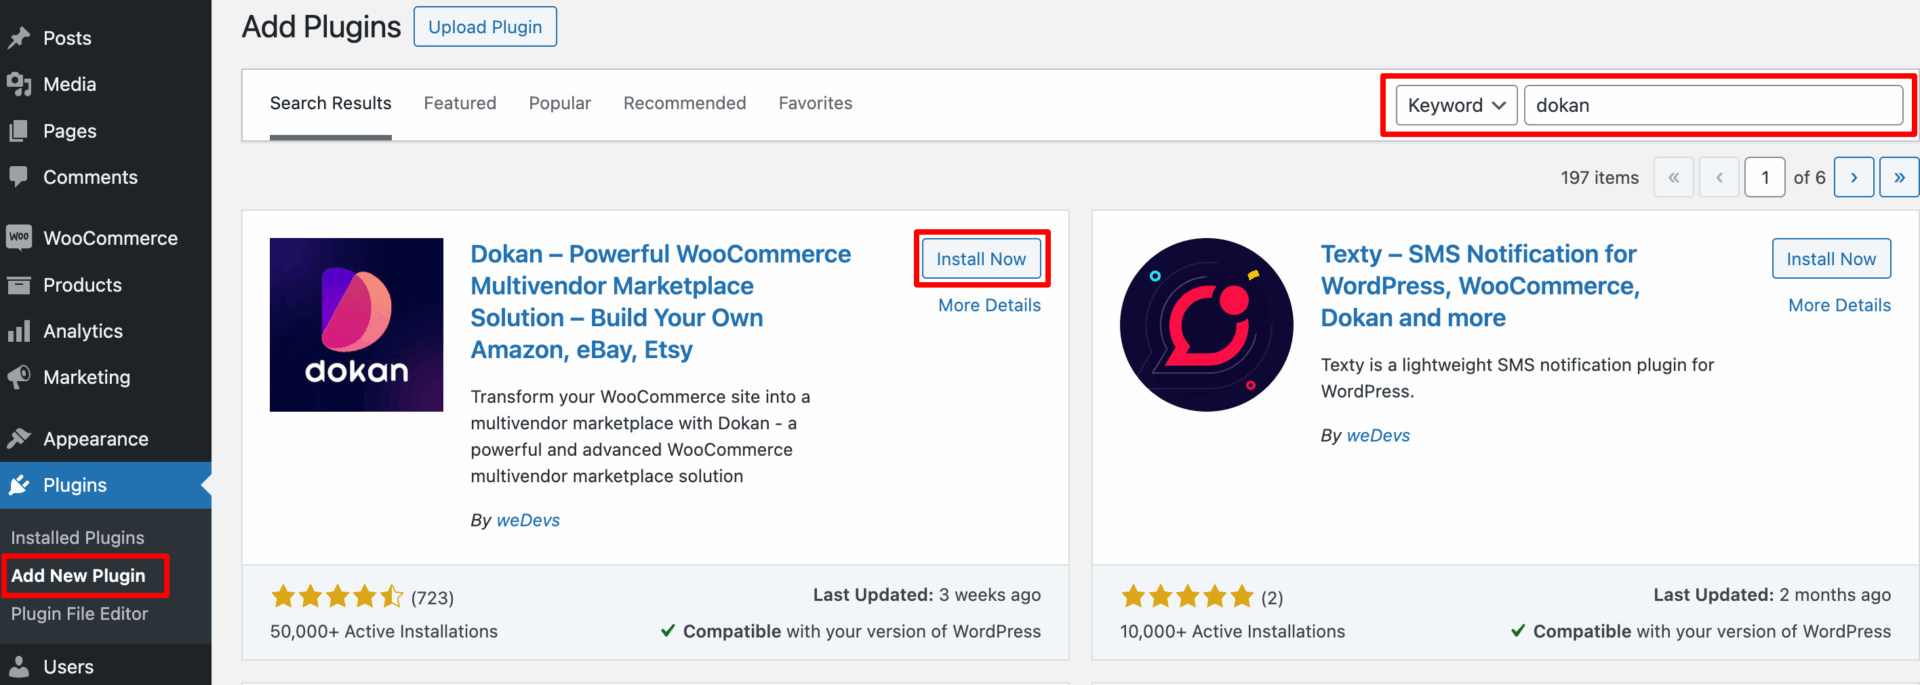
Dokan multivendor will also provide a setup wizard that will help you easily set up your marketplace. Configuring Dokan is very easy by using its own Wizard.
If you are still confused, go through the video tutorial on Dokan installation.
Step 2: Install a Dokan Compatible Theme
After installing the Dokan multivendor plugin, you need to install a Dokan-compatible theme. Any theme that is compatible with WooCommerce is also compatible with Dokan multivendor.
However, Dokan has its own theme “Dokani” that you can use for your convenience.
You can download the Dokani theme from the Dokan site.
You can find the themes in WP-Admin-> Appearance-> Themes. But make sure the theme is Dokan compatible.
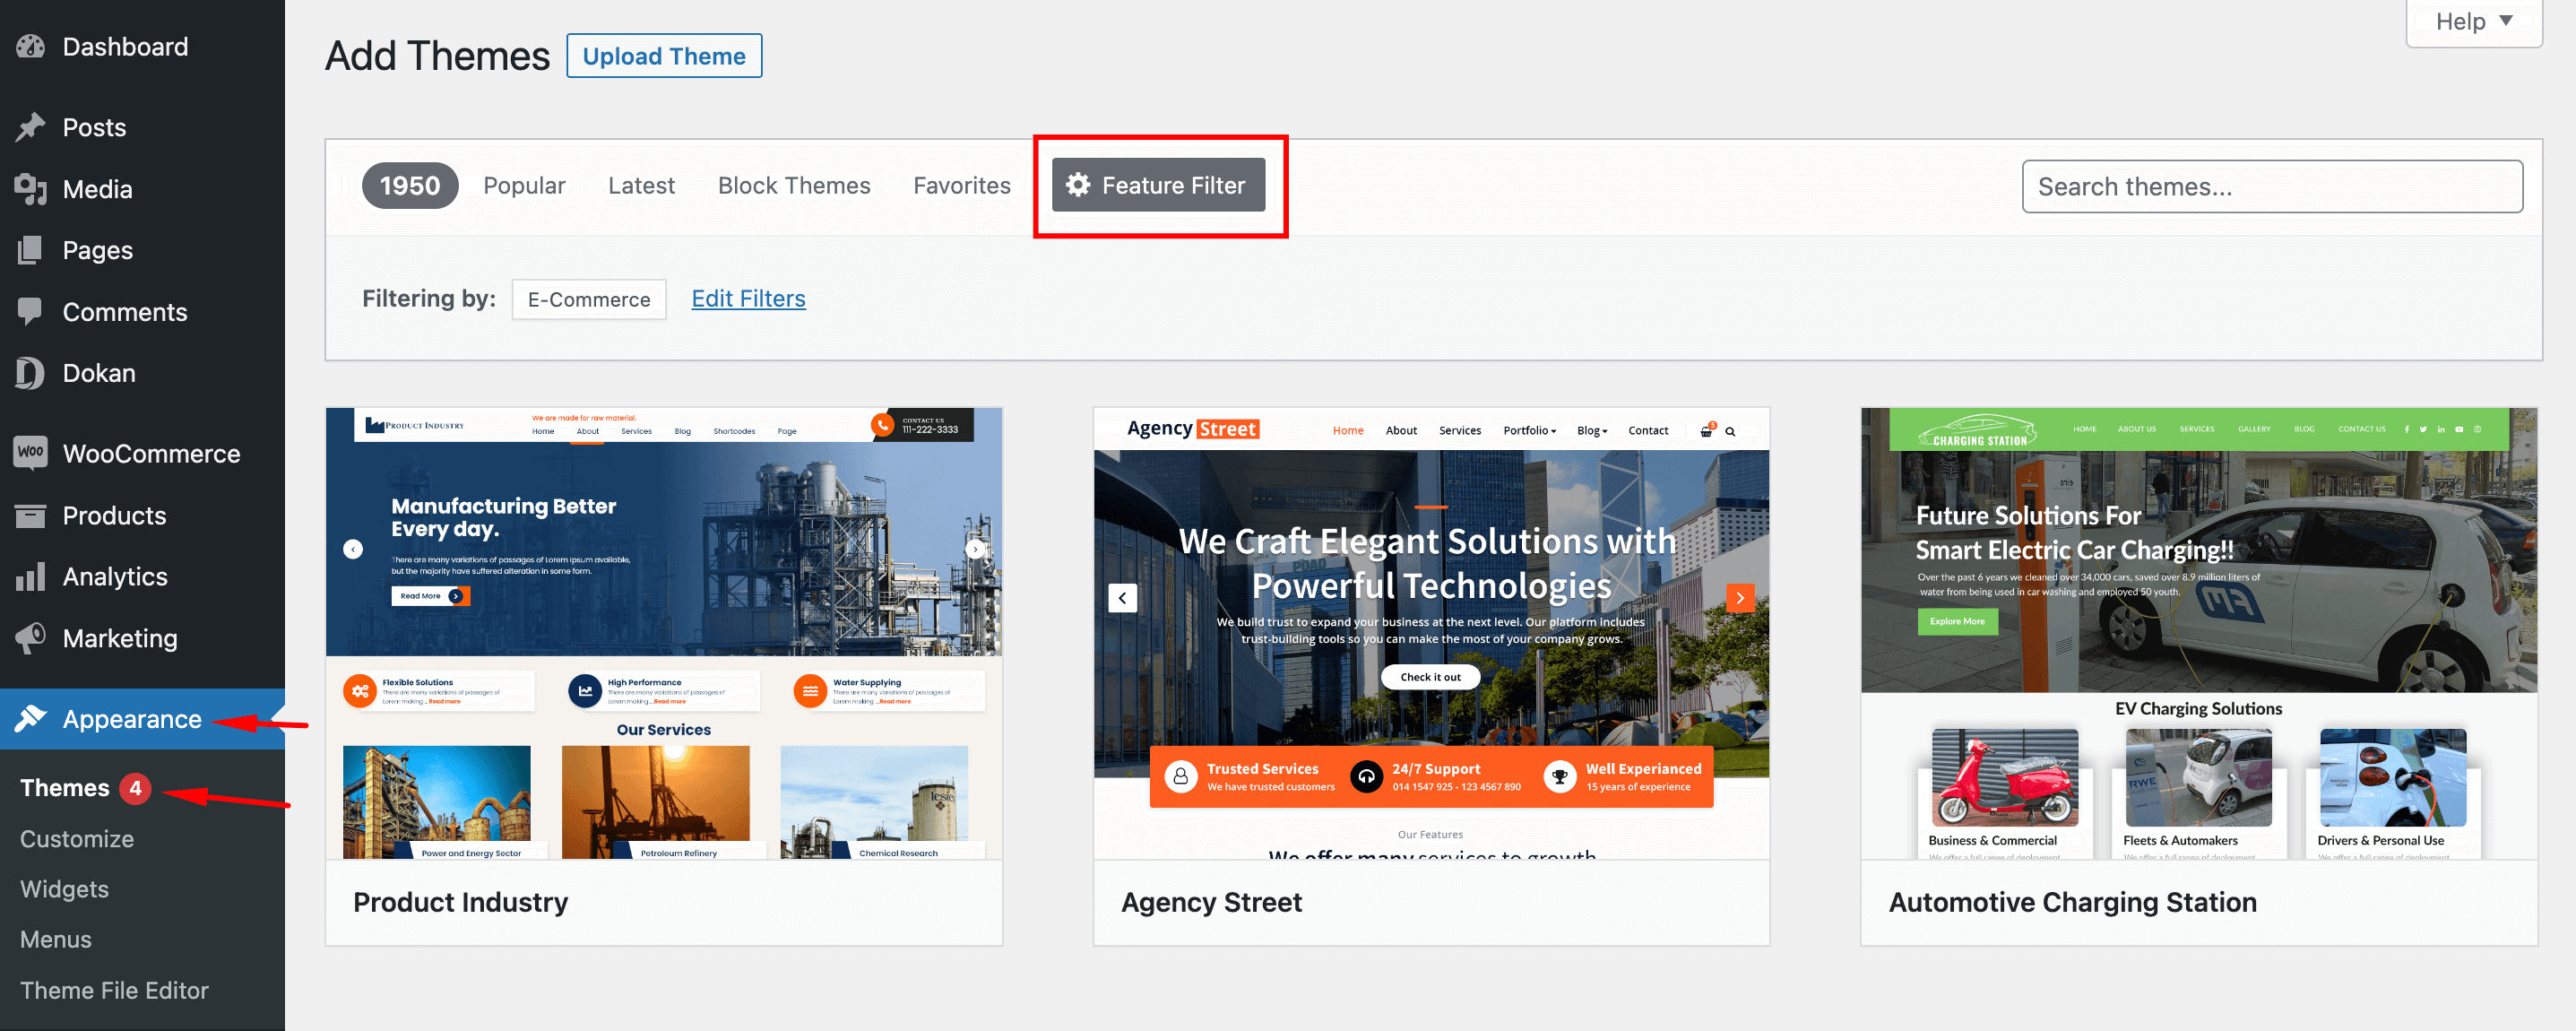
If you choose any other theme, then you will need to customize the theme to make it compatible with your marketplace.

Subscribe to
Dokan blog
Step 3: Configure Dokan General Settings
After installing and activating the Dokan multivendor plugin, you now need to configure all the basic settings. You will find all the settings options at WP-Admin–> Dokan–> Settings.
From here you can:
- Set up your store terms and conditions
- Create store category (so that vendors can add different categories for their stores )
- Enable payment gateways (more on this in the next part)
- Configure withdrawal methods (more on this in the next part)
- Allow vendors to upload new products
- Create new tags
- Set new product status
- Configure selling options
- Set privacy policy
You can select the pages for the vendor dashboard, order page, store listing, and terms and conditions page from the Page Settings option.
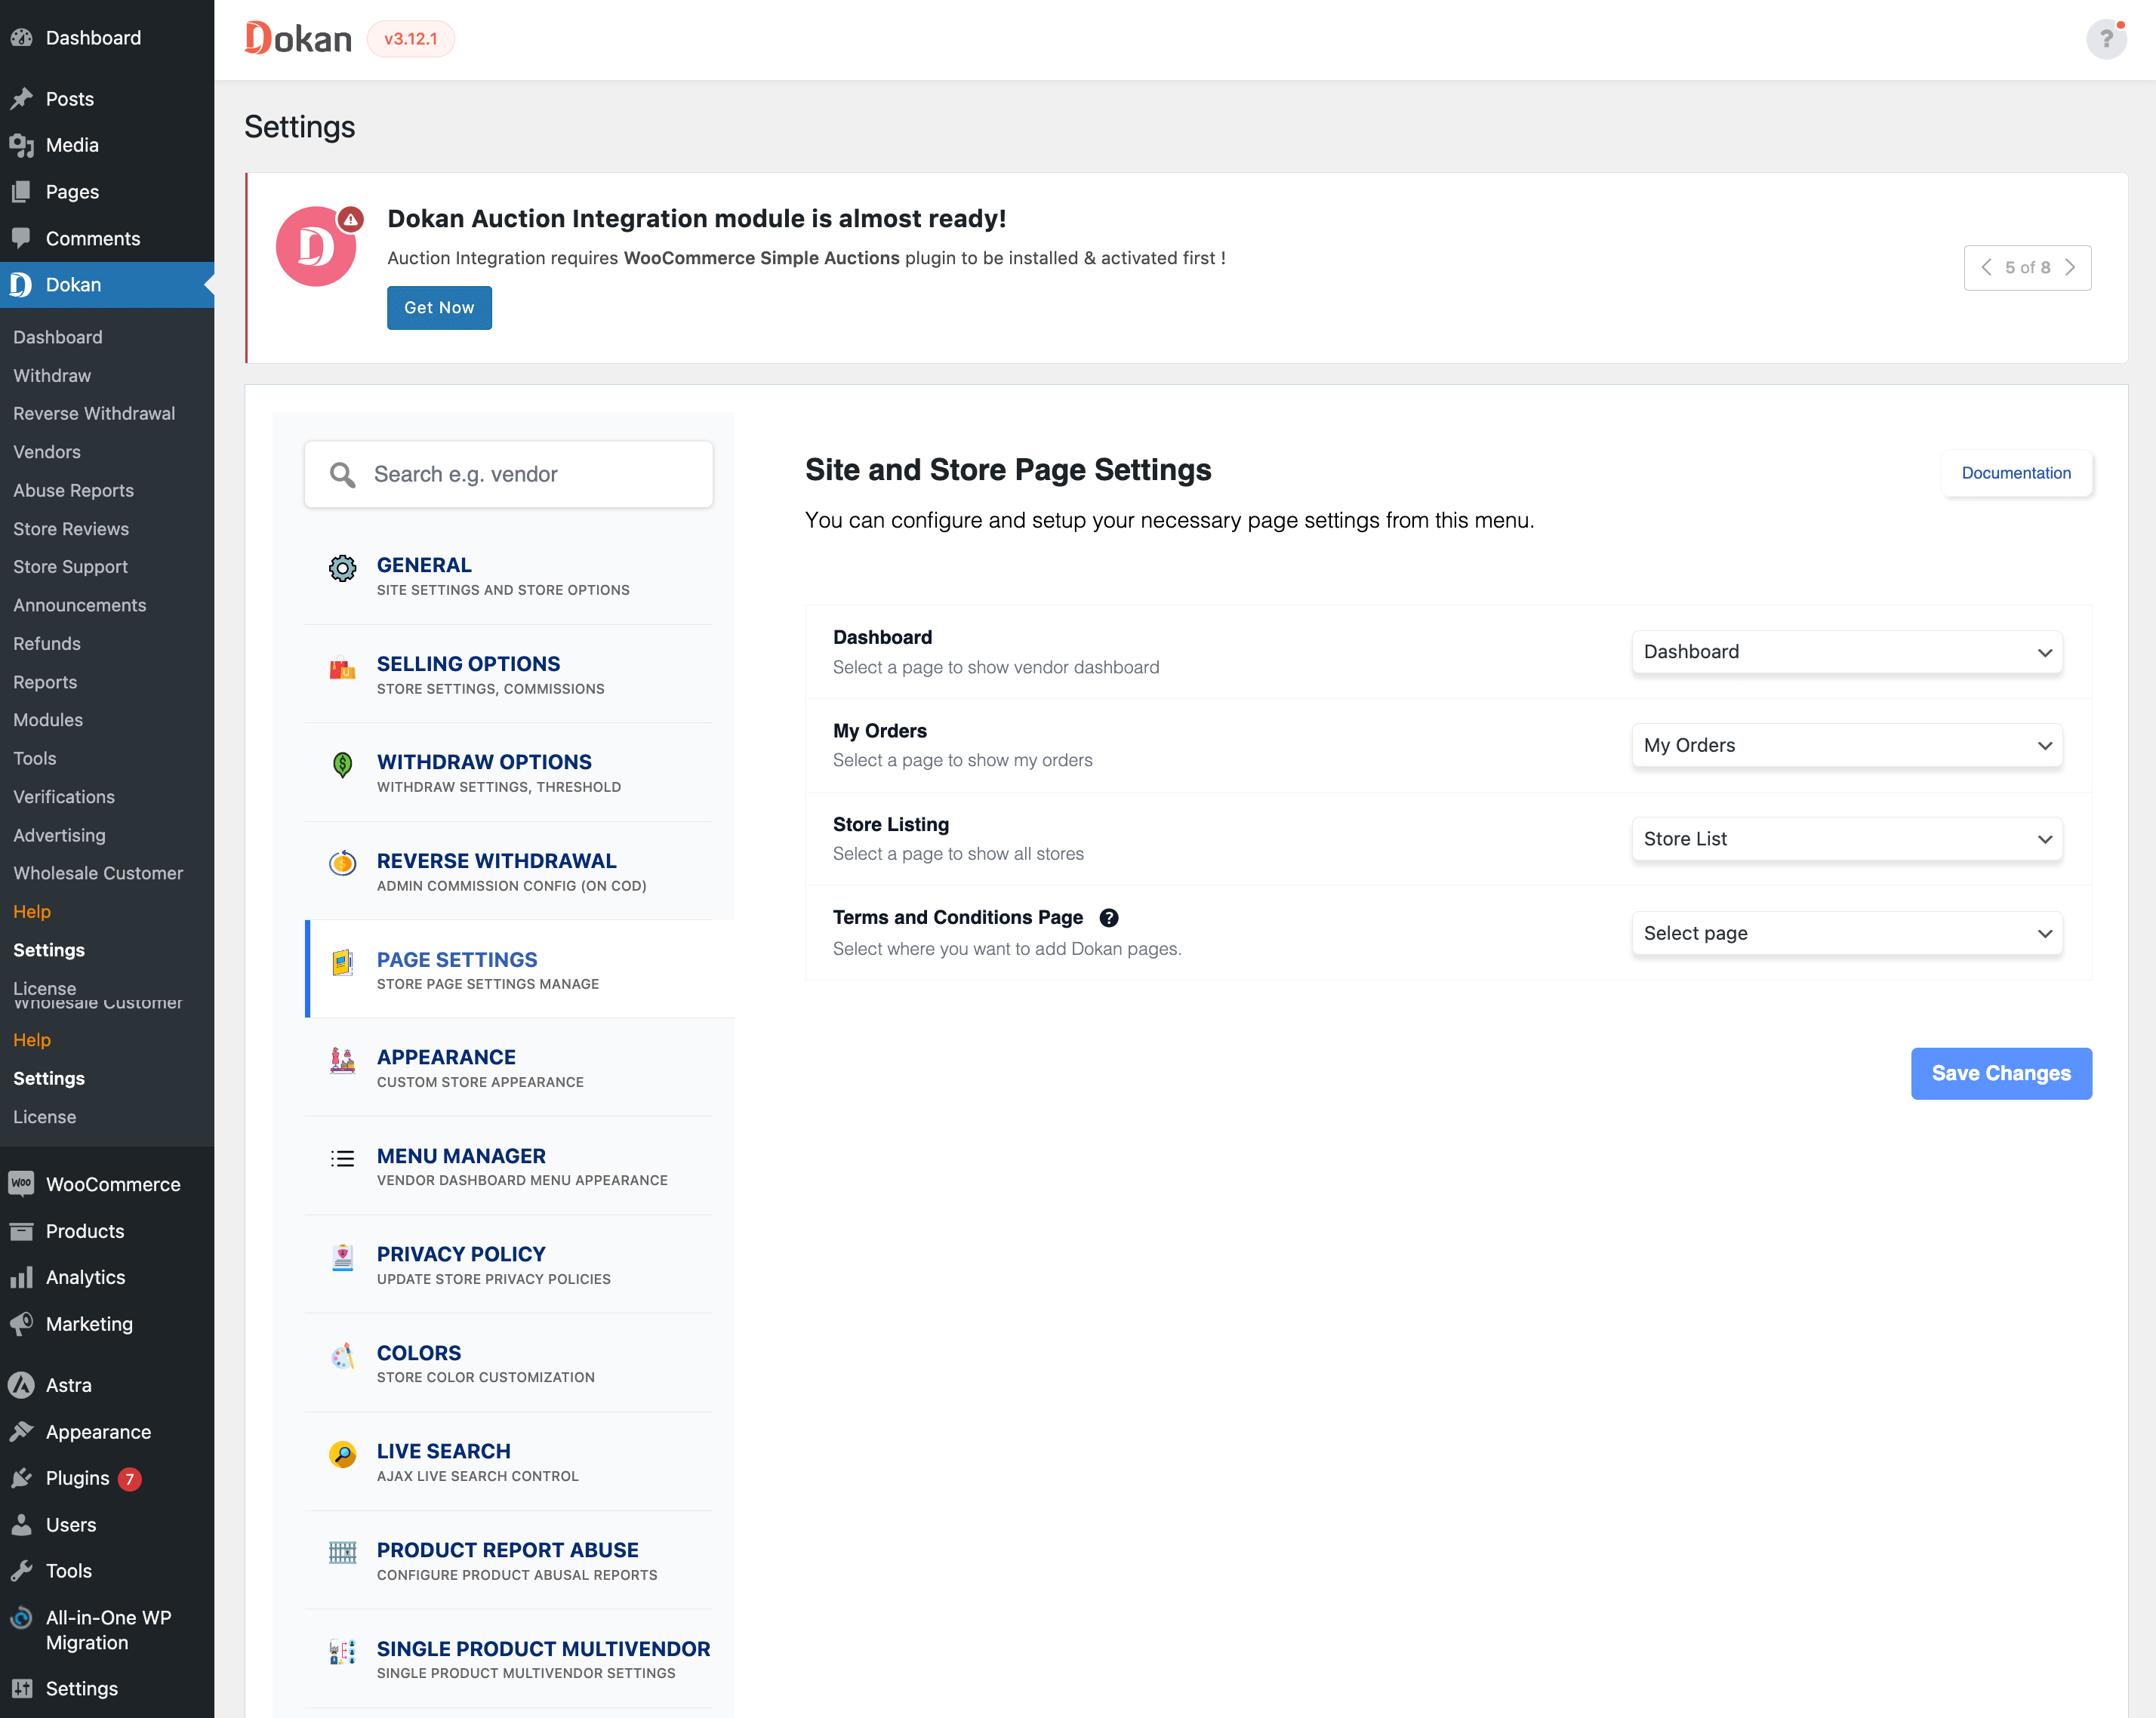
Don’t forget to click the Save Changes button after configuring all the settings. Otherwise, you will lose all your settings.
Also, you need to configure your permalink settings as well. Otherwise, you may get a 404 error on certain pages. Go to WP Admin -> Settings -> Permalinks -> Permalink Settings ->Product Permalinks. Select the check box “Custom Base” for product permalinks and write “/product” on the box.

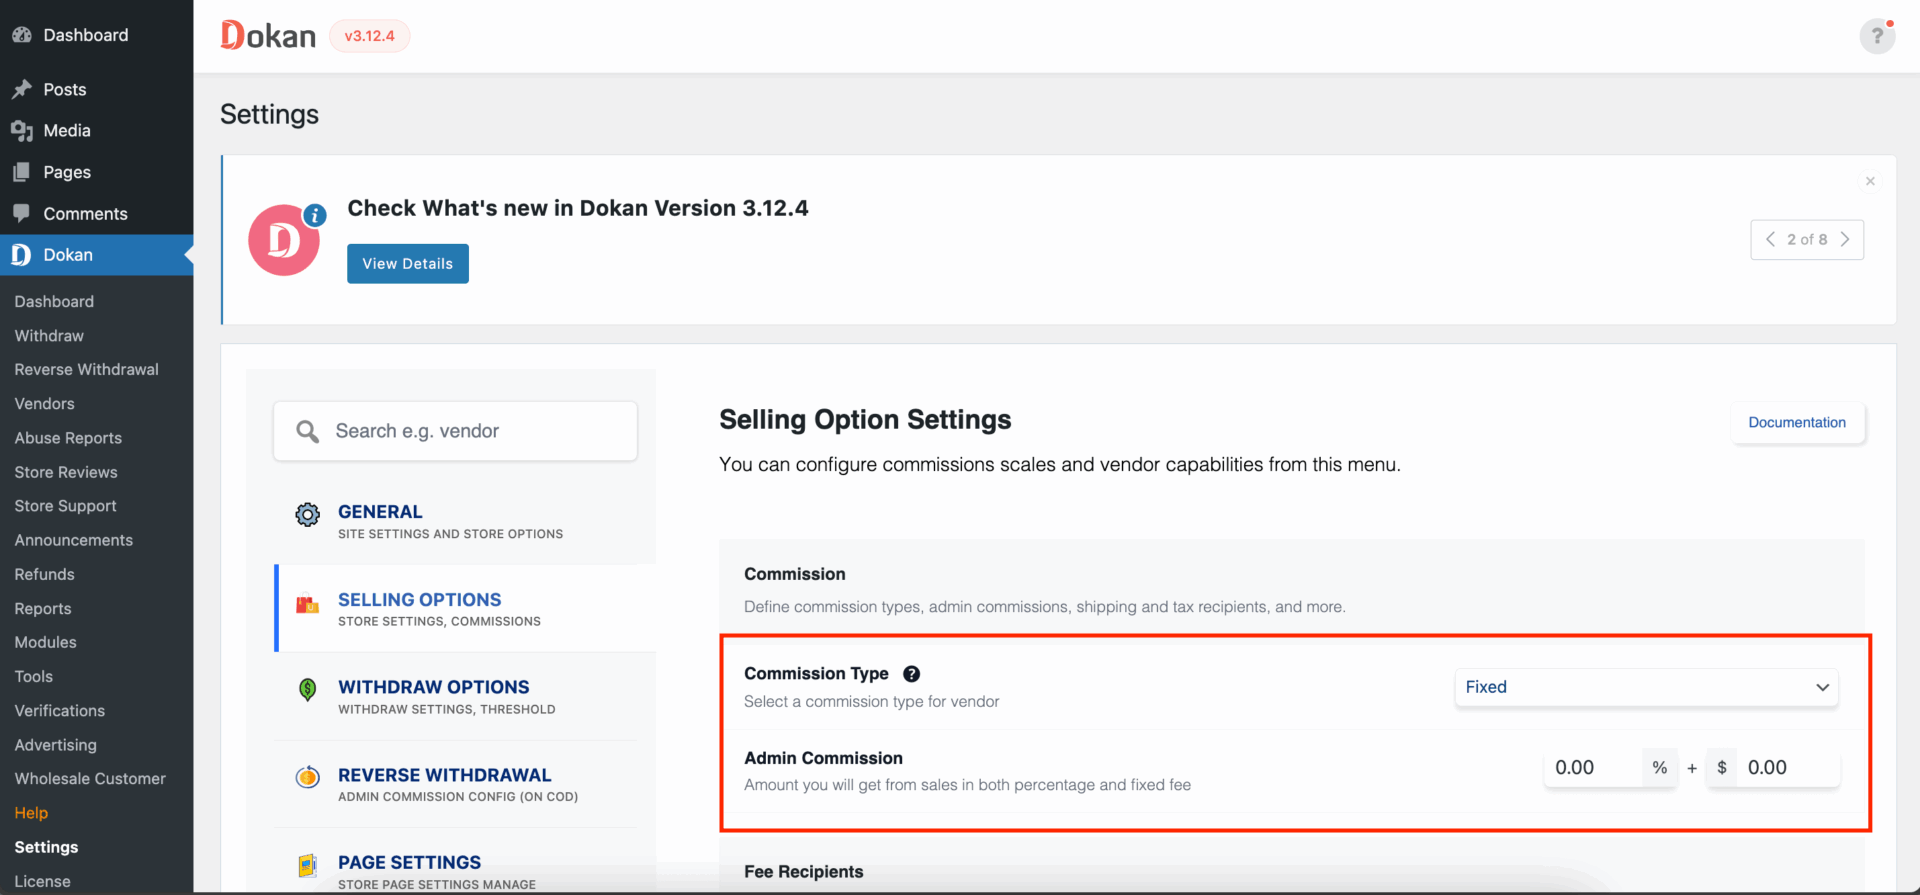
You have to set your commission rate as well. Go to WP Admin Dashboard -> Dokan -> Settings -> Selling Options -> Admin Commission.
You’ll find different options to insert the percentage or fixed amount. Dokan supports various types of vendor commissions.
Enable Payment Gateways
The Dokan multivendor plugin supports all WooCommerce-compatible payment gateways. So, you will get a wide range of choices to make the transaction process easier on your marketplace.
With the Dokan free version, you can use non-adaptive payment gateways like check payments, bank account transfers, cash on delivery, etc. You can install the WooPayments plugin to get support for credit cards, debit cards, and other payment methods.
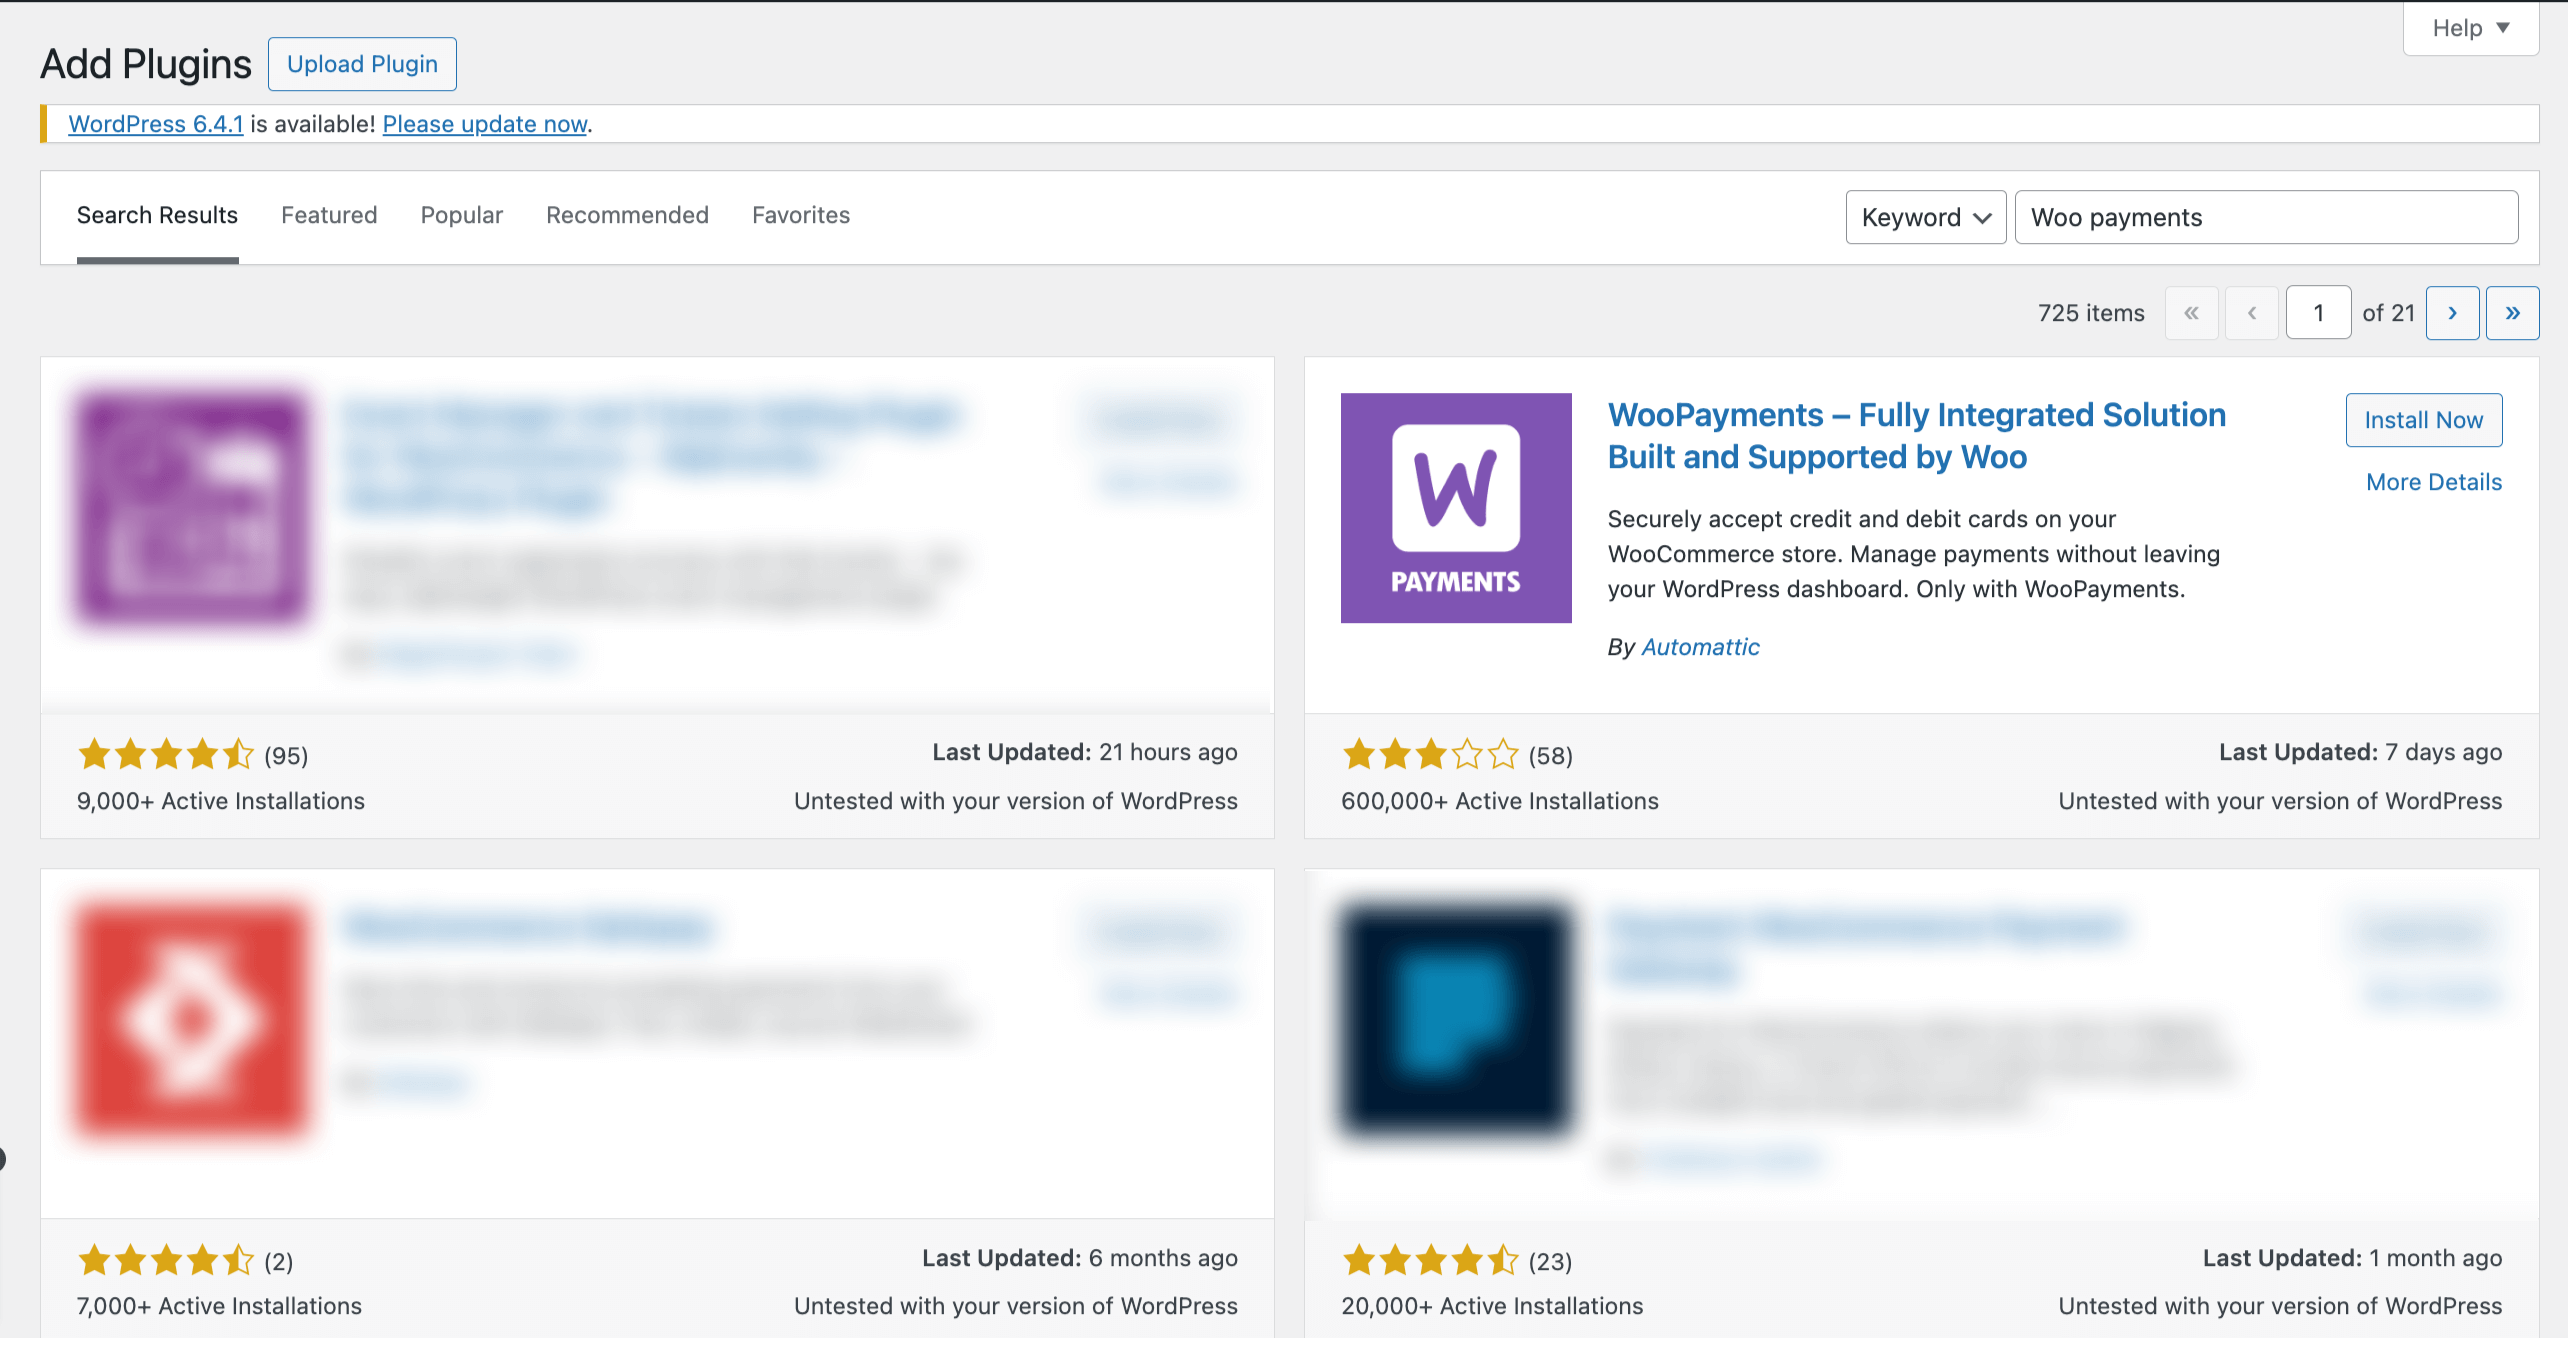
However, if you want your marketplace to support adaptive payment solutions like Stripe Connect and MOIP you need to install the Dokan Pro version.
Enable Withdraw Methods for Vendors
Another vital part of running an online marketplace is to ensure a smooth withdrawal system. The Dokan multivendor plugin helps you take care of this section as well.
Go to WP Admin -> Dokan -> Settings -> Withdraw Options. Here you’ll find options to customize the withdrawal method and set the minimum balance a vendor needs to make a withdrawal limit.
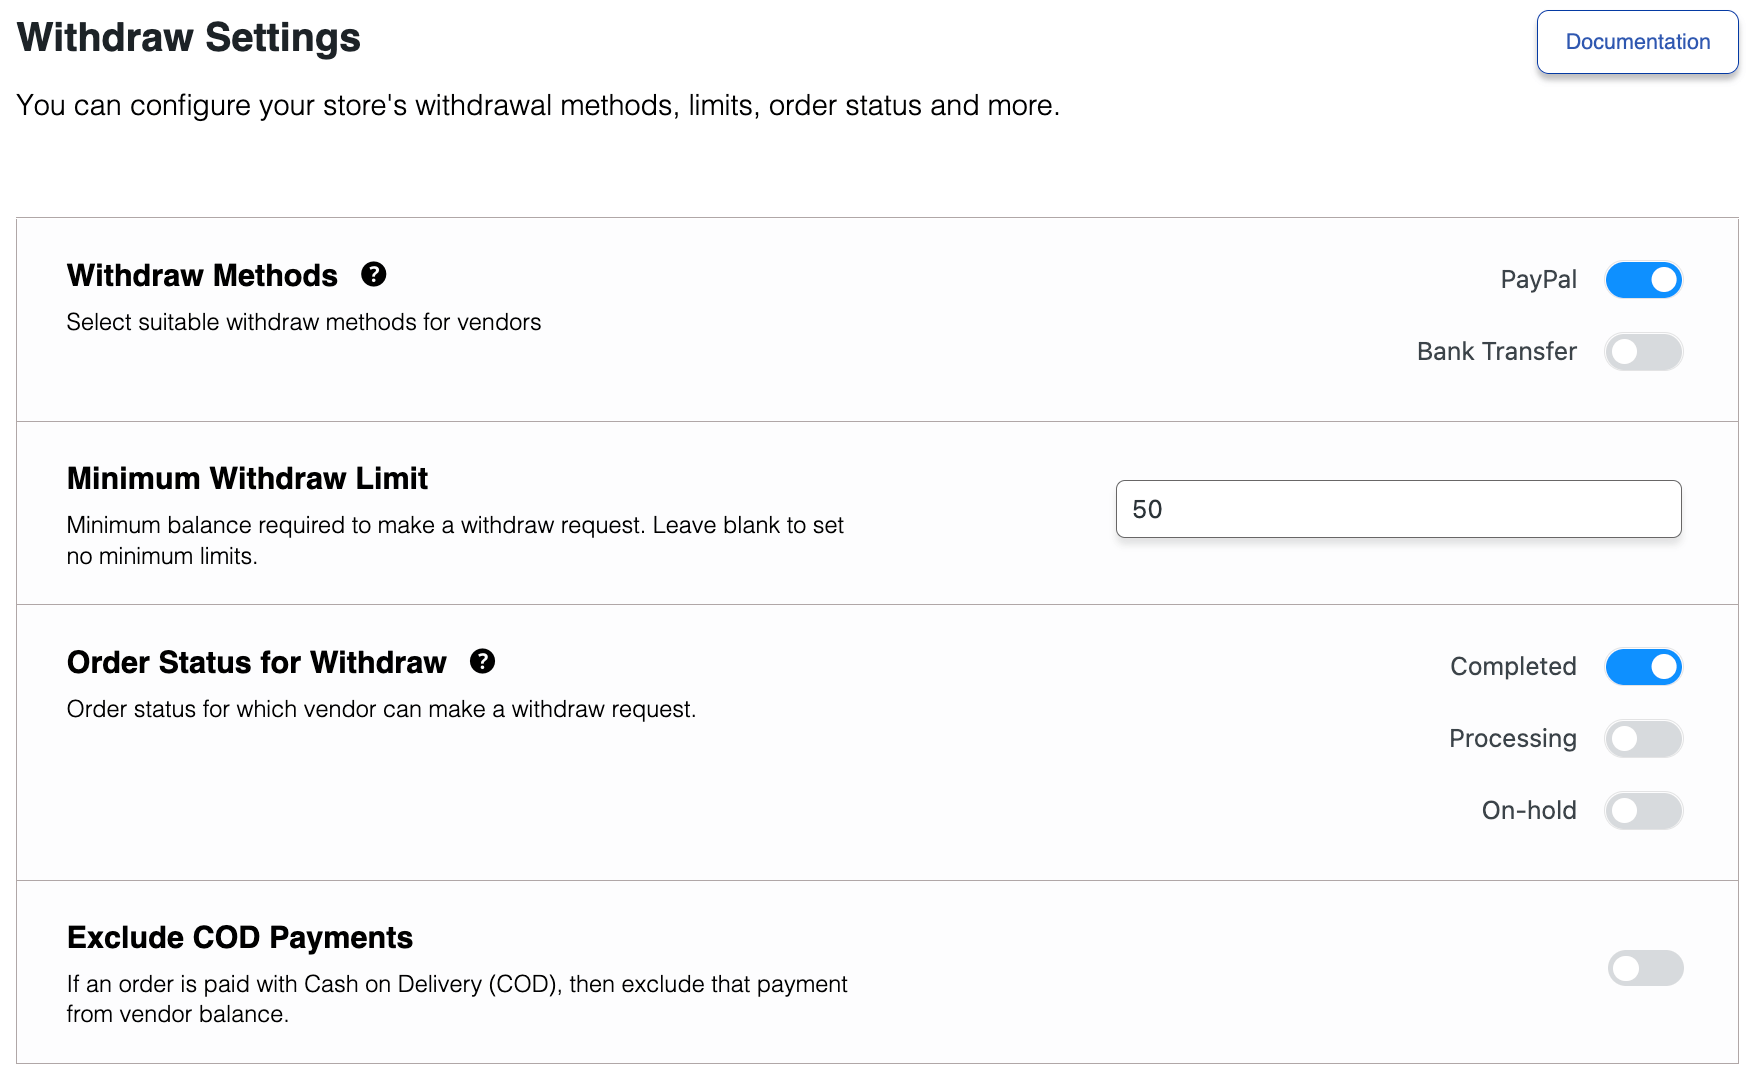
You will get more withdrawal options with the Dokan Pro version.
Step 4: Upload Products and Setup Admin Shop If You Want
This is an optional step. If you want to earn some extra money, you can create your store on your marketplace. All you need to do is enable yourself to sell.
Go to Dokan-> Vendors. There you need to enable selling by toggling the button. You can upload your products by navigating to WordPress Backend -> Products -> Add New.

And to upload products from the front end navigate to, WordPress Dashboard -> Vendor Dashboard -> Products-> Add New. Your registered vendors will upload products this way.

Vendors can add functionalities like shipping, taxes, and product attributes from the product creation form.

Step 5: Allow Vendors to Sign up to Your Marketplace
Now that you have added all the functionalities to your marketplace, you can invite vendors to sign up for your marketplace.
Dokan multivendor has a default registration form that will help vendors to sign up to your marketplace.
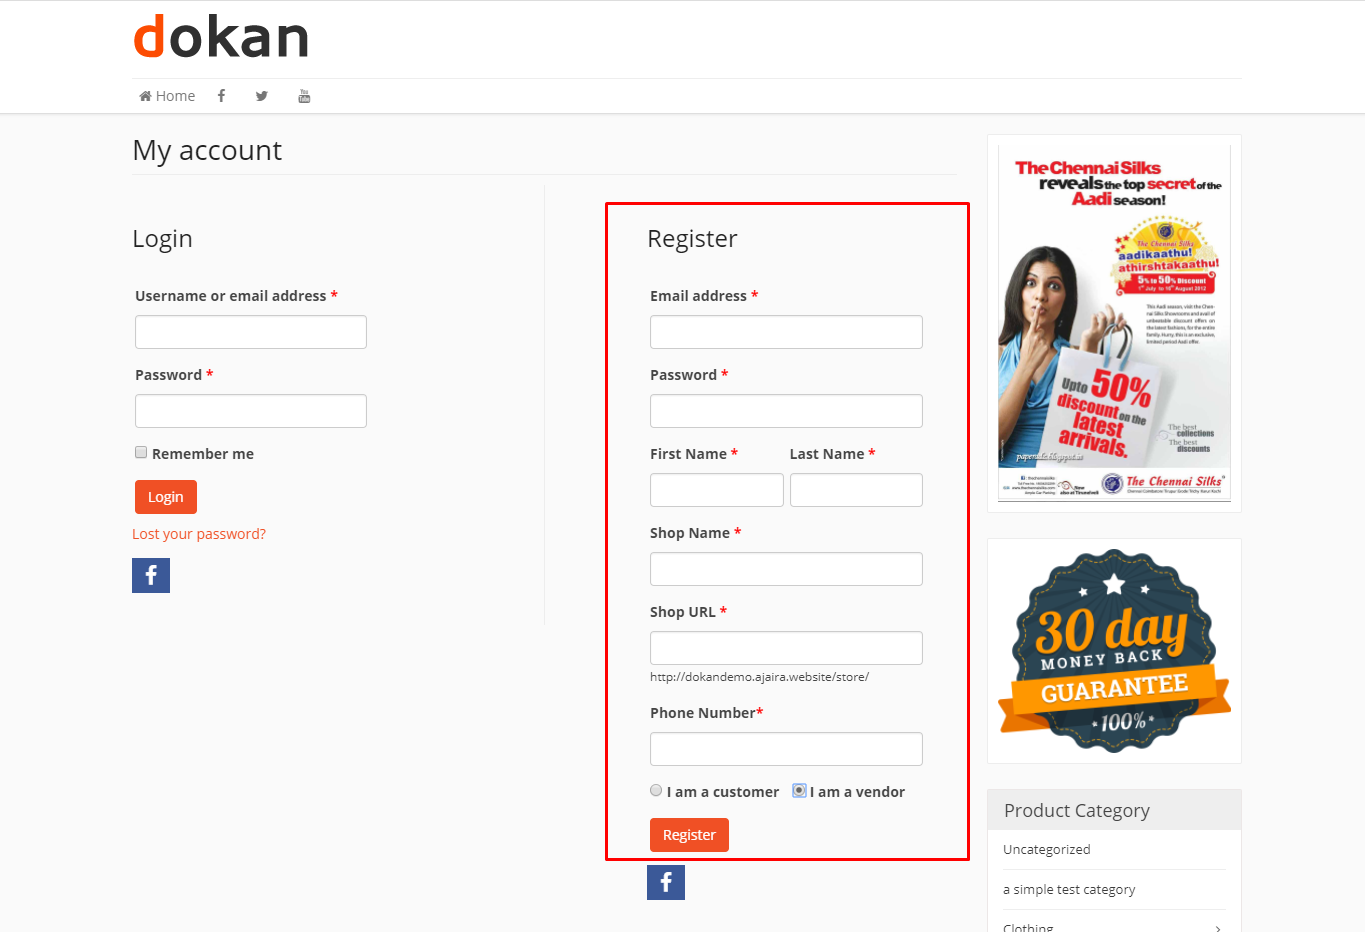
Or you can create customized registration forms with the necessary fields, especially for your marketplace.
For vendors to start selling, you need to enable selling status from Dokan-> Vendors.
Also, if you want the vendors to upload their products, then you need to change the product status from Dokan->Settings-> Selling options. You need to enable the New Vendors Product Upload
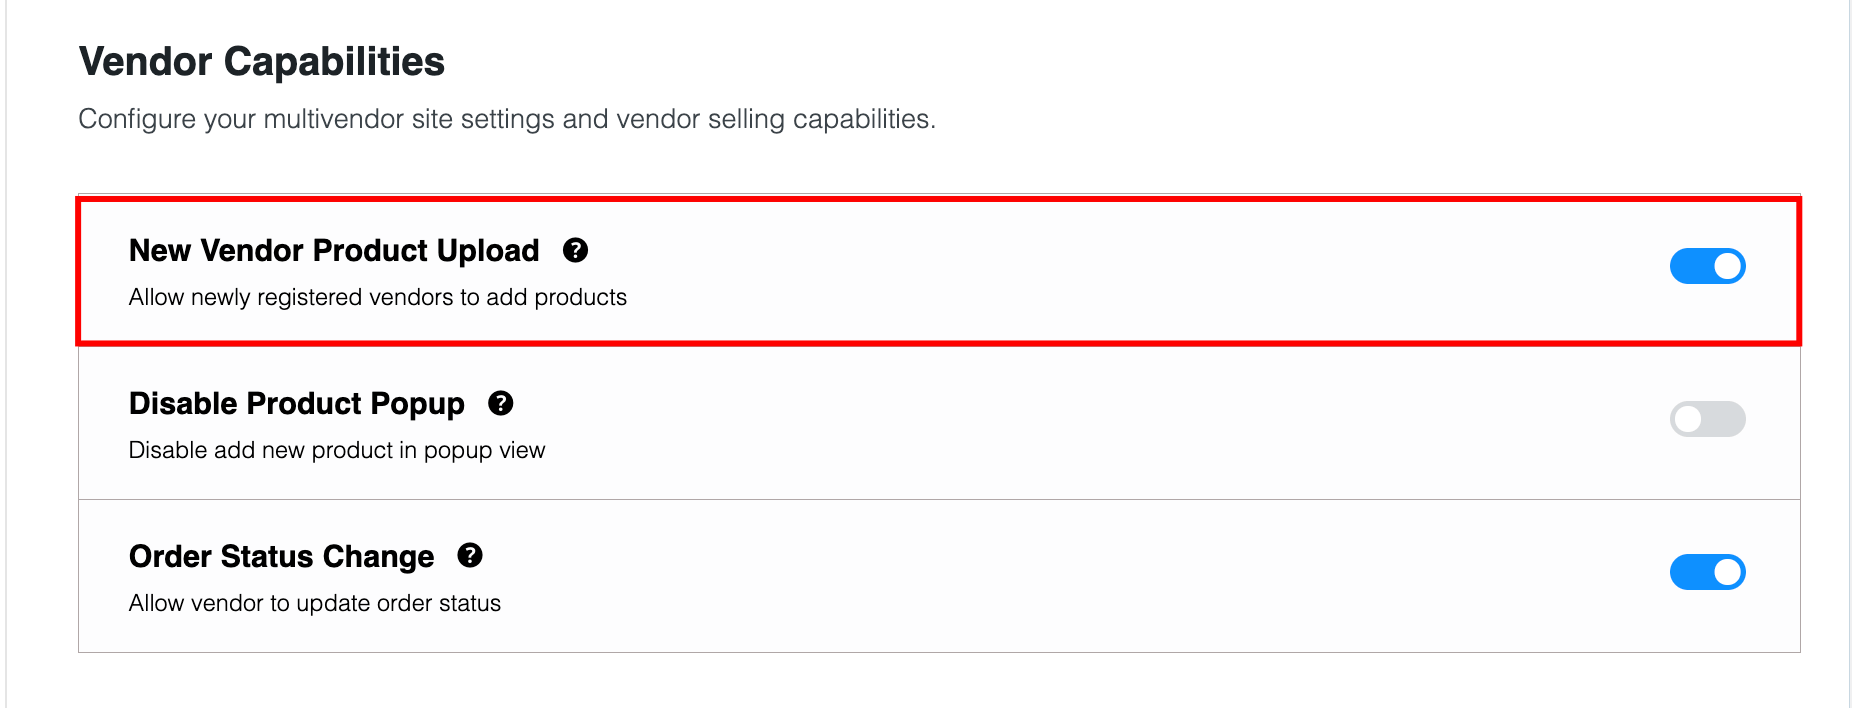
Vendors can upload their products from the front end as we’ve shown above for the admin shop.
Step 6: Configure the Dokan Delivery Driver Plugin
Your marketplace is all set up. Now, you need to configure the Dokan Delivery Driver plugin.
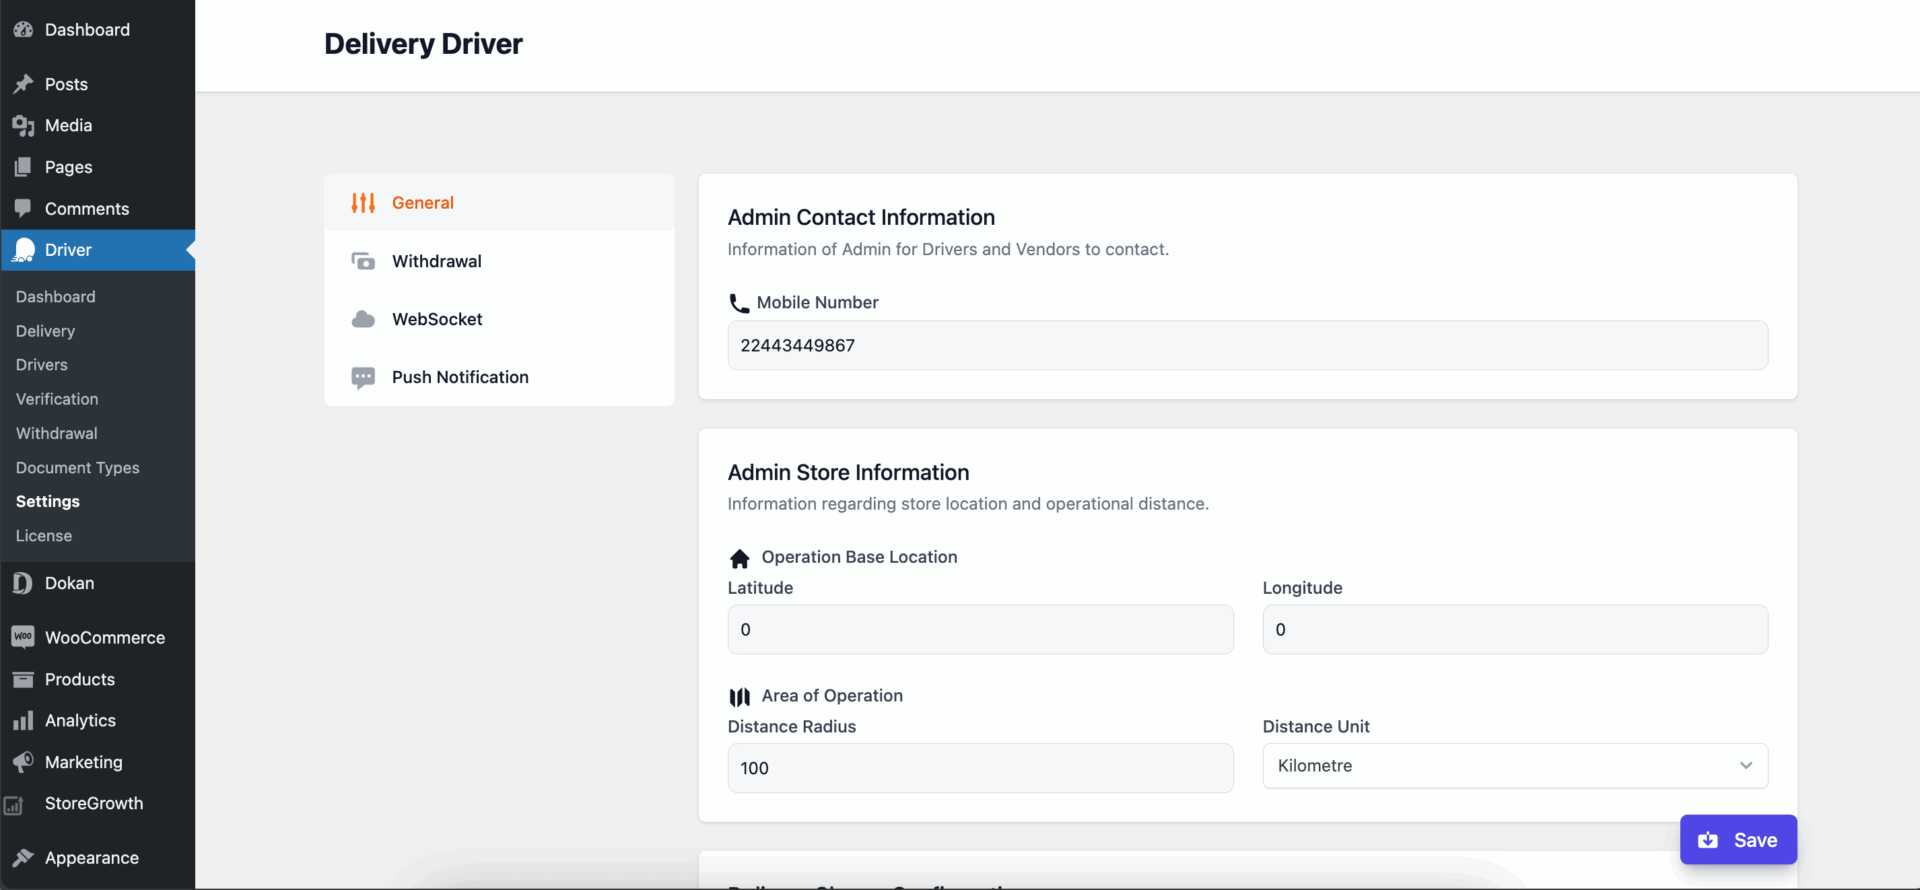
Set your Admin Store information and Admin Contact information from Driver–> Settings–> General,
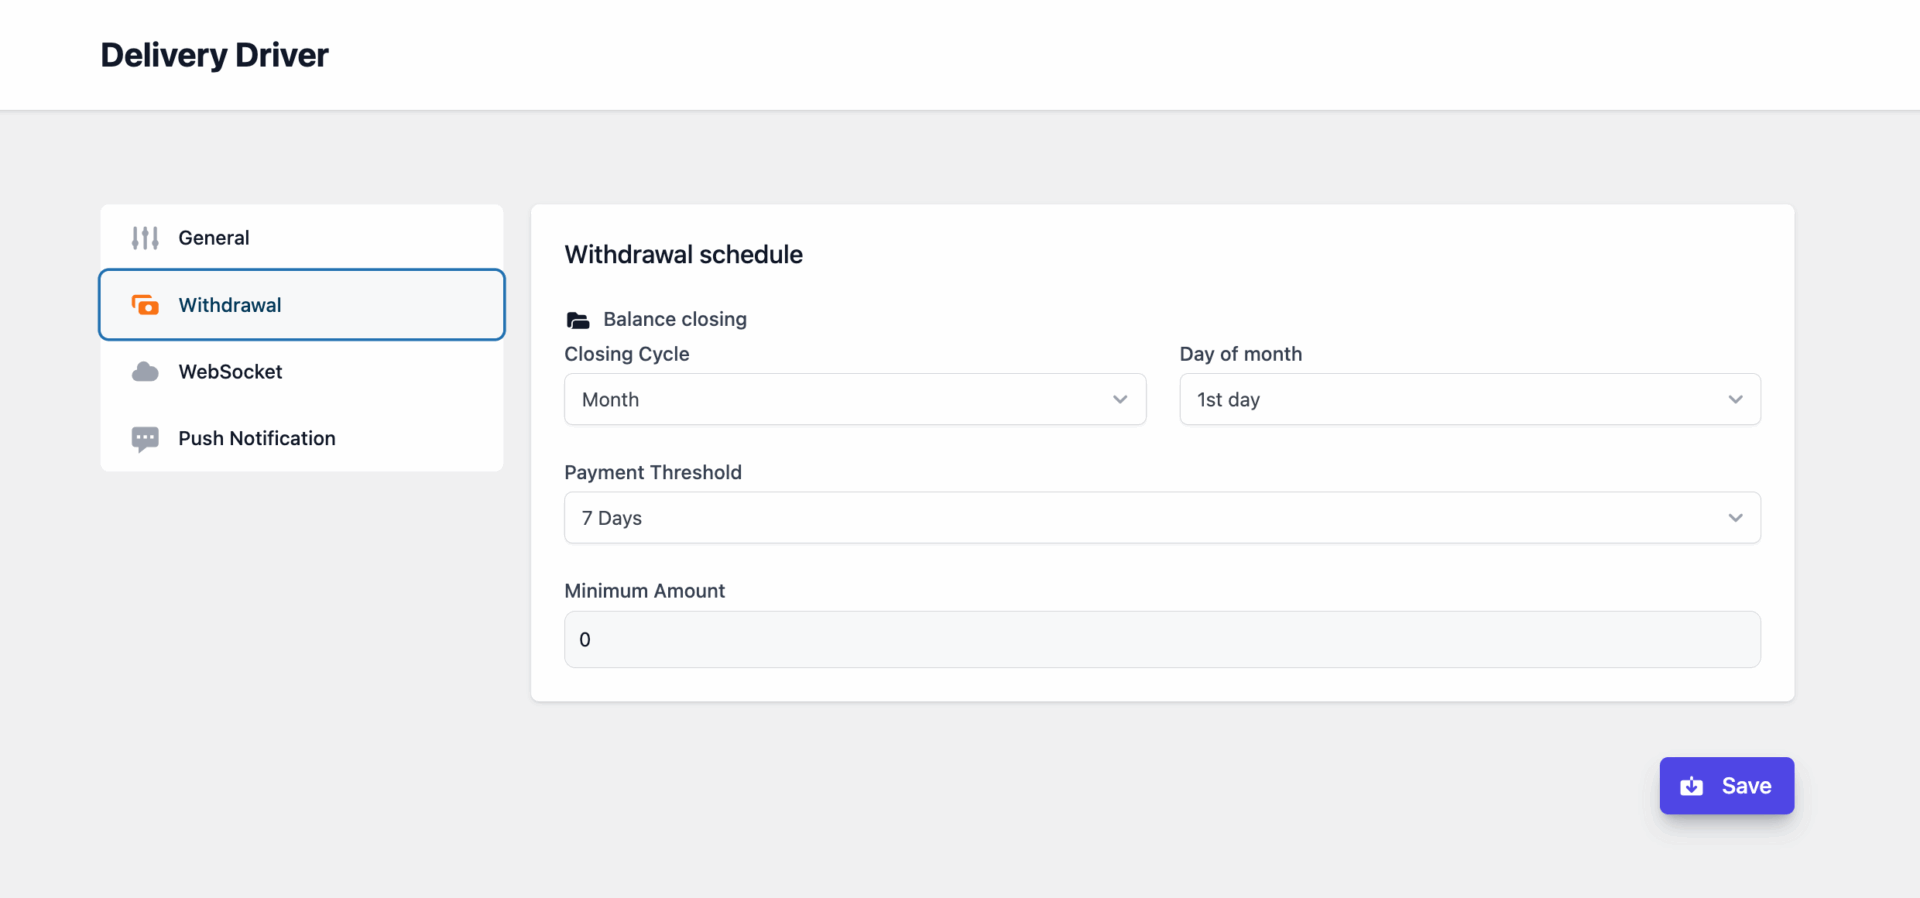
Next, decide the withdrawal schedule and the withdrawal threshold from the Withdrawal settings-
Also, from the Websocket and Push Notification settings, you can integrate platforms like Pusher, and OneSignal to show notifications to your drivers, customers, and vendors.
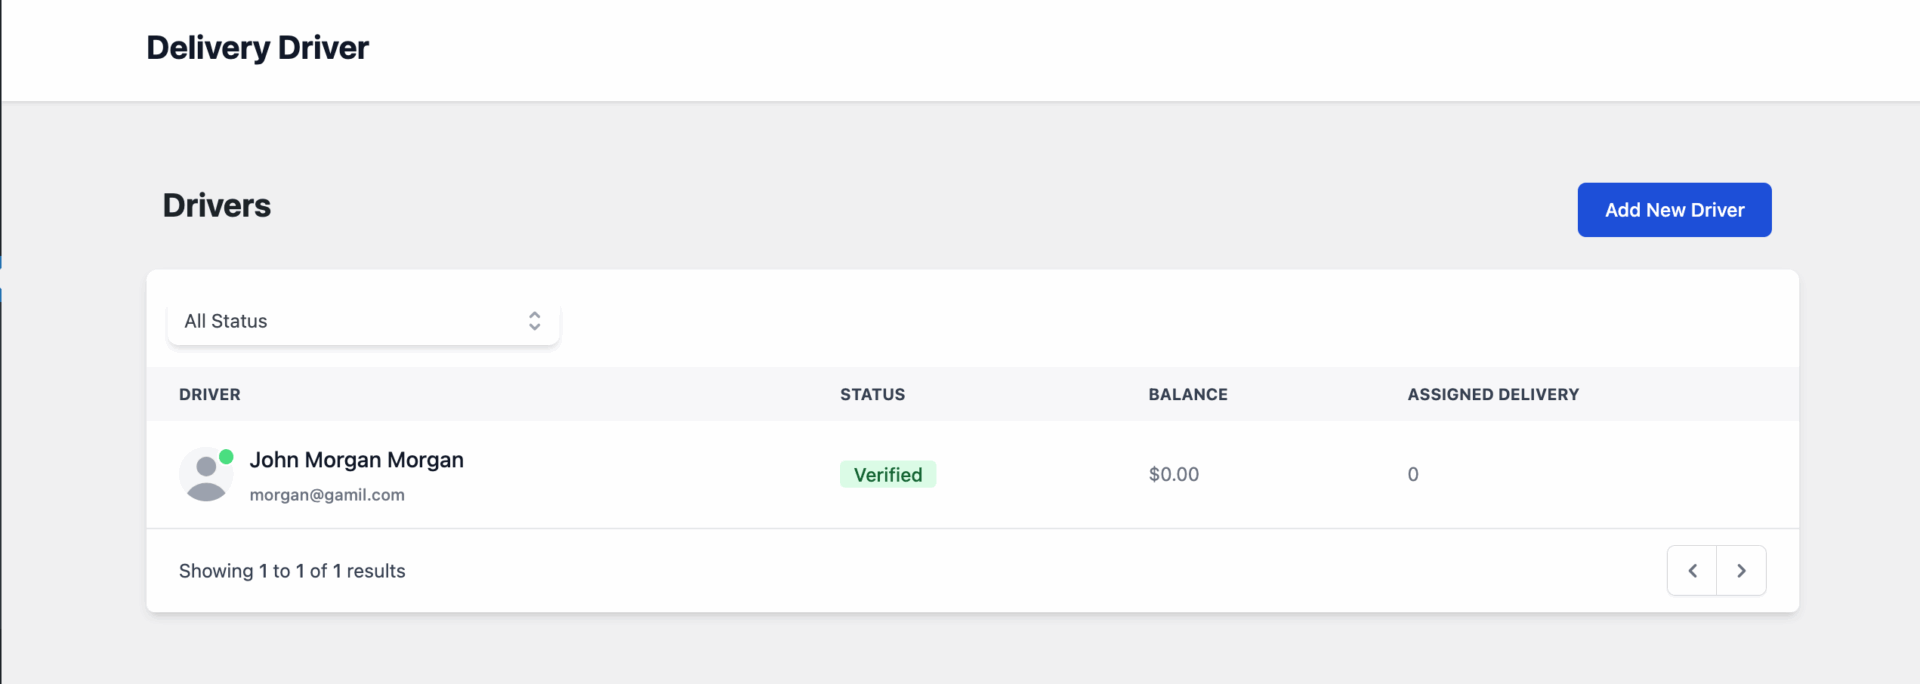
Also, you can manually add drivers as well-
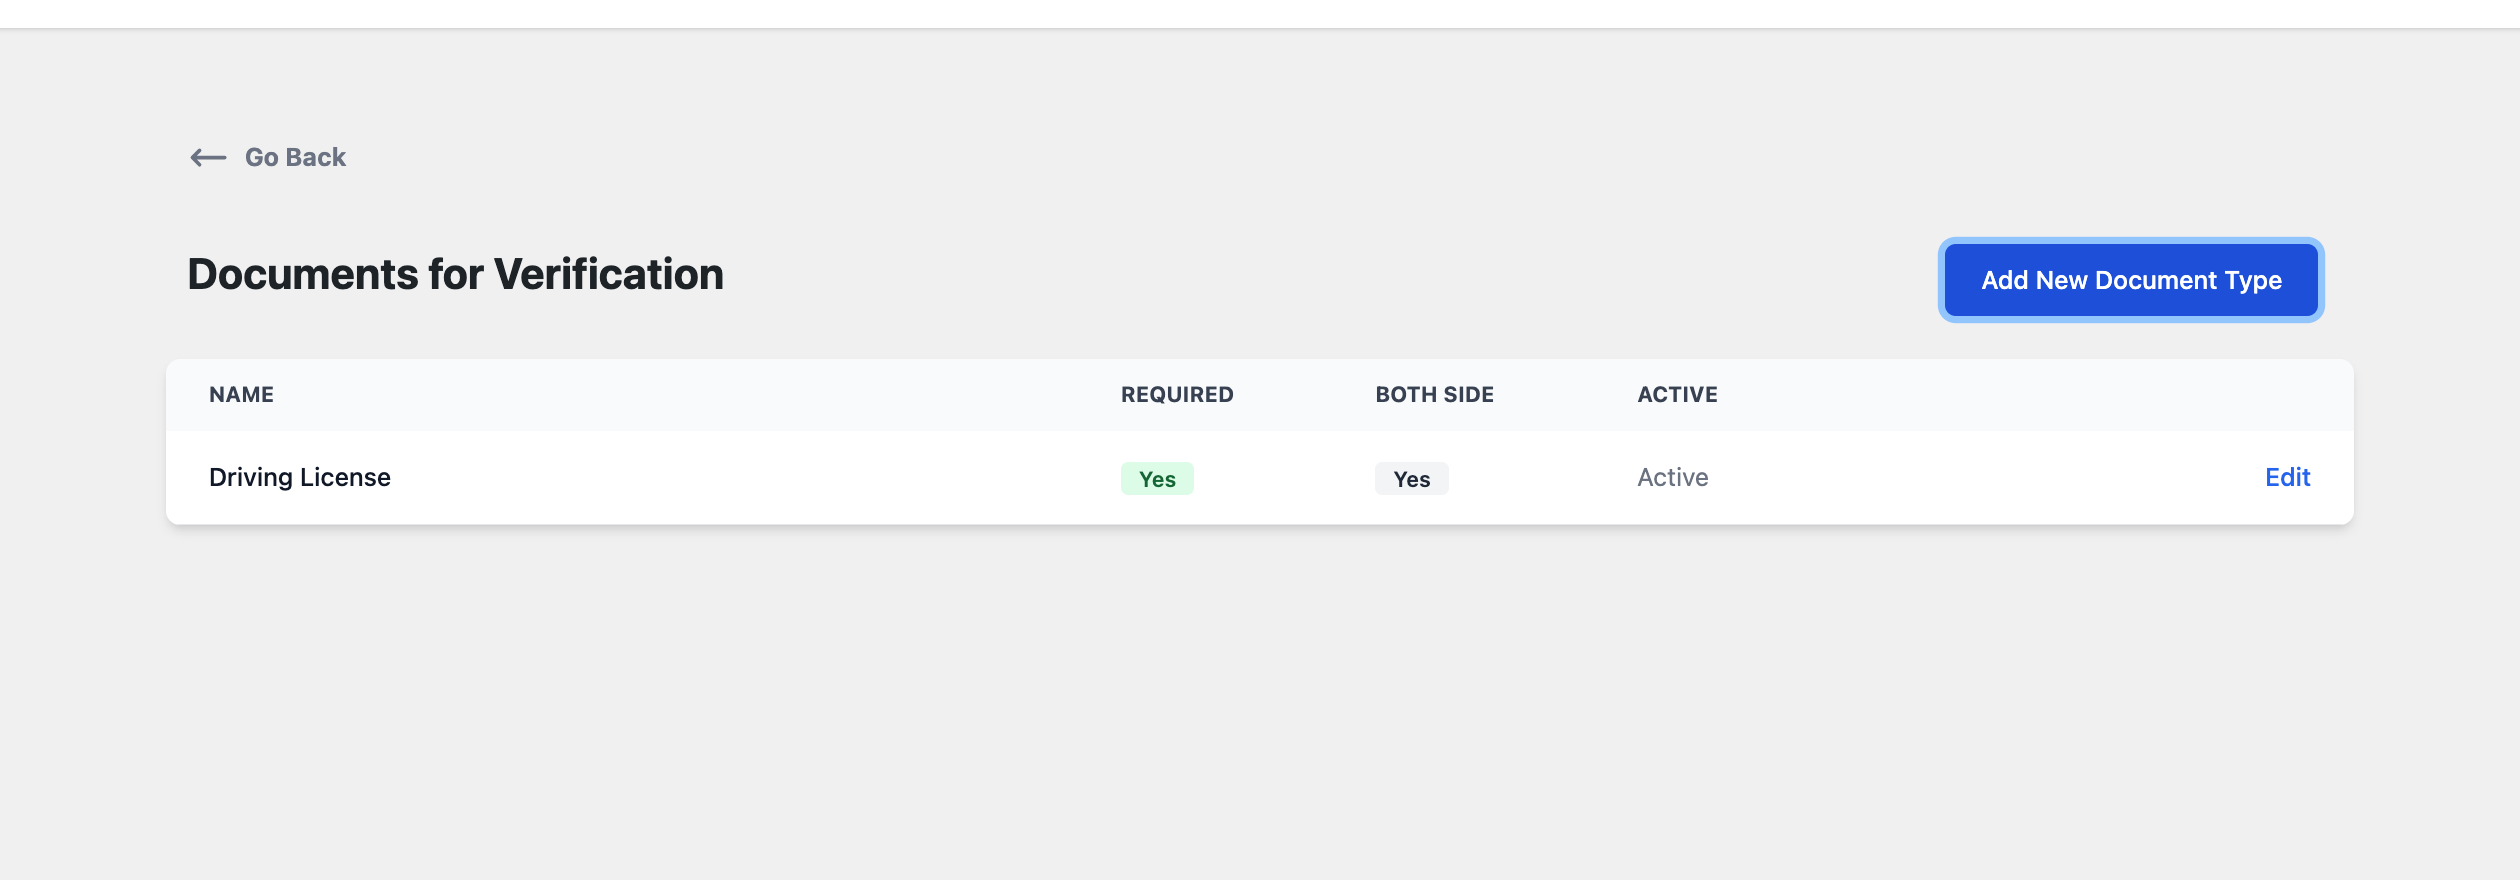
You can add verification documents to verify your drivers as well-
Now, you can assign drivers to vendors or it will be automatically assigned to vendors based on the distance and radius of the vendor store.
Read the complete guide on how to configure the Dokan Delivery Driver and App for your marketplace.
Step 7: Launch Your Marketplace
If you are done configuring your online grocery delivery marketplace, now it is time to launch your marketplace and you are ready to sell-
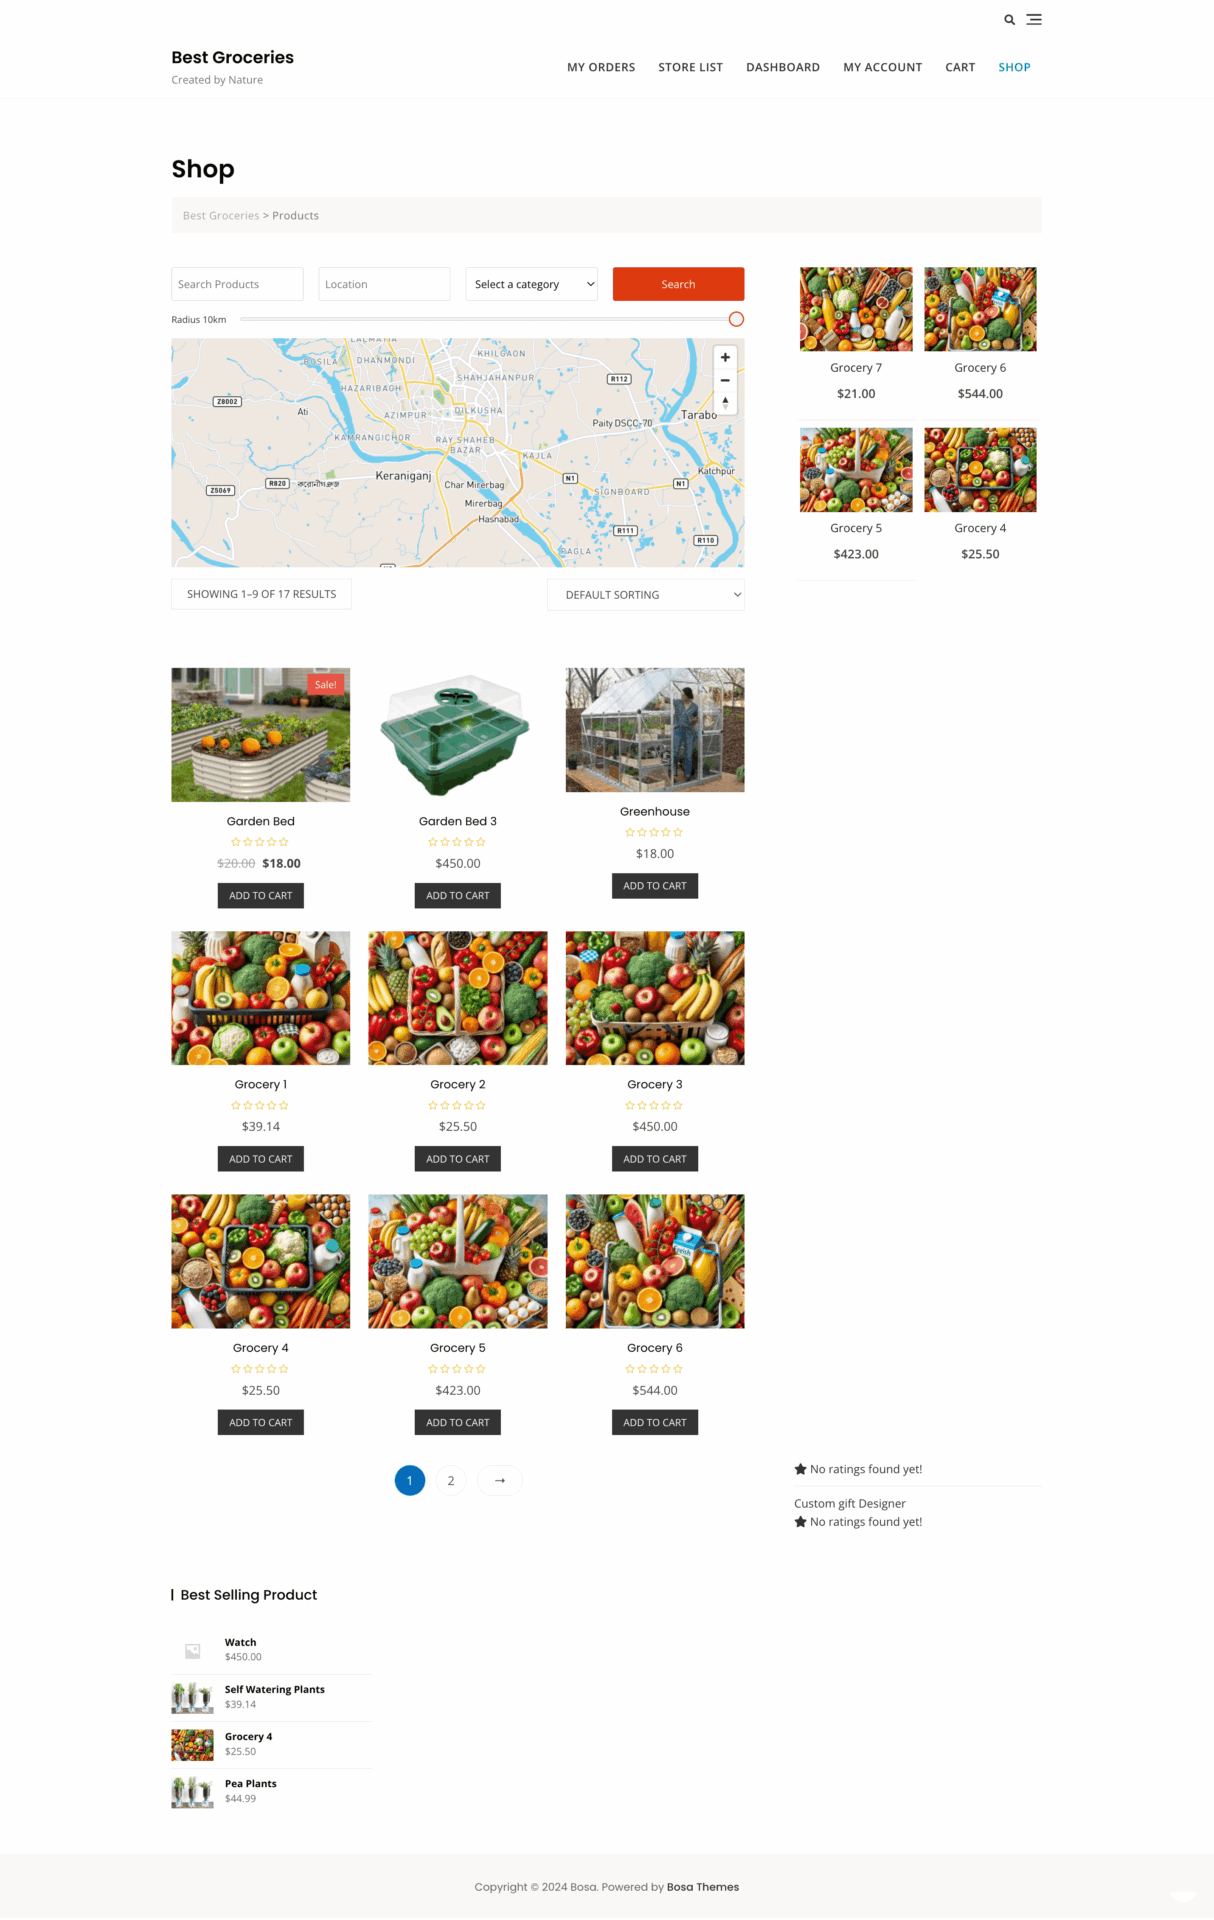
This is how you can create your online grocery delivery marketplace.
Start Your Online Grocery Delivery Marketplace Today
With the success of popular marketplace platforms, you can aim for similar extraordinary results. But remember, achieving such milestones takes time and consistent effort.
If you already own an eCommerce store, turning it into a marketplace can significantly increase your revenue potential. The best part? You don’t need to stop or alter your current store operations. You can seamlessly transition into a marketplace while maintaining your existing setup.
Whether you’re starting from scratch or upgrading your existing platform, we’re here to help. Feel free to reach out if you have questions or need technical assistance with setting up your marketplace or using Dokan.
Our WooCommerce and Dokan experts are ready to assist you in every step of your journey.
Don’t wait—start building your online grocery delivery marketplace today!
Subscribe to
Dokan blog
We send weekly newsletters, no spam for sure!



Leave a Reply