
A vendor selling handmade jewelry and a vendor selling heavy wooden chairs have nothing in common when it comes to shipping. Different weights, different carriers, different costs entirely. Yet if you rely on WooCommerce’s default setup, both get the same flat rate.
That’s where vendor-specific shipping comes in. Plugins like Dokan let each seller configure their own rates based on how they actually ship – base prices, quantity-based charges, location rules, and more. Here’s how to set it up in your WooCommerce store.
Why Vendor-Specific Shipping Matters in WooCommerce
In short, if you want fair pricing and a scalable marketplace, vendor-specific shipping is not optional. When every vendor shares one global shipping rule, problems show up:

Shipping is not just logistics. It affects trust, margins, and conversions. In a marketplace, each seller has:
So you need vendor-specific shipping rates. That means each seller can define:
Without this flexibility, your marketplace feels unfair. Worse, it becomes hard to scale. If you plan to build a serious multi-vendor store, vendor-level shipping control is foundational.

Does WooCommerce Support Vendor-Specific Shipping by Default?
Short answer: No. By default, WooCommerce calculates shipping at the cart level. It does not separate shipping per vendor. Here’s what that means. If a customer buys:

WooCommerce treats the cart as one single order. It applies one shipping logic to everything. It does not:
That creates issues in marketplace setups.
For example, if Vendor A ships from Germany and Vendor B ships from the US, WooCommerce does not automatically calculate two separate shipping costs.
Instead, it combines the cart and applies the available shipping method. So how do marketplace owners solve this? They use multi-vendor plugins such as: Dokan, WCFM Marketplace, and more.
These plugins introduce vendor-level shipping controls. However, even with these tools, shipping logic can become complex. Vendors must configure base prices, additional product charges, quantity rules, and location overrides correctly.
In the next section, we’ll walk through how to actually set up vendor-specific shipping rates step by step.
How to Set Up Vendor-Specific Shipping Rates in Dokan (Step-by-Step)
Dokan is the best multivendor marketplace plugin. We assume you’ll be using it if you need to set up vendor-specific shipping rates for your marketplace.
Vendor-specific shipping is already built into the Dokan shipping system. Each seller can control their own shipping rates from the frontend dashboard. You just need to configure it correctly. Let’s walk through it.
Step 1: Enable Dokan Shipping (Admin Side)
Before vendors can set their rates, you must enable Dokan Shipping as an admin.
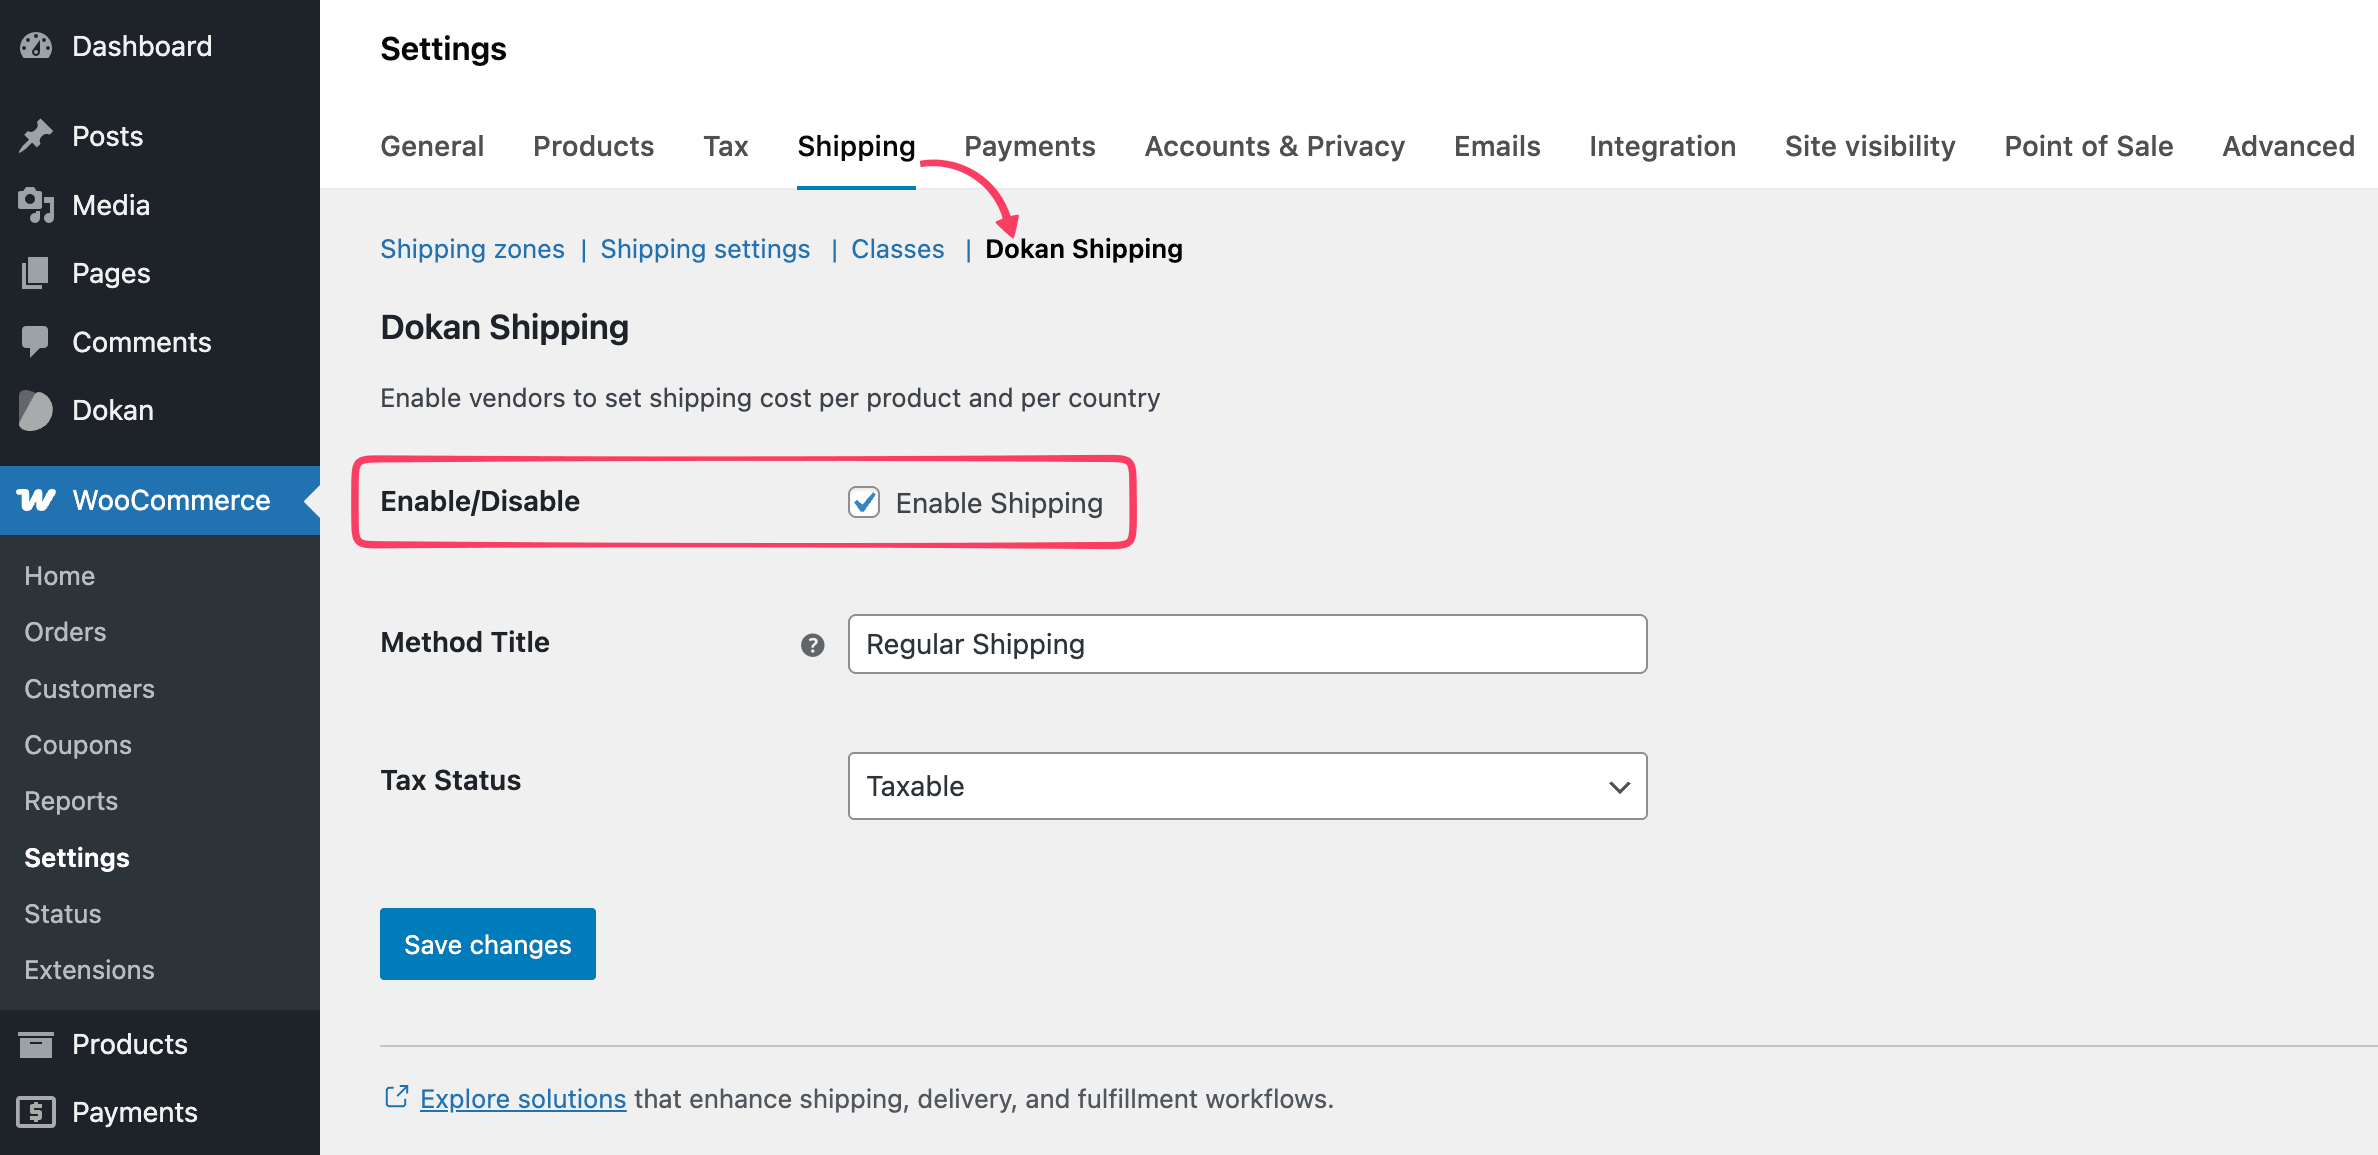
Go to:
Without this step, vendors won’t see shipping options in their dashboard.
Step 2: Vendor Enables Shipping
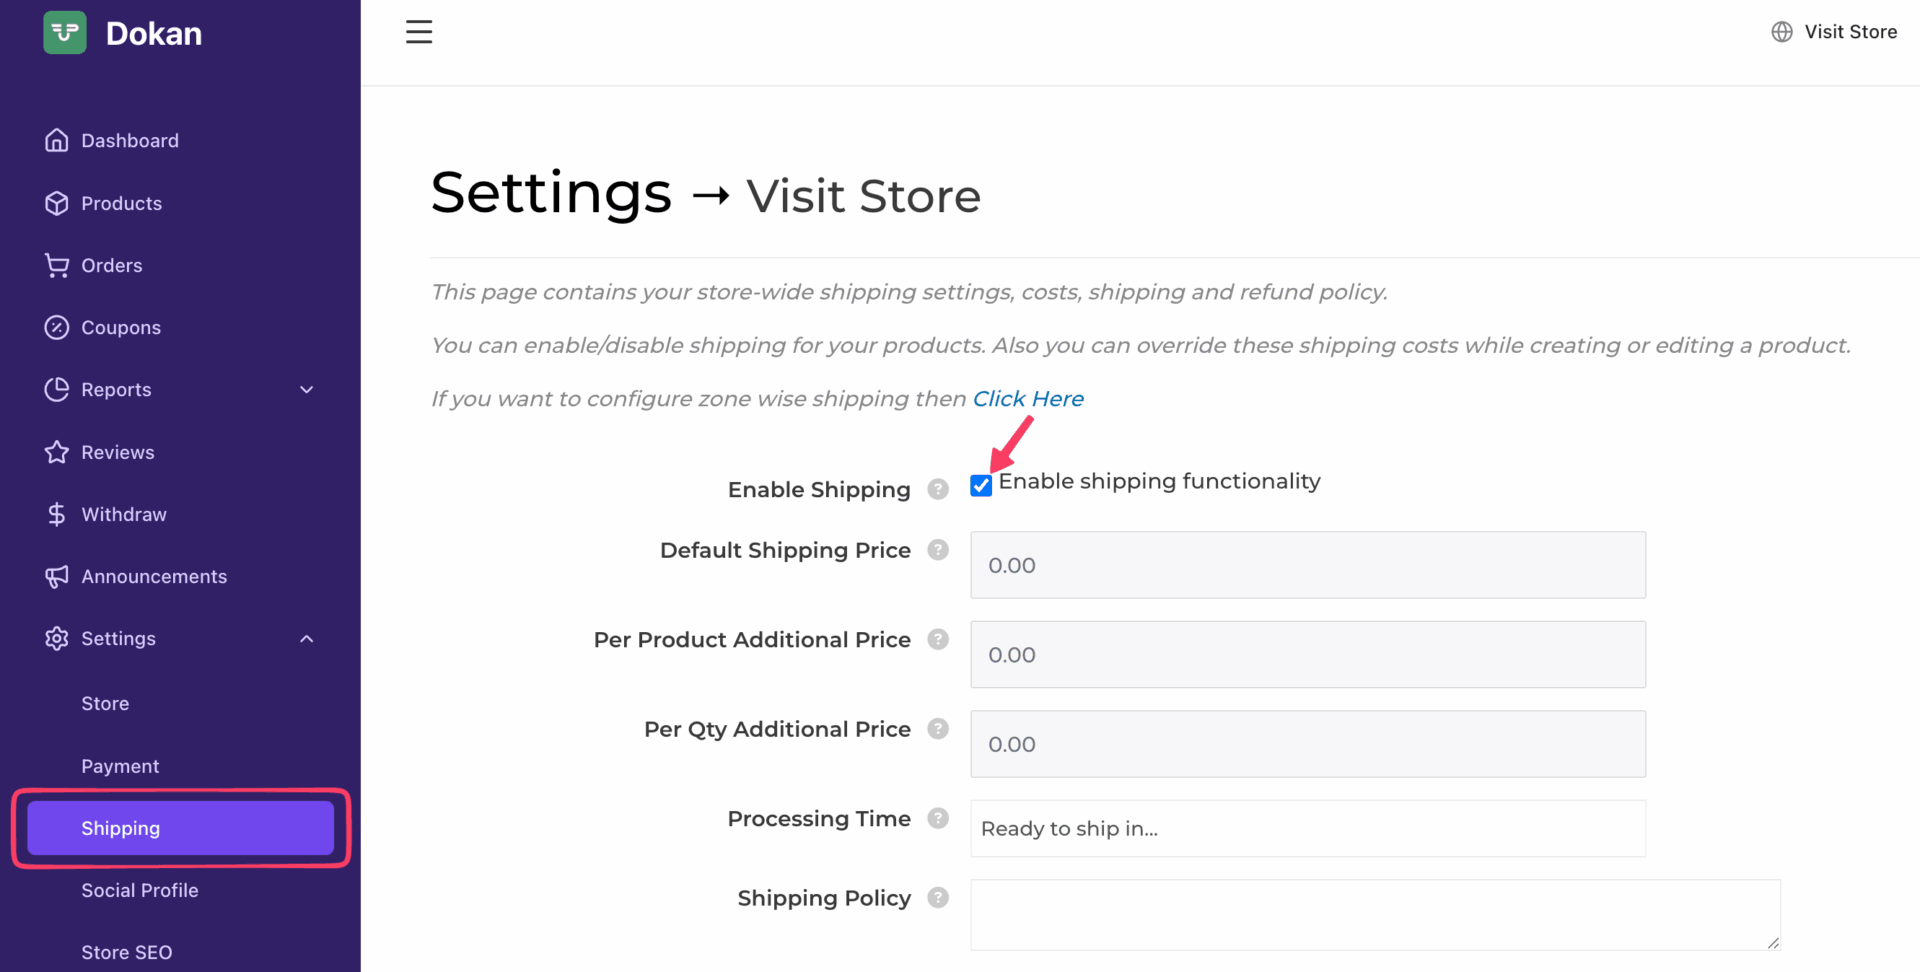
Now switch to a vendor account. From the vendor dashboard:
This switch activates vendor-level shipping. If it stays off, Dokan will not apply any vendor-specific rules.
Step 3: Set the Default Shipping Price
The Default Shipping Price acts as the base cost for the first item in an order.
For example:
- Default shipping price = $5
This $5 becomes the foundation of the total calculation. Every order starts here. Keep this number realistic. If it’s too high, customers hesitate. If it’s too low, vendors lose margin.
Dokan allows you to adjust shipping beyond the base price. You’ll see two key fields:
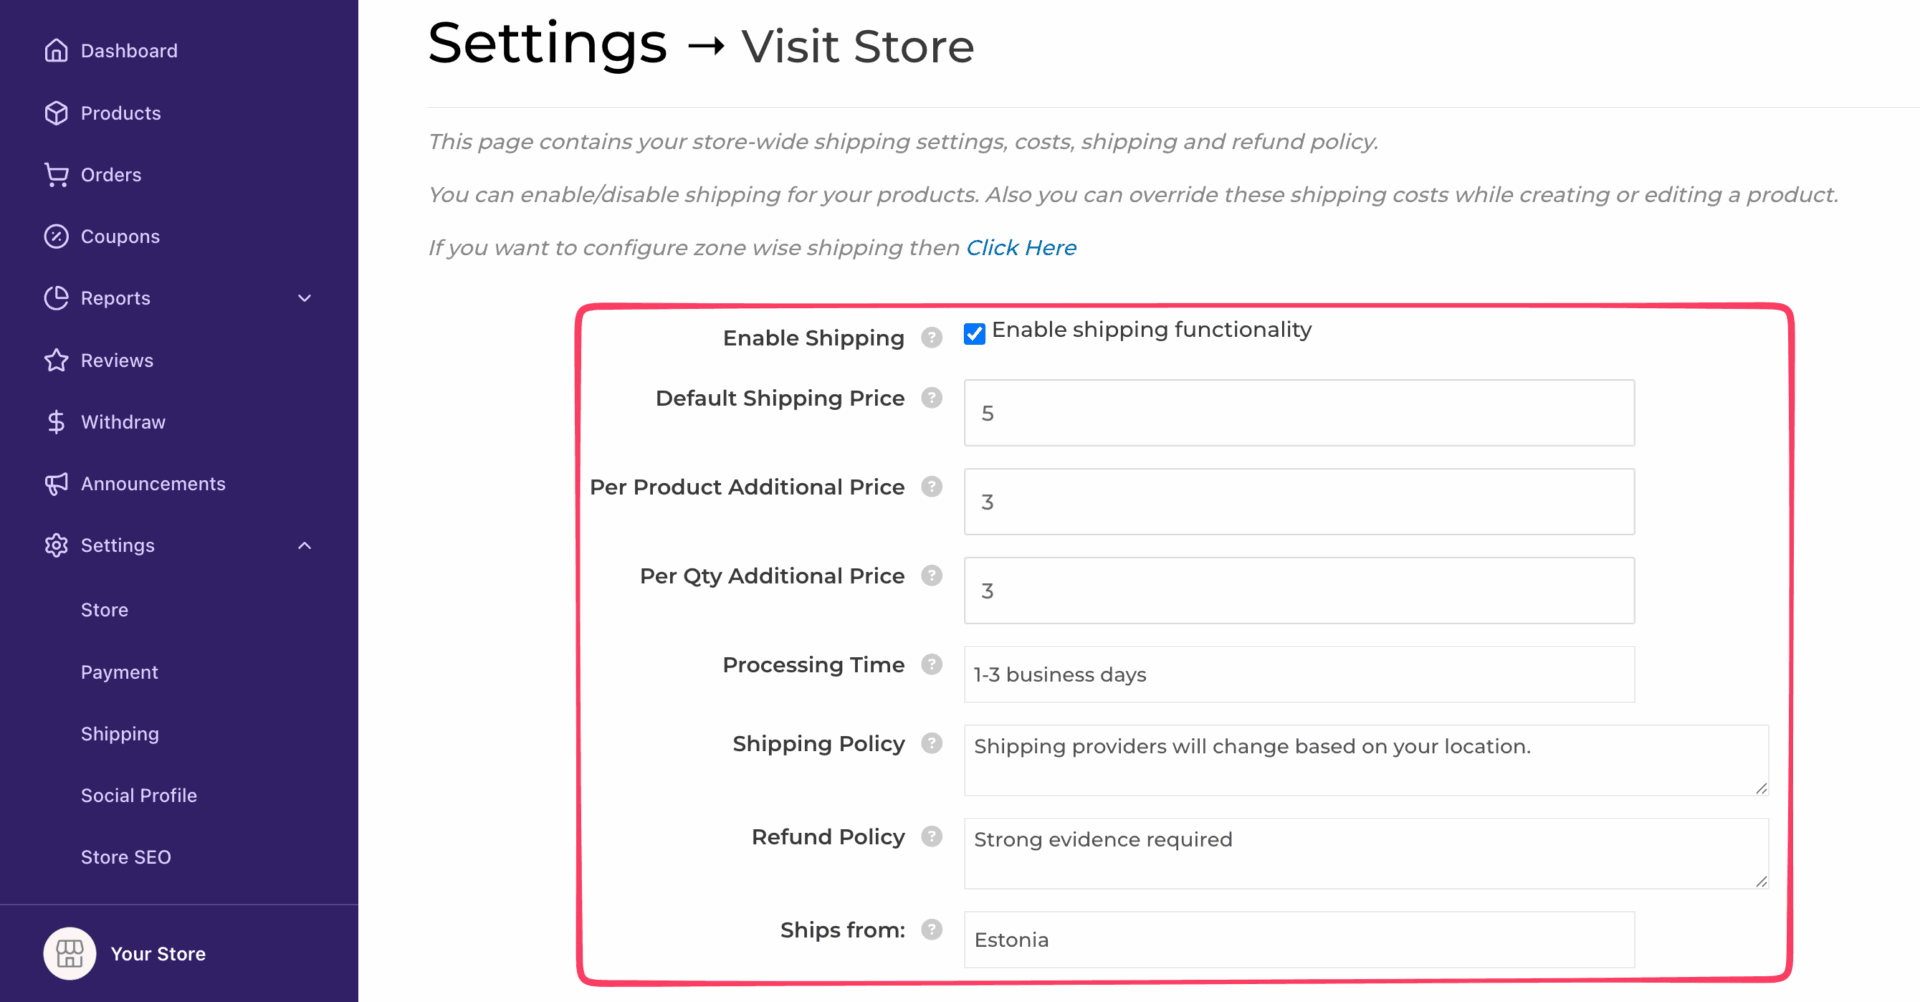
Here’s the difference:
Example:
If per quantity additional price = $3
And a customer orders 4 units
Dokan adds $3 for each extra unit after the first.
That means:
Use these carefully. Too many layered charges can inflate totals fast.
Step 4: Add Location-Based Shipping Rules
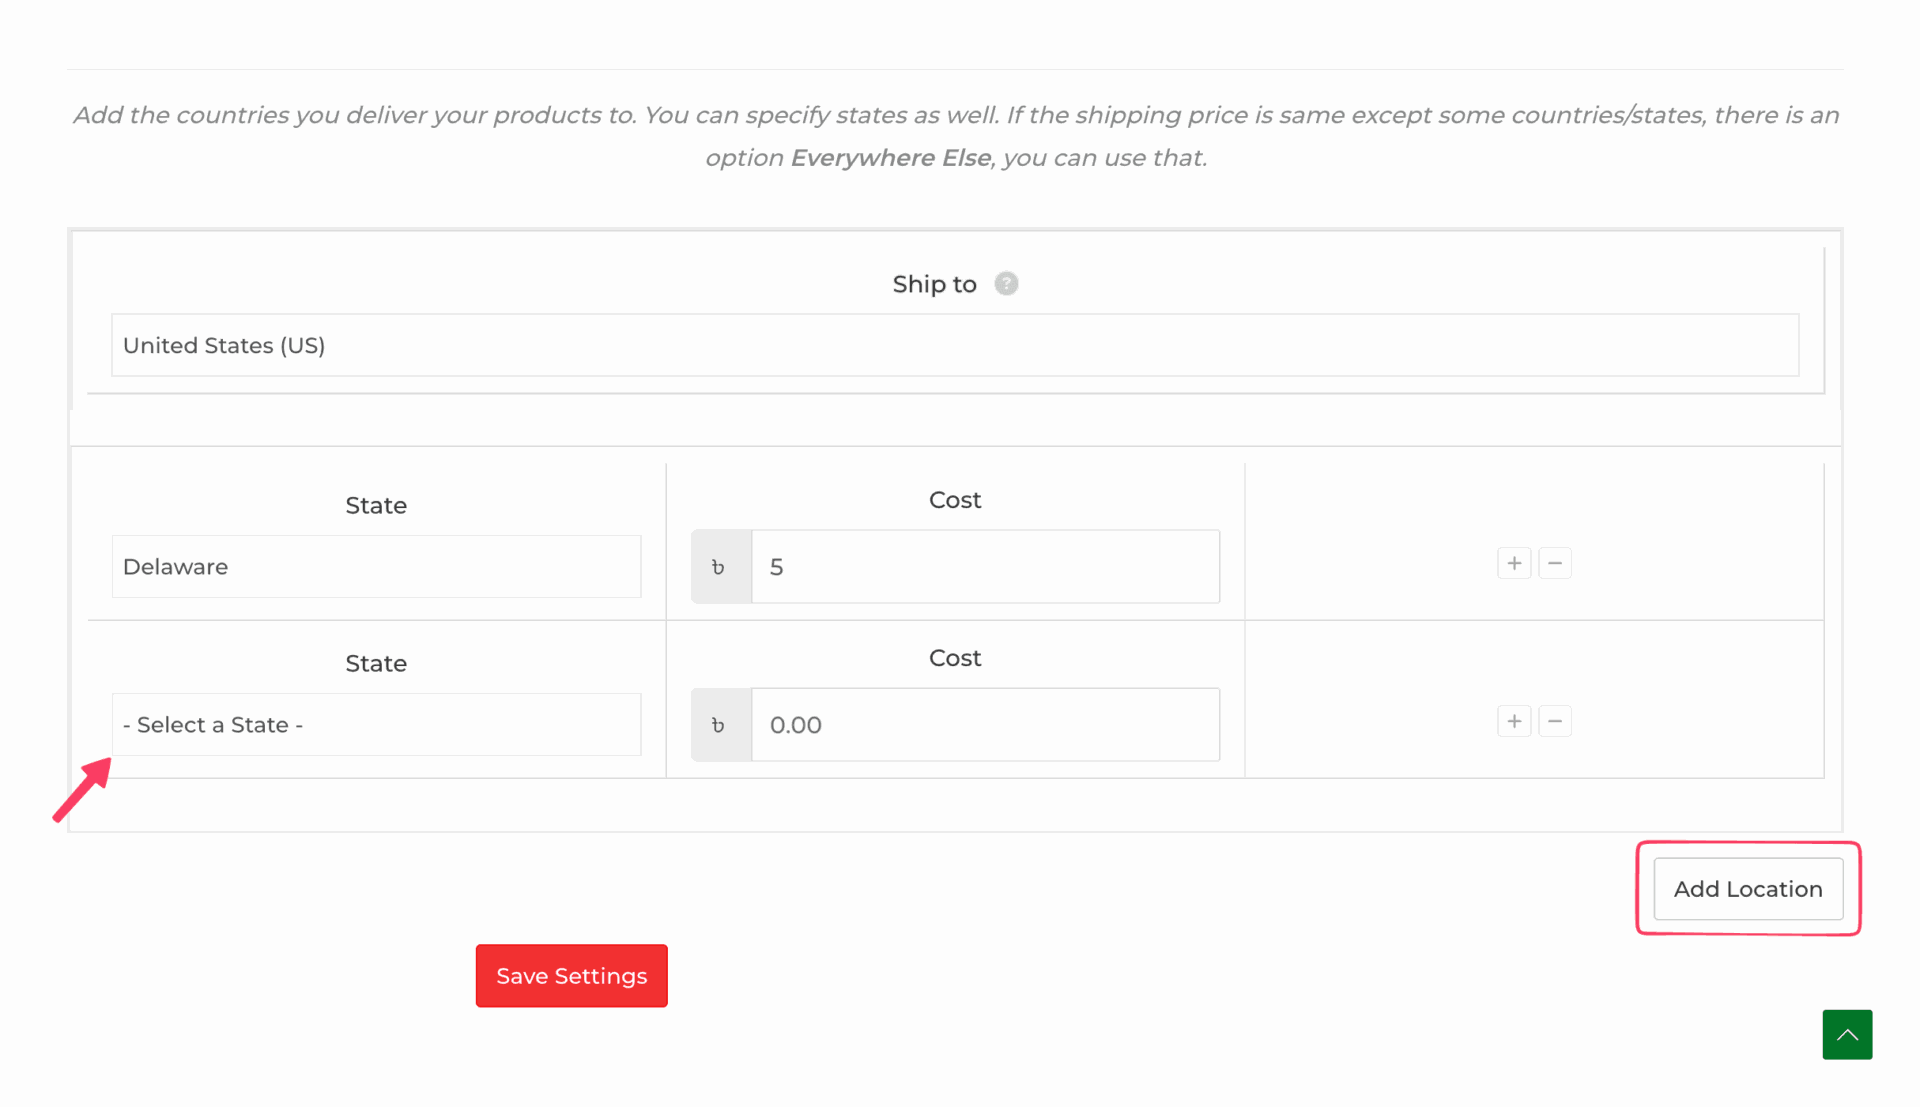
Shipping costs often vary by region. Dokan lets vendors define this clearly. Inside the shipping settings, vendors can:
If a state is not defined, Dokan falls back to the country-level cost. Keep location rules simple. Overlapping or excessive zones can create unexpected totals at checkout.
Step 5: Override Shipping for Specific Products
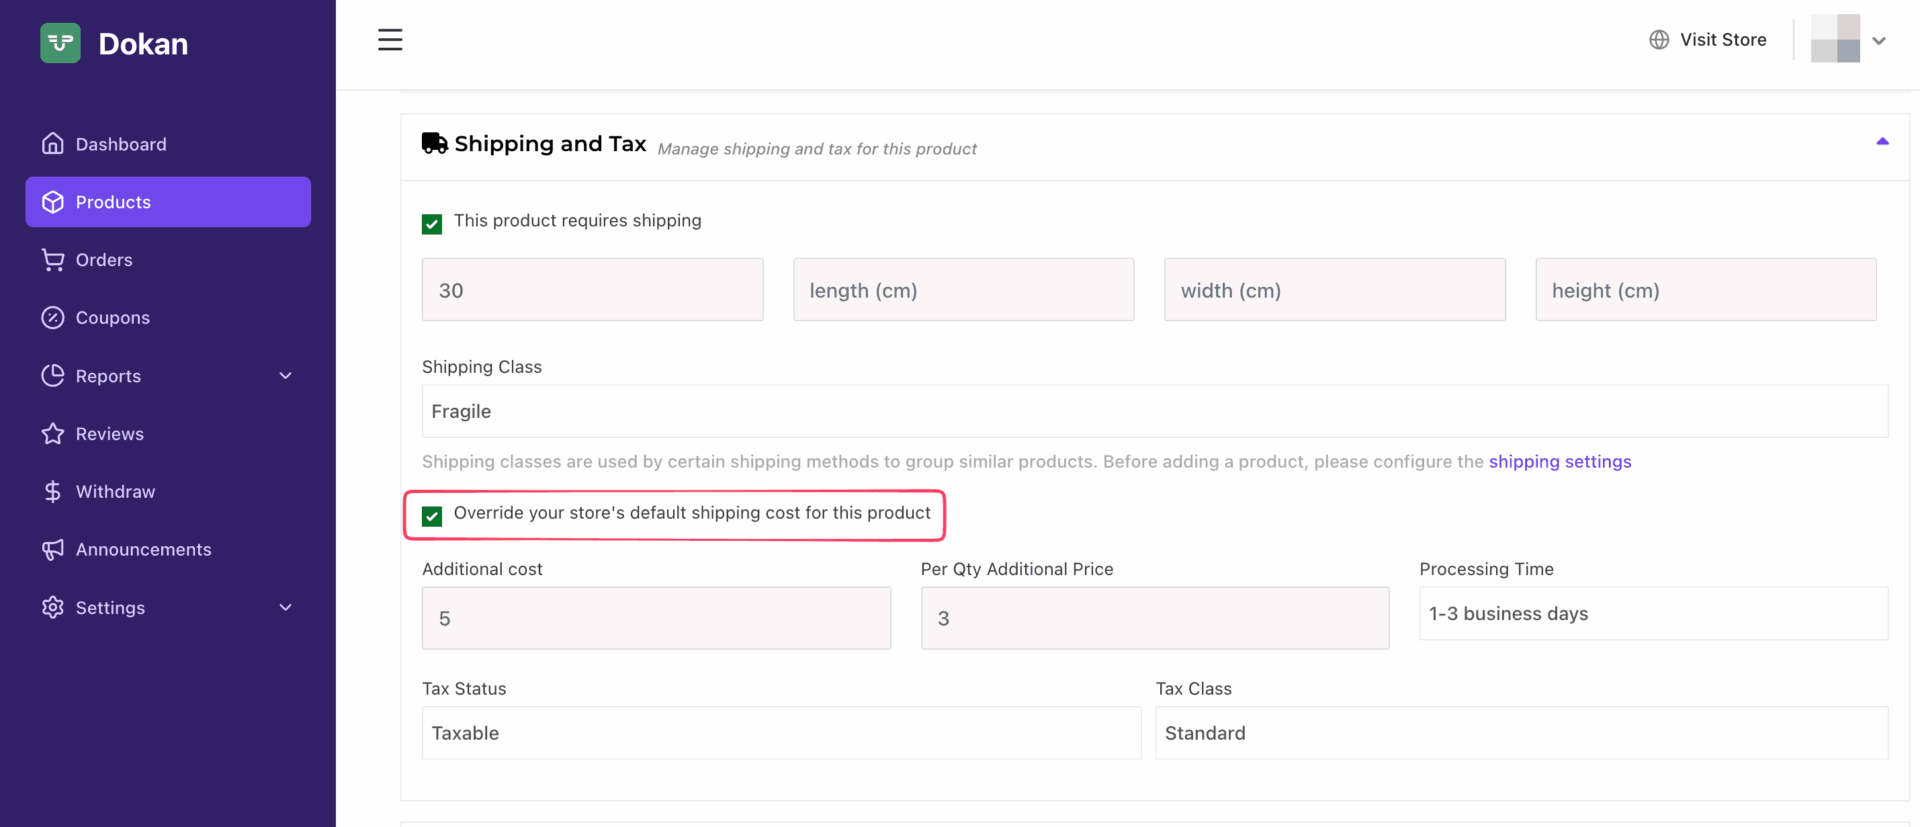
Sometimes one product needs a different base shipping cost. To override:
This override modifies only the base price. All other rules still apply. Use overrides sparingly. Too many adjustments make calculations harder to predict.
Final Step: Test Before Going Live
Before opening your marketplace to customers, test everything. Add products to the cart and verify:
Check if the final total matches your expected formula. If the numbers align, your vendor-specific shipping setup in Dokan is ready.
Keep the structure clean. Avoid unnecessary complexity. When shipping logic is clear, vendors feel confident, and customers trust the checkout process.
How Vendor Shipping Is Actually Calculated (With a Real Example)
Shipping in a multi-vendor setup often stacks multiple layers. If you don’t understand the formula, the totals look random. Let’s simplify it. Assume a vendor sets:
In the following example, the product price is $40, and the quantity is 3, bringing the total product cost to $120. Shipping to Delaware adds $16.
So, the final total comes to $136 ($120 product cost + $16 shipping).
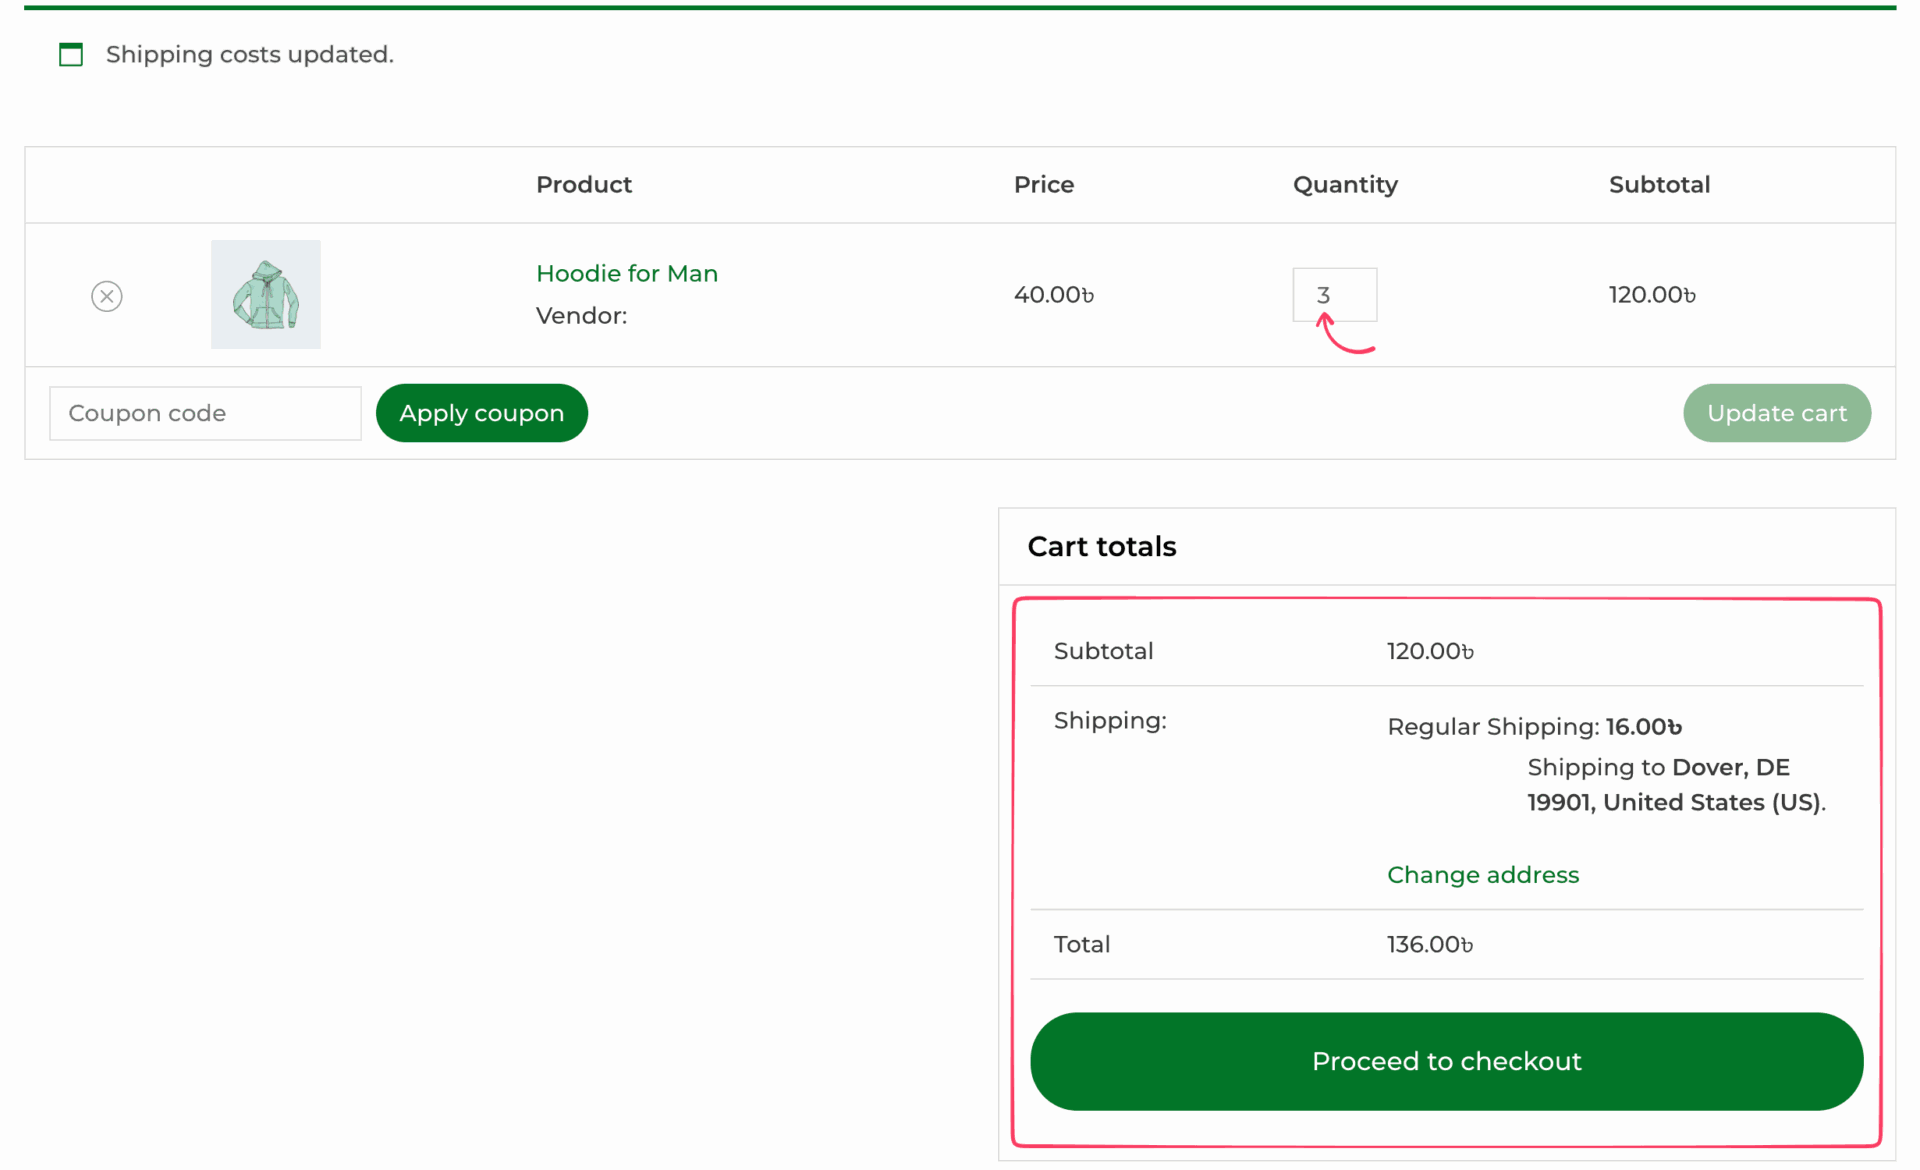
Now let’s calculate step by step. Final shipping cost calculation:
| Component | Amount |
|---|---|
| Base (First Item) | $5 |
| Additional Quantity Cost (Two items = 2 × $3) | $6 |
| Shipping to Delaware | $5 |
| Total Cost | $16 |
If vendors don’t understand this structure, they misconfigure rates. Then customers see unexpected totals at checkout. That leads to support tickets and lost sales.
Common Problems With Vendor Shipping in WooCommerce
Even with multi-vendor plugins, the shipping setup is not always smooth. Here are the most common issues marketplace owners face.
1. Confusing “Per Product” vs “Per Quantity”
Many vendors mix these up.
2. Location Overrides Causing Unexpected Charges
If location rules aren’t set properly, the system falls back to default pricing.
Customers end up seeing higher shipping costs than expected.
3. Overcomplicated Shipping Rules
Too many variables like base price, overrides, per product, per quantity, and location increase errors.
When vendors struggle, admins step in. That slows everything down.
4. Unclear Shipping at Checkout
If shipping isn’t split clearly per vendor, customers get confused.
They may think they’re being overcharged.
5. Plugin Conflicts
Using multiple shipping plugins together can break things due to WordPress plugin conflicts:
Best Practices for Multivendor Marketplace Shipping Strategy

Vendor shipping is not just a configuration; it shapes your margins, ensure customer trust, and influence growth. Keep it simple and scalable.
- Keep Pricing Predictable: Use clear, consistent rules. If totals feel random, customers lose trust. Simple pricing increases conversions.
- Avoid Overlapping Charges: Do not stack too many layers like base, per product, per quantity, handling, and location all at once. Combine logic where possible. Fewer variables mean fewer mistakes.
- Be Transparent at Checkout: Show vendor name, shipping cost per vendor, and a clear breakdown. Transparency reduces disputes and refunds.
- Align Shipping With Vendor Type: Digital sellers may not need shipping. Local vendors may prefer zones. International sellers need country rules. Match shipping logic to vendor category.
- Build for Scale: What works for 10 vendors may fail at 200. Create a structure that is easy to teach, test, and maintain without constant admin fixes.
Vendor-specific shipping works best when it stays predictable, clean, and easy to manage.
Frequently Asked Questions: Add Vendor-Specific Shipping Rates in WooCommerce
How do I charge shipping per vendor in WooCommerce?
WooCommerce alone does not support vendor-level shipping. You need a multi-vendor plugin like Dokan or WCFM Marketplace. These tools allow each seller to configure their own base rate, quantity charges, and location rules.
Can each vendor set their own shipping rate?
Yes. With the right marketplace plugin, vendors can define:
– Default shipping price
– Per product additional cost
– Per quantity cost
– Country or state-based pricing
However, they must configure the settings correctly to avoid miscalculations.
Does WooCommerce split shipping by seller automatically?
No. By default, it does not separate shipping charges per vendor unless you use a multi-vendor extension.
Why is my vendor shipping total higher than expected?
This usually happens because multiple layers are stacked:
– Base price
– Product override
– Per quantity charge
– Location cost
If these are not configured carefully, totals increase quickly.
What is the difference between per product and per quantity shipping?
Per product applies when different products are added to the cart. Per quantity applies when multiple units of the same product are purchased. Mixing these two incorrectly often leads to inflated totals.
When Should You Use Vendor-Specific Shipping?

Shipping should match your marketplace business model. If it doesn’t, you risk incorrect rates, confused vendors, and checkout friction. Let’s find out if you actually need vendor-specific shipping.
| Use Vendor-Level Shipping If… | You Likely Don’t Need It If… |
|---|---|
| You run a multi-vendor marketplace | You run a single-vendor store |
| Sellers ship from different locations or countries | All products have similar shipping costs |
| Products vary significantly in size, weight, or shipping needs | You use flat-rate shipping across your store |
| Vendors manage their own fulfillment | You handle all fulfillment centrally |
Get Shipping Right Before It Costs You Sales
Vendor-specific shipping isn’t a one-time setup task. It’s the system that keeps your marketplace running without drama. Set it up carefully, keep it simple, and test every scenario before you go live. Get it right, and orders flow without friction. Get it wrong, and small pricing gaps turn into a steady stream of support tickets.


Leave a Reply