Having a customized checkout page can surely increase your chances of sales and improve user experience. The checkout page on your site is one of the most significant stages of the buyer journey, you need to make the process as smooth as possible.
WooCommerce is the most popular software for creating an eCommerce store on WordPress. This plugin provides all the tools and functionalities to create and manage an online store including a default checkout page.
Although you can make do with the default one, in order to improve sales and conversion rate you need to customize WooCommerce checkout page.
A customized checkout page is the strategy to improve online store converison rate. The goal is to minimize the checkout flow and remove distractions.
If you are facing this problem, then you need to think about customizing your checkout process. Let us tell you-
Why Customize WooCommerce Checkout Page
According to research-
A whooping 63.3% carts are abandoned during the checkout process and eCommerce industry loses close to 18 billion dollars every year.
By default, WooCommerce provides these default fields on the checkout page,
- Billing details
- First name
- Last name
- Company name
- Country
- Address
- Town/City
- District
- Postcode/ZIP
- Phone
- Email address
- Order notes
All the fields are there but the WooCommerce checkout page isn’t optimized for sales. Think about it, If you are selling digital products, do you need the user’s home address? Collecting the email address will be enough. So you may want to remove those fields.
Also, you may need to make some of the WooCommerce checkout fields required like first name, last name, or email address. And to make the checkout page resonate with your brand, you can alter the placeholder texts, labels, and the button text of the “Place Order” button.
Moreover, by customizing the checkout page, you can add delivery preferences, set a preferred contact method, and more. These changes can and will make your checkout page more user-friendly and help you increase your conversion rate.
WooCommerce is a flexible plugin. It won’t be hard to make these changes. You can use the customization options of a theme, use code snippets if you are comfortable with development, or use the WooCommerce extensions.
We will show you all three ways for WooCommerce checkout page customization.

How to Customize WooCommerce Checkout Page – 3 Easy Methods
There are three ways you can easily customize the WooCommerce checkout page.
- If you are using the popular Storefront theme, then you can use its default settings to redesign the checkout page.
- You can also use custom CSS codes to redesign the checkout page. If you have technical knowledge then you can try this method or you can hire a developer to do it.
- Finally, WooCommerce provides a few excellent for editing the checkout page. We will mention them as well.
Let’s start with,
1. Customizing the Checkout Page Using the Storefront Theme
Storefront theme is the official theme of WooCommerce created for eCommerce websites. This is a popular theme as it has more than 200000+ active installations.
This method is for users who have just started their eCommerce website or already built their website with the Storefront WooCommerce theme.
Here’s how you can customize the WooCommerce checkout page using the Storefront theme.
Note: The amount of customization with the Storefront theme is very limited. You can only add widgets and alter texts.
We are hoping you have already installed the Storefront theme. If you haven’t you can find the theme in the Appearance–> Themes section of your WordPress dashboard and install the theme.
Now go to Appearance –> Customize. There you will find all the default options of the Storefront theme to edit the checkout page.
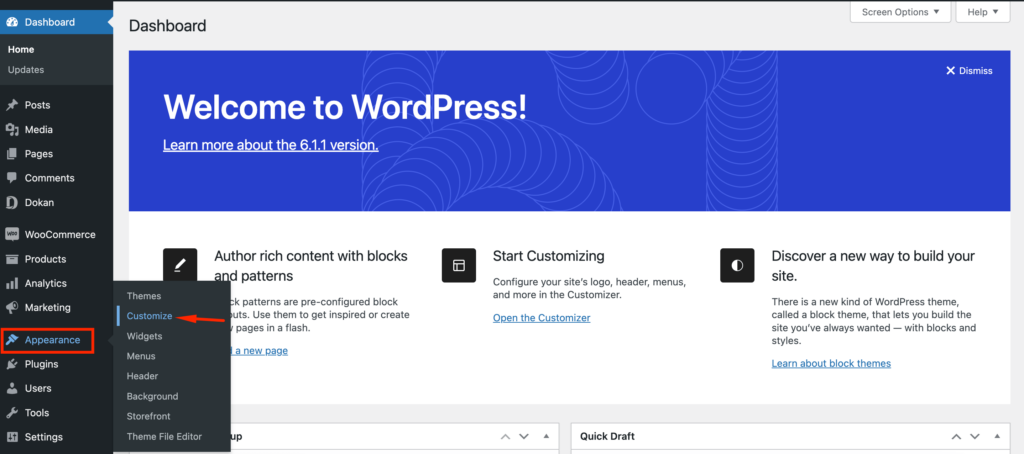
You can use these options to edit every part of your website. But since we are talking about customizing the checkout page, we are going to look at that.
Suppose you want to add a button on top of the checkout form. Go to Widgets–> Below Header.
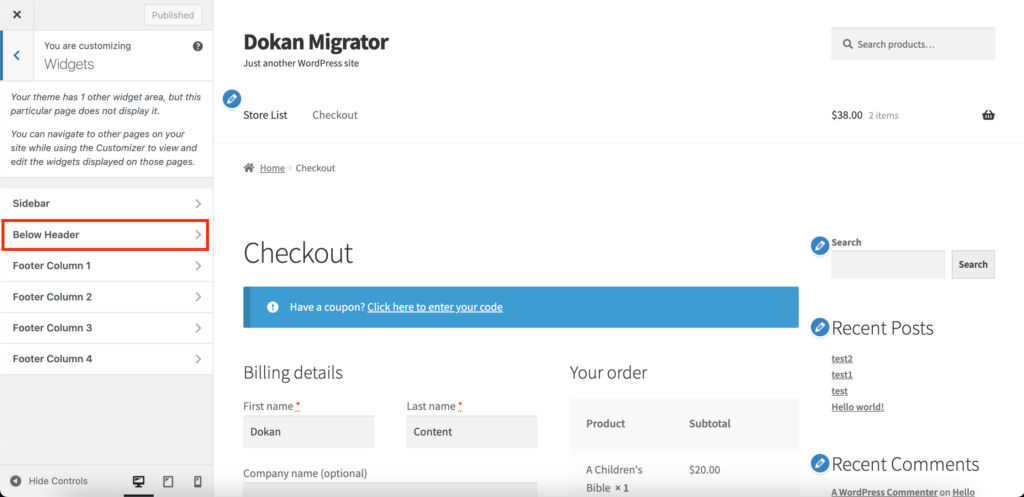
Now, click on the “+” button and type the button in the search box.
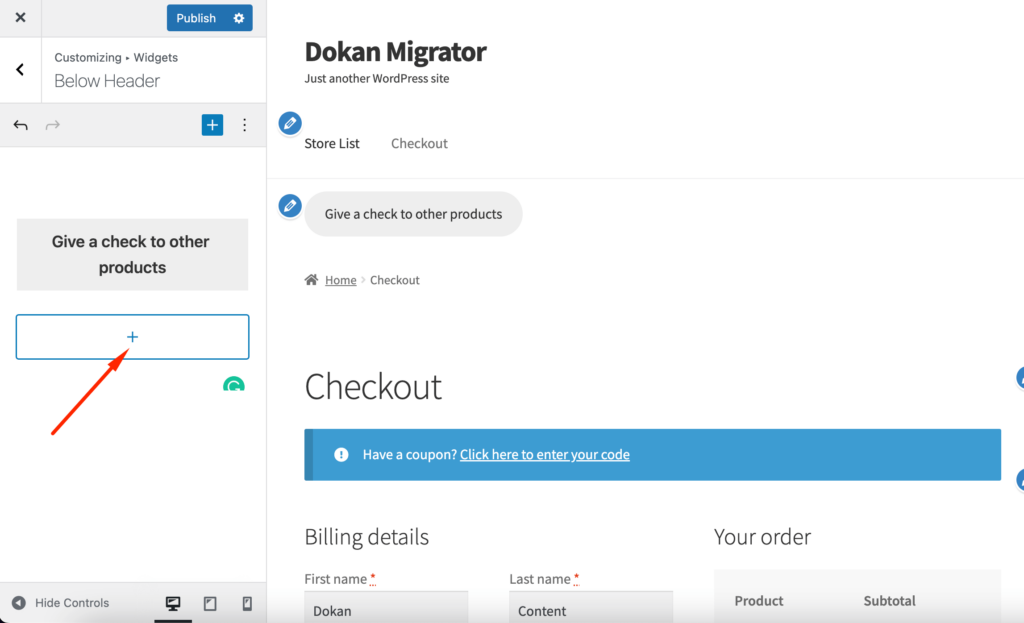
You will see a button added below the header on the checkout page. You can add your preferred text and the product links to the button.
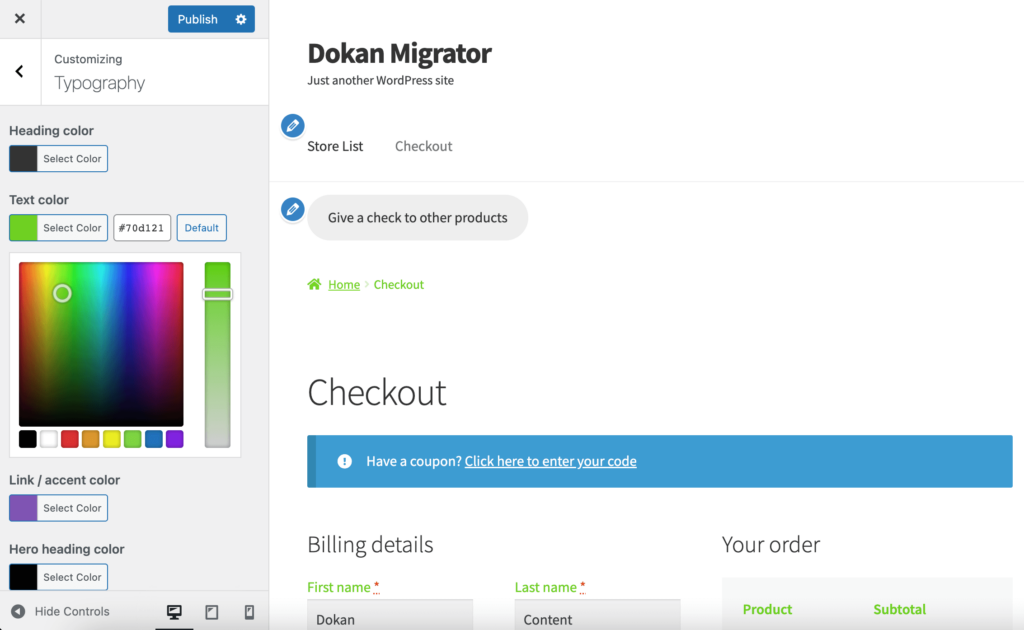
If you want to alter the typography of the checkout page to make it visually appealing and represent your brand, you can do that as well.
Just go to the Typography section. There you will be able to change the Heading, Link, Text, and Hero Heading colors.
This is how you can use the Storefront WordPress theme to make changes to your checkout page.
2. Using Custom CSS Codes to Customize Checkout Page
As you can see, using the Storefront theme gives you limited options to customize the checkout page. Also, what if you don’t have the Storefront theme installed and using other eCommerce themes?
Then you can use custom CSS codes. Yes, without using plugins, you can use codes to customize the WooCommerc checkout page.
Note: You need to all these custom CSS codes to your child theme. Otherwise, you risk breaking your website design.
Here are the main high-level tags, with classes and IDs,
<body class="woocommerce-checkout">
<div class="woocommerce">
<form class="woocommerce-checkout"> <div id="customer_details" class="col2-set">
<div class="woocommerce-billing-fields">
<p class="form-row">
<div class="woocommerce-shipping-fields">
<p class="form-row">
<div class="woocommerce-additional-fields">
<div id="order_review" class="woocommerce-checkout-review-order"> <table class="woocommerce-checkout-review-order-table">
<div id="payment"> <ul class="wc_payment_methods payment_methods methods"> <div class="form-row place-order">Note: You can use the Inspect button on the checkout button/pages to find these tags and ids.
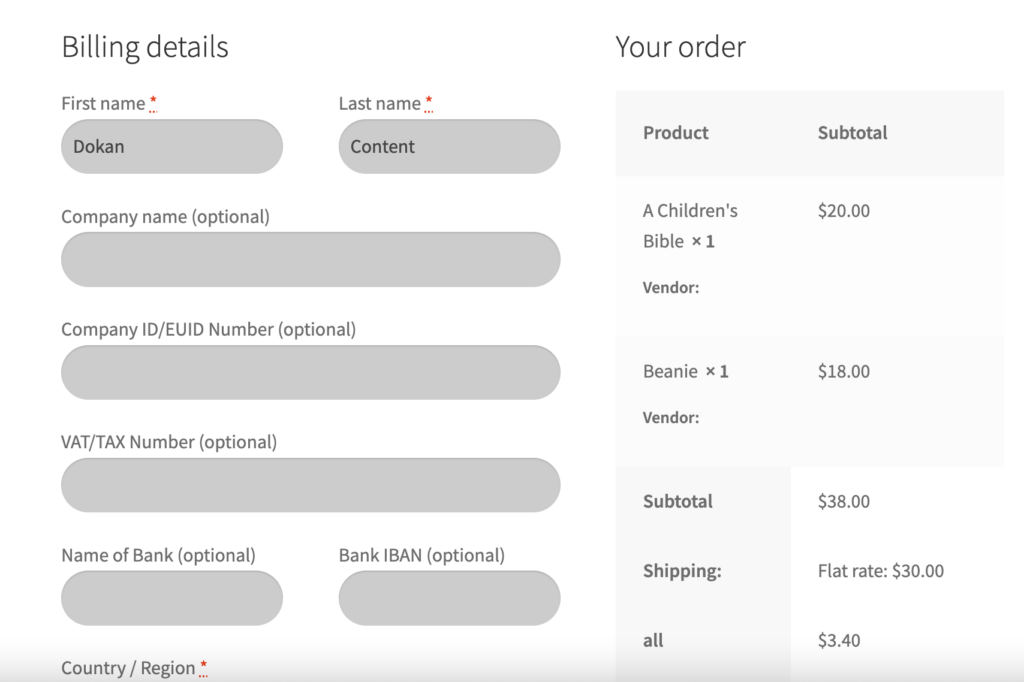
If you want to change the background color of text input boxes and give them rounded corners, you would add this code to your child theme,
form.woocommerce-checkout input[type="text"] {
 border-radius: 3px;
 background-color: #ccc;
 color: #444;
}
Here’s how it will look,
Or if you want to remove a checkout field, then you need to add this code to your child theme’s functions.php file.
/**
 Remove all possible fields
 **/
function wc_remove_checkout_fields( $fields ) {

    // Billing fields
    unset( $fields['billing']['billing_company'] );
    unset( $fields['billing']['billing_email'] );
    unset( $fields['billing']['billing_phone'] );
    unset( $fields['billing']['billing_state'] );
    unset( $fields['billing']['billing_first_name'] );
    unset( $fields['billing']['billing_last_name'] );
    unset( $fields['billing']['billing_address_1'] );
    unset( $fields['billing']['billing_address_2'] );
    unset( $fields['billing']['billing_city'] );
    unset( $fields['billing']['billing_postcode'] );

    // Shipping fields
    unset( $fields['shipping']['shipping_company'] );
    unset( $fields['shipping']['shipping_phone'] );
    unset( $fields['shipping']['shipping_state'] );
    unset( $fields['shipping']['shipping_first_name'] );
    unset( $fields['shipping']['shipping_last_name'] );
    unset( $fields['shipping']['shipping_address_1'] );
    unset( $fields['shipping']['shipping_address_2'] );
    unset( $fields['shipping']['shipping_city'] );
    unset( $fields['shipping']['shipping_postcode'] );

    // Order fields
    unset( $fields['order']['order_comments'] );

    return $fields;
}
add_filter( 'woocommerce_checkout_fields', 'wc_remove_checkout_fields' );
However, if you enter this entire code on your file, then you will remove all the fields from the checkout page. So, only include the fields you want to remove.
Also, The Country field is required. If you remove it, orders cannot be completed and your checkout form will give the following error: “Please enter an address to continue.”

If you want to make any required field not required, then you can use this code in your child theme’s functions.php file,
add_filter( 'woocommerce_billing_fields', 'wc_unrequire_wc_phone_field');
function wc_unrequire_wc_phone_field( $fields ) {
$fields['billing_phone']['required'] = false;
return $fields;
}
We are making the Billing Phone field not required. Alternatively, if you’d like to make a field required, change the “false” text to “true” (But don’t include the quotes).
Add the following code to your child theme’s functions.php file to edit the labels and placeholders of your checkout fields. You can customize it to fit your needs,
add_filter('woocommerce_checkout_fields', 'custom_override_checkout_fields');
function custom_override_checkout_fields($fields)
 {
 unset($fields['billing']['billing_address_2']);
 $fields['billing']['billing_company']['placeholder'] = 'Business Name';
 $fields['billing']['billing_company']['label'] = 'Business Name';
 $fields['billing']['billing_first_name']['placeholder'] = 'First Name';
 $fields['shipping']['shipping_first_name']['placeholder'] = 'First Name';
 $fields['shipping']['shipping_last_name']['placeholder'] = 'Last Name';
 $fields['shipping']['shipping_company']['placeholder'] = 'Company Name';
 $fields['billing']['billing_last_name']['placeholder'] = 'Last Name';
 $fields['billing']['billing_email']['placeholder'] = 'Email Address ';
 $fields['billing']['billing_phone']['placeholder'] = 'Phone ';
 return $fields;
 }
You can use these codes to easily customize the checkout page to improve your sales.
3. Premium WooCommerce Extensions to Edit the Checkout Page
If you are not comfortable with using codes on your website, then you use WooCommerce checkout plugins or extensions to redesign your checkout page.
WooCommerce offers a few premium extensions you can use to customize your checkout page. Here is the list,
Checkout Field Editor
The checkout field editor extension will help you add and remove checkout fields, or update the type, label, and placeholder value with a few clicks. You can also mark each checkout field as “required” or “not required.”
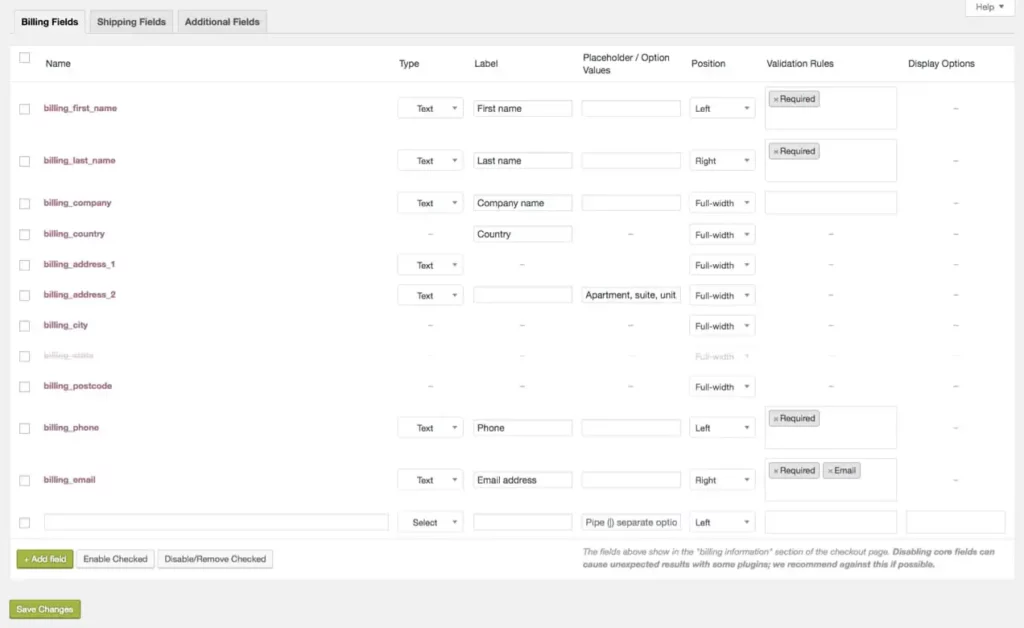
Here are the fields you can choose from,
- Text
- Password
- Textarea
- Drop-down box
- Multi-select box
- Radio inputs
- Checkbox
- Date picker
- Heading.
You can follow the guide on how to configure the Checkout Field Editor.

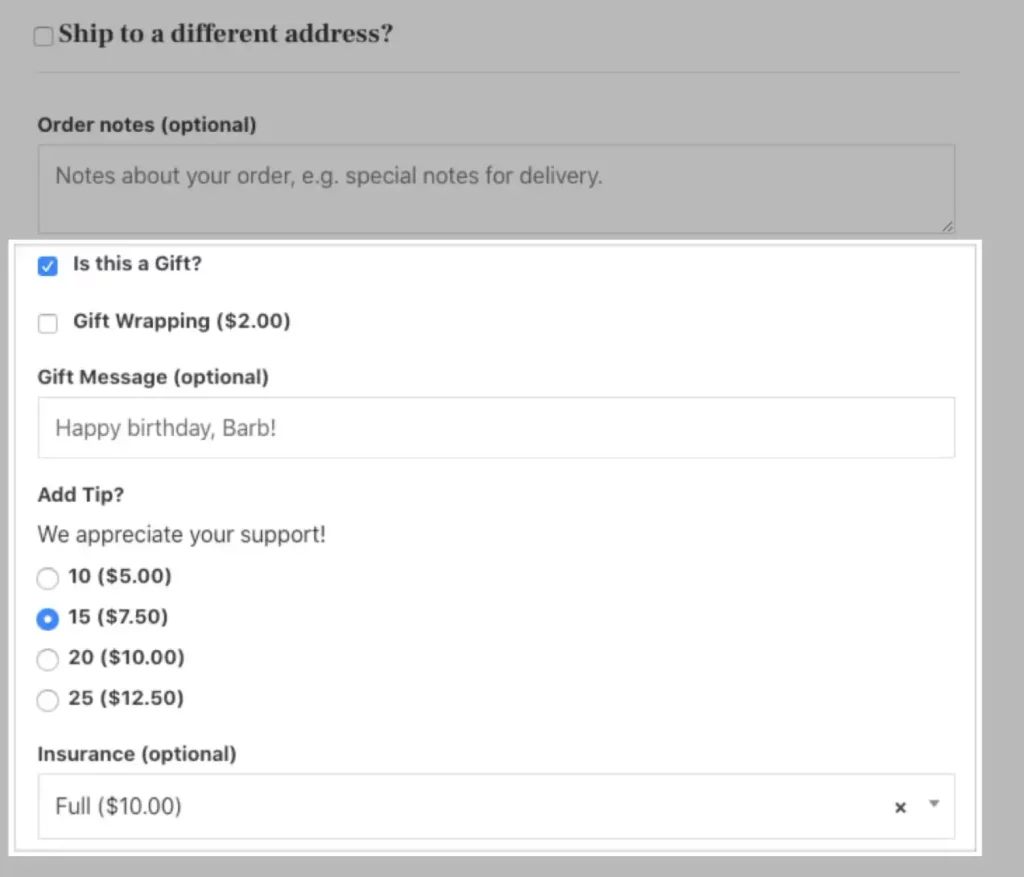
WooCommerce Checkout Add-Ons
The WooCommerce Checkout Add-Ons extension gives you the flexibility to offer free or paid add-ons at checkout. You can add several field types to your checkout page, including text fields, text areas, dropdowns, multi-selects, radio buttons, checkboxes, multi-checkboxes, and file uploads.
You can follow the guide how to configure the WooCommerce Checkout Add-Ons.
WooCommerce One Page Checkout
This extension will help you simplify the checkout process even further. You can turn any page into a checkout page.
You can even add checkout fields to landing pages, which is particularly helpful if you’re a service-based business, sell subscriptions, or offer appointment bookings.
You can follow the guide how to configure the WooCommerce One Page Checkout.
Tips to Optimize Checkout Page & Improve Your Sales
You have learned how to customize WooCommerce checkout page in three ways. Now let’s discuss how a customized checkout page will help you improve your sales.
According to a study, 17% of US online shoppers have abandoned carts due to overly long and complicated checkout process.
There are many ways you can customize WooCommerce checkout page. What we are going to do is tell you the checkout page optimization tips and also tell you how these will help improve sales.
- Remove unnecessary fields. This will shorten the checkout process and make it easy for customers to complete the checkout.
- Allow guest user checkout. That way customers don’t need to go the long way of creating an account and then completing the purchase.
- Provide multiple payment options. This will increase the trust of the customers and enable them to purchase from anywhere.
- Display security badges. Highlight them throughout the checkout process to increase the conversion rate.
- Make the checkout page mobile responsive. Estimates indicate that revenue from mobile commerce will reach approximately 2.5 trillion U.S. dollars in 2025. That should tell you the story.
- Show the checkout flow. You can easily improve the user experience by showing the progress bar at the top of the page. Users will have a sense of accomplishment.
- Apply cross-sell and upsell. You can increase the average order value by cross-selling and upselling your products.
- Use catchy tag lines. Nudge shoppers toward answering “yes” to those questions with psychological triggers at the checkout page.
Use these optimizations when you are doing WooCommerce checkout page customization. Slowly but surely, you will see positive results.
FAQ(s) on Custom WooComerce Checkout Page
Where is the WooCommerce checkout template?
wp-content/plugins/WooCommerce/templates/checkout/form-checkout. php is the main file. It’s recommended that you copy the template folder It’s recommended to copy over the template folder with the files you wish to change from the WooCommerce plugin directory.
Where are WooCommerce checkout fields?
To change the labels of default billing and shipping fields, navigate to WooCommerce > Settings > Checkout Fields > Fields Titles.
What is WooCommerce’s one-page checkout?
One Page Checkout makes it possible to turn any page into a checkout page. It also makes it easier for your customers to buy from these custom checkout pages by displaying both product selection and checkout forms on a single page.
Customize WooCommerce Checkout Page & Improve Your Sale Stats!
The ultimate goal of an eCommerce site is sales. No matter how innovative your products are or how beautifully designed your online store is, if you don’t have sales then all this is worthless.
That is why you need to do everything in your power to increase sales. One of them is having a custom WooCommece checkout page.
We have discussed in detail why a customized checkout page is important, how to create a customized checkout page, and how to optimize it.
Follow our guide and if you get stuck in any of the steps, do let us know in the comment section.
New to WordPress? Learn all about WordPress.
Subscribe to
Dokan blog
We send weekly newsletters, no spam for sure!


Leave a Reply