

If you have ever dreamt of creating an online subscription marketplace, you’re in for an exciting ride. In this step-by-step tutorial, we are going to show you how to create an online subscription marketplace in just 7 steps.
Creating a subscription marketplace may seem a daunting task to you. But to be very honest, it’s quite easier than you think. Because there is WordPress and its dedicated marketplace solution Dokan plugin to create and manage a subscription marketplace with ease.
Don’t be surprised! We are promising to make this journey as easy as possible for you.
So, grab your favorite brew, settle into your comfy chair, and let’s dive into this tutorial to launch your first-ever subscription marketplace!
What is the Subscription Business Model in eCommerce?
The subscription model in eCommerce is a business strategy where customers pay a recurring fee at regular intervals, typically monthly or annually, to access a product or service.
Instead of making one-time purchases, customers subscribe to receive ongoing value- products, services, or exclusive content. This model is gaining popularity across various industries due to its ability to create a steady and predictable revenue stream.
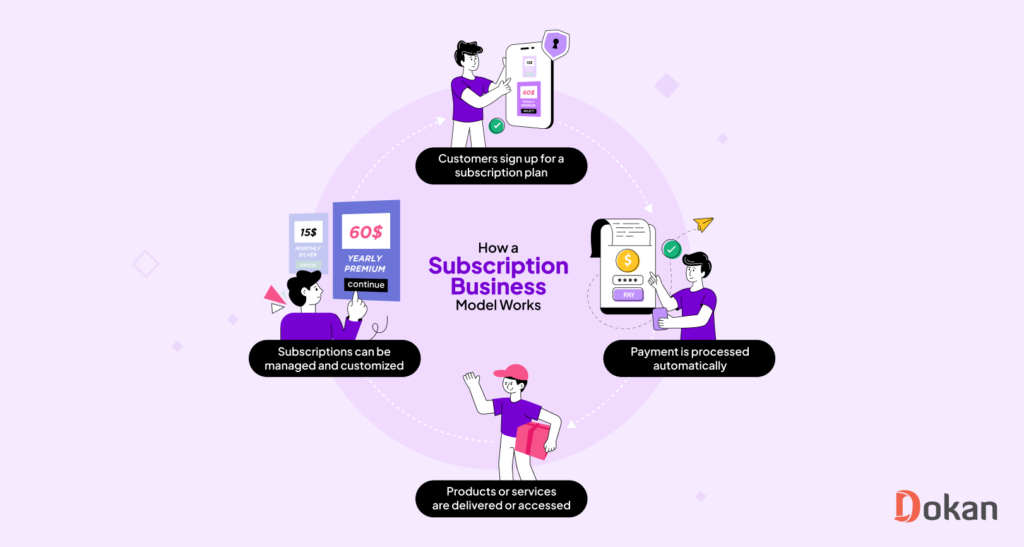
Here’s how it works:
- Customers sign up for a subscription plan: They choose the products or services they want, as well as the frequency of delivery or access (e.g., monthly, quarterly, annually).
- Payment is processed automatically: The customer’s payment information is securely stored, and they’re charged automatically at the start of each billing cycle, ensuring a steady stream of revenue for the business.
- Products or services are delivered or accessed: Depending on the type of subscription, customers either receive physical products delivered to their doorstep or gain access to digital content or services.
- Subscriptions can be managed and customized: Customers typically have the flexibility to manage their subscriptions, such as skipping deliveries, updating their payment information, changing their plans, or canceling altogether.
You may also interested in 👉 How the Dokan Product Subscription Module operates & makes your development process easier.
Major Types of Subscription Business in eCommerce
Here are some major types of subscription businesses in eCommerce, each catering to different consumer needs and preferences:
I) Subscription Boxes:
- Description: Subscribers receive curated boxes of products regularly, offering a surprise and personalized experience.
- Examples: Birchbox (beauty products), Blue Apron (meal ingredients), and Loot Crate (geek and gaming merchandise).
II) Streaming Services:
- Description: Subscribers pay a recurring fee for access to a library of content, including movies, TV shows, music, or other digital media.
- Examples: Netflix, Spotify, Disney+.
III) Software as a Service (SaaS):
- Description: Users subscribe to cloud-based software applications, receiving regular updates and support as part of their subscription.
- Examples: Adobe Creative Cloud, Microsoft 365.
IV) Digital Subscriptions:
- Description: Subscribers gain access to digital content, such as news articles, books, or audio content, often on a monthly subscription basis.
- Examples: The New York Times (news), Audible (audiobooks), Kindle Unlimited (eBooks).
V) Meal Kit Services:
- Description: Subscribers receive pre-portioned ingredients and recipes, enabling them to prepare meals at home without the need for extensive grocery shopping.
- Examples: HelloFresh, Home Chef.
VI) Fitness and Wellness Subscriptions:
- Description: Subscribers access online fitness classes, wellness programs, or meditation sessions on a regular basis.
- Examples: Peloton (fitness classes), Headspace (meditation).
VII) Clothing Rental Services:
- Description: Subscribers rent clothing items and accessories, rotating their wardrobe without the need for permanent ownership.
- Examples: Rent the Runway, Le Tote.
VIII) Gaming Subscriptions:
- Description: Subscribers gain access to a library of video games, often with the ability to play a variety of titles without purchasing each one individually.
- Examples: Xbox Game Pass, PlayStation Now.
IX) Beauty and Personal Care Subscriptions:
- Description: Subscribers receive regular shipments of beauty or personal care products tailored to their preferences.
- Examples: Ipsy (makeup), Dollar Shave Club (razors).
X) Learning and Skill Development:
- Description: Subscribers access online courses and tutorials covering a range of topics, enhancing their skills and knowledge.
- Examples: Skillshare, MasterClass.
These are the examples of the major types of the subscription business in eCommerce.
Why You Should Create an Online Subscription Marketplace
Creating an online subscription marketplace with multiple vendors can bring several benefits to you as the marketplace owner. Here’s a breakdown of the advantages:
- Diverse Revenue Streams: You can generate revenue from multiple vendors, each offering their unique subscriptions. This diversification helps in stabilizing income and reduces dependence on a single product or service.
- Large Product Catalog: With numerous vendors on board, your marketplace can offer a wide variety of subscriptions, attracting a broader audience. This variety enhances the overall appeal of your platform.
- Brand Recognition: The marketplace becomes a recognized platform for various subscriptions, contributing to brand visibility. As the go-to place for diverse offerings, your brand gains credibility and trust.
- Data Insights: Access to data from multiple vendors provides valuable insights into customer behavior, preferences, and market trends. This data can inform strategic decisions and improvements to the platform.
- Marketing Collaborations: Collaborative marketing efforts with vendors can amplify the reach of your platform. Joint promotions, cross-selling, and co-marketing initiatives benefit both the marketplace and individual vendors.
Now ready to create your online subscription marketplace? Great, let’s jump into the 7-step tutorial!
Create a Subscription Marketplace Using WordPress in 7 Steps

Yes, you can create an online subscription marketplace only in 7 steps. First, take a quick look at the steps, and then we will elaborately discuss each step:
- Prerequisites to Create an Online Subscription Marketplace
- Install Dokan Multivendor Marketplace Plugins
- Upgrade to the Dokan Premium Version
- Install a Dokan Compatible Marketplace Theme
- Enable the Woo Subscriptions Extension
- Configure the Basic Settings of the Dokan Multivendor Plugin
- Design Your Admin Shop
- Allow Vendors to Register on Your Marketplace
Now let’s get started with the details!
Step 00: Prerequisites to Create an Online Subscription Marketplace
Before starting to build your marketplace, there are a few things that you need to know about upfront. We have prepared a list of the required items for creating an online subscription marketplace.
Let’s check the list!
- A WordPress Website
- Dokan Multivendor Marketplace Plugin
- Dokan Product Subscription Module
- Woo Subscription Extension
That’s all!
If you don’t have your WordPress site ready, follow these two blogs to get your job done!
- Get the Best Hosting to Keep Your Site Performance High and Rocking
- How to Install WordPress on cPanel in 10 Minutes
After choosing a suitable hosting for your site, just install WordPress on your cPanel. That’s it! Now you are ready to follow this tutorial!
Step 01: Install the Dokan Multivendor Marketplace Plugin
The Dokan plugin is the most popular free multivendor solution for WordPress with 60,000 active installations and 4.6 out of 5 ratings. It’s easy to use and scale. You can convert any kind of WordPress site into a multivendor marketplace using Dokan Multivendor without writing a single line of code.
Moreover, installing Dokan multivendor is as simple as installing any other WordPress plugin. You can install the plugin directly from your WordPress dashboard.
Simply, go to your WordPress dashboard -> Plugin -> Add New. Then use the search box to type the plugin name “Dokan” and click the “Install” button to install the plugin from the search result.
Don’t forget to activate the plugin by clicking the “Activate” button.

When you install the Dokan plugin for the first time on your WordPress-powered website, you get the opportunity to use this setup wizard. It gives you a step-by-step guideline to set up the Dokan multivendor plugin easily.

You can check our admin mult-step setup wizard for a clearer understanding.
Important note: If you have not installed the WooCommerce plugin in the first place, don’t worry. Because when you install the Dokan multivendor plugin, it automatically installs WooCommerce.
If you find it difficult to configure the Dokan plugin, you can watch our video on the Dokan installation guide.
Step 02: Upgrade to the Dokan Premium Version & Activate the Product Subscription Module
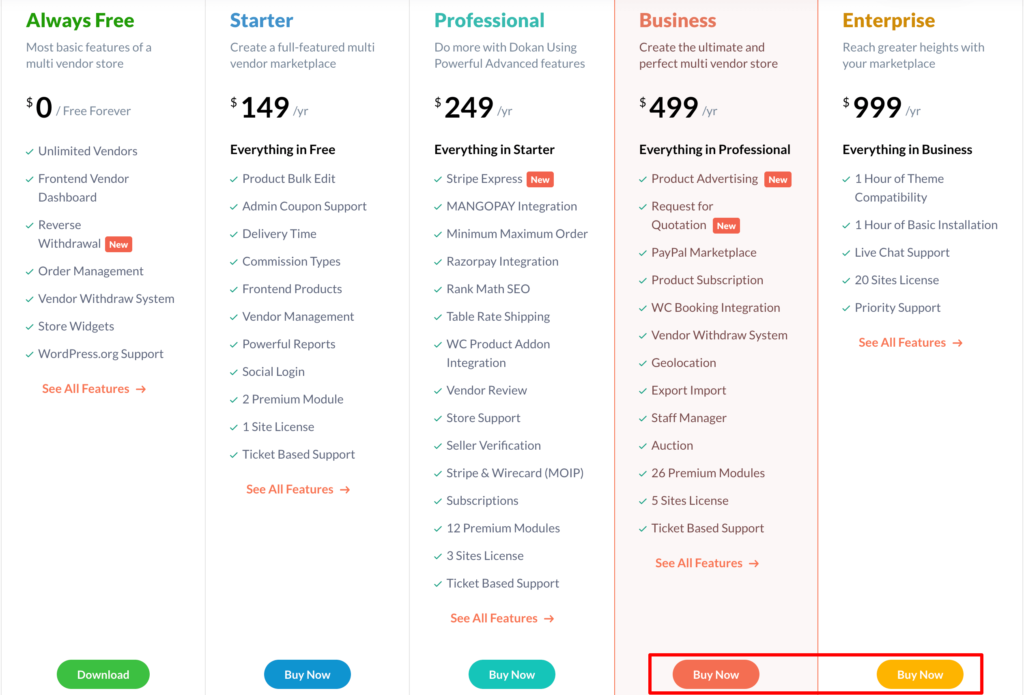
To create a subscription marketplace, you’ll require a premium module called the Dokan Product Subscription Module. This module is included in the Dokan Business and Dokan Enterprise packages.
So, you have to buy either Dokan Business or Dokan Enterprise packages to access this module. Let’s check how to purchase the Dokan premium version and install it on your site.
Visit the Dokan pricing page and choose a package to buy.
After completing the checkout process, go to your weDevs account. Then click on the Downloads option. There you’ll find the zip file of your purchased items. Download that zip file.
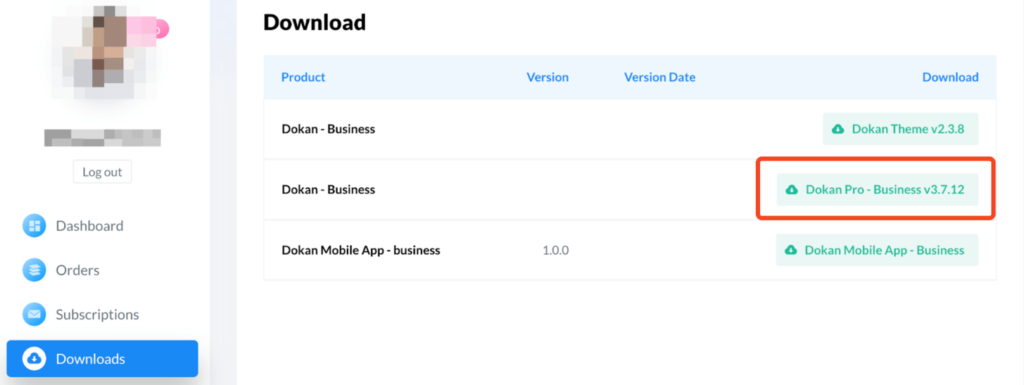
Now navigate to your WordPress Admin Dashboard -> Plugins -> Add New, then click on the Upload Plugin option.
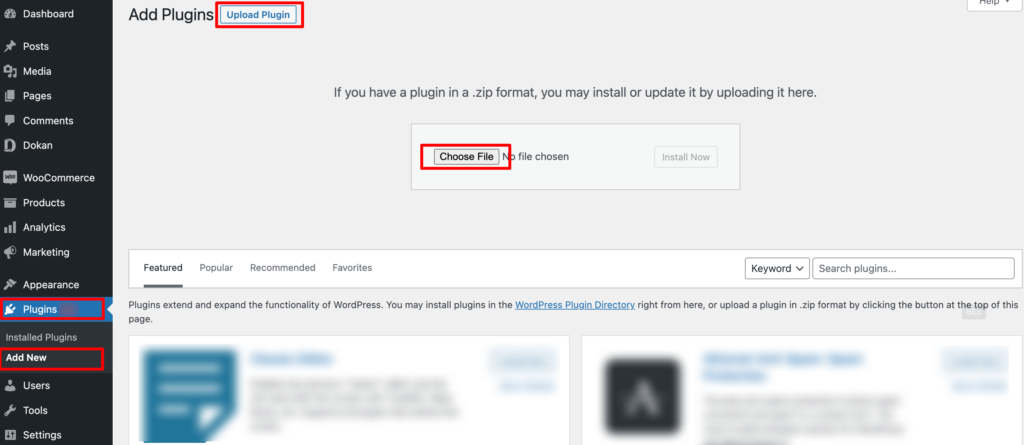
After uploading the plugin, you’ll get the install and activate option to make it usable on your site. Once the plugin is activated, head to the next step to configure the basic settings of the plugin.
For further assistance follow this documentation on the installation of the pro version of the Dokan plugin.
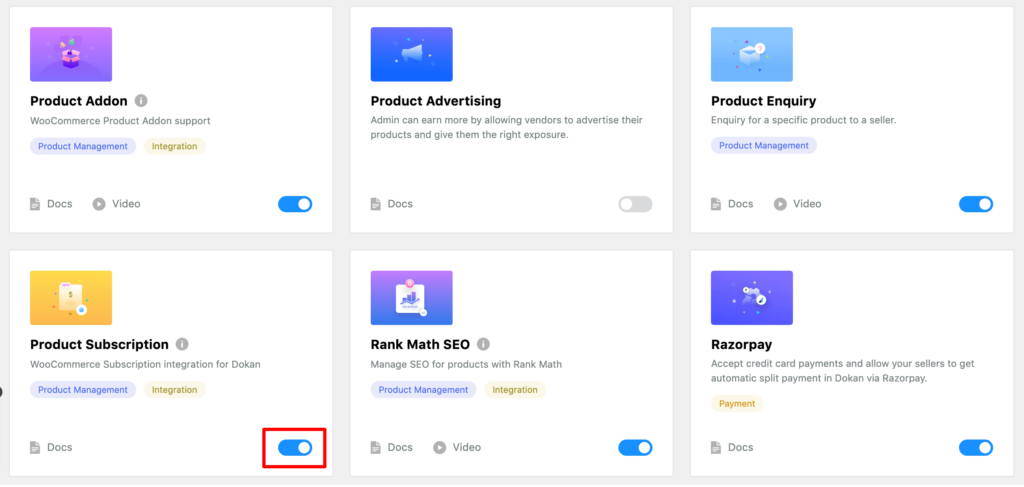
After activating the Dokan premium package, go to your WordPress dashboard -> Dokan -> Modules and enable the Product Subscription module.
Step 03: Install a Dokan Compatible Marketplace Theme
After installing the Dokan multivendor plugin, you need to install a Dokan-compatible marketplace theme. You can install any theme that is compatible with Dokan. The good news is any theme that is compatible with WooCommerce is also compatible with Dokan.
If you are not sure which theme you should consider for designing your online furniture marketplace, we are recommending the “Dokani theme” for you. This theme is created by the same company behind the Dokan plugin. On top of that, this theme is absolutely free to use.
To install this theme on your marketplace, go to your WordPress dashboard -> Appearance -> Themes -> Add New -> Upload Theme. Don’t forget to activate the theme after uploading it.

That being said, if you want to use any third-party premium theme, we have a backup for that as well. We have compiled a list of the best third-party premium Dokan-compatible marketplace themes for you on our website. Click this button to get the list!
Step 04: Enable the Woo Subscriptions Extension
To create an online subscription marketplace, apart from using the Dokan Product Subscription module, you’ll need another extension- Woo Subscriptions. It’s a premium extension of WooCommerce.
Go to the WooCommerce website and find the Woo Subscriptions extension. Since it’s a premium extension, you have to spend $19.92 per month to use this extension on your marketplace.
Buy this extension and install it on your site. Installing a WooCommerce extension is as simple as installing any WordPress plugin.
Navigate to your WordPress dashboard -> Plugins -> Add New Plugin -> Upload Plugin, there you’ll find the Choose File option to upload, install, and activate the extension.
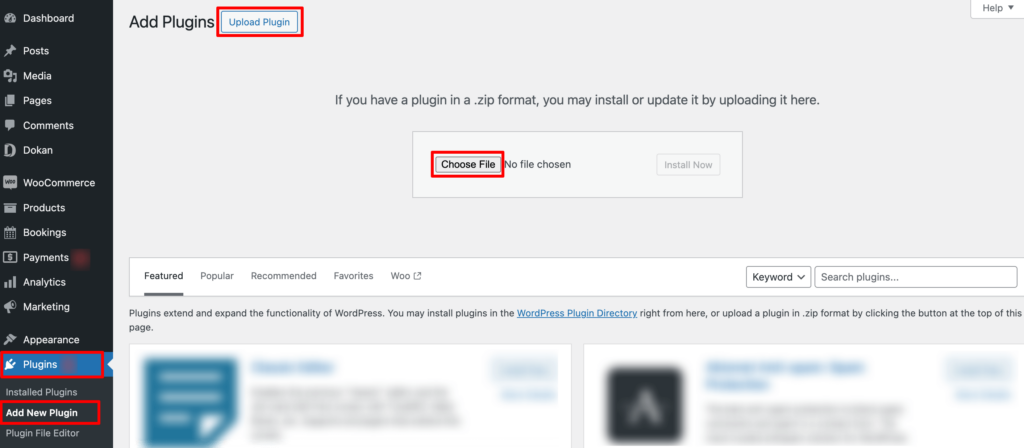
Once you’re done with the extension uploading and activating, let’s proceed to the next step!
Step 05: Configure the Basic Settings of the Dokan Multivendor Plugin
After installing and activating the Dokan plugin, now you need to configure all the basic settings. You will find all the settings options at WP-Admin –> Dokan –> Settings.
You’ll find here:
- General Settings
- Selling Options
- Withdraw Options
- Payment Gateways
- Reverse Withdrawal
- Page Settings
- Appearance
- Privacy Policy

You can select the pages for the vendor dashboard, order page, store listing, and terms and conditions page from here.
Now you need to set the commission type and rate. Go to WP Admin Dashboard -> Dokan -> Settings -> Selling Options. There you’ll find the Commission Type and Admin Commission options.
Set the commission type and rate according to your convenience.

Don’t forget to click the Save Changes button after configuring all the settings. Otherwise, you will lose all the changes that you’ve made now.
Now if you want to set the permalink settings of your product page, you can do that from WP Admin -> Settings -> Permalinks -> Product Permalinks.
For example, using “product” would make your product links like http://yourdomainname.com/store/sample-product/.
This setting affects product URLs only, not things such as product categories.
Select the check box “Custom Base” for product permalinks and write “/product” (or, whatever you want) on the box. Then hit the Save Changes button to save the settings.

Now let’s discuss two basic yet crucial settings of the Dokan multivendor plugin:
a) Configure Payment Gateways
You can’t control your customers which payment gateway they should choose, right? So, it’s always a better decision to ensure several payment gateways on your marketplace.
Dokan supports all WooCommerce-compatible payment gateways. You will get a wide range of choices to make the transaction process easier on your marketplace.
With Dokan Lite you can use non-adaptive payment gateways like PayPal, bank account transfer, cash on delivery, etc. The Pro version supports adaptive payment solutions like Stripe Connect and MOIP.
Go to your WordPress dashboard -> WooCommerce -> Settings, then click on the Payment tab to get the available payment methods.
Note: In case the PayPal option isn’t there, you should install the “WooCommerce PayPal Payments” plugin and you will find the PayPal option here.

b) Enable Withdraw Methods
Another important part of running an interactive online marketplace is to ensure a smooth withdrawal system. Dokan multivendor helps you take care of this section as well.
Go to WP Admin -> Dokan -> Settings -> Withdraw Options. Here you’ll find options to customize the withdrawal method and set the minimum balance a vendor needs to make a withdrawal limit.

You can also customize other Dokan settings following the same process that we have shown here.
We have step-by-step documentation for each Dokan setting, so, if you need any further help with any Dokan setting, don’t forget to check our documentation for Dokan settings, especially created for beginners.
Step 06: Design Your Admin Shop
This is an optional step. You can create your own store on your marketplace if you want to earn some extra money. All you need to do is enable yourself to sell.
Go to Dokan –> Vendors. There you need to enable selling by toggling the button.

Now you can upload products to your shop.
Go to your WordPress Dashboard -> Visit Vendor Dashboard -> Products. Then click on the Add new product.
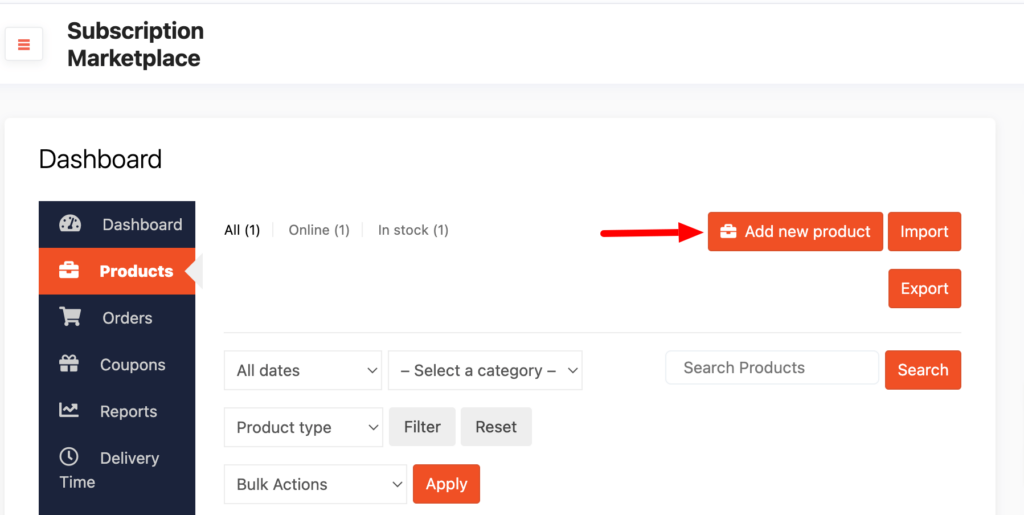
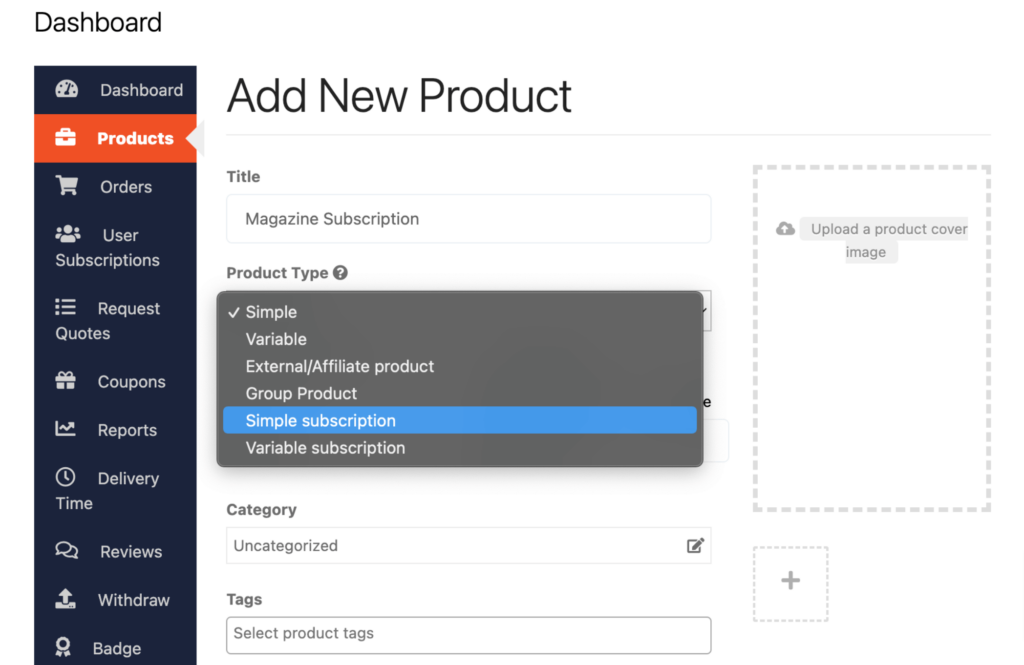
After clicking on the “Add new product” option, you’ll be redirected to a new window where you’ll find options for adding product descriptions, images, pricing, and more.
After adding this basic information, you need to focus on Product Type. You’ll find two types of subscriptions from the Product Type.
- Simple subscription: Using the simple subscription, you’ll sell the same product to everyone in every region. E.g., you sell movie subscriptions for $10 per month to everyone in every region.
- Variable subscription: Using the variable subscription, you’ll sell the same or different versions of the same product to different audiences. E.g., you sell magazine subscriptions for $10 per month in Canada and for $12 per month in Australia.
First, check how to add a simple subscription product!
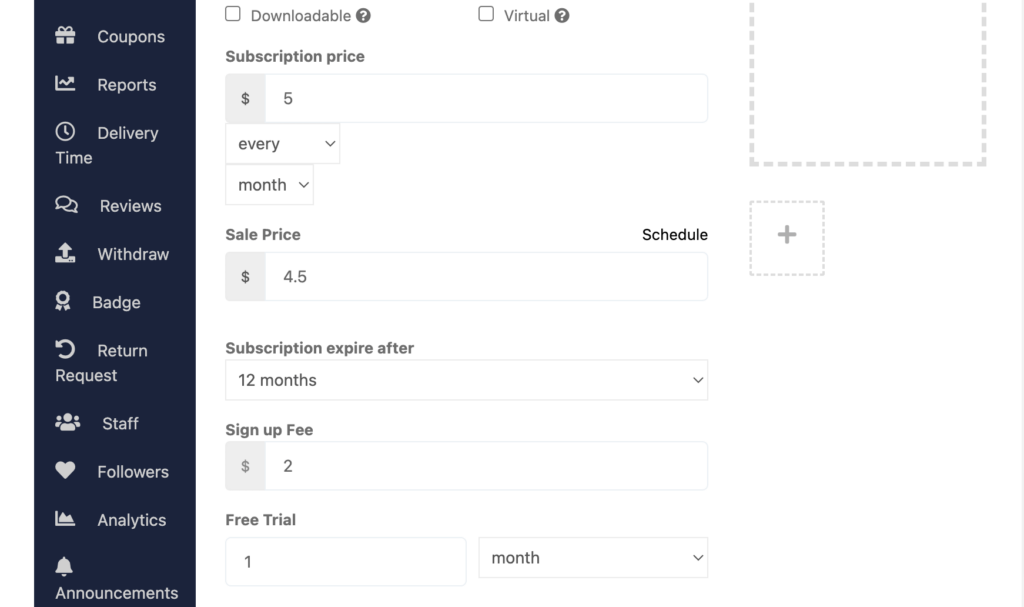
Now you have to fill up a few more information like:
- Subscription Price: You can set a price for every day, week, month, or year.
- Sale Price: Set if you want to give some discount.
- Subscription expires after: Set expiration date ranging from 1 month to 24 months. You can also set it as “Never expire” if you want to continue this subscription product as long as your subscribers pay you the subscription prices.
- Sign-up Fee: Apart from the subscription price, you can also set a sign-up fee. If you don’t charge a sign-up fee, you can leave this field as it is or set a value of 0.
- Free Trial: This field is for if you want to give a free trial to your subscribers. For example, if you create a subscription of $10 per month for 11 months with a 1-month free trial period, the subscription will expire after 12 months.
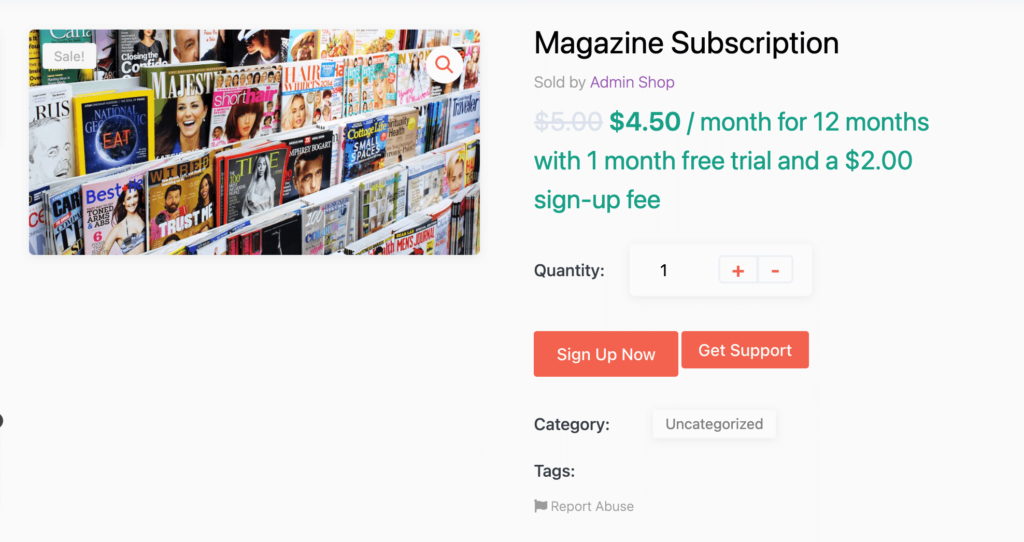
Once you are done with this configuration, click on the “Save Product” option to save all the changes.
Here is the final preview of the simple subscription product that we have just added:
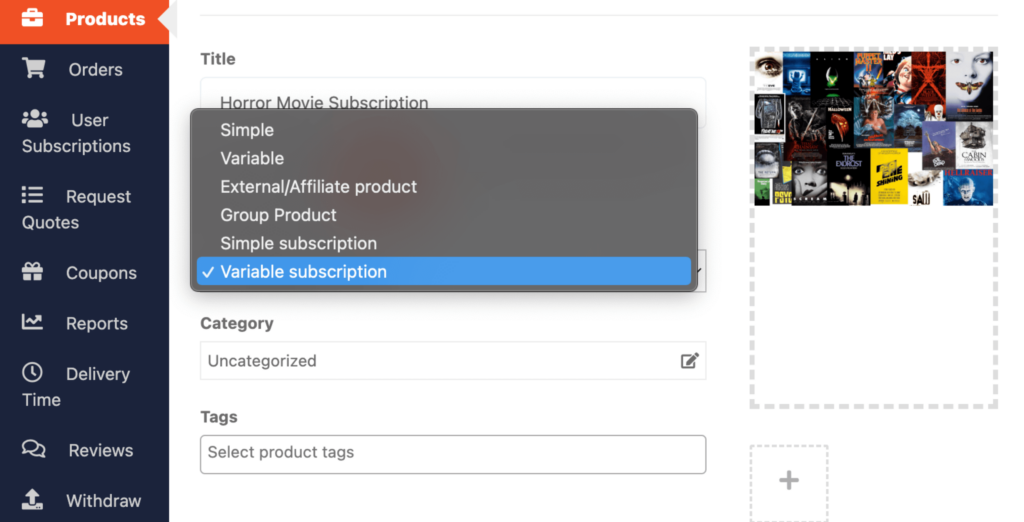
Now if you want to add a variable subscription product, follow this procedure:
Click on the Add new product and choose the Variable subscription option from the Product Type. Also, insert product name, description, etc., and upload images for the product.
Now you need to add Attributes and Variations for the product. Scroll a bit down to get the option.
First, give an attribute name and set the values. Then save the attribute by clicking on the “Save attribute” button. Also, don’t forget to tick on the “Used for variations” option.
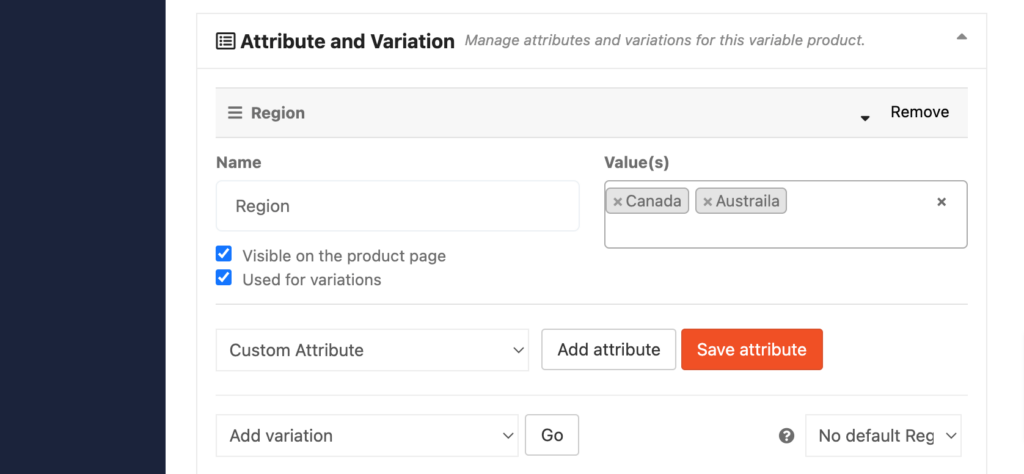
Now create variation. Click on the Go button to create variations.
You should configure these options for each variation if you want to make every variation unique:
- Sign-up fee
- Trial period
- Recurring price
- Billing period
- Subscription length
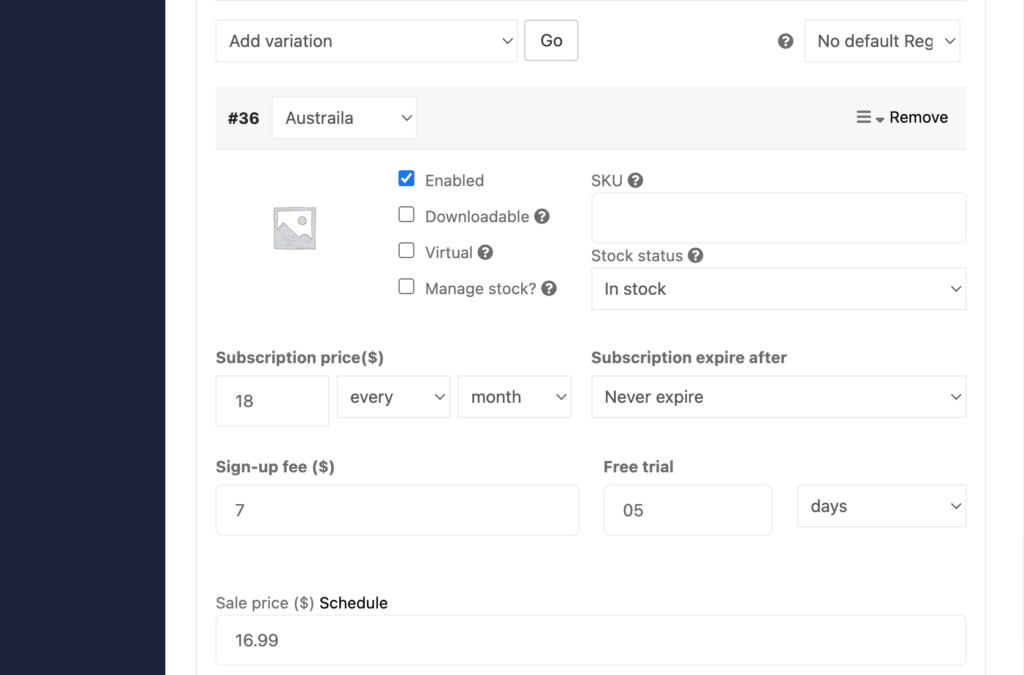
Now click on the Save variation button to save the variation and finally hit the Save product button to publish the product.
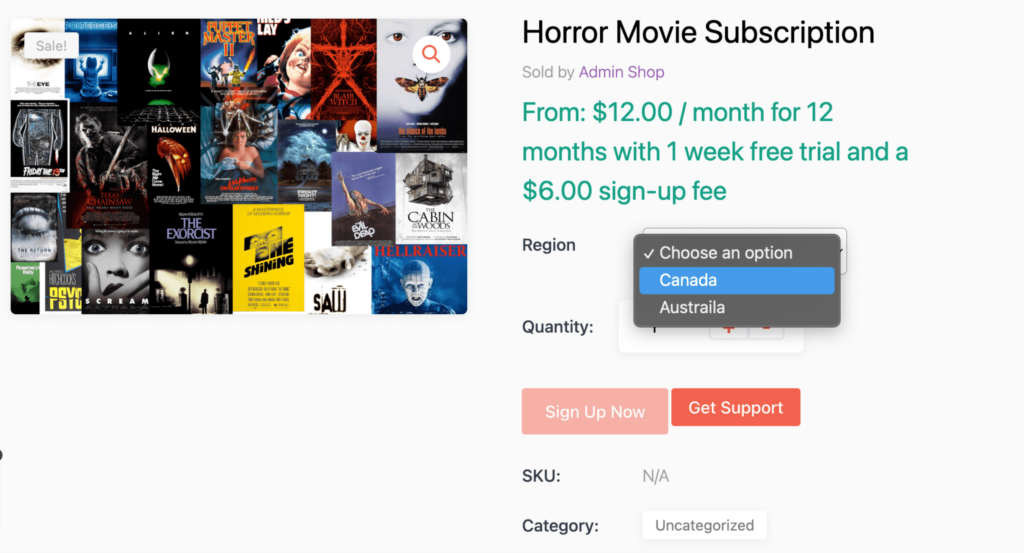
Here is the Variable subscription product preview that we have just added:
That’s all! That’s how you can design your admin store.
Step 07: Allow Vendors to Register on Your Marketplace
After adding all the functionalities and configuring your marketplace, you can invite vendors to sign up for your marketplace. To make sure vendors can sign up for your marketplace, enable the “Anyone can register” option from WP Admin –> General –> Settings.

So, it will open the default registration form for vendors to sign up.

Or you can create customized registration forms with the necessary fields, especially for your marketplace.
For vendors to start selling, you need to enable selling status from Dokan –> Vendors.

Also, if you want the vendors to upload their products, then you need to change the product status from Dokan –>Settings –> Selling options. You need to enable the New Vendors Product Upload.

That’s how you can manage your vendors on your subscription marketplace.

Ready to Create Your Own Subscription Marketplace Now?
Now you know what is an online subscription marketplace, how it works, and how to create a subscription marketplace all by yourself. We promised you that it would be an easy journey. So, after coming this far, what do you think? Was it difficult? I guess, not.
Just follow this 7-step tutorial and create your own subscription marketplace using WordPress and Dokan multivendor plugin now!
That being said, if you have further queries related to this tutorial, feel free to share them with us using the comment box below. We always appreciate your readers’ feedback. Thank you.
Subscribe to
Dokan blog
We send weekly newsletters, no spam for sure!


Leave a Reply