
Starting a digital products marketplace differs from running a physical products marketplace.
Why?
Digital products are intangible. They are usually created, delivered, and consumed electronically. Such as music, software, and ebooks. So, you won’t need to worry about warehouses or shipping. This frees up your time and money. In turn, you can focus on other parts of your business.
Speaking of cost-effectiveness, there’s no better option than WordPress to help you the most in building your marketplace without breaking the bank. Because WordPress itself is a free platform. Moreover, its dedicated eCommerce solution, WooCommerce, is another invaluable free tool available for you.
But it doesn’t stop there.
You’ll get the most popular marketplace solution- Dokan Multivendor for free to create your online digital products marketplace.
So, what are you waiting for?
Let’s dive into this step-by-step tutorial and turn your digital products marketplace dream into a reality!
What You Can Sell on Your Digital Products Marketplace
A digital products marketplace provides a platform for selling a wide range of intangible, electronically delivered goods and services.
Here are some common types of products you can sell on a digital products marketplace:
- Digital Downloads: These are files that customers can download after purchase, such as:
- eBooks: Digital books in various formats (PDF, ePub, Kindle).
- Music: MP3s, albums, or soundtracks.
- Videos: Movies, video courses, tutorials, or stock footage.
- Software: Applications, plugins, themes, or scripts.
- Graphics and Design Assets: Digital design elements for creative projects, including:
- Photos: High-resolution images and stock photos.
- Vectors: Scalable vector graphics (SVG, AI, EPS).
- Templates: Website templates, brochures, or presentation templates.
- Icons: Custom icon sets or individual icons.
- Online Courses and Educational Content: Educational materials and courses, such as:
- Online Courses: Video-based or interactive courses.
- eLearning Modules: Modules, lessons, or quizzes.
- eBooks: Educational books and study guides.
- Digital Art and Creative Work: Digital art and creative projects, like:
- Digital Art: Illustrations, paintings, or digital drawings.
- Photography: Artistic and stock photography.
- Music Production: Custom compositions or sound effects.
- Digital Collectibles and NFTs: Unique digital assets or collectibles, often associated with blockchain technology.
As you know, starting a profitable marketplace requires dedication, innovation, and a deep understanding of your niche. Read this guide to unlocking the secrets of a profitable marketplace.
Why You Should Create a Digital Products Marketplace
We have already said that creating a digital products marketplace is cost-effective if you are using WordPress. There are also a few reasons that should motivate you to go for your digital products marketplace dream:
- No Shipping: Digital products are intangible and can be instantly delivered electronically, eliminating the costs and complexities of physical shipping.
- Sell Worldwide: Digital products can be accessed and purchased by customers from anywhere in the world, breaking down geographical barriers and expanding your market reach.
- High-Profit Margins: Since there are no manufacturing or shipping costs associated with digital products, the profit margins tend to be significantly higher compared to physical goods.
- Never “Out of Stock”: Digital products can be duplicated and sold an unlimited number of times, ensuring that you can always meet customer demand without worrying about running out of inventory.
Now if you’re confident enough to start your digital business by establishing a diverse marketplace, let’s show you the steps below-
How to Build a Digital Product Marketplace Using WordPress and Dokan

Now we are going to show you the steps to create a digital products marketplace. We will keep it as simple as possible and try to finish within as few as 5 steps.
So, here are the steps:
- Install and Activate the Dokan Multivendor Plugin
- Choose and Install a Dokan Compatible Marketplace Theme
- Configure the Basic Settings of the Dokan Multivendor Plugin
- Upload Products and Configure Your Admin Shop
- Allow Vendors to Register to Your Marketplace
Take a seat, get ready with your computer, and start building your dream marketplace by following this simple yet effective guide.
Step 00: Prerequisites to Create a Digital Products Marketplace
To continue this tutorial, you’ll need a few things upfront. Here is the list of prerequisites that you’ll require to create your first-ever digital products marketplace:
- A unique yet easy-to-remember domain name
- A good hosting package
- A ready WordPress website
- WooCommerce plugin
- Dokan multivendor plugin
- A Dokan-compatible marketplace theme
If you don’t know which hosting package will be the best solution for your marketplace, you can check our blog on the best hosting solutions for running a marketplace.
After buying a domain and hosting, all you need to do is install WordPress on your cPanel. That’s how you can ensure a ready WordPress website.
And don’t be worried about the rest of the prerequisites e.g., WooCommerce plugin, Dokan plugin, and a marketplace theme. We will show you in the tutorial how you can manage them. So, let’s get started!
Step 01: Install and Activate the Dokan Multivendor Plugin
Dokan multivendor is by far the most popular and effective solution to create a digital products marketplace. It has more than 60K active installations and 4.6 out of 5 user ratings to date.
You can easily install this plugin from your WordPress dashboard.
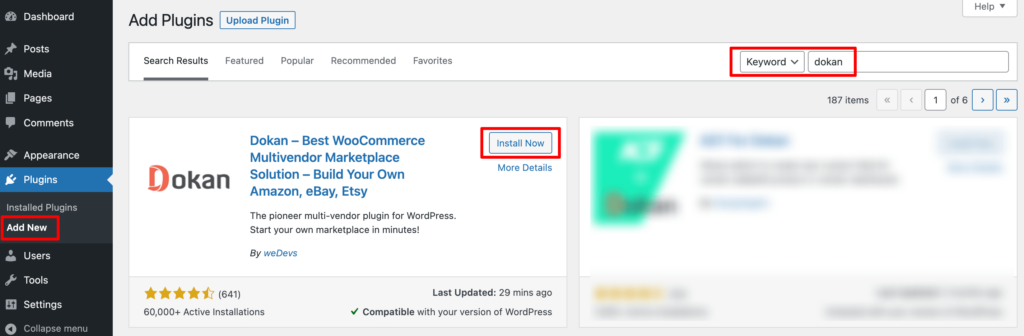
Simply, go to your WordPress dashboard -> Plugin -> Add New. Then use the search box to type the plugin name “Dokan” and click the “Install” button to install the plugin from the search result.
Don’t forget to activate the plugin by clicking the “Activate” button.
When you install the Dokan plugin for the first time on your WordPress-powered website, you get the opportunity to use this setup wizard. It gives you a step-by-step guideline to set up the Dokan plugin easily.

You can check our admin mult-step setup wizard for a clearer understanding.
If you have not installed the WooCommerce plugin in the first place, don’t worry. Because when you install the Dokan multivendor plugin, it automatically installs WooCommerce.

If you find it difficult to configure the Dokan plugin, you can watch our video on the Dokan installation guide.
Step 2: Choose and Install a Dokan Compatible Marketplace Theme
After installing Dokan, you need to install a Dokan-compatible marketplace theme. You can install any theme that is compatible with Dokan. The good news is any theme that is compatible with WooCommerce is also compatible with Dokan.
If you are not sure which theme you should consider for designing your digital products marketplace, we are recommending the “Dokani” theme for you. This theme is created by the same company behind the Dokan plugin. On top of that, this theme is absolutely free to use.
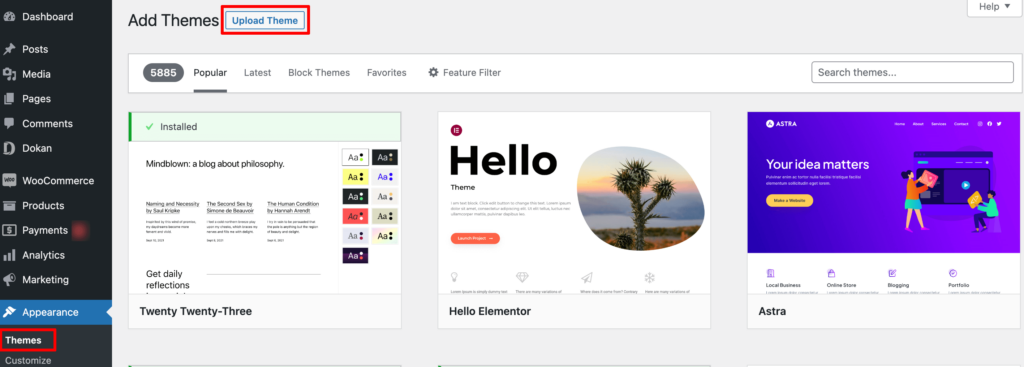
To install this theme on your marketplace, go to your WordPress dashboard -> Appearance -> Themes -> Add New -> Upload Theme. Don’t forget to activate the theme after uploading it.
That being said, if you want to use any third-party premium theme, we have a backup for that as well. We have compiled a list of the best third-party premium Dokan-compatible marketplace themes for you on our website. Click this button to get the list!
Step 3: Configure the Basic Settings of the Dokan Multivendor Plugin
After installing and activating the Dokan plugin, now you need to configure all the basic settings. You will find all the settings options at WP-Admin –> Dokan –> Settings.
You’ll find here:
- General Settings
- Selling Options
- Withdraw Options
- Payment Gateways
- Reverse Withdrawal
- Page Settings
- Appearance
- Privacy Policy

You can select the pages for the vendor dashboard, order page, store listing, and terms and conditions page from here.
Now you need to set the commission type and rate. Go to WP Admin Dashboard -> Dokan -> Settings -> Selling Options. There you’ll find the Commission Type and Admin Commission options.
Set the commission type and rate according to your convenience.

Don’t forget to click the Save Changes button after configuring all the settings. Otherwise, you will lose all the changes that you’ve made now.
Now if you want to set the permalink settings of your product page, you can do that from WP Admin -> Settings -> Permalinks -> Product Permalinks.
For example, using “product” would make your product links like http://yourdomainname.com/store/sample-product/.
This setting affects product URLs only, not things such as product categories.
Select the check box “Custom Base” for product permalinks and write “/product” (or, whatever you want) on the box. Then hit the Save Changes button to save the settings.

Now let’s discuss two basic yet crucial settings of the Dokan multivendor plugin:
a) Configure Payment Gateways
You can’t control your customers which payment gateway they should choose, right? So, it’s always a better decision to ensure several payment gateways on your marketplace.
Dokan supports all WooCommerce-compatible payment gateways. You will get a wide range of choices to make the transaction process easier on your marketplace.
With Dokan Lite you can use non-adaptive payment gateways like PayPal, bank account transfer, cash on delivery, etc. The Pro version supports adaptive payment solutions like Stripe Connect and MOIP.
Go to your WordPress dashboard -> WooCommerce -> Settings, then click on the Payment tab to get the available payment methods.
Note: In case the PayPal option isn’t there, you should install the “WooCommerce PayPal Payments” plugin and you will find the PayPal option here.

b) Enable Withdraw Methods
Another important part of running an interactive online marketplace is to ensure a smooth withdrawal system. Dokan helps you take care of this section as well.
Go to WP Admin -> Dokan -> Settings -> Withdraw Options. Here you’ll find options to customize the withdrawal method and set the minimum balance a vendor needs to make a withdrawal limit.

You can also customize other Dokan settings following the same process that we have shown here.
If you need more help configuring the Dokan general settings, you are in luck! We have step-by-step documentation for every Dokan setting. Just check our Dokan settings documentation and set up your multivendor with ease!
Step 4: Upload Products and Configure Your Admin Shop
This is your marketplace. You are the admin. So, you’ll get commissions from your registered vendors while they sell something from your marketplace. Apart from that, you can also earn by selling products as a vendor from your own marketplace. To do that, follow the below procedures:
Go to Dokan –> Vendors. There you need to enable selling by toggling the button.

Now you can upload products to your shop.
Go to your WordPress Dashboard -> Visit Vendor Dashboard -> Products. Then click on the Add new product.

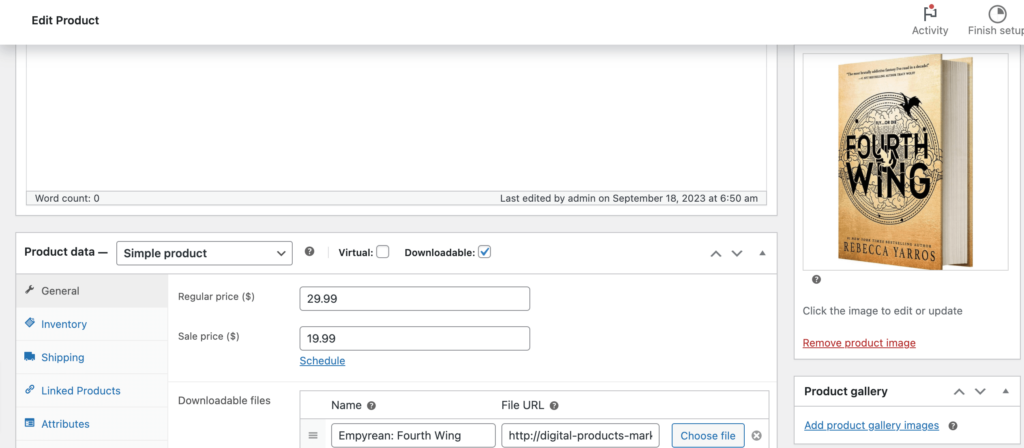
There you’ll find options to add the product title, image, price, description, and more. Most importantly, as it’s a digital product, you have to tick the “Downloadable” box.
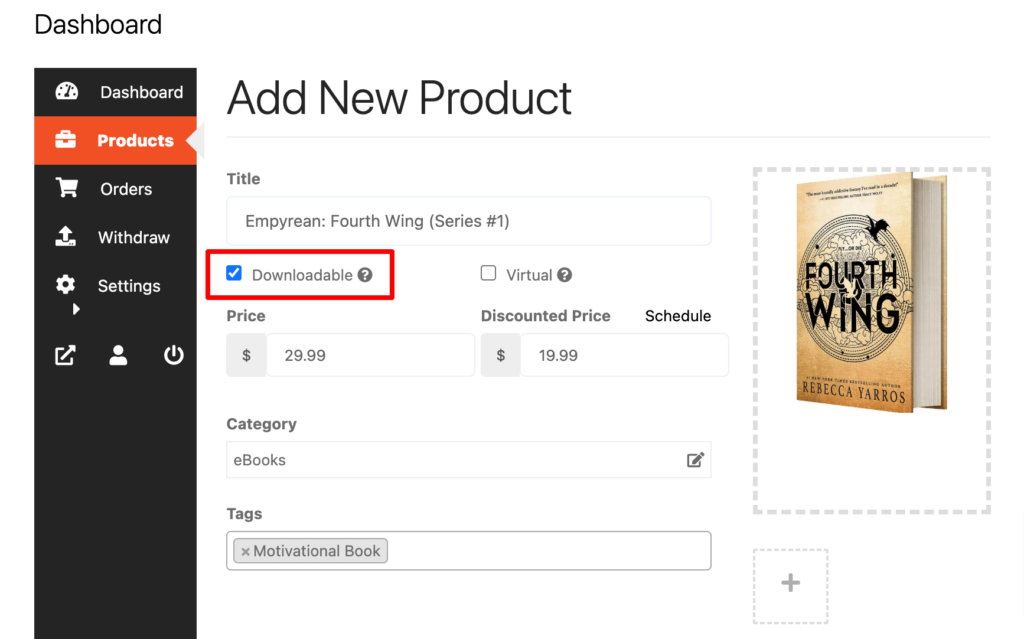
If you didn’t create Categories and Tags before, you won’t be able to add Categories and Tags from here.
To assign a category and different tags from the frontend, you have to create categories and tags from the backend. So, navigate to your WordPress dashboard -> Products -> Categories to add new categories.

In the same way, go to your WordPress dashboard -> Products -> Tags to add new tags.
After inserting the category and tag, scroll down a bit and you’ll find downloadable options to configure.
- Name: This is the name of the download shown to the customer.
- File URL: This is the URL or the absolute path to the file to which the customer will get access.
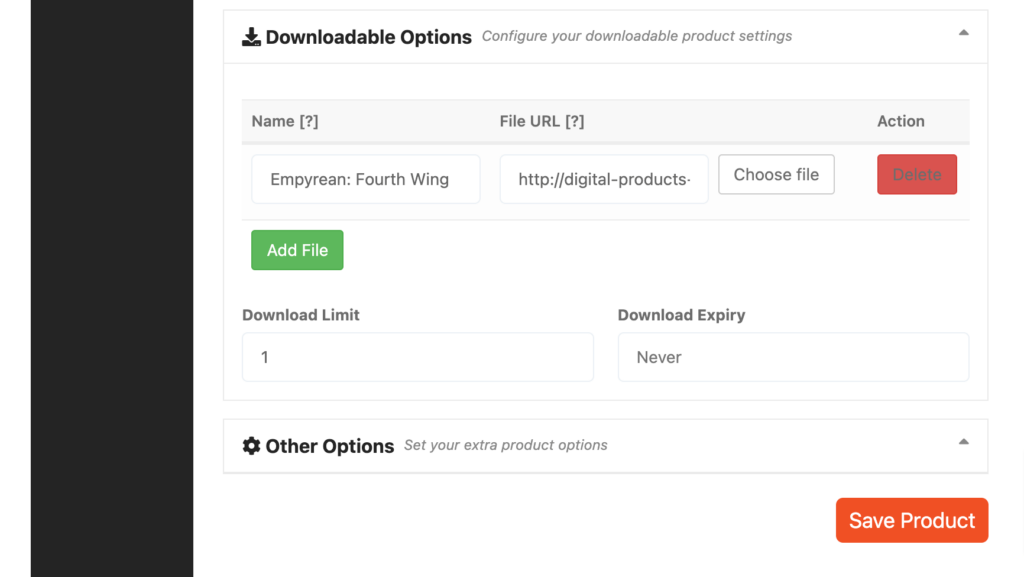
Don’t forget to hit the “Save Product” button to complete the process.
But this product won’t be publicly available unless the admin which is you approves it. That means you’ll find the product with pending review unless you approve it.
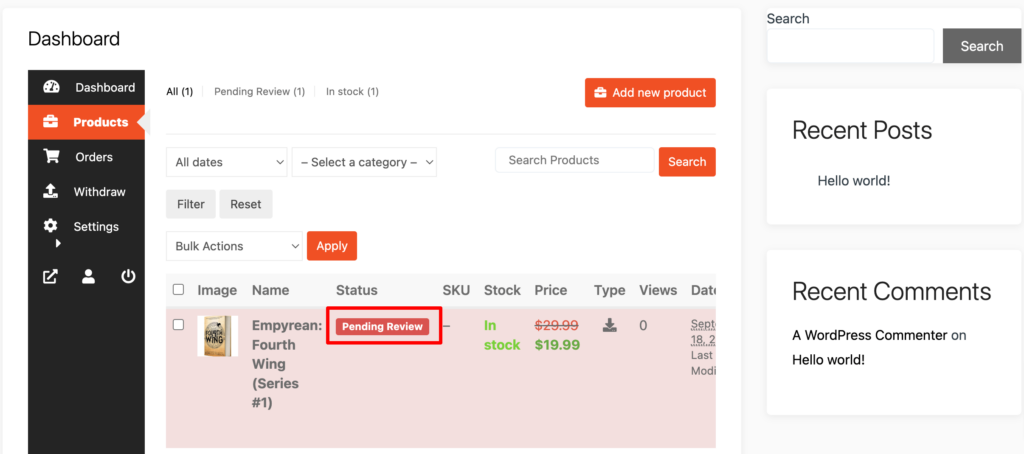
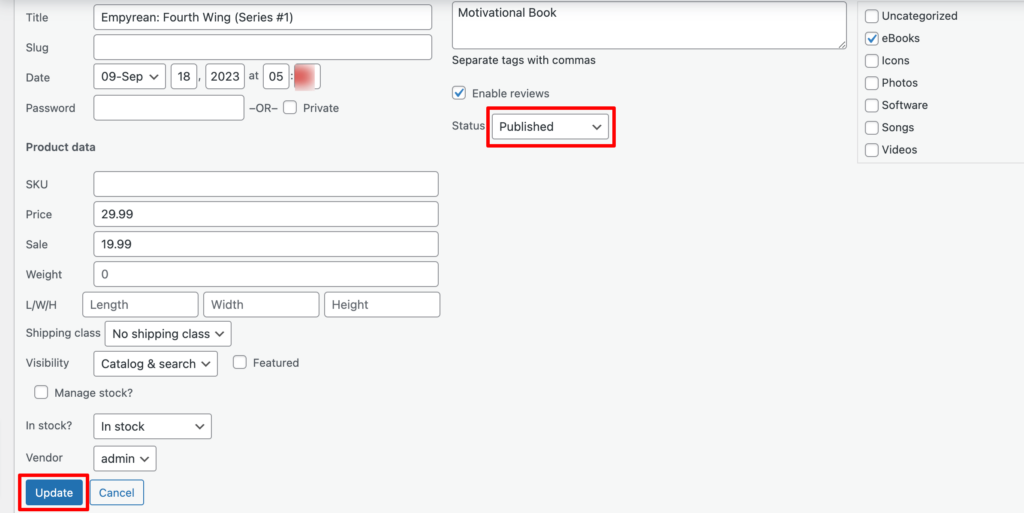
To approve this product, go to your backend and click on the Products option, then click on the Quick Edit. There you will find the Status option. Choose the Published option and click the Update button to approve and publish the pending products.
That’s all!
Note: Your vendors will upload the products this way.
As an admin, you can also upload products from the backend (your vendors won’t be able to do that). Simply, go to your WordPress dashboard and then click on the Products -> Add New to upload new products.
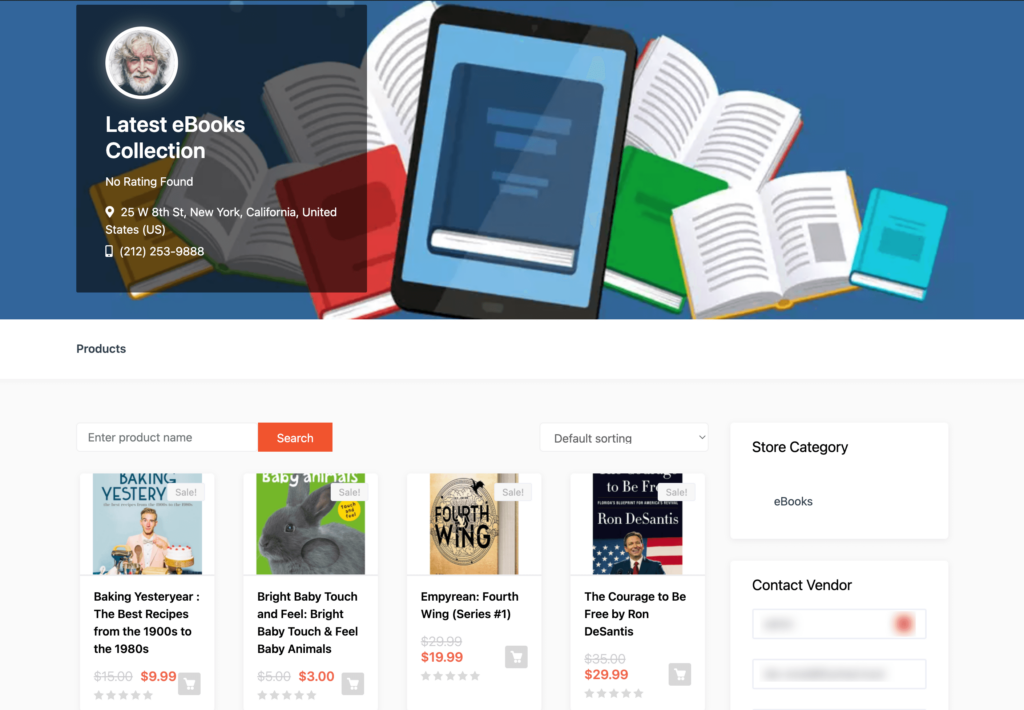
You can customize your store design by going to Vendor Dashboard -> Settings. From here you can update your store name, address, opening & closing time, etc.
After customizing your store, visit the store to check the front-end view.
Note: This is not a mandatory step for you. If you don’t want to sell as a vendor from our marketplace, you can simply skip this step and proceed to step 5.
Step 05: Allow Vendors to Register to Your Marketplace
After adding all the functionalities and configuring your marketplace, you can invite vendors to sign up for your marketplace. To make sure vendors can sign up for your marketplace, enable the “Anyone can register” option from WP Admin –> General –> Settings.
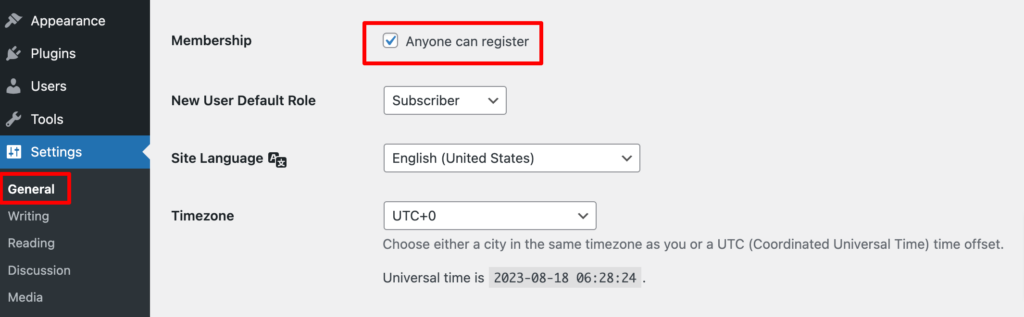
So, it will open the default registration form for vendors to sign up.

Or you can create customized registration forms with the necessary fields, especially for your marketplace.
For vendors to start selling, you need to enable selling status from Dokan –> Vendors.

Also, if you want new vendors to upload their products directly, then you need to change the product status from Dokan –>Settings –> Selling options. You need to enable the New Vendors Product Upload.

Now navigate to your WordPress dashboard then click on the Visit Stores to check all the registered stores on your digital products marketplace.
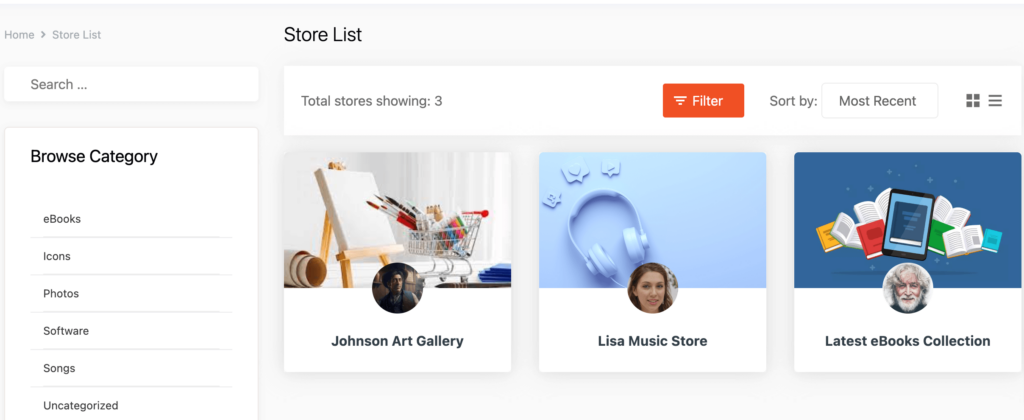
Once approved by the admin, vendors gain the freedom to create their own stores with unique URLs. Dokan also provides each vendor with an individual vendor dashboard, empowering them to effortlessly upload, manage, and successfully sell their products.
The store customization process for vendors is the same as we’ve shown above for an admin. From the front dashboard, a vendor can easily set up his shop.
This is how you can simply create and manage your digital products marketplace with WordPress and Dokan multivendor plugins. But once your marketplace starts growing, you’ll require more advanced features to tackle and satisfy increased traffic, vendors, and customers.
Luckily, Dokan multivendor supports 35 premium modules and offers 3 different pricing plans so you can choose the best fit for your business.
Bonus: A Case Study of an Online Digital Products Marketplace for Inspiration
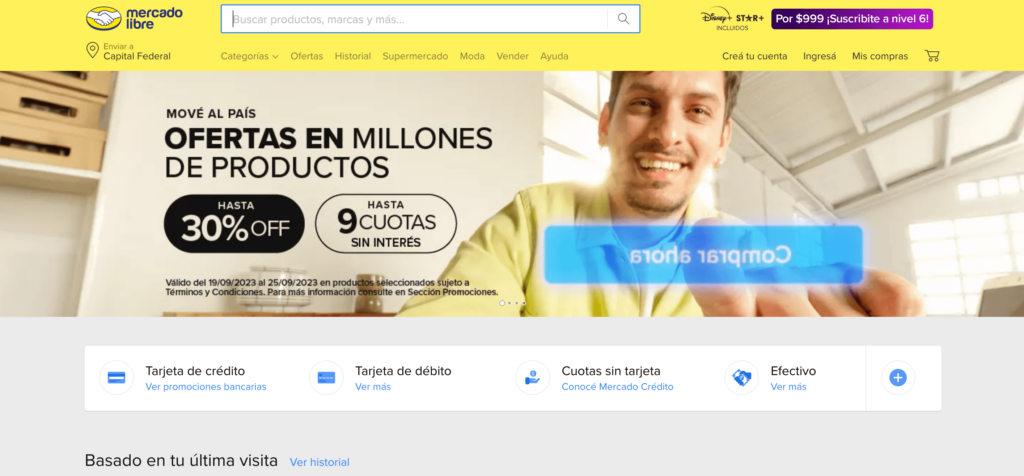
Here we are going to show you a case study (or success story) of MercadoLibre, often referred to as the “eBay of Latin America.”
MercadoLibre is an online digital products marketplace based in Argentina but has a significant presence throughout Latin America.
Background of MercadoLibre
MercadoLibre was founded in 1999 by Marcos Galperin and a group of entrepreneurs.
Initially, it started as an online auction platform similar to eBay but quickly evolved into a comprehensive eCommerce and digital products marketplace serving multiple countries in Latin America.
Key Success Factors for MercadoLibre
- Localized Approach: MercadoLibre tailored its approach for each Latin American market, recognizing the unique cultural, economic, and logistical factors in each country.
- Payment Solutions: It introduced MercadoPago, a digital payment platform, to facilitate secure transactions, especially in regions with lower credit card penetration. This helped build trust among buyers and sellers.
- Seller and Buyer Protection: The platform implemented measures to protect both sellers and buyers, including dispute resolution services and buyer feedback systems.
- Mobile-First Approach: Recognizing the importance of mobile in Latin America, MercadoLibre developed mobile apps and optimized its platform for mobile users.
- Diversified Product Categories: It expanded its product categories beyond auctions to include new and used items, digital products, and even real estate and vehicles.
Outcomes of MercadoLibre
MercadoLibre’s commitment to addressing the unique challenges of the Latin American market has led to remarkable results:
- Market Dominance: MercadoLibre has established itself as the leading eCommerce platform in Latin America, with a strong presence in countries like Argentina, Brazil, Mexico, and more.
- Financial Growth: The company has experienced significant financial growth, driven by the increasing adoption of eCommerce in the region.
- Digital Products Marketplace: MercadoLibre hosts a wide range of digital products and services, including software, digital media, and eBooks, serving the diverse needs of its users.
- Innovation: MercadoLibre continues to innovate by expanding its services, exploring fintech opportunities, and improving its platform’s user experience.
The success story of MercadoLibre should be an inspiring example for every new entrepreneur like you. So, deep study a few more success stories like this one and ensure viable growth for your digital products marketplace.

Start Building Your Own Digital Product Marketplace Now!
Now you know what is a digital products marketplace, what can be sold through a digital products marketplace, and how to build a digital products marketplace. So, create and launch your dream marketplace without any further hesitation following this 5 steps tutorial.
The process is simple-
- Buy a hosting package and install WordPress on your cPanel
- Install the Dokan multivendor plugin and a Dokan-compatible marketplace theme
- Configure Dokan settings
- Set up your admin shop, and
- Allow vendors to register to your marketplace
That’s all!
If you have an interest in other niches as well, check these blog posts to explore more-
- How to Create an Online Cosmetics Marketplace in WordPress with Dokan
- Building A Jewelry & Ornaments Marketplace with Dokan on WordPress
- Building Your Clothing Marketplace with WordPress and Dokan: A Step-by-Step Guide
- Creating a Multivendor Sports Marketplace on WordPress: A Step-by-Step Guide
Do you have any further queries regarding creating a digital products marketplace? Feel free to share them with us using the comment section below. Good luck!


Leave a Reply