Dokan Cloud has an amazing shipping system that will enable you to create and manage the complications of the marketplace shipping system.
We will show you how to configure the Dokan shipping system.
Shipping Settings
First, the admin needs to enable the Shipping option from the Settings→ Shipping. Also, choose which countries you want to ship your products to or which country needs to be excluded from delivering products.
Admin can create a new shipping type along with the Standard shipping type. Just click on the Add Shipping Type button ,choose shipping name and category,
Click on the Create button and the new shipping type is created.
Shipping Types
After the admin enables the shipping, the vendor needs to configure shipping settings from their part. Go to Shipping→ Preferences-
The vendor needs to configure the shipping preferences. They can choose either
- Custom-based shipping or
- Carrier-based shipping
You need to set the Weight Unit and Dimension Unit for your shipping as well.
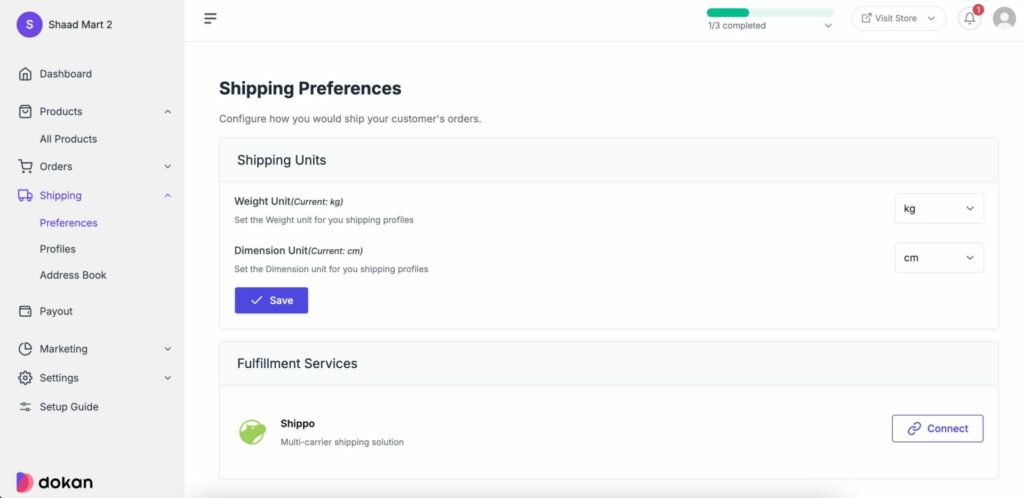
If you choose Carrier Based shipping, you must connect with the Carrier. In this case, you will get Shippo.
Click on the Connect button and if you are already logged in your shipping account, then it will be connected automatically.
Note: Make sure you have a working Shippo account.
Now, you need to choose the carriers from the list.
Note: Make sure the carrier you are choosing, you know all about their rules and regulations.
After configuring, your account will be connected to Shippo.
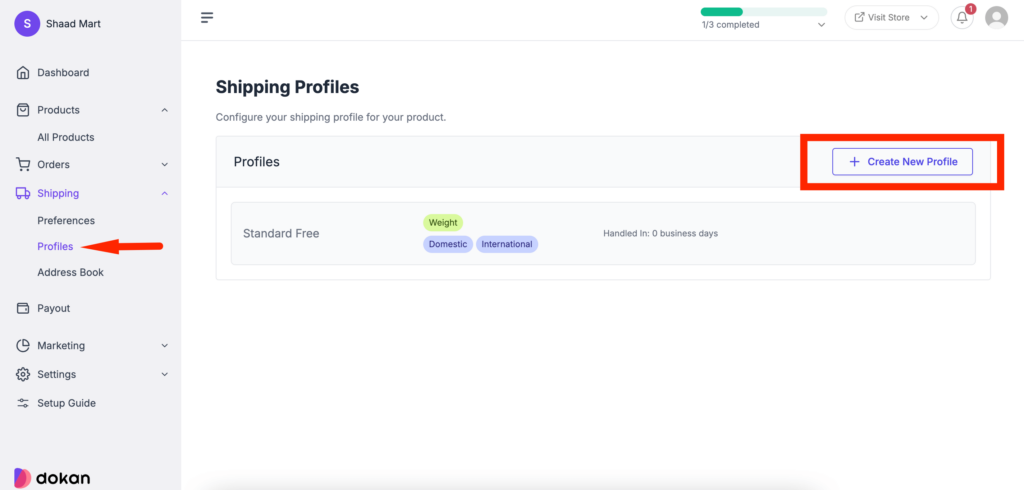
Now, the vendor needs to create their shipping profile. Go to Shipping→ Profiles and click on the Create New Profile button.
Shipping Configuration
First, you need to create an address from which you will ship your orders. To create a address, go to Shipping–> Address Book. There click on the Create New Address button. You will get a pop-up window.
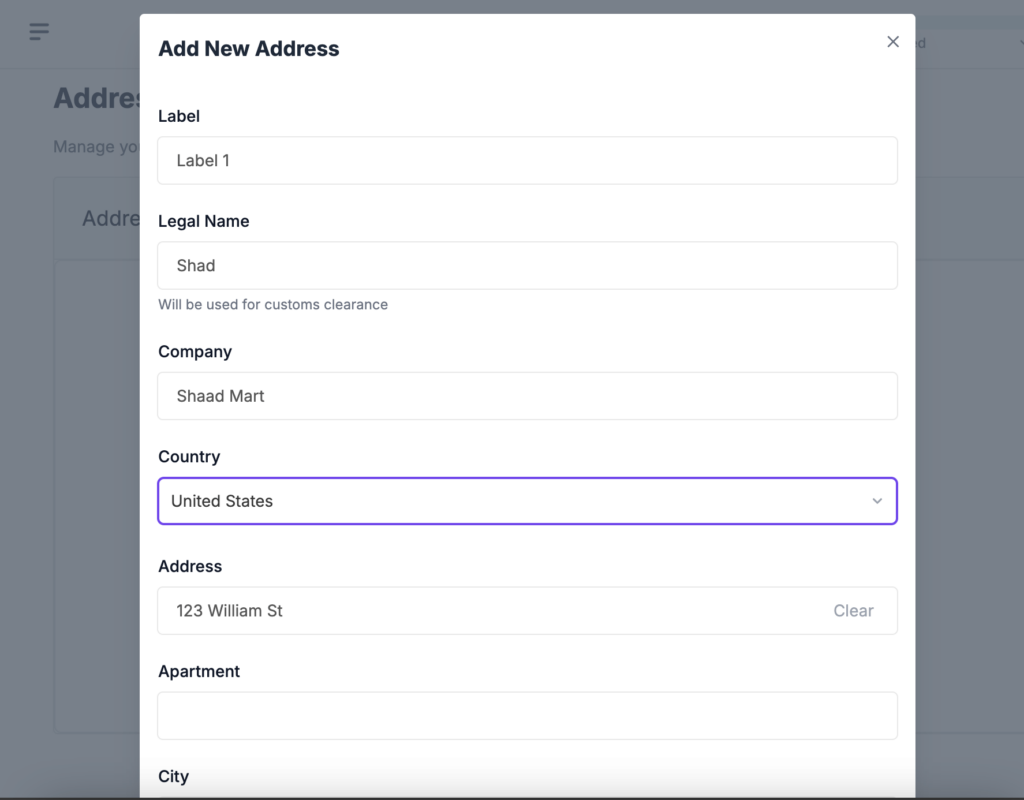
Don’t forget to save the address.
Now, you need to create your shipping profile.
Note: You can add different shipping rates under one profile. This way you can charge different shipping rates for one product while shipping domestically and internationally.
To do that, go to Shipping–> Profiles and click on the Create New Profile button.
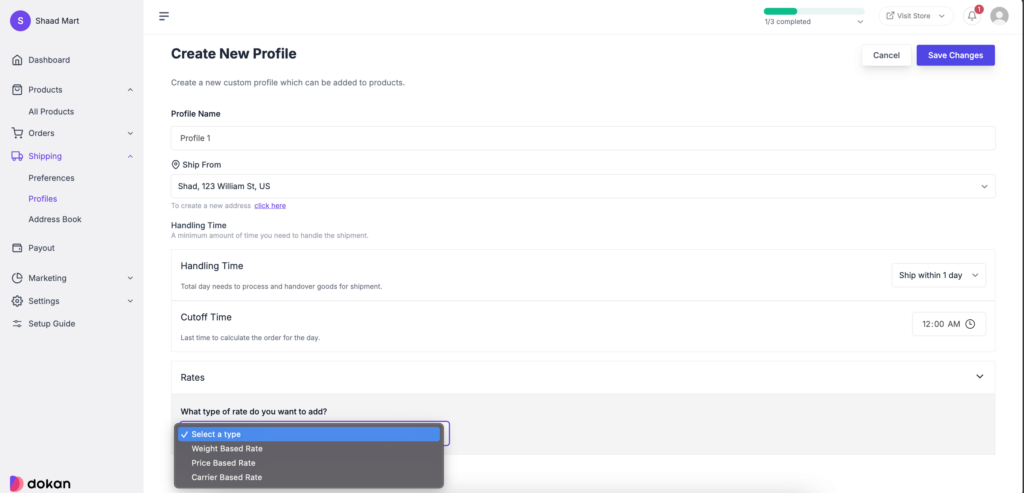
You need to create your profile on the next page by adding the necessary information.
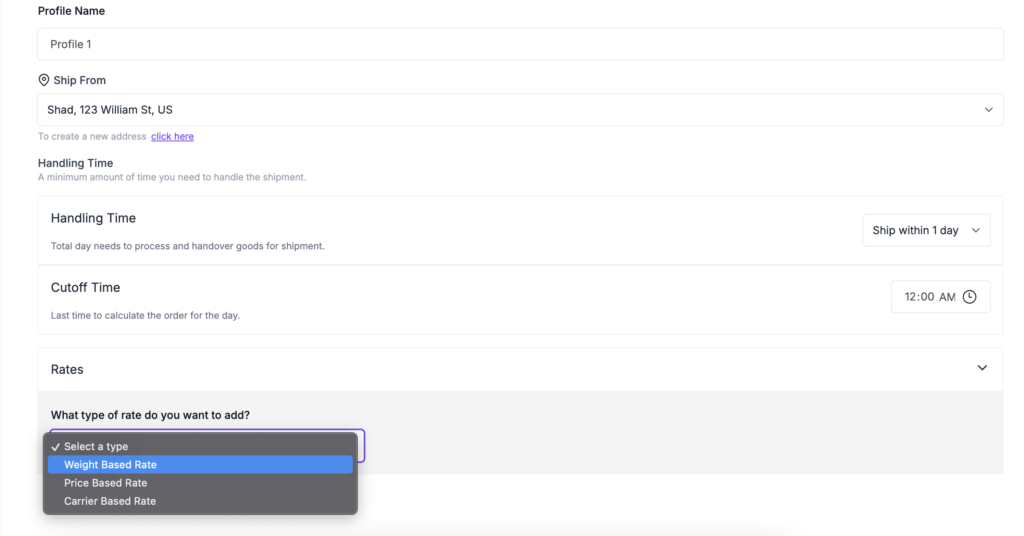
Profile Name: Give your shipping profile a name.
Ship From: Add the address you have saved previously here.
Handling Time: Total day needs to process and hand over goods for shipment.
Cutoff Time: Last time to calculate the order for the day.
Rates: You can select from 3 kinds of shipping rates-
- Price Based
- Weight Based
- Carrier Based
Save the changes after you are done.
We are going to show you how to set up Price Based Shipping and how it works.
Price Based Shipping
You can set a shipping rate based on the price of the product.
From the dropdown, select Price Based Rate.

You need to configure the price-based shipping rate. For that you need to choose-
Shipping Type: You can choose the shipping type you have created. You can choose to international shipping or domestic shipping type.
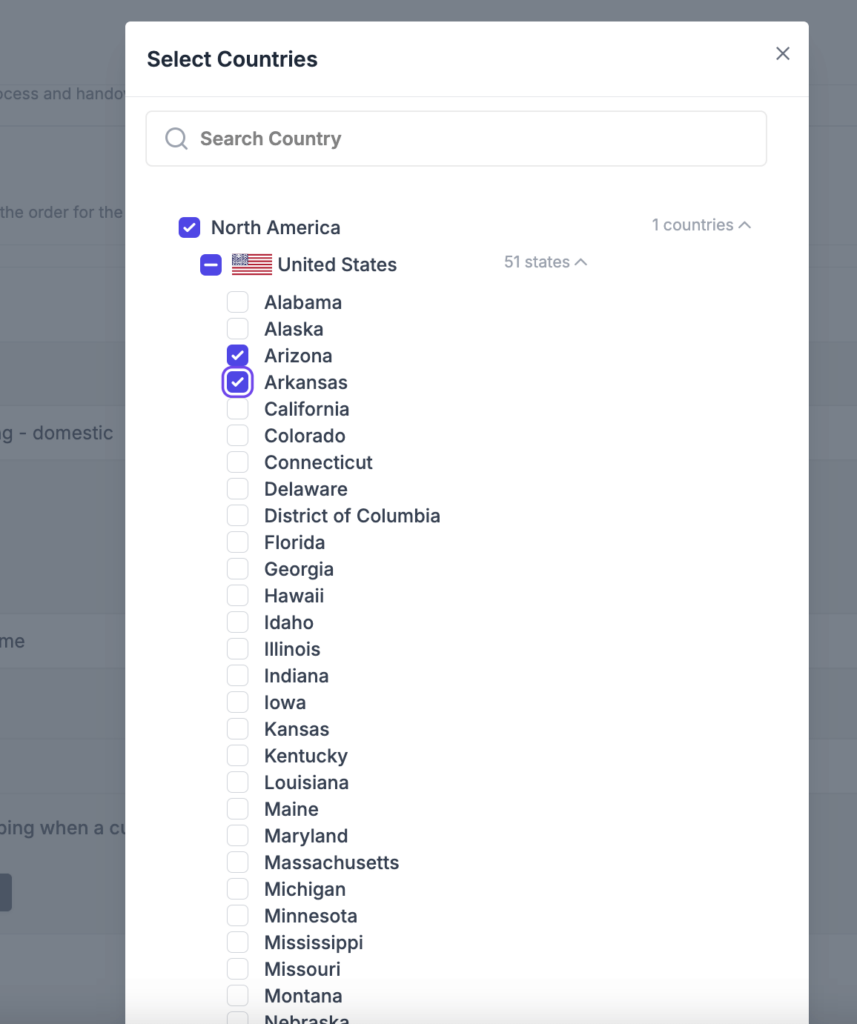
Region: Now, you need to choose a region. If you choose domestic shipping type, you need to choose a region from your own country. If you have chosen international shipping then you need to choose continent, country and if you want you can choose regions of that country as well. You can make it as specific as you like.
We have chosen domestic shipping type, our shipping address is from the USA, so we will choose region from the USA-
Transit Time: Time needed to ship the products
Cost On: Choose whether to add shipping cost on item or item quantity
Handling Fee: Set the amount for handling fee
Shipping Cost: Set the shipping cost
Ending price: You can set multiple ending prices. For example, You can set a shipping fee of $10 for the product price between $0-$500 and a shipping fee of $5 for the product price between $500+ – $1000.
Minimum Order Amount: You can also choose the minimum order amount for free shipping.
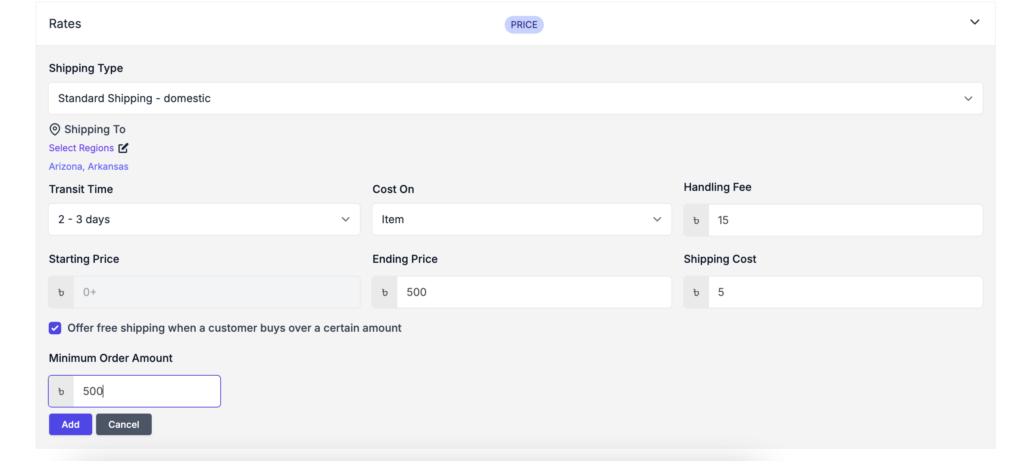
Click on the Add button to finish adding the price-based shipping rate-

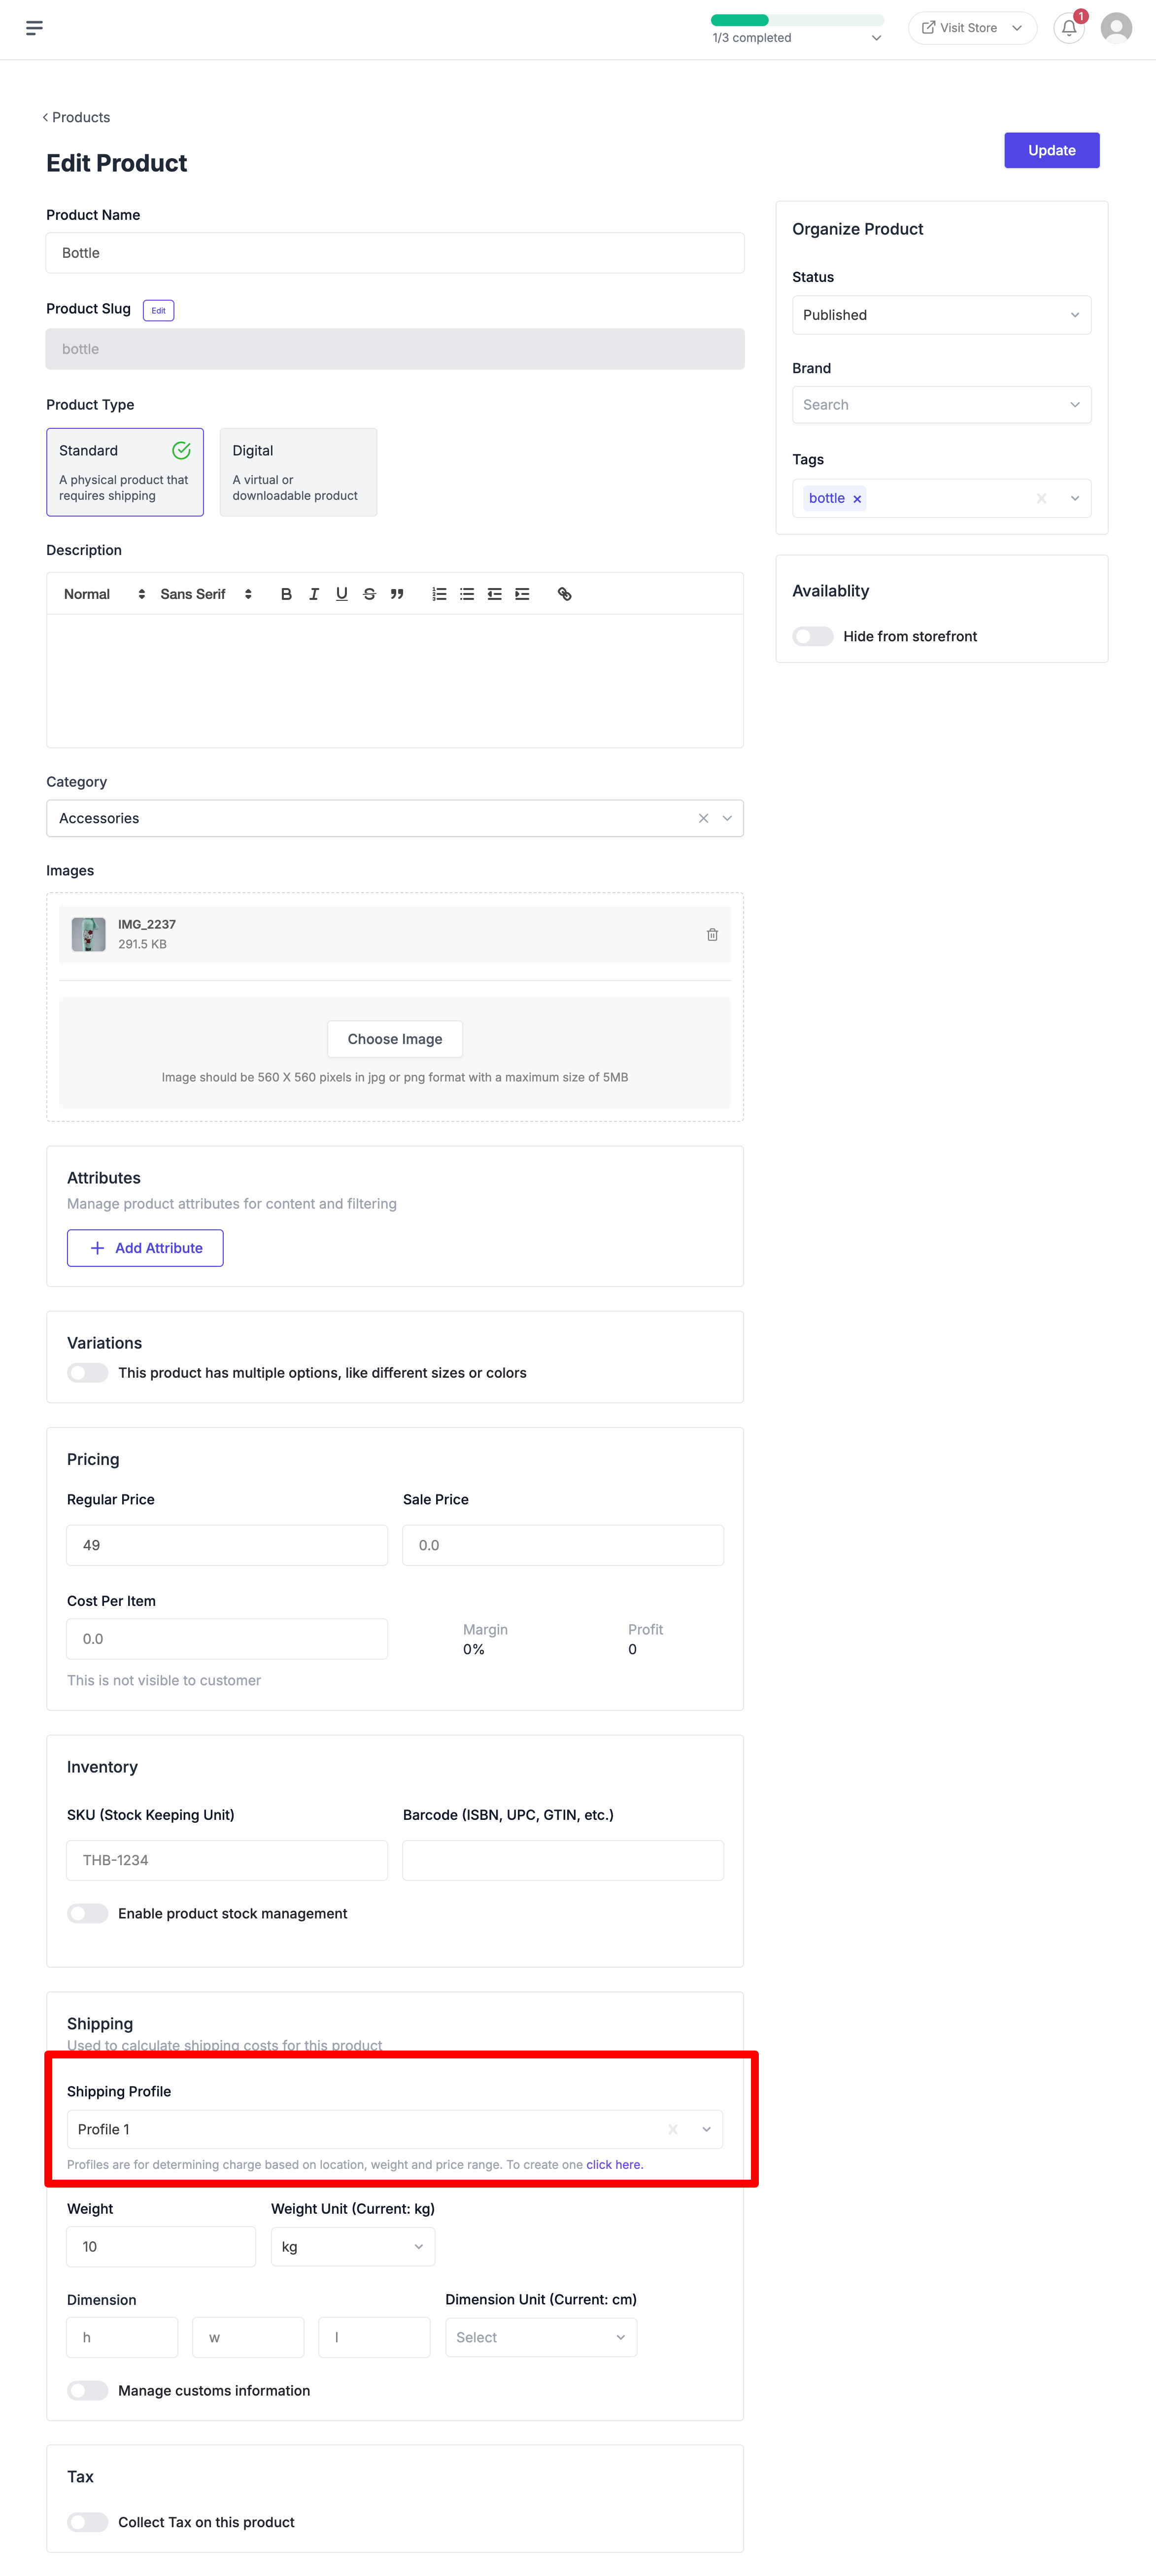
Now you need to add tne profile to your product. You can add the shipping profile while creating a product or editing a product.
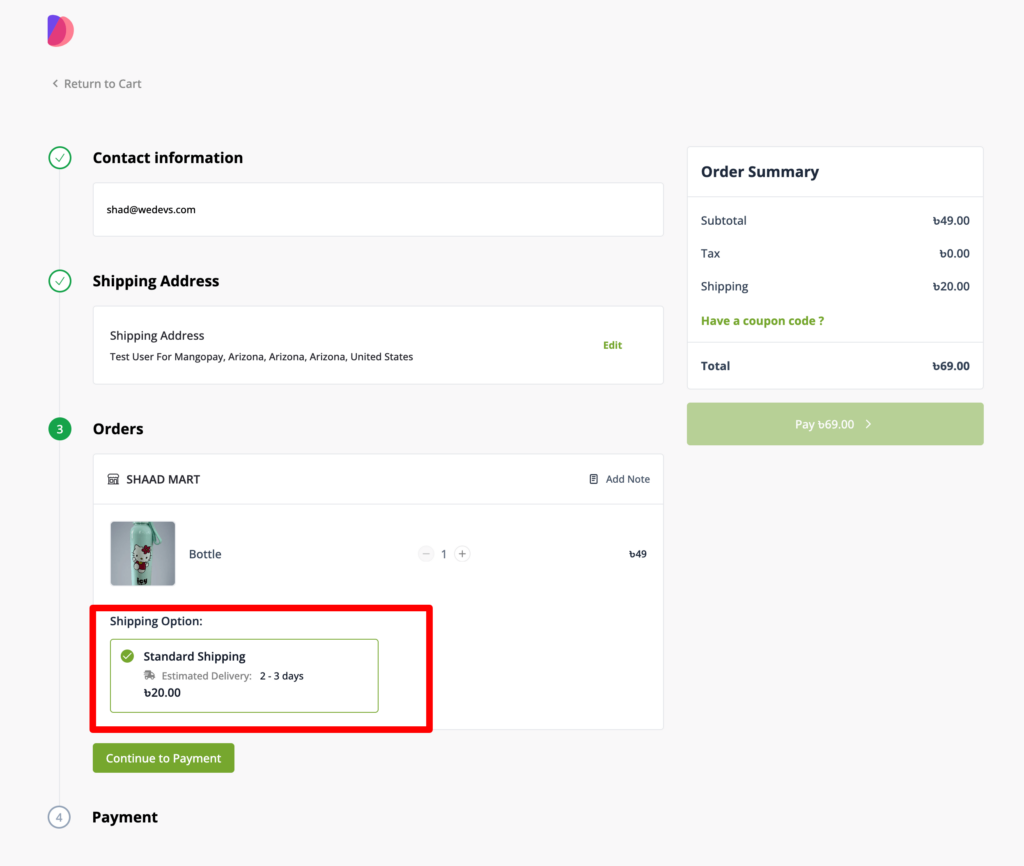
This is what the price-based shipping rate will look like in the Checkout page for the customers-
Weight Base Shipping
Similarly, you can set up weight-based shipping as well. Just select the Weight Based rate from the dropdown-
The parameters are the same. Instead of Ending price, you need to add ending weight.
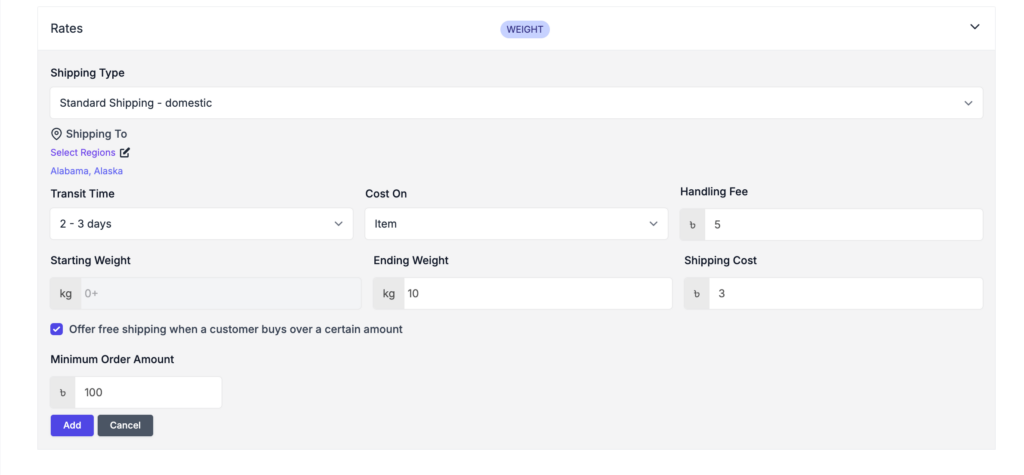
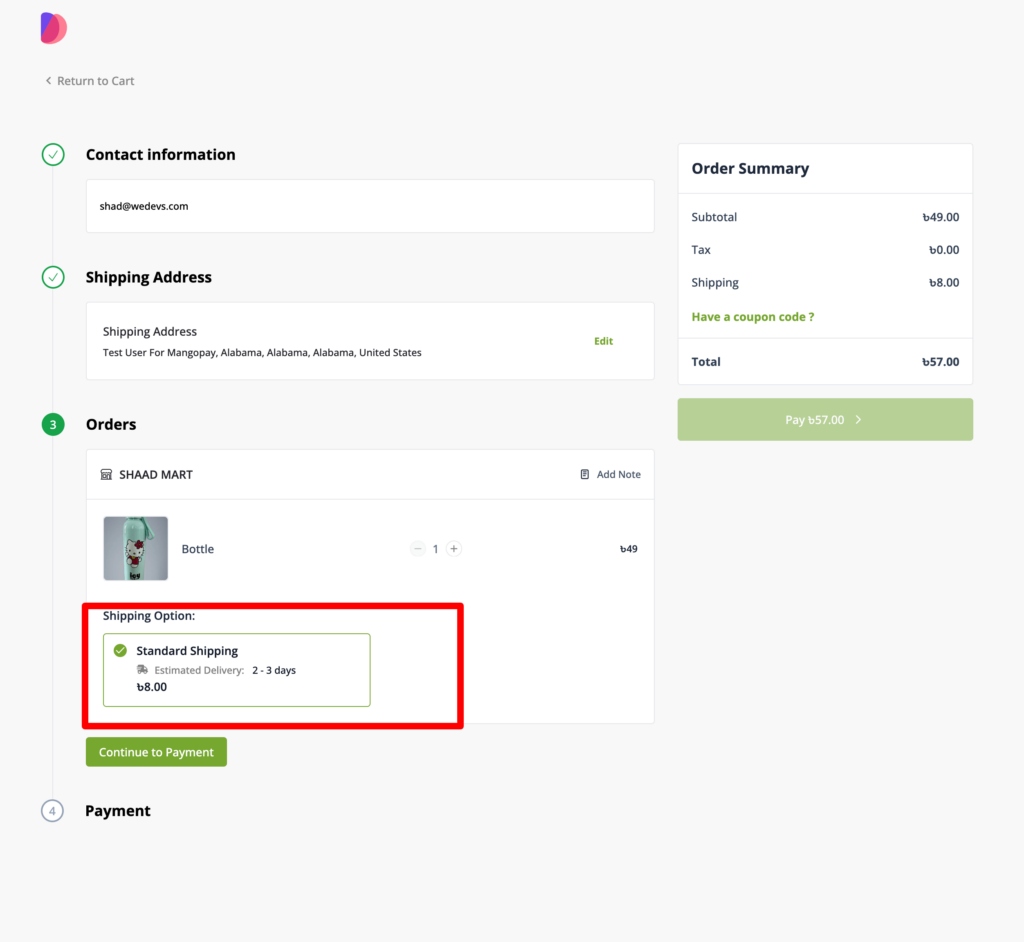
As it is under the same profile, so you don’t need to add this again to the product.
This is what the checkout page will look like-
Price Based and Weight Based
If you set both price-based and weight-based shipping in the same profile, then in the checkout page the shipping charge will be shown after adding both the price-based shipping and weight-based shipping.
Here is an example-
As you can see the shipping fee for the price-based rate is $1+$5=$6.
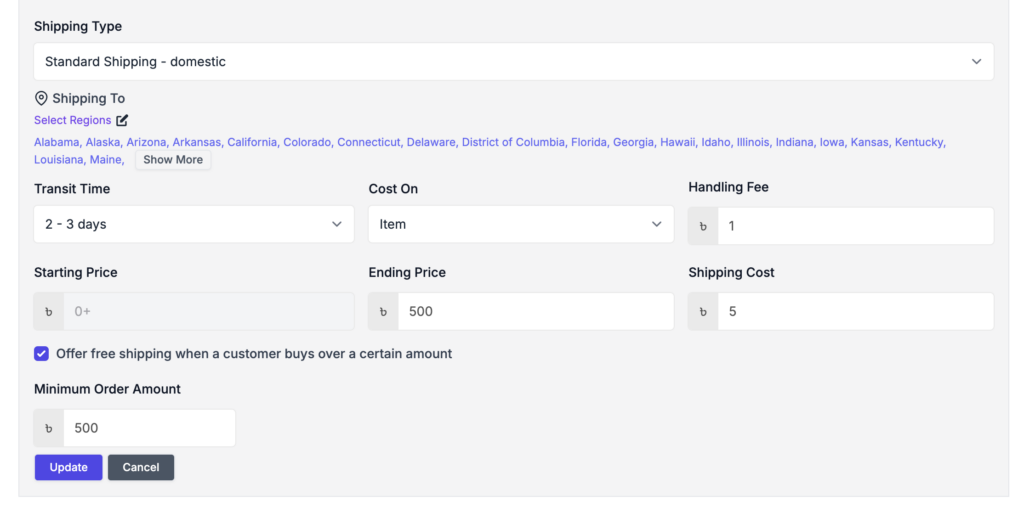
For the weight based shipping fee is $5+$3=$8.
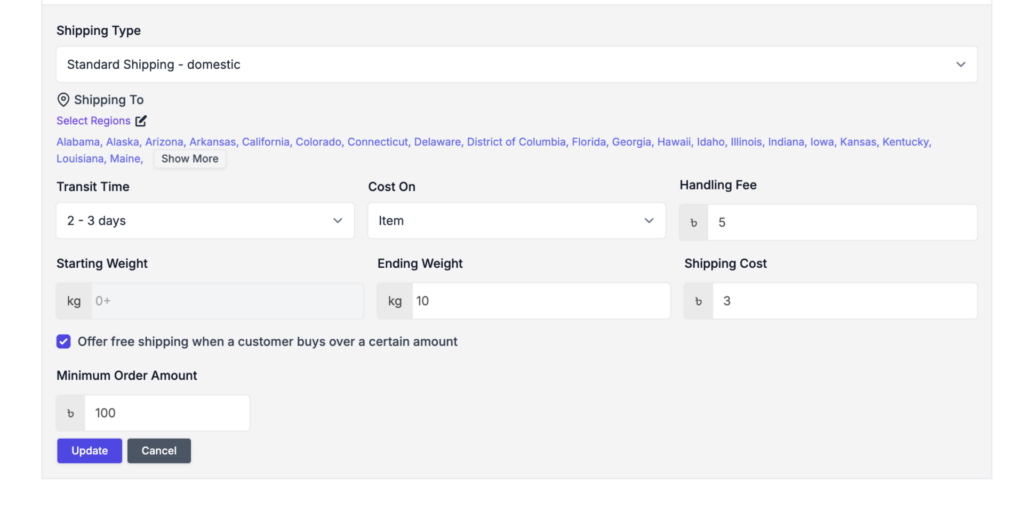
So the shipping fee will be $6+$8=$14
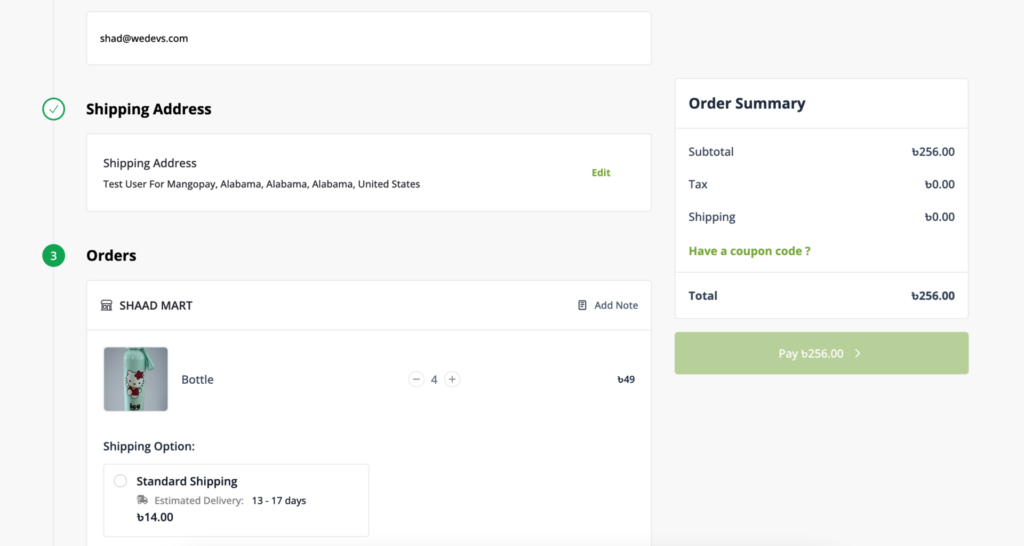
This is how it works.
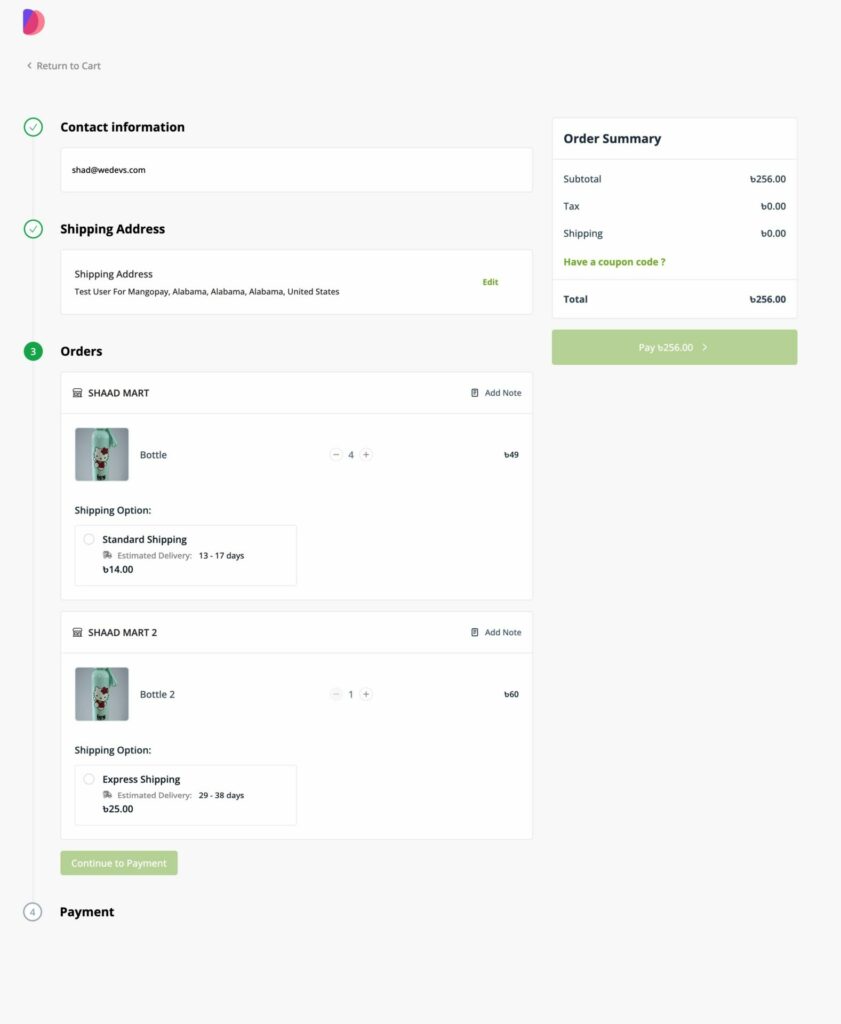
Multivendor Shipping
This is how the shipping works when customers choose from different vendors-
Carrier-Based Shipping
You can also set up Carrier Based Shipping. Dokan Cloud has integration with Shippo, a Multi-carrier shipping solution.
