

Planning to migrate your website from your current CMS to WordPress?
This guide helps you migrate to WordPress and experience the power of customization and SEO optimization!
There are several CMS platforms to build your site. But in the long run, you may feel the limitations of the platforms and want to switch to a more flexible and robust platform like WordPress.
WordPress is a powerful and versatile content management system (CMS). Right now, it powers 43% of all websites. If you’re currently using a different CMS, like Wix, Magento, BigCommerce, or any other, and you’re considering a move to WordPress, you’ve come to the right place.
In this comprehensive guide, we’ll walk you through the process of migrating to WordPress step by step.
5 Benefits of Migrating to WordPress
Before we dive into the migration process, let’s briefly explore the reasons why you might want to move your website to WordPress:
- Ease of Use: WordPress is renowned for its intuitive and user-friendly interface. Regardless of technical expertise, you can quickly learn how to create, edit, and manage content on a WordPress site.
- SEO Benefits: WordPress is inherently SEO-friendly. It comes with many useful features like clean code, responsive design, etc. Moreover, you’ll find a range of SEO plugins to boost your search engine rankings.
- Customization: You can customize your website’s design and functionality using thousands of free and premium themes and plugins.
- Community and Support: WordPress has a massive and active user and developer community. You’ll find many forums, blogs, and tutorials available to assist you.
- Scalability: As your website grows, WordPress can scale with you. It can handle larger amounts of content, more visitors, and advanced functionality without sacrificing performance.
As you can see, moving your website to WordPress from any other CMS (content management system) can offer numerous benefits and advantages. Then, what are you waiting for?
Are you worried about the migration process?
Let us help you out!

Migrating to WordPress From Any CMS – 4 Steps to Follow
Migrating a site to WordPress doesn’t mean just moving information. It includes several steps you need to follow carefully; otherwise, there is a chance of losing important content.
Here are the general steps you may follow to migrate your site from any other CMS platform to WordPress:
- Choose a WordPress Hosting
- Install WordPress and Select a Theme
- Export Your Existing Website
- Import the Website Into WordPress
Important note: Before you begin, make sure to create a complete backup of your current website. This includes both the files and the database. You can use the built-in tools of your current CMS (if available) or use third-party backup plugins or services.
After getting the backup, let’s follow the steps below:
Step 1: Choose a WordPress Hosting
First, select a reliable WordPress hosting provider that suits your needs. Luckily, many hosting providers offer specialized WordPress hosting plans.
To build a WordPress site, you’ll need two things:
- A domain name (this is the name of your blog, i.e dokan.co)
- A web hosting account (this is where your website lives on the internet)
You have to sign up for a web hosting account and register a domain name. Here, you should consider factors like performance, security, customer support, and scalability.
If you need more options, check out our guide on the best WooCommerce hosting. It helps you make some informed decisions that would be beneficial for your site.
Though WordPress itself is free, you need to pay for both domains and web hosting. Typically, it’ll cost you $14.99 per year for a domain and $7.99 per month for web hosting.
Many CMS platforms offer you a custom domain name and hosting on their own servers; it’s time to transfer that domain to your new web host.
📚 Related Resource: 12 Essential Things to Consider When Building an eCommerce Website.
Step 2: Install WordPress and Configure the Design
Once you’ve set up your hosting, install WordPress. If you need help, here is our step-by-step guide on how to install WordPress. Fortunately, many website hosting providers offer one-click installation. You can choose this type of service to save time.
Next, set up the basic settings from the WordPress dashboard. It may include the site title, tagline, time zone, etc.
Shape Your Website Look
Select a WordPress theme that matches the design and functionality of your old website. You can find free and premium themes in the WordPress Theme Repository or third-party marketplaces.
According to research from Colorlib, there are approximately 20,000+ WordPress themes available for download or purchase.
If you want to choose from the WordPress repository, go to Appearance → Theme → Add New. Search for themes by inserting your niche-related keywords into the search bar.
Install Essential Plugins
Install and activate essential plugins that you’ll need to run your website. Such as an SEO plugin (e.g., Yoast SEO or All in One SEO Pack), a caching plugin (e.g., WP Super Cache or W3 Total Cache), and any other plugins specific to your site’s requirements.
Learn more about WordPress plugins here!
Change Permalink Settings
At this stage, you need to set up the permalink structure in WordPress. It’s essential to ensure that the URL structure matches your old CMS as closely as possible. This will help you maintain SEO rankings.
Here are the steps to change Permalink Settings in WordPress before migrating:
- In the WordPress dashboard, navigate to Settings and then click on Permalinks.
- There are different permalink structures available. For example, Plain, Day and name, Month and name, Numeric, Post name, etc. Select a structure that closely resembles the URL structure of your old CMS.
- Usually, the post name option is the most common and SEO-friendly. You can choose a post name structure based on the post title: example.com/sample-post/.
If your old CMS has a specific URL structure that isn’t exactly replicated by the default options, you might need to use custom permalinks. WordPress allows you to create a custom structure using placeholders like %postname%, %post_id%, %category%, etc.
After choosing the desired Permalink structure, save the changes by clicking the “Save Changes” button at the bottom of the page.

Subscribe to
Dokan blog
Step 3: Export Your Existing Website
Exporting content from various Content Management Systems (CMS) typically involves different procedures due to the unique structures and functionalities of each platform.
Let’s show you the detailed steps to migrate content from your Wix site:
Wix
Wix websites can’t be directly exported due to the closed nature of their platform. You can copy content manually, which is very time-consuming.
Rather, use the Wix RSS feed to get a file for your website content. And then import RSS from your WordPress dashboard.
Below are the steps you need to follow:
1. Locate RSS Feed
- Visit your Wix site and add
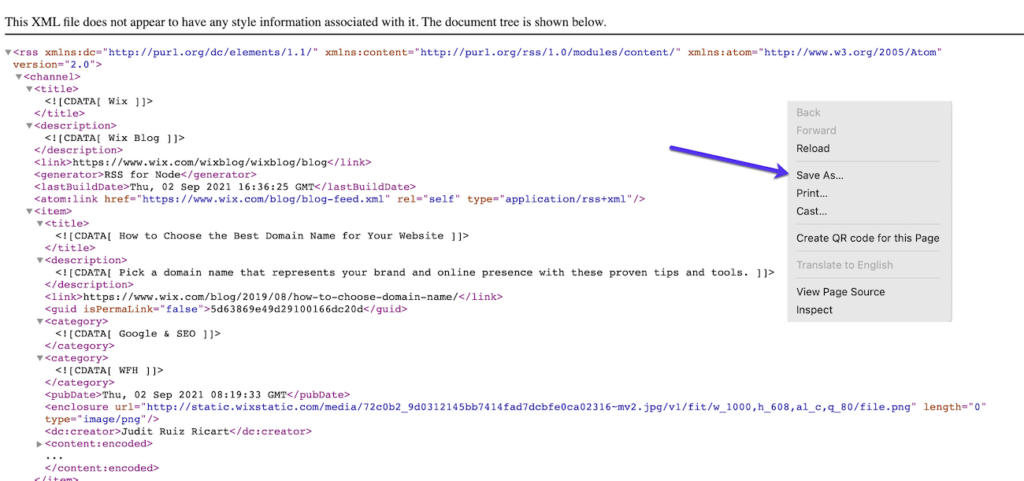
/feed.xmlto the end of the URL. - Save the generated XML file on your computer.

From your Chrome browser, you’ll see a page full of code. Now, right-click on that page and save the file on your device. It’ll be saved as feed.xml by default. However, if you’re using other browsers like Firefox then right-click and select View page source. After that save it to your computer.
Important note: This approach is workable for old Wix blogs. In their latest updates, there are no RSS feeds for new Wix blogs. You can start from Step 2 if you’re using a new Wix blog.
2. Import to WordPress
- In your WordPress dashboard, go to Tools → Import.
- Choose the RSS option and run the importer.
- Upload the
feed.xmlfile that you saved earlier. - Then click the Run Importer button. (Note: you may need to install it first.)

3. Check Imported Post
- Verify that all posts have been imported correctly. From your WordPress dashboard go to Posts → All Posts.
- If some posts didn’t import, edit the XML file to remove the ones that were successfully imported.
4. Handle Images
You have migrated all your posts to WordPress but your images are still hosted with Wix. To move them on your WordPress site you can-
- Manually save images on your computer and upload them to the Media Library in WordPress.
- Alternatively, use the “Import External Images” plugin to streamline the process.
- First, install and activate the plugin then go to Media → Import Images and click the Import Images Now button.
5. Move Wix Pages to WordPress
Unfortunately, there’s no automated way to transfer pages. Copy content from each Wix page and create a new page in WordPress by navigating Admin Dashboard → Pages → Add New. Finally,
customize the page and publish it.
Check this comparison guide on ➡️ Wix vs WordPress.
Here are some general steps for exporting content from other popular CMS platforms:
Weebly
- Weebly allows you to export some content via its settings.
- Log in to your Weebly account, go to ‘Settings’, and click on ‘Export Site’.
- This will generate a ZIP file containing HTML, CSS, and image files of your website’s pages.
Check this comparison guide on ➡️ Weebly vs WordPress.
BigCommerce
- To export data from BigCommerce, log in to your account’s control panel.
- Go to ‘Server Settings’ and select ‘Export Data’ to download files such as products, customers, orders, and other data in CSV format.
Check this comparison guide on ➡️ BigCommerce vs WordPress.
Magento
- Magento offers data export functionality through its admin panel.
- Log in to your Magento admin, go to ‘System’ → ‘Export’, and select the type of data you want to export, such as products, customers, or orders.
Check this comparison guide on ➡️ Magento vs WordPress.
Joomla
- In Joomla, content can be exported using extensions like “J2XML” or “SP Transfer”.
- Install the desired extension and follow the provided instructions to export articles, categories, users, and other content in XML or other compatible formats.
Check this comparison guide on ➡️ Joomla vs WordPress.
Drupal
- For Drupal, the “Views” module allows data export in various formats.
- Install and enable the “Views” module, and create a view for the content you want to export. Use the ‘Export’ option to generate a CSV, XML, or other format.
Check this comparison guide on ➡️ Drupal vs WordPress.
Keep in mind that these steps might vary based on the version of the CMS, installed plugins, and specific configurations. Some platforms might require additional tools or extensions for exporting content, while others might have limitations for exporting certain elements.
Always ensure that the exported content is compatible with the new platform (here, WordPress) where you intend to import it.
Step 4: Import Your Website Into WordPress
You’ve exported the required files from your existing CMS platform. Now it’s time to get all the data on your WordPress site.
There are several ways to migrate a website to WordPress. You can either use manual methods or plugins that facilitate the process. Some plugins might assist specifically with migrating from certain platforms.
For example, WordPress plugins like “FG Joomla to WordPress” or “FG Drupal to WordPress” can assist in migrating from Joomla or Drupal to WordPress. For other platforms, there might be specific migration plugins available.
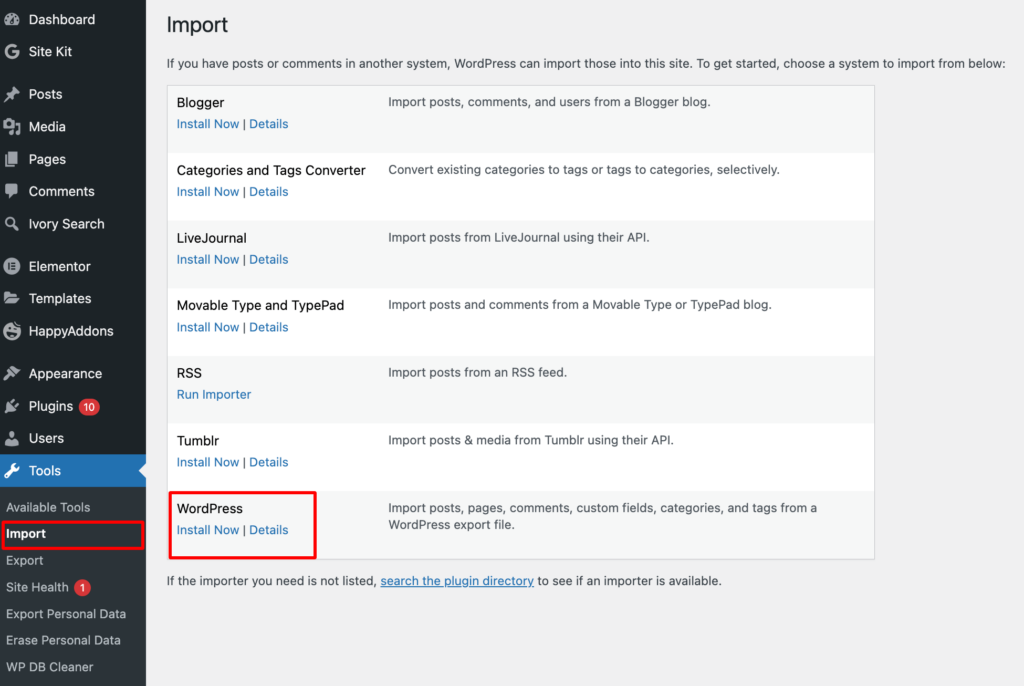
From your WordPress dashboard, go to the Tools → Import page.
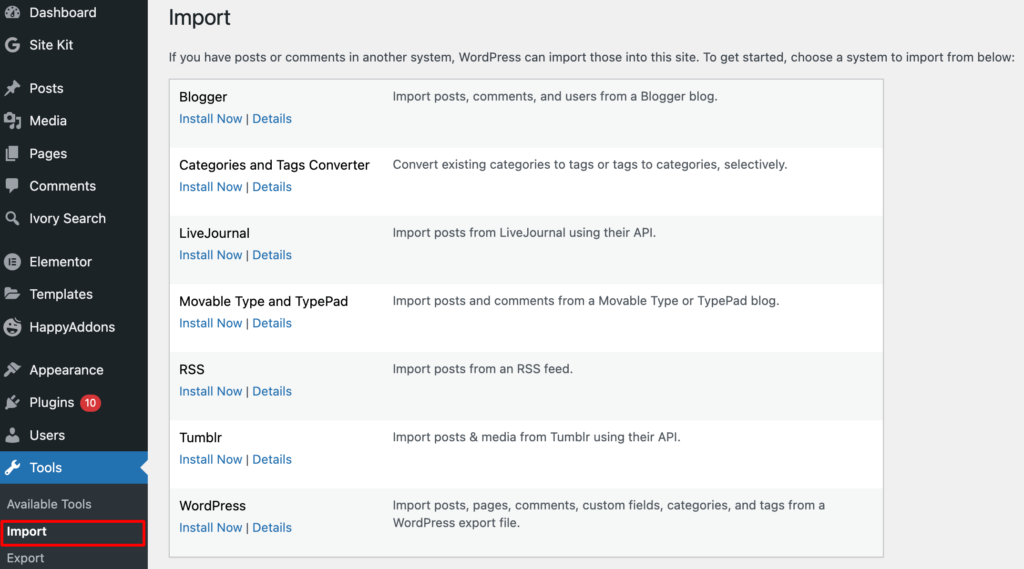
Here you’ll find a list of importers available for different platforms. Now search for the required format you need to upload your exported files. For example, for a Wix to WordPress migration, you’ll get a Wix RSS file including all the essential files from your website.
In this case, you’ll need to click the Install Now link under the RSS heading.
It’ll take a few seconds and give you a link at the top of the page to “Run Importer“. Move forward and click the link.
After that, you’ll get a new page to upload the XML you’ve saved from your Wix website. click the Choose File button
Next, you need to click the Choose File button and select the feed.xml file that is saved to your computer. Once selected, you can click the upload file and import button.
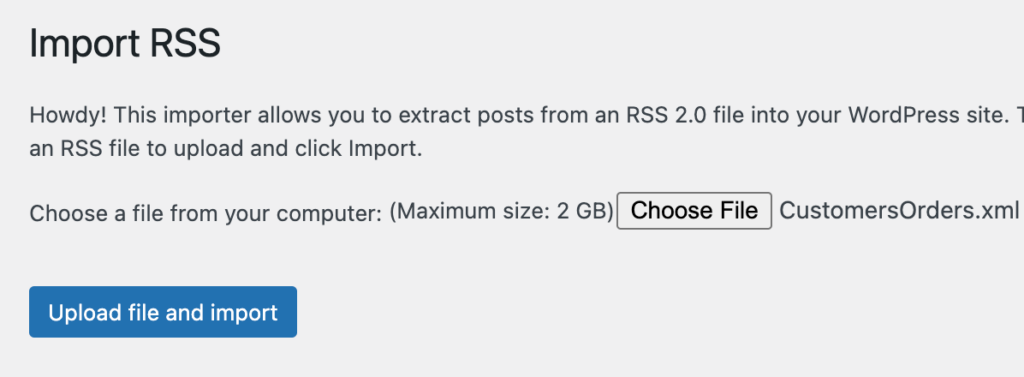
Depending on your file size, it’ll take a few minutes. After a while, you’ll get a confirmation message.
But what will happen if you can’t find your required file format in the importers list?
In this case, scroll down to WordPress and then click on the ‘Install Now’ link.
Once installed, click “Run Importer”.
It brings you to the WordPress importer page. On this page, click on the ‘Choose File’ button. Select the file that you downloaded earlier from your previous CMS platform.
Finally, click the ‘Upload file and import’ button.
You can then map the authors and assign imported content to specific users. At last, click the “Submit” button to start the import process.
For some CMS platforms, you can’t export all the data together. Sometimes you may move your images or other media files individually. To do this, you can get help from the Auto Upload Images plugin.
Things to Do After Migration
Migrating from another content management system (CMS) to WordPress is a significant step. There are several important tasks to complete afterward to ensure a smooth transition and optimize your WordPress site.
Here’s a checklist of things to do after migrating to WordPress:
1. Manage Redirects and Permalinks
To ensure a seamless transition for your visitors and maintain SEO rankings, set up 301 redirects from your old URLs to the new WordPress URLs. Also, configure your permalink structure to match your old site’s URLs if possible (as we’ve already shown above).
2. Test Your New WordPress Site
Check all pages, posts, images, links, forms, and functionalities to ensure everything is working as expected on the new WordPress site.
3. Domain Mapping and DNS Changes
Once you are satisfied with the test site, point your domain to your new WordPress installation by updating your DNS settings. First, you need to log in to your domain registrar account where you initially purchased your domain (e.g., GoDaddy, Namecheap).
Then, navigate to the DNS settings or Domain Management section. The exact location varies between registrars.
Change the name servers to those provided by your WordPress hosting provider. These are typically given to you during the WordPress setup process.
Note: Understand that DNS changes may take some time to propagate across the internet. This can range from a few hours to 48 hours.
Next, it’s time to verify domain mapping in WordPress. It may include:
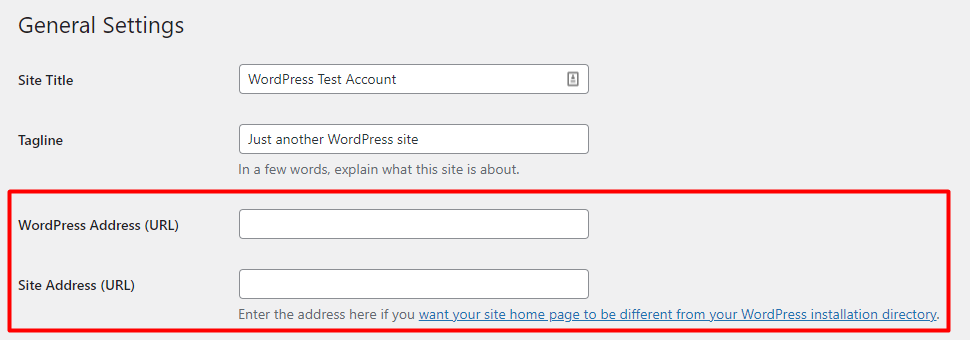
- In your WordPress dashboard, go to Settings → General.
- Update the WordPress Address (URL) and Site Address (URL) to your domain.
- Save changes.
- SSL Certificate (if applicable):
If there are issues accessing the site after DNS changes, consider clearing your browser cache or contacting your hosting provider’s support for assistance.
4. Launch and Monitor
Once everything is set up and you’ve thoroughly tested your new WordPress site, you can officially launch it. Monitor its performance and ensure everything continues to work smoothly.
5. Update Search Engines
Inform search engines about your website’s change by submitting an updated sitemap to Google Search Console and Bing Webmaster Tools.
Migrating a website to WordPress can be complex. Also, the specific steps may vary depending on your current CMS and site structure. It’s essential to plan carefully, take your time, and test thoroughly to ensure a smooth transition and minimize any potential issues.
Consider seeking professional help if you’re not confident in your technical skills or if you have a large, complex website to migrate.
Let’s Migrate to WordPress – Right?
Migrating your website to WordPress can be a transformative step for your online presence. Whether you’re moving from a different CMS or switching from a static site, WordPress helps you enhance your site’s functionality, design, and overall performance.
It’s very normal to get errors when moving elements from your old website to WordPress. As a precaution, always take a full backup of your site before starting. It gives you the confidence that you have a safe version in your hand.
You may take individual paths to migrate from different CMS platforms. But once you’ve done your migration, WordPress gives you all the support you need to run any type of website very smoothly. However, WordPress has many built-in features and additional plugins to make your migration process easier.
Let us help if you face any issues while migrating your site from any CMS platform to WordPress. Do use the comment section below.
Subscribe to
Dokan blog
We send weekly newsletters, no spam for sure!


Leave a Reply