


Do you want to build an online store on your own? Creating a website is easy today and you don’t need to have coding knowledge for that. We are going to show you how to build an eCommerce website with WordPress from scratch having zero experience.
Why WordPress?
WordPress is the most popular content management system in the world with over 42% market share of all web. It is a popular, robust, and scalable platform for creating eCommerce stores as well. You need to follow the right steps in order to develop and launch your store.
According to research,
76% of US people shop from eCommerce stores, and the US eCommerce industry is set to hit the 1329.7 billion in revenue by 2025, a 6% increase from 2022.
We can clearly understand how crucial eCommerce business will become going forward for the USA and for the world. That is why there are about 26 million eCommerce companies across the globe.
In this guide, we will walk you through how to set up an online store in WordPress from scratch and publish it. So stick around till the end.
How to Build an eCommerce Website with WordPress
So, we are at the most important part of our article. We are going to show you how to create an eCommerce website in WordPress for free.
As there are many eCommerce plugins available in WordPress, we will use WooCommerce to create our eCommerce site.
It is the most popular plugin in WordPress and most people are familiar with it. It’s free and highly customizable which gives you total control over your online store.
Almost 30% of online stores are using WooCommerce to create their eCommerce store. WooCommerce features a complete eCommerce backend that helps you build and organize product pages and provides a shopping cart and checkout process. Moreover, you can extend its functionality even further with various paid and free extensions.
Here are the steps to create an eCommerce site with WooCommerce.
- Choose an Attractive Store name
- Sign up for a Hosting Provider
- Install WordPress
- Install and Configure WooCommerce
- Choose a Responsive eCommerce Store Theme
- Install Additional Plugins for SEO, Security
- Configure Your Payment Methods
- Add & Upload Products
- Bonus: Take the Necessary Steps to Grow Your eCommerce Store
Let’s see the details of these steps.
Step 1: Choose an Attractive Store Name
First, you need to come up with your store name. Make sure to choose a store name that resembles your brand and also it is easy to pronounce. If you look at popular eCommerce sites like Amazon, eBay, Etsy, Daraz, etc., they all have one thing in common. The store names are only one word and easy to say and write.
So, you also need to come up with a store name that is short and memorable.
Moreover, you need to make sure you score the domain closer to your brand name. Your domain name is basically your website’s unique address. It’s the part after the ‘www.’ in your URL.
There are many famous domain providers where you will find your preferred domain name at a low rate like Namecheap, Bluehost, Kinsta, etc.
Remember, “.com” is the strongest and most popular domain extension. It’s a smart choice for online stores, as it leaves you open to selling worldwide.
Step 2: Sign Up for a Hosting Provider

After securing your domain name, now it is time to sign up for a hosting provider. Hosting is like buying land on the internet where you will build your store. Every website needs hosting.
When choosing a hosting provider, be very careful. A lot depends on the hosting like website speed, performance, storage, traffic, etc. Also, you need to skip shared hosting. There are a lot of issues with shared hosting. For example, if one of the websites gets hacked, your site will also be vulnerable. People will be using credit cards for payment, and when you have a vulnerable website there is a good chance that information can get leaked.
There are popular WordPress hosting providers like Bluehost, Hostinger, and Siteground you can buy your hosting from. They all have the built-in installer so you can get WordPress up and running in just a few clicks.
Step 3: Install WordPress
There are two ways you can install WordPress,
- One-click installation from your hosting dashboard
- Manual installation
Definitely, the first one is easy as it takes only one click to install WordPress. When you are choosing your hosting provider, look for the feature of a one-click WordPress installation. Then all you have to do is go into your hosting dashboard and hit a button that says Install WordPress. Most WordPress hosting providers have this feature.
However, if your hosting provider doesn’t have this feature, you need to manually download the WordPress software from WordPress.org and upload it to your hosting dashboard.
You can read this article on how to install WordPress on localhost to get a better idea about installing WordPress manually.
Step 4: Install and Configure WooCommerce
You have installed WordPress on your site. Now it is time to install WooCommerce and start building your eCommerce site. This is a very important part of how to build an eCommerce website with WordPress.
Login to your WordPress dashboard and go to Plugins–> Add New. In the search box type WooCommerce. Then just install and activate the plugin.
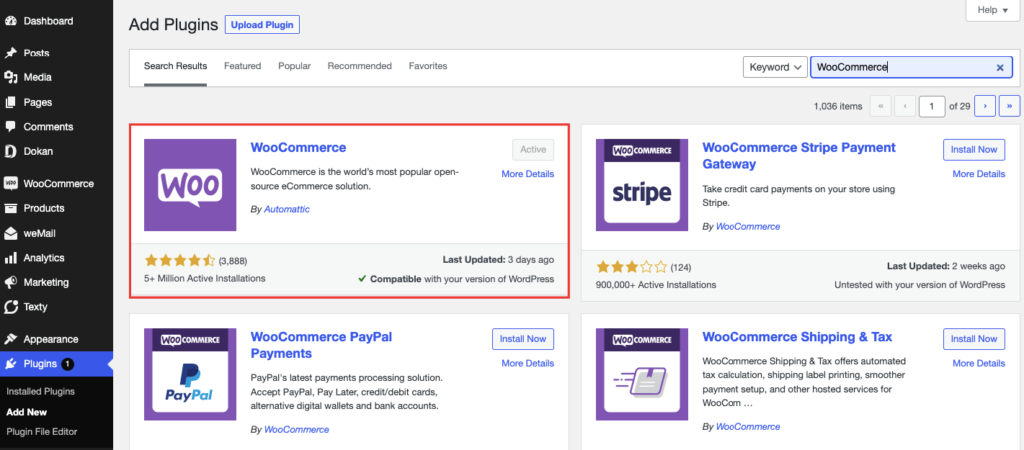
After activating the plugin you need to finish the setup wizard with the necessary details like,
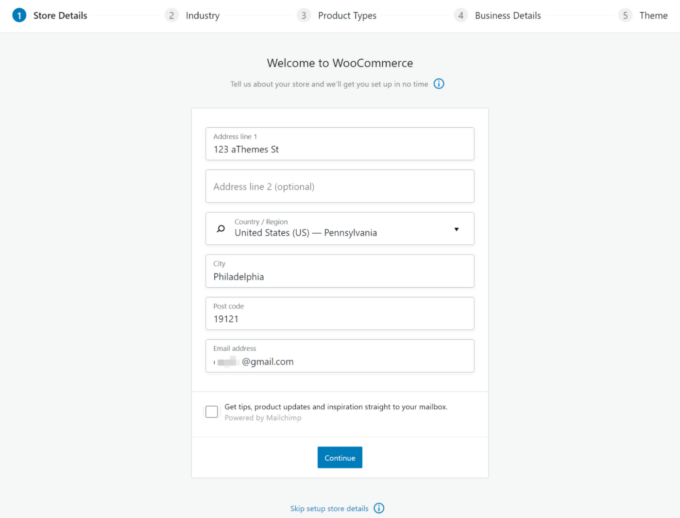
Store Details
In the first step of the setup wizard, you will need to enter some basic details about your store’s location, and email address. Carefully fill out all the information.
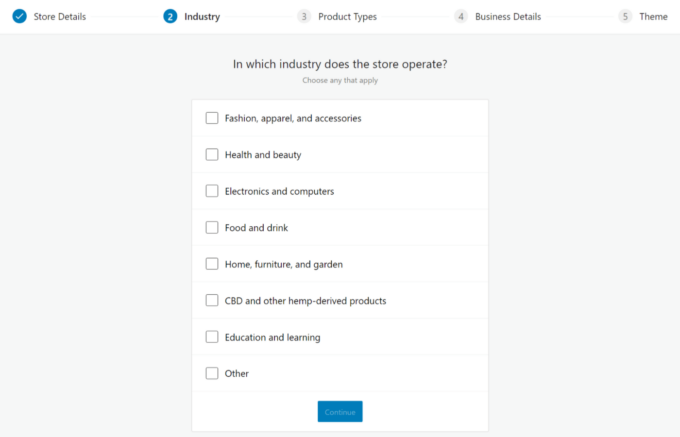
Industry Details
Next, you have to specify which industry you belong to. If you don’t see your option in the list then choose other.
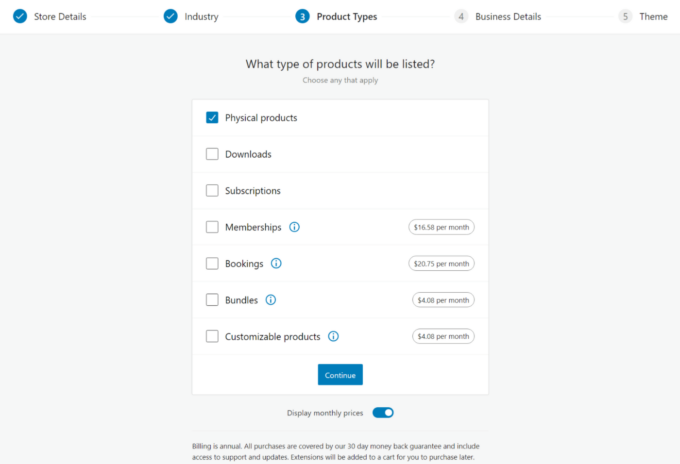
Product Types
Then, choose the types of products that you want to sell. Most stores will just want to check the box of the Physical product. If you’re selling digital products, you can select Downloads.
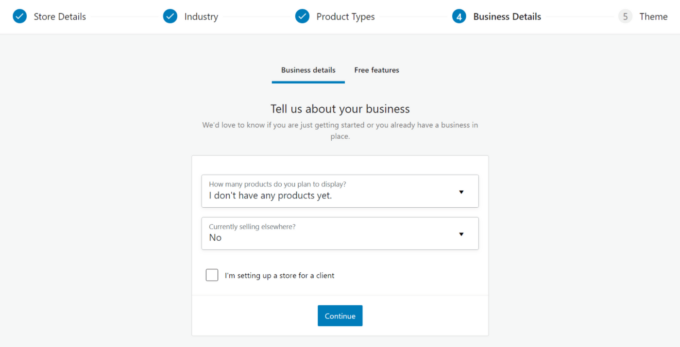
Business Details
Finally, you will need to enter some additional business details about your store.
Theme
Finally, the setup wizard will prompt you to install a WordPress theme. If you want to add a premium theme then just skip this section by clicking Continue with my active theme. We will discuss choosing a theme in the next section.
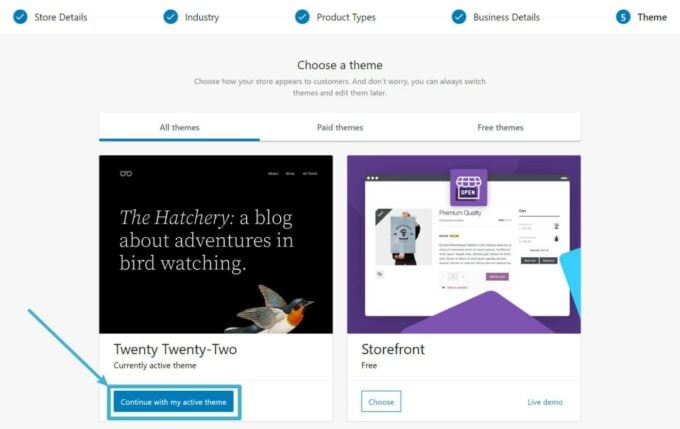
But if you want to use a free theme, you can choose the Storefront theme. It can get the job done.
After finishing the setup wizard, there are other settings you need to configure. Like,
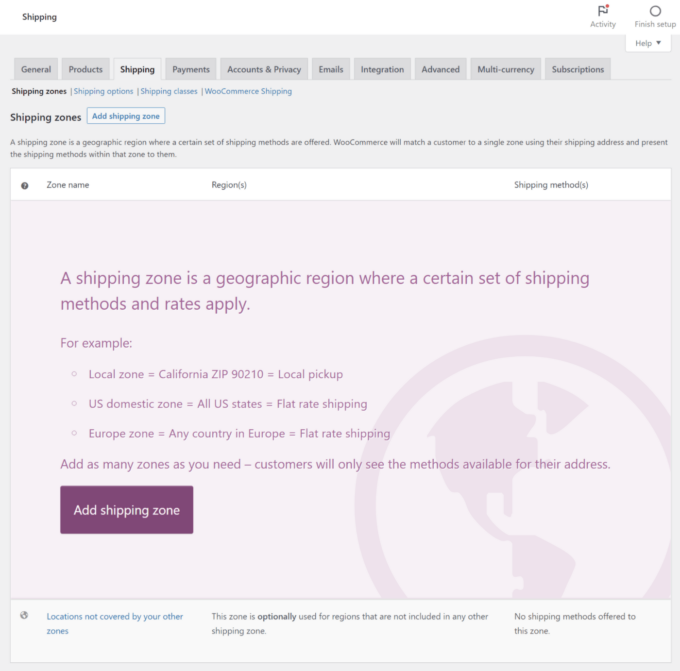
Configure Shipping
WooCommerce has its own built-in shipping features. You can set shipping zones for which you can add shipping methods. There are three types of shipping methods,
- Flat rate
- Free shipping
- Local pickup.
Once you add a method, you can enter its cost. However, the built-in shipping feature doesn’t let you change the cost based on the weight/dimensions of a package, which is why you’ll probably want either a table-rate shipping plugin or a real-time rates plugin.
If you want to explore the built-in shipping settings, you can go to WooCommerce → Settings → Shipping.
Set Up Taxes
WooCommerce has a manual tax option. To enable manual taxes, you need to click the Setup tax option and then select the manual option.
Once you do that, you’ll get a new settings area at WooCommerce → Settings → Taxes. You can also import CSV files for Tax rules.

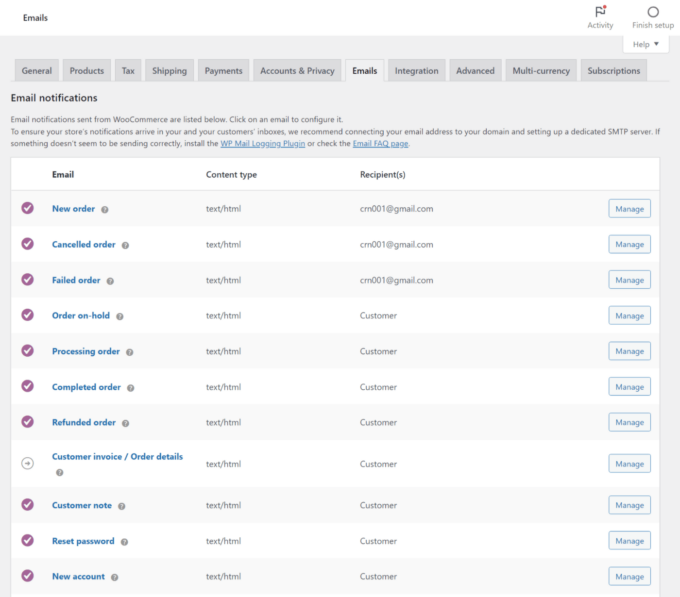
Customize Emails
Go to WooCommerce → Settings → Emails, you can customize the content of the emails that your store sends to customers and admins, such as the email that a shopper receives after they place an order.
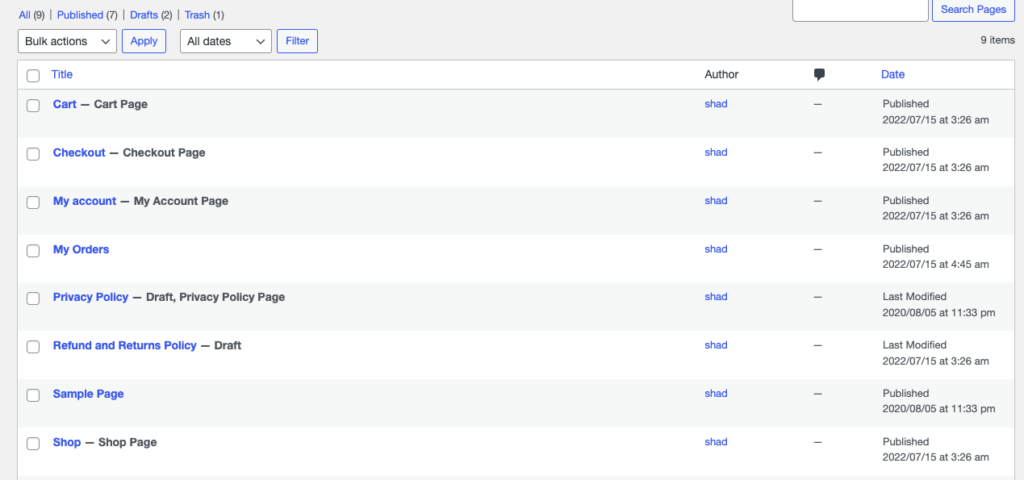
Create the Necessary Pages
After configuring the WooCommerce settings, you need to create the necessary pages for your eCommerce store. However, when you install WooCoomerce, it automatically creates,
- Cart page
- Checkout page
- My Account page
- Shop (product) page
- Privacy policy page
- Refund and Return policy page.
Reminder: Don’t forget to update your privacy policies as well. You will find the options at WordPress Settings–> Privacy.
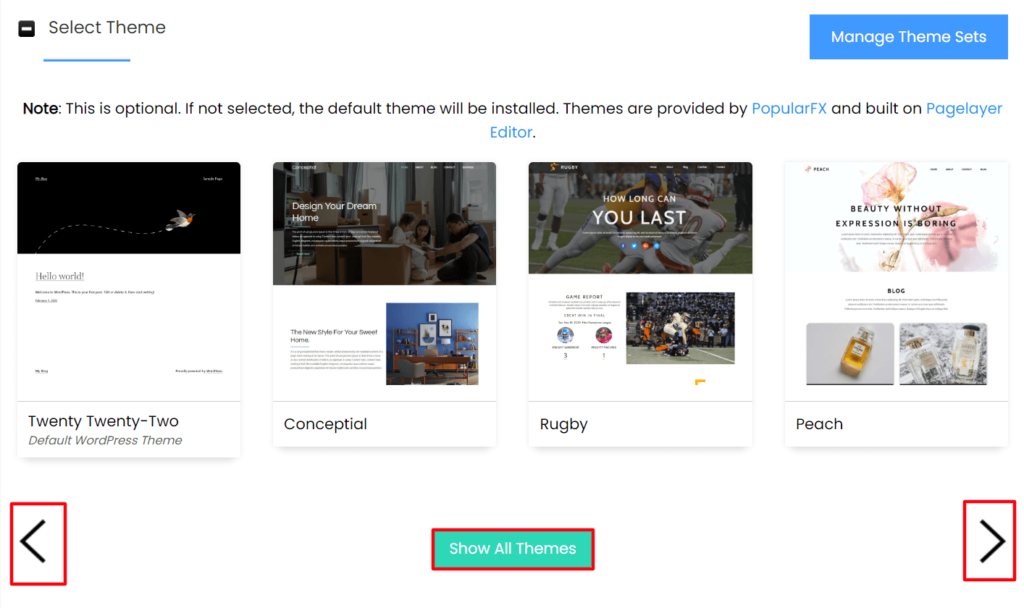
Step 5: Choose a Responsive eCommerce Store Theme
The theme will decide the layout of your eCommerce store. There are many popular WordPress eCommerce themes available in the WordPress repository. You will find both free and premium versions of these themes. Also, these themes are customizable. By adding HTML and CSS codes, you can end up with a design that looks nothing like the original layout.
But, if you are not a coding pro, you can use the original design. Popular themes like Astra, Hestia, Storefront, eStore, Shopkeeper, etc have the layout to match your requirements.
If you want to select a free theme, just go to Appearance–> Themes and click on Add new. Then, type the theme name, install and activate the theme.
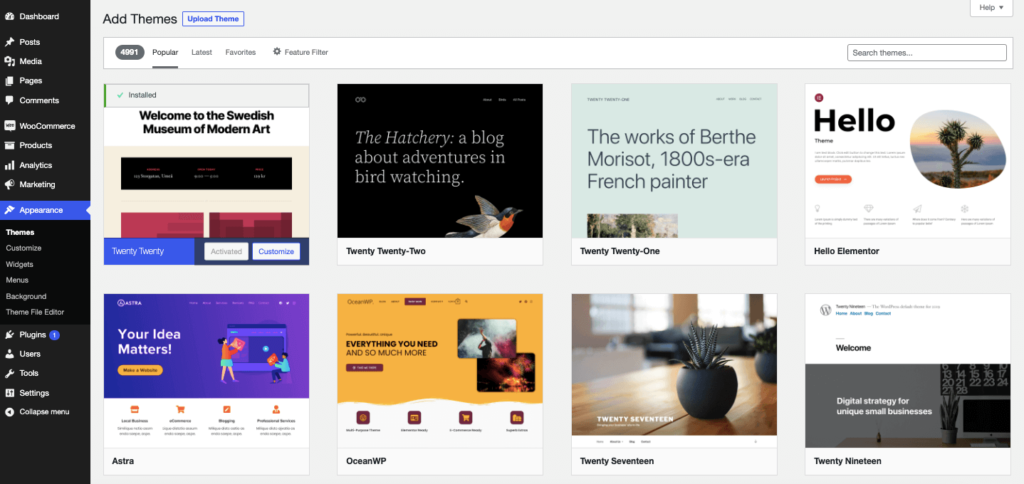
But, if you want to use a premium theme, you need to upload the theme on your WordPress dashboard. Download the zip file. Then hover over ‘Appearance’, then click ‘Themes’. This will take you through to the theme dashboard. Click the button above the themes that say ‘Add New’. This will take you to the WordPress theme dashboard.
Click the blue button at the top that says ‘Upload Theme’. You will then be prompted to choose the zip file from your computer. Choose your new theme file. You are done.
Once you have installed a WooCommerce theme you can customize its appearance to your own requirements. Just head over to the Appearance » Customize page. This will launch a theme customizer where you can change different theme settings.
Step 6: Install Additional Plugins for SEO and Security
Alongside WooCommerce you need to install additional plugins in order to optimize your site for SEO and ensure security.
For Search Engine Optimization (SEO) you can install the Rank Math plugin. It is a handy plugin that will help you optimize your site for SEO. It will also give you the best possible chance to secure your rank on page one. Also, the plugin will add the essential schema, meta description, and Robots. txt, permalinks, etc to your website as well.
And for security, you can try the Sucuri WordPress security plugin. Although there are free plugins available like Wordfence, it is better to go with a premium plugin like Sucuri. Because you can’t take too many risks regarding the security of your site. Sucuri premium plans start at $199/year, and you’ll need to install the free plugin from the WordPress directory to enable it.
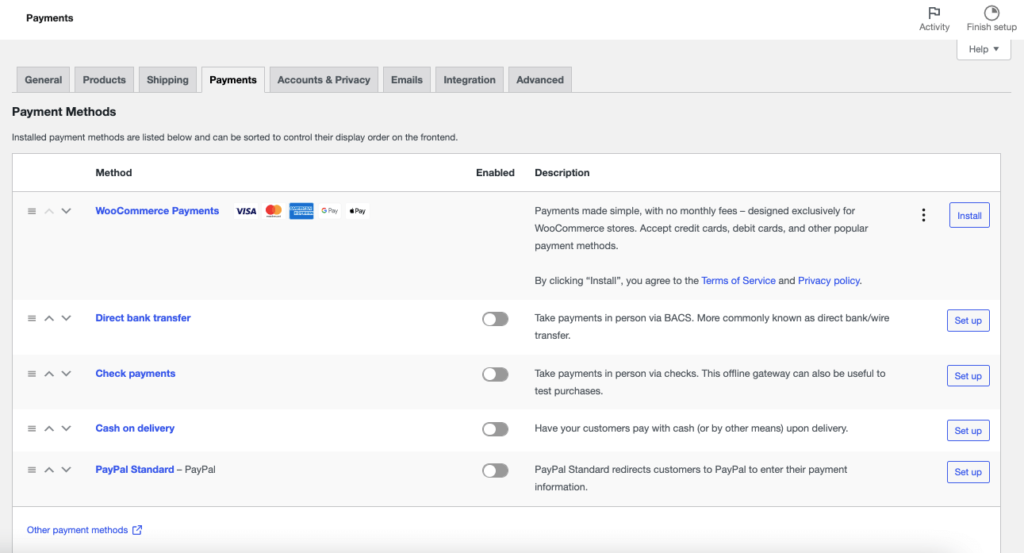
Step 7: Configure Your Payment Methods
WooCommerce has built-in payment methods available. If you go to WooCommerce–> Settings–> Payments, you will find all the payment options available to you. You will find,
- WooCommerce Payments for credit/debit cards
- Direct bank transfer
- Check payments
- Cash on Delivery.
You need to configure them in order to use them on your eCommerce store.
If you want to you can use other third-party payment gateway plugins if needed, which can be helpful if there’s a certain local payment gateway that you want to use.
Step 8: Add & Upload Products
After configuring your theme, now it is time to upload your products to your store. To upload a product, go to Products from your dashboard and click on the Add new button.
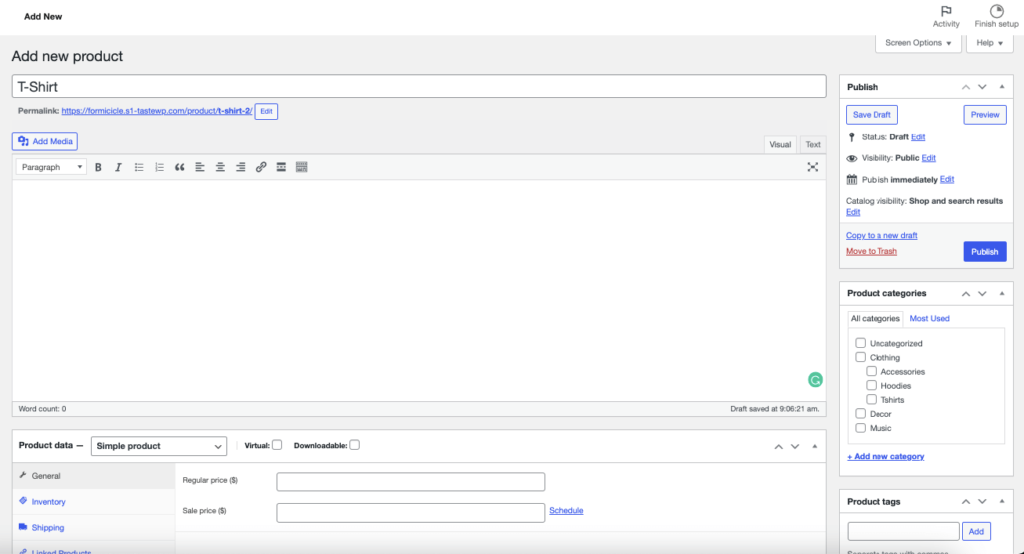
For every product you upload, you’ll need the following things:
- Product name
- Price
- Main product image (optimize your images)
- Additional product images
- Product description (make sure to write a detailed product description)
- Short product description
- Product category.
Also, you can upload different types of products like,
- Simple
- Grouped
- External/Affiliate
- Variable
- Downloadable
- Virtual.
Bonus: Take the Necessary Steps to Grow Your eCommerce Store
You are done with your eCommerce setup and you have launched your store. But your work is not done yet. You need to do some additional tasks. Like,
- As you have used WooCommerce, configure its scale further to enhance your store’s features. Especially the technical parts.
- You need to add content to your site that will help you with the conversion rate. Publish blogs that will generate organic traffic and increase your conversion rate. Use copies that attract people and turn them into paying customers.
- Place your Call to Action buttons in the right place. If you need to take help from copywriters to get the job done.
And there you have it. These are the steps on how to build an eCommerce website with WordPress. Follow these steps to create your own eCommerce store within the short amount of time possible.
Let’s finish by answering one of the most common queries-
Why Choose WordPress as Your eCommerce Platform
WordPress is a popular CMS platform with more than 42.7% market share. It has all the essential features you need to create any type of website in a matter of a few minutes. You can build professional-looking websites with very little prior knowledge of design and optimize them for SEO.
Its multiple functionalities and modification capabilities will help you to create the perfect design layout that suits your business. For a beginner, there is a learning process. However, once they are familiar with the layout it’s smooth sailing from there. Still, thinking about why you should choose WordPress for your eCommerce business? Here’s why,
1. Cost-Effective
First and foremost, when you are starting your eCommerce business, you need to take care of your budget. You don’t want to spend too much on your site as you have to think about marketing, promotions, and inventory as well. That is where a WordPress eCommerce website comes into play.

Other than hosting and domain, you don’t need to spend any money on WordPress as it’s completely free. In addition, all the eCommerce plugins have a free version that you can use to get your work done.
2. Easy Learning Process
WordPress is user-friendly and very easy to use. Its dashboard is straightforward to use and you can manage your whole site from here. You can quickly start creating posts, new pages, content, and product images and customize your layout. If you need to update the capability of your site, just install the required plugins.
And with time you will become a WordPress expert, then you don’t need to hire developers for customizations. This will also save you money.
3. Numerous Plugins and Themes
As we said earlier, you need to install plugins in order to update the capabilities of your site. You will find a plugin based on your needs in the WordPress repository. The popular eCommerce plugin WooCommerce has over 5 million+ active installations and 75m+ downloads.
Choosing a platform like WooCommerce has many advantages and will simply make your e-commerce development simpler, easier, and more reliable. We will discuss more later.
Also, you will find stunning WordPress eCommerce themes that will help you with the design of your store. With a little modification, you can create the perfect layout for your store. These themes have all the features for an e-commerce website and provide a lot of customization options, a fully responsive design, and a user-friendly interface. Astra, Webify, Kalium, and many more themes are available in WordPress that can be exclusively used for e-commerce websites.
4. SEO and Search Engine Friendly
WordPress ranks highly on most search engines as it has a clean code base. So, in terms of Search Engine Optimization, you don’t need to do much than the basic practices. Also, there are many popular SEO plugins that will take care of most of the work like adding Schema, Robots.txt, Canonical URL, etc.
5. Customization Options
WordPress is a developer-friendly platform, so you can easily create custom designs to meet your design requirements. For that, you need to have knowledge of HTML and CSS or you need to hire a developer. Also, the theme you choose will provide you with customizable widgets.
You can use them to upgrade the design, appearance, layout, etc. With these essential modifications, you will have a higher chance of converting traffic into sales.
6. High-level Security
You need to have high-level security in your eCommerce store. When compared to other website management systems, WordPress has a well-proven and secure system. To make sure your website is impenetrable, use WordPress security plugins that can further bolster your website’s security.
The core WordPress also has a great security system as there is a team that working on providing the best security for your websites. With every new release, there is a new security update.
So as you can see building an eCommerce website in WordPress is not a bad idea. If you are a start-up and looking for a way to start an eCommerce website on a limited budget, then you can choose WordPress.
Now, let us see how to build an eCommerce website with WordPress.
Bonus: Extend Your eCommerce Facilities to a Multivendor Marketplace
You have created your own eCommerce store. But how about turning your eCommerce store into a multivendor marketplace?
For your kind information, an eCommerce store is a store where you are the owner and only seller. Whereas a multivendor marketplace is a platform where different sellers come together and sell their products like Amazon, Flipkart, Etsy, etc.
Dokan Introduces AI Integration! With the new AI feature in the Dokan plugin, vendors can now create eye-catching product titles and descriptions—both short and long—directly within the product form. This helps vendors craft SEO-friendly content effortlessly, boosting visibility and sales.
If you have a team and eager sellers waiting to connect with you, then you can turn your WooCommerce store into a multivendor marketplace with the help of a plugin like Dokan.
Installing Dokan is easy. All you have to do is search the plugin in the WordPress dashboard and install and activate it. Then you can follow the documentation to create your marketplace.
FAQs on WordPress and eCommerce
Is WordPress safe for an eCommerce website?
Yes. With its advanced plugins and regular releases, WordPress makes sure that your site is safe from any vulnerabilities.
Can we build a powerful eCommerce website on WordPress?
Yes. With WooCommerce you can create a powerful eCommerce site.
Can I use WordPress to sell products?
With WordPress.com it’s easy to collect payments on your website. You can sell physical or digital goods, accept monthly donations, and provide access to exclusive content to paying subscribers. Your premium content can also be delivered automatically to your followers’ inboxes as a paid newsletter.
Build Your Own eCommerce Store & Earn Profits
So you have learned how to build an eCommerce website with WordPress. You can tick that off from your bucket list. If you follow the guide carefully, then you have a fully functioning eCommerce website. You are now ready to accept orders from the customers.
Want to Create an
Furniture Marketplace?
We have aimed to make this guide as simple as possible, but the reality is that WordPress is best suited to those with some tech experience. However, after the learning process, you will become a WordPress expert and will be able to control your eCommerce store on your own.
Subscribe to
Dokan blog
We send weekly newsletters, no spam for sure!


Leave a Reply