Looking for a step-by-step tutorial to build a print on demand marketplace? You are in the right place. In this guide, we will show you how to build print on demand marketplace using WordPress and Dokan multivendor plugin in 6 easy steps.
Print on demand industry is growing super fast. According to a recent statistic,
The POD industry is expected to be worth around USD 59.3 Billion by 2033, from USD 5.1 Billion in 2023, growing at a CAGR of 27.8% during the forecast period from 2024 to 2033.
Want to get a big slice of this cake? Create a print on demand marketplace and start earning today. Let’s explore how you can do that by following this tutorial together!
No Worries: Why Print on Demand + Marketplaces is the Future of Selling
Print on Demand (POD) has changed the way how businesses create and sell products. With no need to stock inventory, sellers can offer custom-designed items while avoiding the upfront costs and risks of traditional retail.
Marketplaces amplify this by providing a ready-made platform to showcase these products to a wide audience.
This combination is future-proof because it suits the modern demand for personalization and convenience. Buyers want unique products, and POD fulfills that need efficiently. Sellers can also experiment with designs, and products are only printed when purchased. This reduces wastage as well.
Now let’s find out what POD marketplace comes with for sellers, buyers, and marketplace owners:
(i) For Sellers
- Low startup costs: No need to invest in upfront inventory.
- Scalability: Easily expand your product range without additional overhead.
- Global reach: Access a worldwide customer base.
- Passive income: Generate revenue with minimal effort.
(ii) For Buyers
- Unique products: A customer can buy products that are only designed and created for him.
- High-quality products: Since customers choose the design and all, so chances are high to get high-quality products.
- Convenient shopping experience: Enjoy a seamless online shopping experience.
(iii) For Marketplace Owners
- Diverse product catalog: Attract a wider range of customers with a unique product offering.
- Increased revenue: Generate additional revenue through commission fees and advertising.
- Enhanced user experience: Provide a personalized shopping experience for customers.
Now let’s jump into the main tutorial part to create an online print-on-demand marketplace for you!
How to Build Print on Demand Marketplace Using Dokan Plugin
Creating a POD marketplace is not as complicated as it sounds. Choosing the right platform like WordPress and a marketplace solution like the Dokan plugin makes the whole process a lot easier.
Excited?
Okay! Here are the steps that you need to follow to create your own POD marketplace:
- Install the Dokan Multivendor Plugin
- Enable the Printful Module
- Configure the Dokan Plugin
- Configure the Printful Integration
- Design and Upload Products to Your Admin Shop
- Allow Vendors to Register to Your Marketplace
Let’s get into the details!
Prerequisites of Building a Print on Demand Marketplace
Before diving into the main part, you need to follow these 2 prerequisites:
Prerequisite 01: Need a Live WordPress Website
To build a print-on-demand multivendor marketplace, the first prerequisite you’ll need to make sure is a live WordPress website.
If your WordPress website isn’t ready yet, there is nothing to be worried about. You can create a WordPress website by following these steps:
- Buy a domain name and a hosting plan
- Install WordPress on your cPanel
That’s all!
We have a series of blog posts to get these things done. So, follow these blogs if you need any help:
- How to Choose The Best Domain Name for Your Website
- How to Choose The Best Hosting for Your Website
- How to Install WordPress on Your Control Panel
After ensuring a live WordPress website, now let’s move forward!
Prerequisite 02: Install a Suitable Theme
After getting your site live, you need to install a theme. The good news is any theme that is compatible with WooCommerce is also compatible with Dokan. So, choose a theme according to your preferences.
To find a theme for your website, you can check this list of Dokan compatible themes that we have prepared for you.
However, if you want to use a free theme, you can use the Dokan theme. It’s specially designed for multivendor marketplaces.
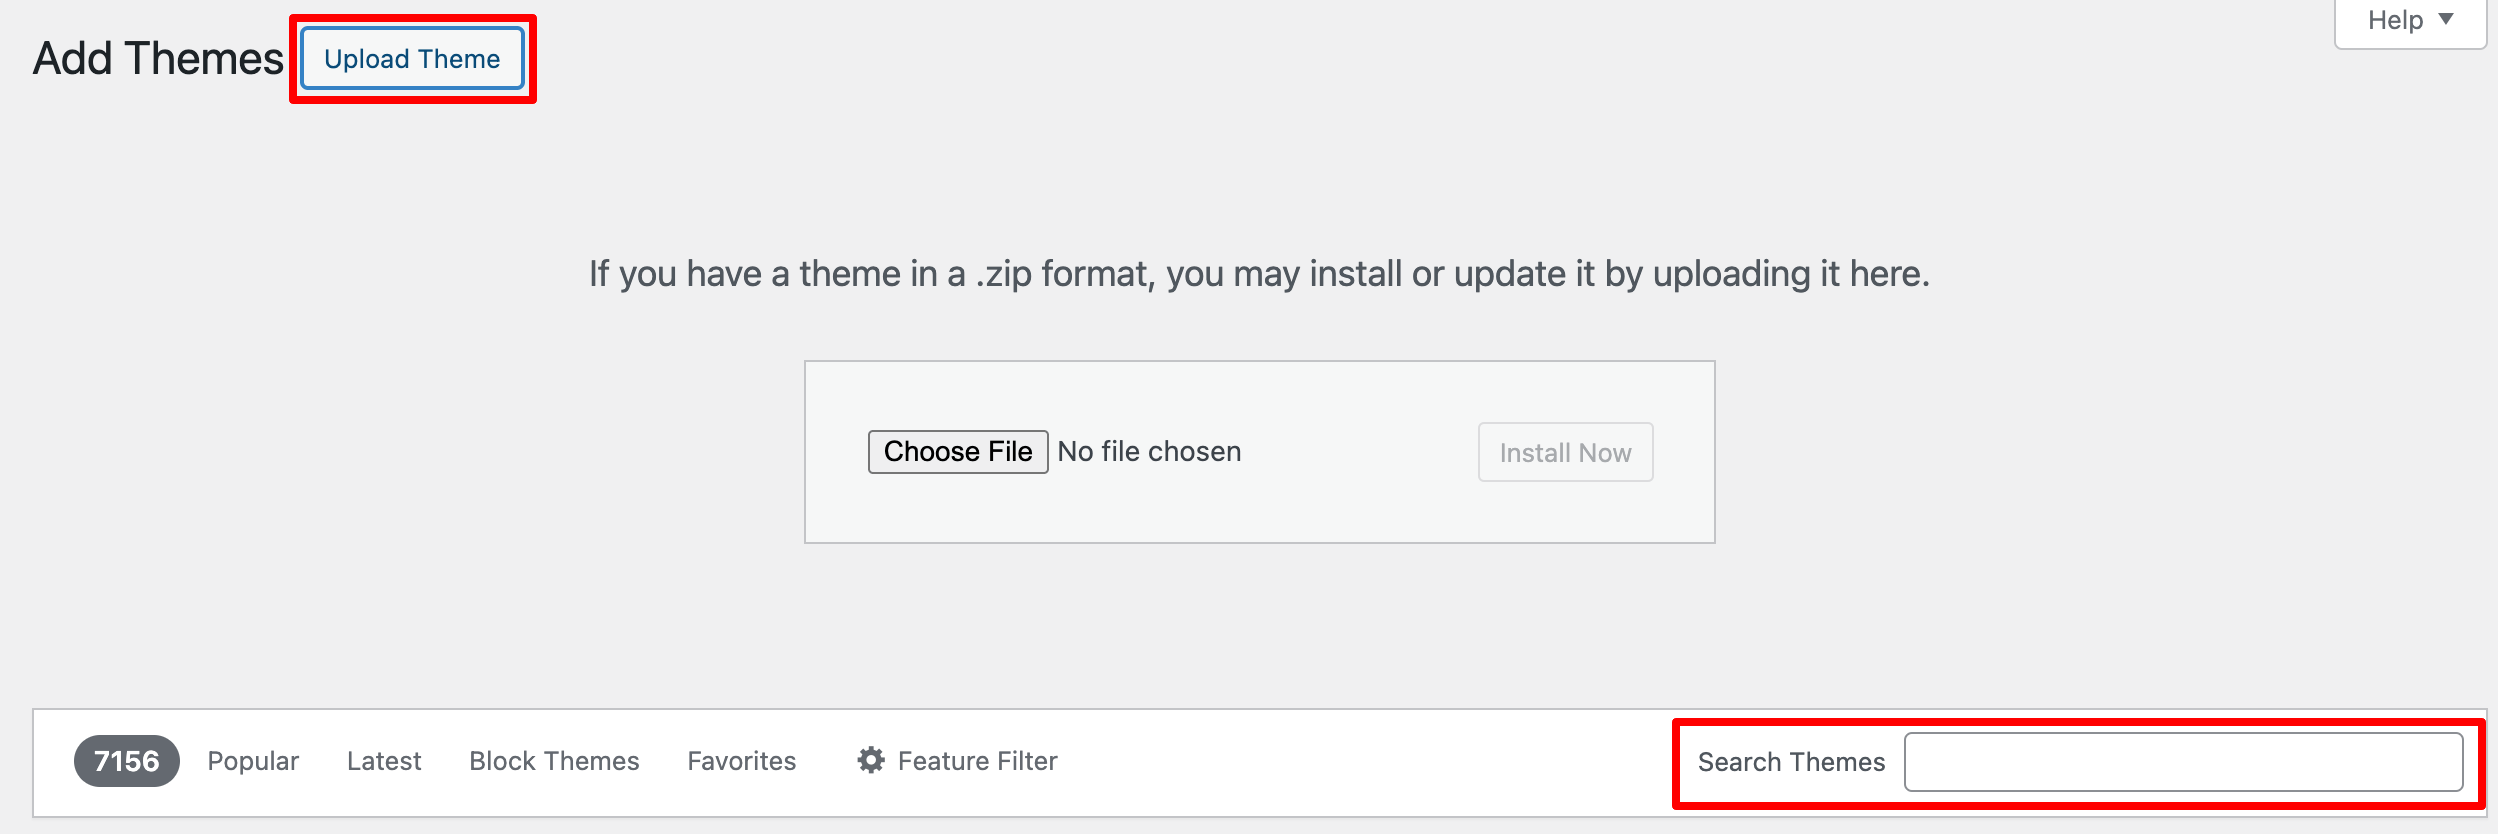
- To install a theme, go to your WordPress dashboard and then navigate to Appearance -> Theme -> Add New Theme.
- There you’ll find the options to upload a theme or search for a theme. After uploading or choosing the theme, click on Install and then Activate to complete the process.
Note: If you find it difficult to install a WordPress theme, you are highly requested to check out our blog on installing WordPress themes to get your job done with ease!
Now let’s follow the below steps to complete the whole process of creating your own POD marketplace.
Step 01: Install the Dokan Multivendor Plugin
Dokan plugin is the most popular free multivendor solution for WordPress with 50,000 active installations and 4.6 out of 5 ratings. It’s easy to use and scale. You can convert any kind of WordPress site into a multivendor marketplace using this plugin without writing a single line of code.
Moreover, installing Dokan multivendor is as simple as installing any other WordPress plugin. You can install the plugin directly from your WordPress dashboard.
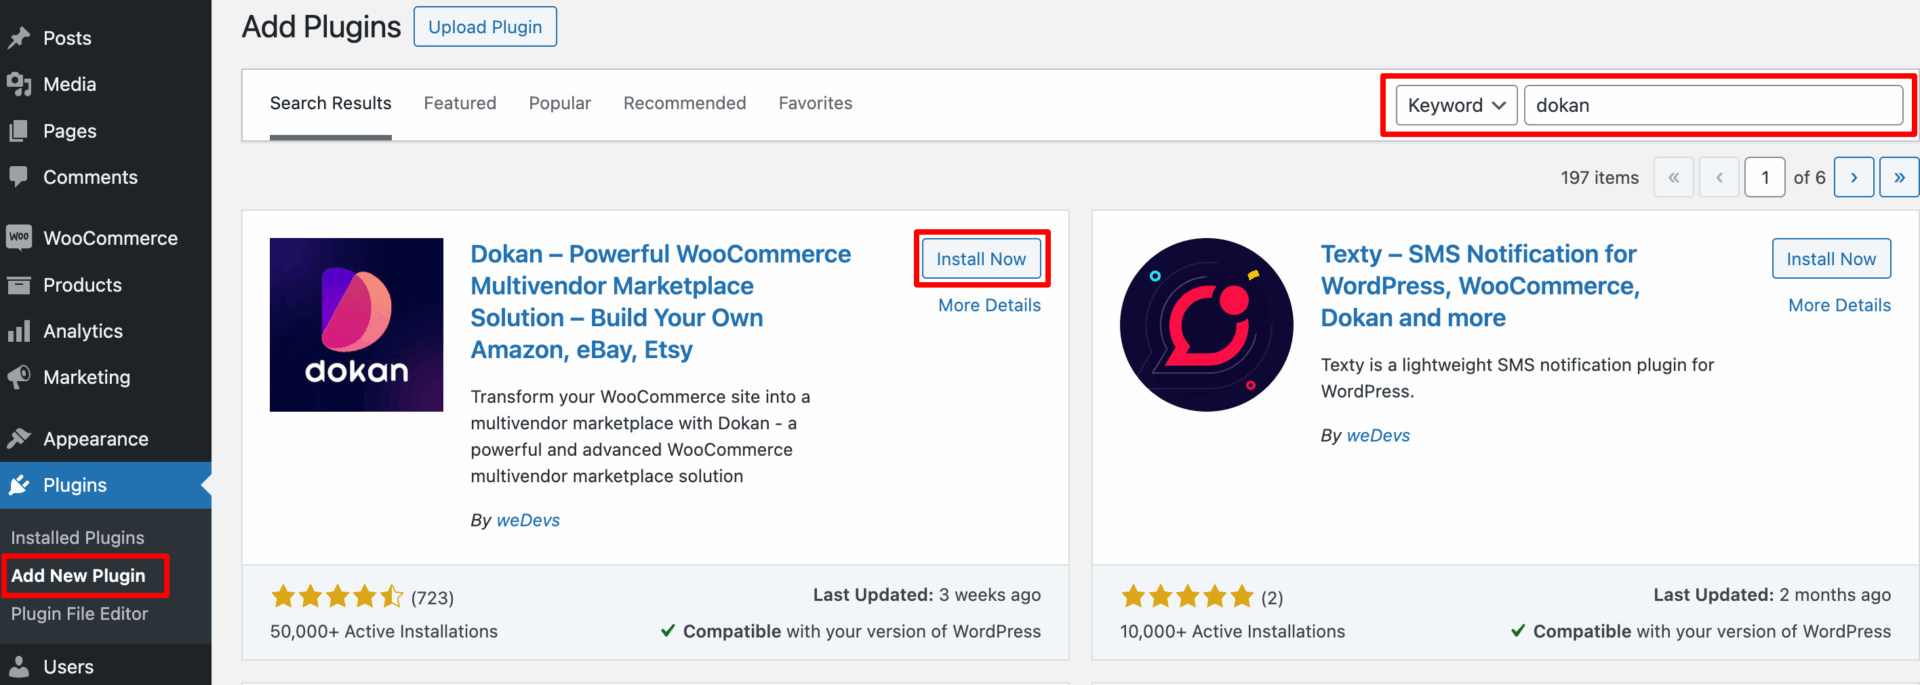
Simply, go to your WordPress dashboard -> Plugin -> Add New. Then use the search box to type the plugin name “Dokan” and click the “Install” button to install the plugin from the search result.
Don’t forget to activate the plugin by clicking the “Activate” button.
Note: WooCommerce is a mandatory plugin for using the Dokan plugin. So, you can install the WooCommerce plugin separately before installing the Dokan plugin. Or, you’ll be asked to install the WooCommerce plugin while installing the Dokan plugin.
When you install the Dokan plugin for the first time on your WordPress-powered website, you get the opportunity to use this setup wizard. It gives you a step-by-step guideline to set up the Dokan multivendor plugin easily.
You can check our admin mult-step setup wizard for a clearer understanding.
If you find it difficult to configure the Dokan plugin, you can watch our video on the Dokan installation guide.
Step 02: Enable the Printful Module
Printful is a printing and fulfillment service that helps businesses and individuals sell custom products without managing inventory. It works with many eCommerce platforms and offers items like clothing, accessories, and home decor.
People like Printful because it’s easy to use, handles most of the work automatically, and delivers worldwide. It’s perfect for small businesses, online stores, and creators who want to sell custom items.
Now, the Dokan multivendor marketplace plugin has a module that connects with Printful. This lets marketplace owners create their own print-on-demand marketplace easily.
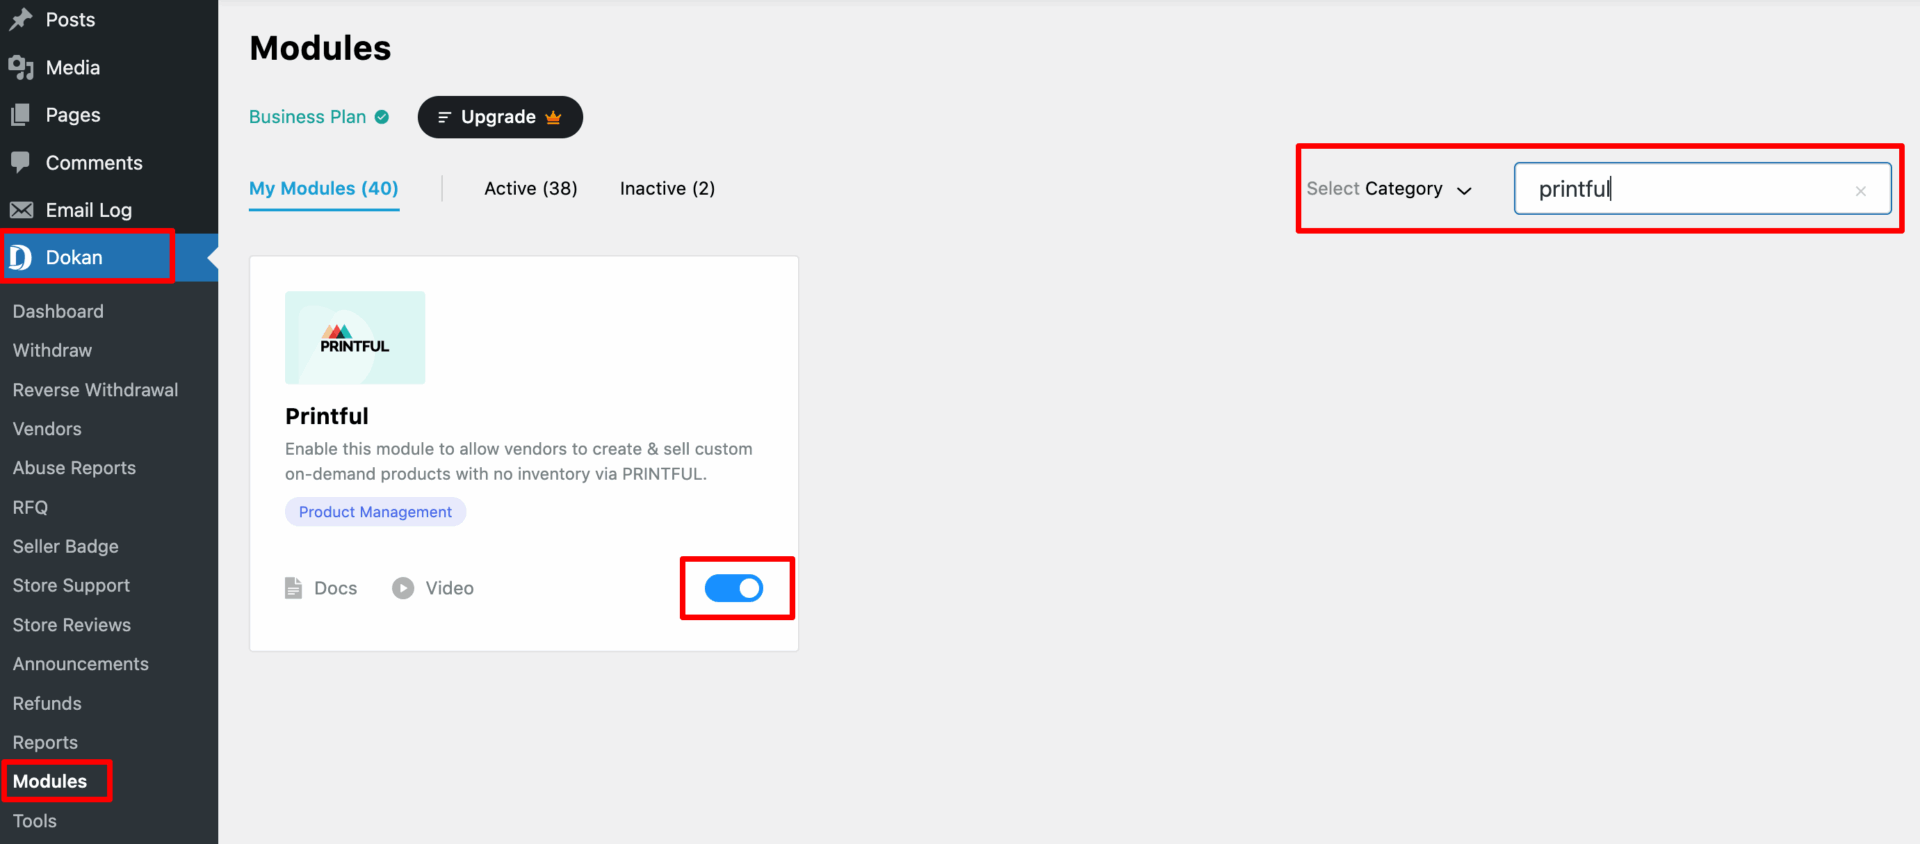
To enable the Printful module, navigate to Dokan -> Modules and search for the Printful module. Then enable the module by clicking the toggle button.
Note: Printful is a premium module of the Dokan plugin. It comes with the Dokan Business or Dokan Enterprise package. So, choose either package, upgrade to Doka Premium, and start using this module.
Step 03: Configure the Dokan Plugin
After installing and activating the Dokan plugin, now you need to configure all the basic settings. You will find all the settings options at WP-Admin –> Dokan –> Settings.
You’ll find here:
- General Settings
- Selling Options
- Withdraw Options
- Payment Gateways
- Reverse Withdrawal
- Page Settings
- Appearance
- Privacy Policy
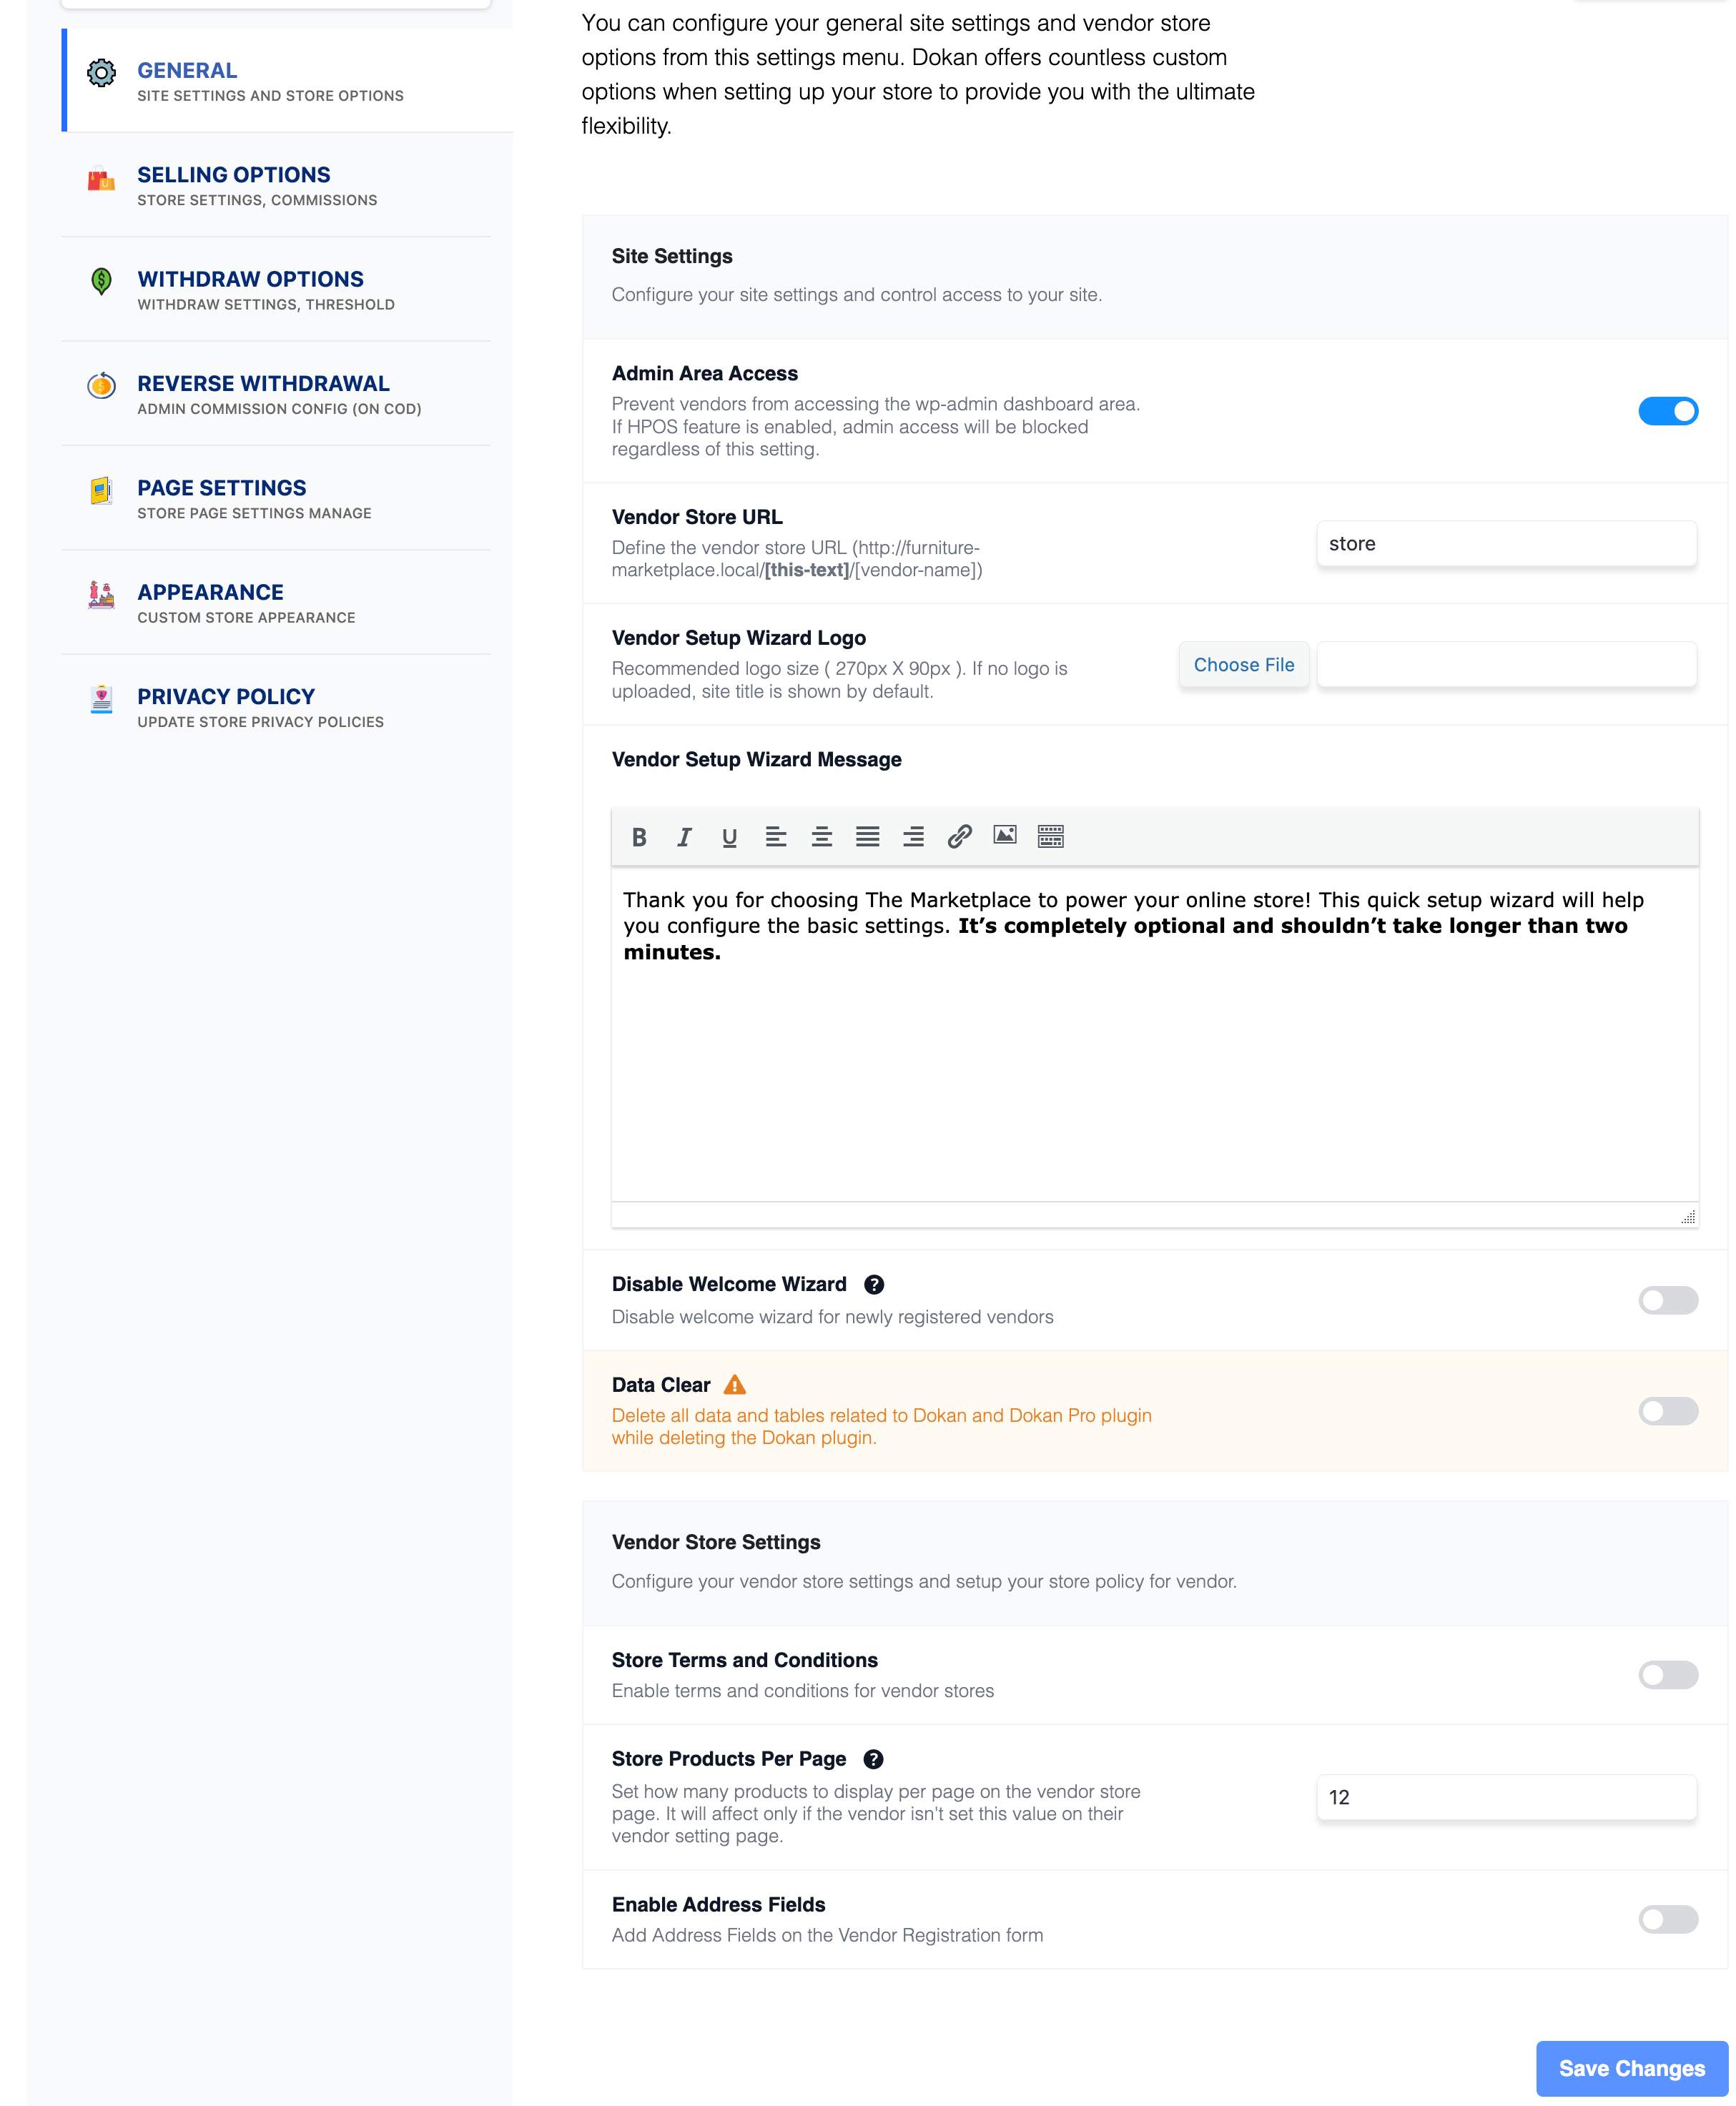
You can select the pages for the vendor dashboard, order page, store listing, and terms and conditions page from here.
Now you need to set the commission type and rate. Go to WP Admin Dashboard -> Dokan -> Settings -> Selling Options. There you’ll find the Commission Type and Admin Commission options.
Set the commission type and rate according to your convenience.
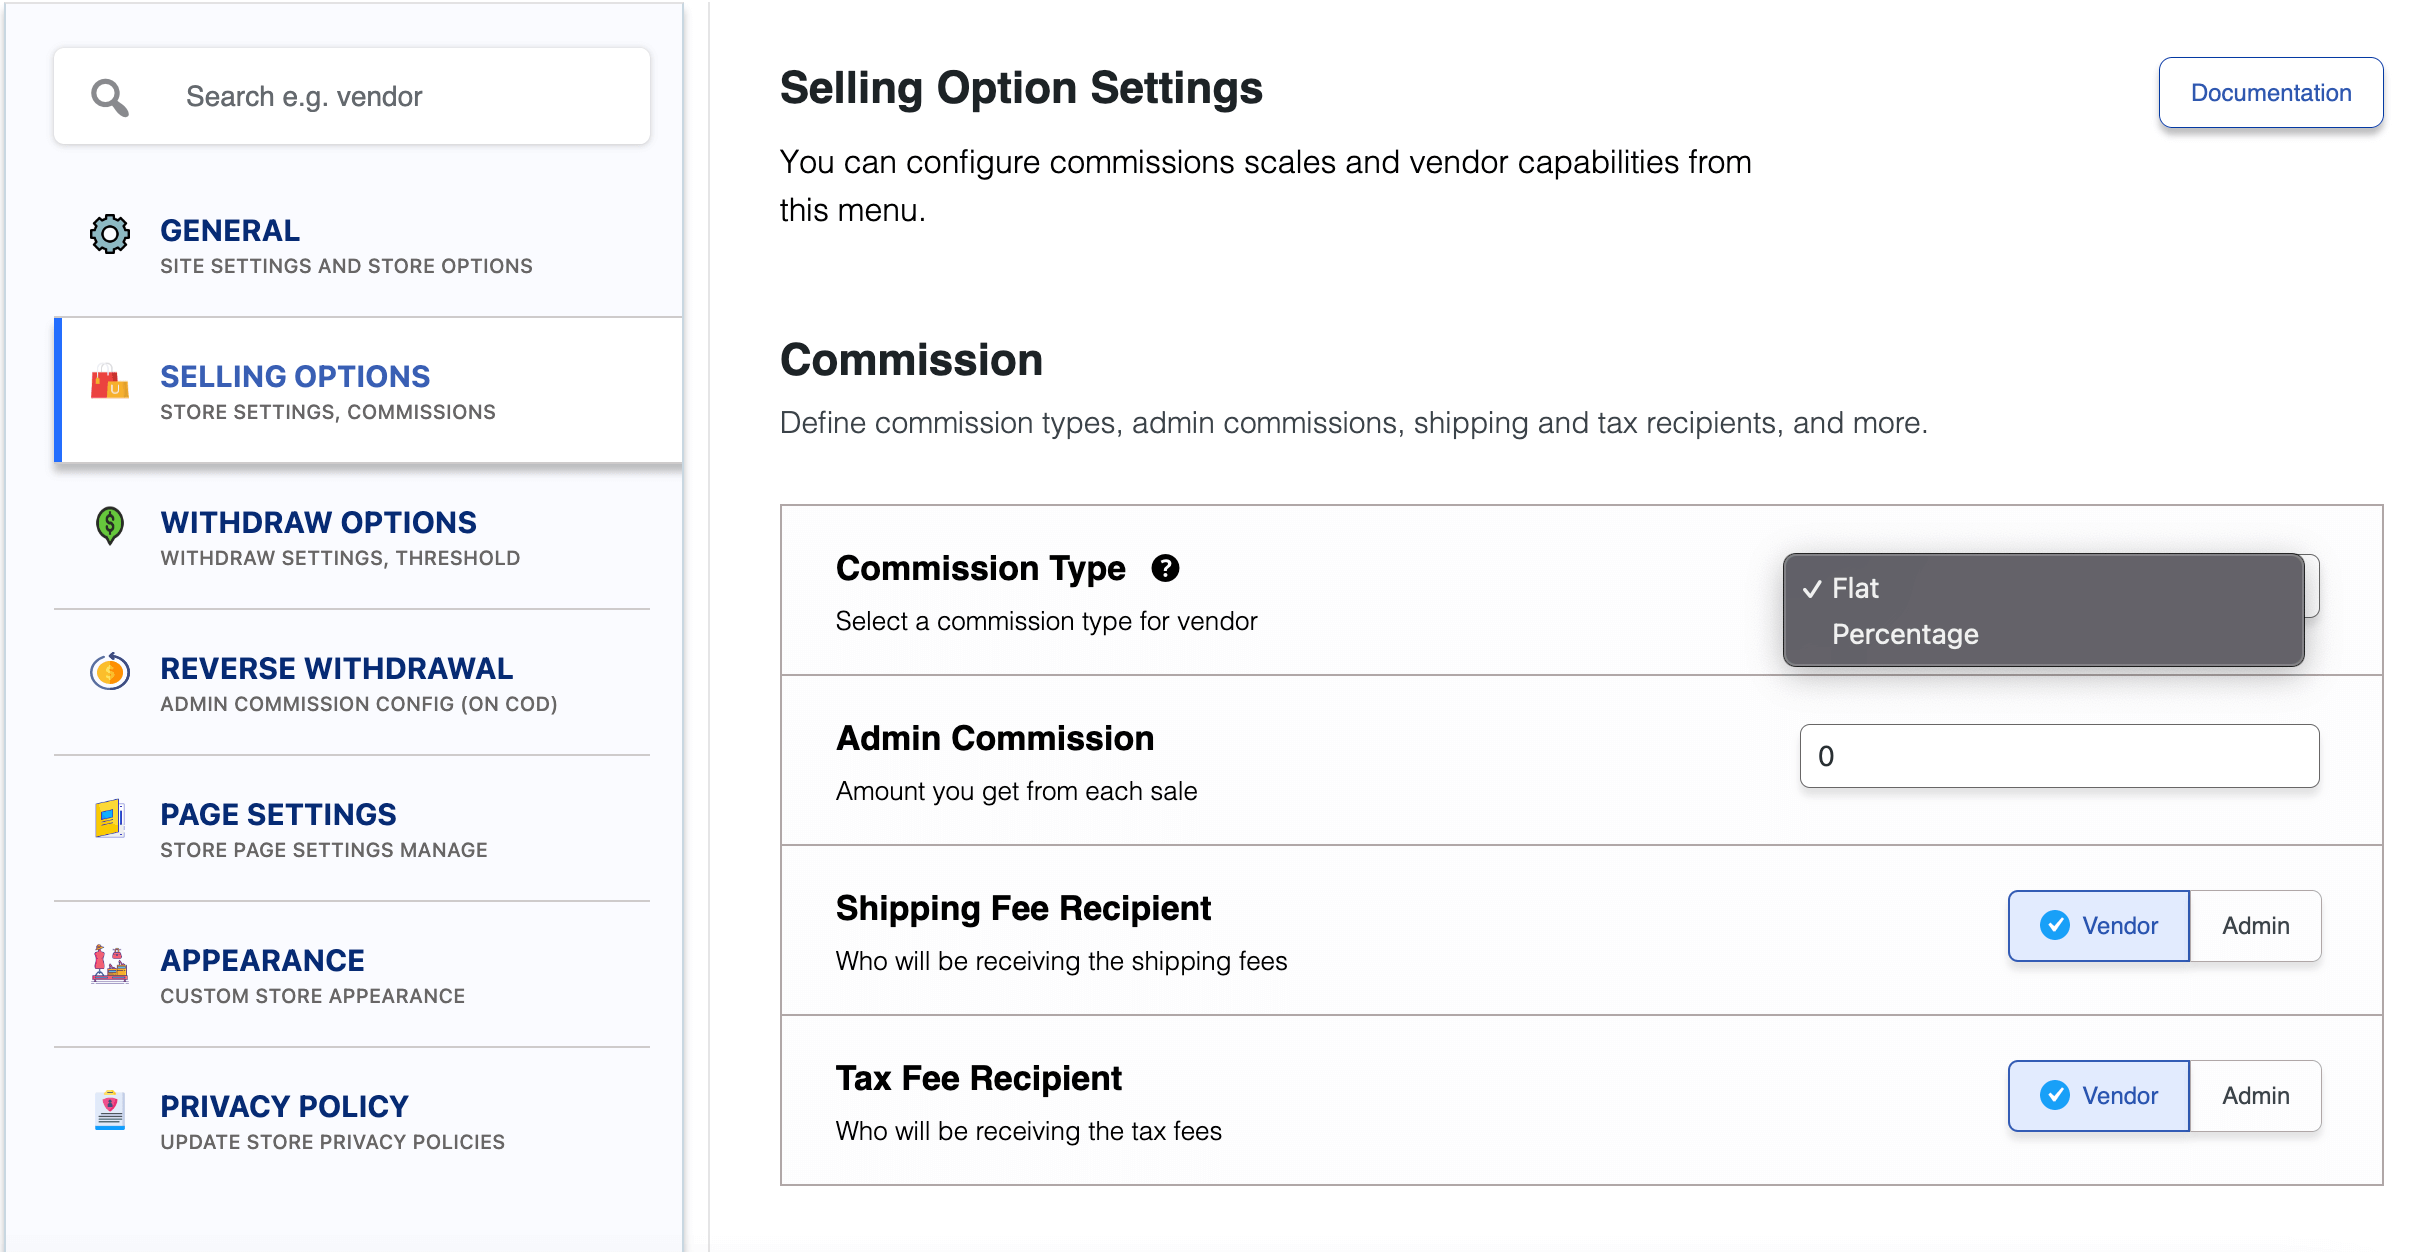
Don’t forget to click the Save Changes button after configuring all the settings. Otherwise, you will lose all the changes that you’ve made now.
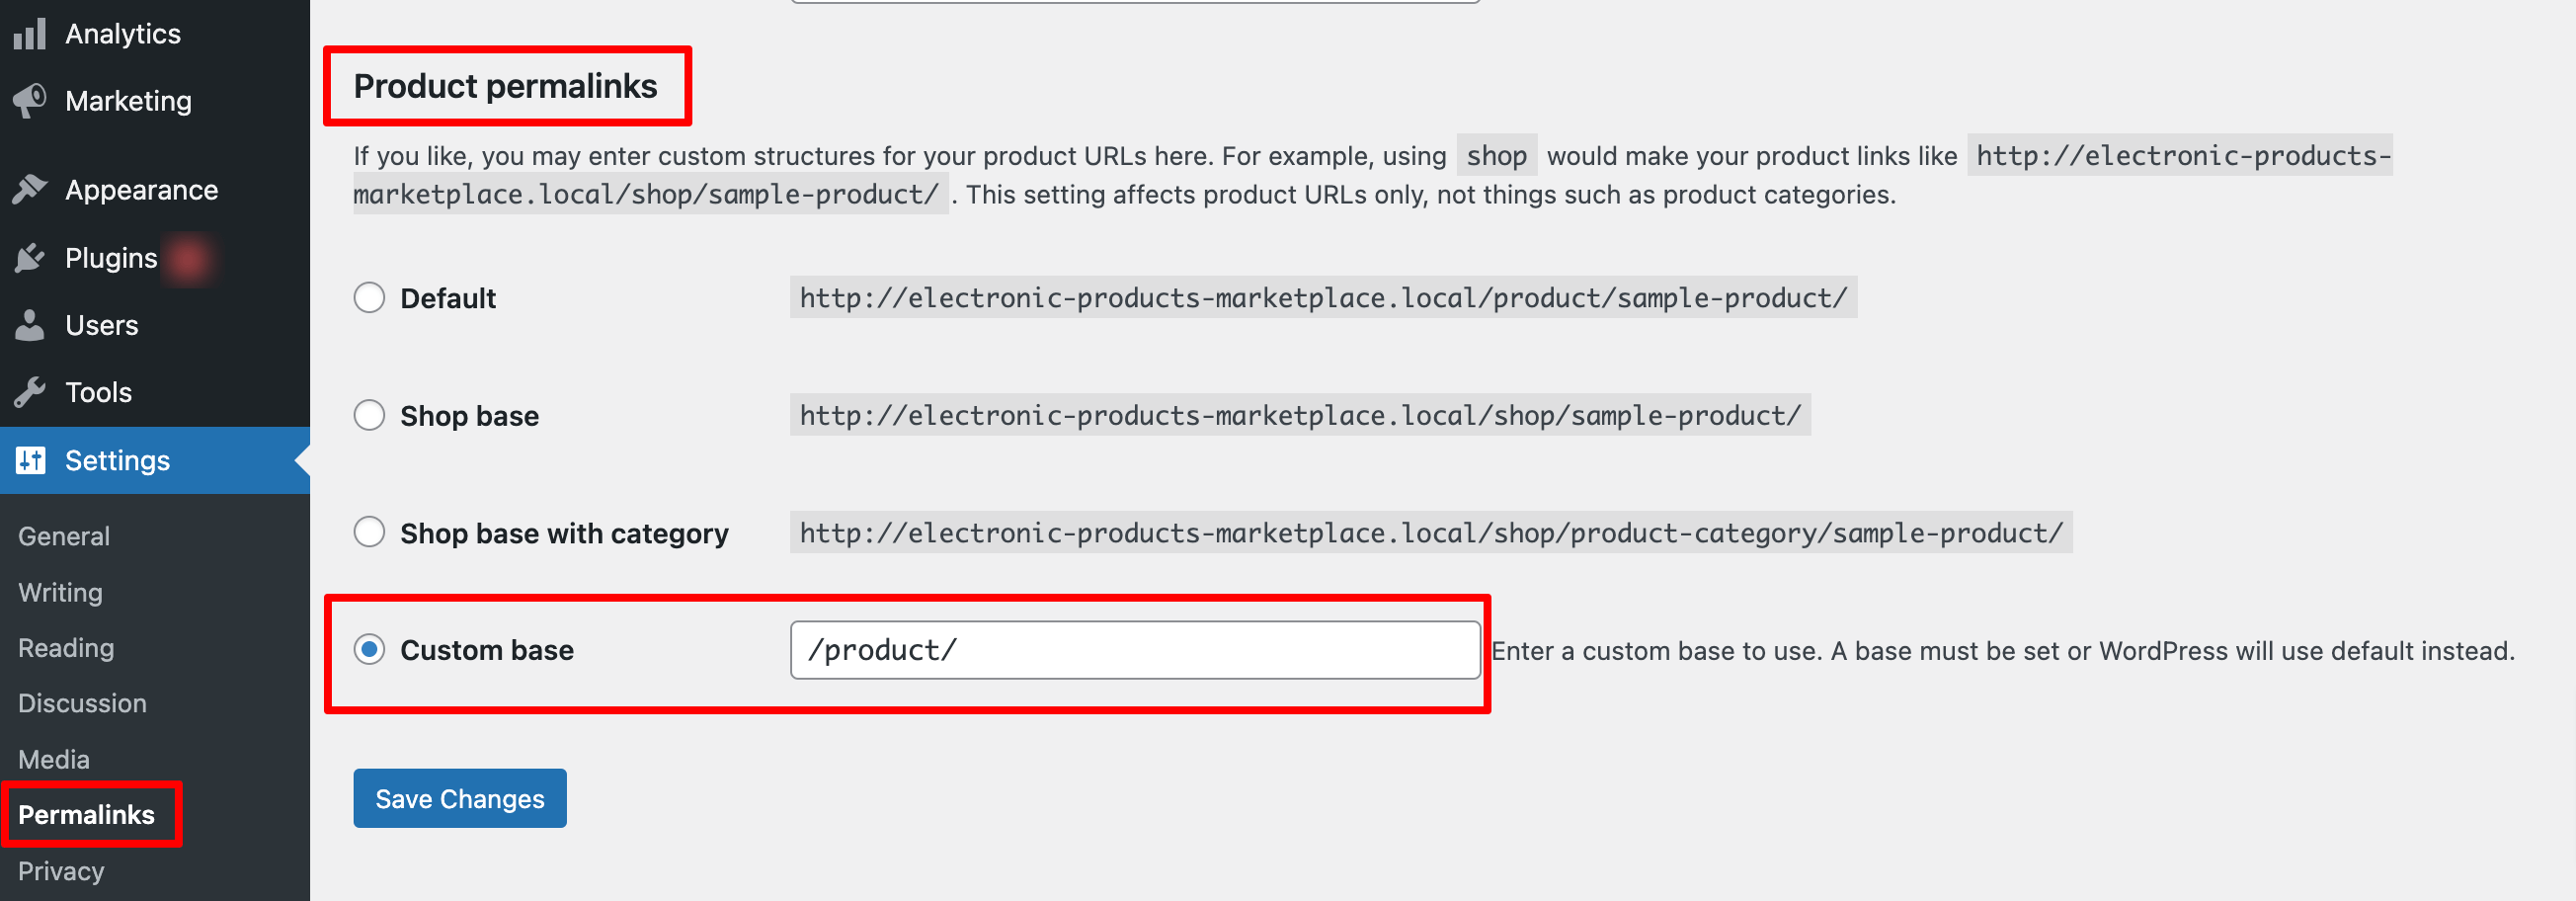
Now if you want to set the permalink settings of your product page, you can do that from WP Admin -> Settings -> Permalinks -> Product Permalinks.
For example, using “product” would make your product links like http://yourdomainname.com/store/sample-product/.
This setting affects product URLs only, not things such as product categories.
Select the check box “Custom Base” for product permalinks and write “/product” (or, whatever you want) on the box. Then hit the Save Changes button to save the settings.
Now let’s discuss two basic yet crucial settings of the Dokan multivendor plugin:
a) Configure Payment Gateways
You can’t control your customers which payment gateway they should choose, right? So, it’s always a better decision to ensure several payment gateways on your marketplace.
Dokan supports all WooCommerce-compatible payment gateways. You will get a wide range of choices to make the transaction process easier on your marketplace.
With Dokan Lite you can use non-adaptive payment gateways like PayPal, bank account transfer, cash on delivery, etc. The Pro version supports adaptive payment solutions like Stripe Connect and MOIP.
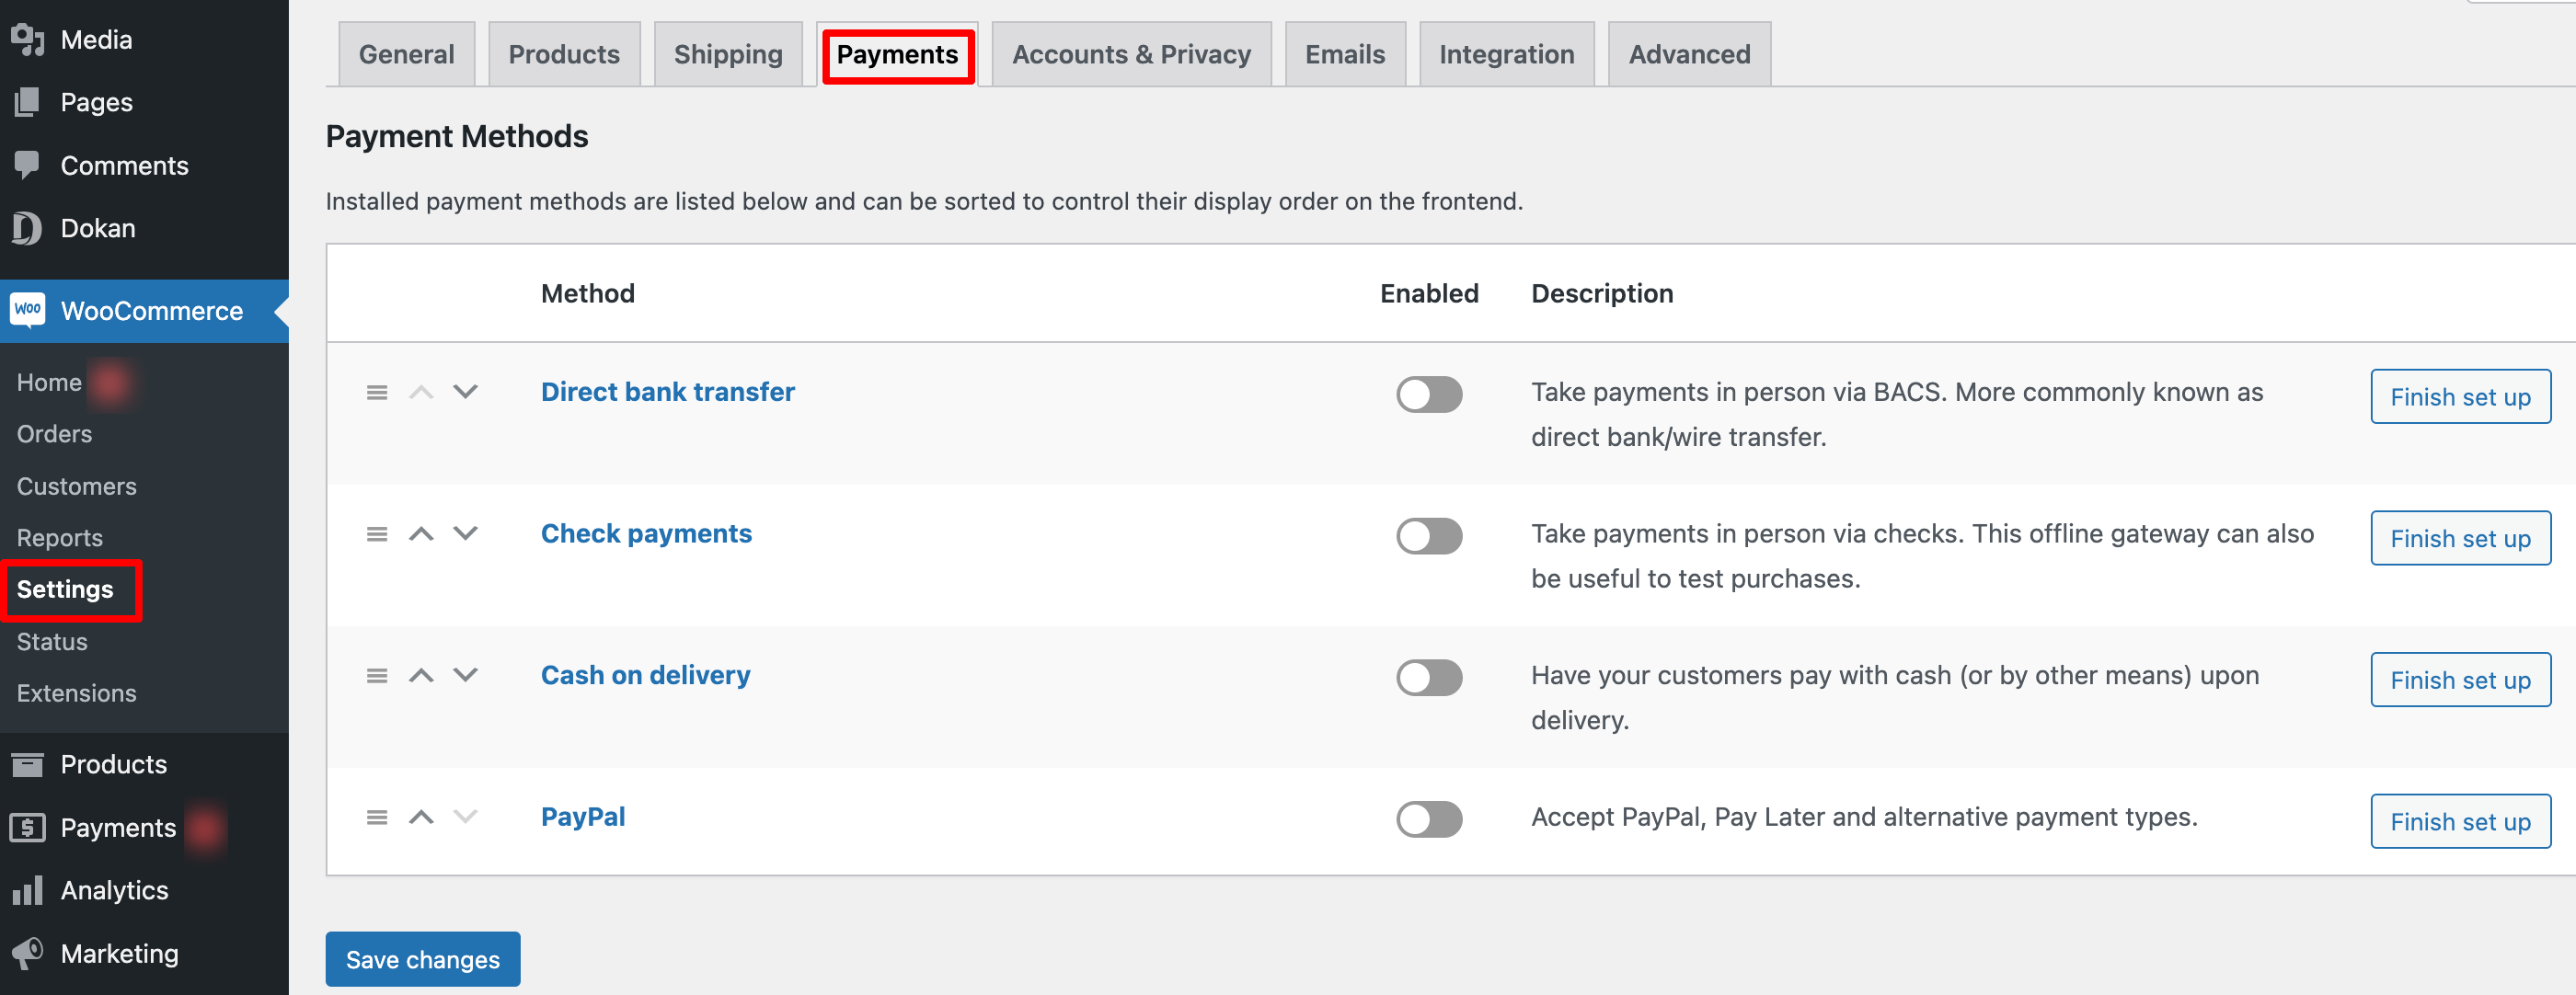
Go to your WordPress dashboard -> WooCommerce -> Settings, then click on the Payment tab to get the available payment methods.
Note: In case the PayPal option isn’t there, you should install the “WooCommerce PayPal Payments” plugin and you will find the PayPal option here.
b) Enable Withdraw Methods
Another important part of running an interactive online marketplace is to ensure a smooth withdrawal system. Dokan multivendor helps you take care of this section as well.
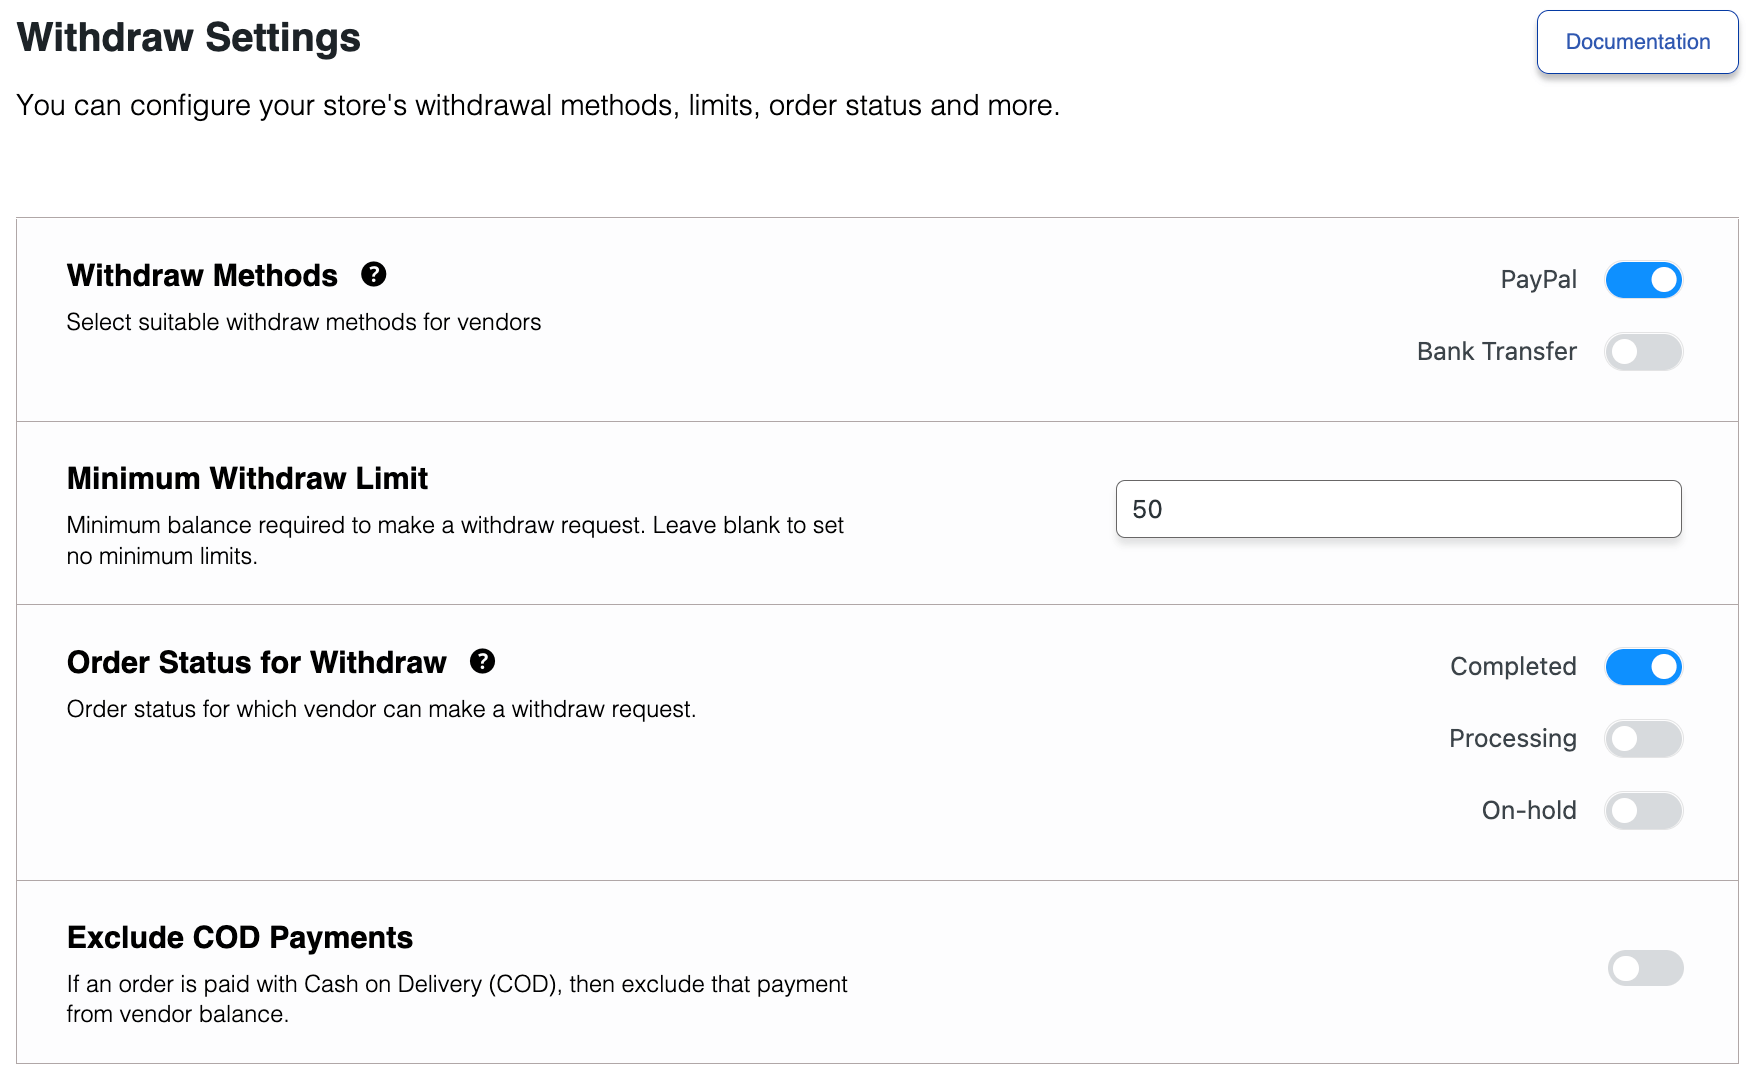
Go to WP Admin -> Dokan -> Settings -> Withdraw Options. Here you’ll find options to customize the withdrawal method and set the minimum balance a vendor needs to make a withdrawal limit.
You can also customize other Dokan settings following the same process that we have shown here.
We have step-by-step documentation for each Dokan setting. So, if you need any further help, don’t forget to check our documentation for Dokan settings, specially created for beginners.
Step 04: Configure the Printful Integration
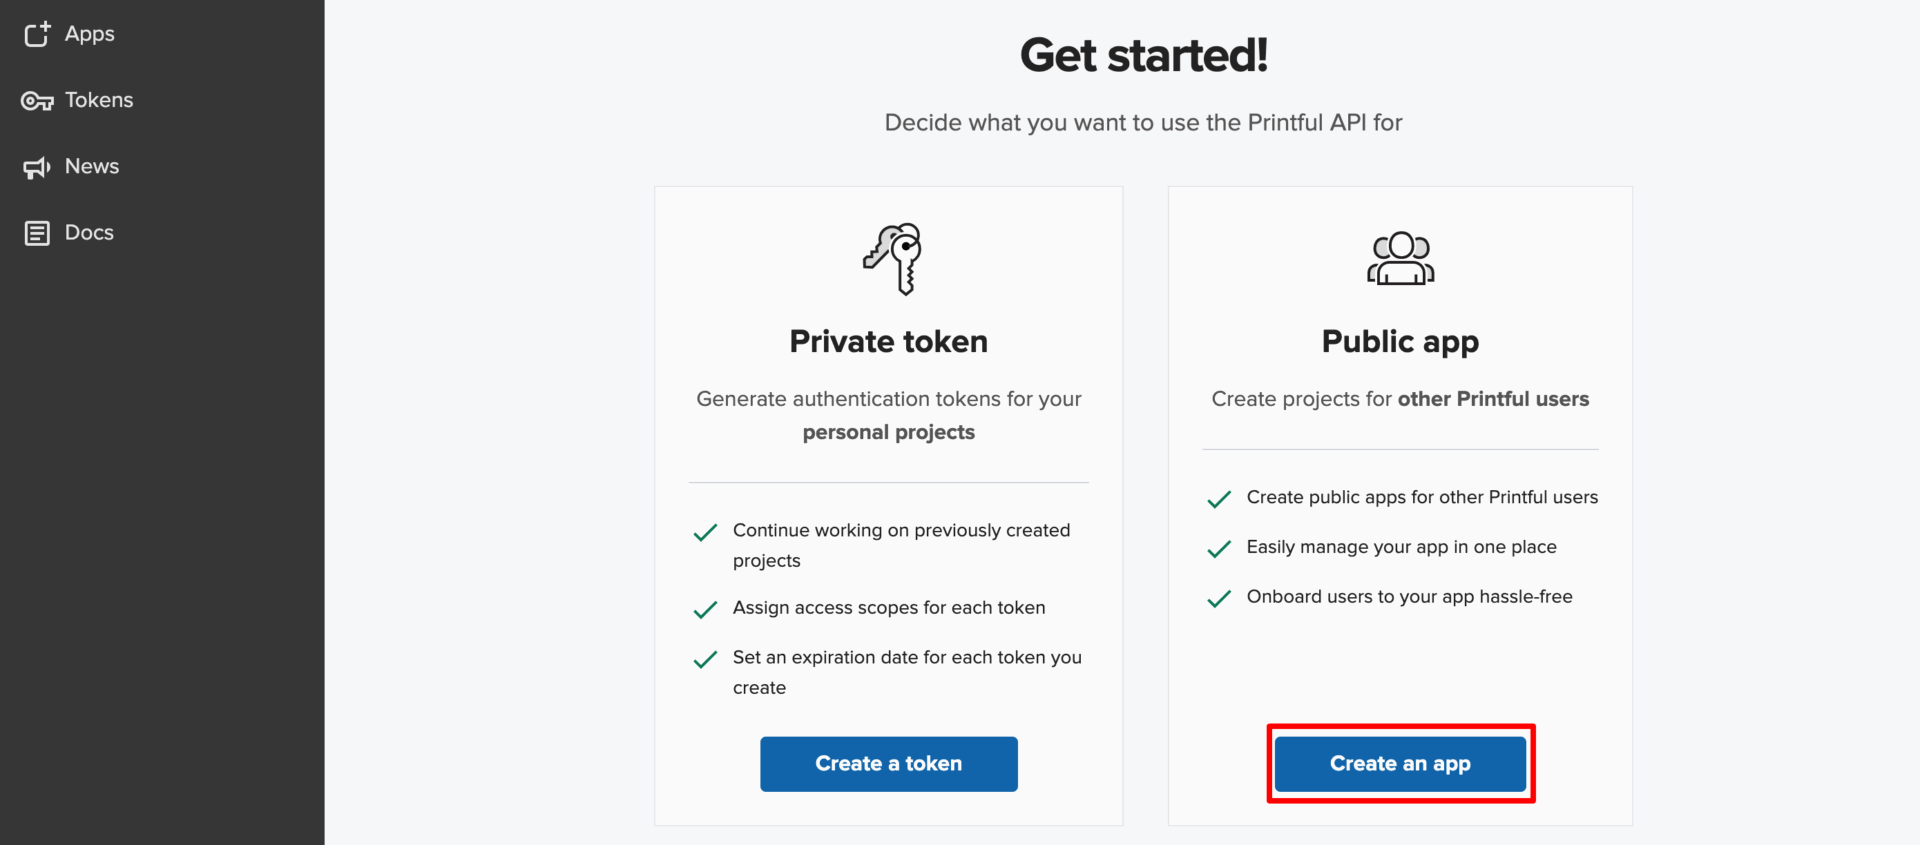
Now you need to create an app to connect to Printful. Go to the Printful Developer Platform, sign up, or log in. Then click on the Create an App button. Then you’ll be redirected to a new interface.
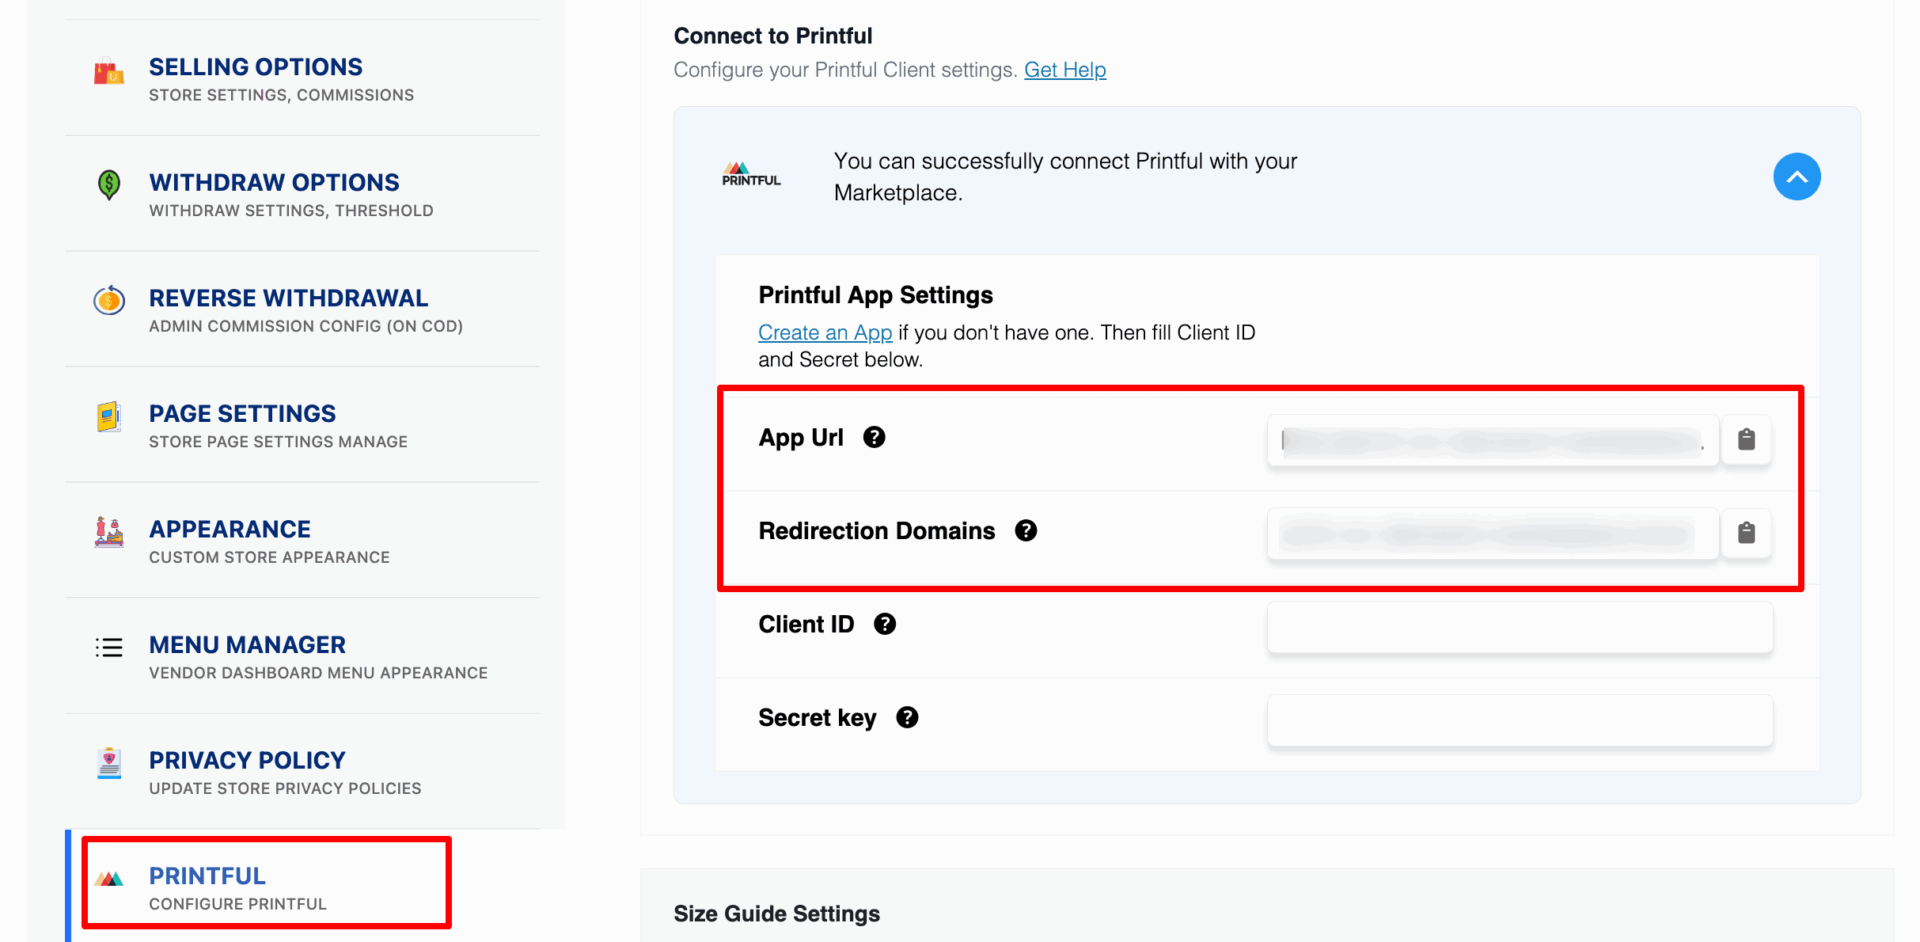
In this interface, you’ll require two important URLs:
- App URL
- Redirection Domains
To get his URLs, go to your WordPress dashboard and navigate to Dokan -> Settings -> Printful. There you will find these URLs.
Copy these links and paste them to the App details interface. Also, fill up the other required information like App name and Contact email.
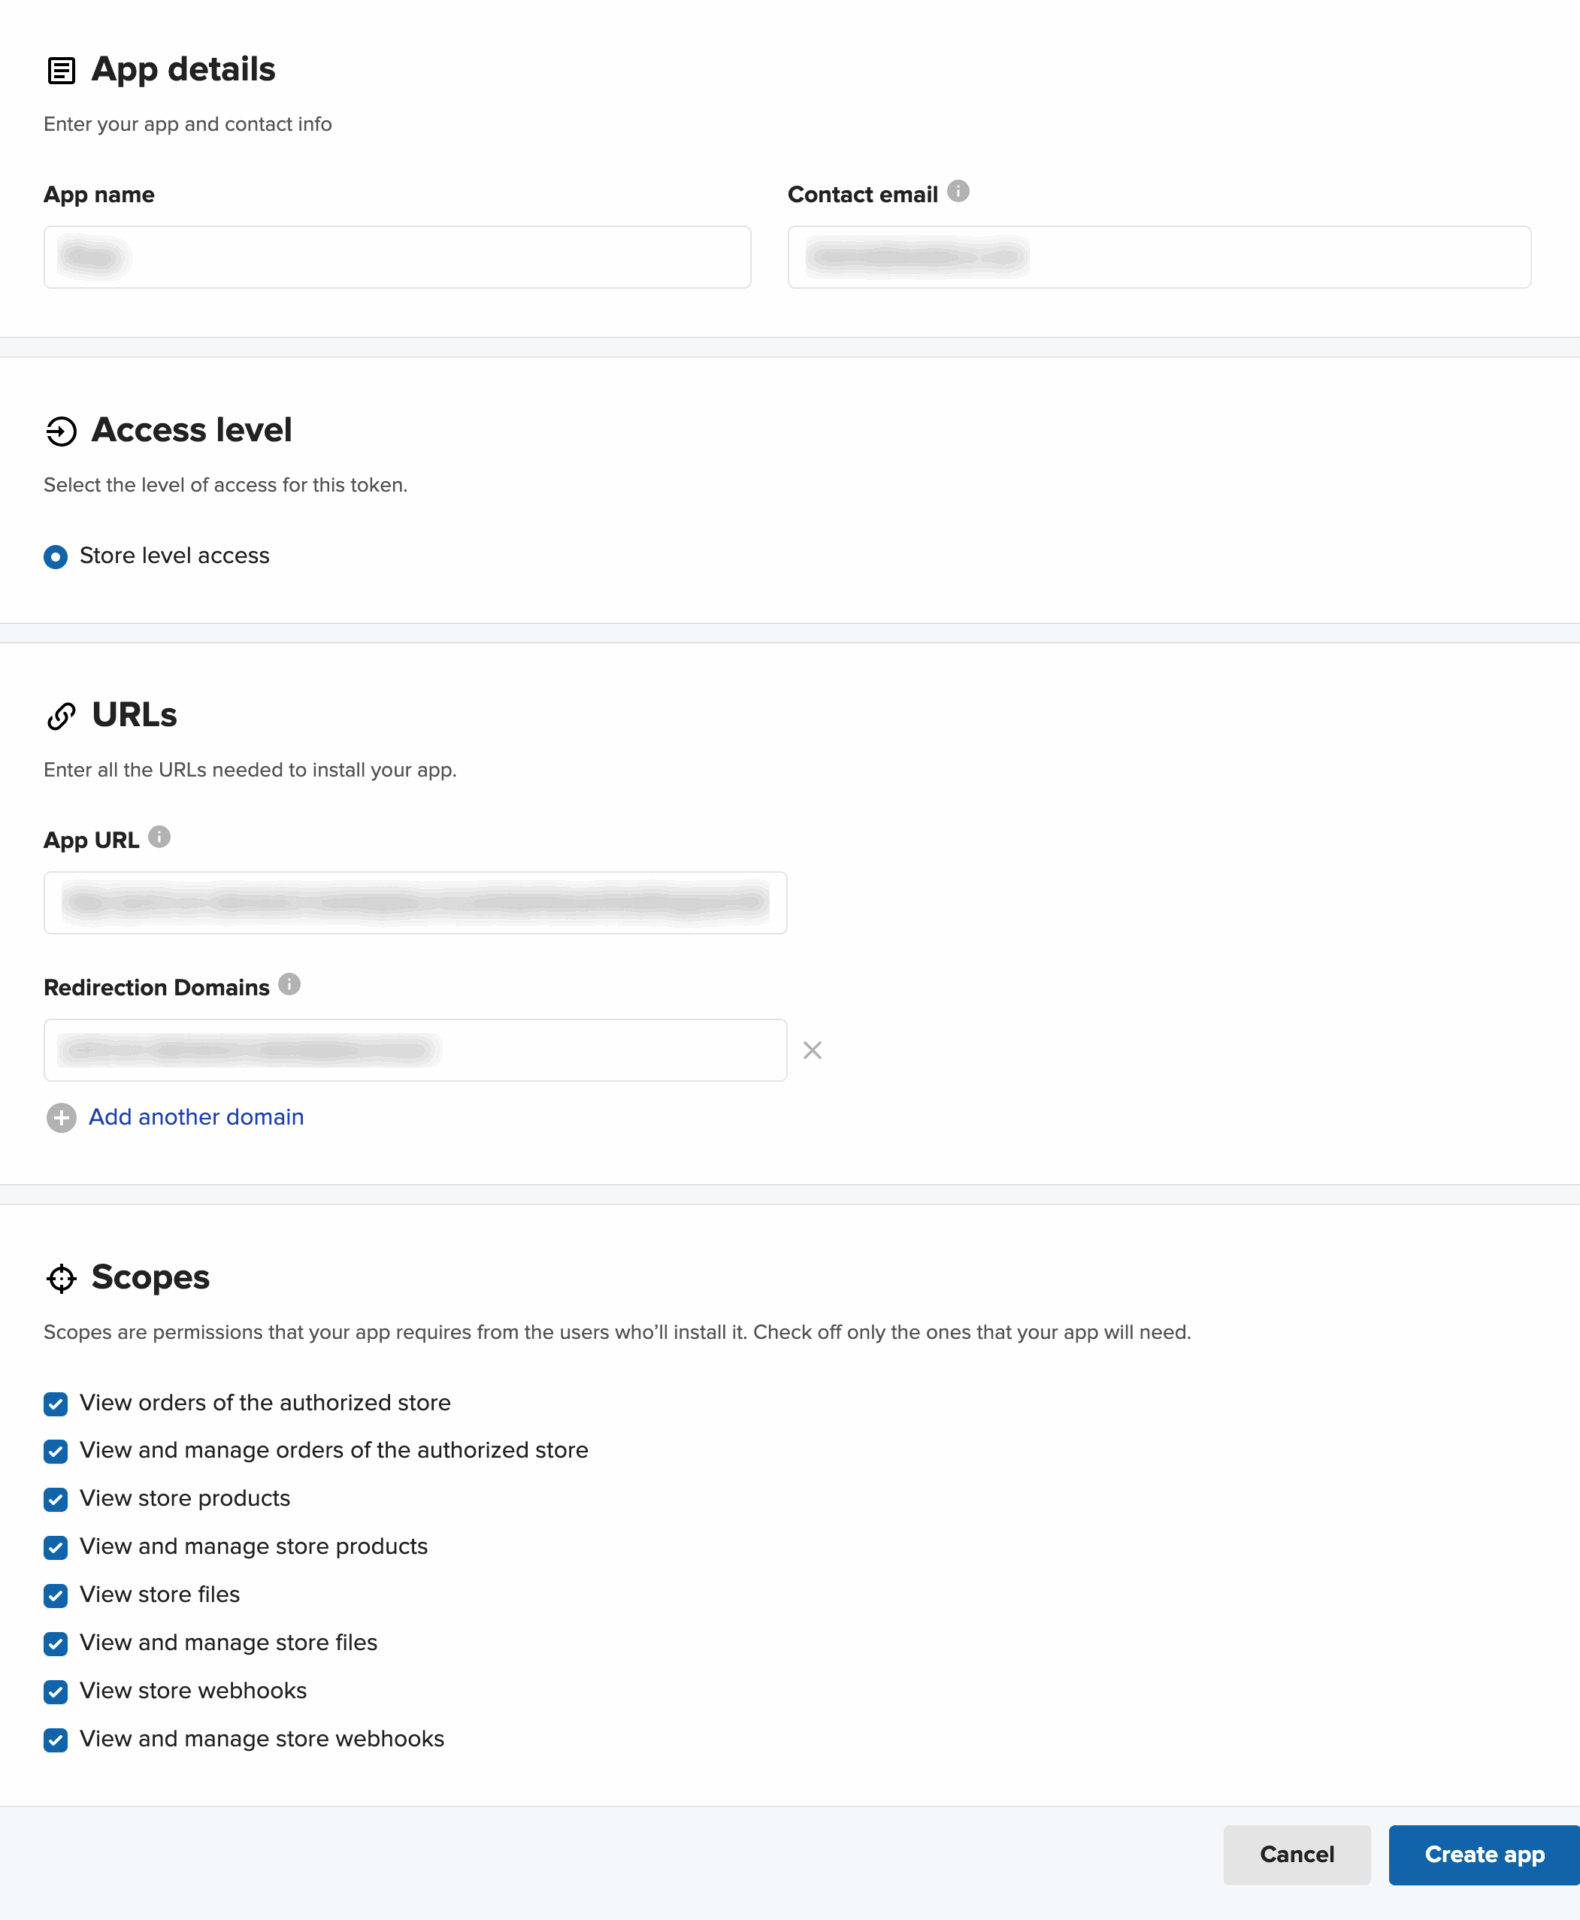
When you are done, click the “Create app” button.
Note: Choose all the scopes while creating app. Avoid writing Printful in the App Name.
When you click on the Create App button, you will see the Client ID and Secret Key. Copy them and paste them on the Dokan settings page.
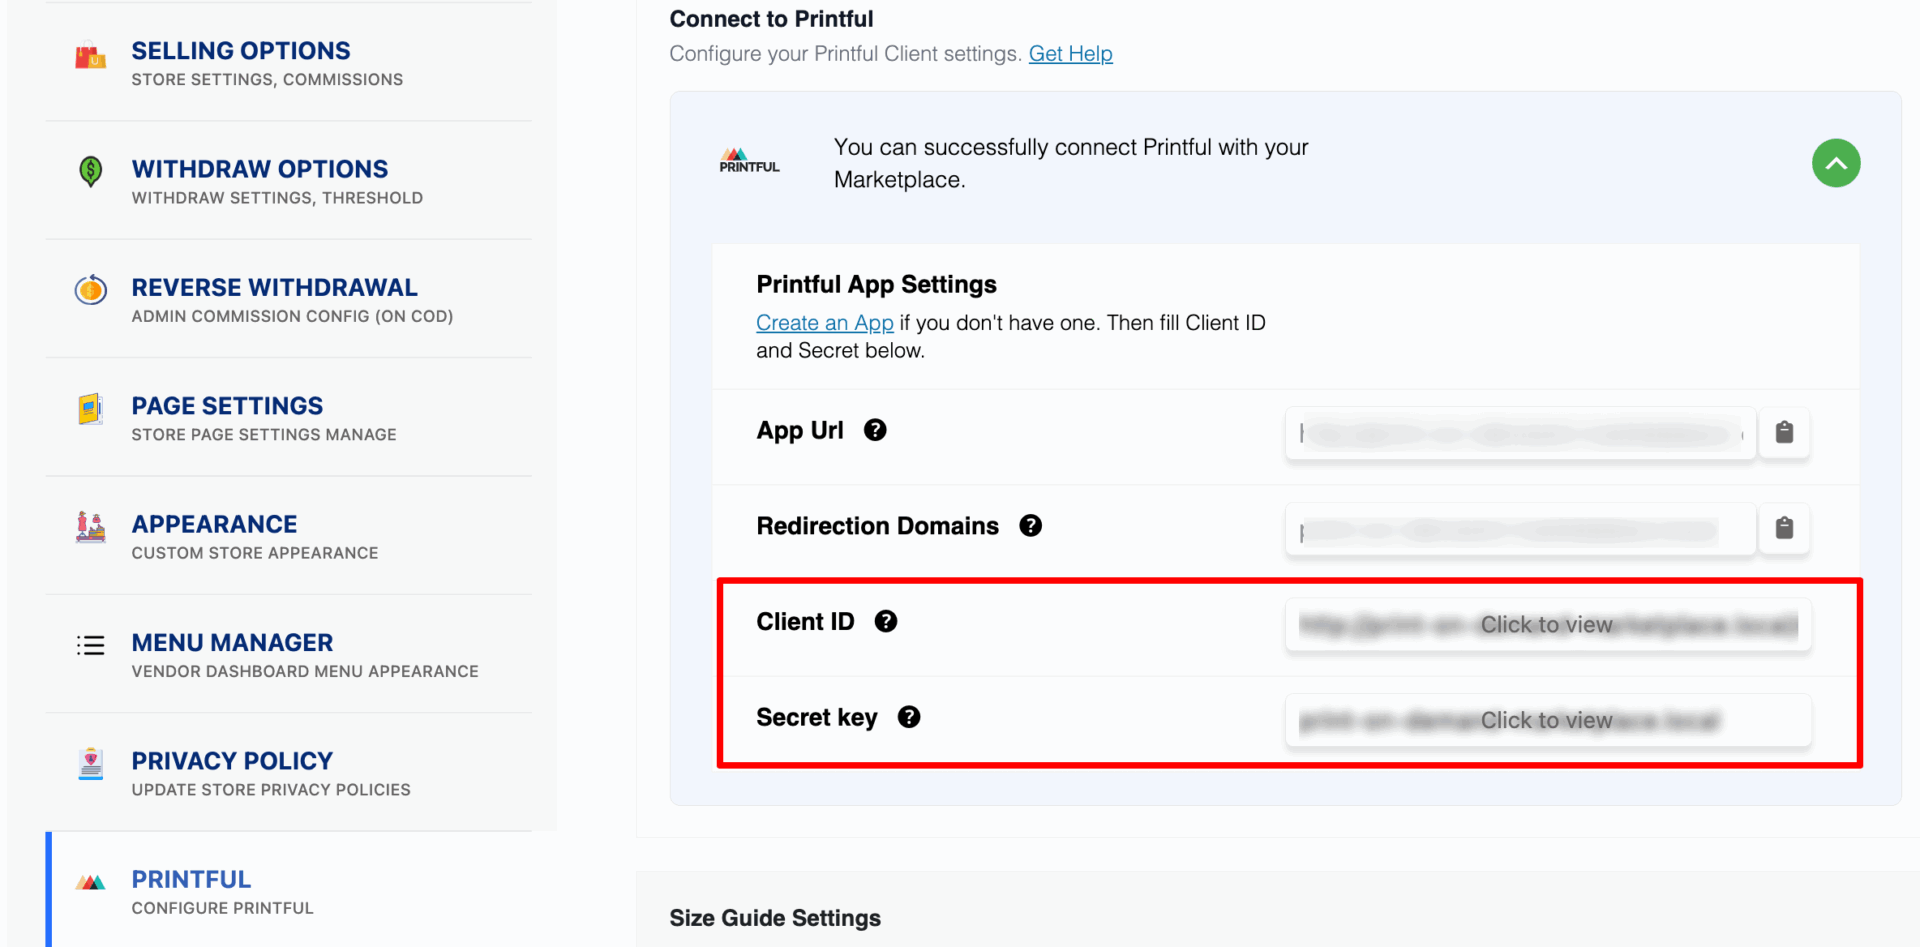
Now you have successfully configured the Printful integration with your POD marketplace.
Configure Printful as a Vendor
Now, for vendors to connect their store to Printful, they need to go to their Vendor dashboard–> Settings–> Printful. There click on the Connect with Printful button.
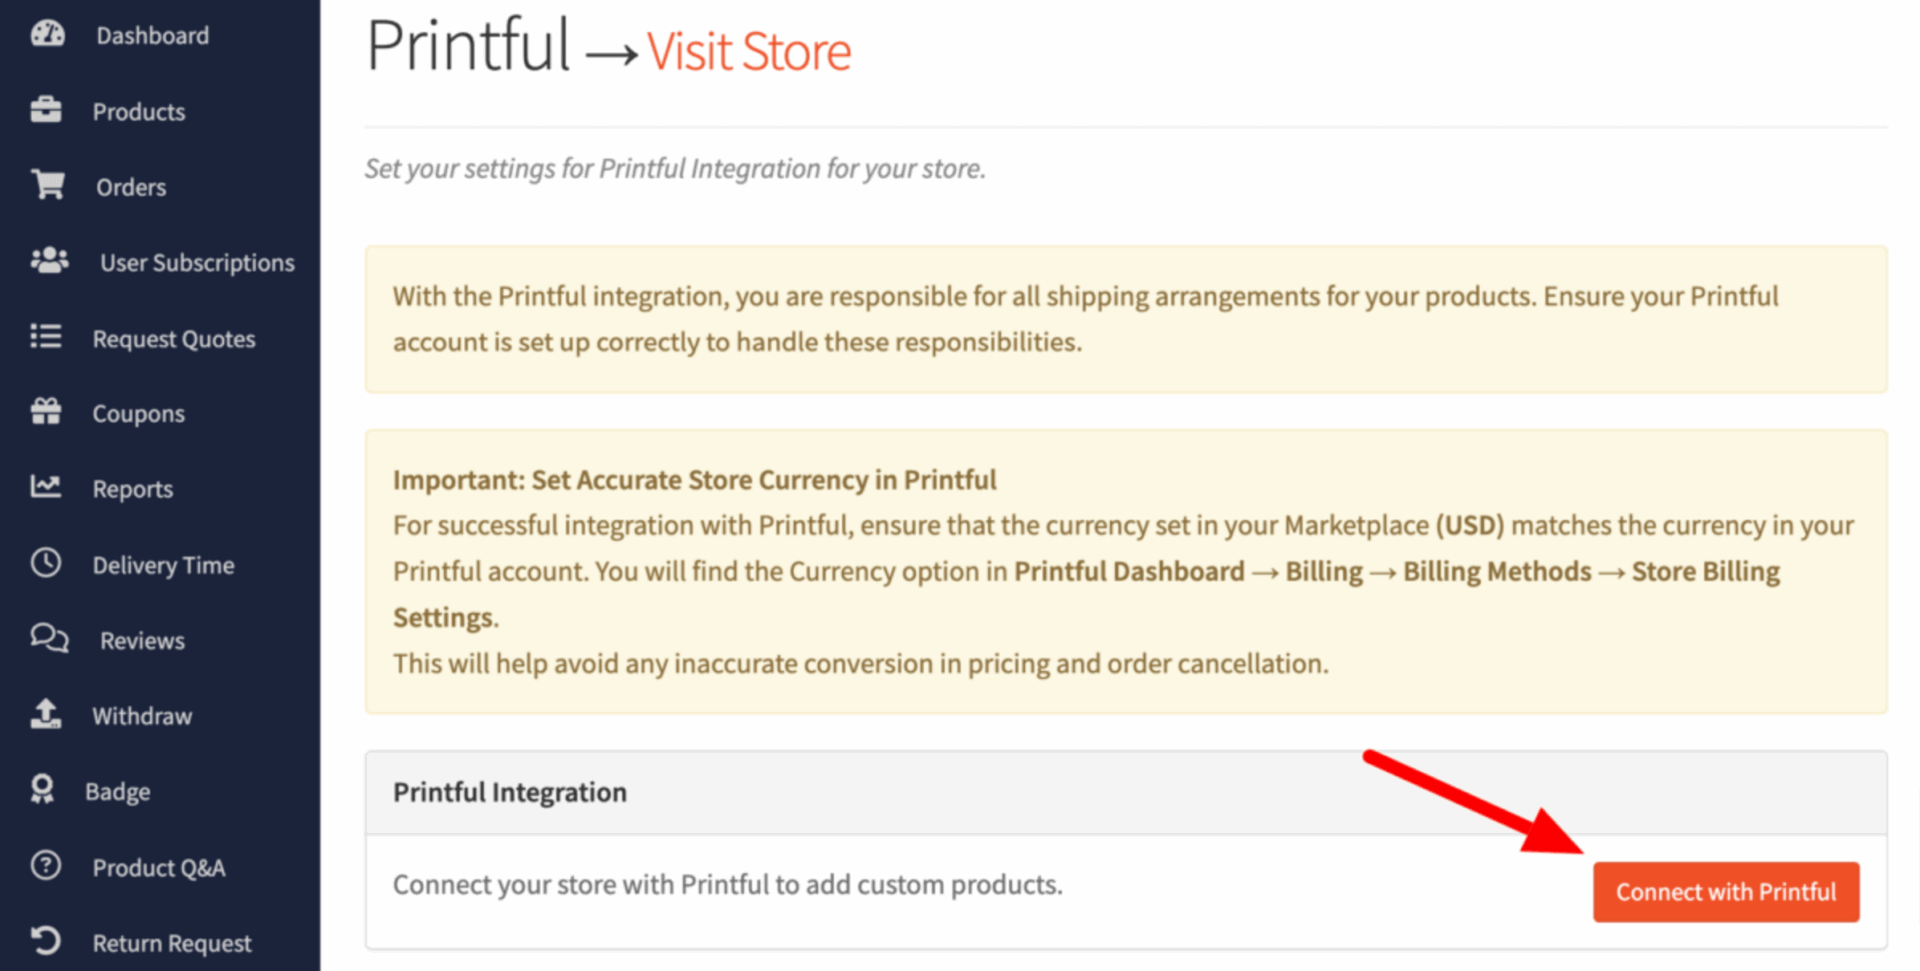
Note: Read the notices carefully before proceeding to configure the Printful account.
You will need to authorize the Printful app to access your store.
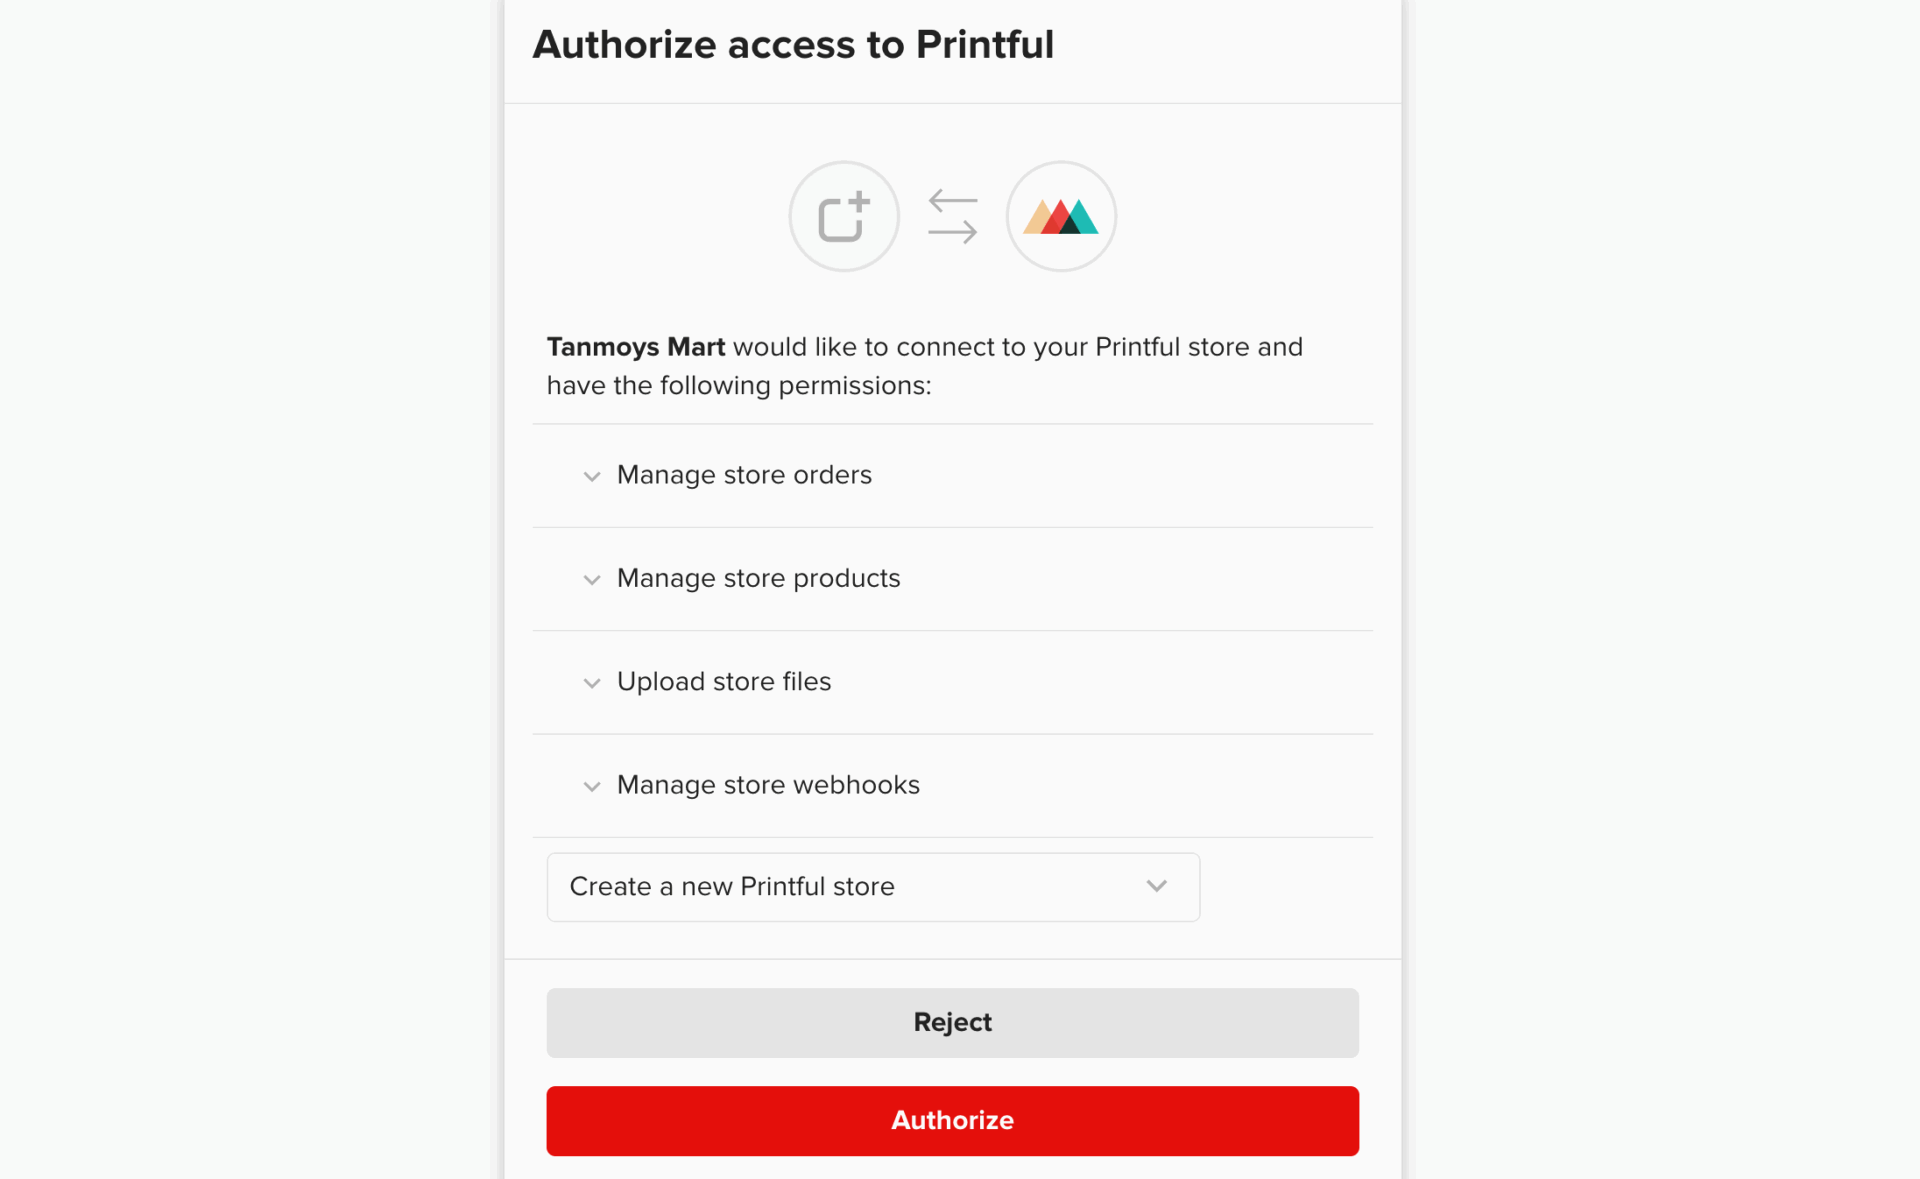
If everything is okay, on the next screen, you’ll see that your store is successfully connected.

Step 05: Design and Upload Products to Your Admin Shop
You can sell from your own marketplace as a vendor. Interesting, right? Let’s check how you can do that!
The first thing you need to do is to enable yourself as a vendor. Go to your WordPress dashboard -> Dokan -> Vendors, then enable yourself as a vendor.

Now you can upload products to your admin store.
- Go to your Vendor Dashboard and scroll down a bit to get the “Printful” option. Click on that button and you’ll redirected to your Printful store.

- In this screen, there is an option named “Add Product“. Click on that to upload products.
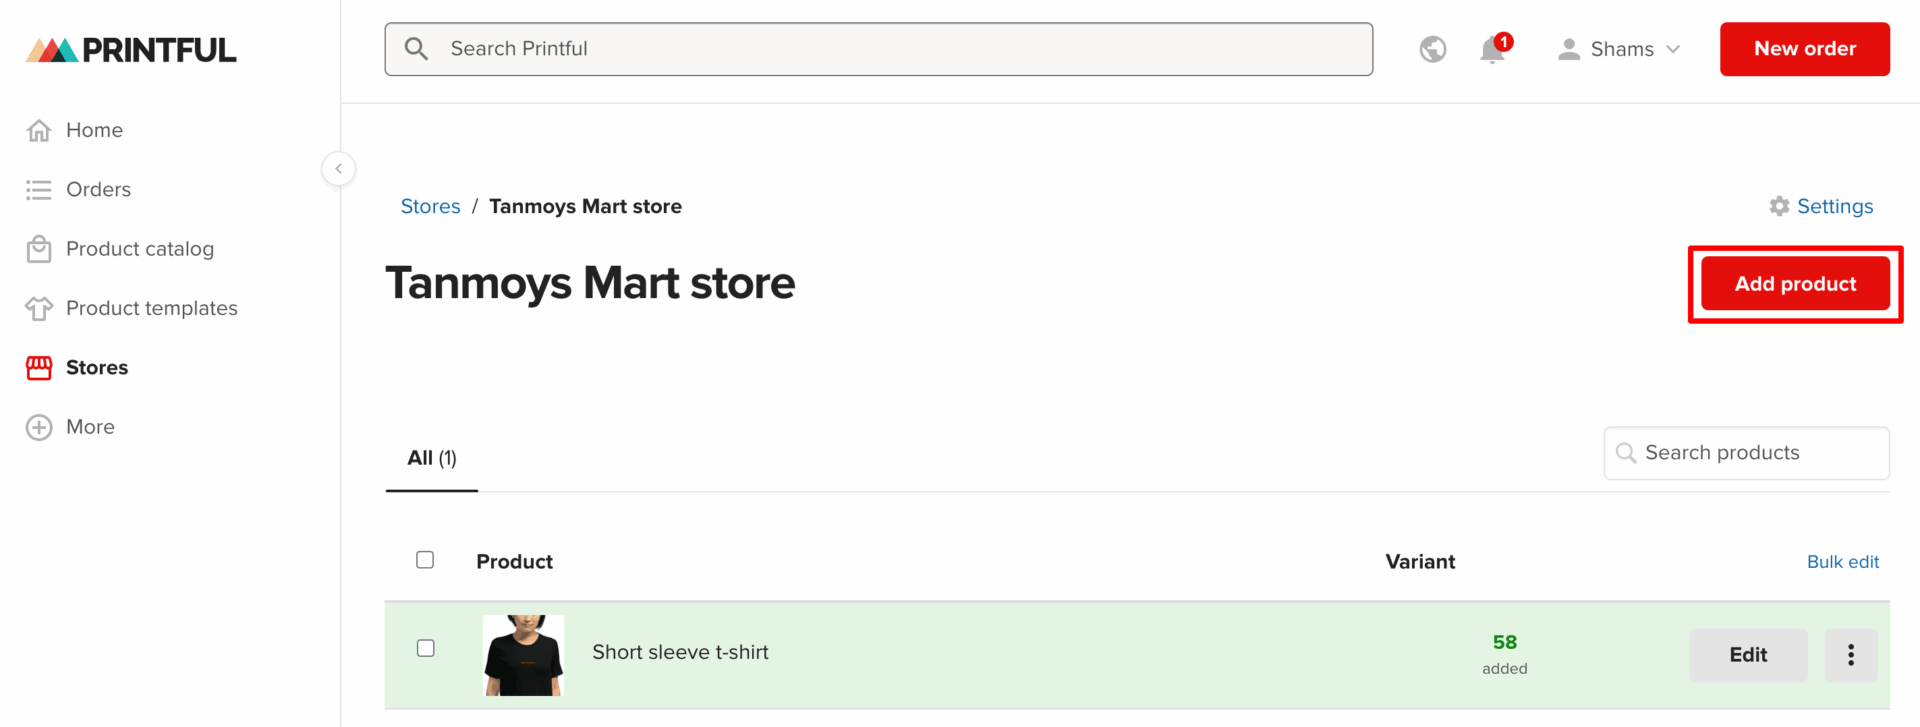
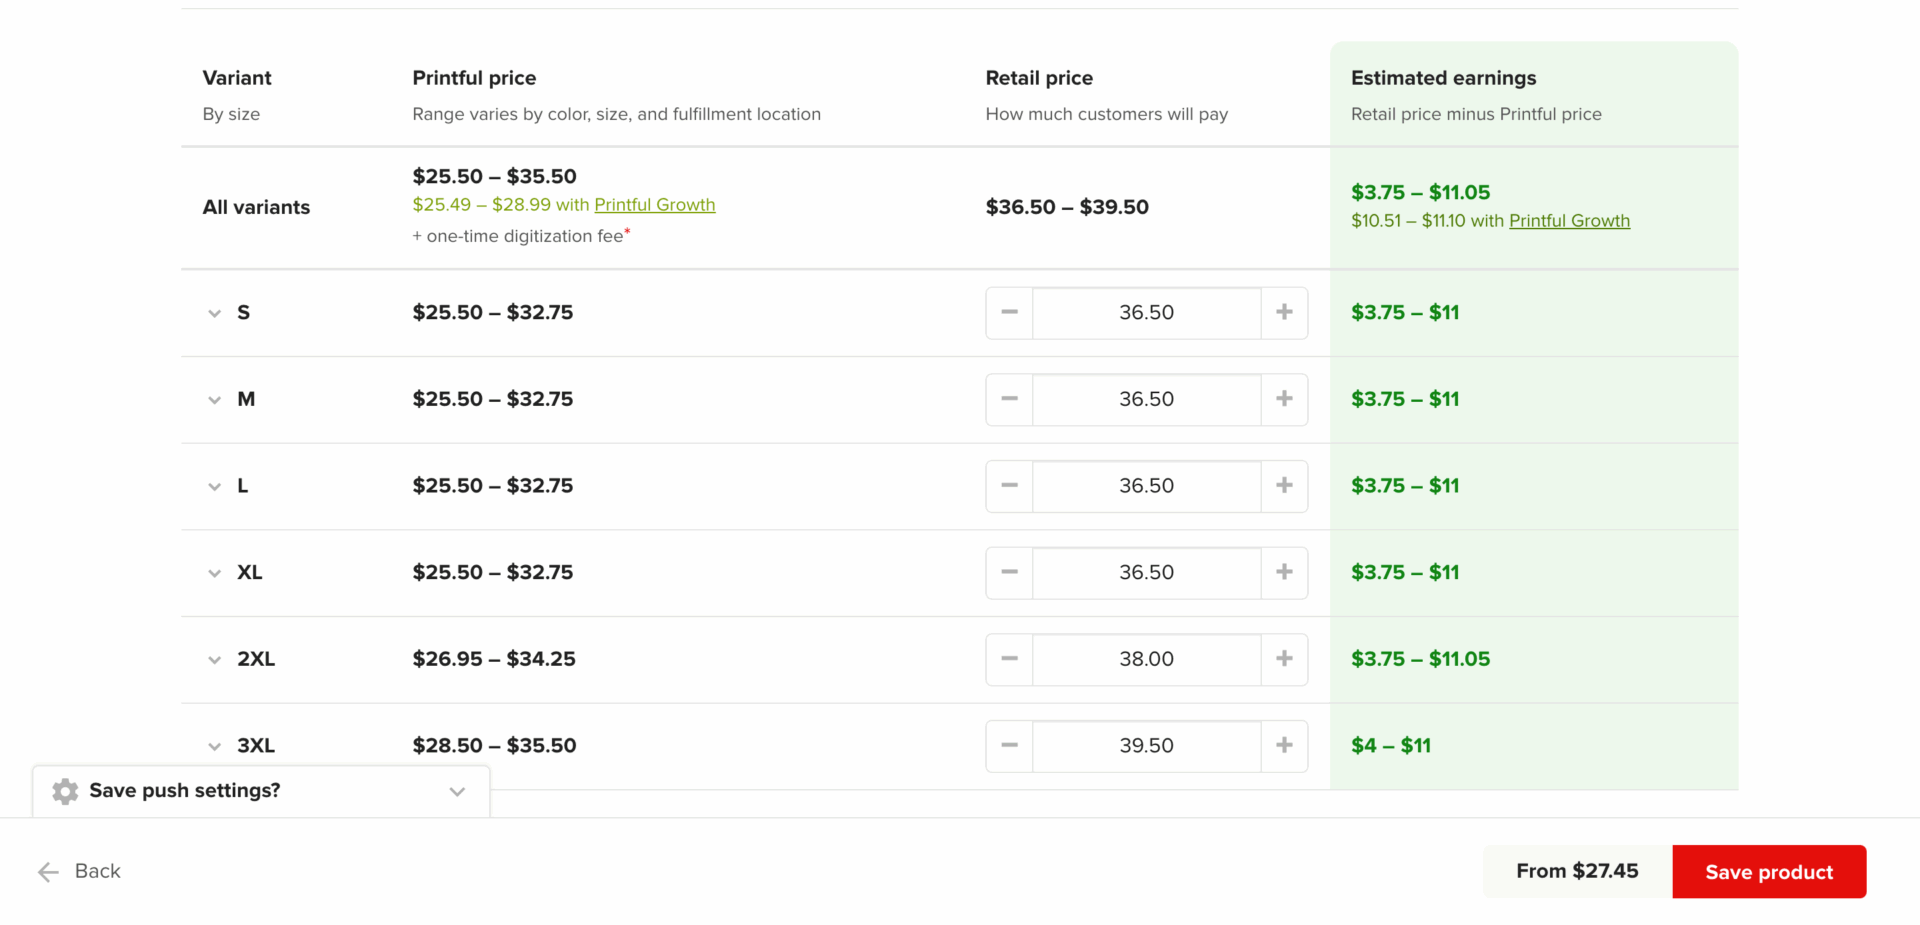
- After configuring the product, fix the price for every variant. Then click on the “Save Product” button to complete the product-adding process.
- Now go to your Vendor Dashboard and navigate to Product/Listing, there you’ll get the list of the products that you have just added.
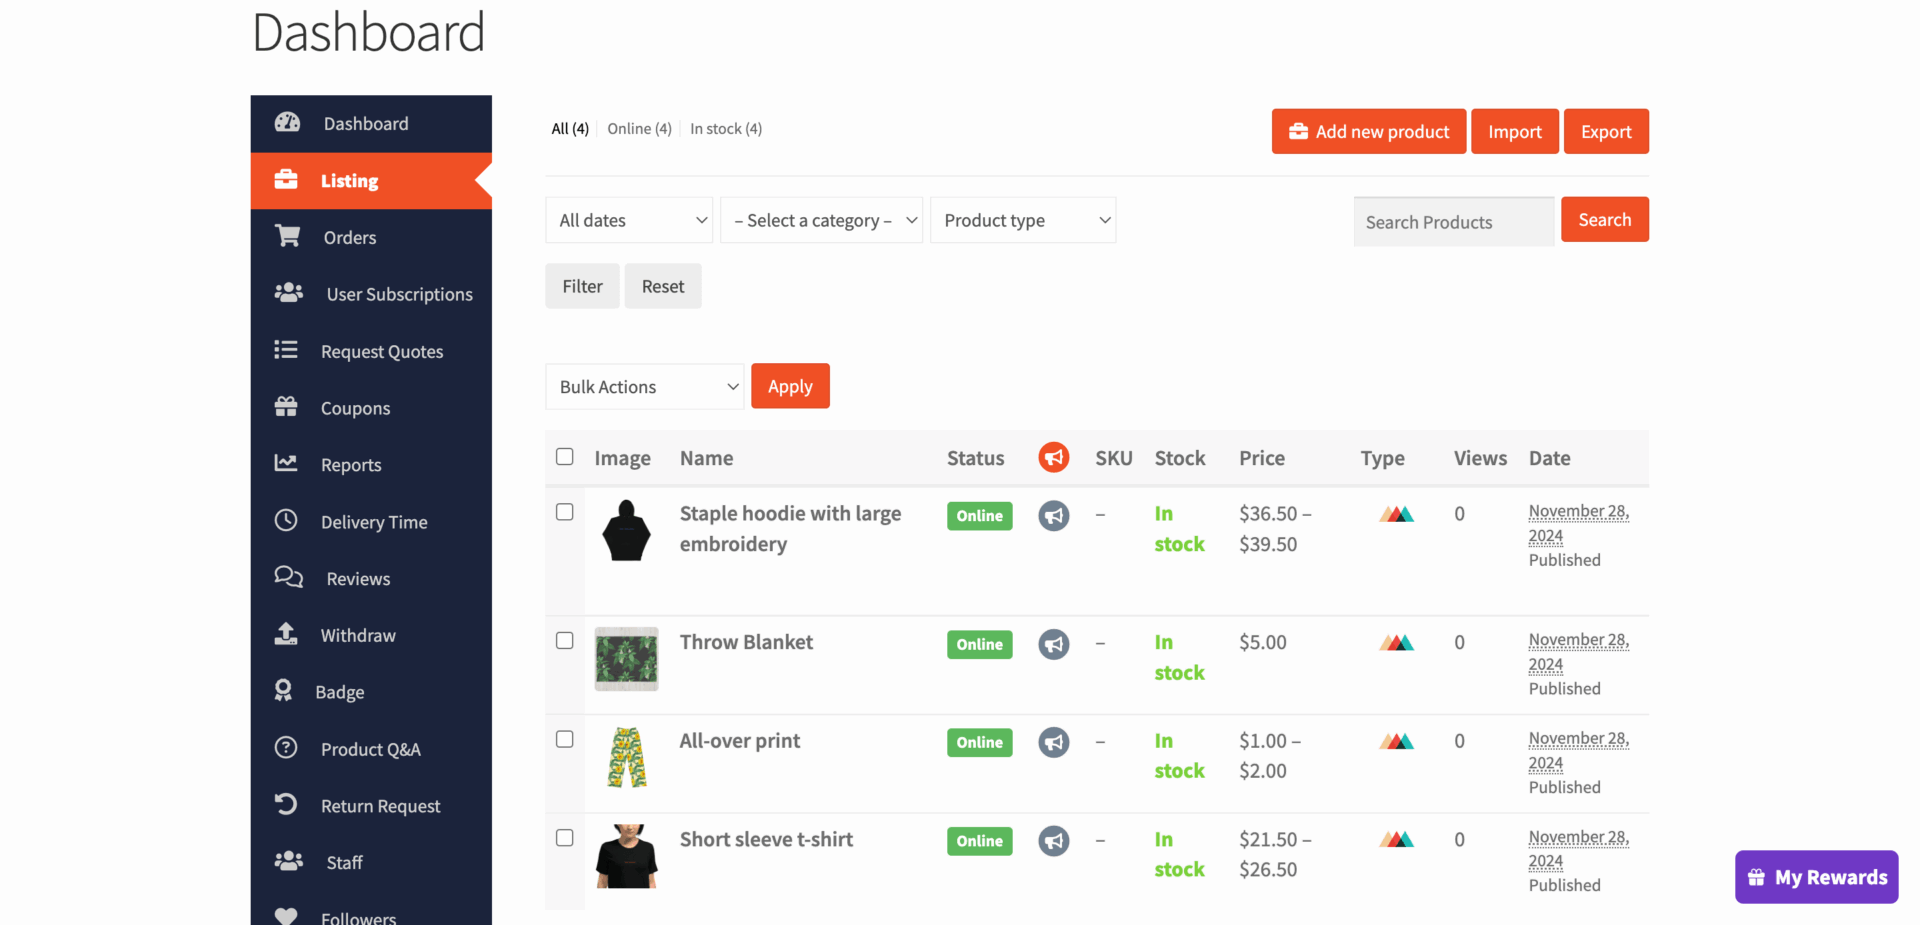
This is how you can add products to your store.
Note: However, if you make changes in the Dokan dashboard, it will not affect Printful, but Printful can override Dokan settings. If you delete any product or variation of a product from Printful, it will be deleted from Dokan as well.
- Want to configure your store appearance? Navigate to Vendor Dashboard -> Settings -> Store, and configure your store look.
After customizing your store, visit the store to check the frontend view.
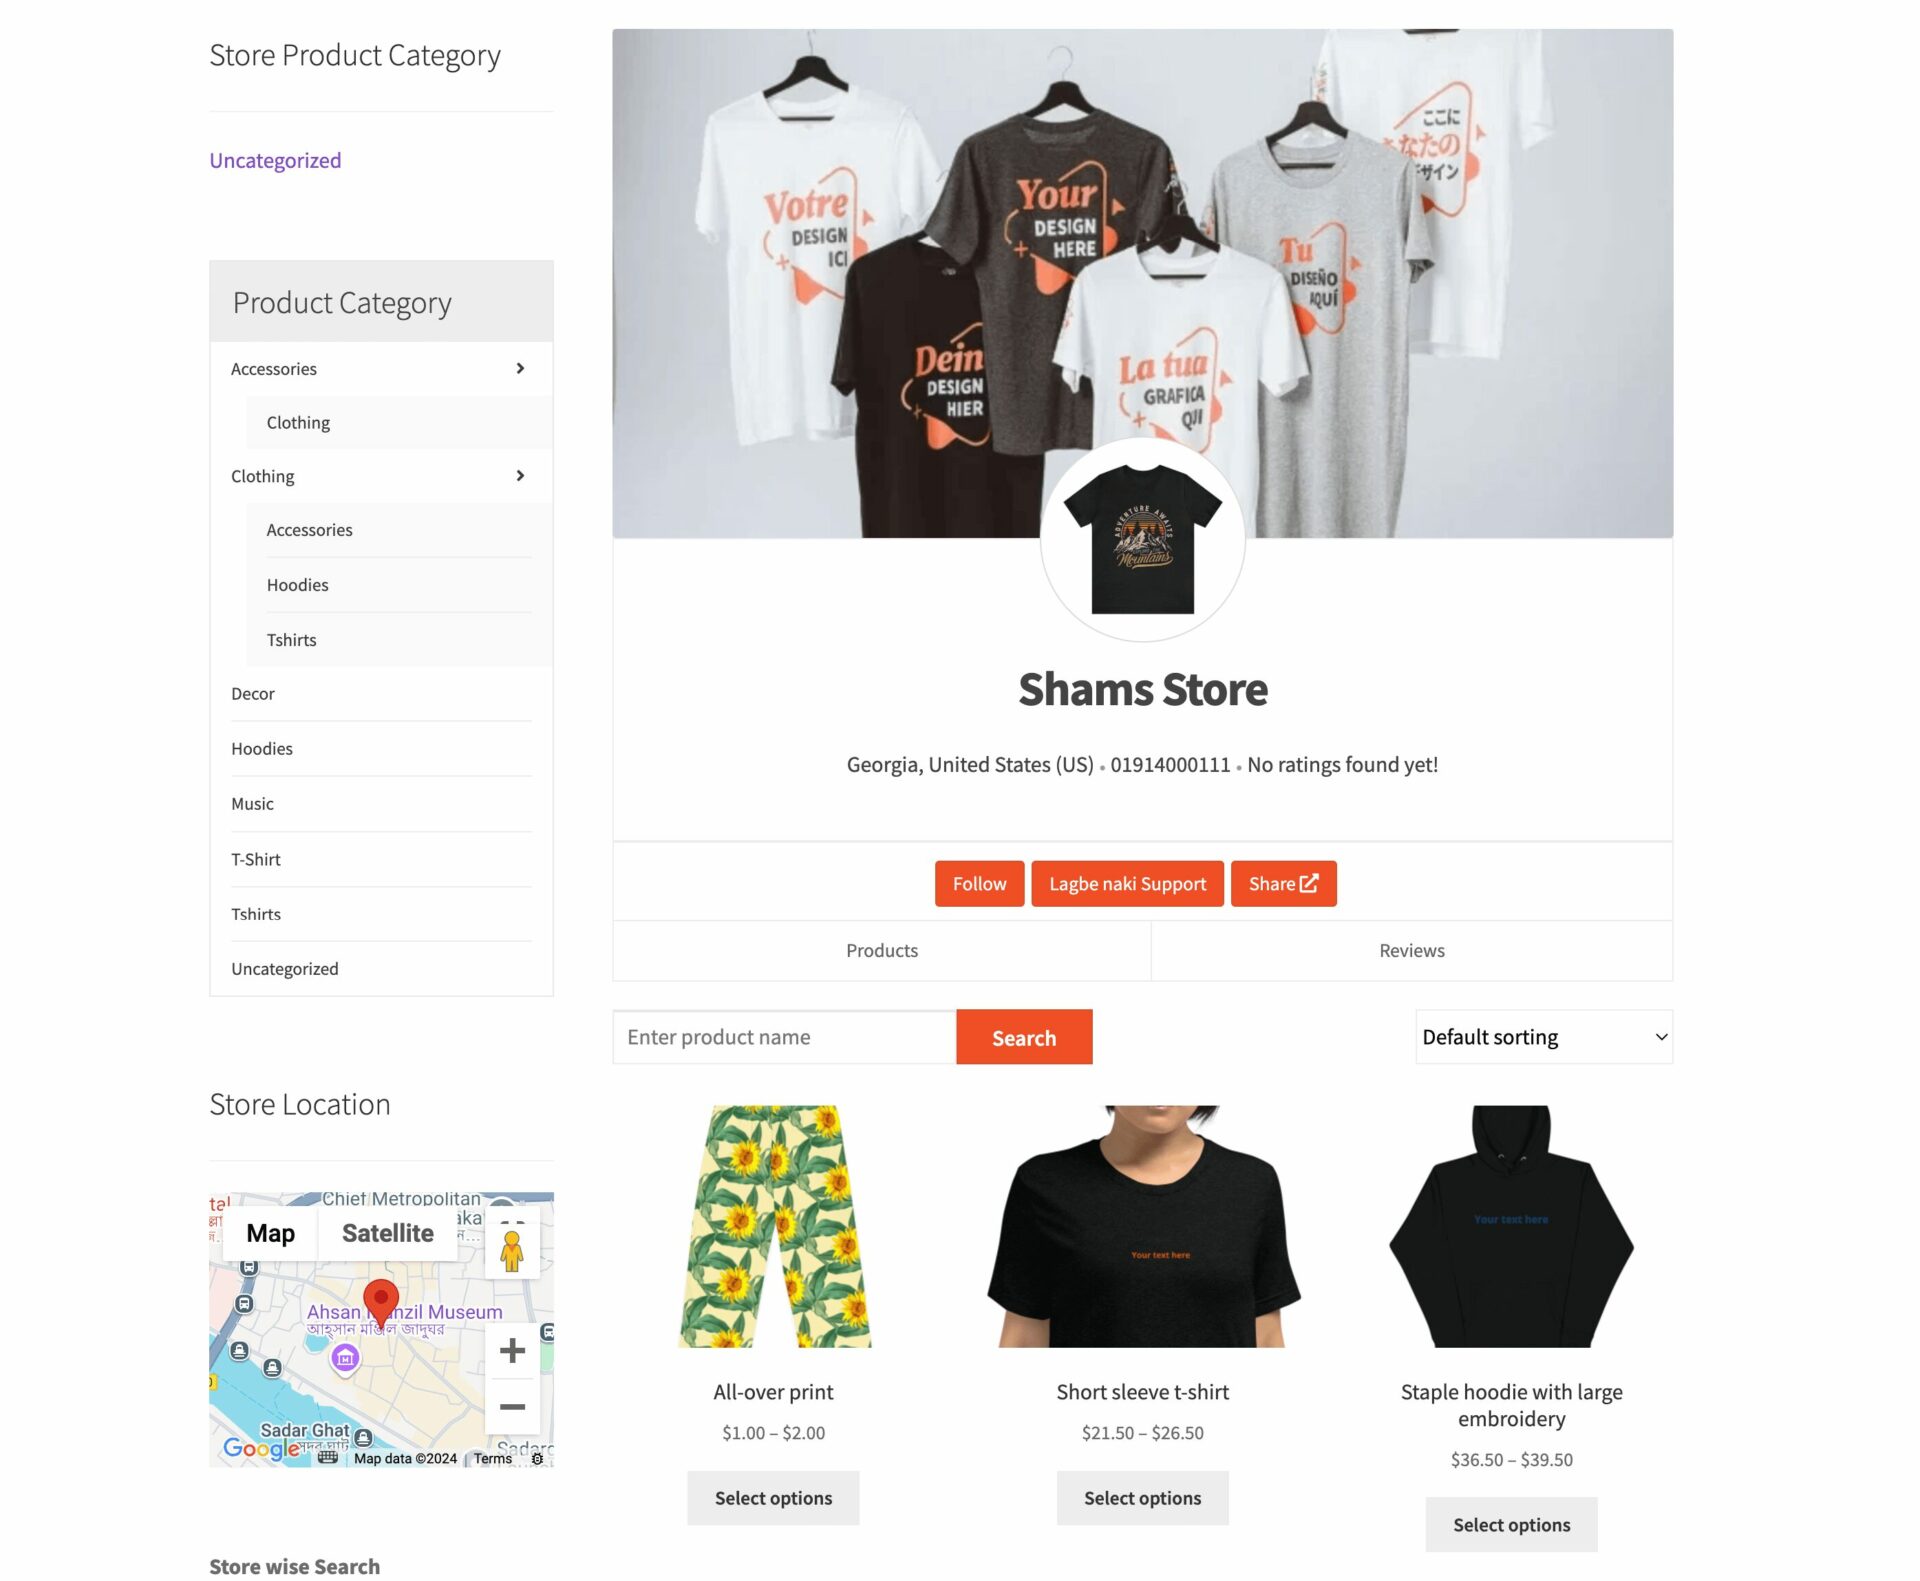
Note: If you disconnect from Printful, your products will go back to being drafted again. If you connect again, then you have to publish the products manually.
If you find any difficulties while adding the Printful products, you can check our step-by-step documentation to get the solution to your problem.
Step 06: Allow Vendors to Register to Your Marketplace
After adding all the functionalities and configuring your marketplace, you can invite vendors to sign up for your marketplace. To make sure vendors can sign up for your marketplace, enable the “Anyone can register” option from WP Admin –> General –> Settings.

So, it will open the default registration form for vendors to sign up. Now if anyone wants to register as a vendor in your marketplace, he will get the registration form from his “My Account” option.
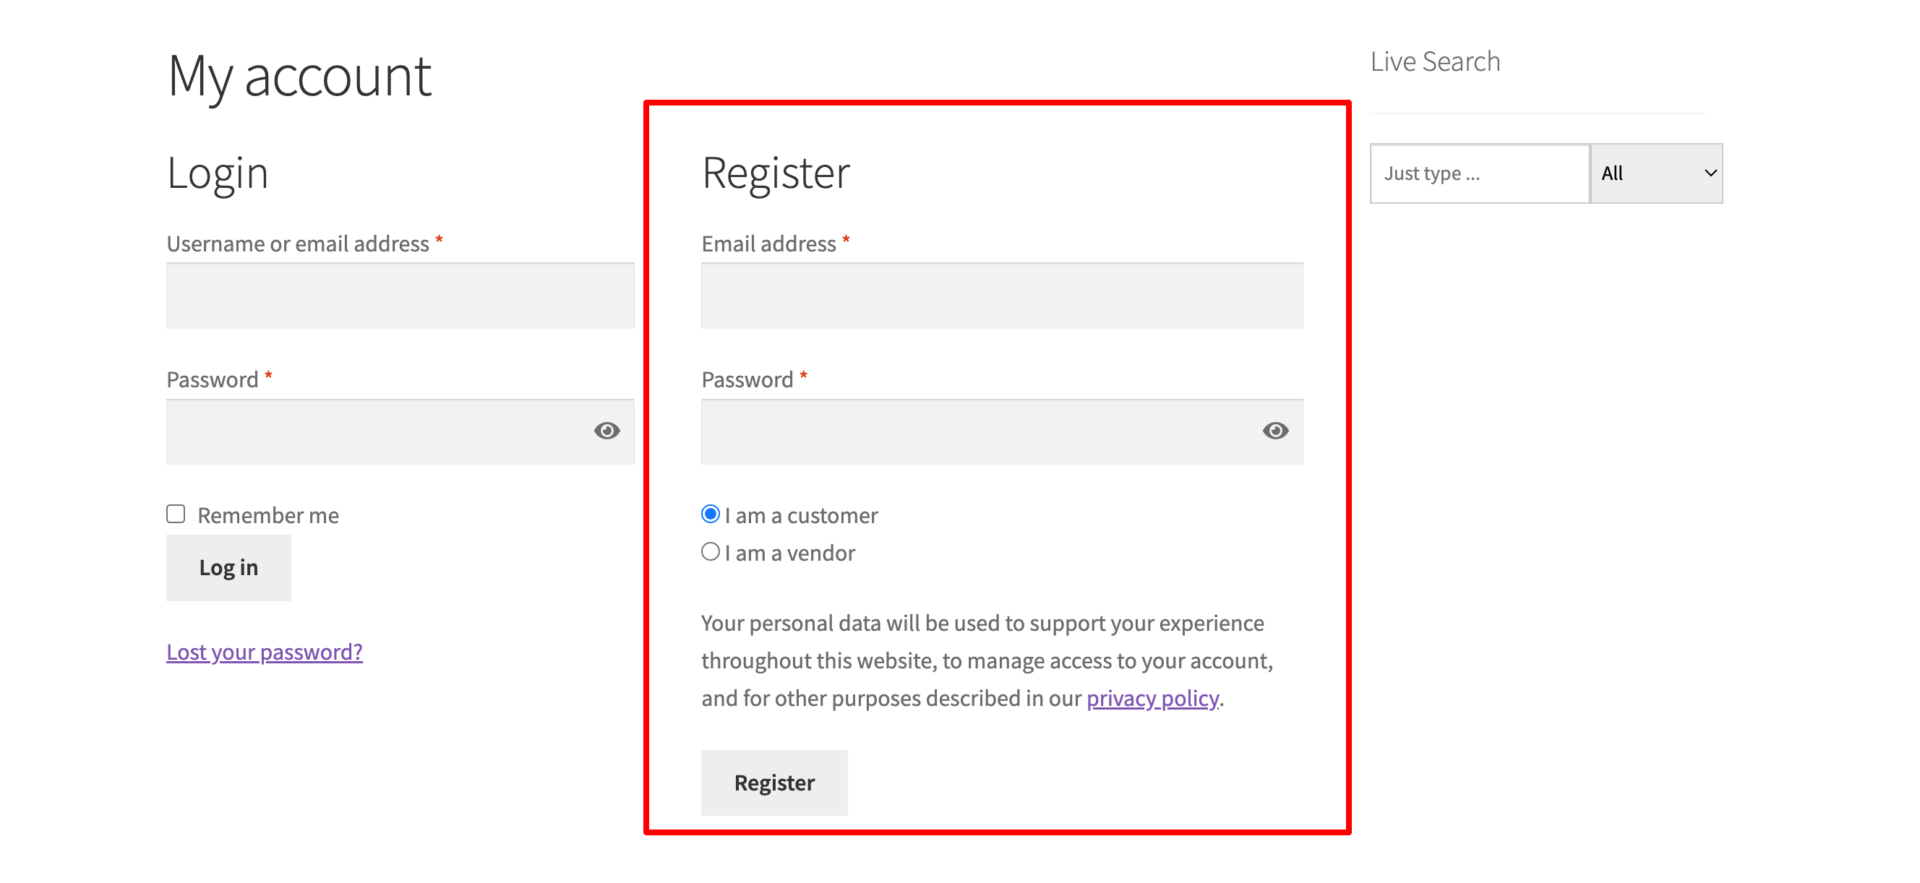
- For vendors to start selling, you need to enable selling status from Dokan –> Vendors.
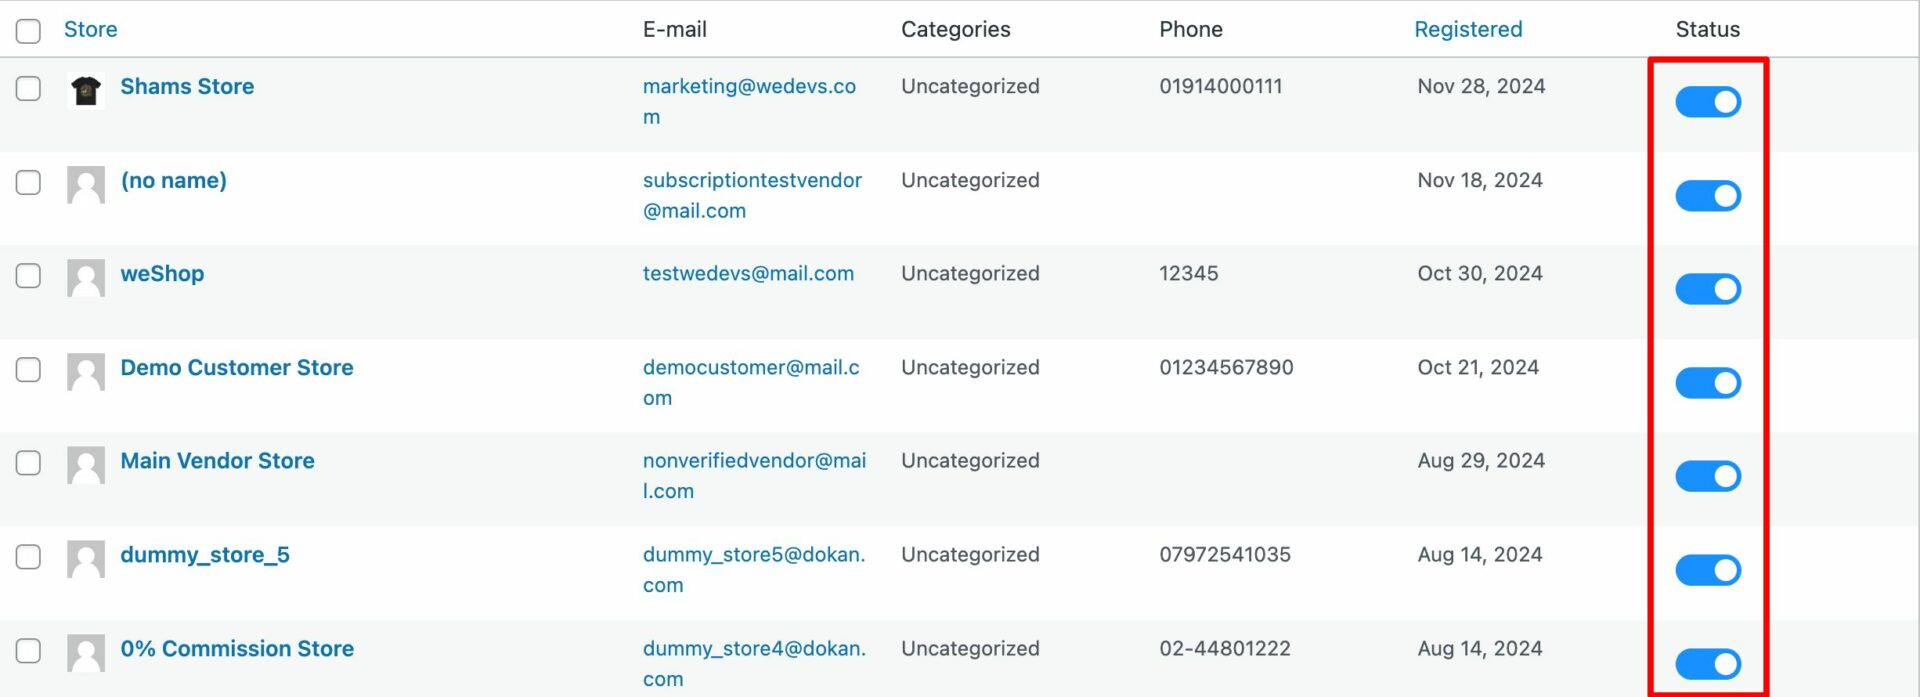
- Now navigate to your WordPress dashboard then click on the Visit Stores to check all the registered stores on your marketplace.

Once approved by the admin, vendors gain the freedom to create their own stores with unique URLs. Dokan also provides each vendor with an individual vendor dashboard, empowering them to effortlessly upload, manage, and successfully sell their products.
The store customization process for vendors is the same as we’ve shown above for an admin. From the front dashboard, a vendor can easily set up his shop.
This is how you can simply create and manage your marketplace with WordPress and Dokan multivendor plugins. But once your marketplace starts growing, you’ll require more advanced features to tackle and satisfy increased traffic, vendors, and customers.
Luckily, Dokan multivendor comes with 36+ advanced modules to take your marketplace to a whole new level. Let’s check them out!
Bonus: Install Required Plugins to Smoothly Run Your Marketplace
To make your print-on-demand marketplace more functional and user-friendly, you’ll need some additional plugins. These tools will enhance operations, improve customer experience, and help you manage your site more efficiently.
Here are the must-have plugins for your marketplace:
- Yoast SEO: To help your marketplace rank higher on search engines, Yoast SEO is essential. It simplifies on-page SEO by providing suggestions for optimizing your pages, products, and blog posts. With better visibility, you can attract more customers to your site.
- WPForms: Communication is key for a successful marketplace. WPForms allows you to create contact forms, vendor application forms, or feedback forms easily. This makes it simple for customers or vendors to get in touch with you.
- Wordfence Security: Keep your marketplace safe with Wordfence. This plugin protects your site from threats like malware, hacking attempts, and brute-force attacks. A secure marketplace builds trust with your users.
- Smush – Image Optimization: A marketplace often has many product images, which can slow down your site. Smush compresses images without losing quality, ensuring faster load times and a better user experience.
- Mailchimp for WooCommerce: To grow your marketplace, staying connected with your customers and vendors is essential. Mailchimp helps you create email campaigns, send updates, and promote your products efficiently.
These plugins will provide the additional features your marketplace needs to run smoothly and give users a hassle-free experience.

Are You Ready to Launch Your Print on Demand Marketplace?
So, here we are. Now you know how to build print on demand marketplace using WordPress and Dokan plugin by following only 6 easy steps.
What are you waiting for? Follow these 6 steps and create your POD marketplace now!
- Install the Dokan Multivendor Plugin
- Enable the Printful Module
- Configure the Dokan Plugin
- Configure the Printful Integration
- Design and Upload Products to Your Admin Shop
- Allow Vendors to Register to Your Marketplace
Want to explore more about POD? We have a couple of blogs on that. So, check them out to understand everything about print on demand business.
- Print On Demand Marketplace: Everything You Need to Know
- How to Start a Print on Demand Business: A Step-by-Step Guide
Now if you want to share anything related to print on demand business, feel free to do that using the comment box below. We would love to know your feedback. Take care!
7 Inspiring
Print-on-Demand
Business Success
Stories
“Unlock the Secrets of POD Success”
Motivational Stories
Marketplace Ideas
Common Challenges
Checklist to Launch
Entrepreneurs’ Tips
How to Start Yours
Subscribe to
Dokan blog
We send weekly newsletters, no spam for sure!





Leave a Reply