Since September 21, 2014, weDevs will no longer provide updates for its Dokan theme. Instead, the functionality has been moved to a standalone Dokan plugin. Users are required to upgrade to the Dokan plugin. More details about the change can be found in our blogs.
So in this documentation, we will show you how to upgrade from your existing Dokan theme to the newly released Dokan plugin step-by-step. If you follow the steps below carefully, you should have no problem running the newly released Dokan plugin on your site in minutes.
Download Dokan Plugin and Theme
Go to your weDevs account to download both the Dokan plugin and theme. You may only use the plugin if you want to use another WooCommerce-supported theme, but in this tutorial, we will show you how to use the Dokan theme along with the Dokan plugin.
Note: Using Dokan plugin is mandatory as all functionality of Dokan is now on Dokan plugin. But use of Dokan theme is optional.
1. Backup
It’s important to back up your entire site using your favorite method of backup before initializing the upgrade process. This ensures you can return to the current state of your site should any problem occur during the upgrade. But if you follow the steps carefully, you should have no problem.
Optionally, you may also want to activate maintenance mode on your site. This makes sure your users know you’re upgrading the site. Don’t worry though, the process takes a few minutes after that you can disable maintenance mode.
2. Deactivate and Delete Dokan Theme
Go to WordPress Dashboard -> Appearances -> Themes and activate another theme. It doesn’t matter which theme you activate at this time because you only need to do this in order to be able to delete the Dokan theme. Do not delete Dokan theme from /wp-content/themes/ folder without deactivating the theme first.
Important: You must delete your existing Dokan theme before installing Dokan plugin, otherwise a fatal error will occur.
3. Update to WooCommerce 2.2.4+
If you haven’t already, you need to update your WooCommerce plugin to the latest version (at the moment of this writing, version 2.2.4 or above). Dokan plugin is only compatible with WooCommerce 2.2 so your WooCommerce plugin must be upgraded to the latest version before Dokan plugin can be activated.

After updating WooCommerce plugin to 2.2+, you will see a notice and a button requesting to upgrade the database. You MUST click the “Run the updater” button to upgrade your database. This will take a moment to upgrade depending on the size of your database.
4. Upload and Install Dokan Plugin
Upload the Dokan plugin from WordPress plugin interface. This is not different than any other plugin activation process. Head over to Plugins -> Add New -> Upload and locate your Dokan plugin zip file. Click Upload and Install, when done, activate the plugin.
5. Install the Theme
If you want to continue using the Dokan theme, install the newly downloaded Dokan theme version 2.0. You can’t use the old Dokan theme (version 1.0.6 or below), you have to download Dokan theme version 2.0 from your weDevs account if you want to continue using Dokan theme.
If you want to use another WooCommerce-supported theme, you can upload, install and activate that theme in this step.
6. Update the Pages
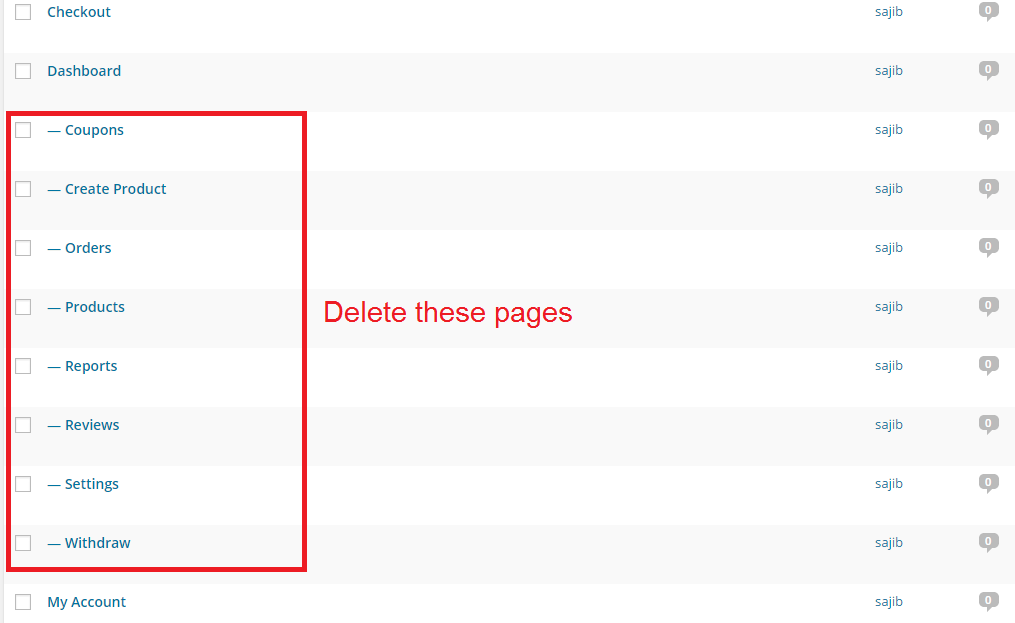
There are some changes that you need to make to your Pages. Go to WordPress -> Pages, and remove all of the following pages (hint: Pages that are child of “Dashboard” page). Do not remove the page titled Dashboard.
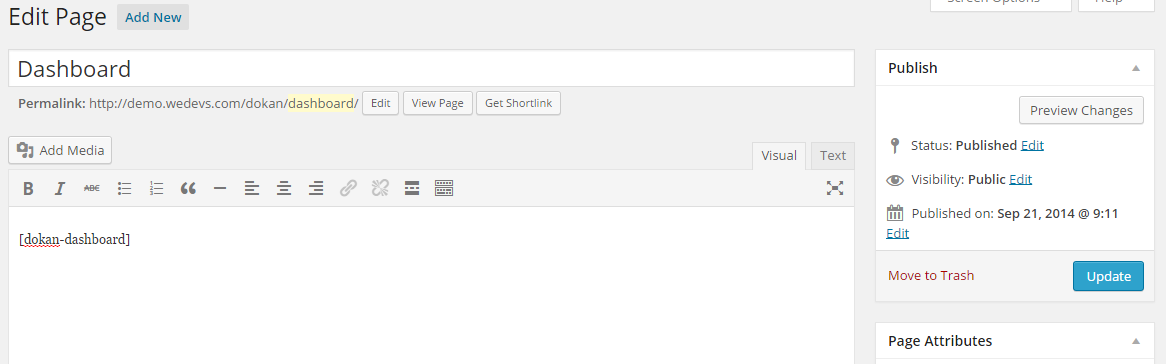
After deleting these pages, click on the Dashboard page to edit it. In page edit mode, insert the short code [dokan-dashboard] in post body and click Update. See the screenshot below.
You can also create another page and insert the short code [dokan-stores] to show all the stores (stores of the sellers) on your site.
7. Update Permalinks
Go to WordPress Settings -> Permalinks and click the Save Changes button at the bottom. No need to change anything on this page. This is not required but in some cases, you may need to do this to make sure everything is working. So if you’re seeing some links are returning 404 not found error, do this and the problem should be fixed.
That’s all!
Now return to your store homepage and see everything is working as it should. If it is, congratulations! You have successfully made the upgrade to Dokan plugin!