With the latest version of Dokan Pro 3.3.0, we are introducing the new PayPal Marketplace module. This is a new payment gateway that will help to make all the transaction process smooth. This payment is specially made to handle multi-vendor marketplace transactions. Let’s see how to set up and use this new module.
Get PayPal API Credentials
You can either use your live PayPal Business account or create a new business account. To test the integration, you can create a Sandbox account. Both setup processes are the same. This business account would act as the Partner (API Caller) Account. For integrating in Sandbox, please go through the following steps:
Step 1: Login to https://developer.paypal.com/
Create a new Live PayPal Business account or use an existing Live PayPal account to log in. This Live account has to be a Business account.
Note: For live mode, make sure to have the PayPal balance set to 0. If you have any balance beforehand, you won’t be able to withdraw that amount.
Step 2: Collect REST API Credentials and Merchant ID
a. Collect PayPal Merchant ID
To attain the necessary credentials, you need to log in to your PayPal account or to test with a sandbox login to your sandbox account.
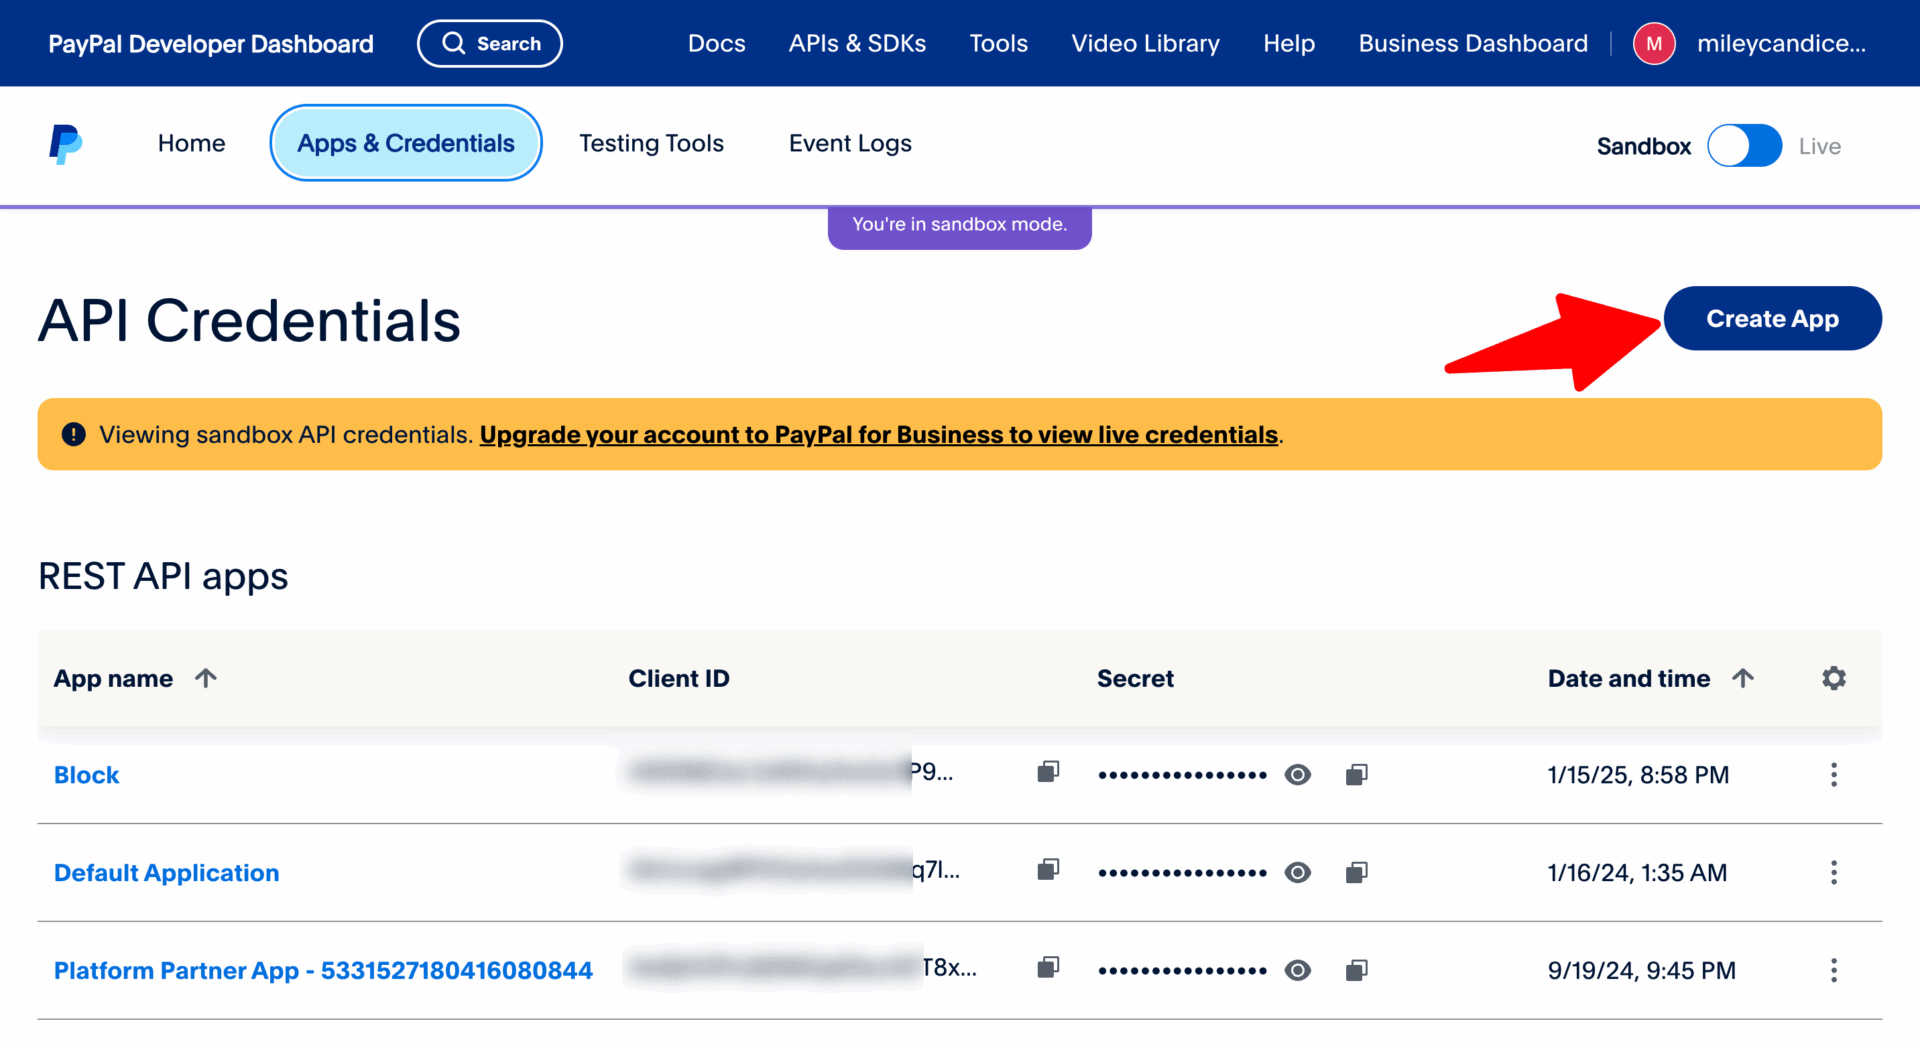
Now, click on the Apps& Credentials button and click on the Create App Button-
Note: Don’t use the Default Application that is already created beforehand. You need to use a freshly made app.
In the pop-up page, you need to select the Platform option and name your partner app-
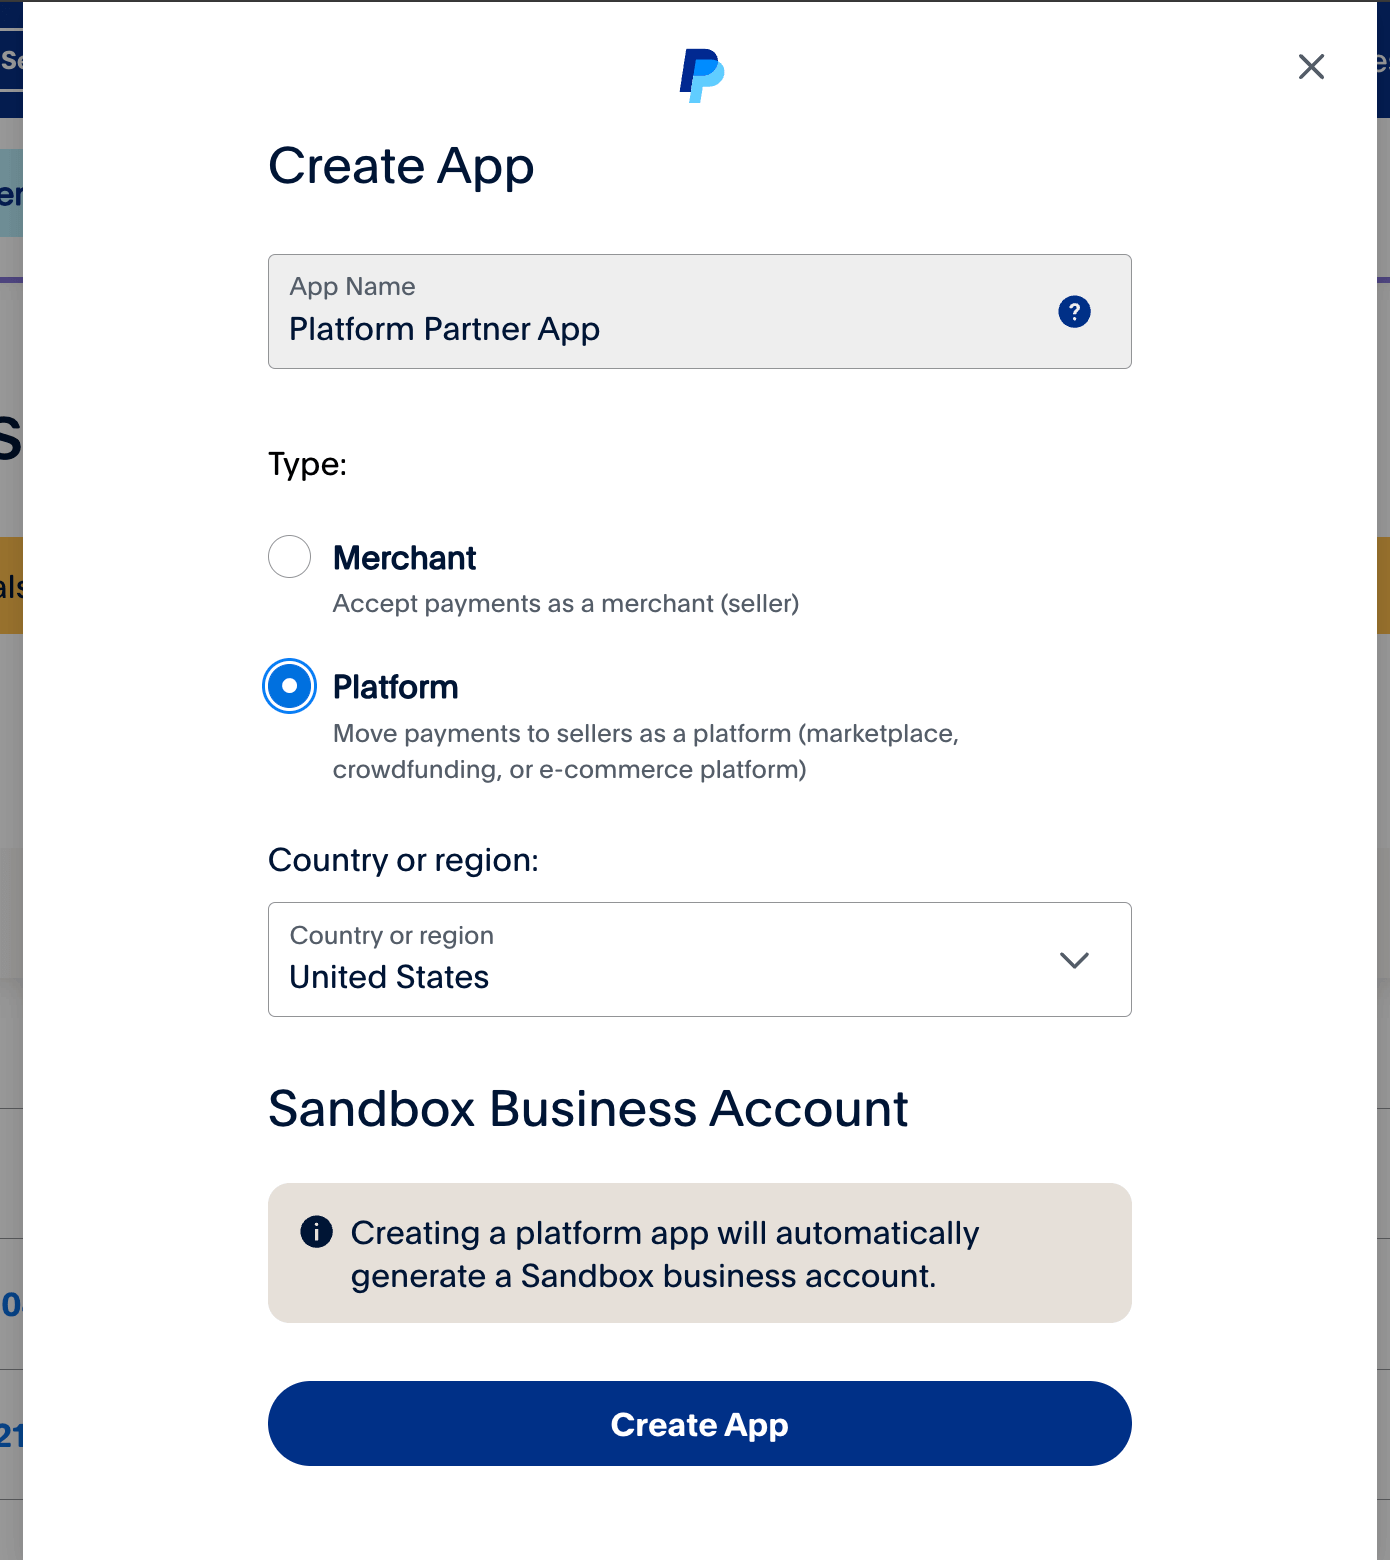
Click on the Create App button to finish.
You will find the Client ID and Secret Key from here-
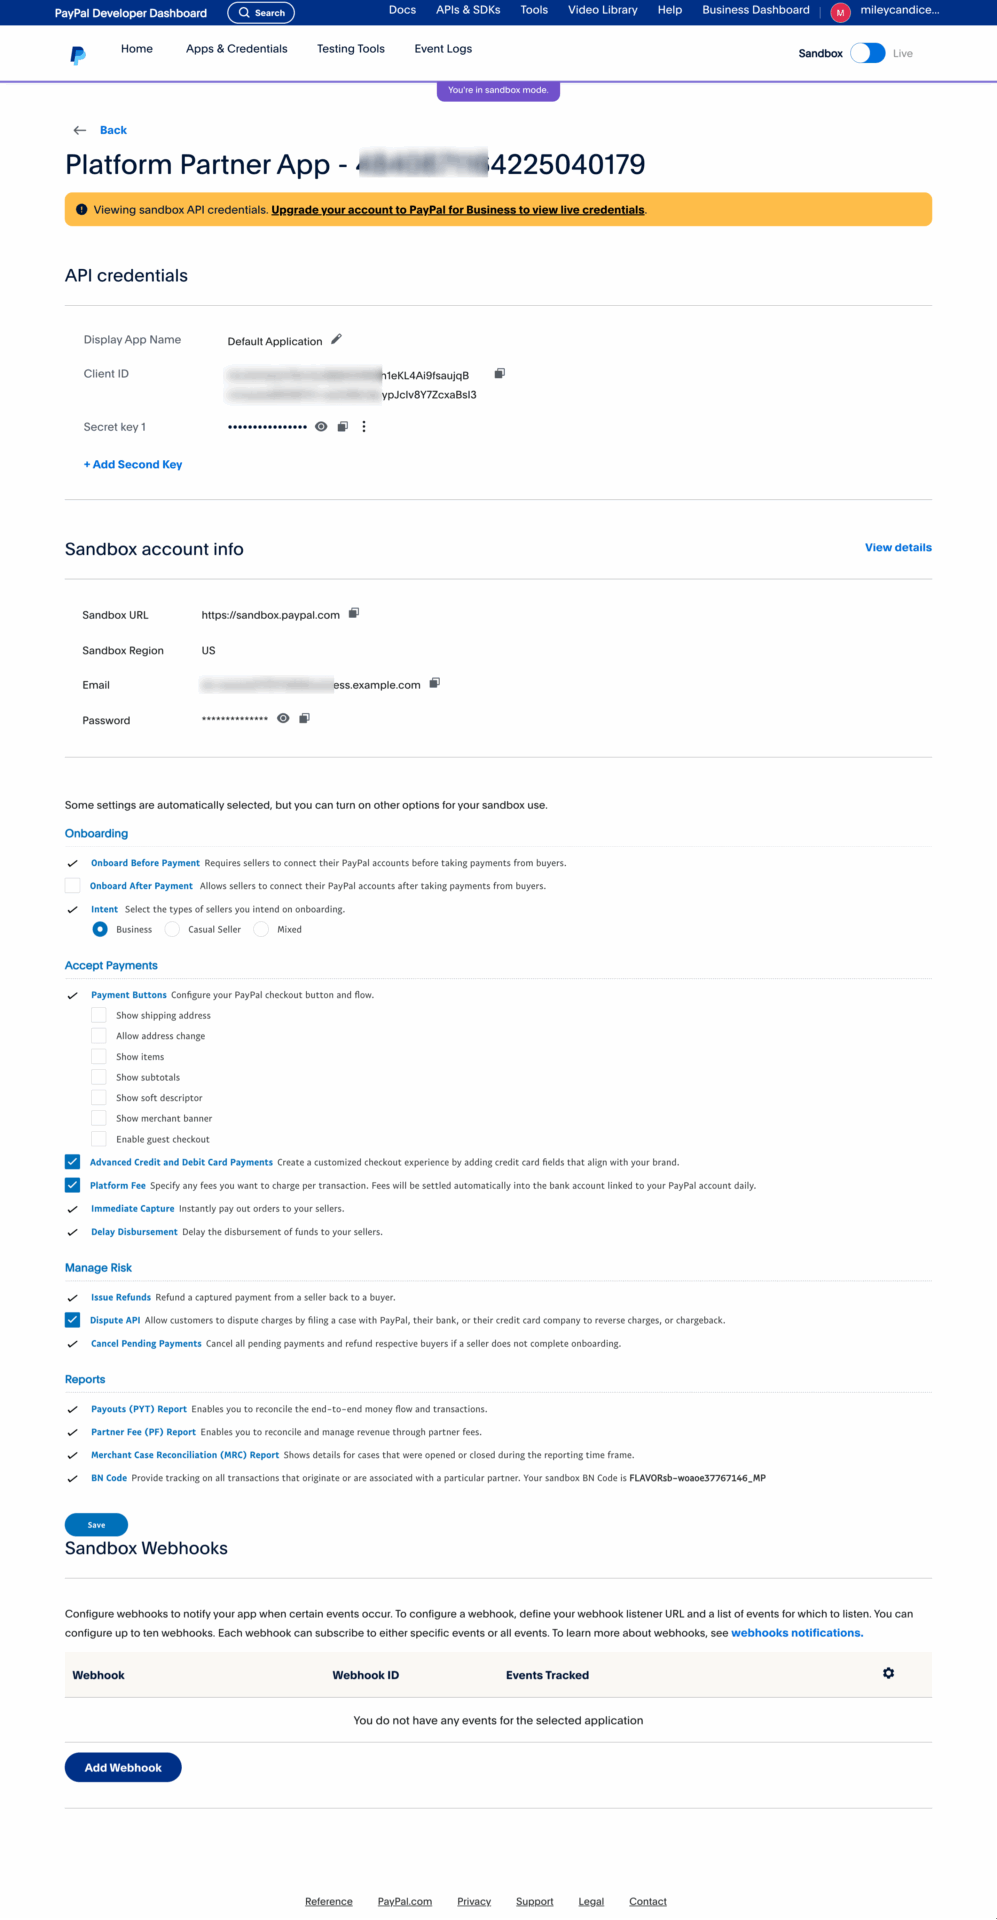
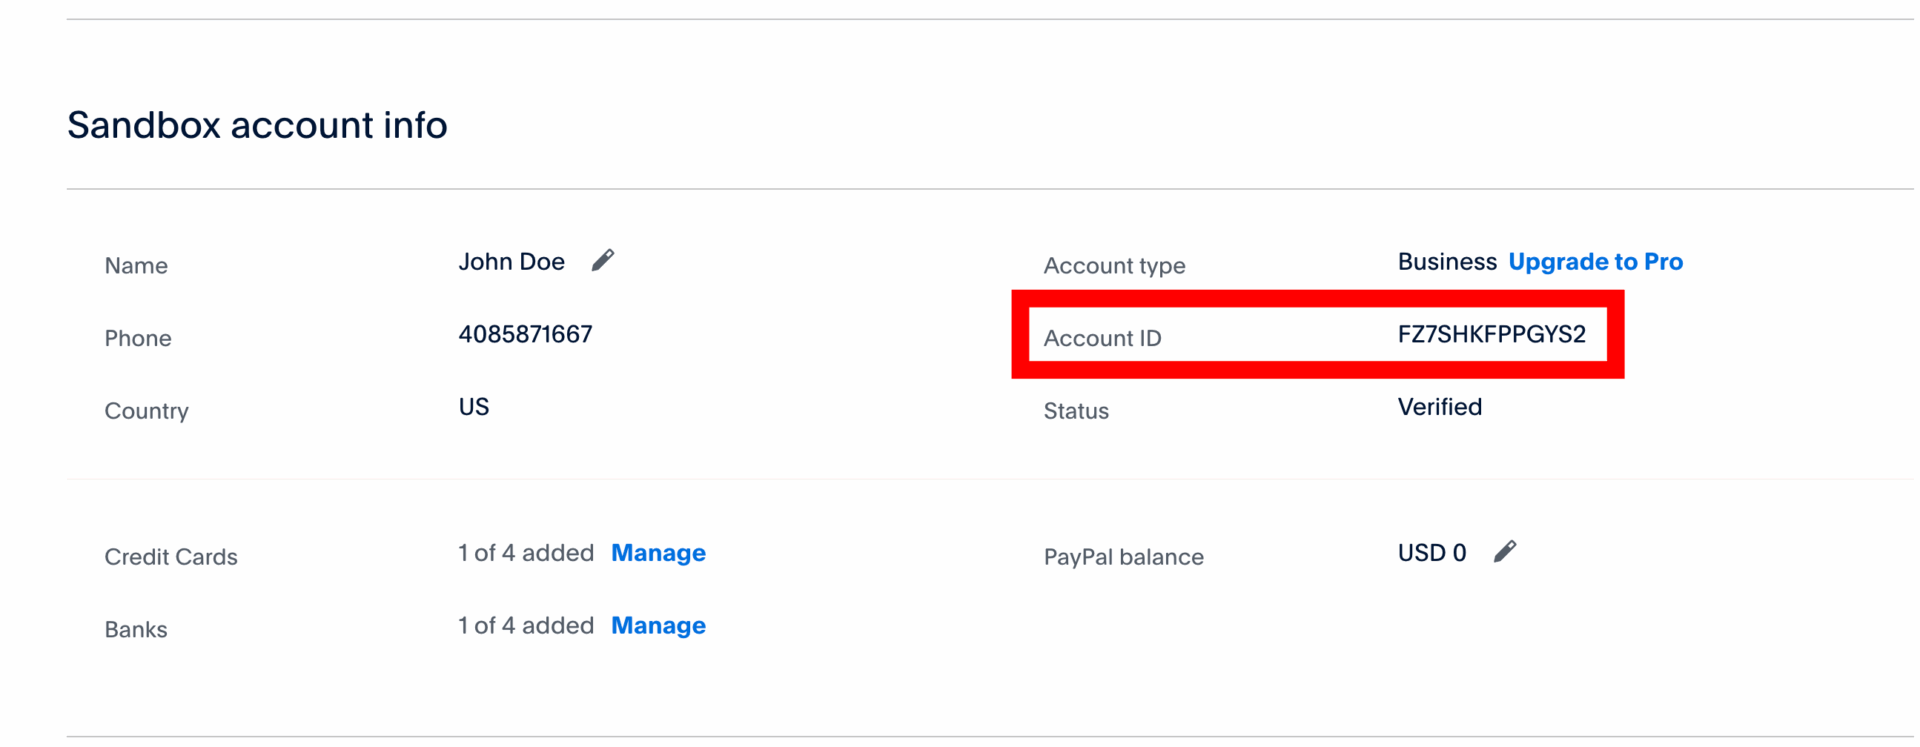
Click on the View Details option in the Sandbox Account Info to find the Partner ID-

There you will find the Account ID. That is the Partner Id.
You are done.
C. Fill out the PayPal Marketplaces and Platforms form
Live credentials are only available to approved marketplaces and platforms. If you are interested in becoming an approved marketplace or platform, fill out the PayPal Marketplaces and Platforms form. This form will be sent to PayPal directly and they will verify the information. Without this approval, calling the PayPal Commerce Platform for Marketplaces and Platforms APIs with your live credentials results in the HTTP status code of 401 Unauthorized. Calling the PayPal Commerce Platform for Marketplaces and Platforms APIs with your sandbox credentials does not require approval.
After PayPal get all the details, it takes from 1 to 3 business days for the customers to get a response. However, it may take 45-60 days to get permission as it depends on the PayPal team. They will notify you once the configurations are done from their side.
Once your PayPal Live account has been configured with the PayPal Commerce Platform configurations, you can start using that Live account as the Partner account. Use this Partner account’s REST credentials to make your API calls against the Sandbox endpoints.
Setup Dokan PayPal Marketplace
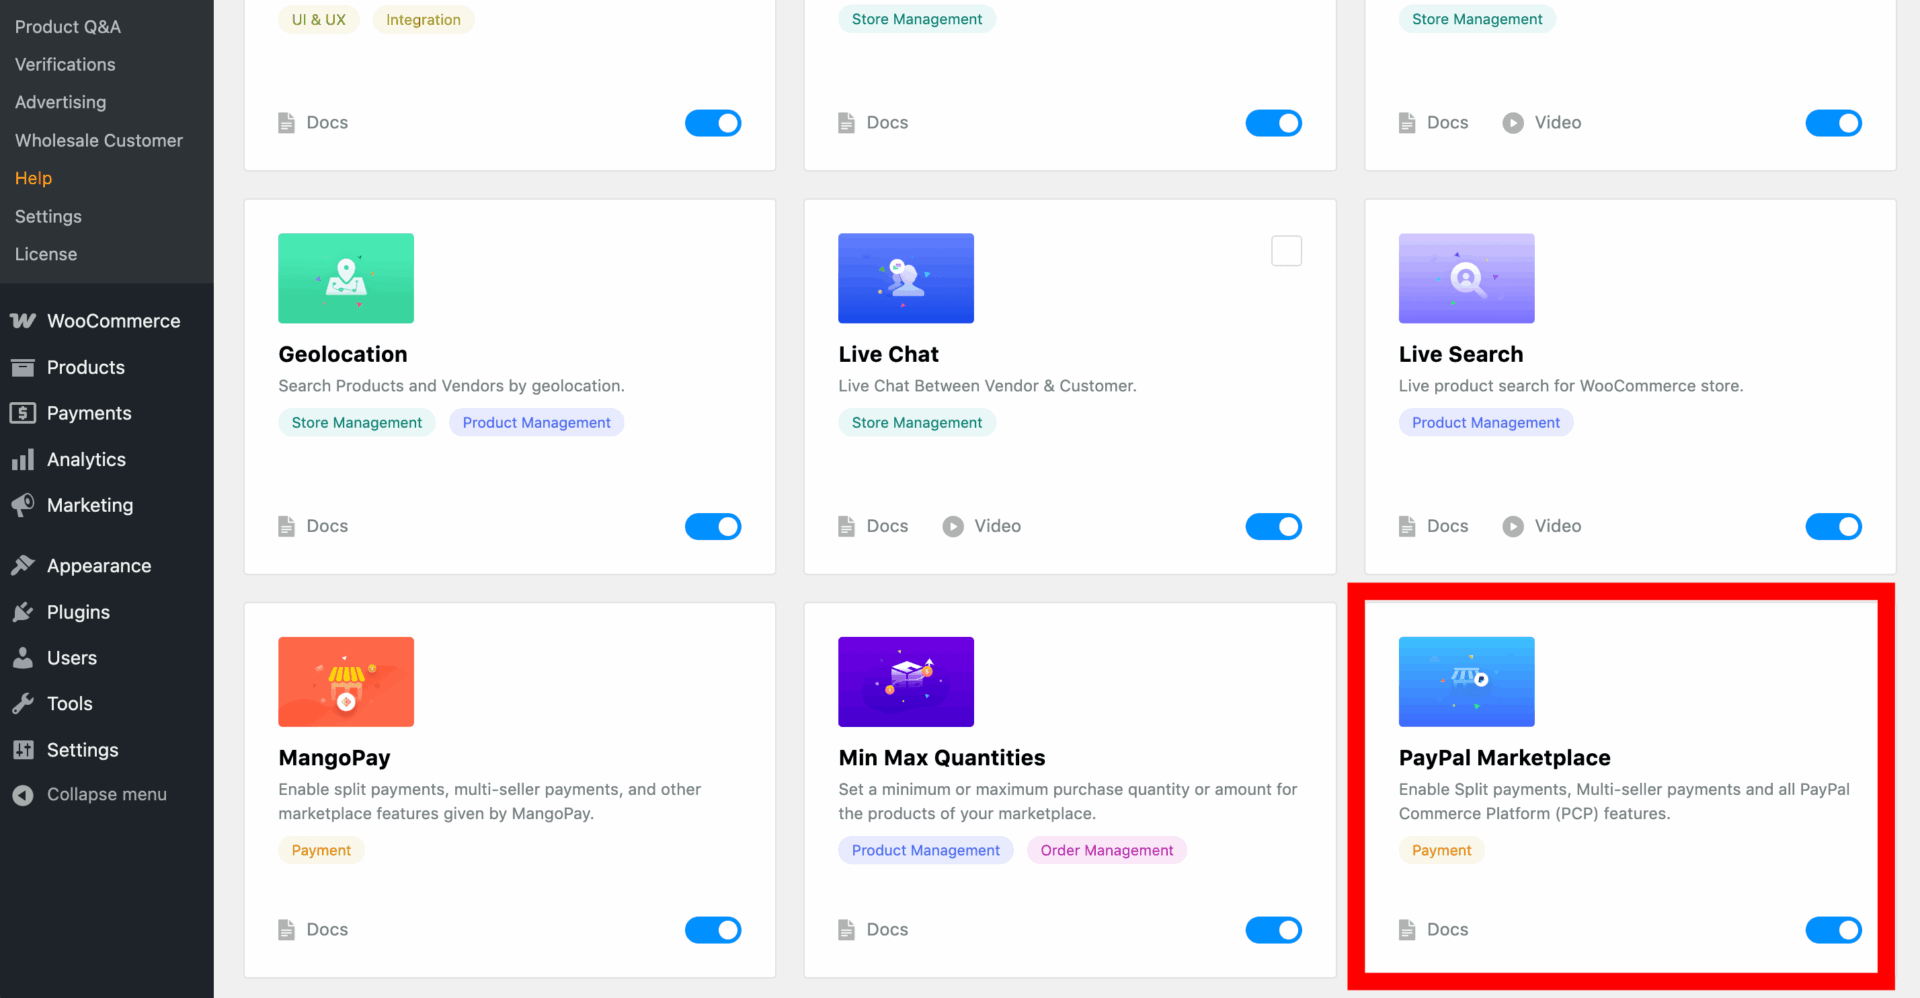
After configuring your PayPal API credentials, you need to enable the module. Navigate to WP Admin–> Dokan–> Modules. Now you need to enable the Dokan PayPal MarketPlace module.
WooCommerce Setup
Now, you need to manage the gateway from WooCommerce settings. Navigate to WooCommerce–> Settings–> Payments.
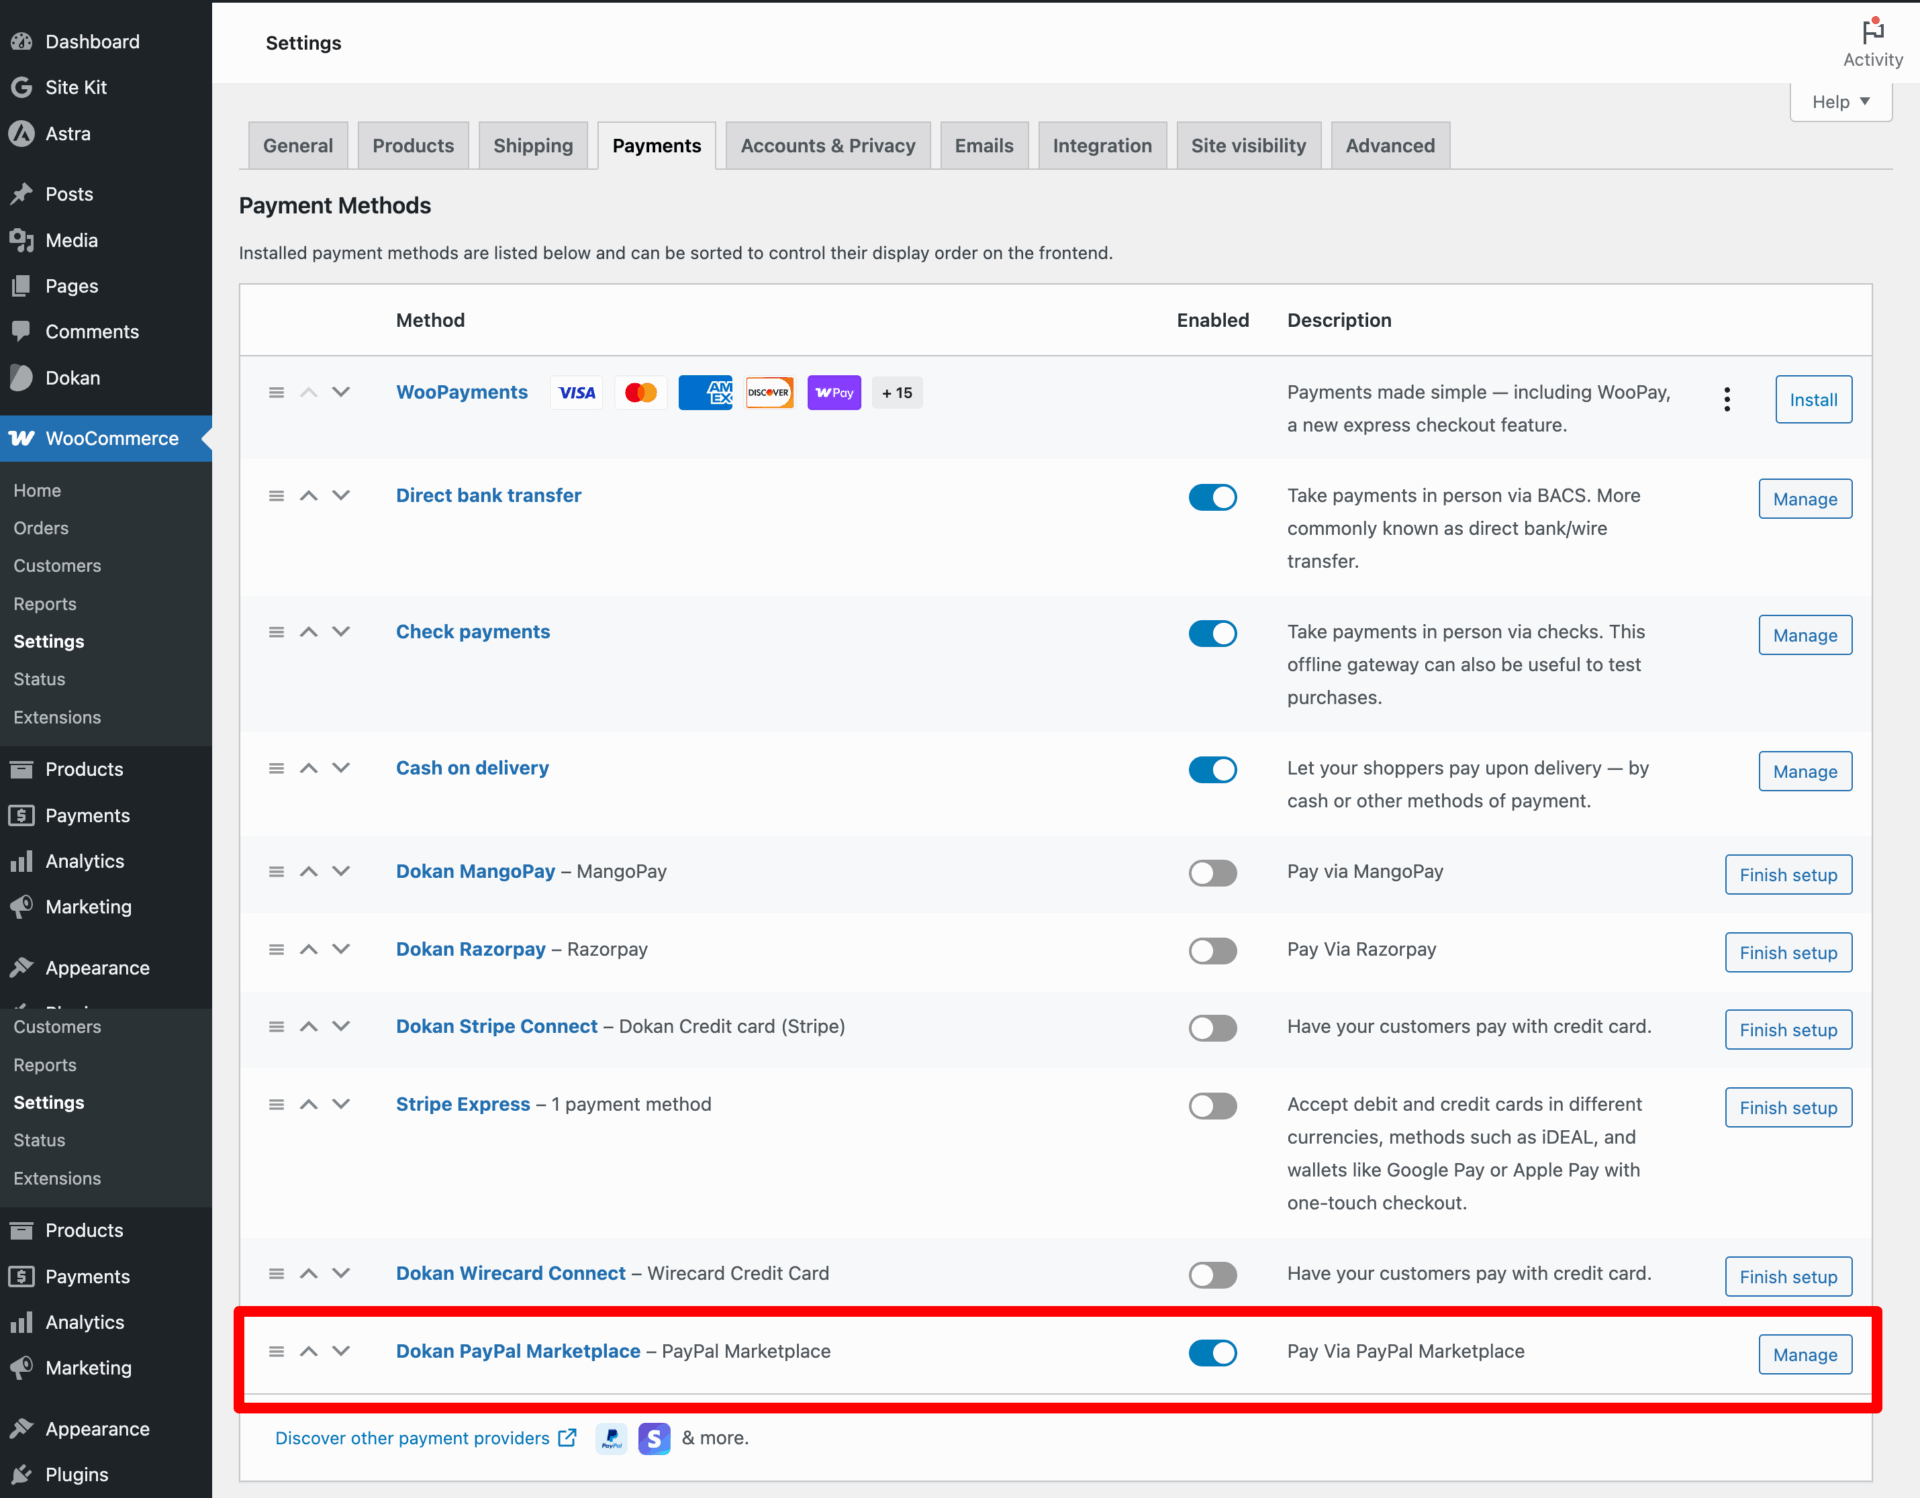
Enable the Dokan PayPal Marketplace Payment gateway and click on Manage.
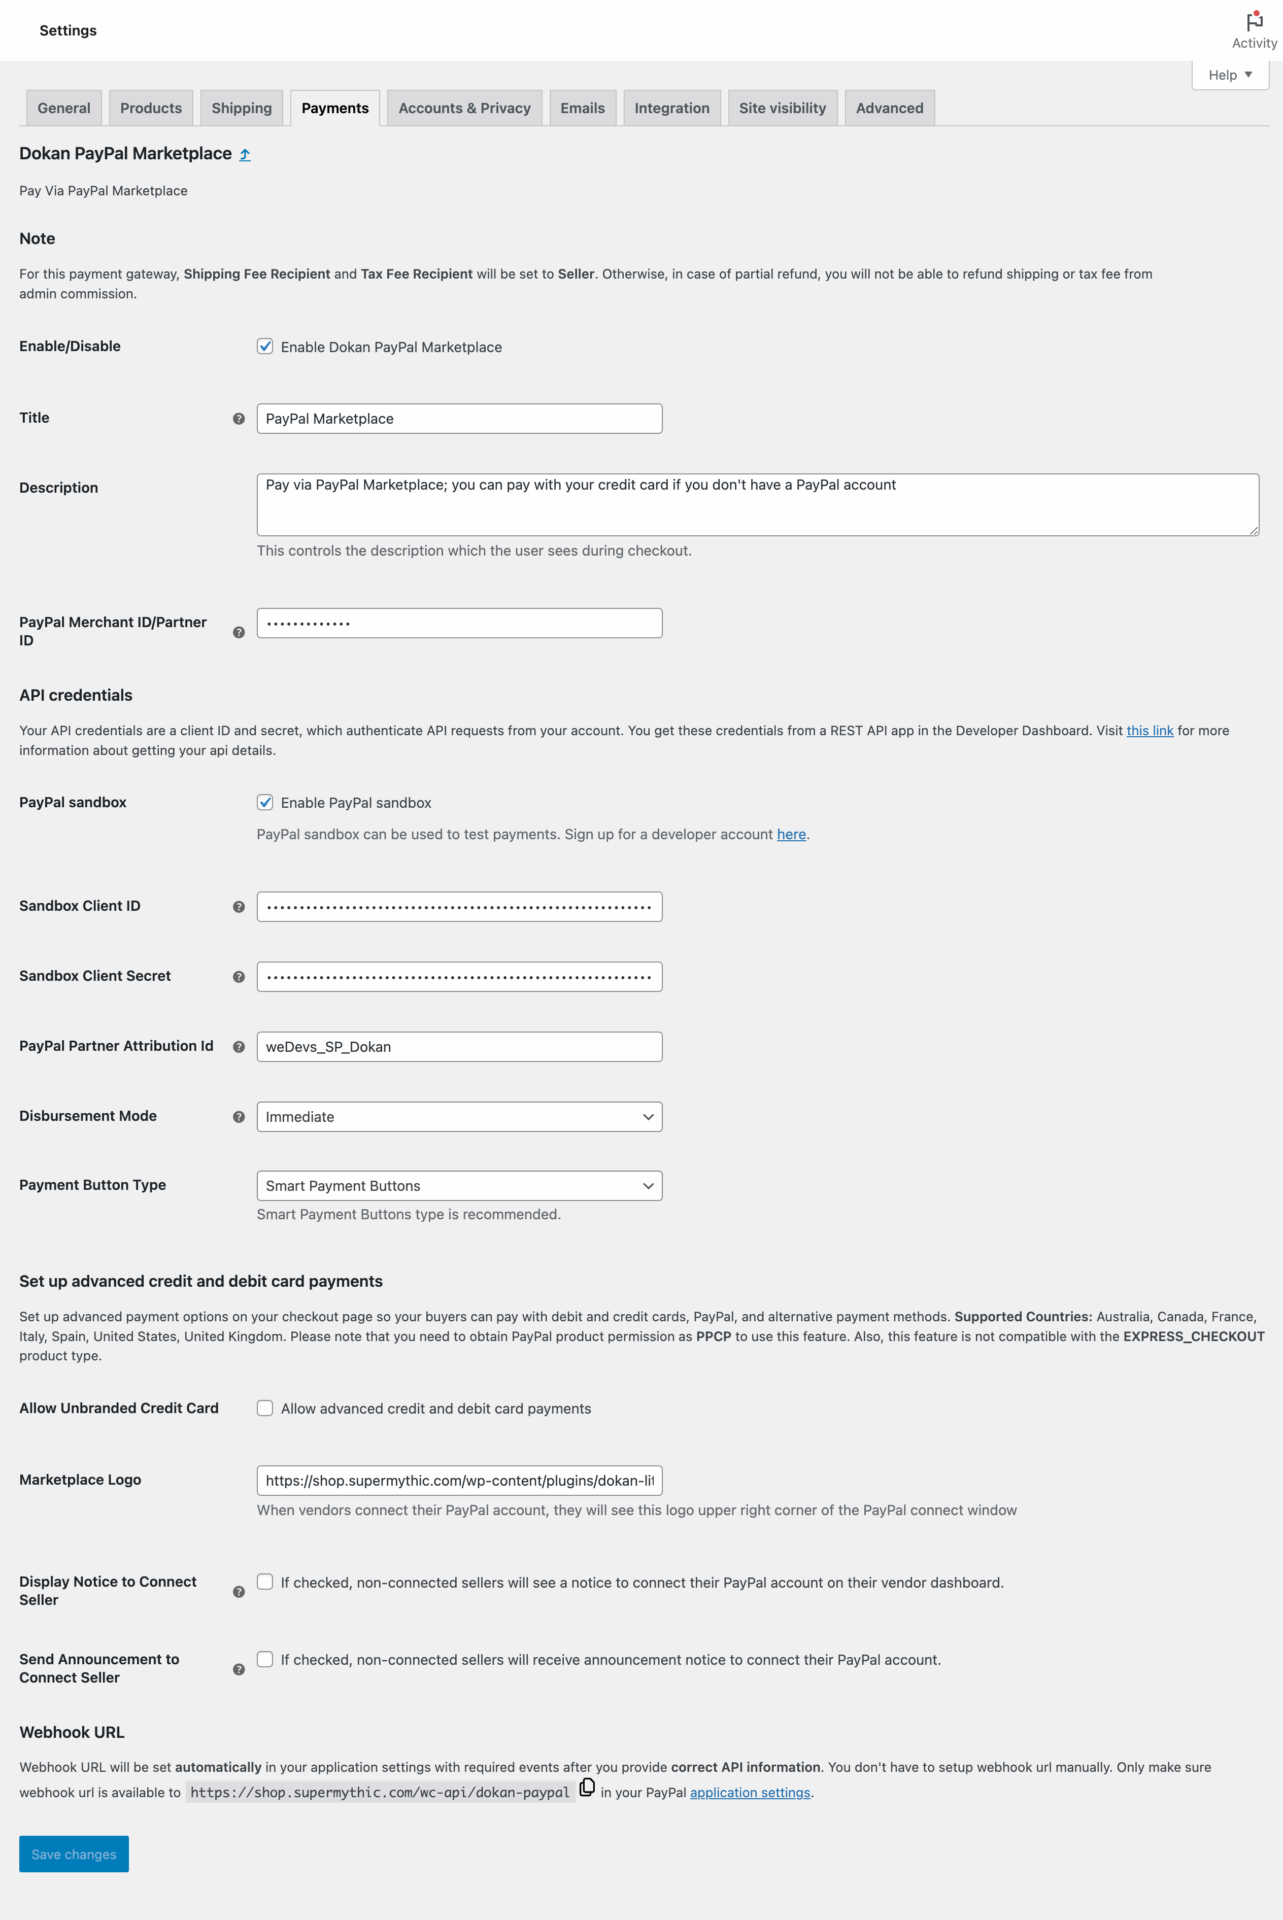
Here you will find all the options to set up the payment gateway. Enable/Disable: Check the box to enable (or disable) the Dokan PayPal Marketplace payment gateway.
Title: Give a title or use the default one that the customers will see during the checkout.
Description: Add a description or use the default one, customers will see this on the checkout page.

PayPal Merchant ID/Partner ID: Add the merchant/partner id you got while you were setting up API credentials from Step 2 (a).
API Credentials:
PayPal Sandbox: If you want to test the integration in Sandbox mode, check this setting. If you have checked PayPal sandbox mode, you’ve to provide Sandbox Client ID and Sandbox Client Secret below. Otherwise, you’ve to provide Client ID and Client Secret for live account API Credentials you got from Step 2 (b).
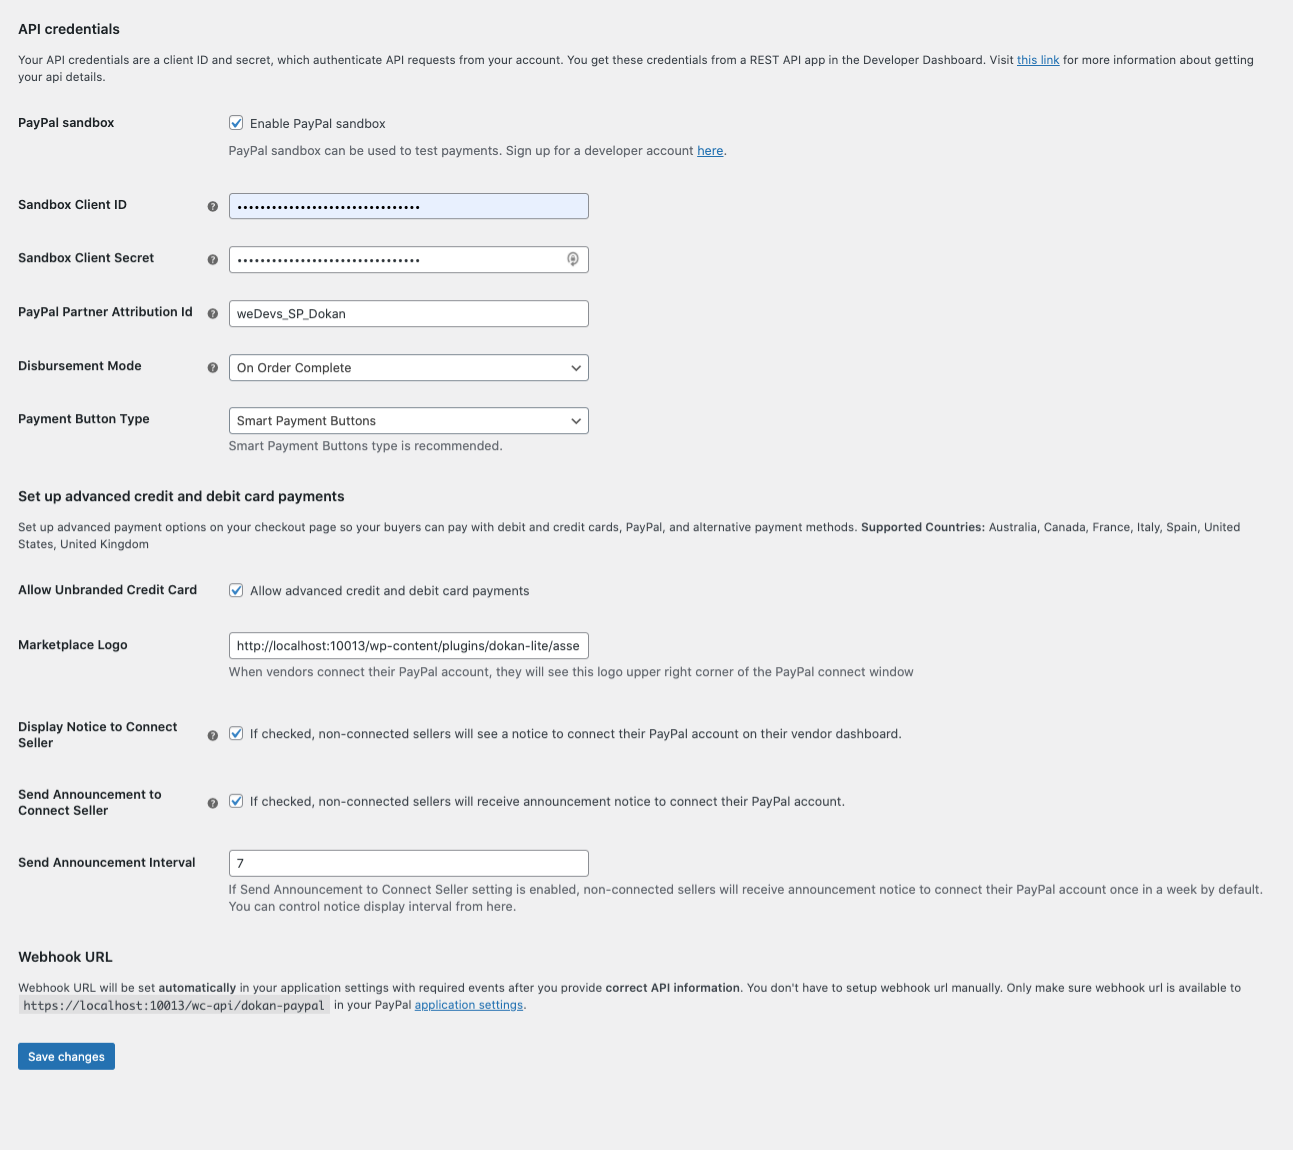
Sandbox Client ID: Add the client id you collected while setting up PayPal API credentials on Step 2 (b).
Sandbox Client Secret: Add the client secret you collected while setting up PayPal API credentials on Step 2 (b).
Client Id: Add the client id you collected while setting up PayPal API credentials on Step 2 (b). (for live mode)
Client Secret: Add the client secret you collected while setting up PayPal API credentials on Step 2 (b). (for live mode)
PayPal Partner Attribution ID / BN Code: PayPal Partner Attribution ID will be given to you after you setup your PayPal Marketplace account. If you do not have any, default one will be used.
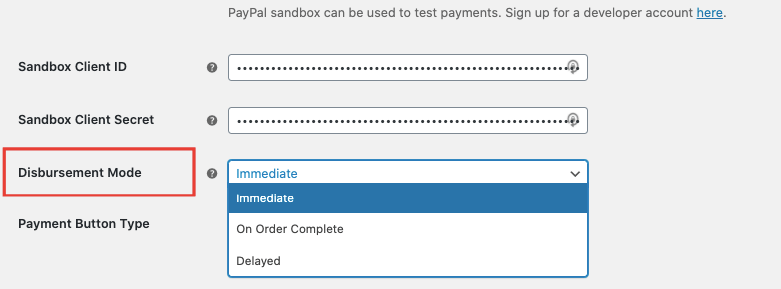
Disbursement Mode: Choose whether you wish to disburse funds to the vendors immediately or hold the funds. Holding funds gives you time to conduct additional vetting or enforce other platform-specific business logic. As an admin, you can choose when to disburse the funds to the vendors. You will have 3 options,
- Immediate: vendors will get their money immediately after the order.
- On order complete: vendors will get their money after the order is complete via site admin or vendors based on Settings (either vendor can change order status or not)
- Delayed: You can choose to hold the fund for a specific number of periods of an interval to disburse the funds. After the specified day’s funds will be automatically disbursed to the vendor’s PayPal account. The maximum delay period is of 29 days. If the fund is not disbursed within 29 days, PayPal will automatically release funds to the corresponding vendors.

Payment Button Type: PayPal supports two different payment options. One is Standard and the other one is Standard. But we recommend using the Smart Payment Buttons option.
Allow Unbranded Credit Card: You can allow the usage of unbranded credit cards. Set up advanced payment options on your checkout page so your buyers can pay with debit and credit cards, PayPal, and alternative payment methods. If you enable this option, customers will be able to checkout directly from your site using Credit/Debit cards.
Supported Countries For Unbranded Credit Cards: Australia, Canada, France, Italy, Spain, United States, United Kingdom.
Note: You need to select Smart Payment Buttons in order for UCC modes to work. This option will not work with the Standard button.
Marketplace Logo: Add the link to the logo of your marketplace. This logo will be visible to vendors when they connect their PayPal account to your marketplace from the vendor payment settings page.

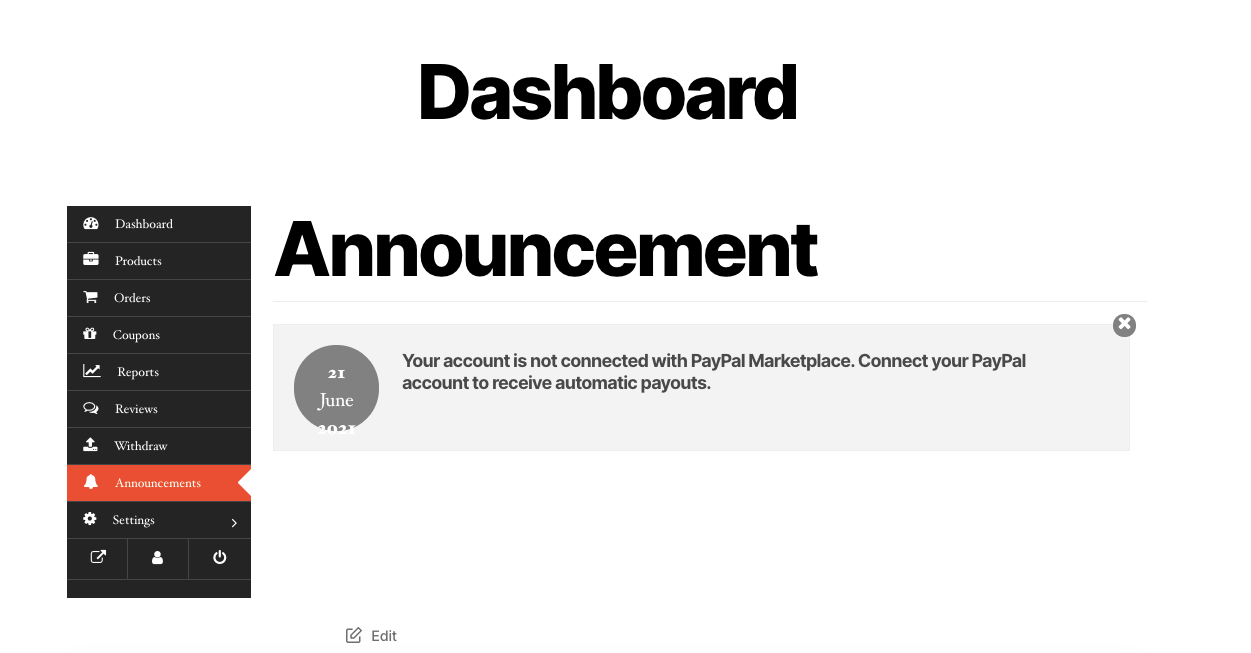
Display Notice to Connect Seller: If you enable this setting your non-connected vendors will see a notice to connect their PayPal account on their vendor dashboard. Send Announcement to Connect Seller: If you enable this setting your non-connected sellers will receive an announcement notice to connect their PayPal account. Send Announcement Interval: You can choose a period of an interval to send the announcement.
Webhook URL
Webhook URL will be set automatically in your application settings with required events after you provide correct API information. You don’t have to set up the webhook URL manually. Only make sure the webhook URL is available to https://your store/wc-api/dokan-paypal in your PayPal application settings. Lastly, hit the Save Changes button to finish.
How Vendors Will Connect Their PayPal Account?
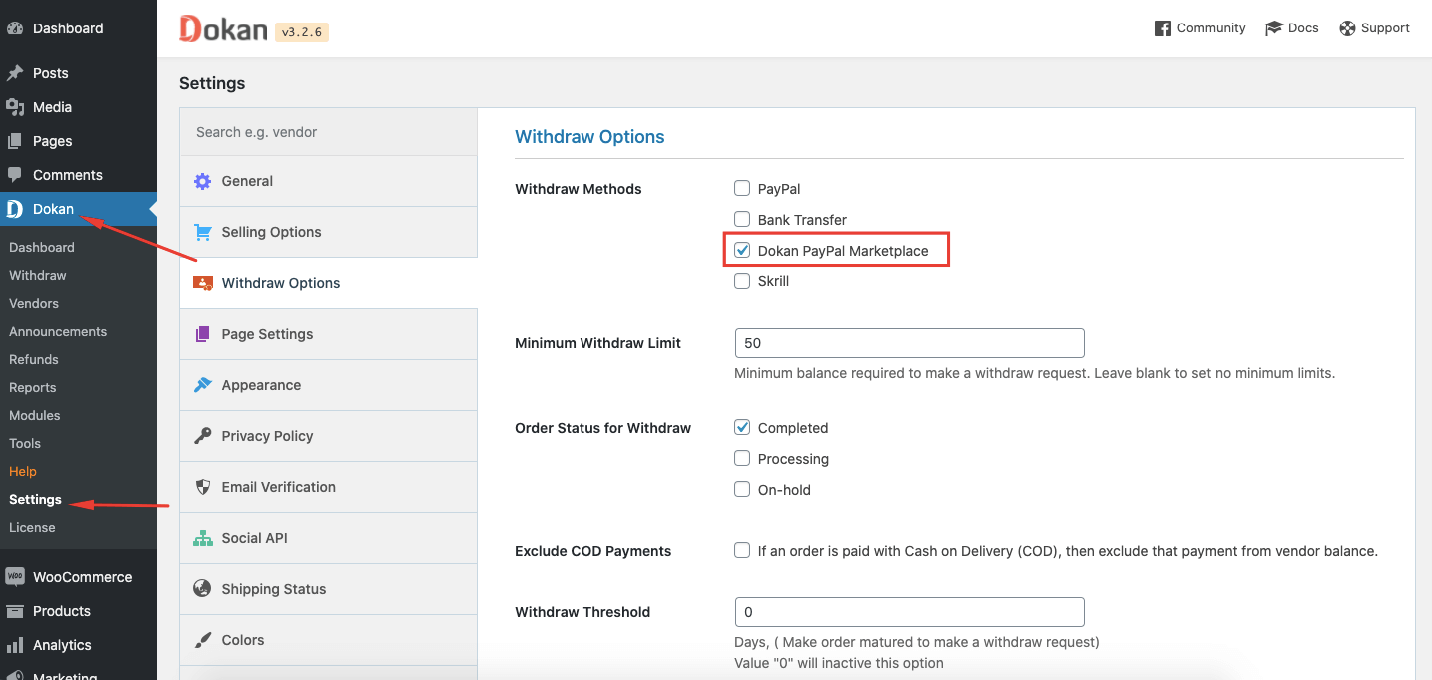
Go to Dokan–> Settings. Choose the Withdraw options. You need to select the Dokan PayPal Marketplace option in order to activate the payment gateway.
Note: If you didn’t provide API Credentials for Dokan PayPal Marketplace payment gateway settings, this option won’t be visible to you or your vendors.
Also, When vendors connect their PayPal account to your MarketPlace their PayPal account will be converted to a business account automatically.
Note:
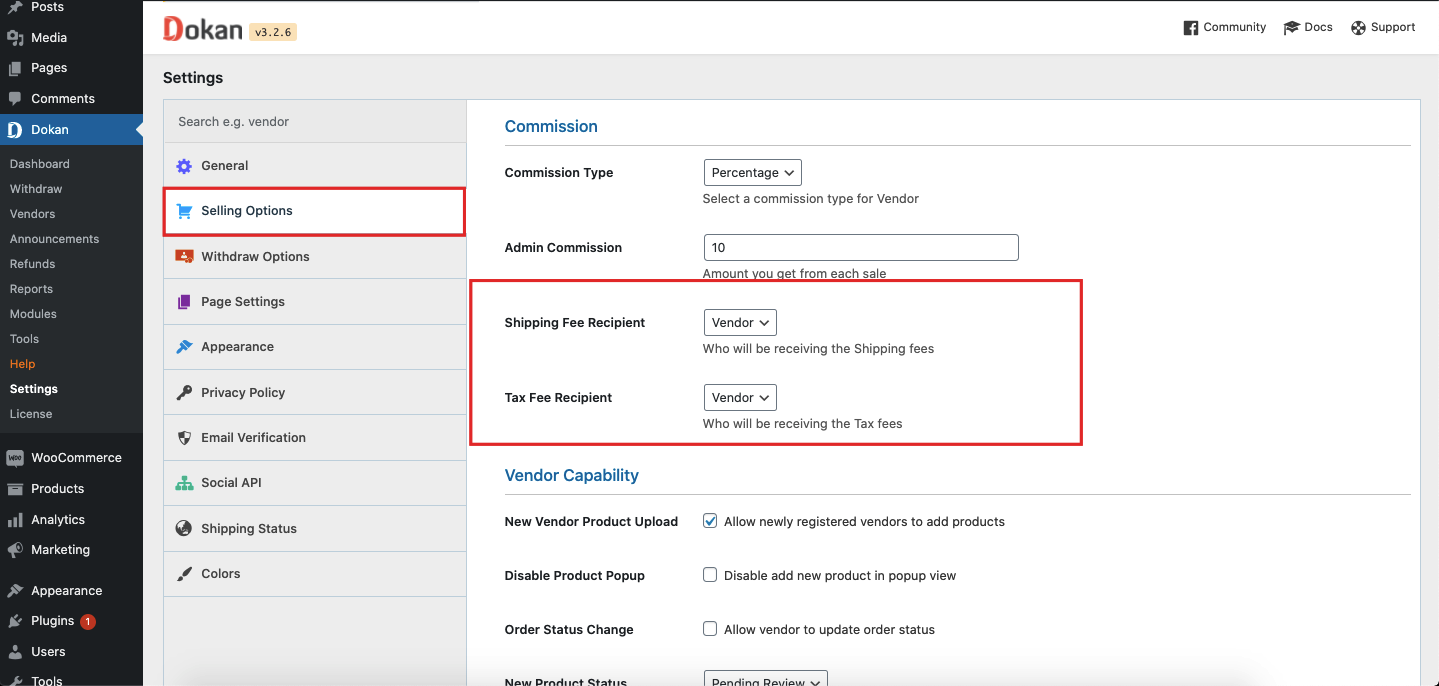
You need to select the Shipping fee and Tax fee recipient as Vendors. Otherwise, there won’t be any problem with transactions but an issue may arrive in case of a refund. So, we strongly suggest you choose Vendors as Shipping fee and Tax fee recipient. You will find the options in Dokan–> Settings–> Selling options.
You will find more details about it in the Refund section.

 Also, if you choose the wrong currency that isn’t supported by PayPal, you can’t configure this payment gateway. When you choose any wrong currency that PayPal doesn’t support, then you will get a notice like that on the Payment Gateway Settings page,
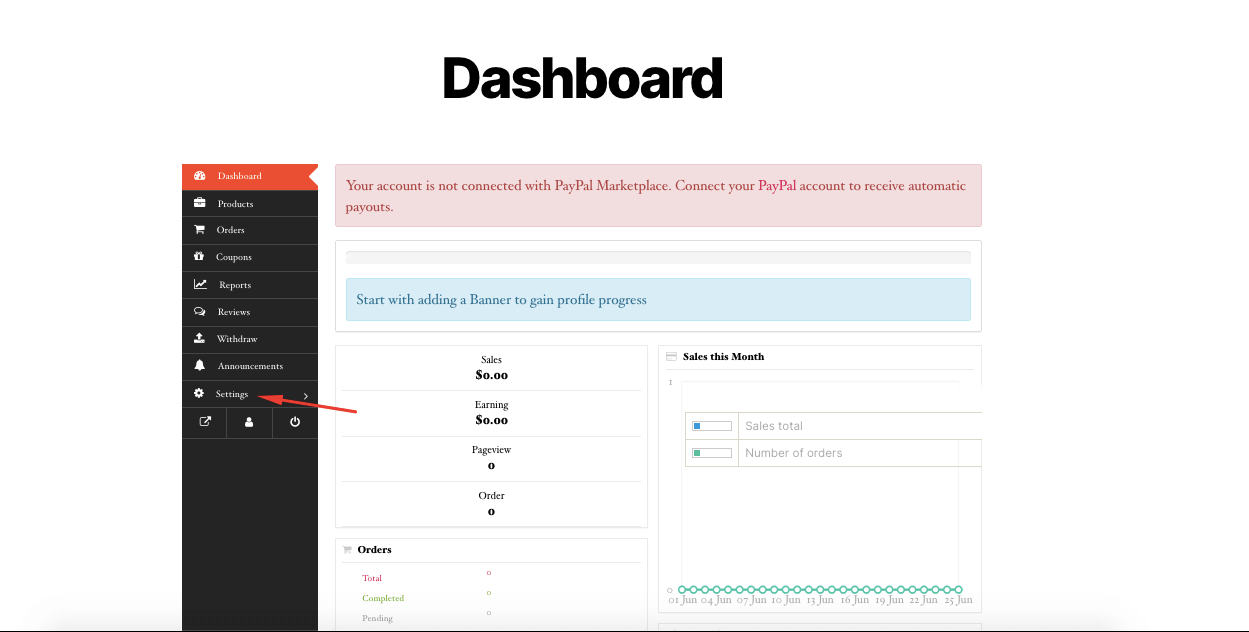
To connect their PayPal account, the vendors need to navigate to Vendor Dashboard–> Settings,
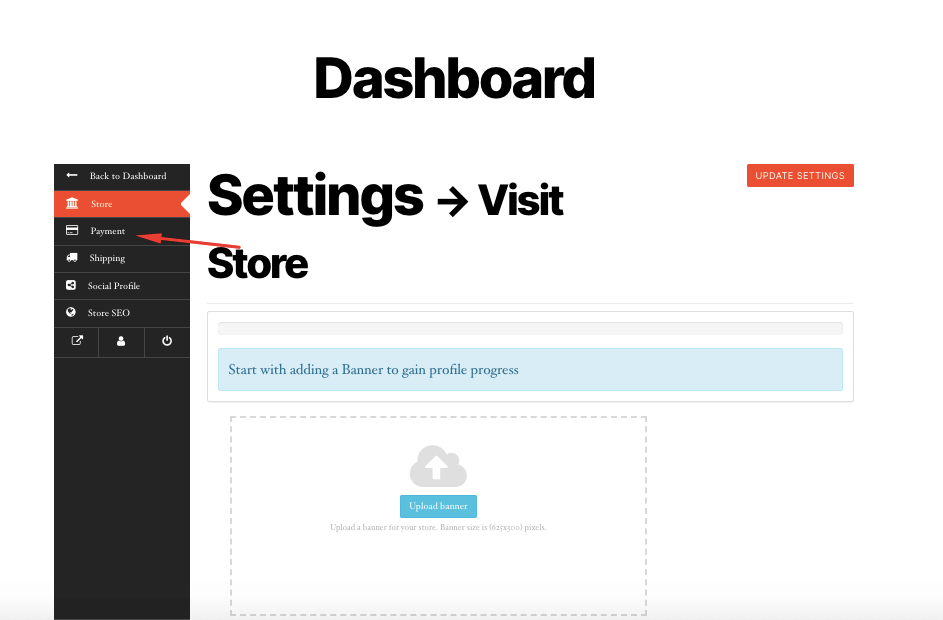
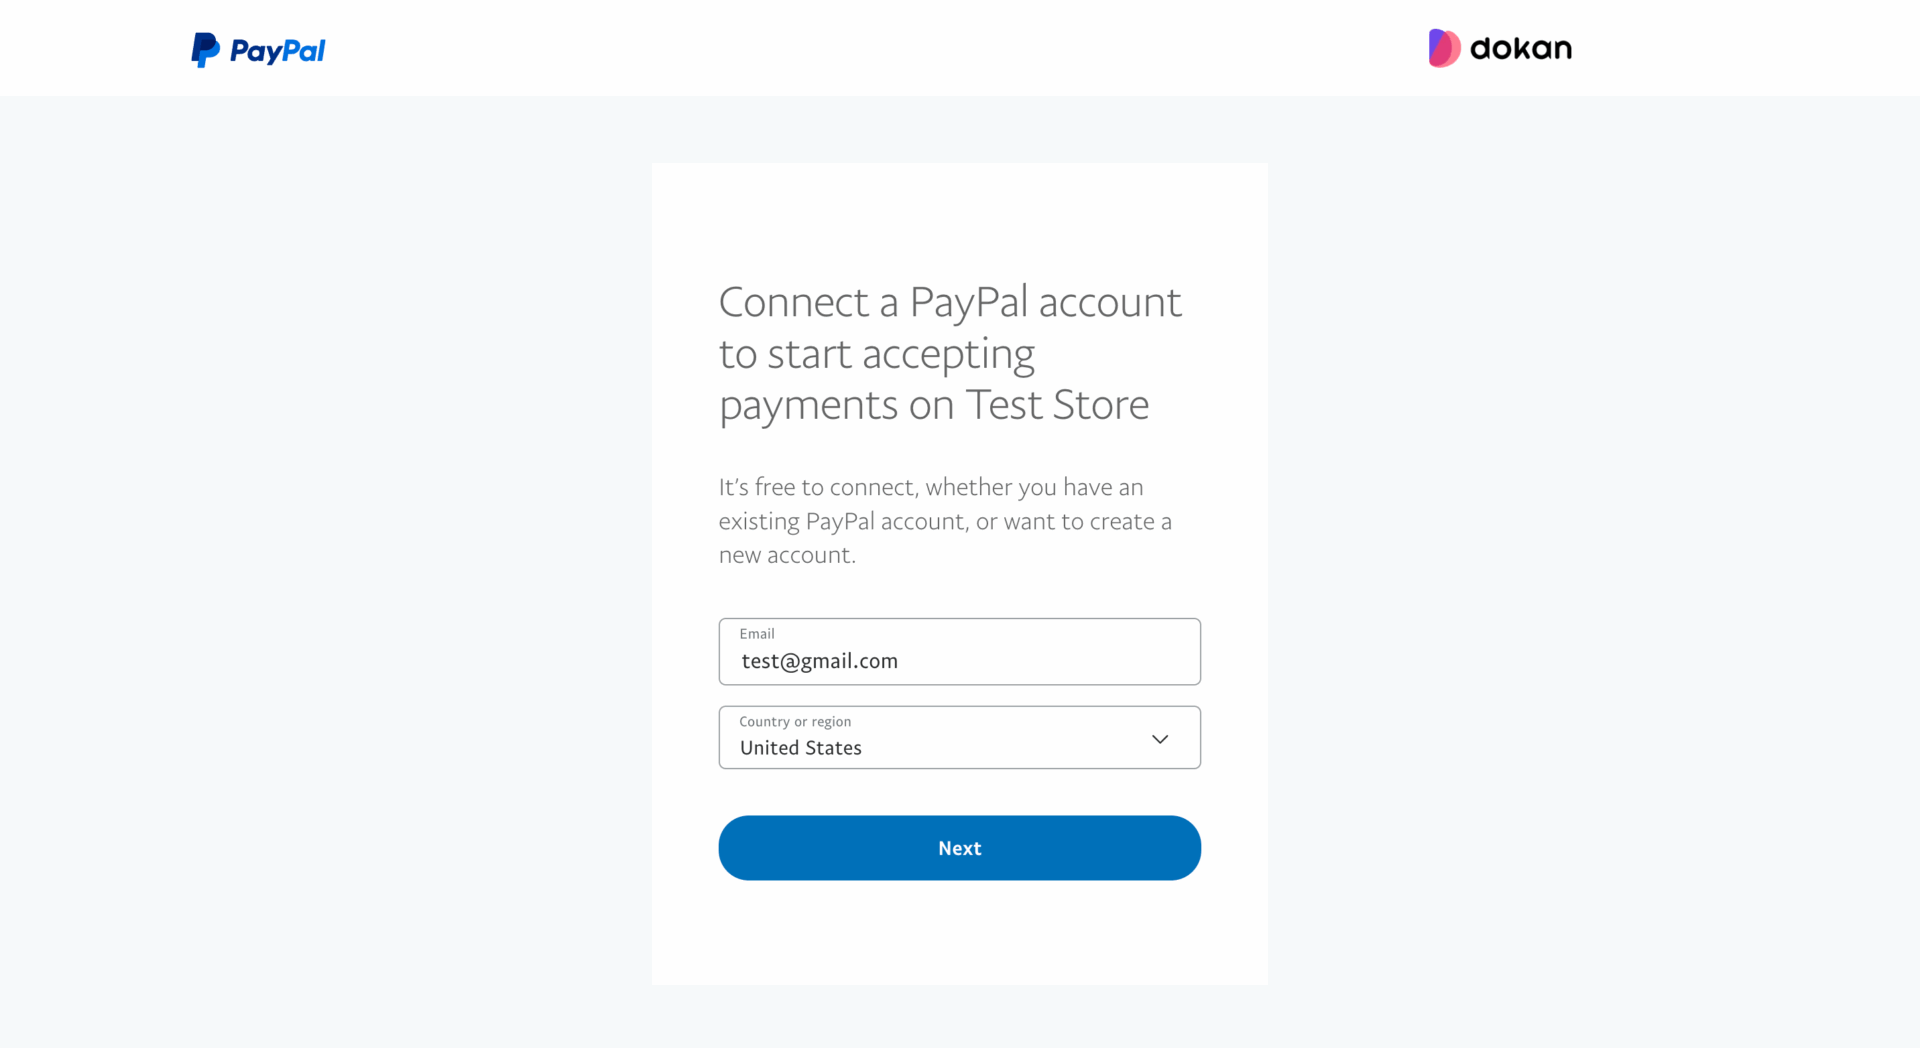
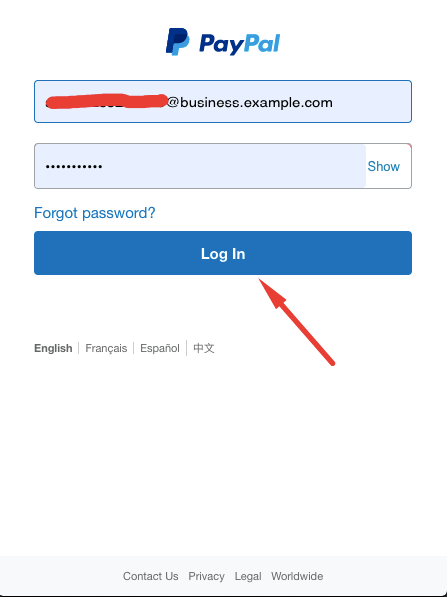
On the next page, choose the Payment option. They will see a Text Field. They need to add their PayPal email address and hit the SignUp button. A pop-up window will appear and they need to select the region. When they click on the Next button, they need to add their password and press Log in.
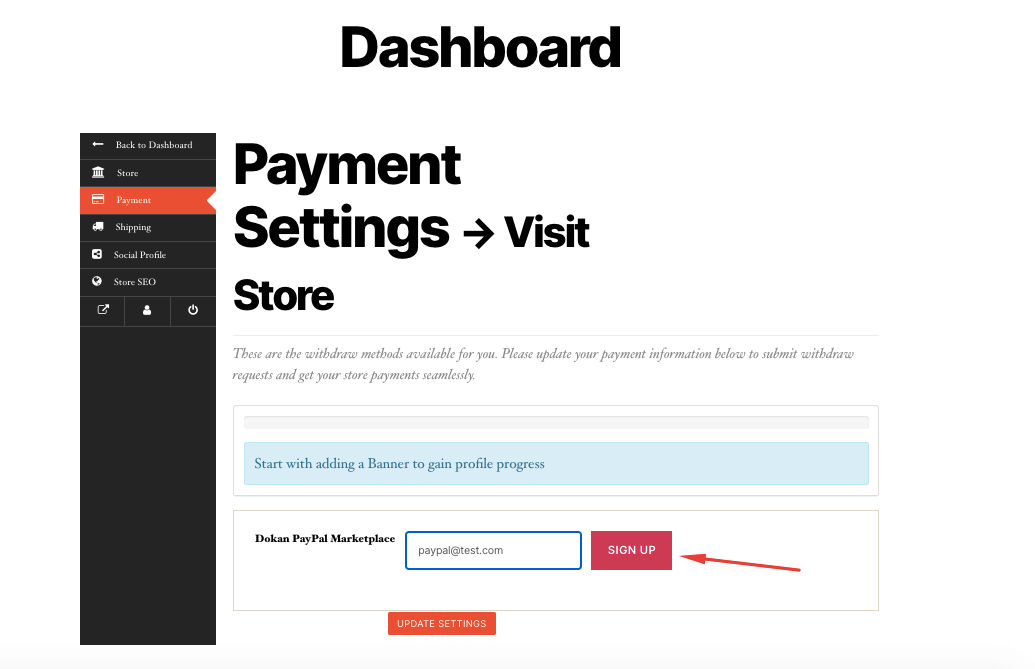
On the next page, choose the Payment option. They will see a Text Field. They need to add their PayPal email address and hit the SignUp button. A pop-up window will appear and they need to select the region. When they click on the Next button, they need to add their password and press Log in.
Vendors can use existing or if they want they can create a new business account. It’s up to the user.
Then the vendor needs to add their password to log in-
This will complete the process-
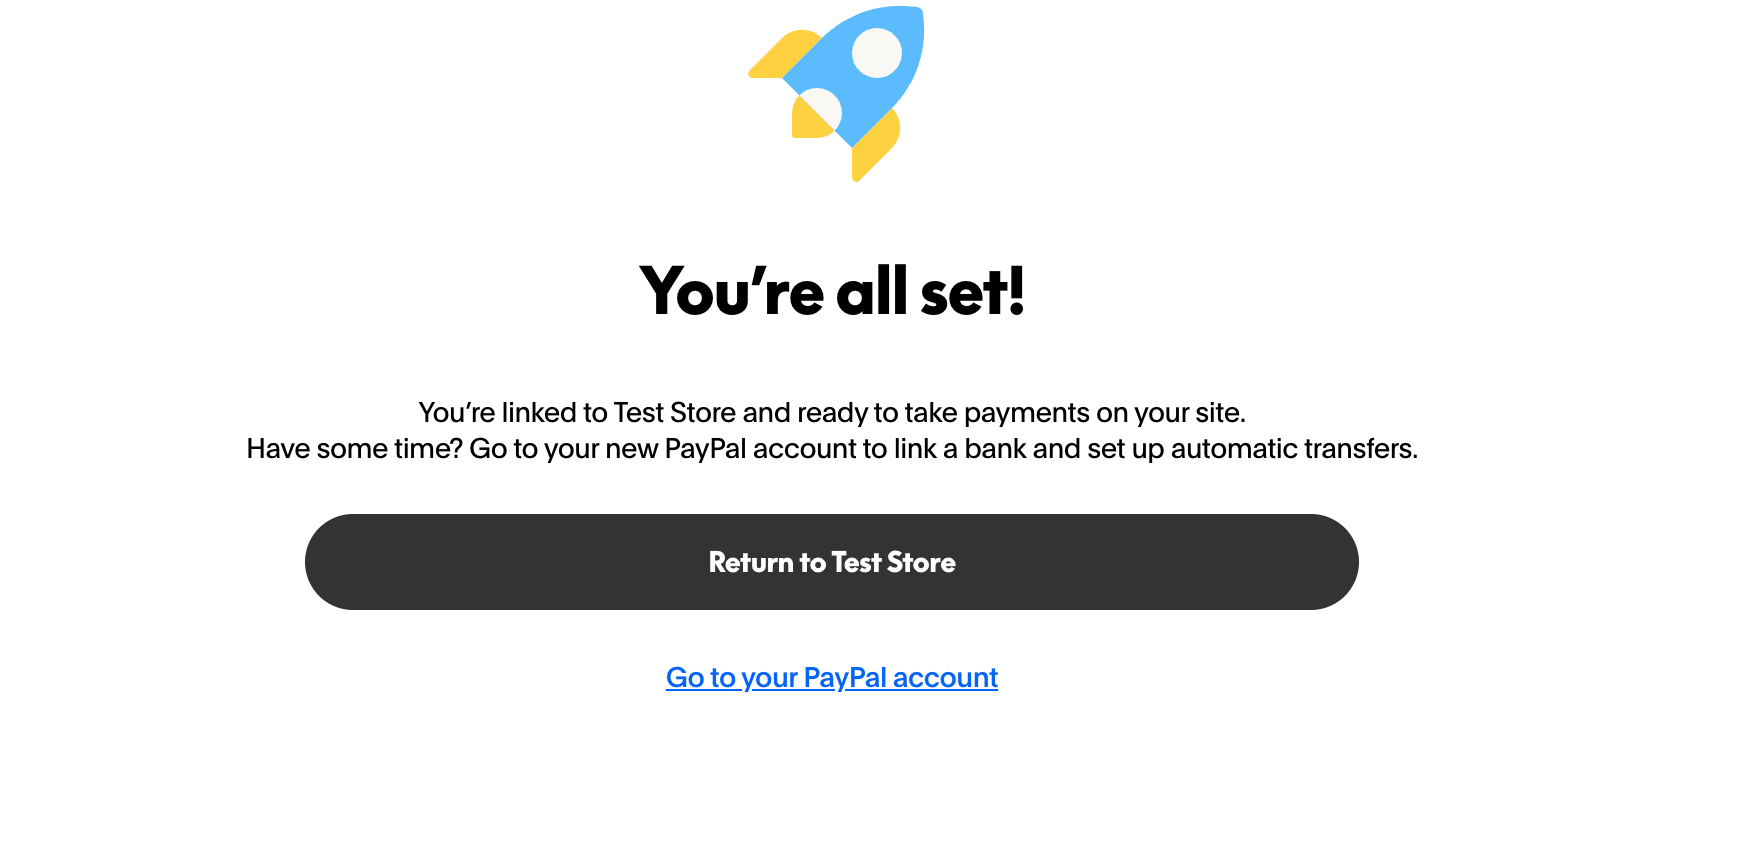
Vendor will see that their store is connected-
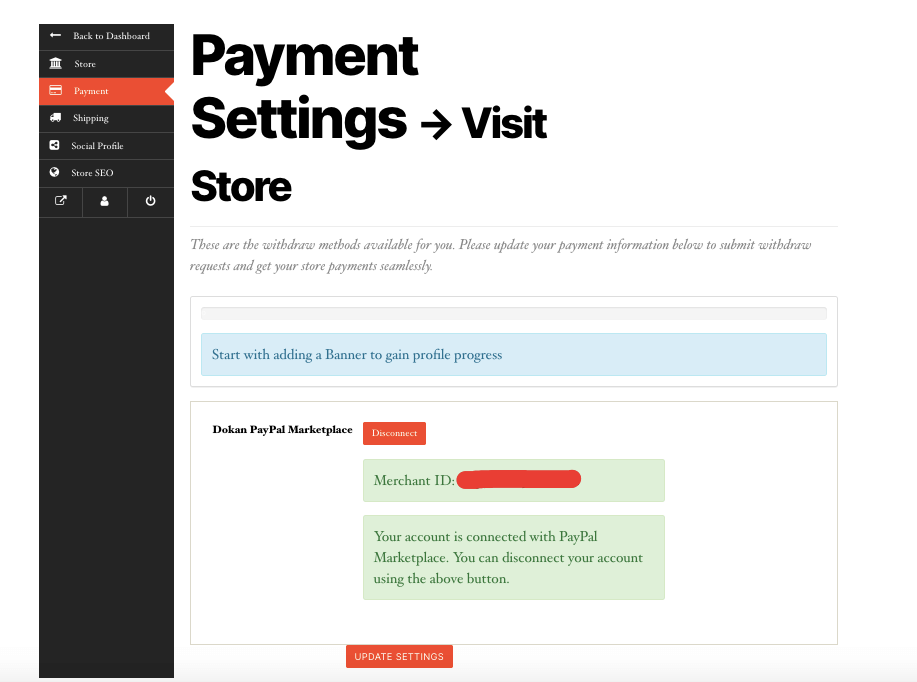
If the connection is successful, they will be redirected to the marketplace and they will see their Merchant ID, a notice that the connection is successful. That is how Vendors can connect their PayPal account to the marketplace.
Note: if the vendor’s account needs further verification from the PayPal end, vendors will see the relevant message here instead of the Disconnect button. Once PayPal verifies the vendor’s PayPal account, their PayPal account will be automatically connected and they don’t have to follow further actions to connect their account from here (payment settings page)
Checkout Eligibility
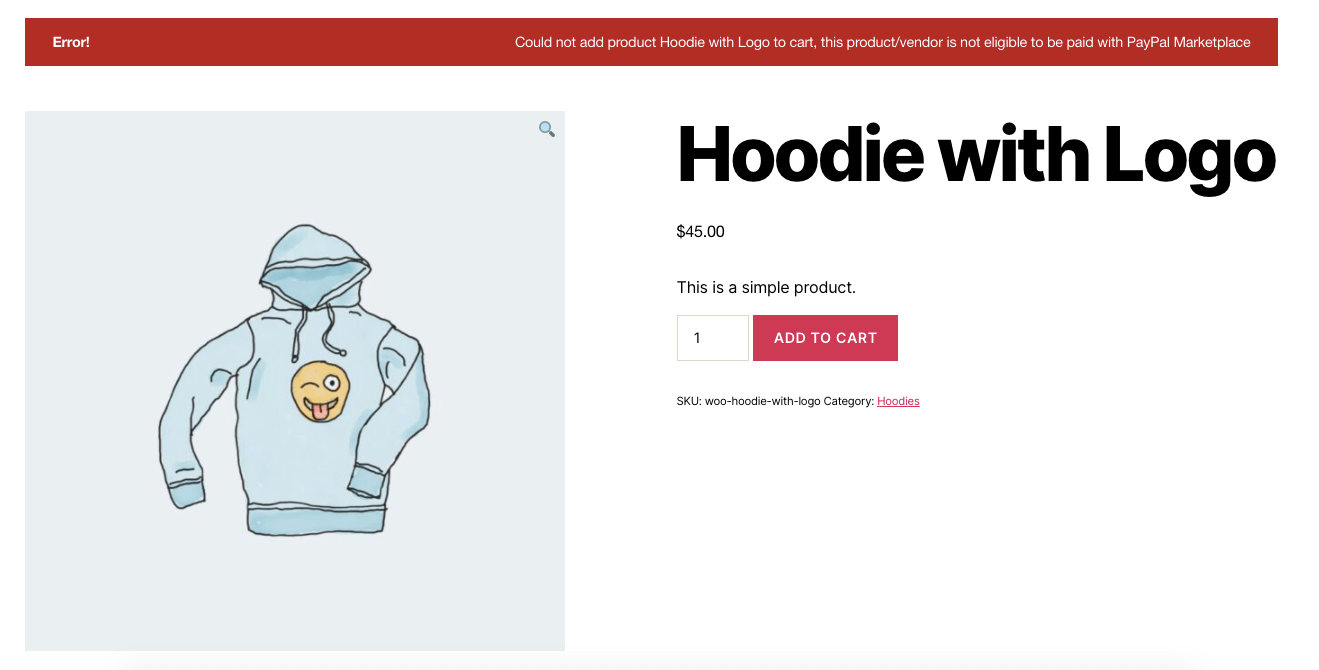
Vendors need to connect their PayPal account before they start selling their product. if the vendor is not connected to their PayPal account, and PayPal marketplace is the only payment gateway available, then when a customer adds a product from those vendors they will see a notice like this,
Otherwise, they’ll see a notice to remove products for those vendors in the checkout page.
Also, Customers can buy products from 10 vendors at a time while using the Dokan PayPal Marketplace payment gateway. That is the PayPal policy. There is no limit on how many products they can buy at a time.
Payment Options ( How To Pay With Dokan PayPal MarketPlace )
We said earlier that there were two types of payment button options and a third option named Unbranded Credit Card methods for selected countries.
If you choose the Standard Payment Button option, the customer will see a default Place Order button. After they click that button, they’ll redirect back to the PayPal site and after they completed their payment on the PayPal site, they’ll redirect back to the marketplace site.
Note: In Standard Mode, the order status will change to Processing/Completed after the webhook is processed, till then, the order status will remain in a pending payment state.
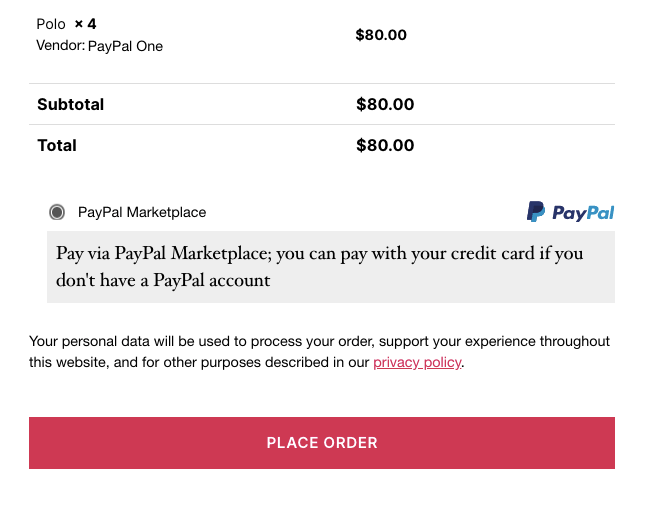
When you choose the Smart Payment buttons, customers will see multiple payment options based on the country. When the customer places the order an IFrame will open in order to complete the payment.
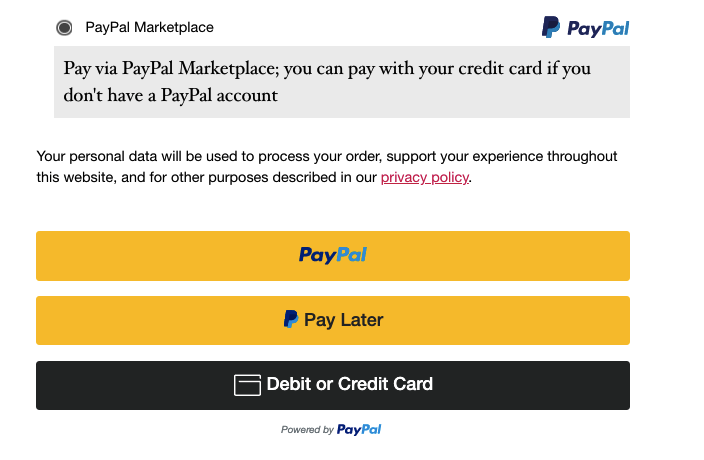
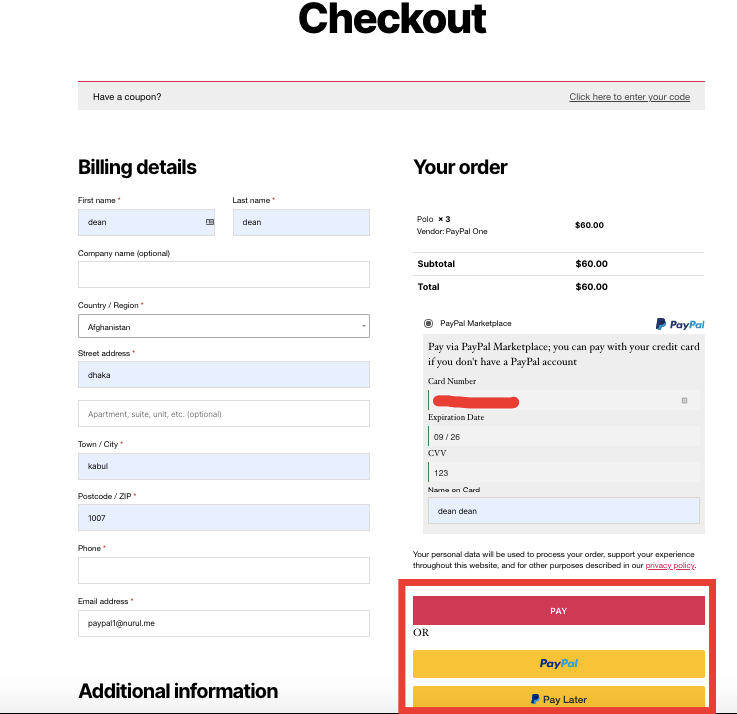
When you choose the Smart Payment Button option and check Unbranded Credit Card Mode, the Customer will see a credit card form along with Smart Payment Buttons. Customers will not leave your site in order to complete their payment if they choose to pay via credit card.
Note: In order for UCC mode to work, you need to choose Smart Payment Buttons from the payment gateway settings page.
Disbursement Mode
Vendors will receive their money based on the disbursement mode.
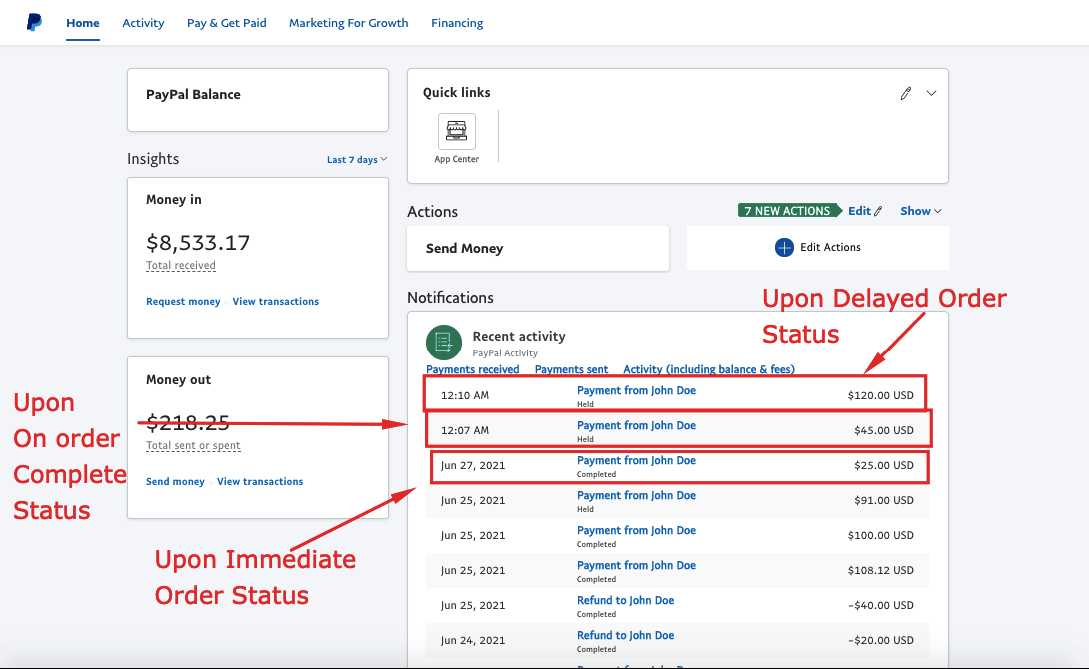
- For Immediate Disbursement mode, vendors will receive money right after the customer payment.

- In the case of On Order Complete Disbursement mode, the vendor’s money will be On-Hold. Vendors will be able to view that from their PayPal dashboard. In that case, the fund will release automatically after the admin changes the order status to Completed from the order details page of your admin/vendor dashboard.
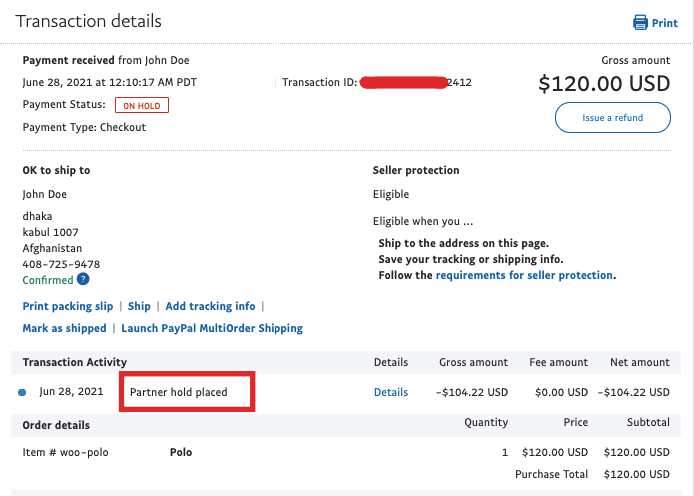
- The same goes for Delayed Disbursement mode as well. The vendor’s money will be On-Hold. In that case, the fund will be automatically released after the specified amount of days mentioned in payment gateway settings.
Refund
Vendors can refund the orders right from their vendor dashboard or PayPal dashboard.
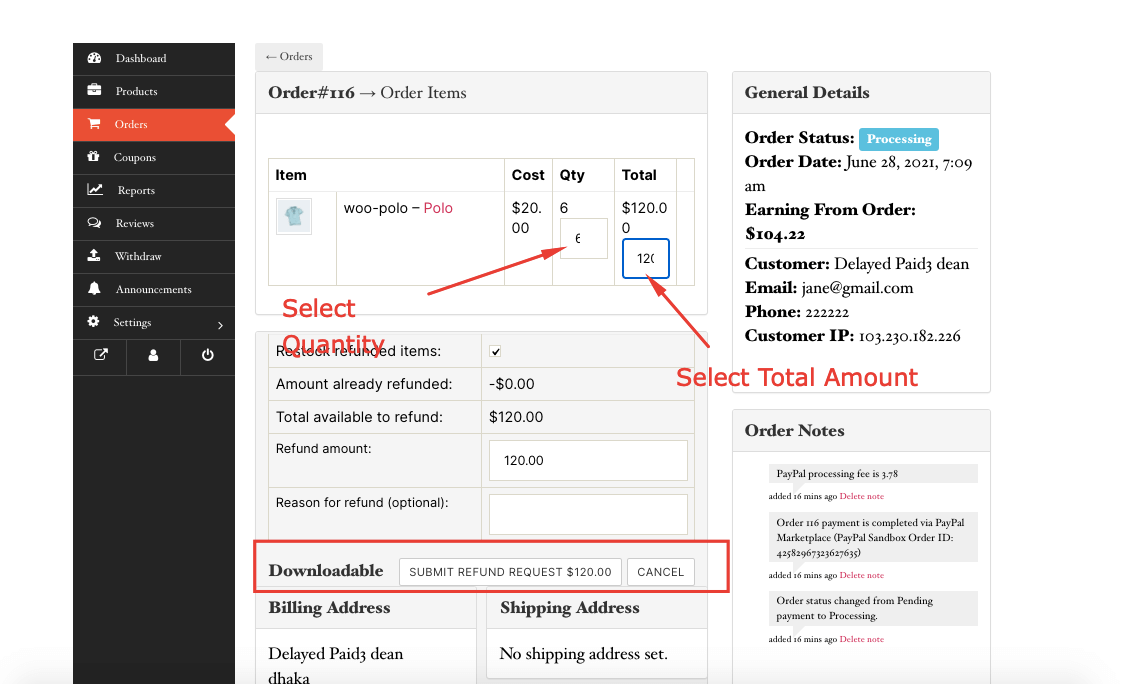
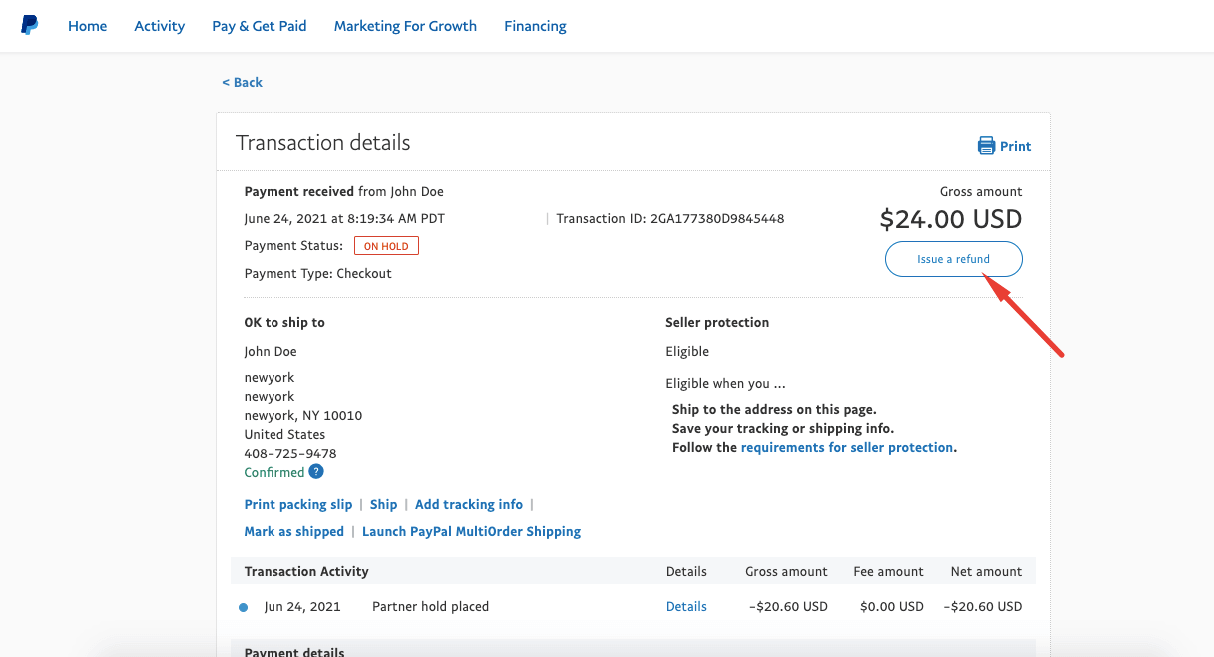
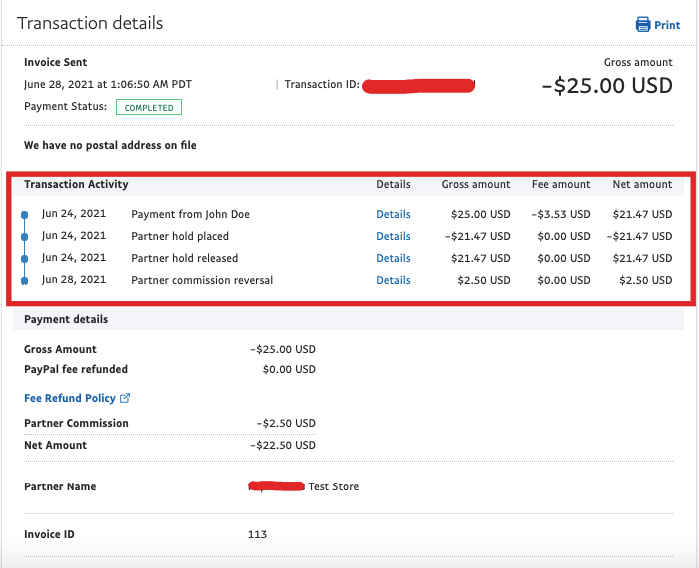
To refund orders from the Vendor Dashboard, choose an order from Vendor Dashboard–> Orders. Now, if there are multiple products, select the quantity and the amount you want to refund. Then, click on the Submit Refund Request button. Then the Refund will be complete. Or they can issue a refund from the PayPal dashboard. Choose an order from the PayPal dashboard and click on the Issue Refund button. You can see all the details in the PayPal dashboard or in the Orders section of the Vendor dashboard. Note:
Suppose a customer bought a product worth $100, after adding tax and shipping ($10+$10), the total amount is $120. The admin commission is 10%. Admin will receive $10 as the actual price of the product is $100. However, PayPal will assume that the admin’s commission is based on the $120. In the case of a partial refund, if the refund amount is $60, that means PayPal will also calculate the admin’s commission.
Although admin got commission only for the product price, for a partial refund, admin commission percentage will also be refunded.
In that case, the admin won’t have to pay any extra money in case of a partial refund. Admin percentage of Application fee/ Partner fee will be refunded, not more than that. Check PayPal documentation to learn more about how PayPal refund works for marketplace payment.
Note: We will be including this Module With Dokan Pro Business and Enterprise Plans only due to API restrictions from PayPal. We will include this module with all Dokan Pro packages in the near future.