Dokan Delivery Driver Plugin and Dokan Delivery Driver App help users deliver products more efficiently. Marketplace owners can configure this plugin and the app so that drivers can signup/login and accept delivery requests to perform the product delivery.
Also, vendors and admins can assign delivery drivers for particular orders or can assign a delivery driver to any store.
Here’s how the Dokan Delivery Driver plugin and Dokan Delivery Driver App work.
Pre-requisites
In order to use the delivery driver plugin, you need to install the,
- WooCommerce
- Dokan (For Multivendor Experience)
- Dokan Pro (for advanced features)
- The Delivery Driver app.
For the Delivery Driver App, the user needs to provide,
- Google Map API Key
- Pusher Notifications Integrations credentials (Onesignal/pusher beams)
Now let’s see the steps to configure the delivery driver app
Note: You need to activate the Geolocation Module of Dokan Pro. So the system will consider the driver’s location as the pickup location.
For the Dokan Lite version, the search radius will be according to the admin location as Geolocation Module and Shipment tracking is disabled.
Install and Activate the Delivery Driver Plugin (Admin)
In order to integrate the delivery driver app with your marketplace, you need to install the delivery driver plugin. The plugin is premium so you need to purchase it. The plugin will be provided in your weDevs account and the app will be built according to the plugin to connect with your marketplace.
After downloading the plugin, go to Plugins–> Add New. There click on the Upload Plugin button to upload the plugin.
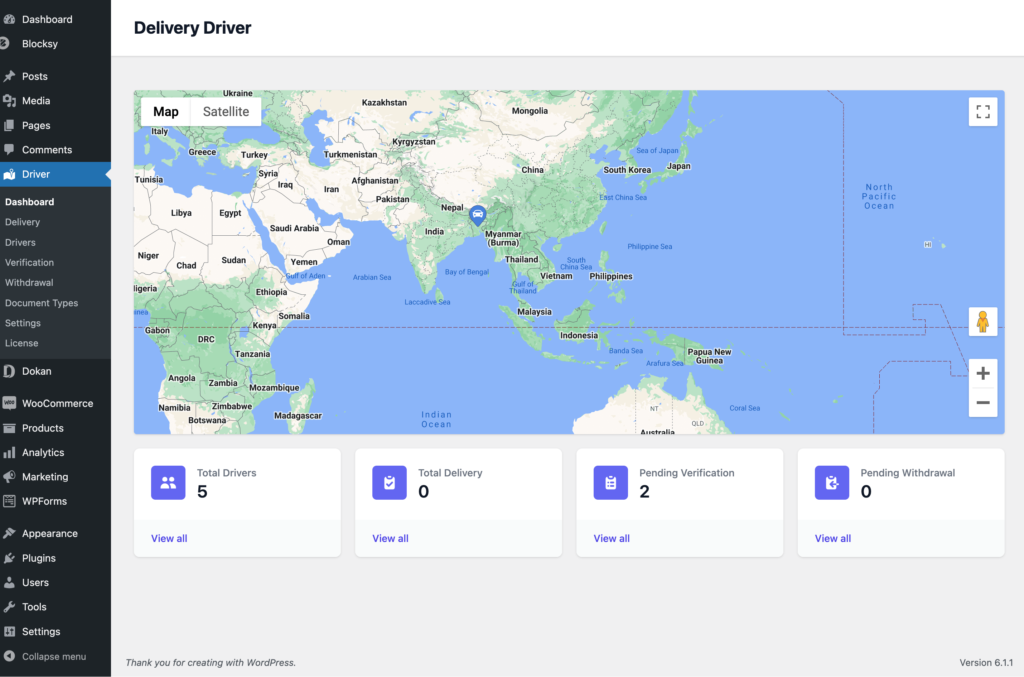
If you go to the Driver–> Dashboard, you will see the dashboard. You will be able to see your (the admin) location and the drivers location in the dashboard. This is a default feature of the Dokan Delivery Driver plugin.
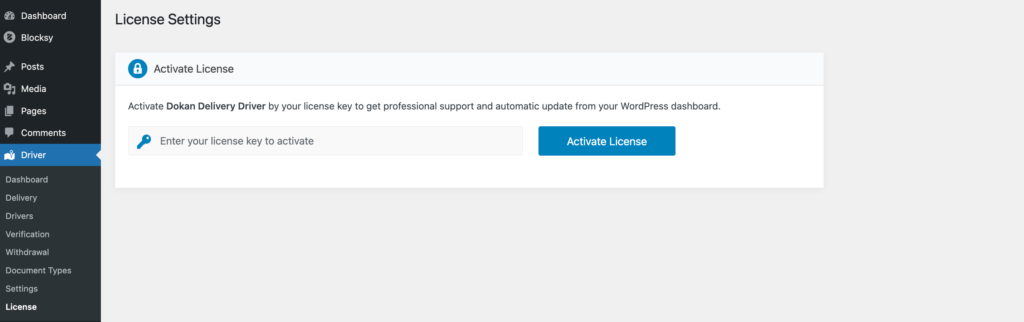
Then go to Driver–> License and enter the license key to activate the plugin.
Configure the Delivery Driver Plugin Settings (Admin)
Now, after installing the plugin, you need to configure the settings. Go to Driver–> Settings to find all the settings options.
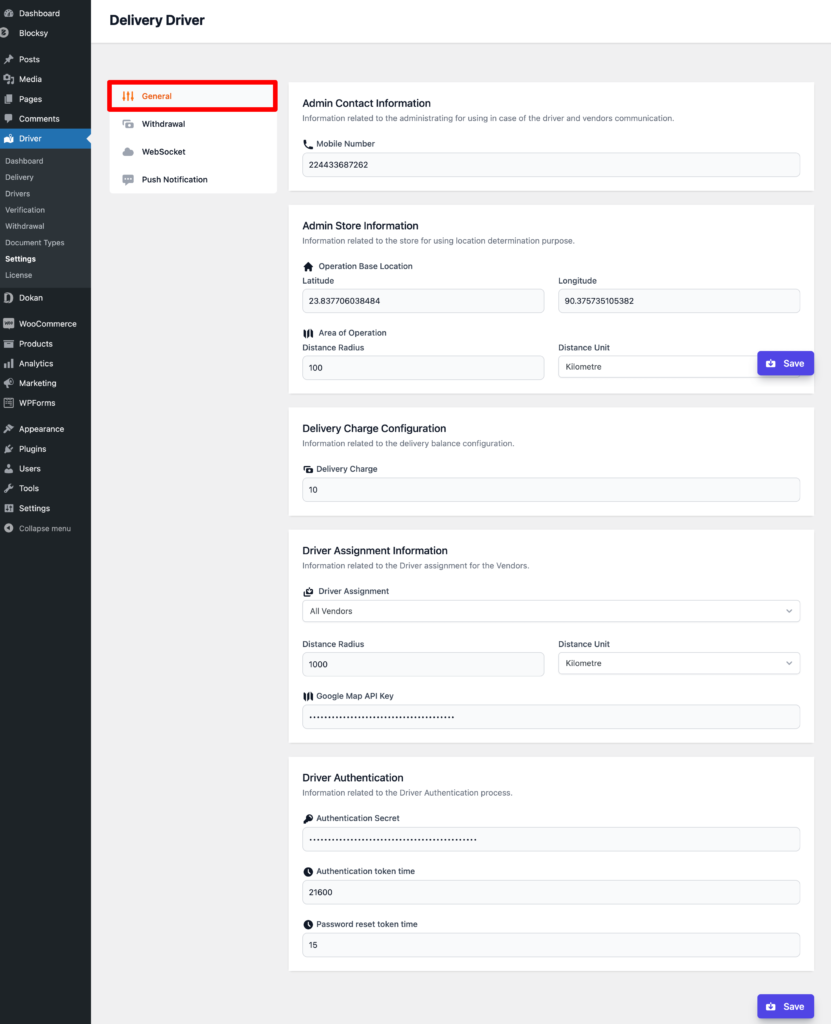
General Settings
In Driver–>Settings–>General, you will find the basic settings of your plugin.
Like,
Admin Contact Information: Here you need to put the admin mobile number in case the vendor to driver wants to get in touch with you.
Admin Store Information: You need to add the location of your store to determine your delivery area and where you want to deliver. You need to add,
- Latitude
- Longitude
- Distance Radius
- Distance Unit (you can choose from Kilometres, Feet, Mile, and Metre)
Follow this link to know how to find your location.
Delivery Charge Configuration: Determine the per-order delivery charge for delivery drivers.
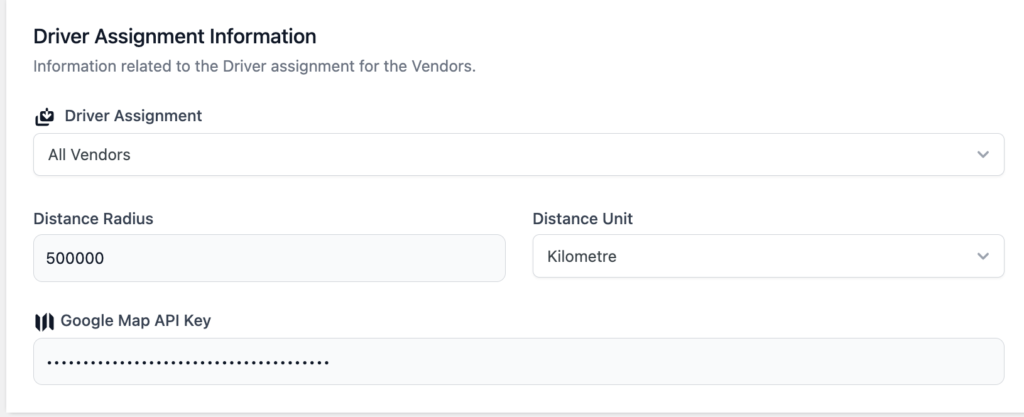
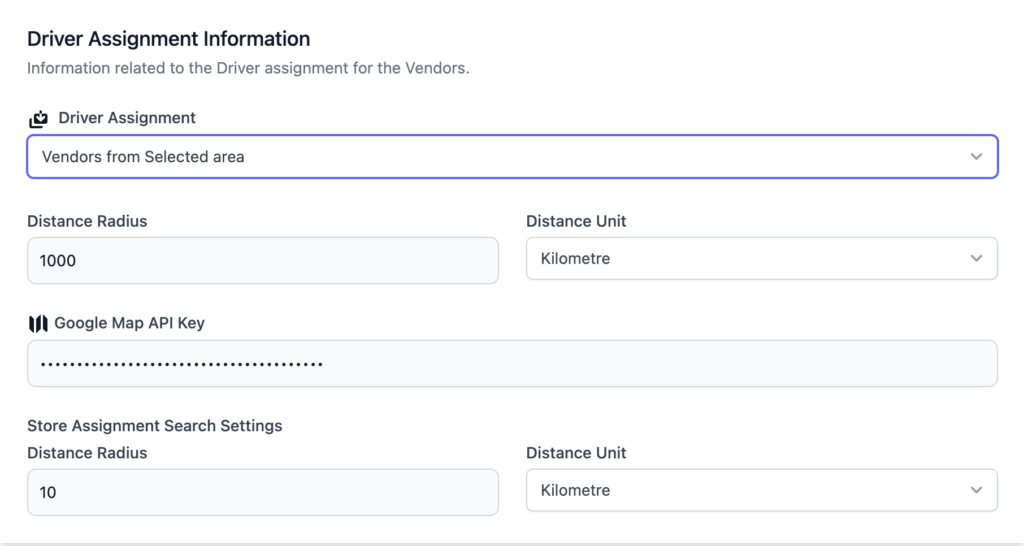
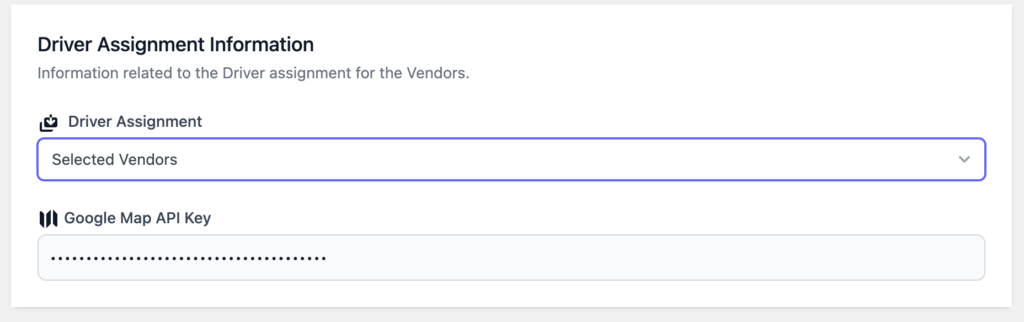
Driver Assignment Information: You can assign the delivery drivers for,
- All Vendors: Here the delivery driver assignment will be automatic. Whenever there is an order placed, based on the distance, the drivers will be assigned automatically. However, vendors and admins can still assign a driver manually for every order.
- Vendors from Selected Areas: This option will allow you to select drivers based on the vendor’s distance.
- Selected Vendors: You can select a particular driver for a particular store. You don’t have to worry about the distance or anything else. The driver will only receive notifications from your selected vendors.
- Driver Authentication: You need to write the Authentication Secret key, the Authentication token time, and also the Password reset time.
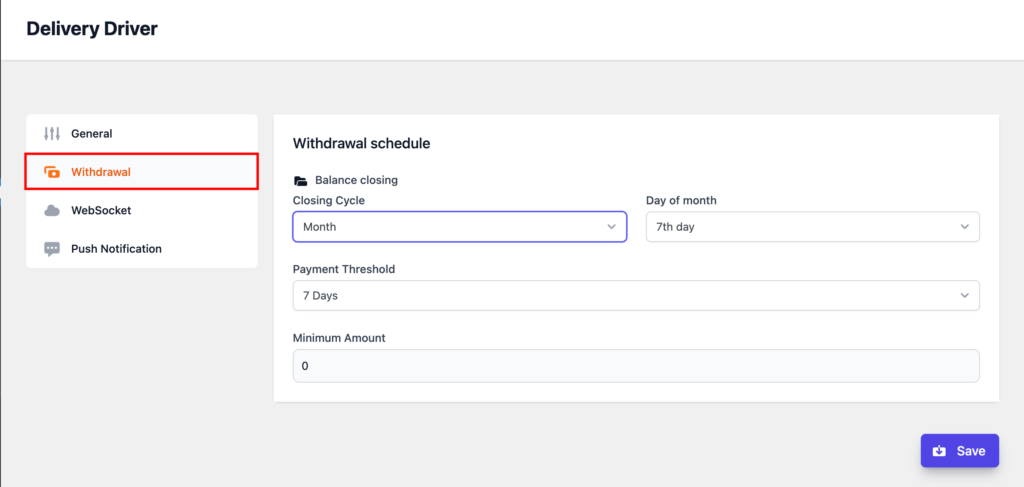
Withdrawal
In the Driver–> Settings–> Withdrawal, you can set the withdrawal time and minimum withdrawal amount for the drivers. You need to choose the closing cycle like monthly,
Or weekly,
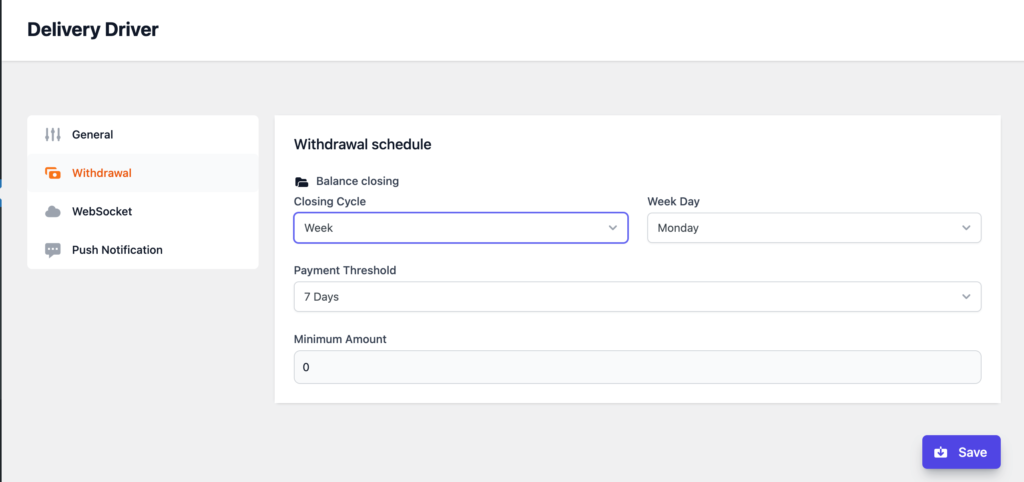
You need to set the payment threshold as well.
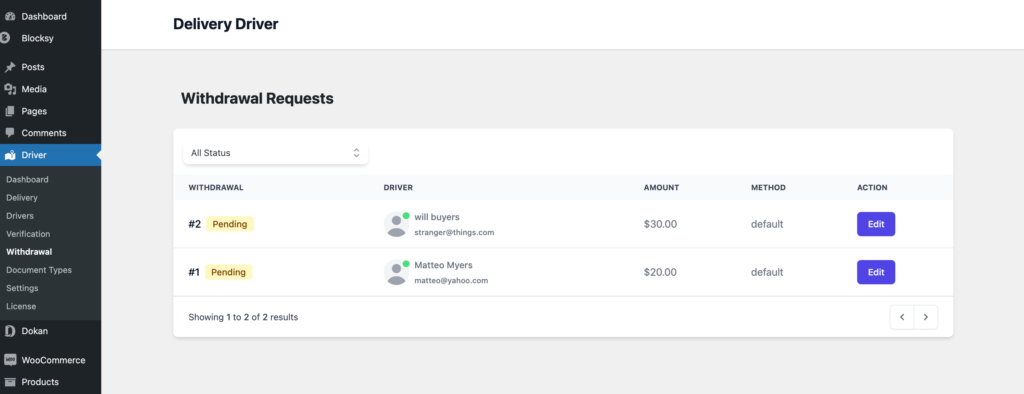
Note: If a withdrawal request is already created, then without clearing the previous withdrawal request, a new withdrawal request will not be created.
You will see the withdrawal requests in the Driver–> Withdrawal section.
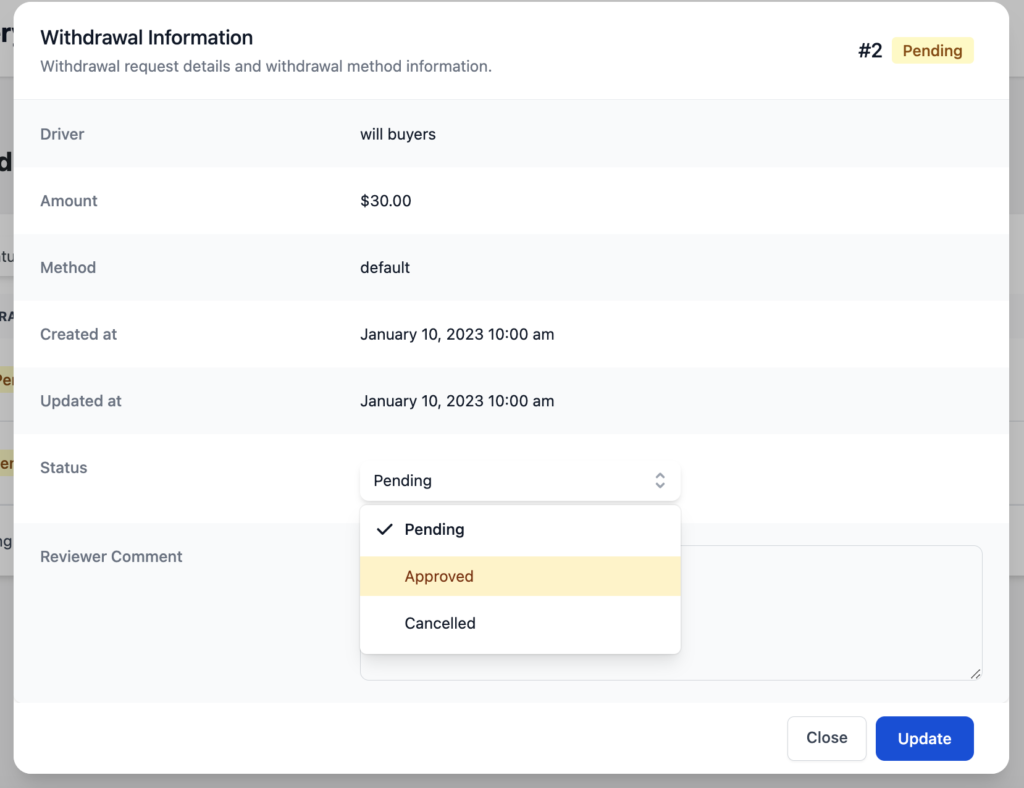
You can approve the withdrawal request by clicking the Edit button,
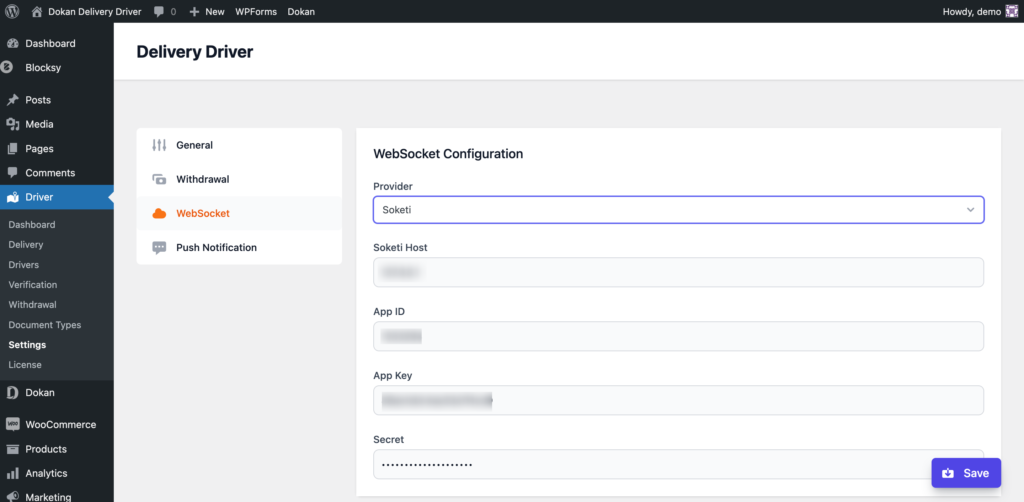
WebSocket Configuration
There are two ways to configure this section. You can use either Pusher,
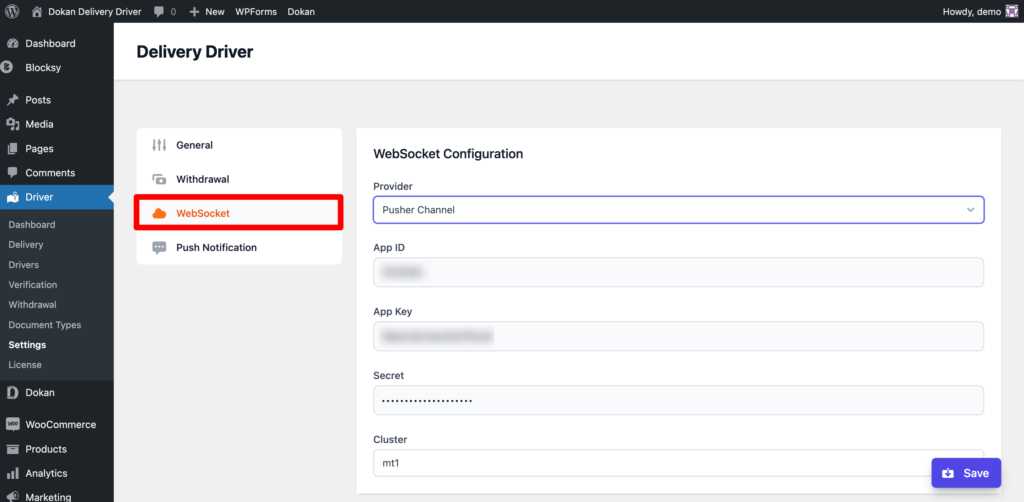
You can learn how to get Pusher App ID and Secret Key from this documentation.
Or you can use Soketi,
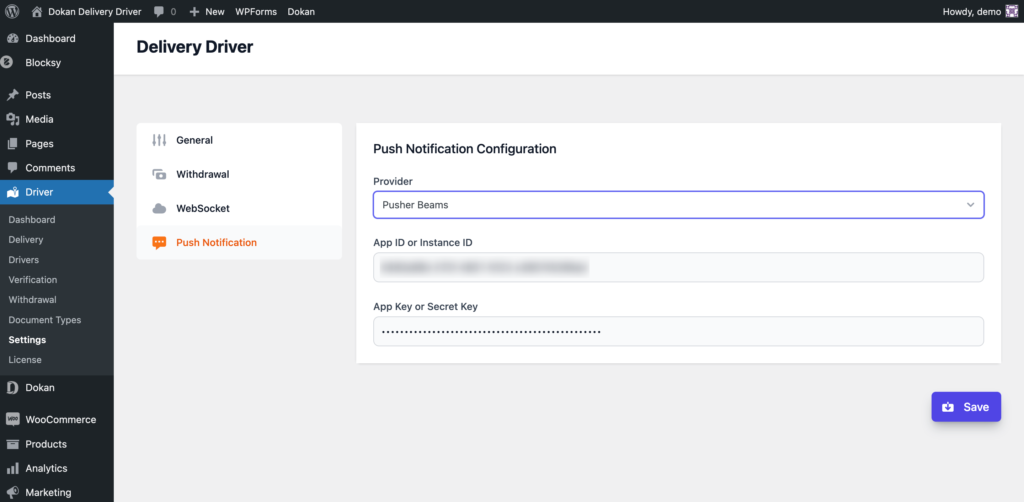
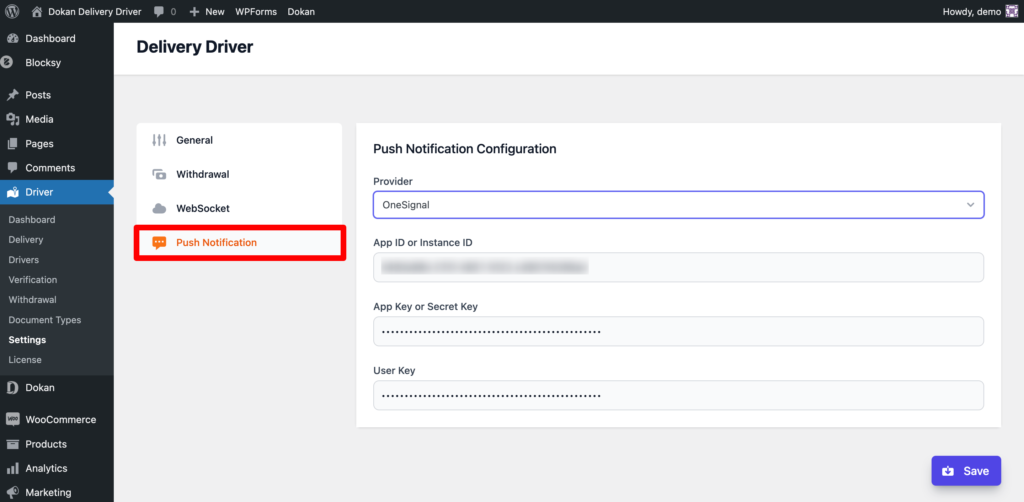
Push Notification
In order for drivers to receive real-time notifications in their app, you need to configure the push notifications. There are two types of integrations. You can use either Pusher Beams,
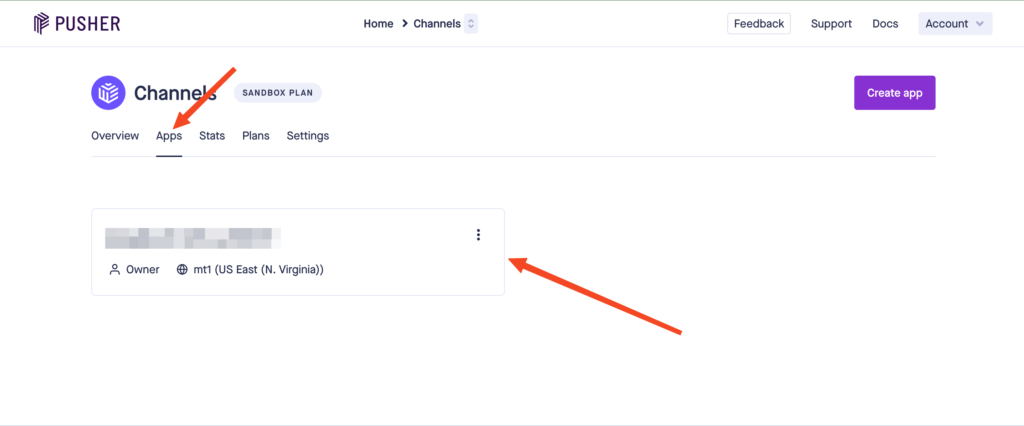
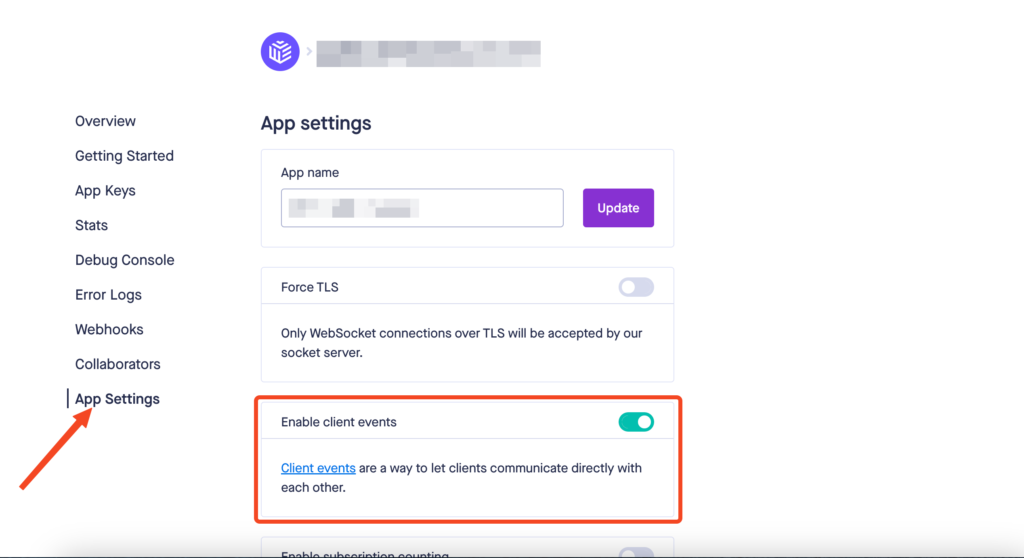
In order to send live notifications to Delivery drivers through Puhser, you need to enable the client event settings.
Login to your pusher account and click on your App name,
Then, go to App Settings and enable the Client Event option,
Or you can use One Signal.
Adding a New Document Type and Verification (Admin)
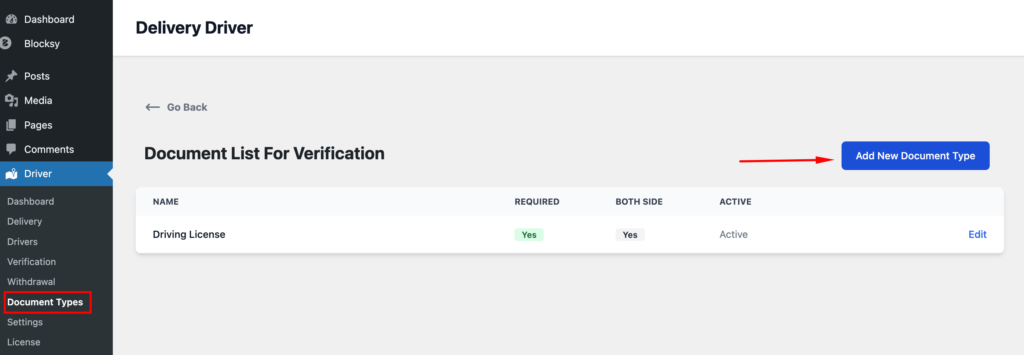
In order to verify the driver, you can add a document type like a driver’s License, National ID Card, or any other documents.
In order to add a document type, go to Driver–> Document Types. There click on the Add New Document type button.
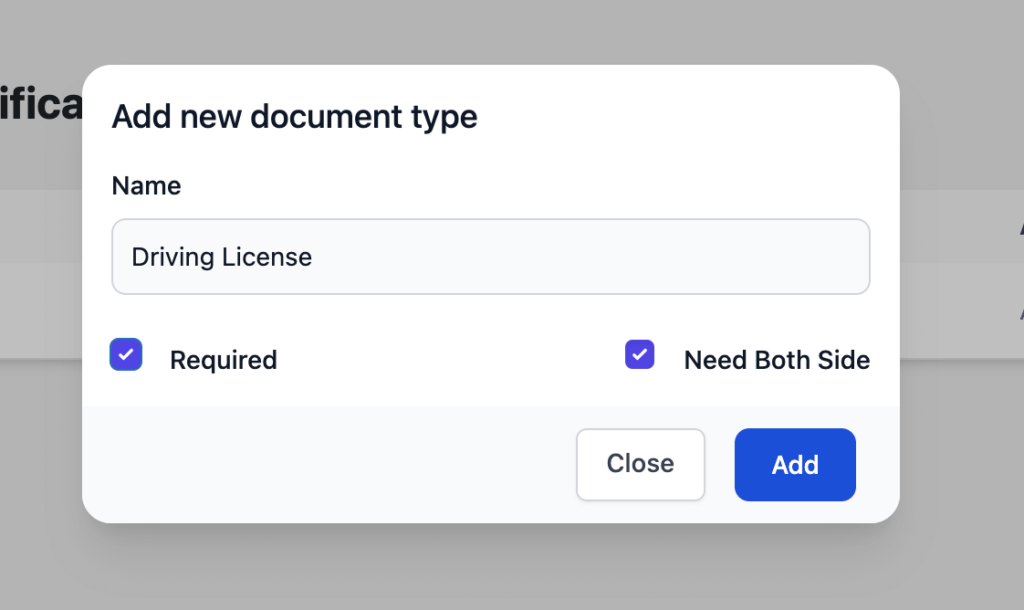
You will get a pop-up and there you need to write type of document, make it required if you want and also if you want you can verify both sides. Click on the Add button to finish.
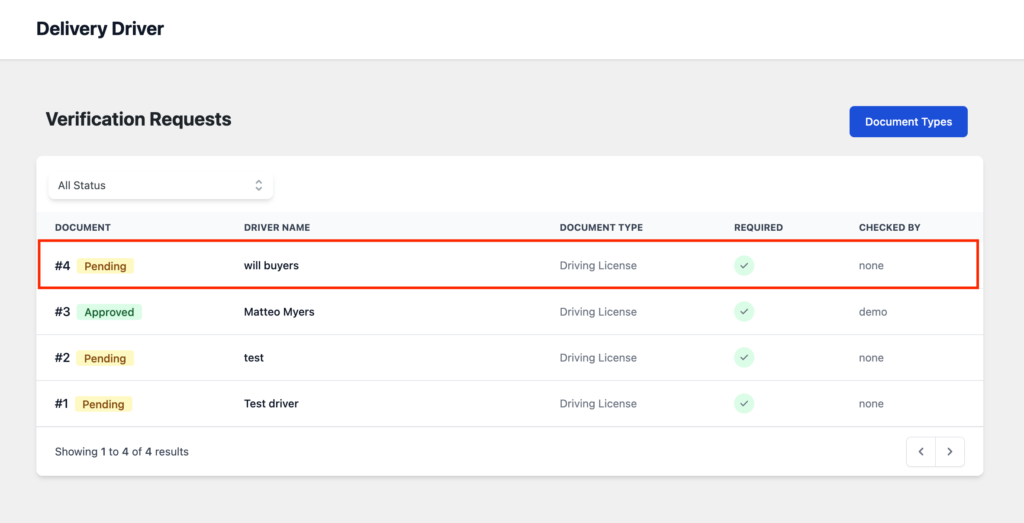
Document Verification
When a driver uploads the documentation, the admin needs to verify those documents. To do that, go to Driver–> Verification. You will see all the documents that have been uploaded.
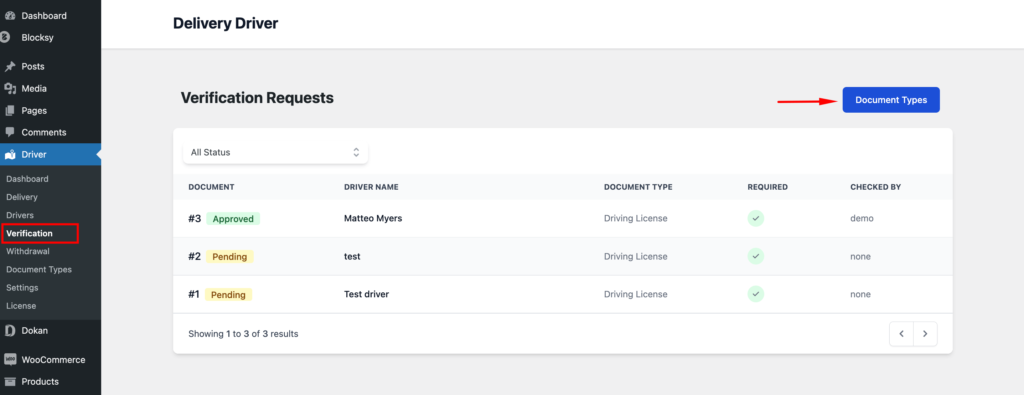
This part has a filter section so that you can filter the documents by their statuses.
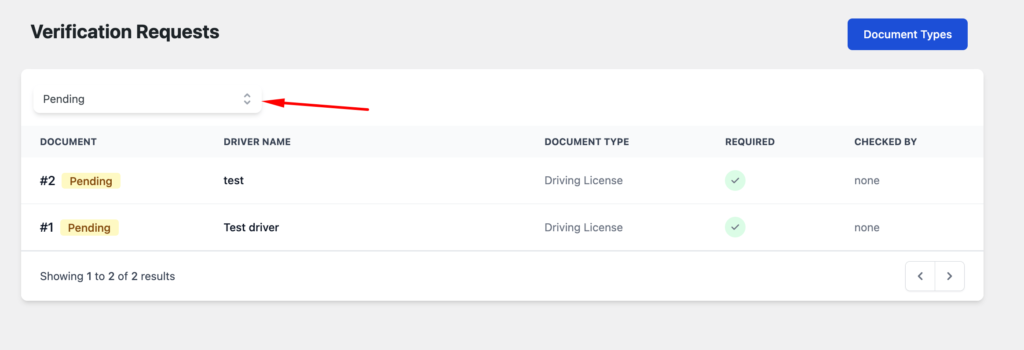
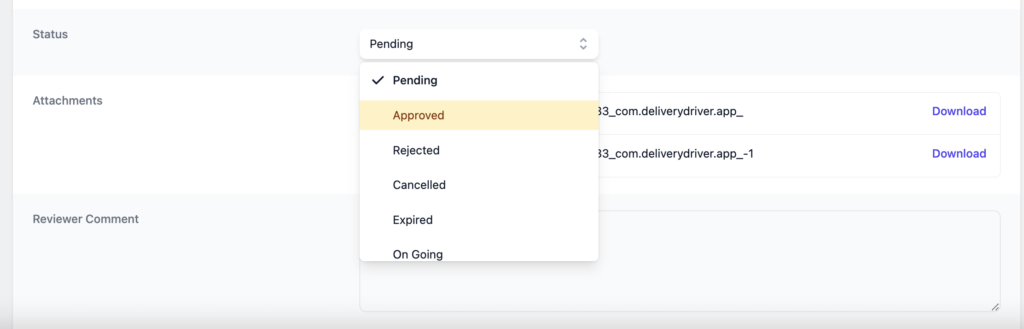
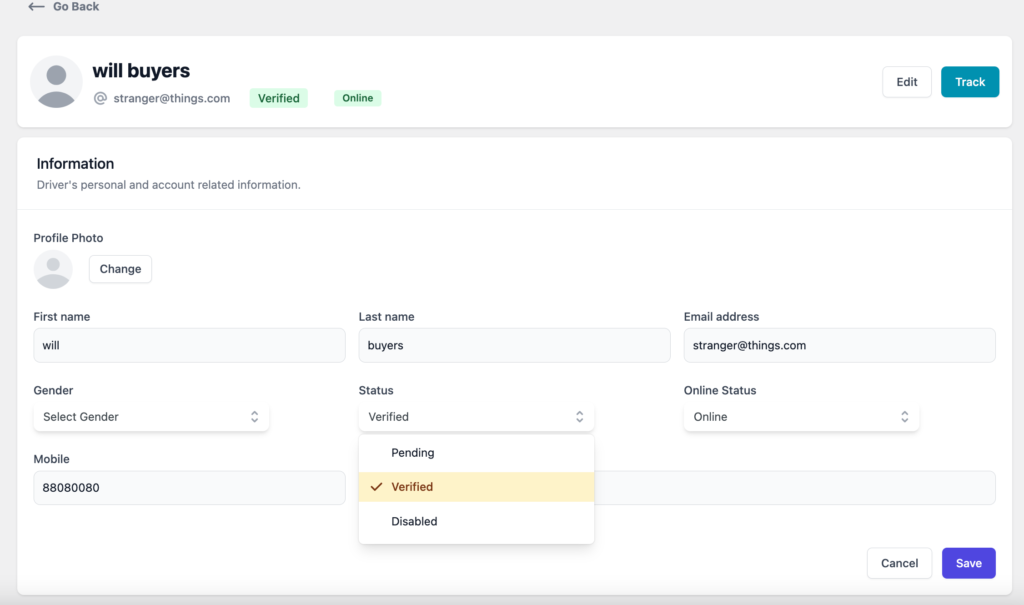
You can verify a document by clicking on the document. There you will be able to download the documents and review them.
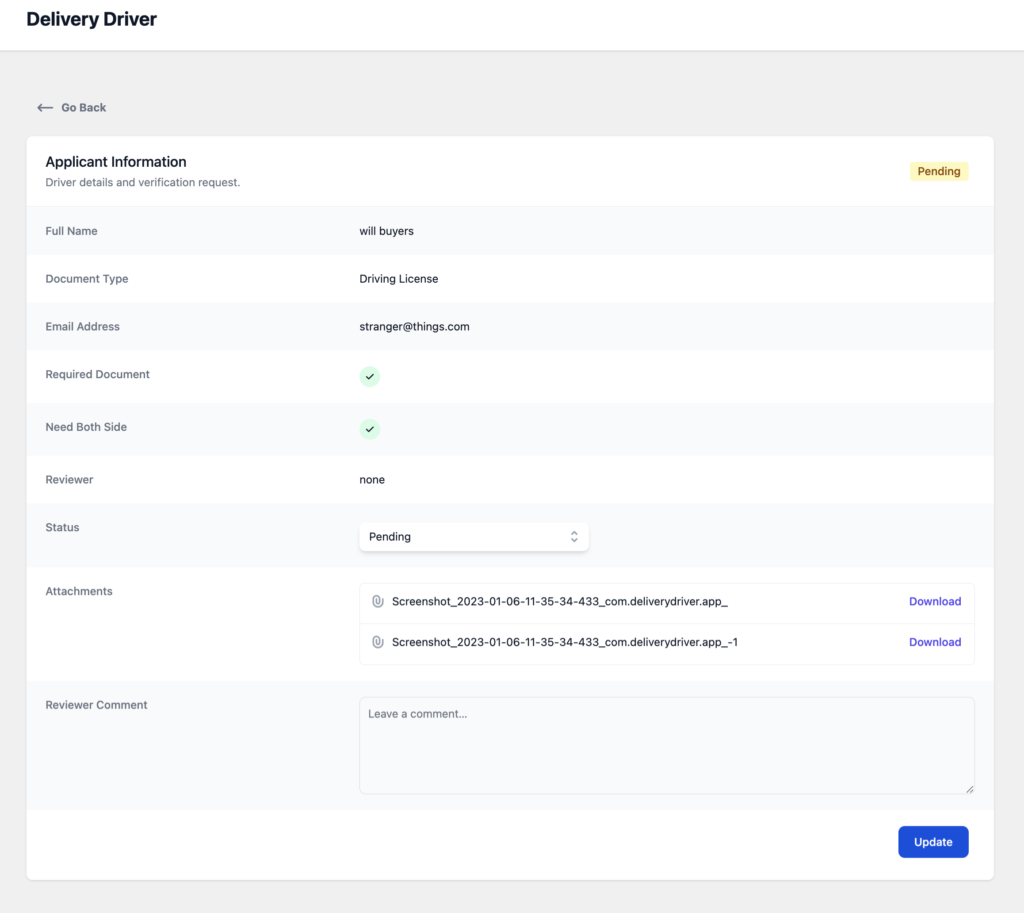
if you are satisfied, then you need to change the status to approved. If you approve the documentation then the driver will be approved as well.
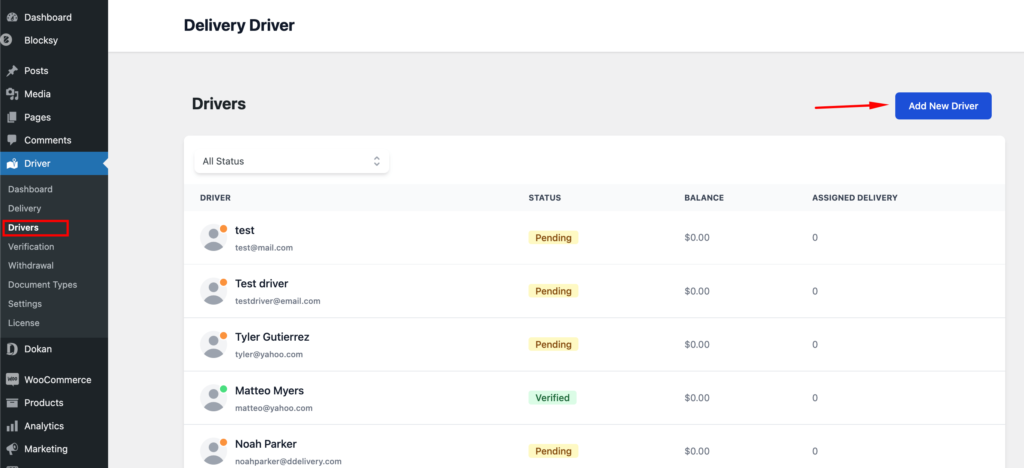
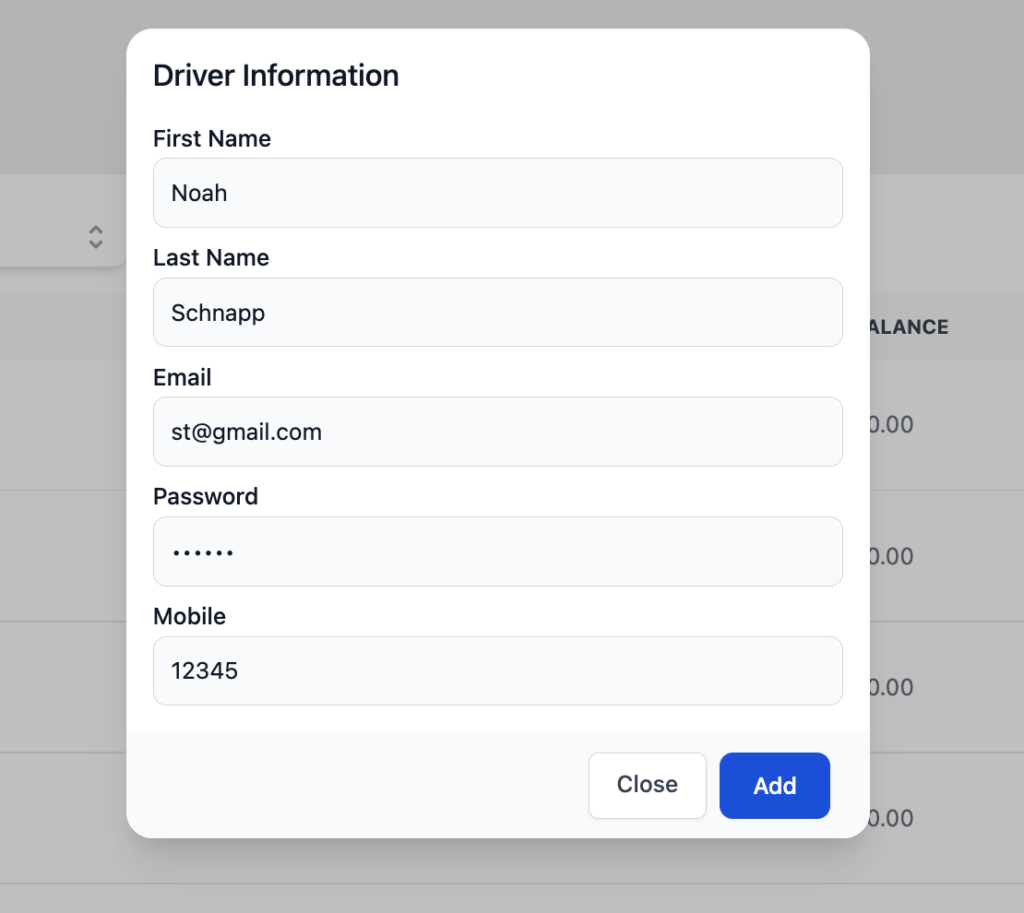
Adding a New Driver Manually (admin)
If an admin wants he/she can add a driver from the backend or admin dashboard. To do that, go to Driver–> Drivers. Click on the Add New Driver button.
You will get a pop-up where you need to add the driver details,
After adding the driver, you can see the driver’s details by clicking on the driver’s name.
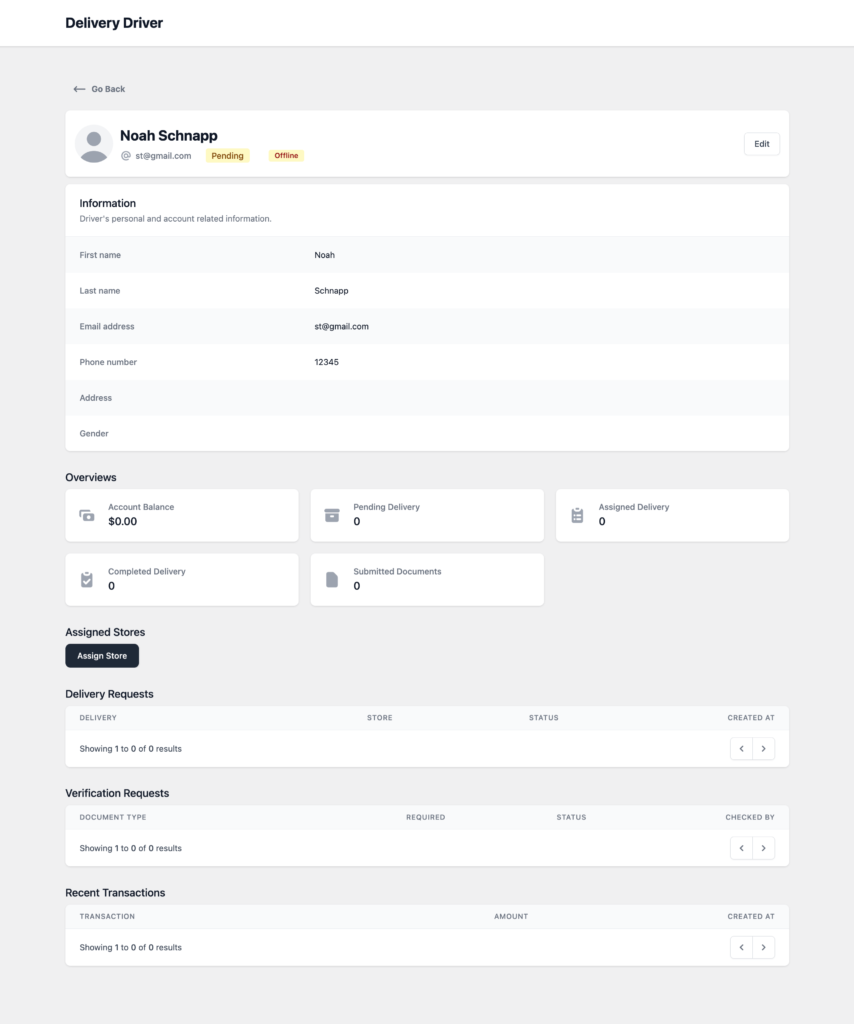
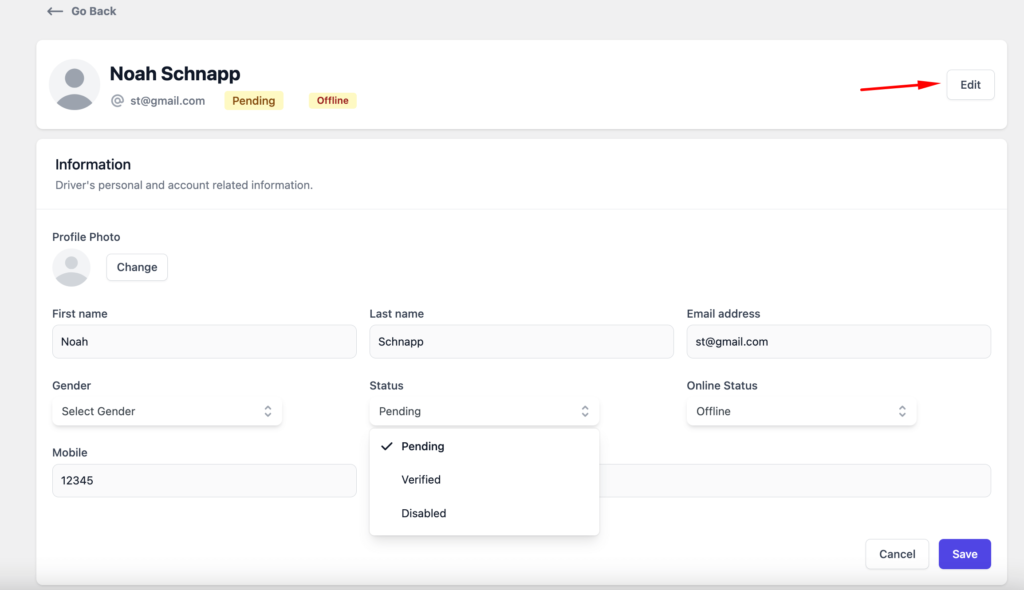
Also, you can edit the driver details by clicking the Edit button. Hit the save button to save your changes.
Driver Tracking
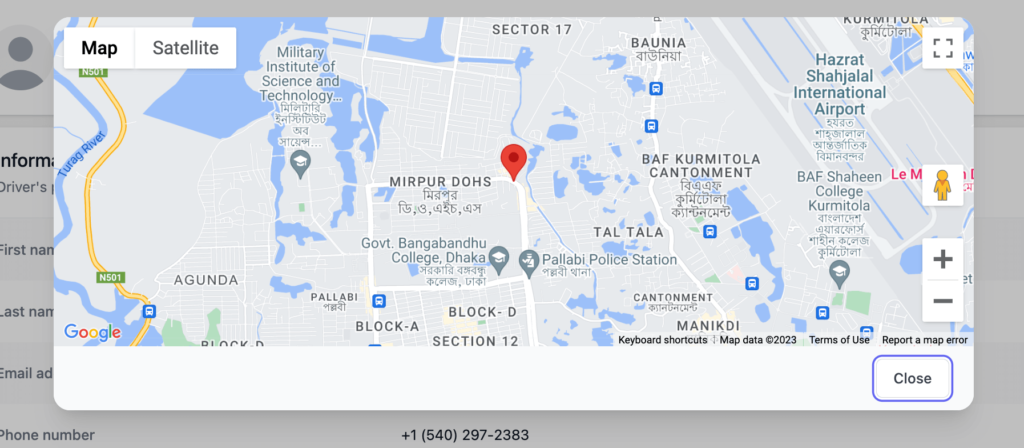
Admin can also track the driver and see their whereabouts. Click on the Track button from the top right-hand corner.
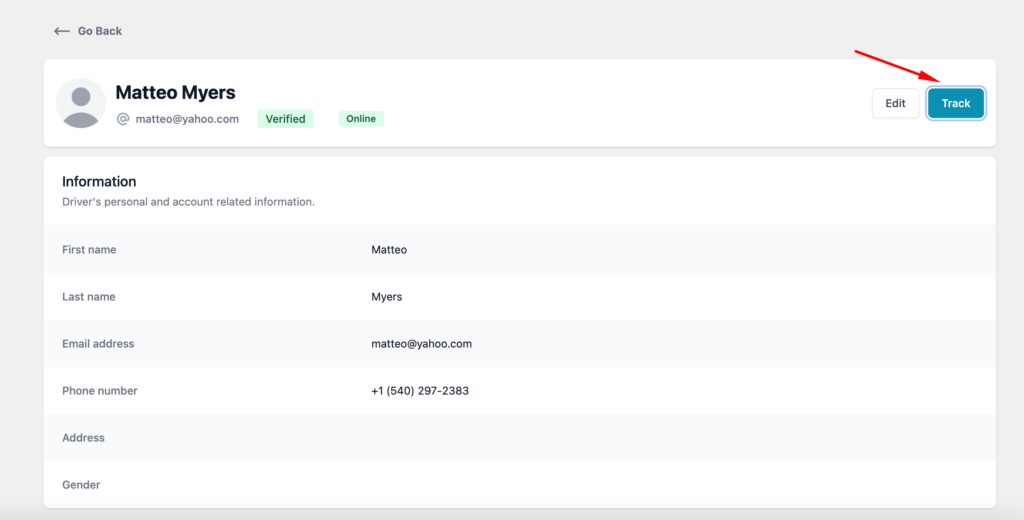
Then the admin will see the location on the map.
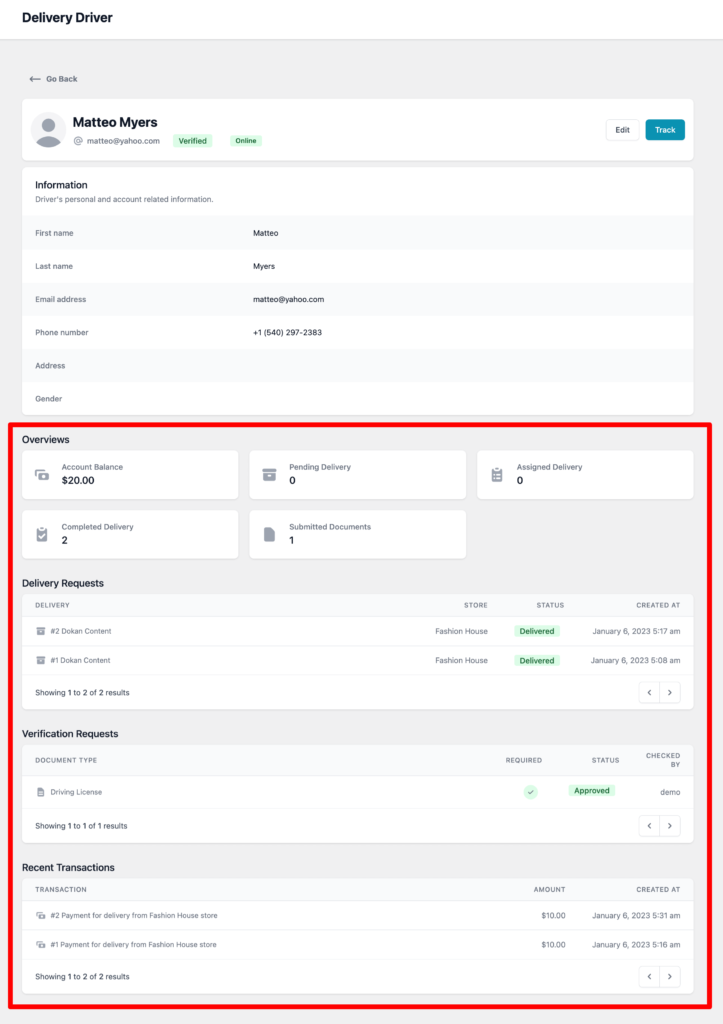
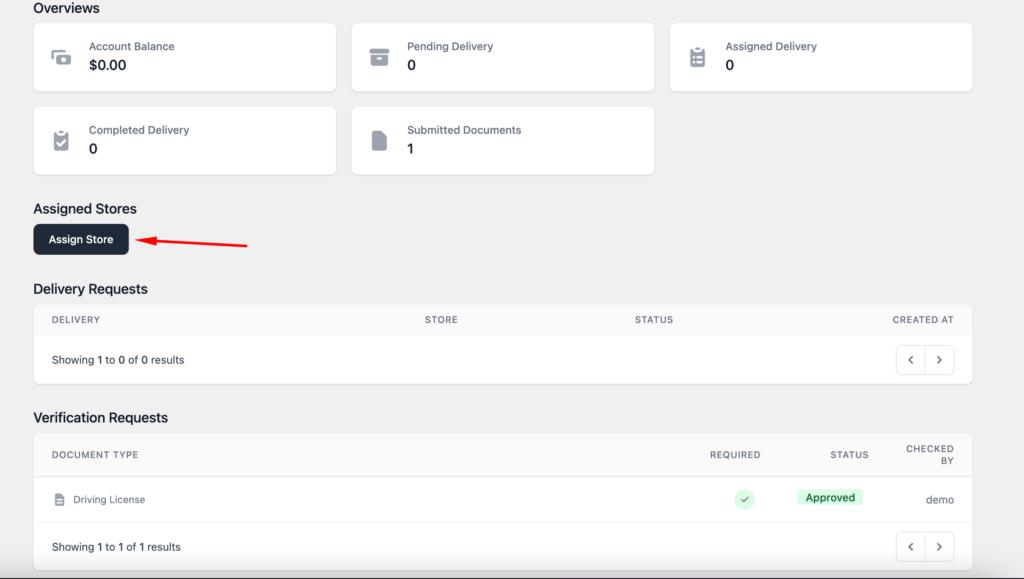
Driver Transaction Details (admin)
If you click on any driver from Driver–> Drivers, you will be able to see the transaction details as well like driver summary, delivery requests, verification requests, recent transactions.
How the Delivery Driver Plugin Works With Only WooCommerce
The Delivery Driver plugin works with only WooCommerce as well. In that case, the delivery request will be created automatically. The driver will be assigned based on the driver’s location and store base operation, automatically for the order. You can find the details in WooCommerce –> Order–> Selected Order.
But the admin can also manually assign a driver for the order from here.
How the Delivery Driver Plugin Works With Dokan and Dokan Pro
Now let’s see how the Delivery Driver Plugin works with Dokan and Dokan Pro.
Driver Assignment for All Vendors (Admin)
The assignment will be automatic. Whenever there is an order placed, based on the distance, the drivers will be assigned automatically. However, vendors and admins can still assign a driver manually for every order.
Driver Assignment for Vendors from Selected Areas (Admin)
This setting will allow you to select drivers based on the vendor’s distance. This will work in Dokan pro with the Geolocation module enabled.
You need to determine your distance radius. That means delivery drives will be assigned to the Vendors in that distance radius. Also, if you want you can manually assign vendors. Before that, you need to determine your search radius.
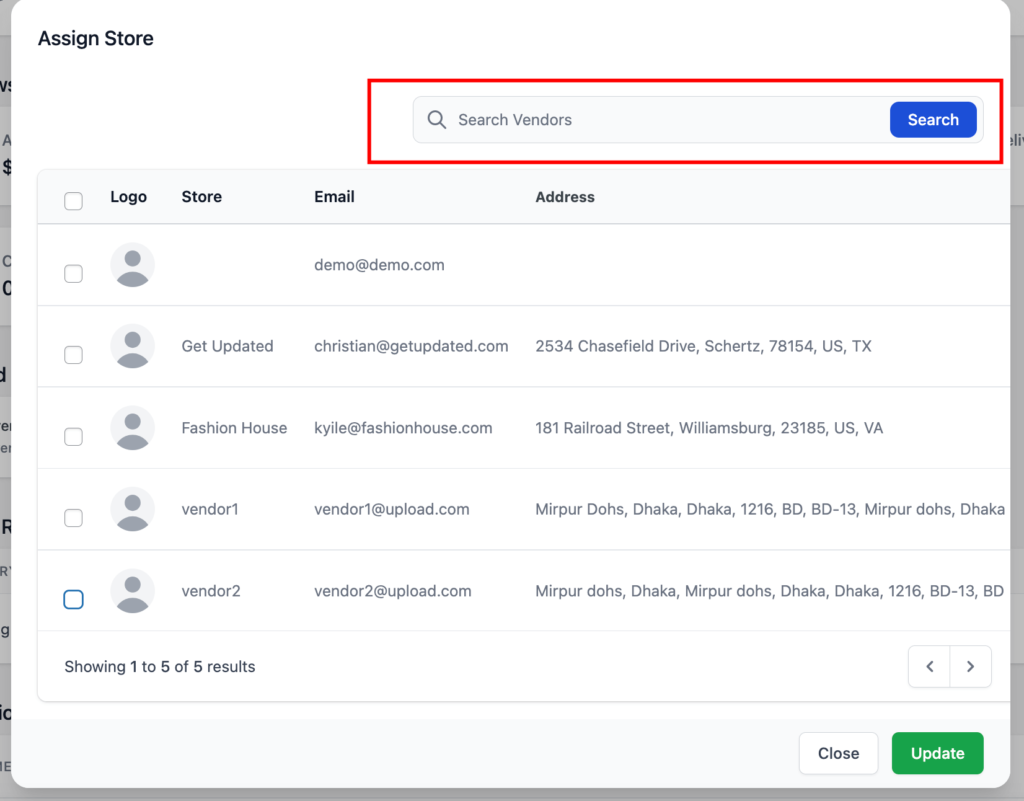
In order to assign drivers for the selected area, go to Driver–> Drivers and click on a driver you want to assign. Then scroll down and you will find the Assign Store option. Click on it.
Then you will get a pop-up and there you can search by address based on your Search Settings Distance Radius. (only the address based on your search settings distance radius will appear).
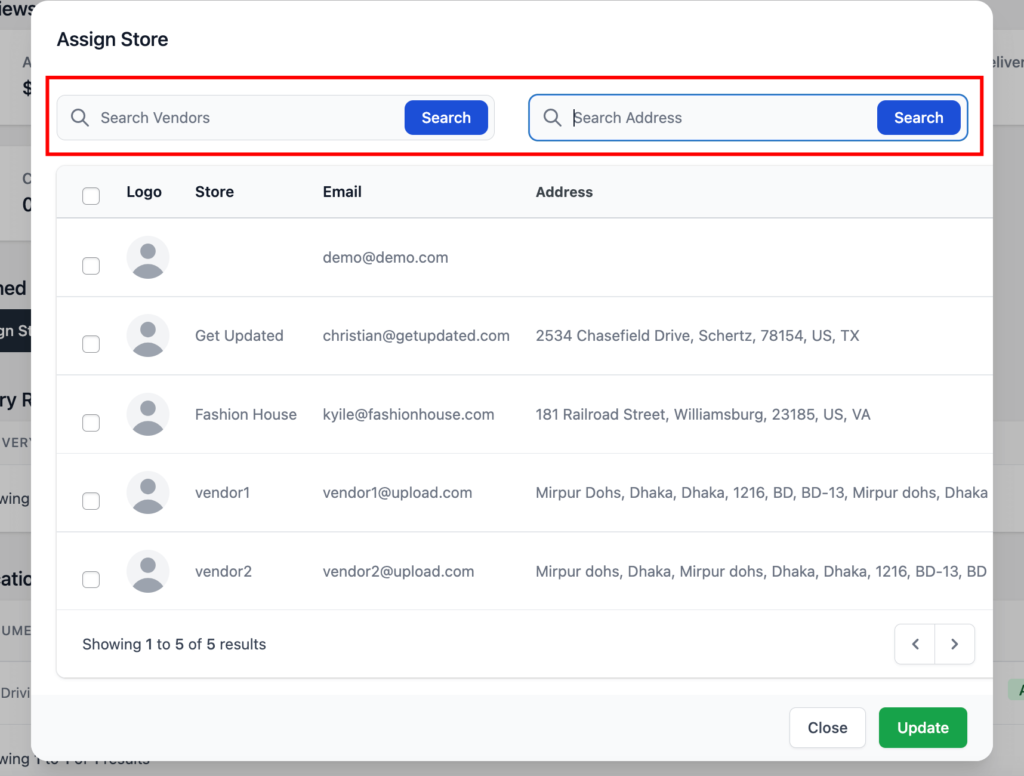
The address you will type, the vendor store will appear according to the distance. If you write Railroad street and set the search distance radius at 10 km, then vendors in the 10 km area of railroad street will appear.
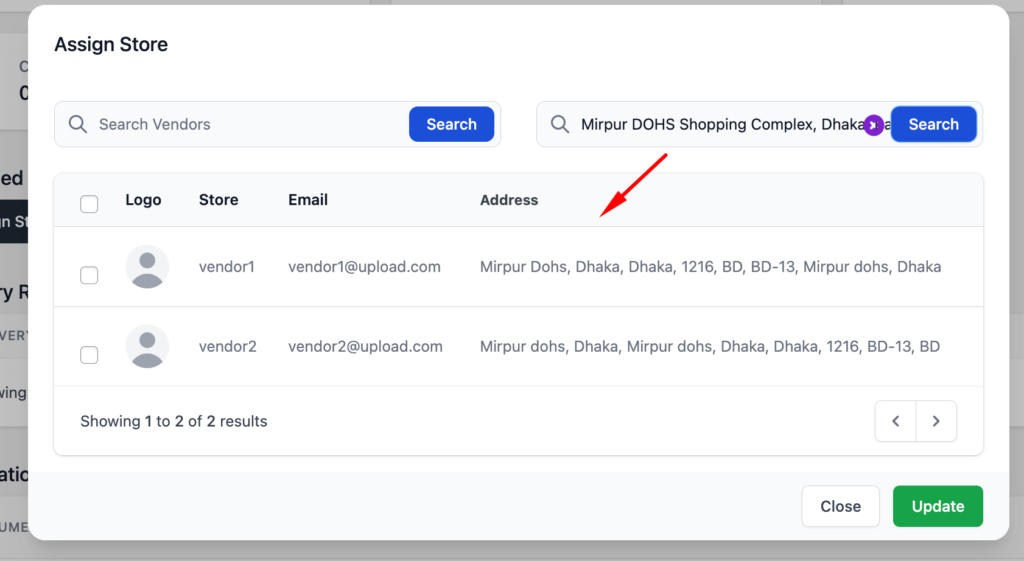
You can select the vendor stores to assign them to the delivery driver. Here’s how it will look.

Driver Assignment for Selected Vendors (Admin)
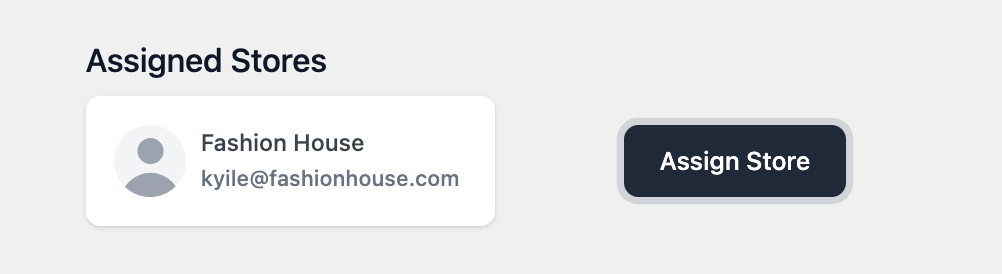
In order to select a particular driver for a particular store. You don’t have to worry about the distance or anything else. The driver will only receive notifications from your selected vendors.
If only one driver is selected for one vendor, then the driver will be automatically assigned.
In the driver section, you will be able to search for vendors in the pop-up.
Then you can assign vendor/vendors store for that driver.
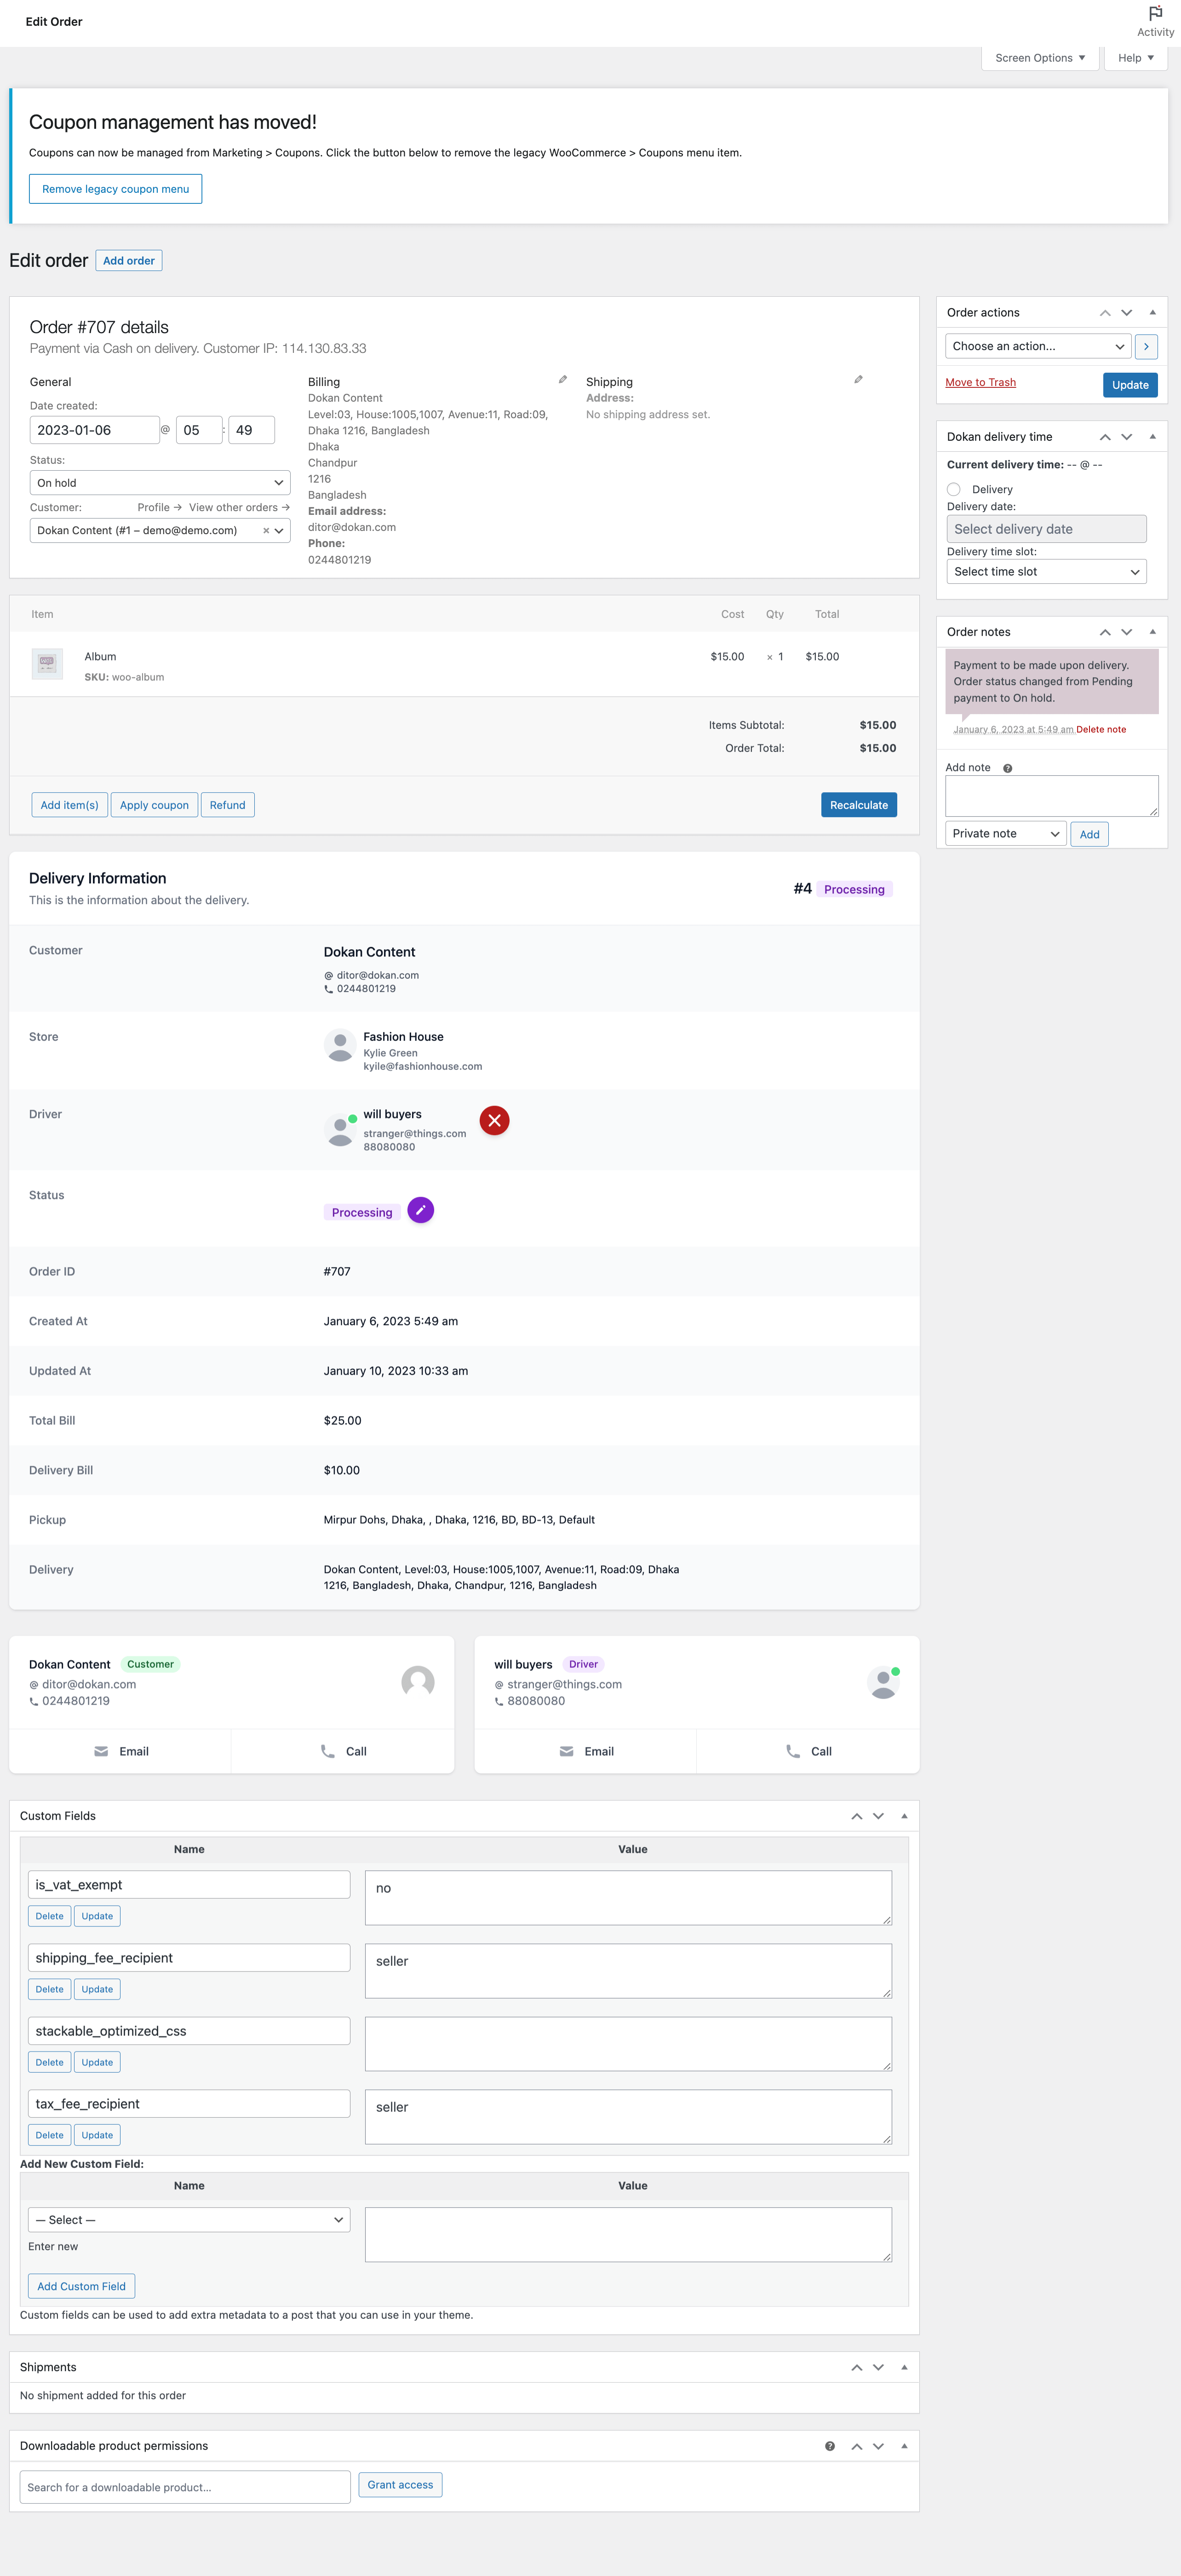
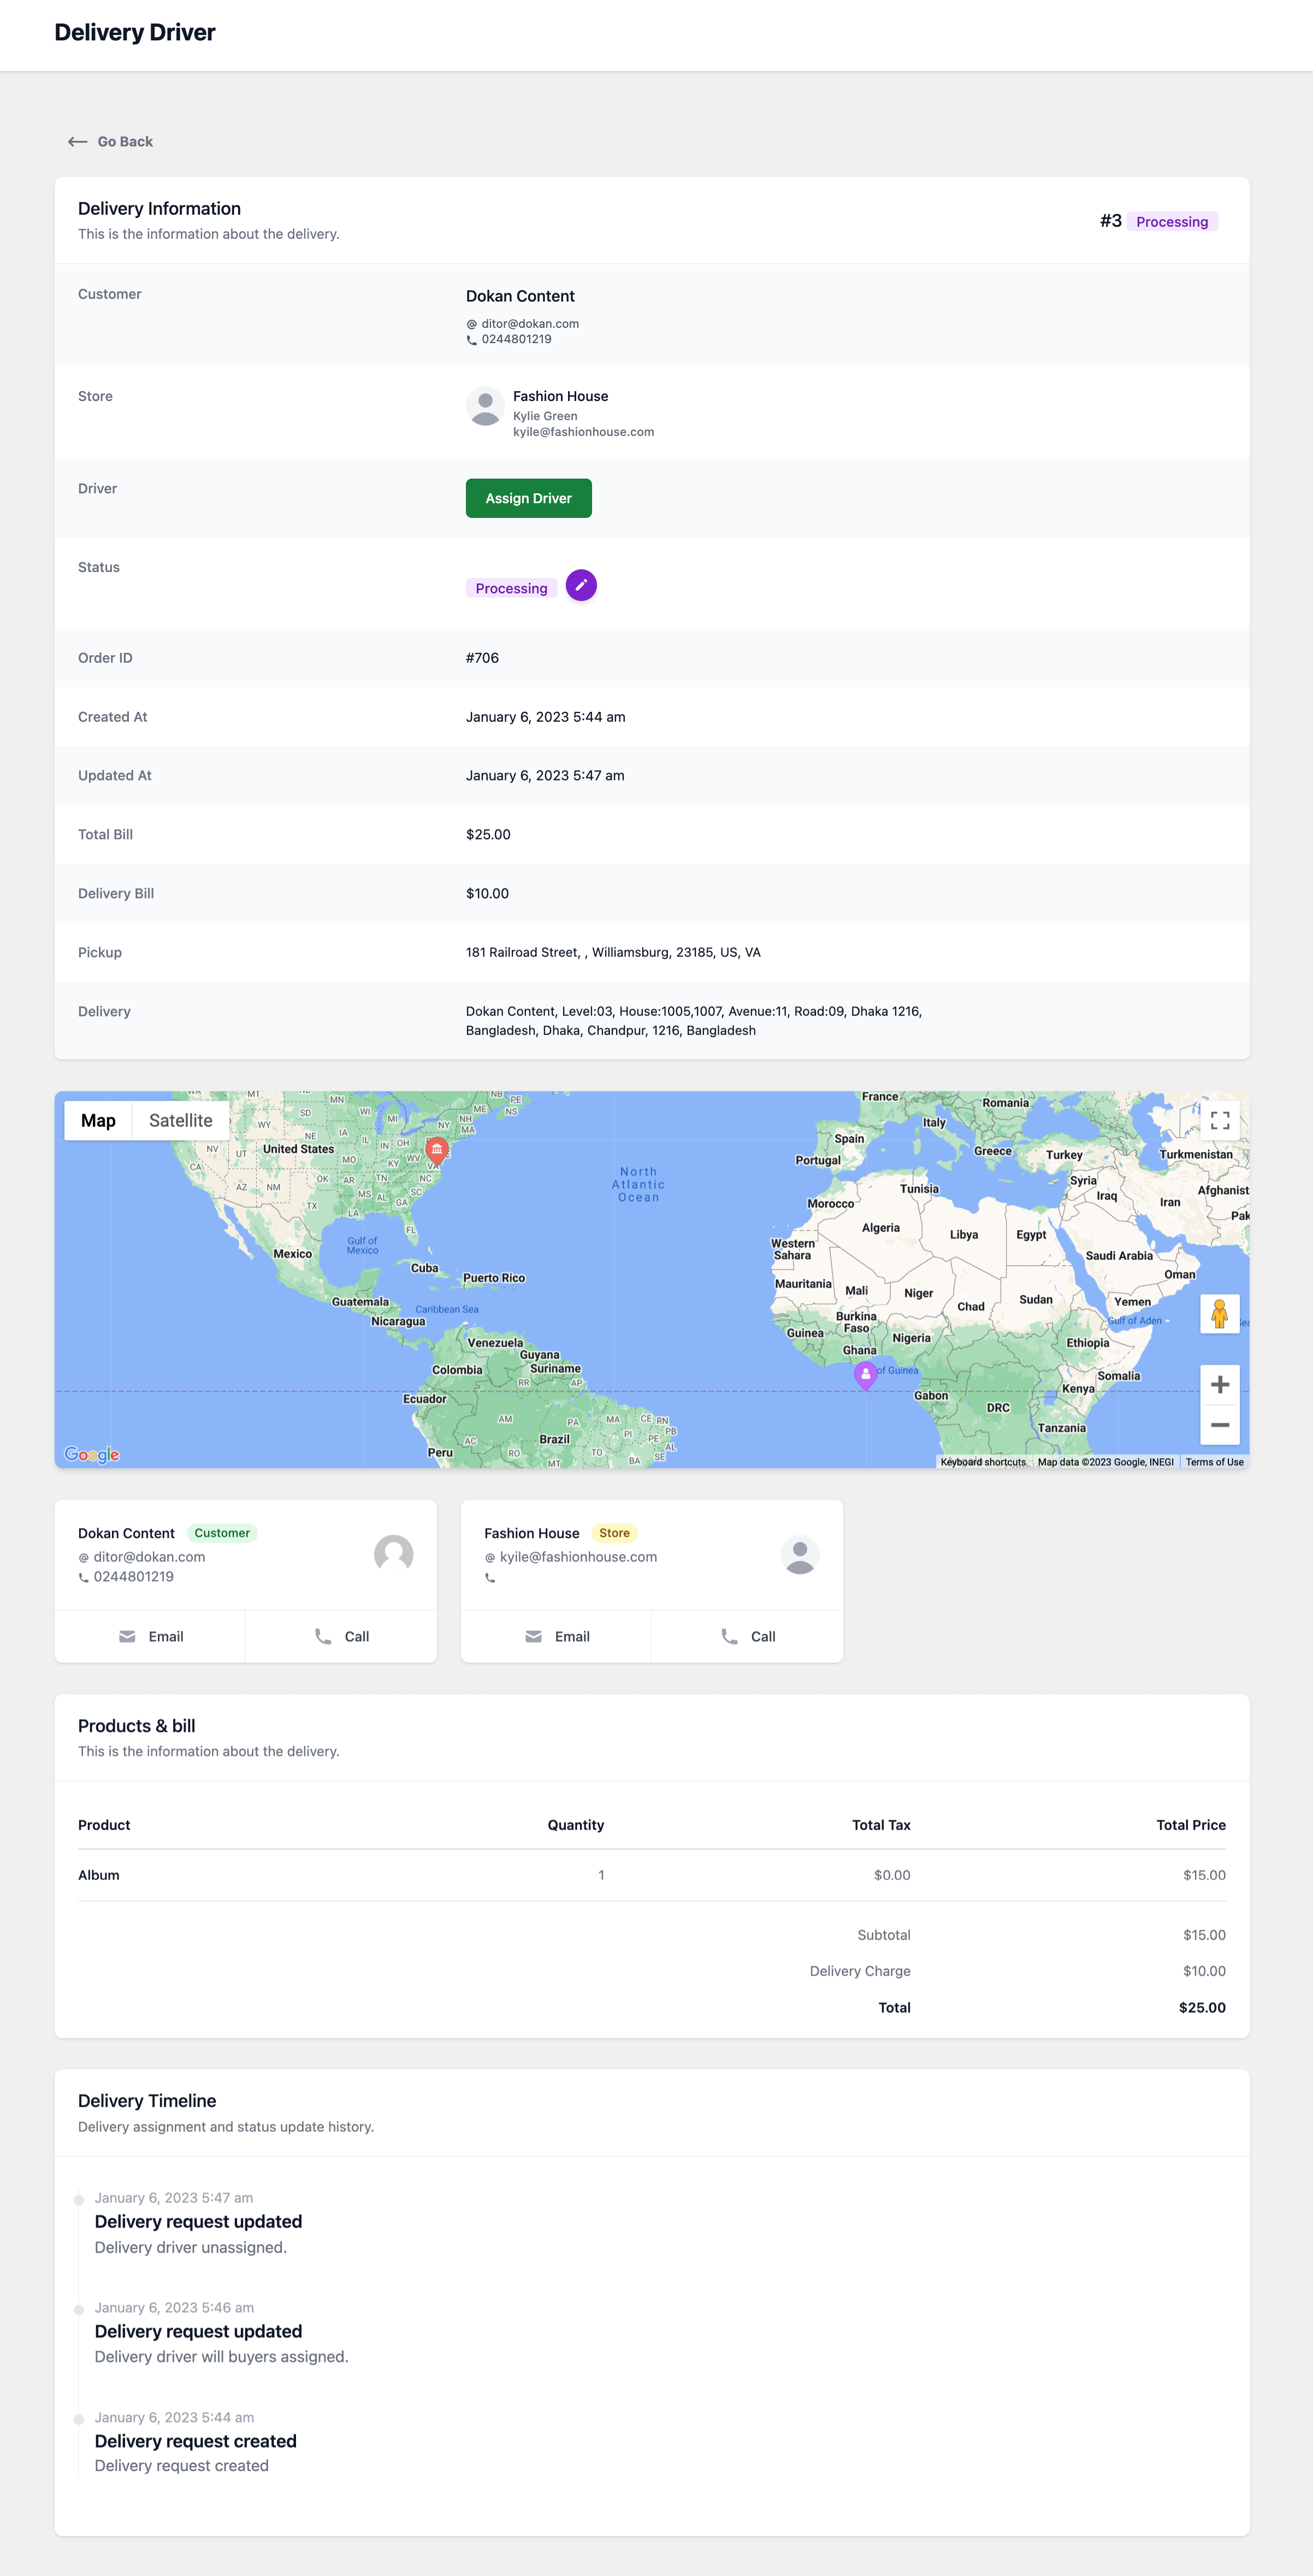
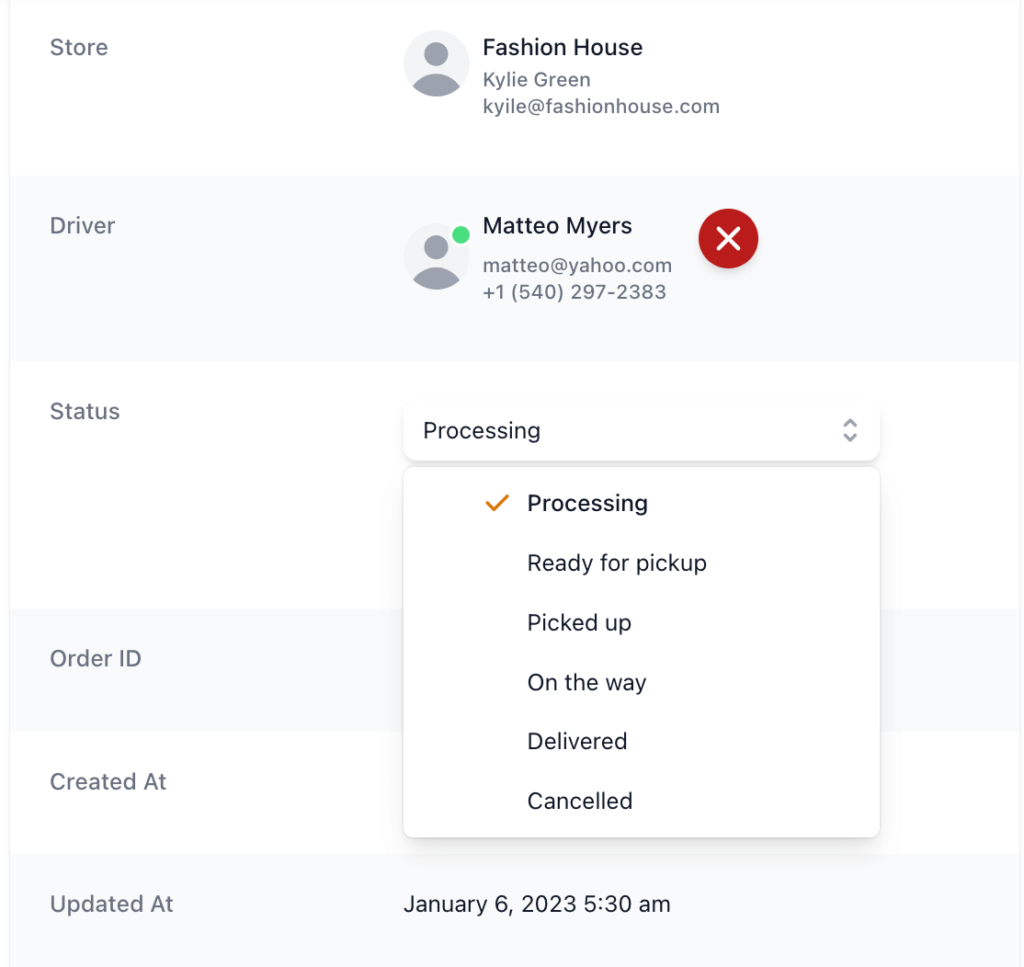
Assigning a Driver to a Delivery Request (Admin)
Admin can assign a driver to a delivery request manually. So when an order is placed and the delivery request is created, the admin will find the delivery request in the Driver–> Delivery menu. To assign a new driver to a delivery request that is not assigned, click on the Assign Driver button. Then you can select or search using the name, email address. or the Username of the driver to assign a driver.

Note: Even if a driver has accepted the order request, the admin has the power to manually unassign and assign another driver.
Admin can see the delivery information along with the delivery timeline.
Assigning Driver to a Delivery Request (Vendor)
Vendors can also assign a driver to a delivery request when an order is created. To do that, the vendor needs to go to the orders section from the vendor dashboard and click on an order,
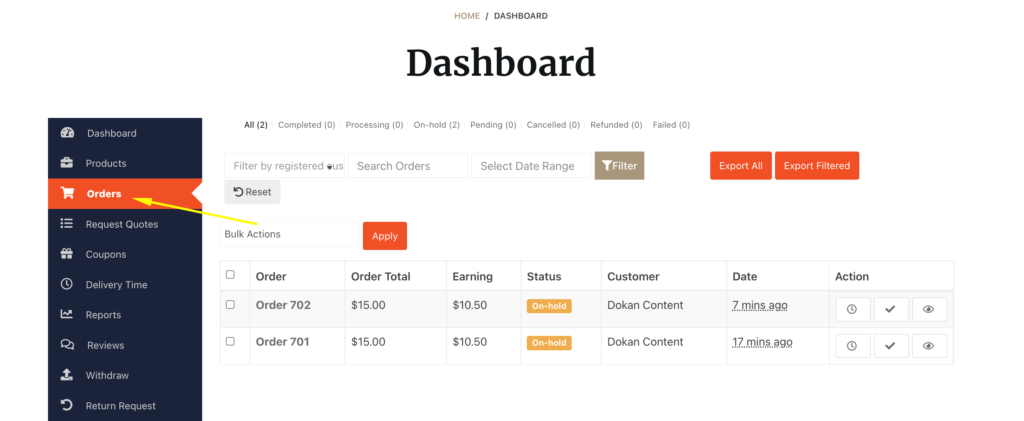
There, the vendor will find the Assign Driver button in the delivery information section of the delivery request.
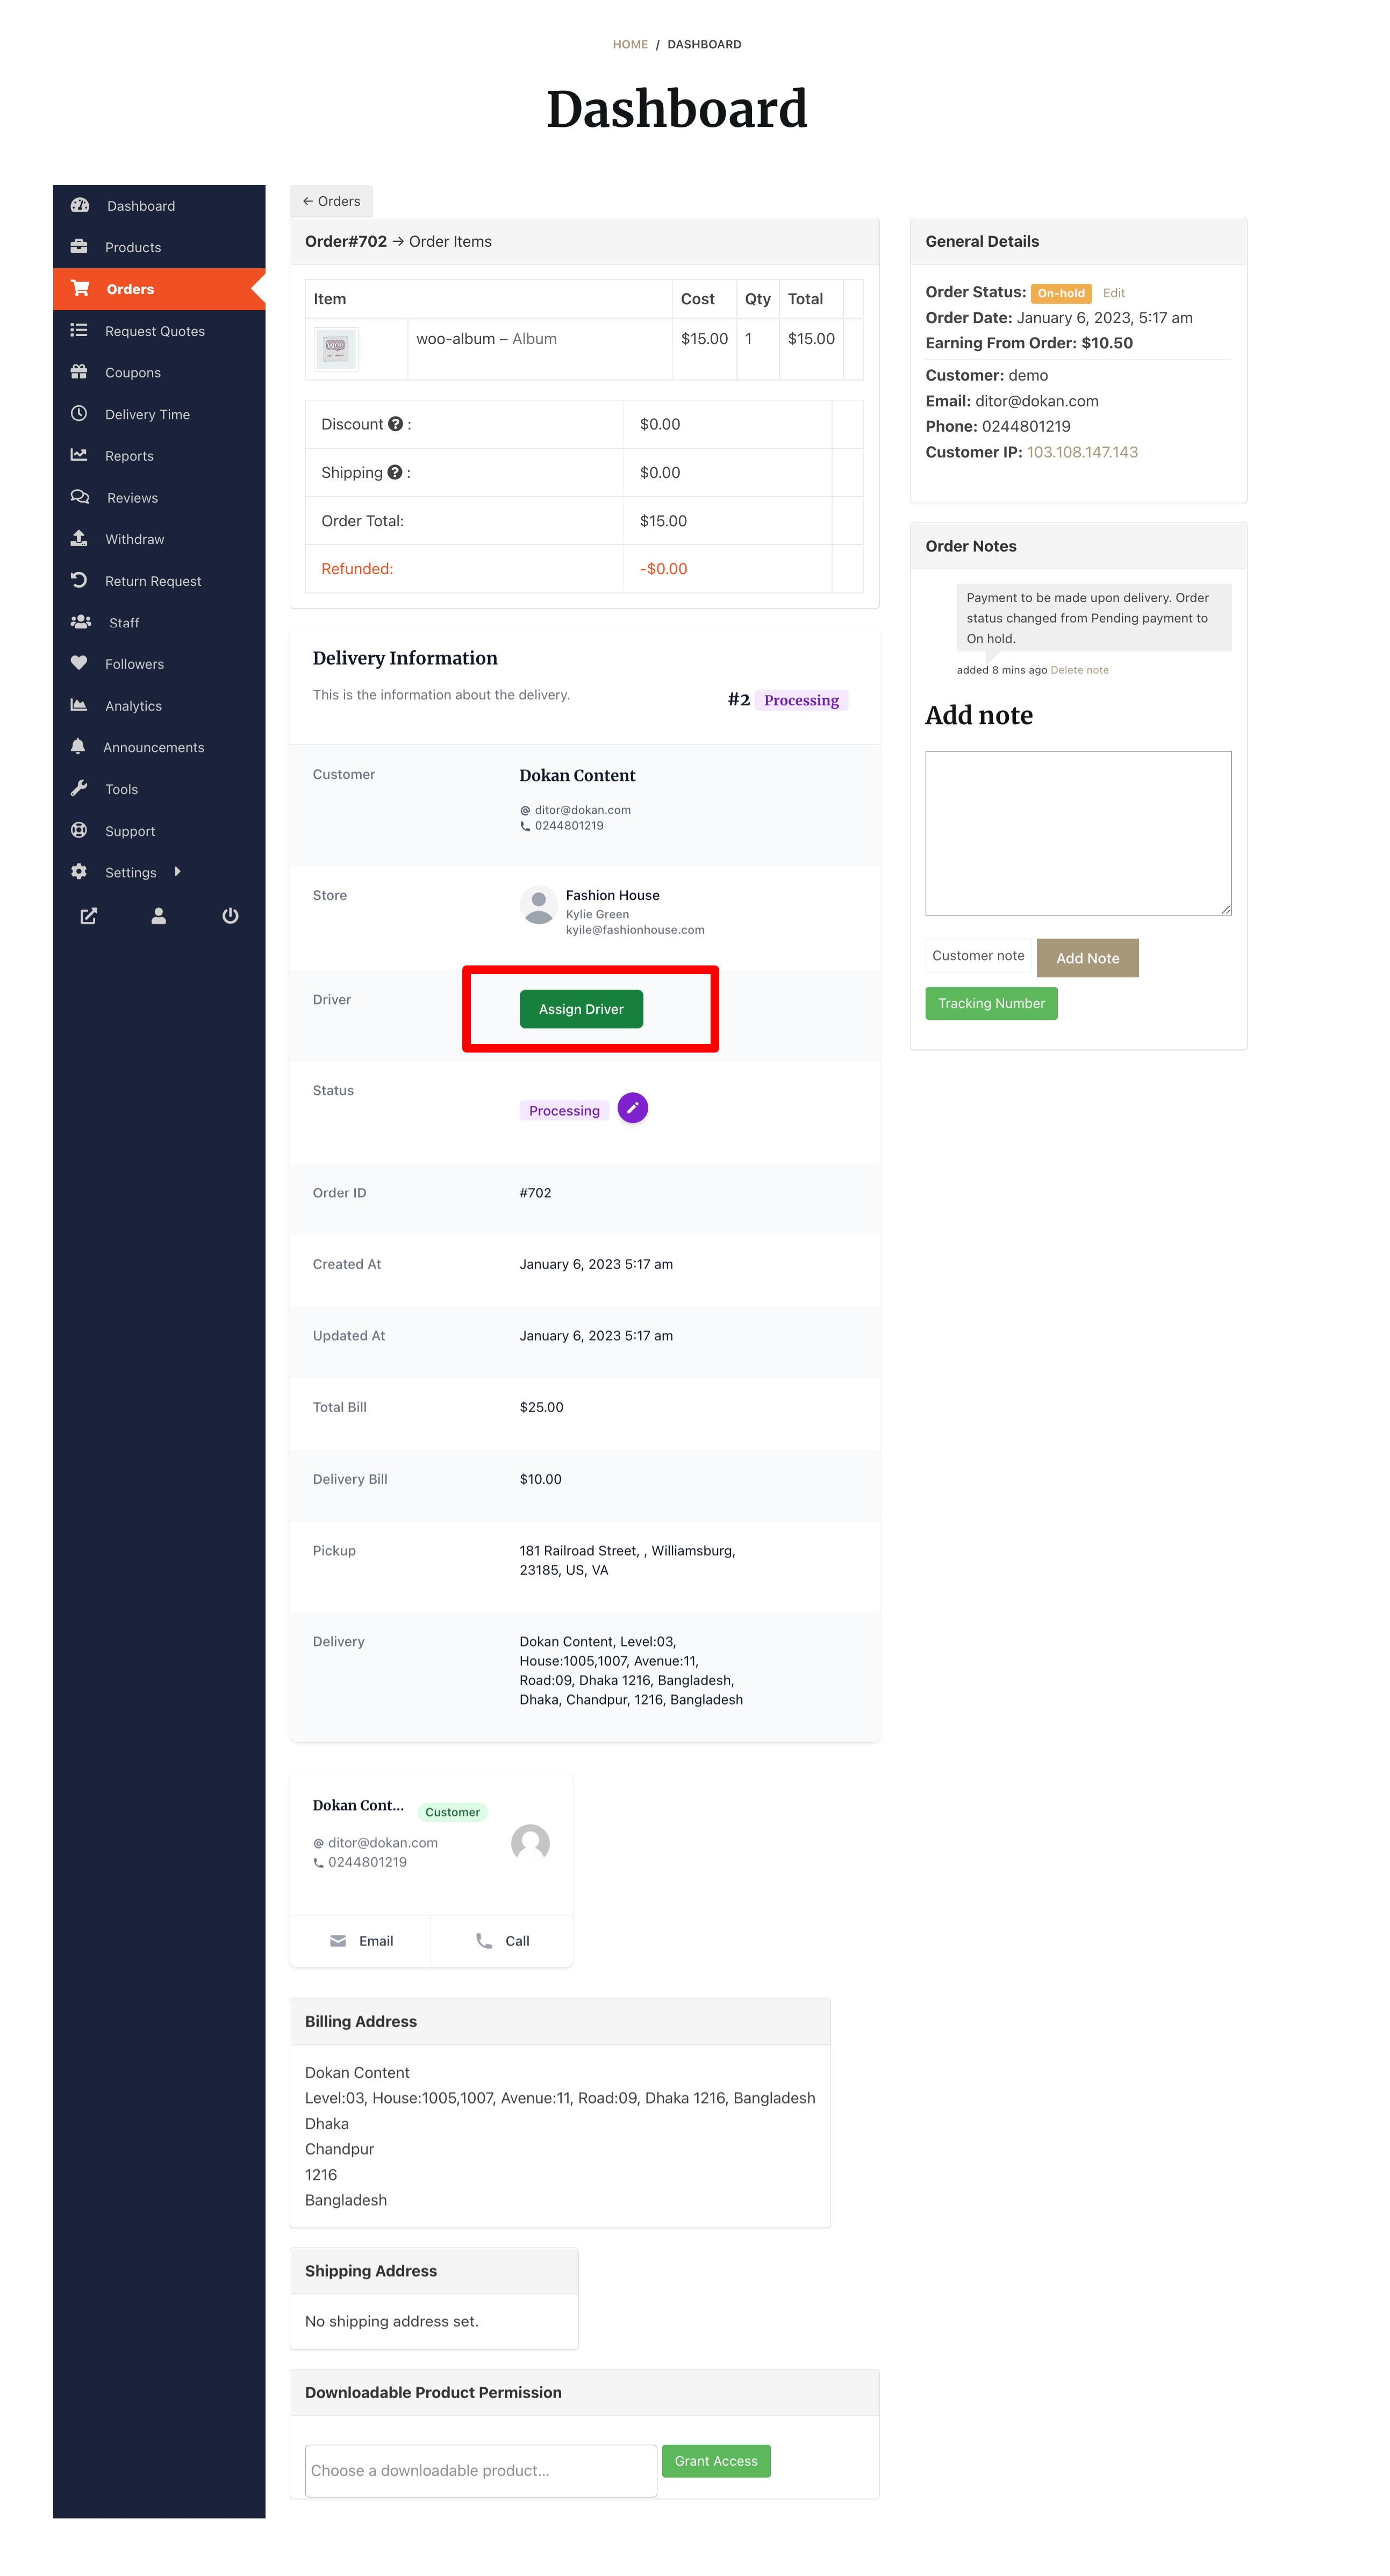
Then the vendor needs to select or search using the name, email or username of the driver they want to assign the order.
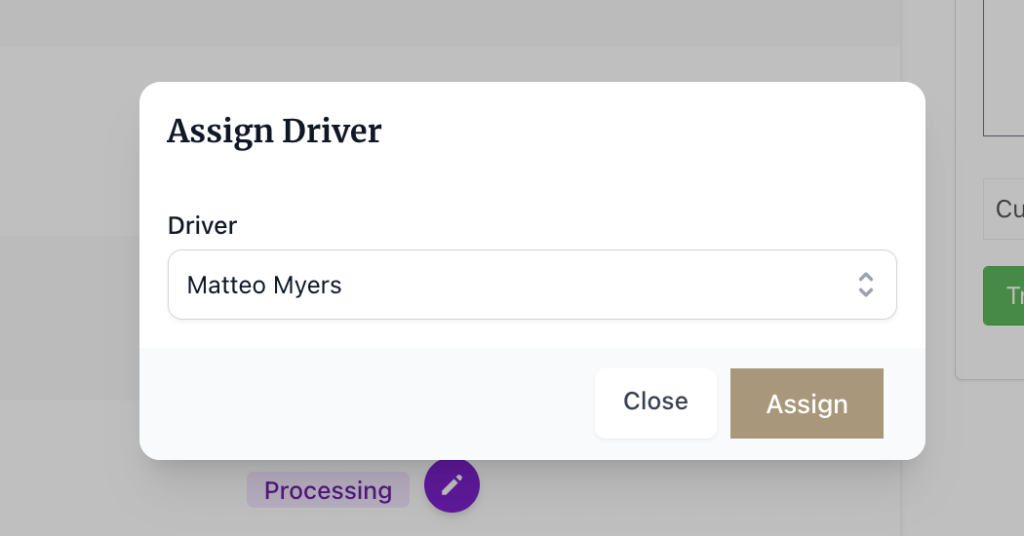
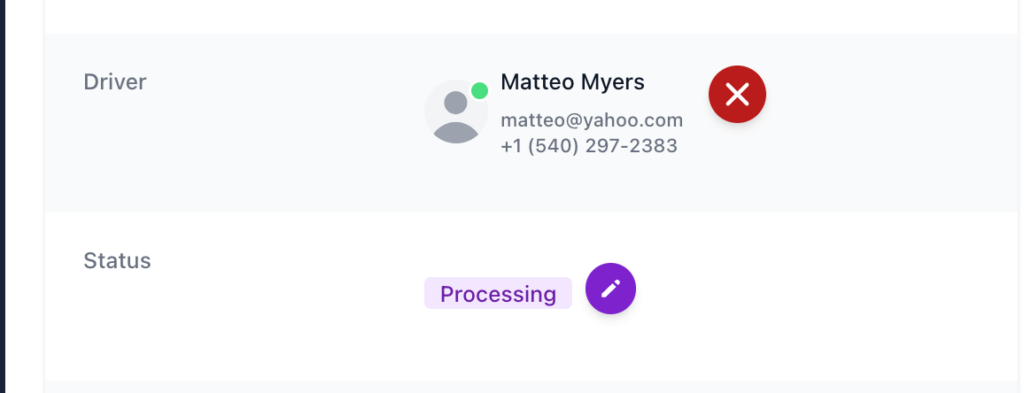
Click on the Assign button to finish assigning the driver.
Note: For Vendors from Selected Areas/Selected Vendors option, vendors can only see and select the drivers that are manually assigned to them. They won’t be able to view the entire list of drivers.
Changing Delivery Status (vendor)
Vendors can change the delivery status.
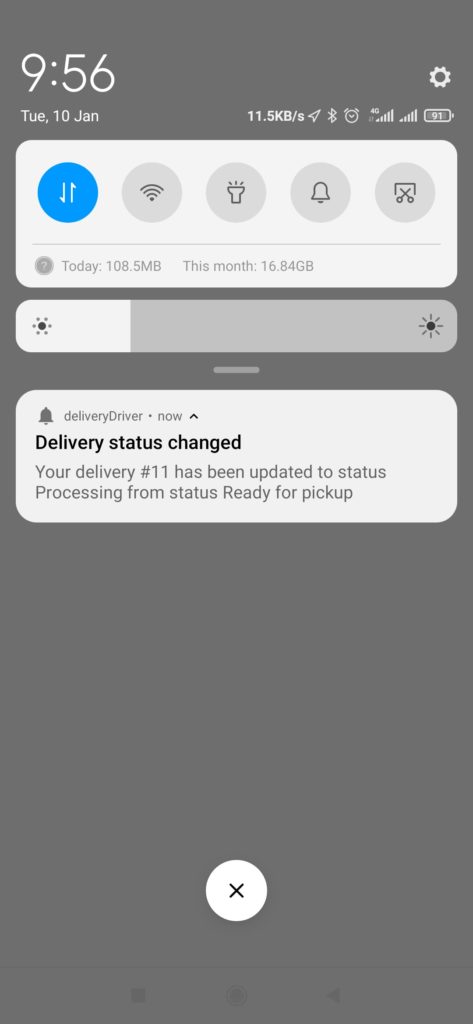
That status will be updated on the driver app for the driver to see.
Driver Tracking (Vendor)
When the vendor changes the order status to “Ready for Pickup“, then the vendor can track the driver and the customer location in the Vendor–> Orders–> Delivery Information section of the delivery request.
Driver Tracking (Customer)
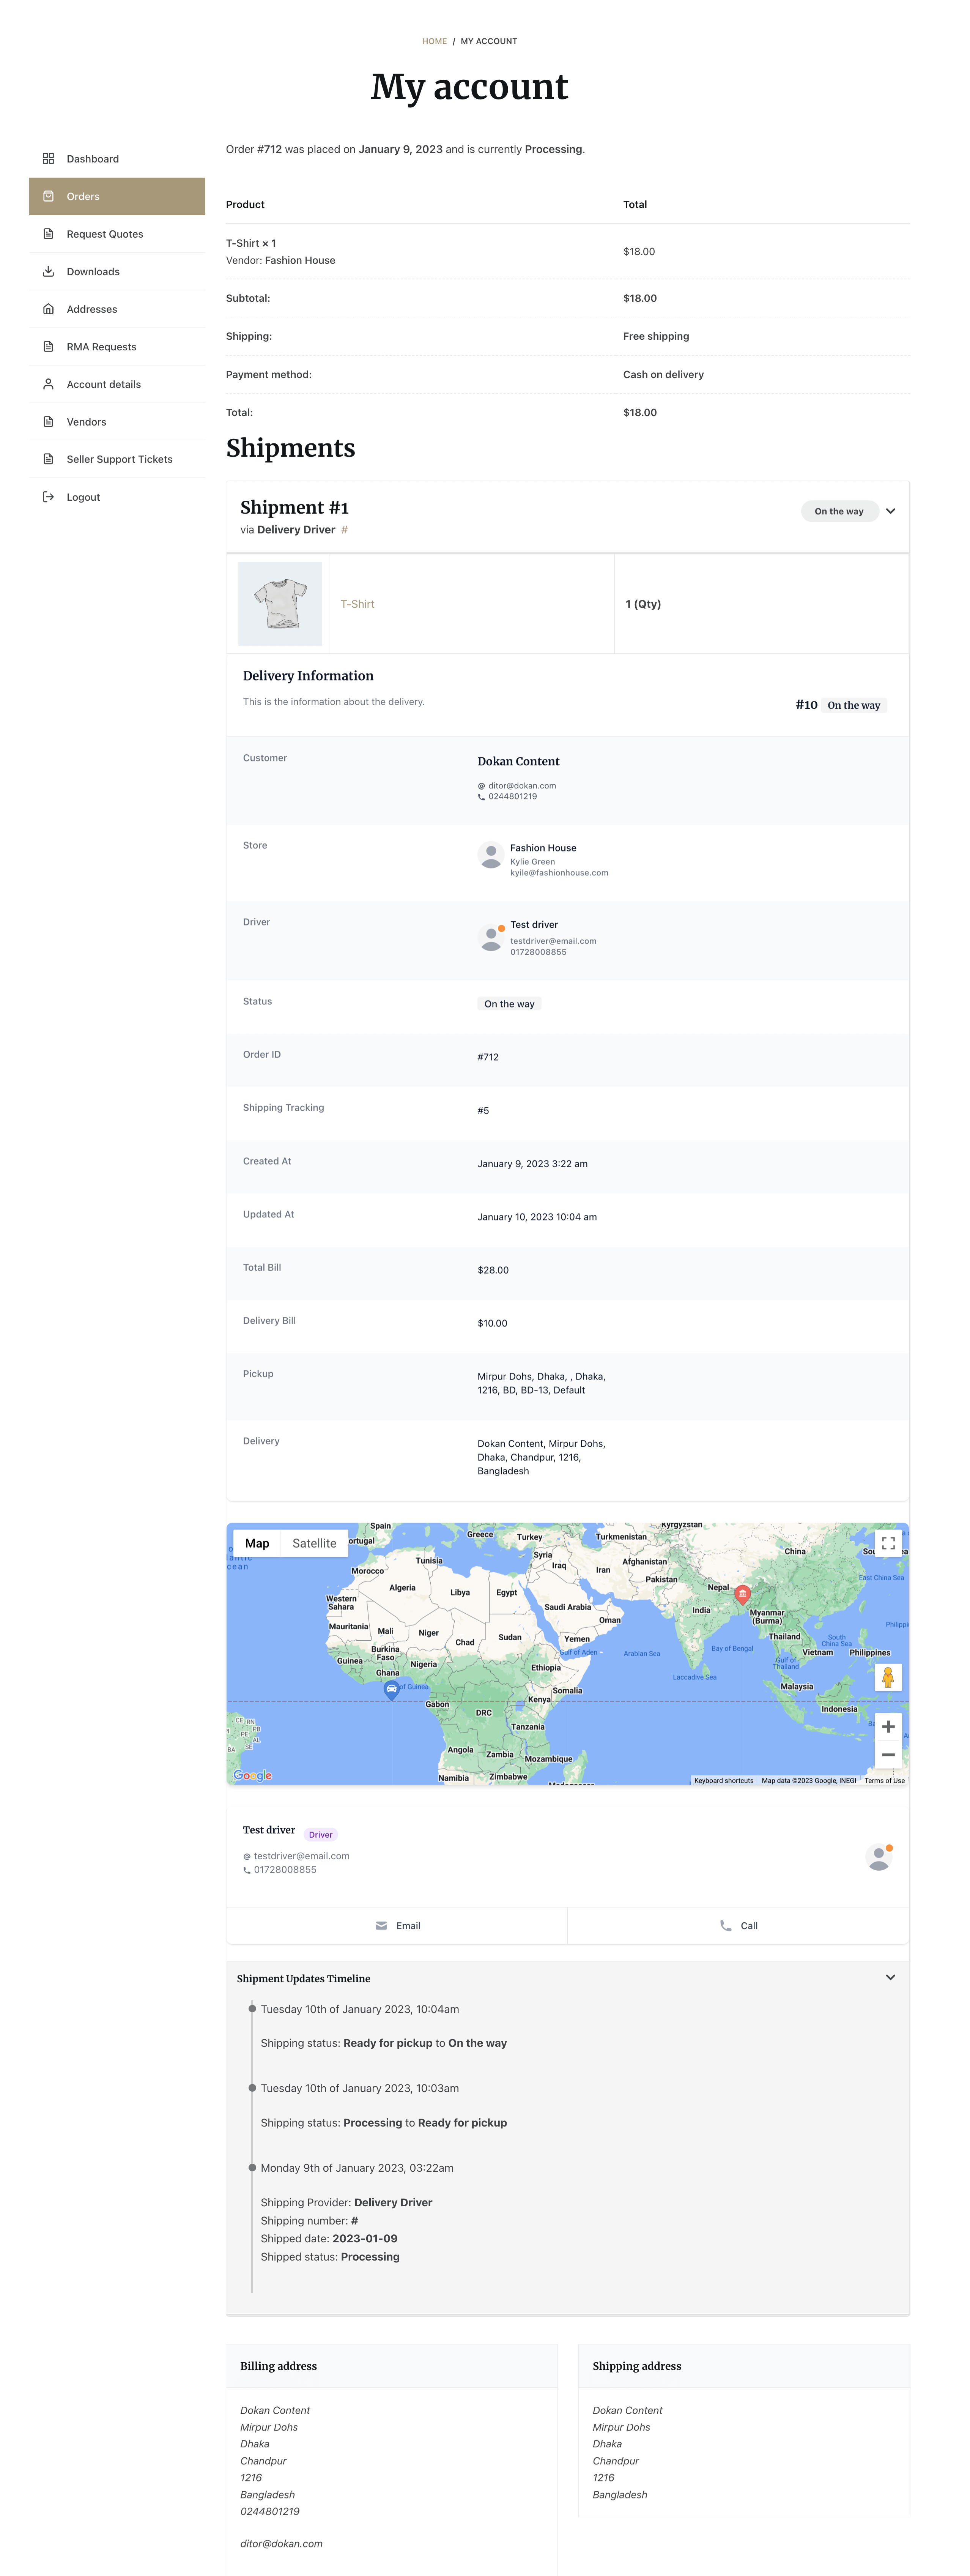
Customers can also track the whereabouts of the driver through the customer account. When the delivery status is changed to “On the Way“, then the customer will be able to track the driver, email or call the driver, and see the shipment timeline.
The customer needs to go to My Account–> Order–> Selected orders to track the driver.
Support for Shipment Tracking
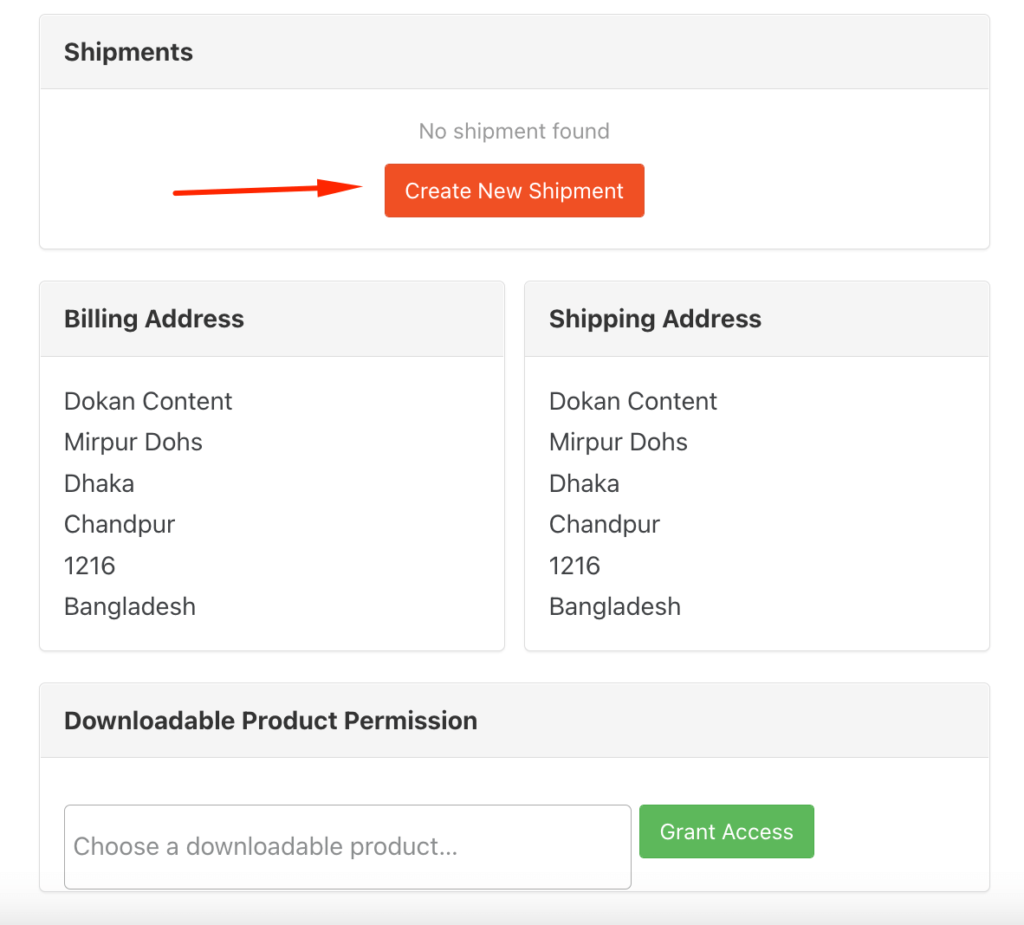
As Dokan Pro has a shipment tracking system, if the user enables the “Allow Shipment Tracking”,
Then the vendors need to create a shipment from Vendor Dashboard–> Orders–> Selected Order.
Then they need to choose the Delivery Driver option from the Shipping System,
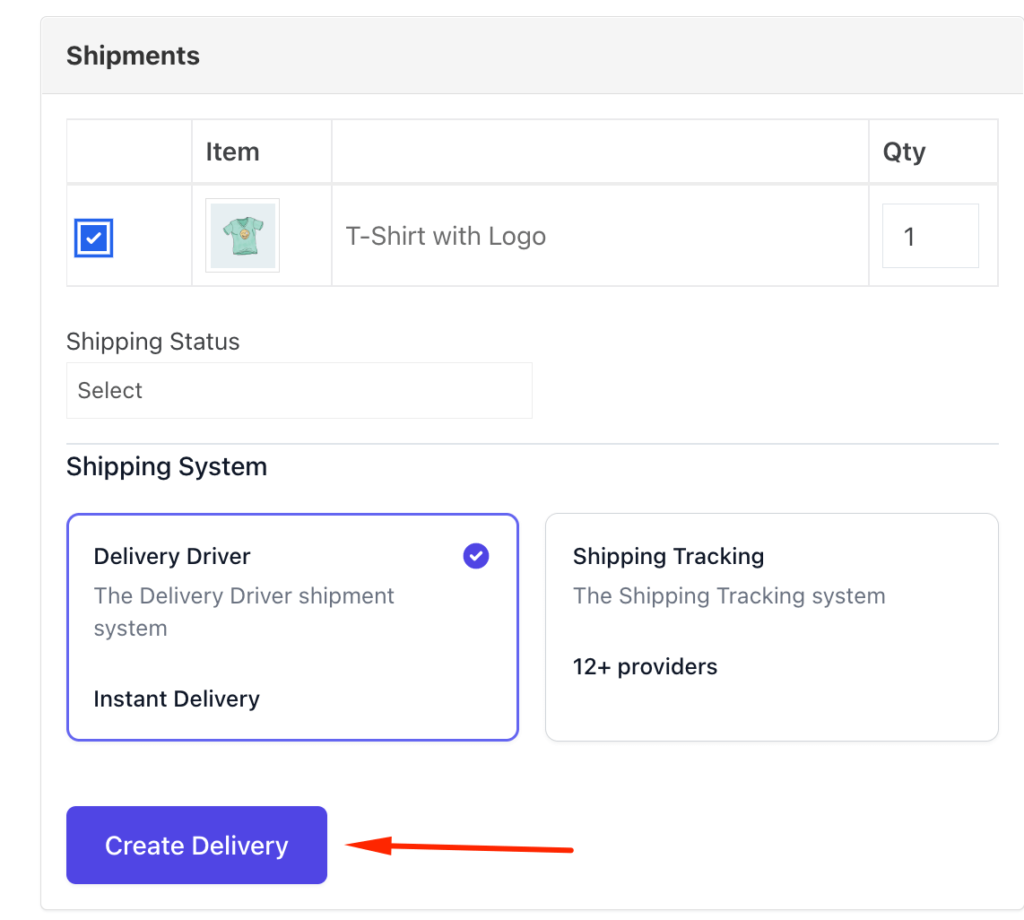
Then the vendor can assign a driver or the driver will be assigned automatically. The rest of the process is the same as the previous one.
Note: Without the shipment tracking system, the search radius will be according to the admin location.
When the Shipment tracking system is enabled, the customer screen will look something like this. The details will be under the Shipment section.
Delivery Driver Signup Via Mobile App (Delivery Driver)
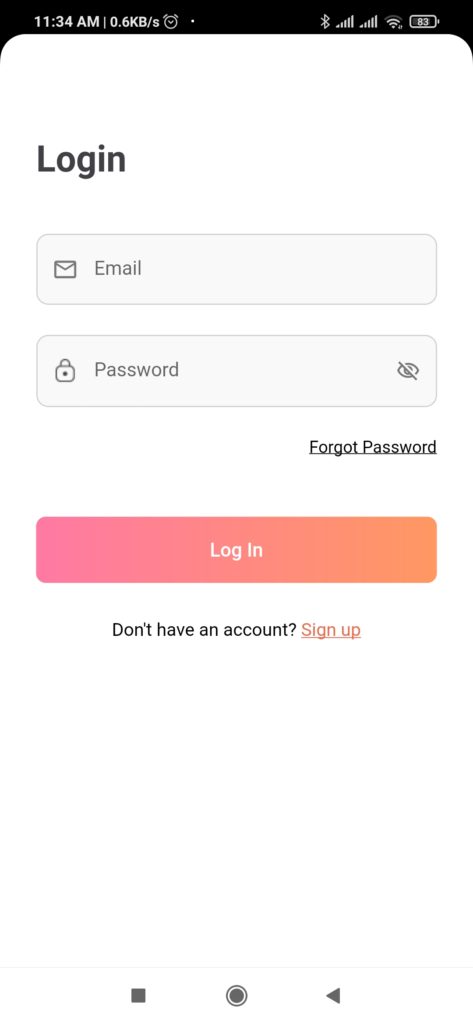
After downloading the app from the play store or app store, the driver needs to signup by following the steps.
They need to click on the sign-up button,
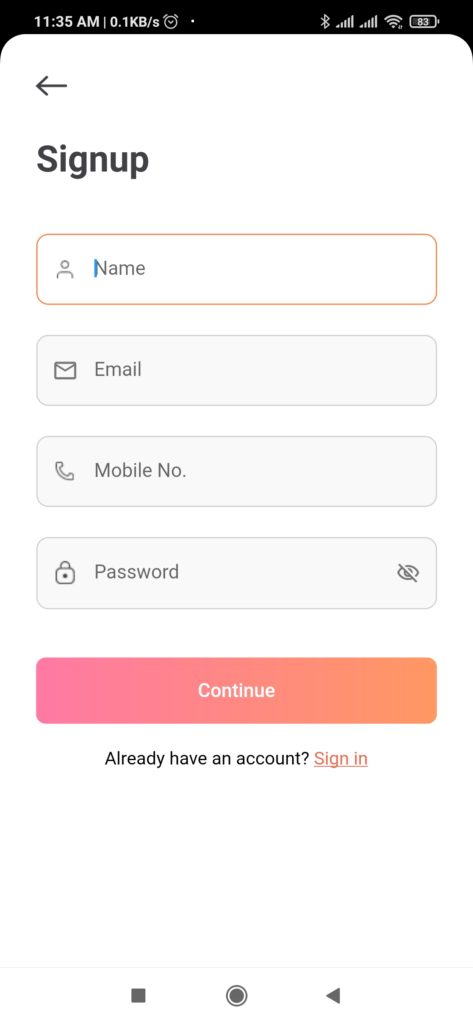
Next, they need to add their name, email id, mobile no and their account password.
Then they need to upload the necessary documents as per the admin requirements. If required they need to upload both sides.
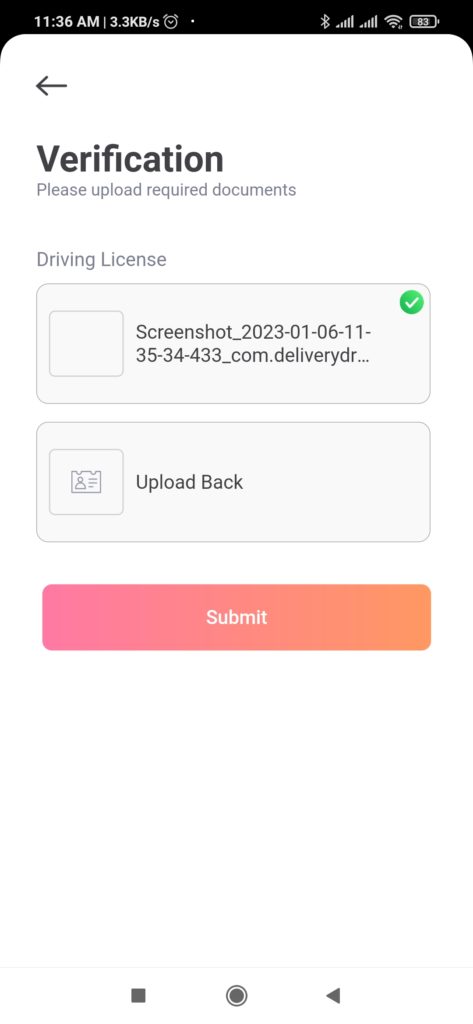
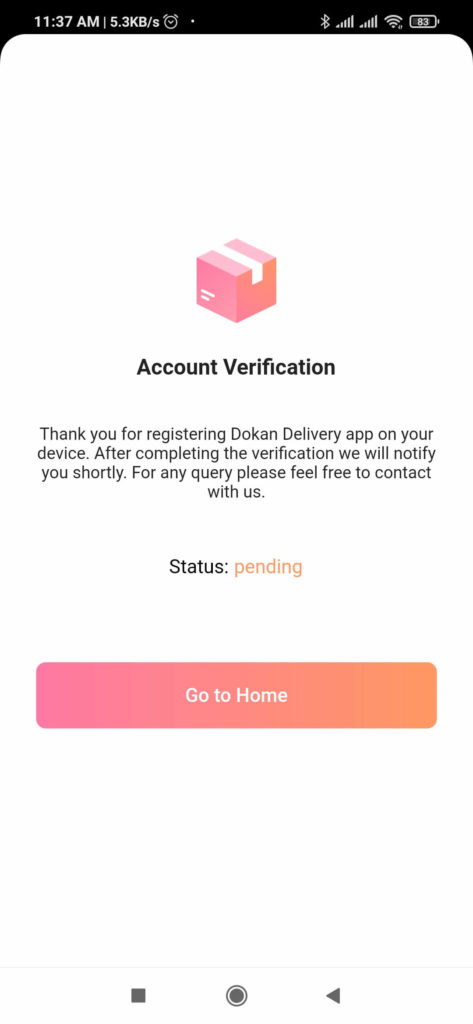
After uploading they need to wait for the verification to be completed. In the meantime, the status will show pending. In that time, the driver will be able to edit his profile, update his uploaded documents again.
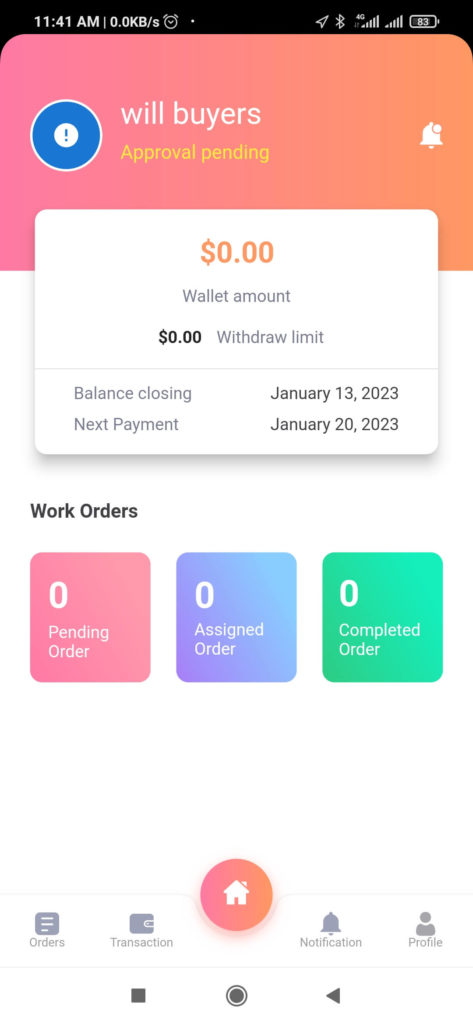
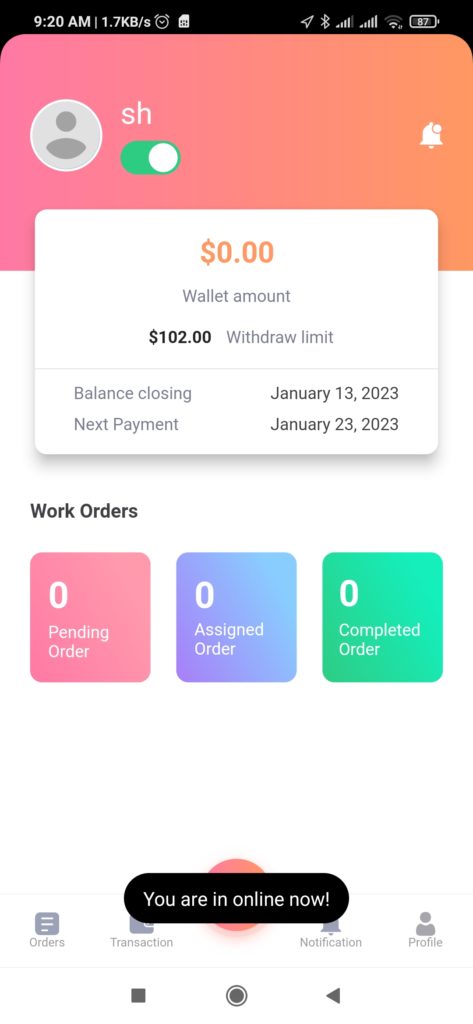
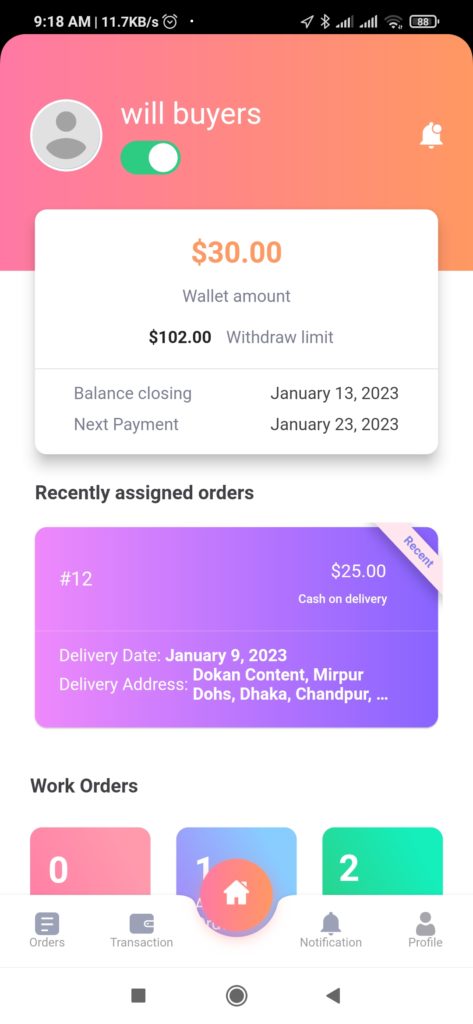
Here’s what the home page of the delivery driver app looks like,
Verification pending,
Admin needs to approve the driver from the admin dashboard,
Here’s what drivers will get with the Delivery Driver App,
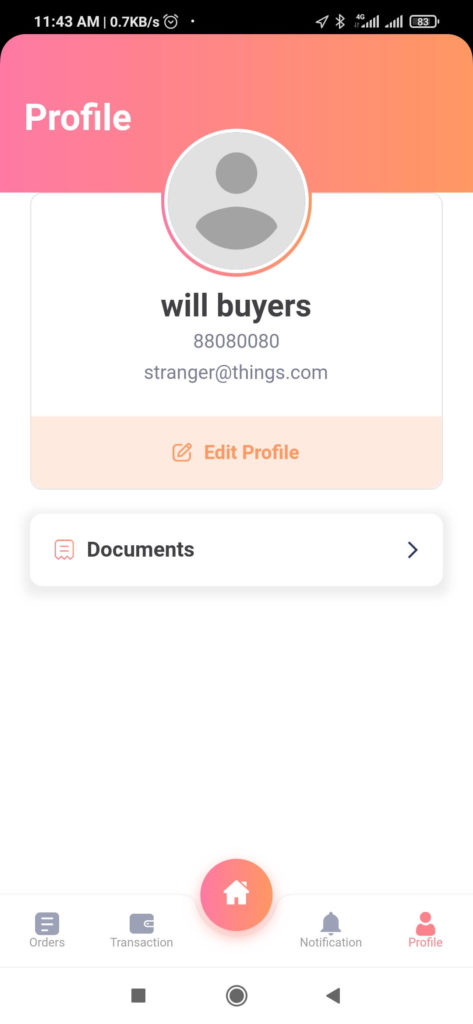
Profile Section
Drivers will get their individual profile section. They can edit their profile and also, update their verification documents as well. But if the drivers update their documentation again, then they will be reverted back to pending status and they have to wait for admin verify their documents again.
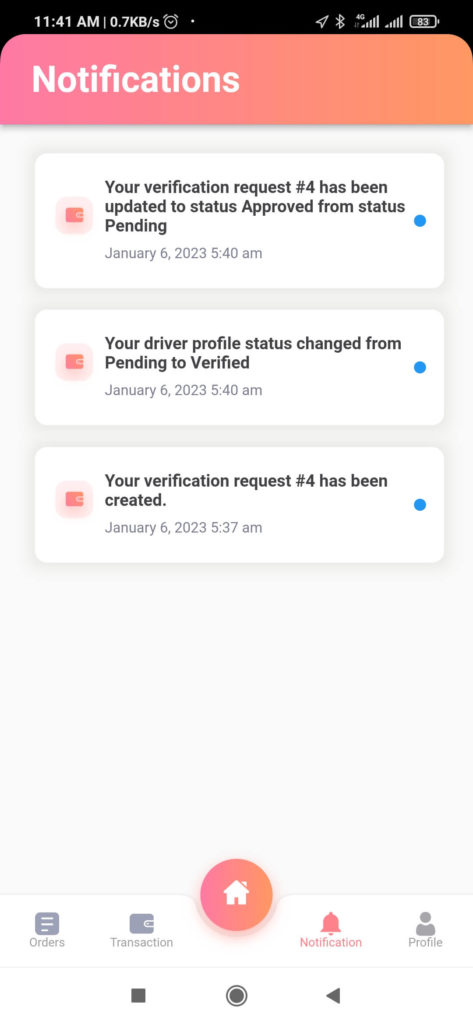
Notifications
In the notification section, the driver can see the notifications including order assigned, order status changed, documentation verification, etc.
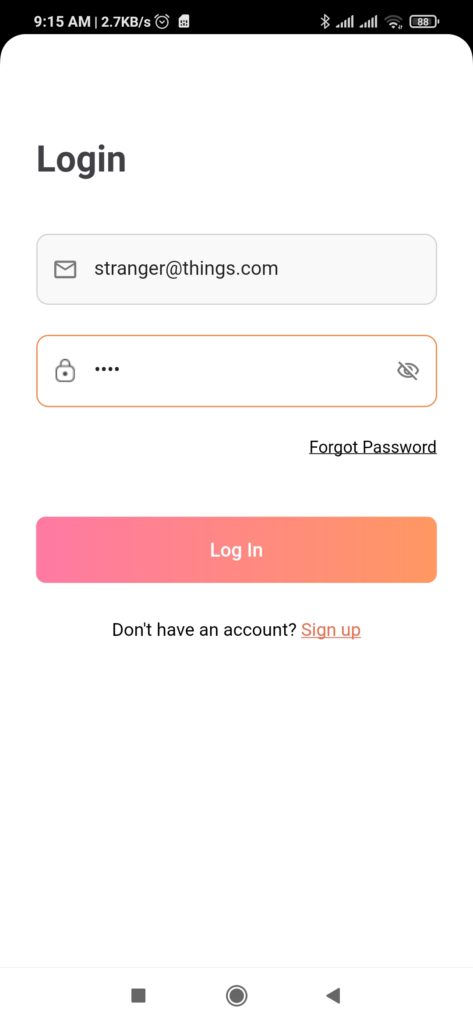
After getting approved, the driver needs to login with his/her credentials,
After logging in, the driver needs. to Google himself/herself online so that users can track him/her.
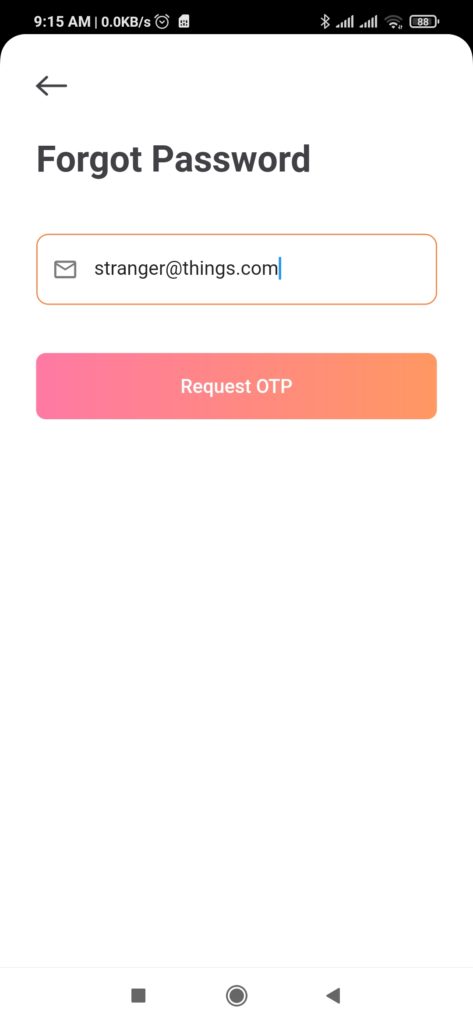
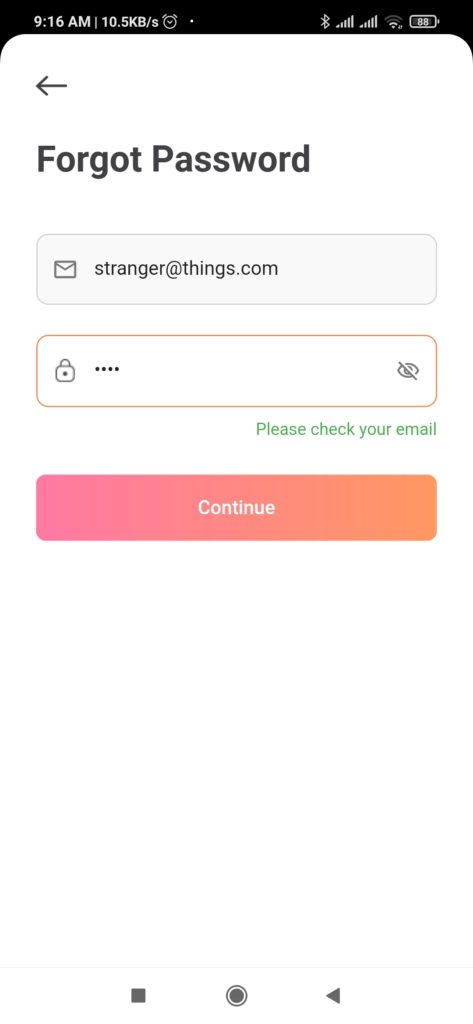
In case the driver forgets their password, then they need to click on the Forgot Password option. Then they need to add their email if to get the OTP number,
After receiving the OTP, just add the OTP number and set your password again. Then the driver can login with their new credentials.
How to Accept a Delivery Request
Other than assigned orders, in the case of automatically assigned orders, delivery drivers will receive a pop-up wanting to know if the rider wants to accept the order or cancel the order.
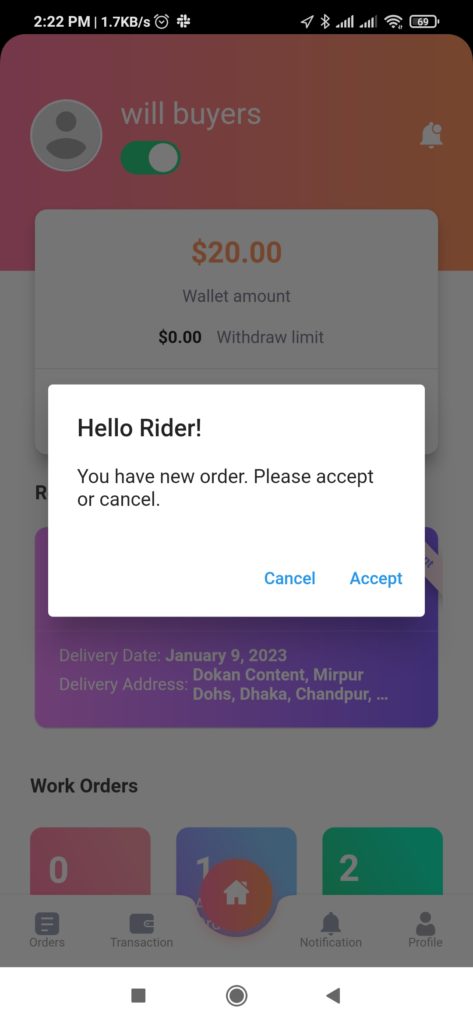
Then they can see the order details.
Order Details
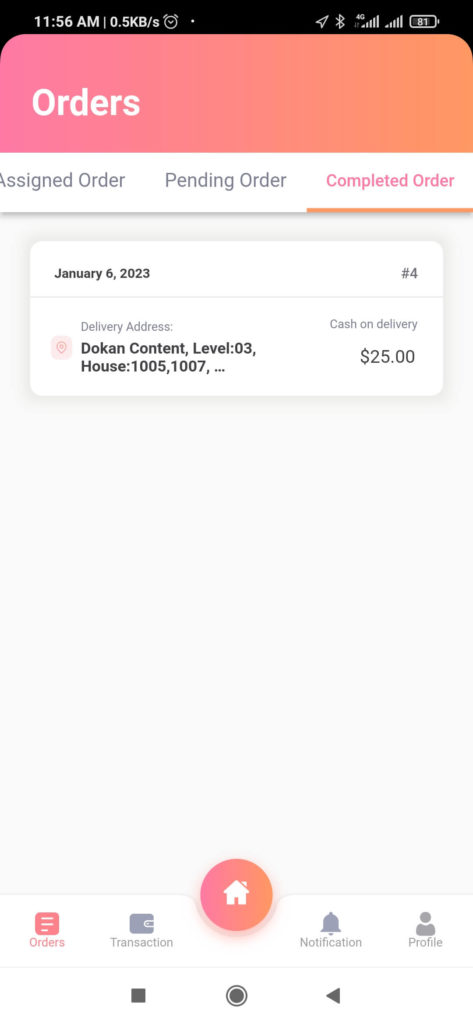
In the order section, the driver will be able to see the assigned order, completed orders, pending orders,
Also, if a new order is assigned then it will be shown in the home screen as well,
Drivers will be able to see the order details,

Also, after completing or receiving the orders, drivers can change the order status,
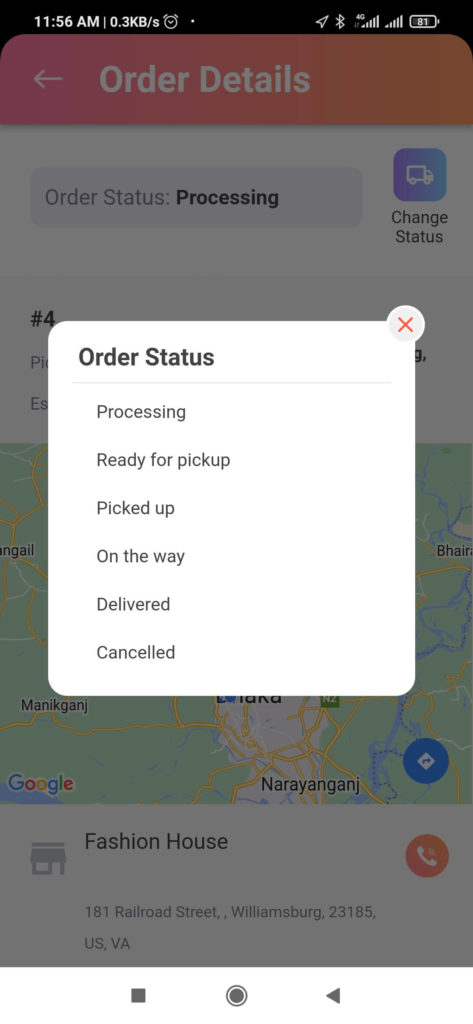
After changing the order status, here’s what it will look like,
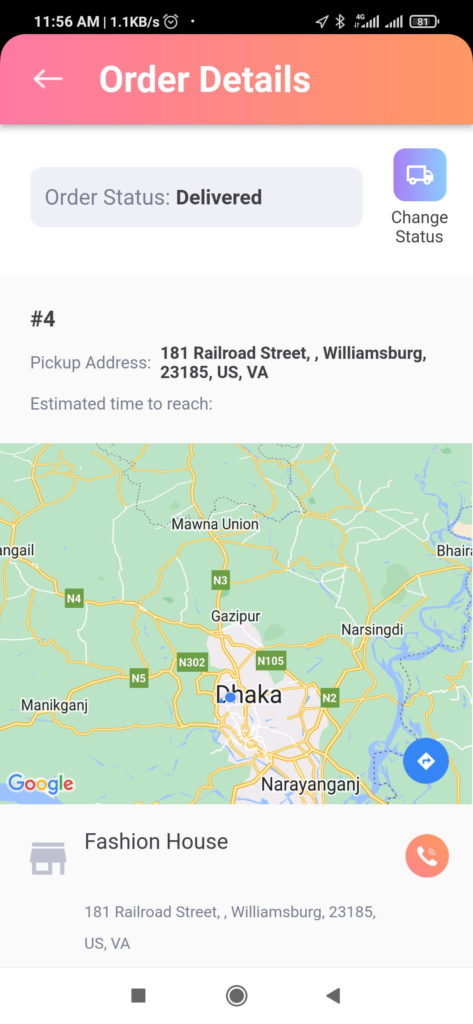
Here is an overview of the order details,
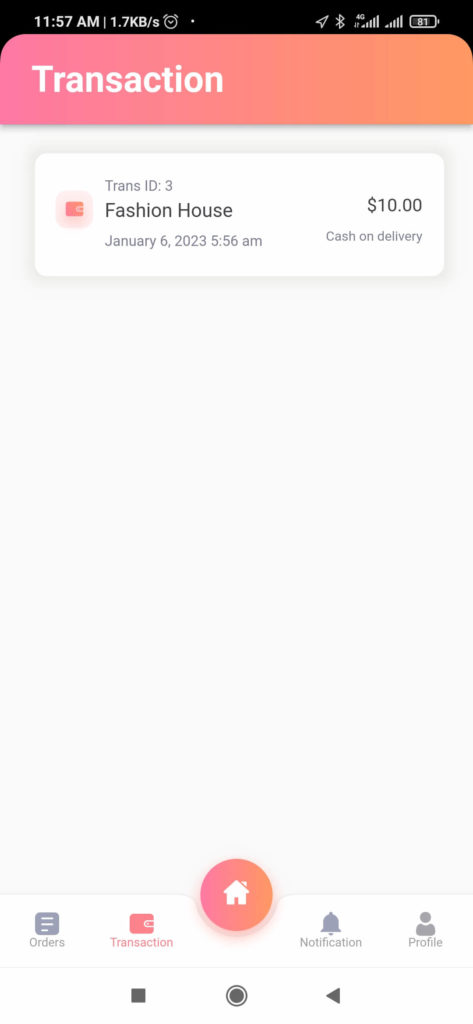
Transaction
In the transaction section, drivers will be able to see the transaction details of every order they received,
Dokan Delivery Drive App Workflow
Here is the workflow of the Dokan Delivery Driver app.
- Successfully install the Dokan Delivery Driver plugin and configure it.
- Create the Dokan Delivery Driver app from the Dokan team
Here is how it will work,
- When a customer places an order, a delivery request will be created
- Based on the settings, a driver will be assigned to the order
- The driver will receive a notification on his/her app
- After completing the order, the driver will change the order status to delivered.
- After completing the order, the driver will see his/hers earnings on the app home screen
- Based on the settings a withdrawal request will be created after every month or every week
- The admin needs to close the withdrawal request otherwise a new request will not be created.
This is how the Dokan Delivery Driver App works.

