Dokan Vendor Verification module benefits your marketplace by connecting the vendor’s social profiles to their storefront and also telling your customers that the vendor has a verified address and contact number. With these added to the store, customers will be more comfortable trusting your vendors and ultimately buy from them.
We are breaking this process in several steps to make the workflow easier for you.
- Admin installs the plugin.
- Configures social site API.
- Configures sms gateways.
- Adds the widget from the backend to the storefront.
- Now admin is able to receive verification requests from vendors.
- Vendor completes the verification using ID, Address or Social Media.
- Admin approve/disapprove their request.
- Vendor connects social profiles or vendor inputs Cell phone number for verification.
Admin – Configuration
Note: Don’t forget to run the updater to get the latest updates.
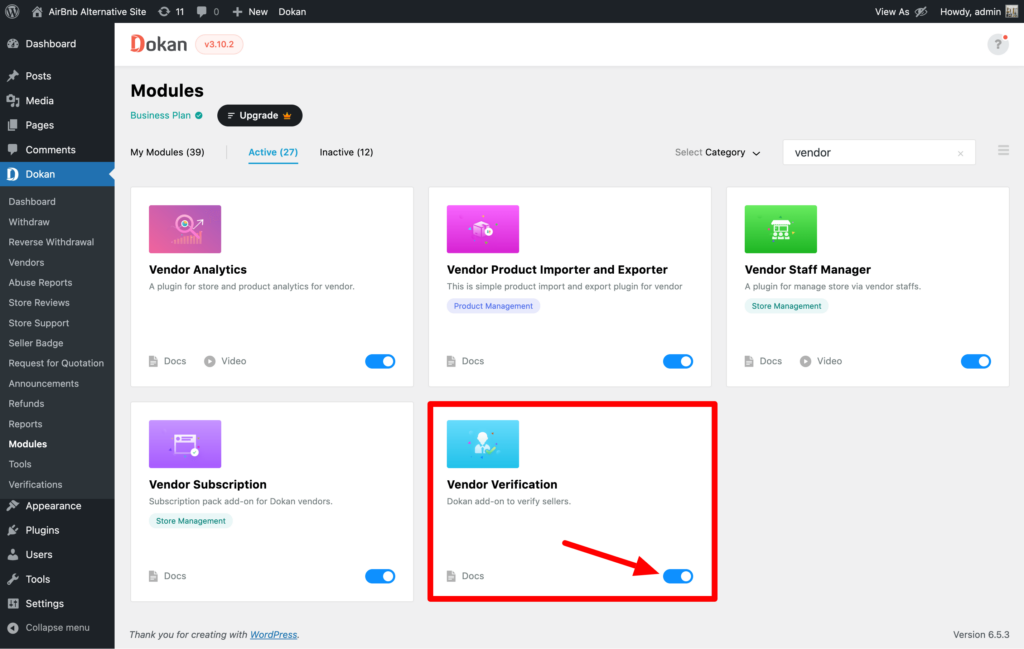
Installation
Navigate to your WP dashboard->Dokan->Modules. Find Vendor Verification and turn on the toggle button on the top right to activate this module.
Configuring Vendor Verification
After successfully installing and activating the module, Navigate to – WP Dashboard → Dokan → Settings
You will find two new tabs-
1. Vendor Verification
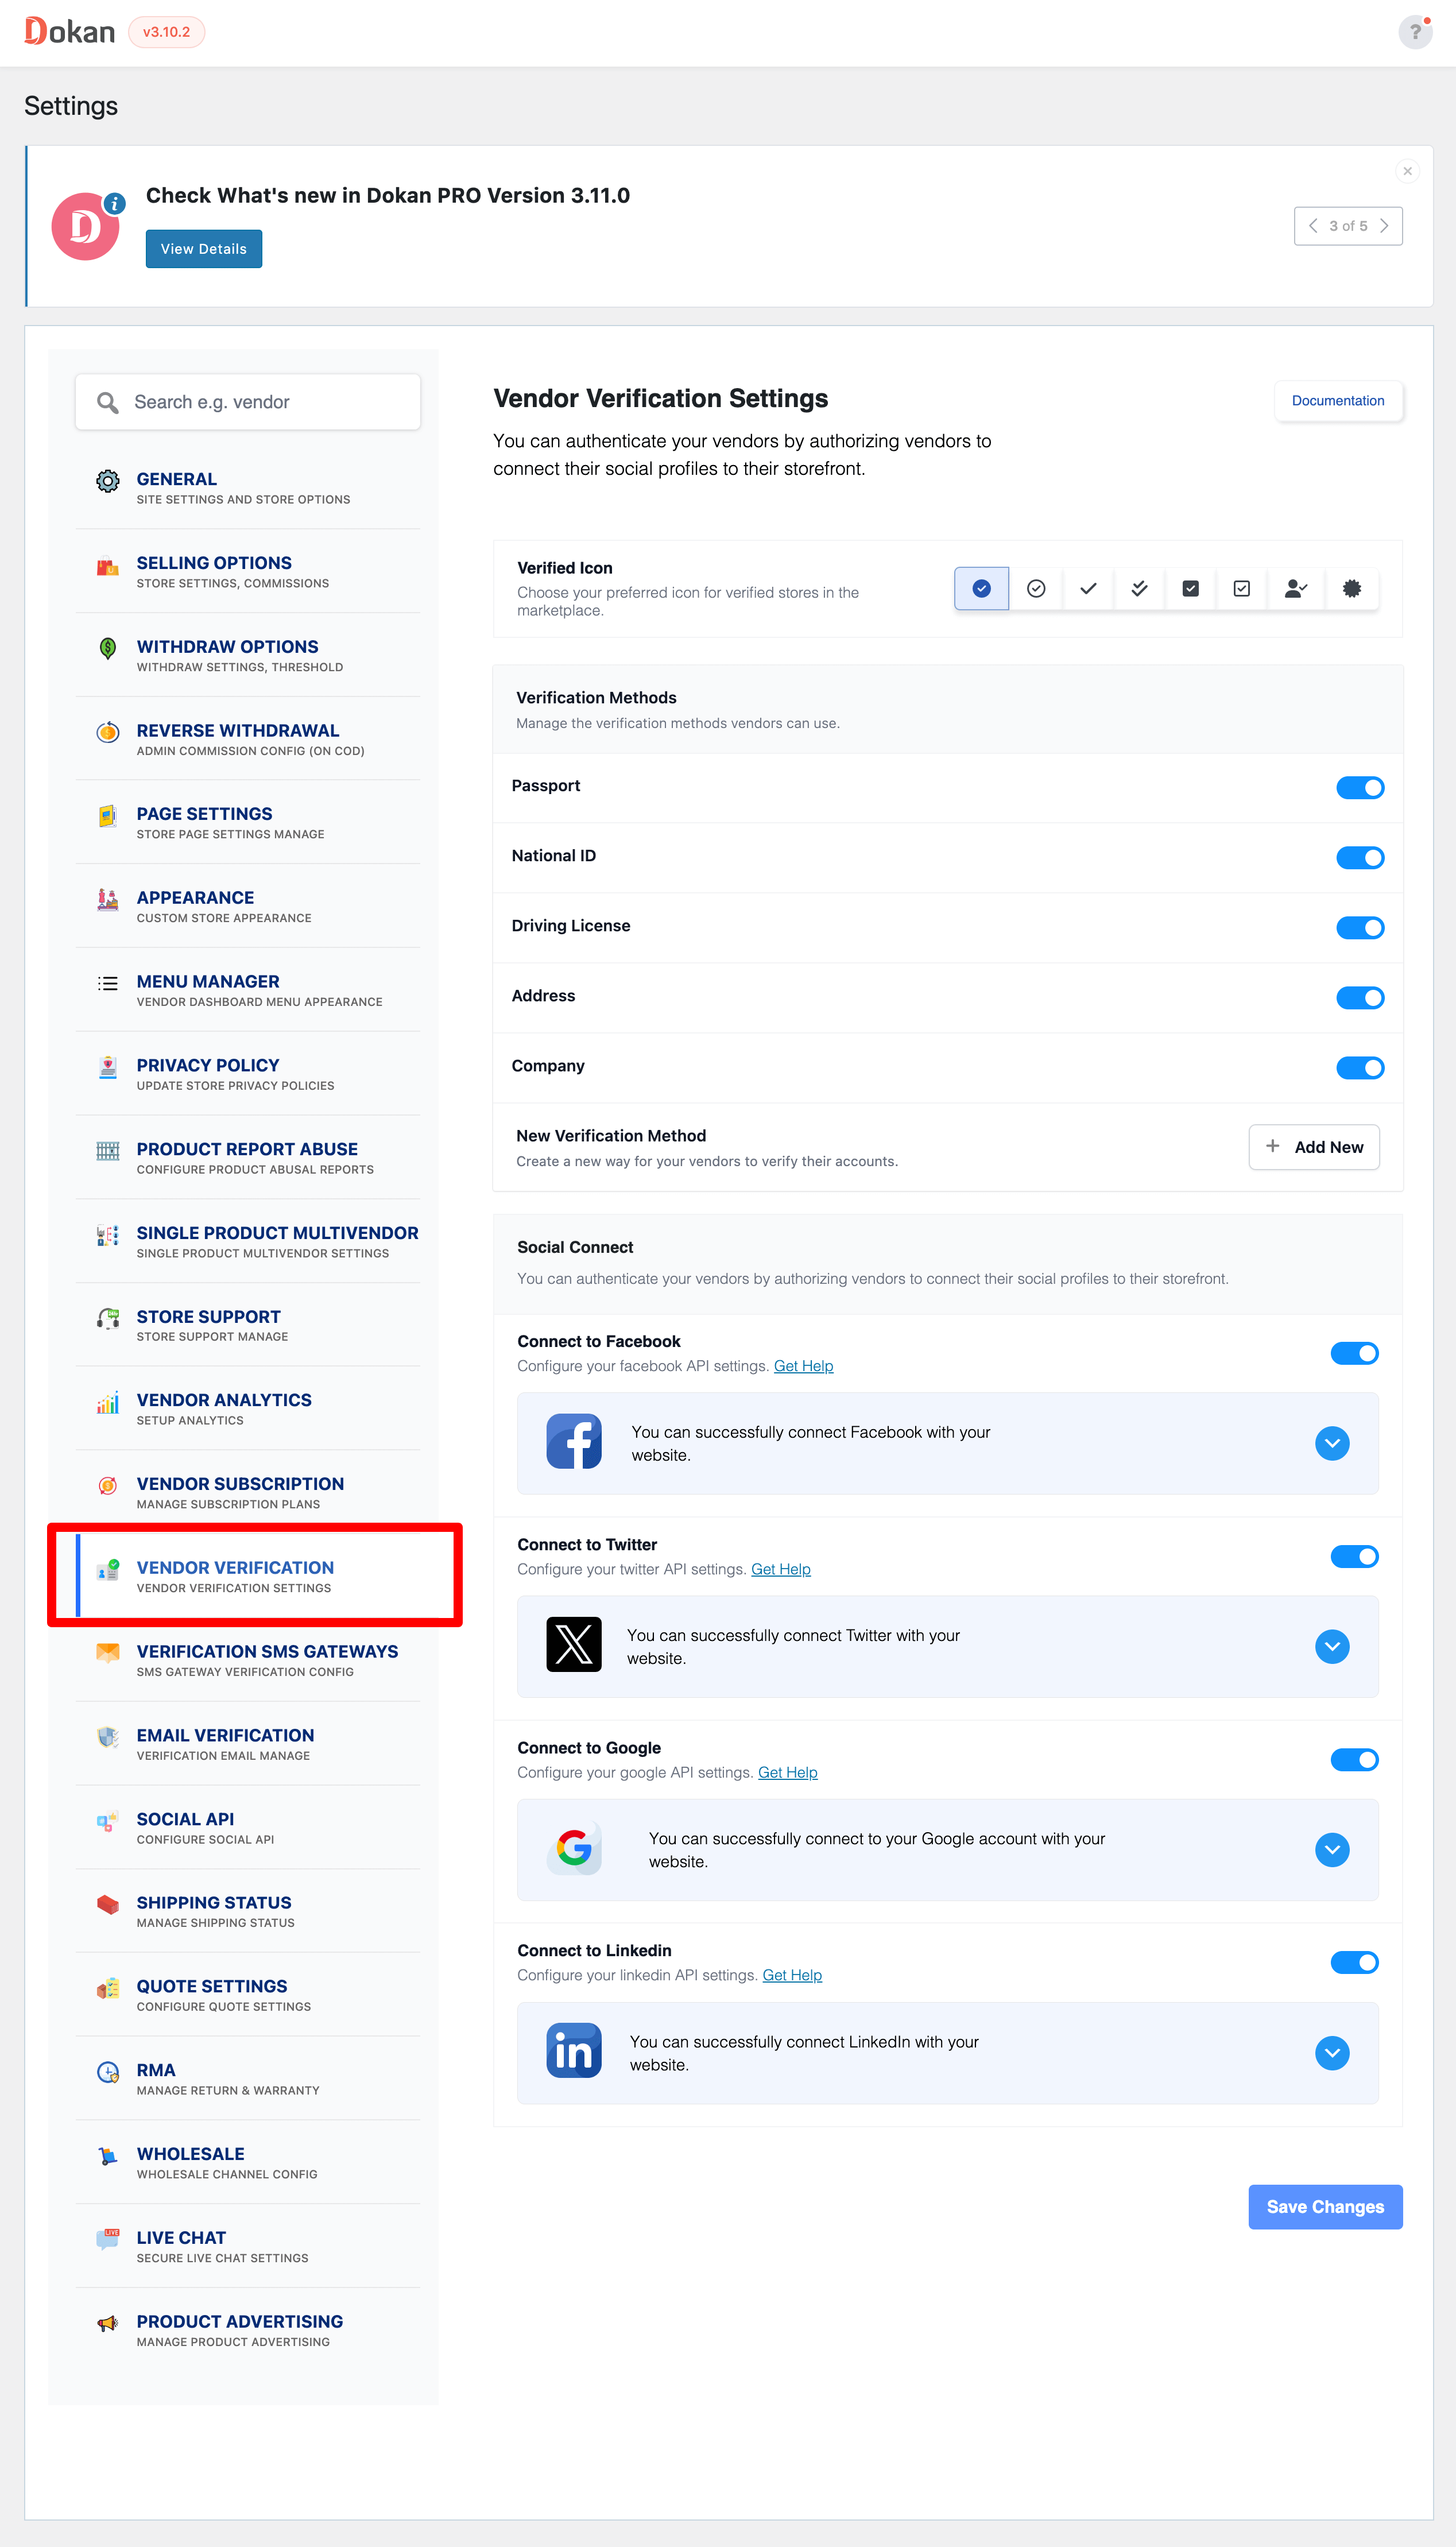
In this page, you will notice the following settings –
- Verification Icon: Choose the icon you want to show as a verified badge for the vendor. The icon will be displayed in the single store page and in the store list page.
- Verification methods: You can create custom verification methods other than the social and SMS settings from here.
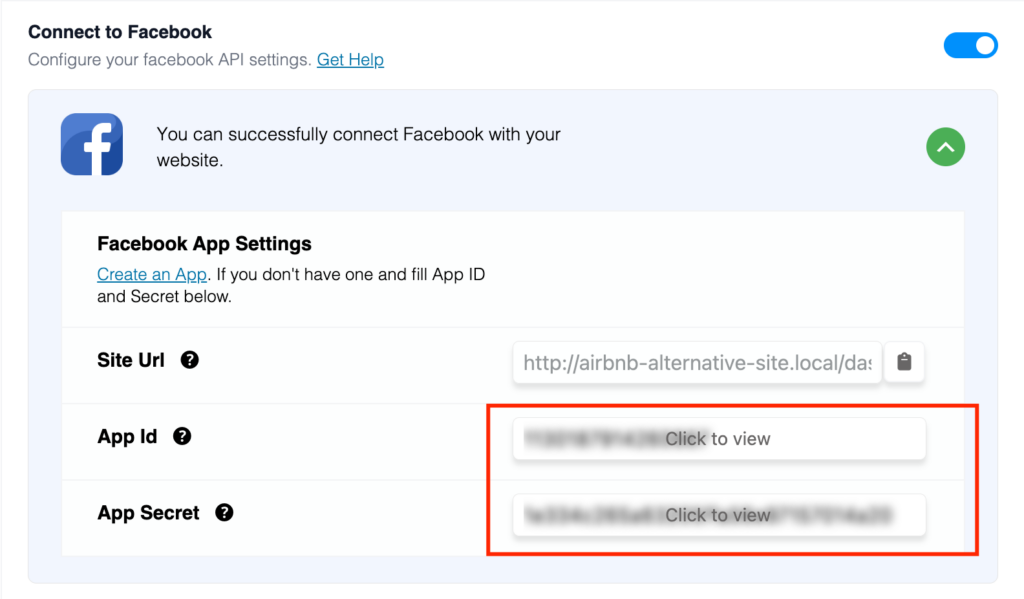
- Facebook App Settings – to fill this section, you have to create a Facebook App from Facebook Developer Platform and put the App ID and App Secret on their respective fields of this page.
- Twitter App Settings – to fill this section, you have to create a Twitter App from Twitter and put the Consumer Key and Consumer Secret on their respective fields of this page.
- Google App Settings – to fill this section, you have to create a Google App from Google Developer Platform and put the Client ID and Client Secret on their respective fields of this page.
- LinkedIn App Settings – to fill this section, you have to create a LinkedIn App from LinkedIn and put the Client ID and Client Secret on their respective fields of this page.
Please note that, you will find either site URL, callback URL, Redirect URI and Redirect URL under their related platform.
2. Verification SMS Gateways
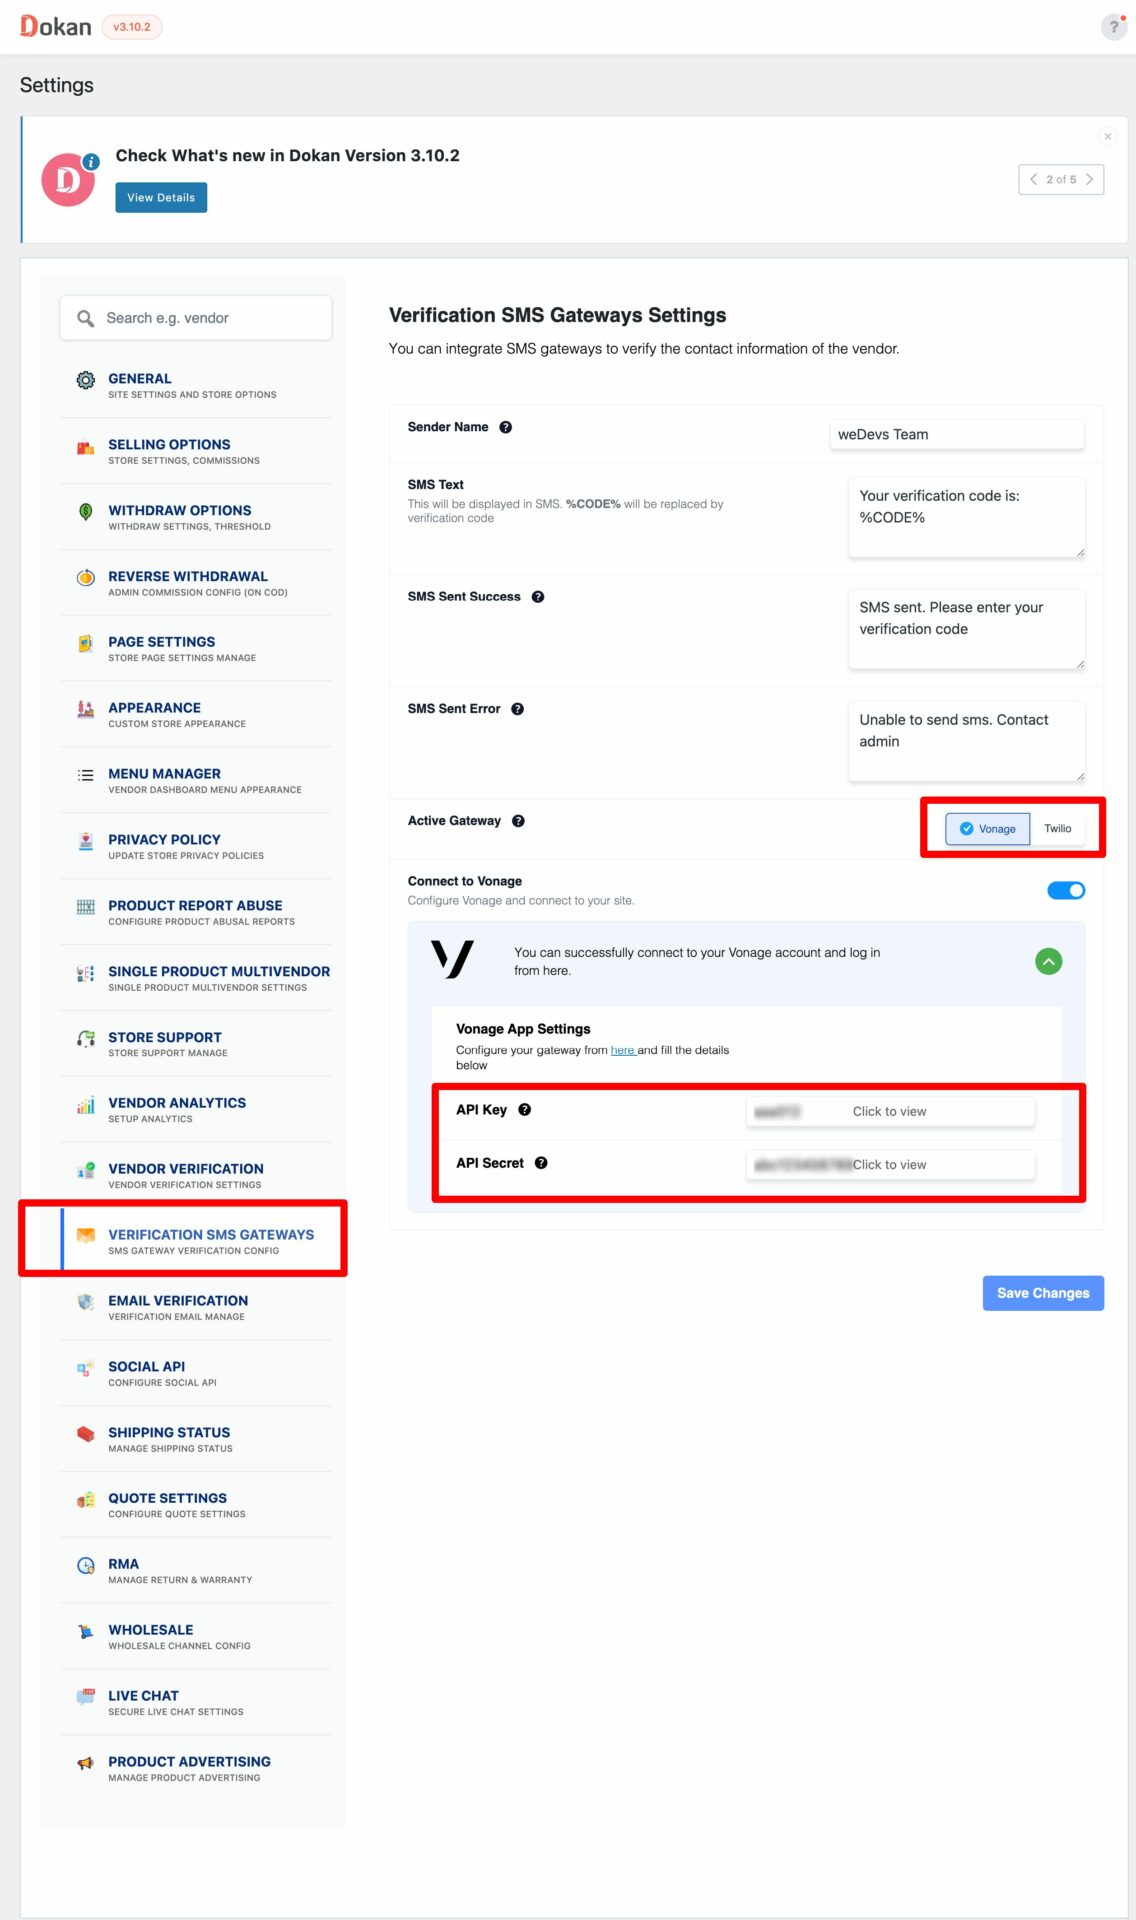
This page will allow you to configure all SMS notification settings for vendor verification.
Adding & Editing Verification Methods
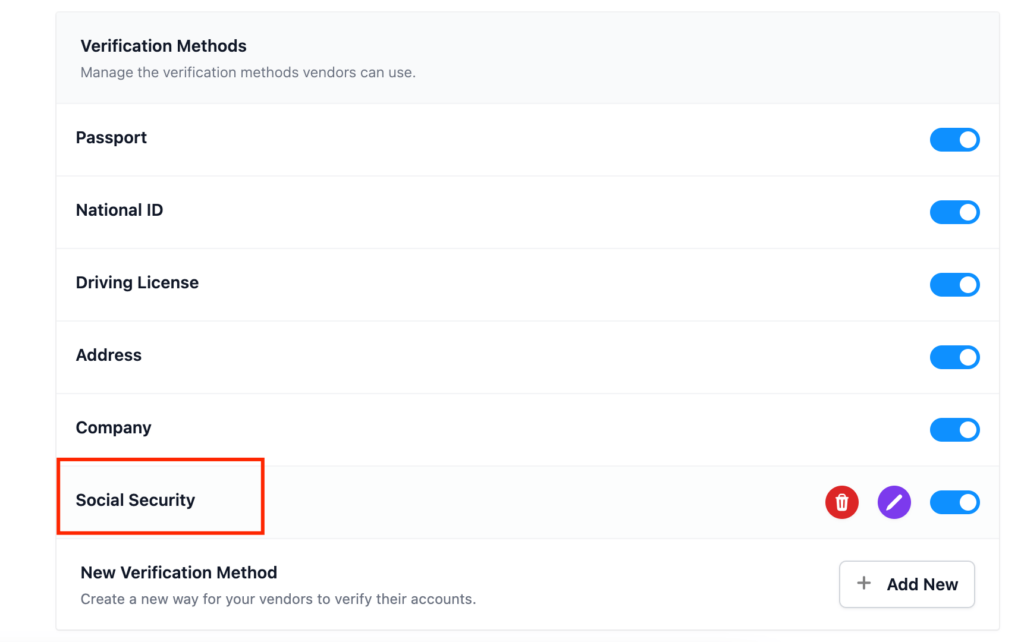
Admin can edit and delete the verification methods.
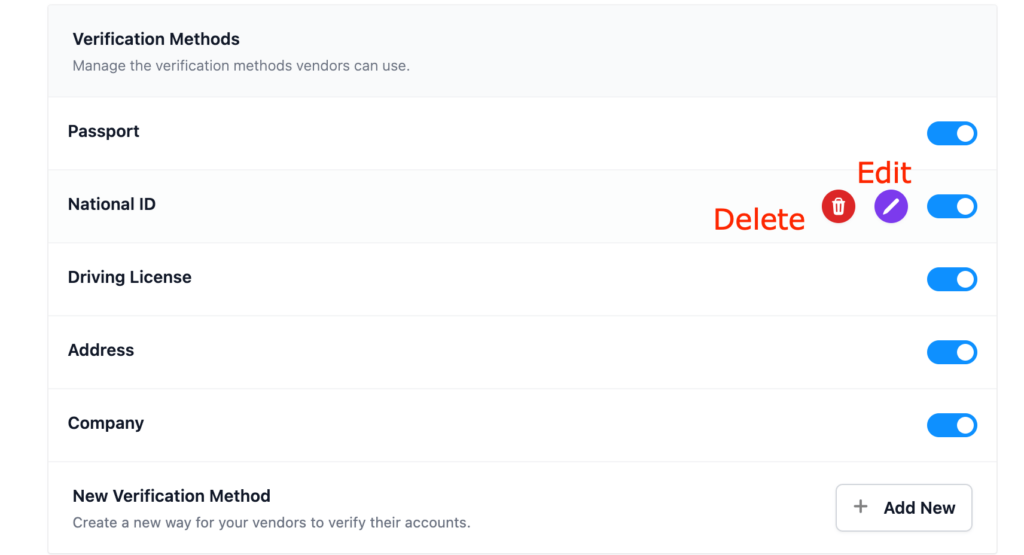
Note: You can’t delete the address verification method. You can only enable or disable it.
You can also edit the verification methods as well. You can make any of the verification methods required as well.
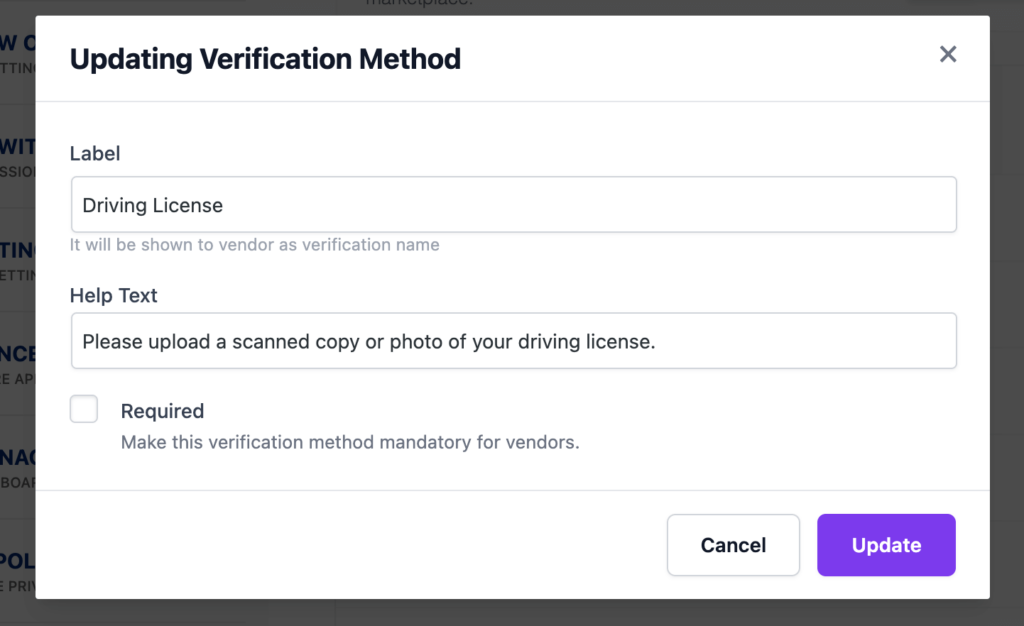
Click on the “Add New” button to create a new verification method. Give the method a Label, Help text, and decide whether you want to make the method required or not,
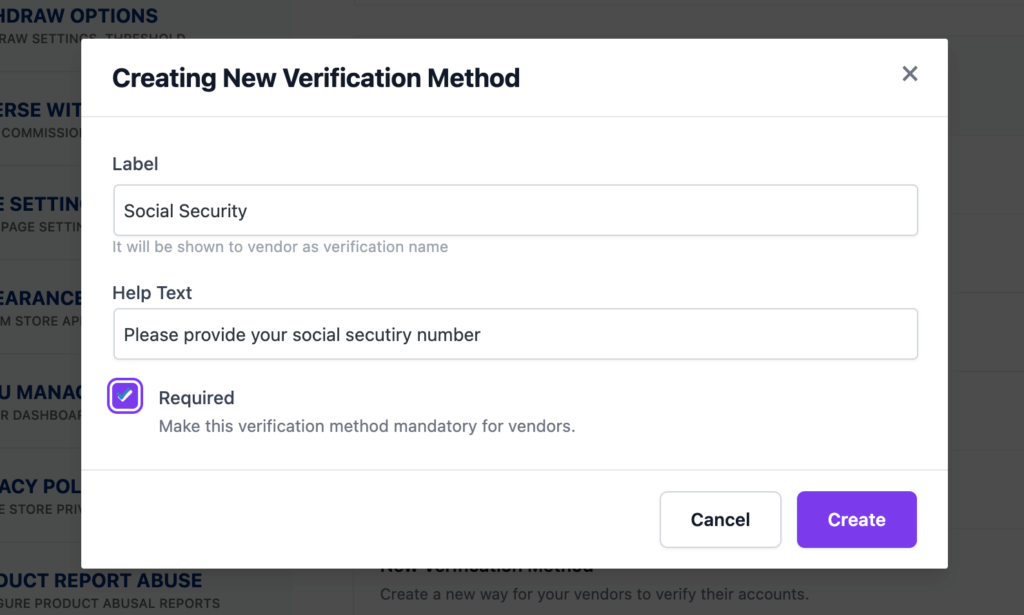
Click on the Create button to finish creating a new verification method-

You can see that the new verification method has been created-
Social App Settings
Vendor Verification supports the following social media to connect with your marketplace, which can be used to verify your vendors-
- GooglePlus
Setting up Facebook Social App
1. For integrating your Dokan Vendor Storefront with their social media accounts, you have to create an App first. Navigate to –
WP Dashboard → Dokan → Settings → Seller Verification
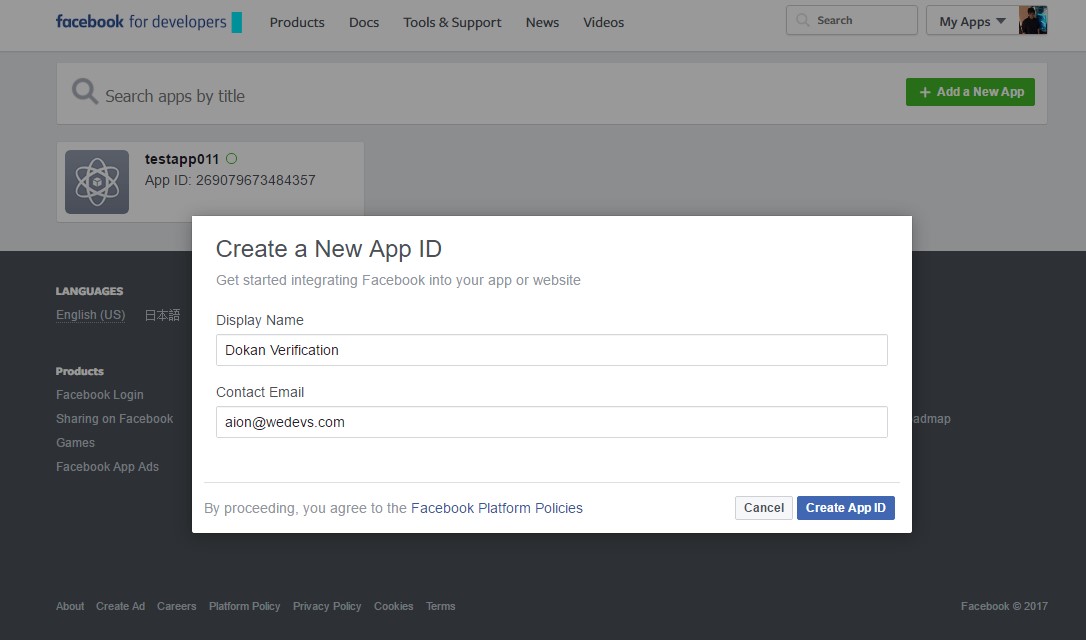
2. At first, you have to create an App. If you already have an app created just use its credentials. Otherwise, click on the Create an App button provided beside Facebook App Settings. You will be redirected to Facebook Developer platform.
Sign in with your Facebook ID and click on the Add a New App button. You will see a popup. Now, enter your App Display Name and Contact Email. Then click on the Create App ID button.
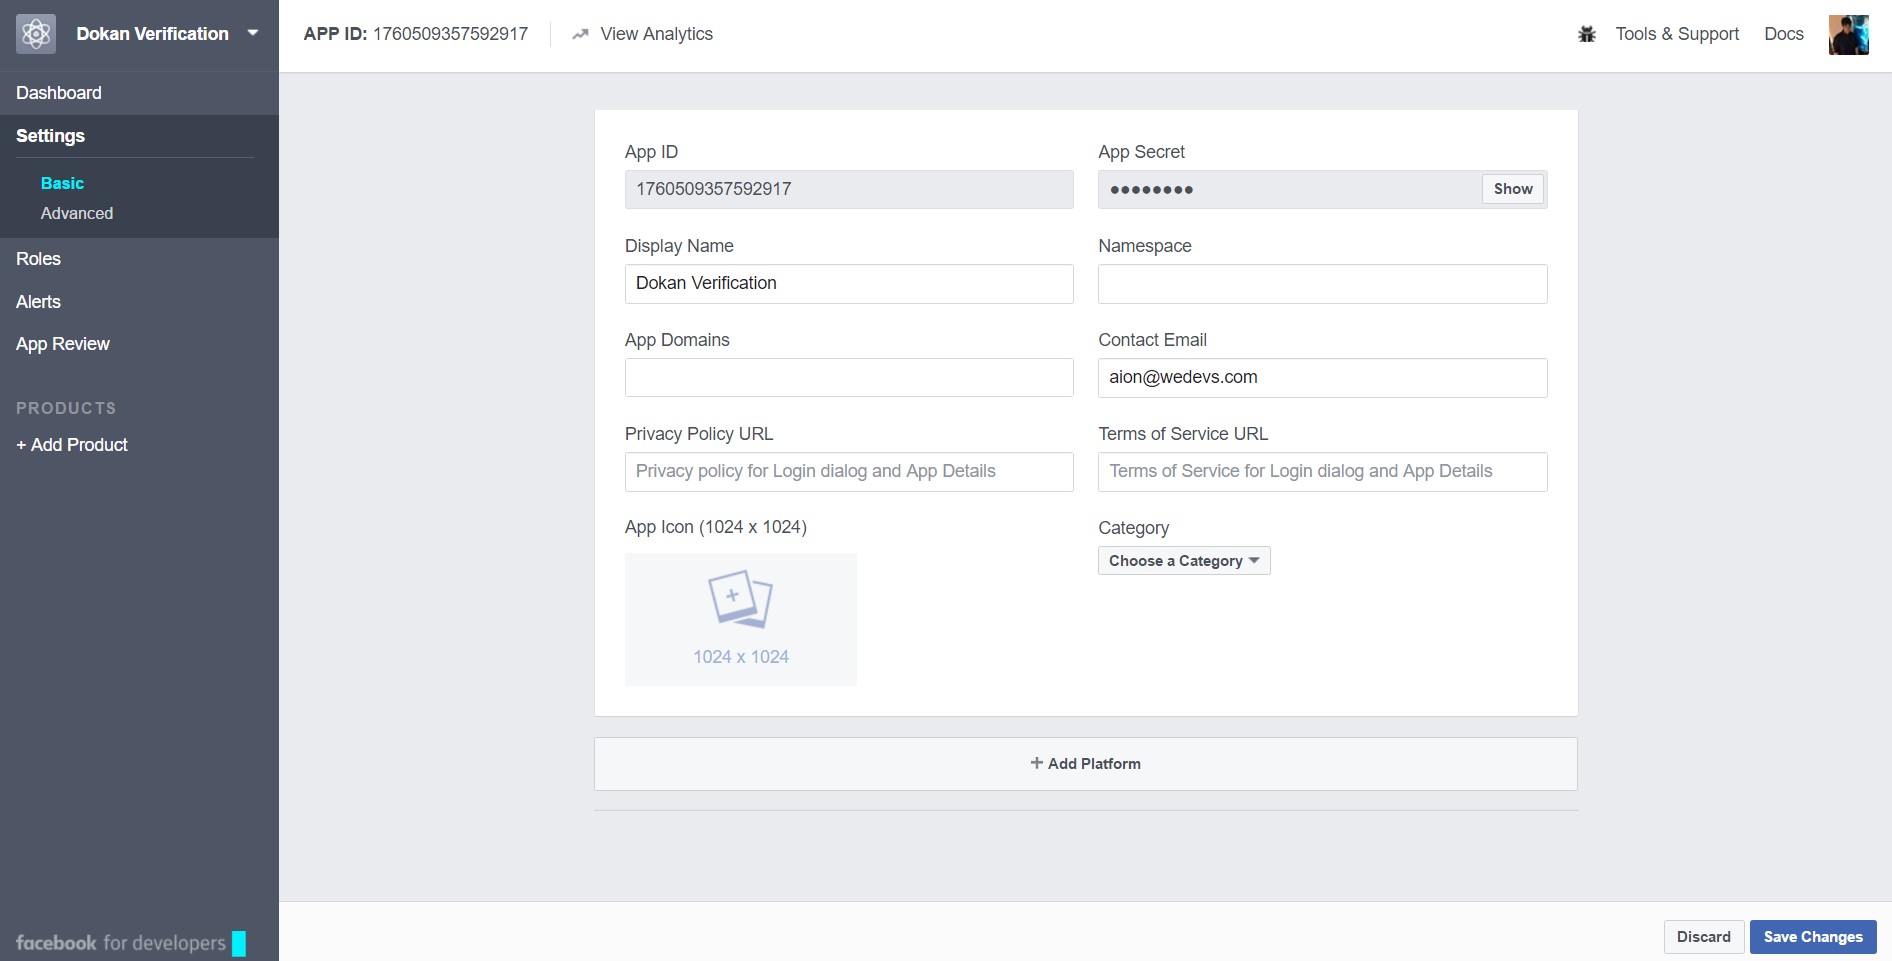
3. You will be redirected to the Dashboard of your App. Select Facebook Login.

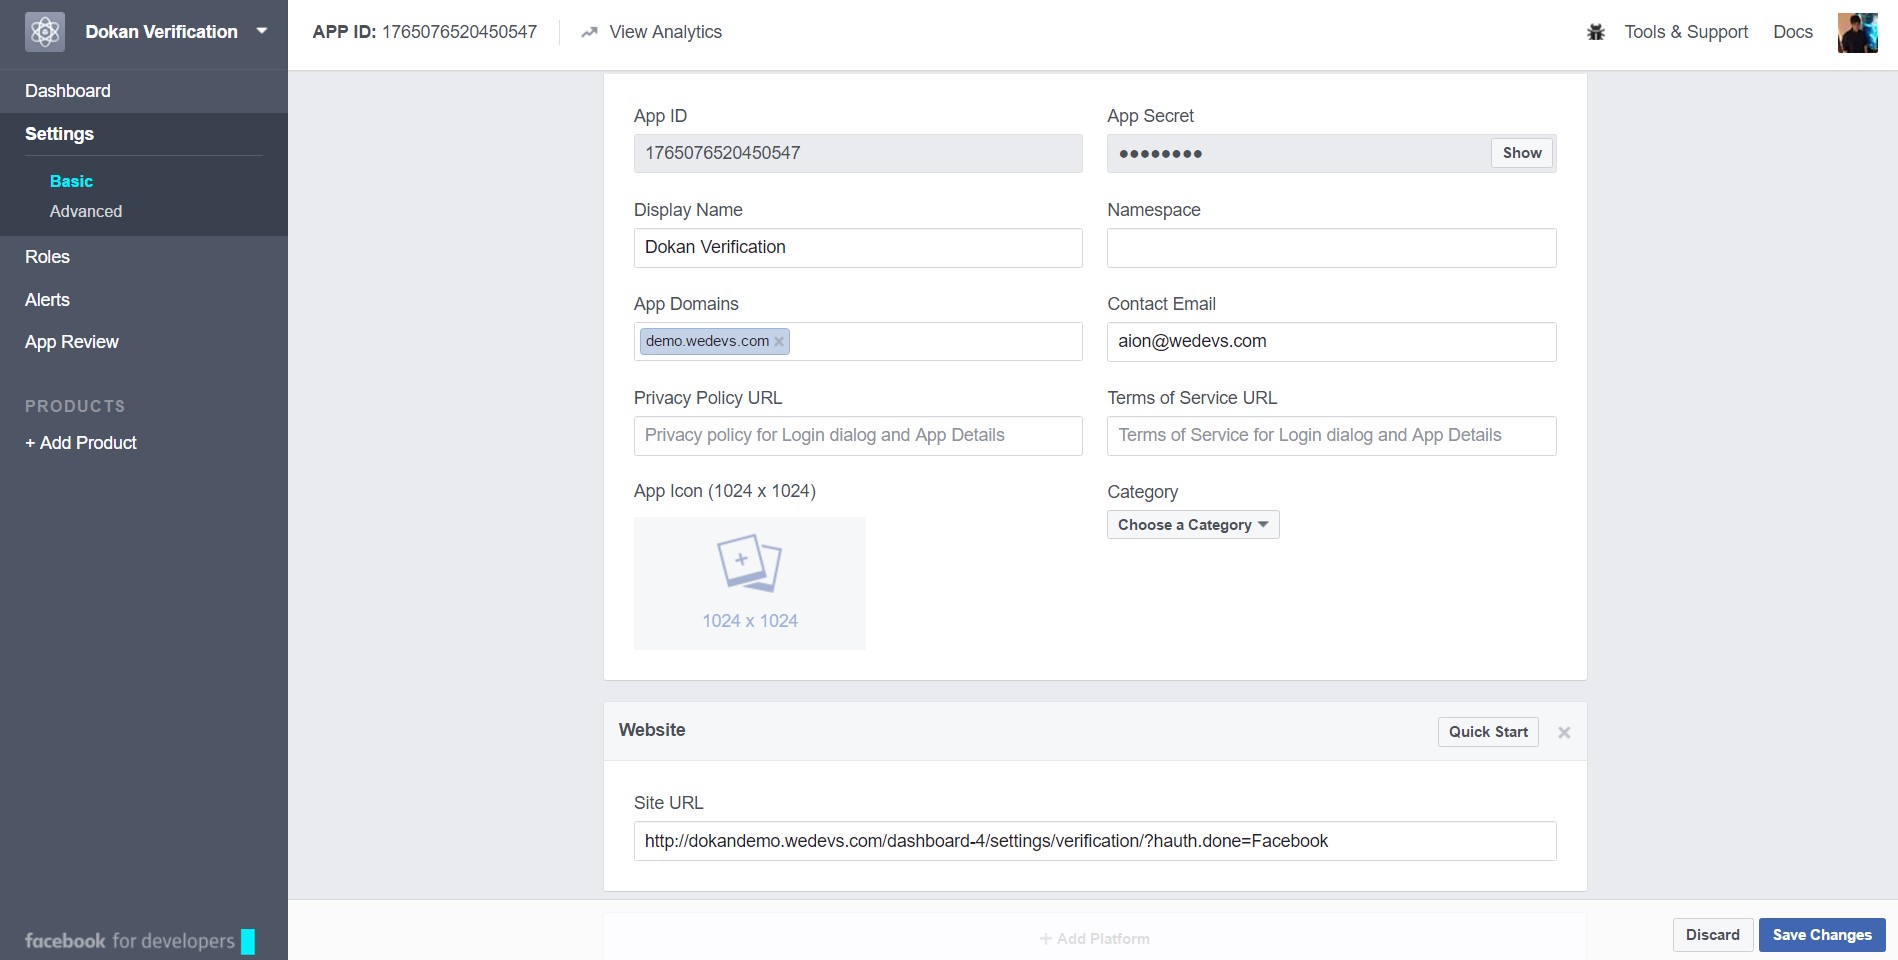
4. Click on the Settings from the left menu bar. You will get the App ID and App Secret.
You have to copy these two keys and paste them on Dokan Seller Verification Settings page.
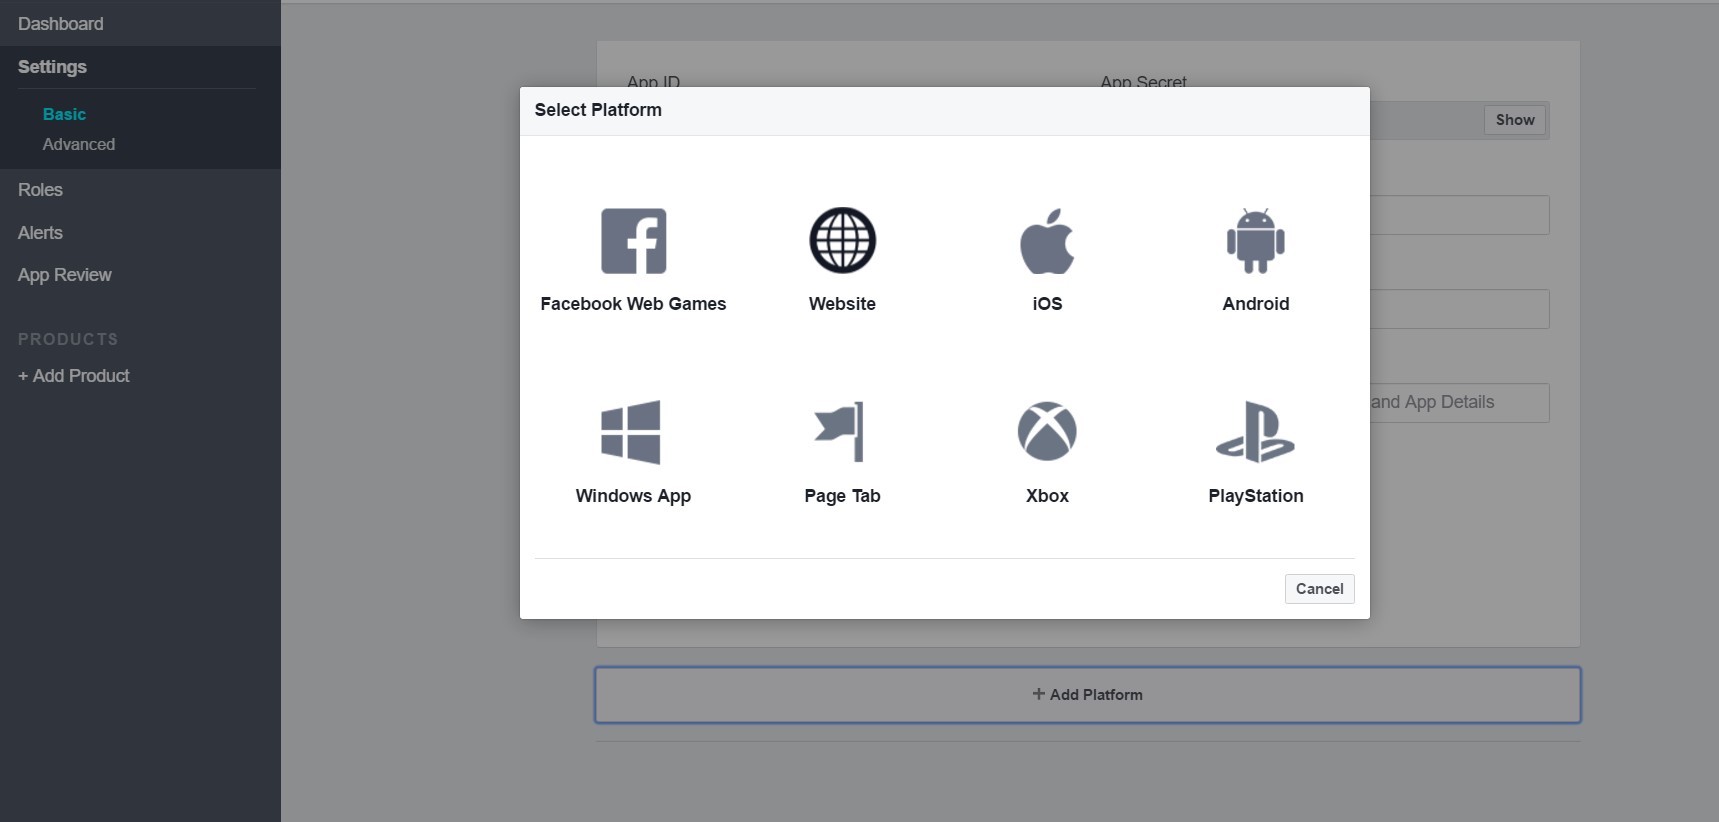
5. In this stage, you have to specify a platform. Click on the Add Platform button.
6. Select the platform you want to add. In case of Dokan, we will be adding Website platform. Thus, click on the Website icon.
7. Now, copy the Site URI for Facebook Settings given from the Vendor Verification Settings page.
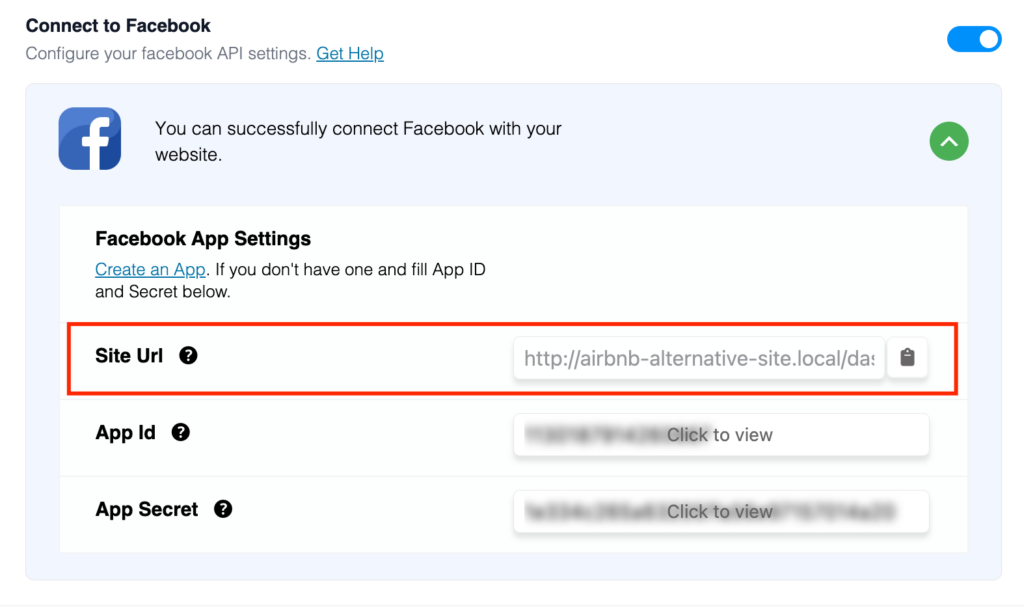
Paste the Site URI on Site URL under Website Section on Facebook App Settings page.
Use this Site URL in two places:
a) after you log into Facebook to create app, you have to navigate through Settings>Advanced>Share redirect domain whitelist. Paste the Site URL of your Dokan settings.
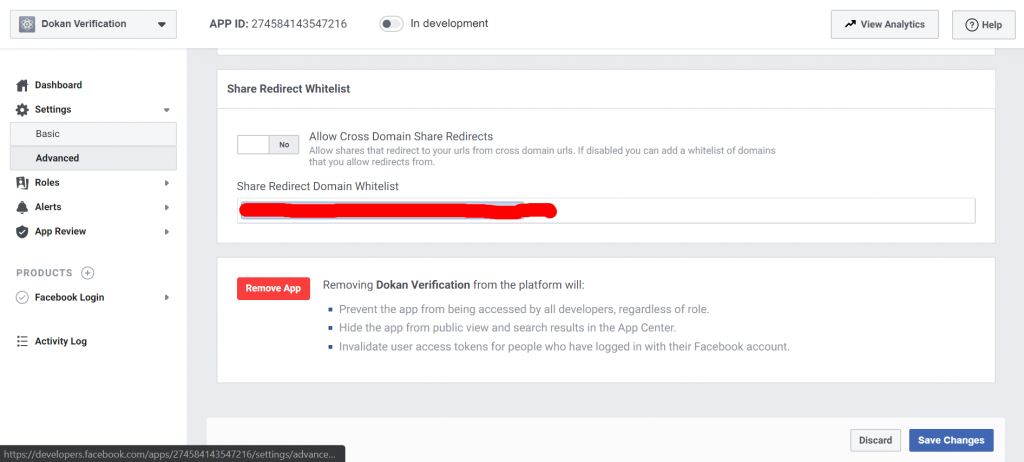
b) navigate through Facebook login>Settings>Valid OAuth URI. Paste the Site URL of your Dokan settings.
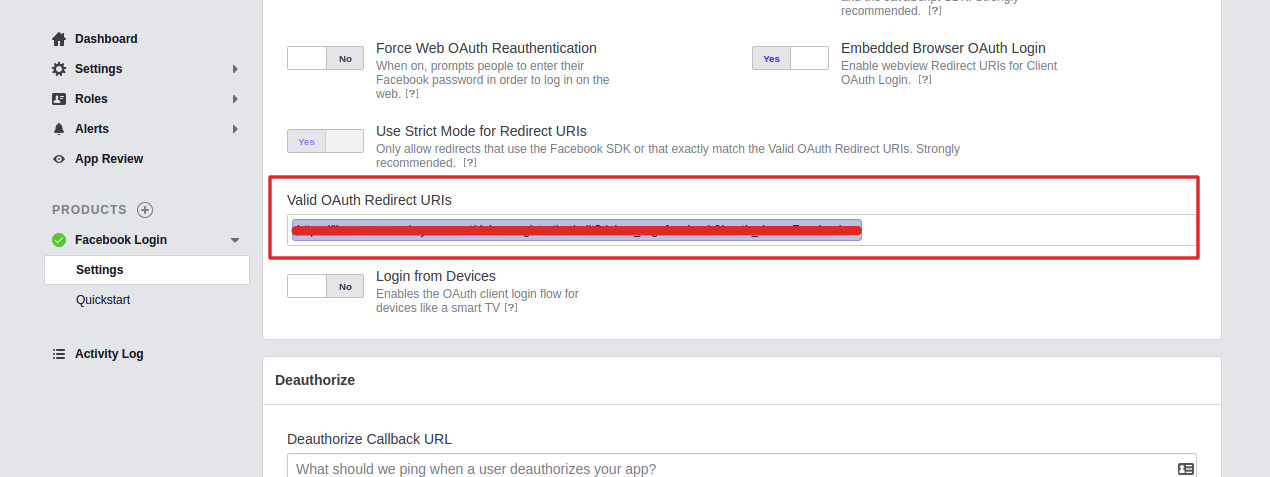
8. Click on Save Changes.
9. Then add the App Domains including the sub domains (if any) in the App Domains field. Basically, this is the domain of your Marketplace’s web URL, so copy and paste it here.
10. Finally, click on the Save changes button and you are done with creating your App.
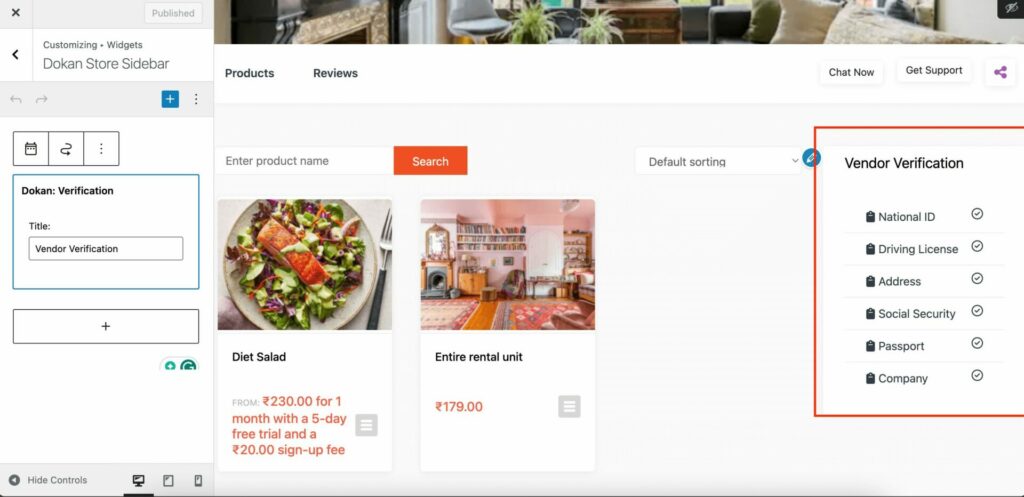
Adding the Widget
Admin should add the Dokan Verification widget to the Store page or the verification will not display on the store front. Go to –
WP Dashboard → Appearances → Widgets
And add drag the widget into the Store panel to the top right. Please note that the verification widget only appears on the storefront and no other pages.
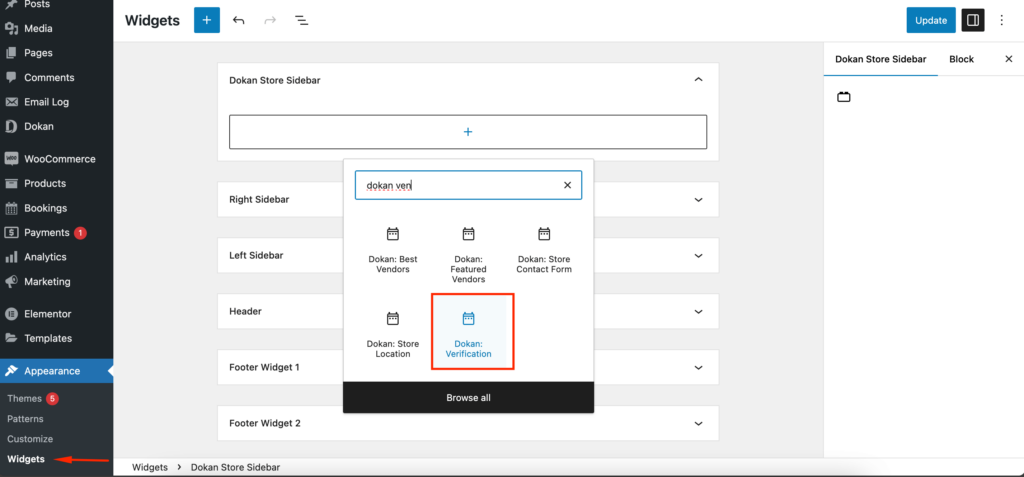
Or you can customize the from the front end as well. Just click on the Customize button, and click on the Dokan store sidebar. Then add the widget-
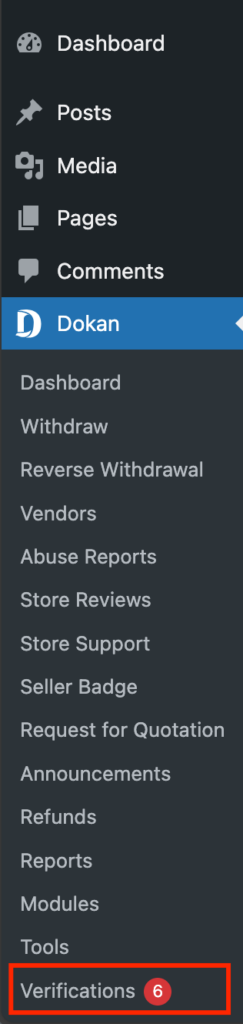
Manage Verification Requests
Admins can Approve or Reject verification requests from WP Dashboard>Dokan>Verifications.
From the menu, admins can see how many verification requests are pending-
This is how the verification requests page will look like-

ID and Address verification do not require anything to be configured separately. But Admins need to manually approve Photo ID and Address.
To approve Photo ID and Address, admins need to simply hover over the request. The Approve|Reject |Notes buttons will appear.
Also, admin can approve or reject verification requests in bulk.
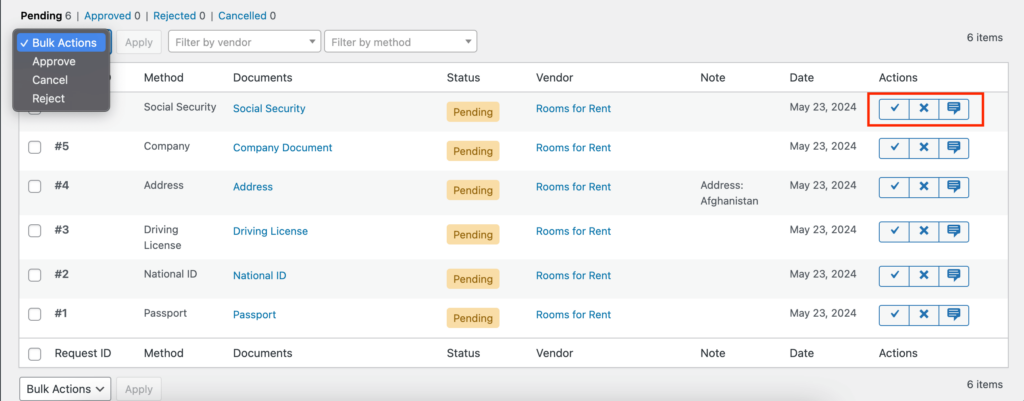
The check-marks and cross-marks will indicate which fields have been approved and rejected.
An approved field will make the request move to the Approved tab automatically. Admins can undo the action and Disapprove the field again.
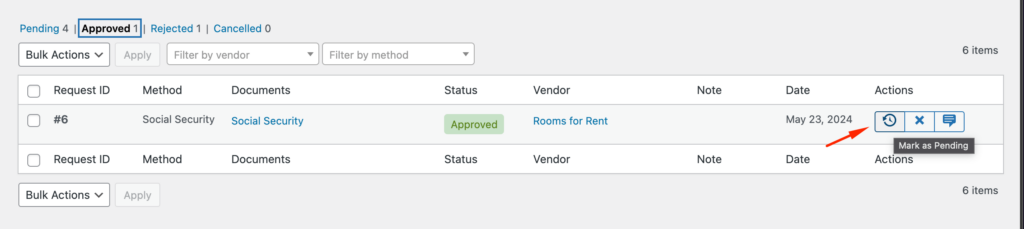
If a field has been rejected by the admin, the request will automatically move to the Rejected tab. Admins can still Approve or make the field Pending.
Setting up SMS Gateways for Verification
Admin – Configuration
The module also has a feature to send SMS to verify the contact number of the vendor and match it with his profile.
1.To do this go to WP Dashboard → Dokan → Settings → Verification SMS Verification. In this tab, you have the all the required fields to populate from the service provider once you have registered with them. Everything else is plain and simple.
2. We have implemented two famous SMS gateway service providers, Vonage and Twilio. Simply click on the gateway links provided in the instruction to obtain the API Key and Secret for Vonage, and SID and Auth Token for Twilio.
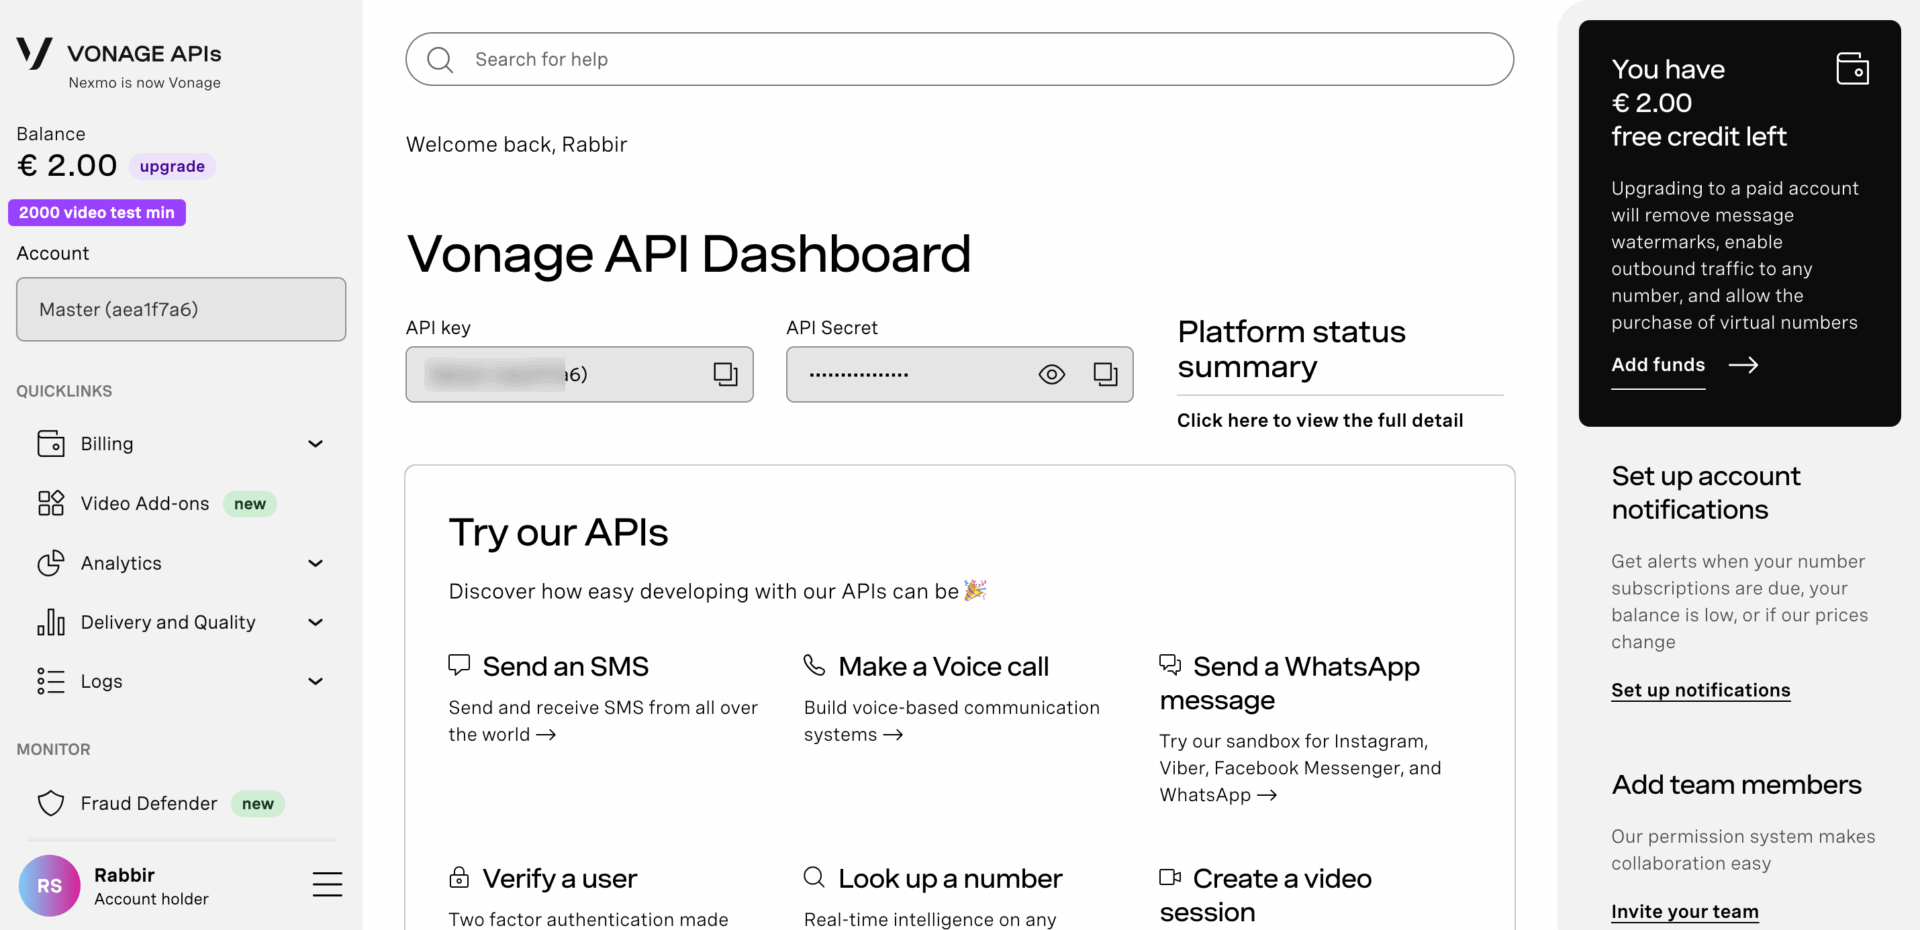
To get API Key and Secret for Vonage, just login to your Vonage account and in the dashboard you will see the API Key and Secret. Copy and paste them in your Dokan Settings page-
For Twilio–
Login to your Twilio account, there you will find your From number, SID, and Auth Token–

Or, you can use test keys for your local account from API Keys section of your Twilio account-
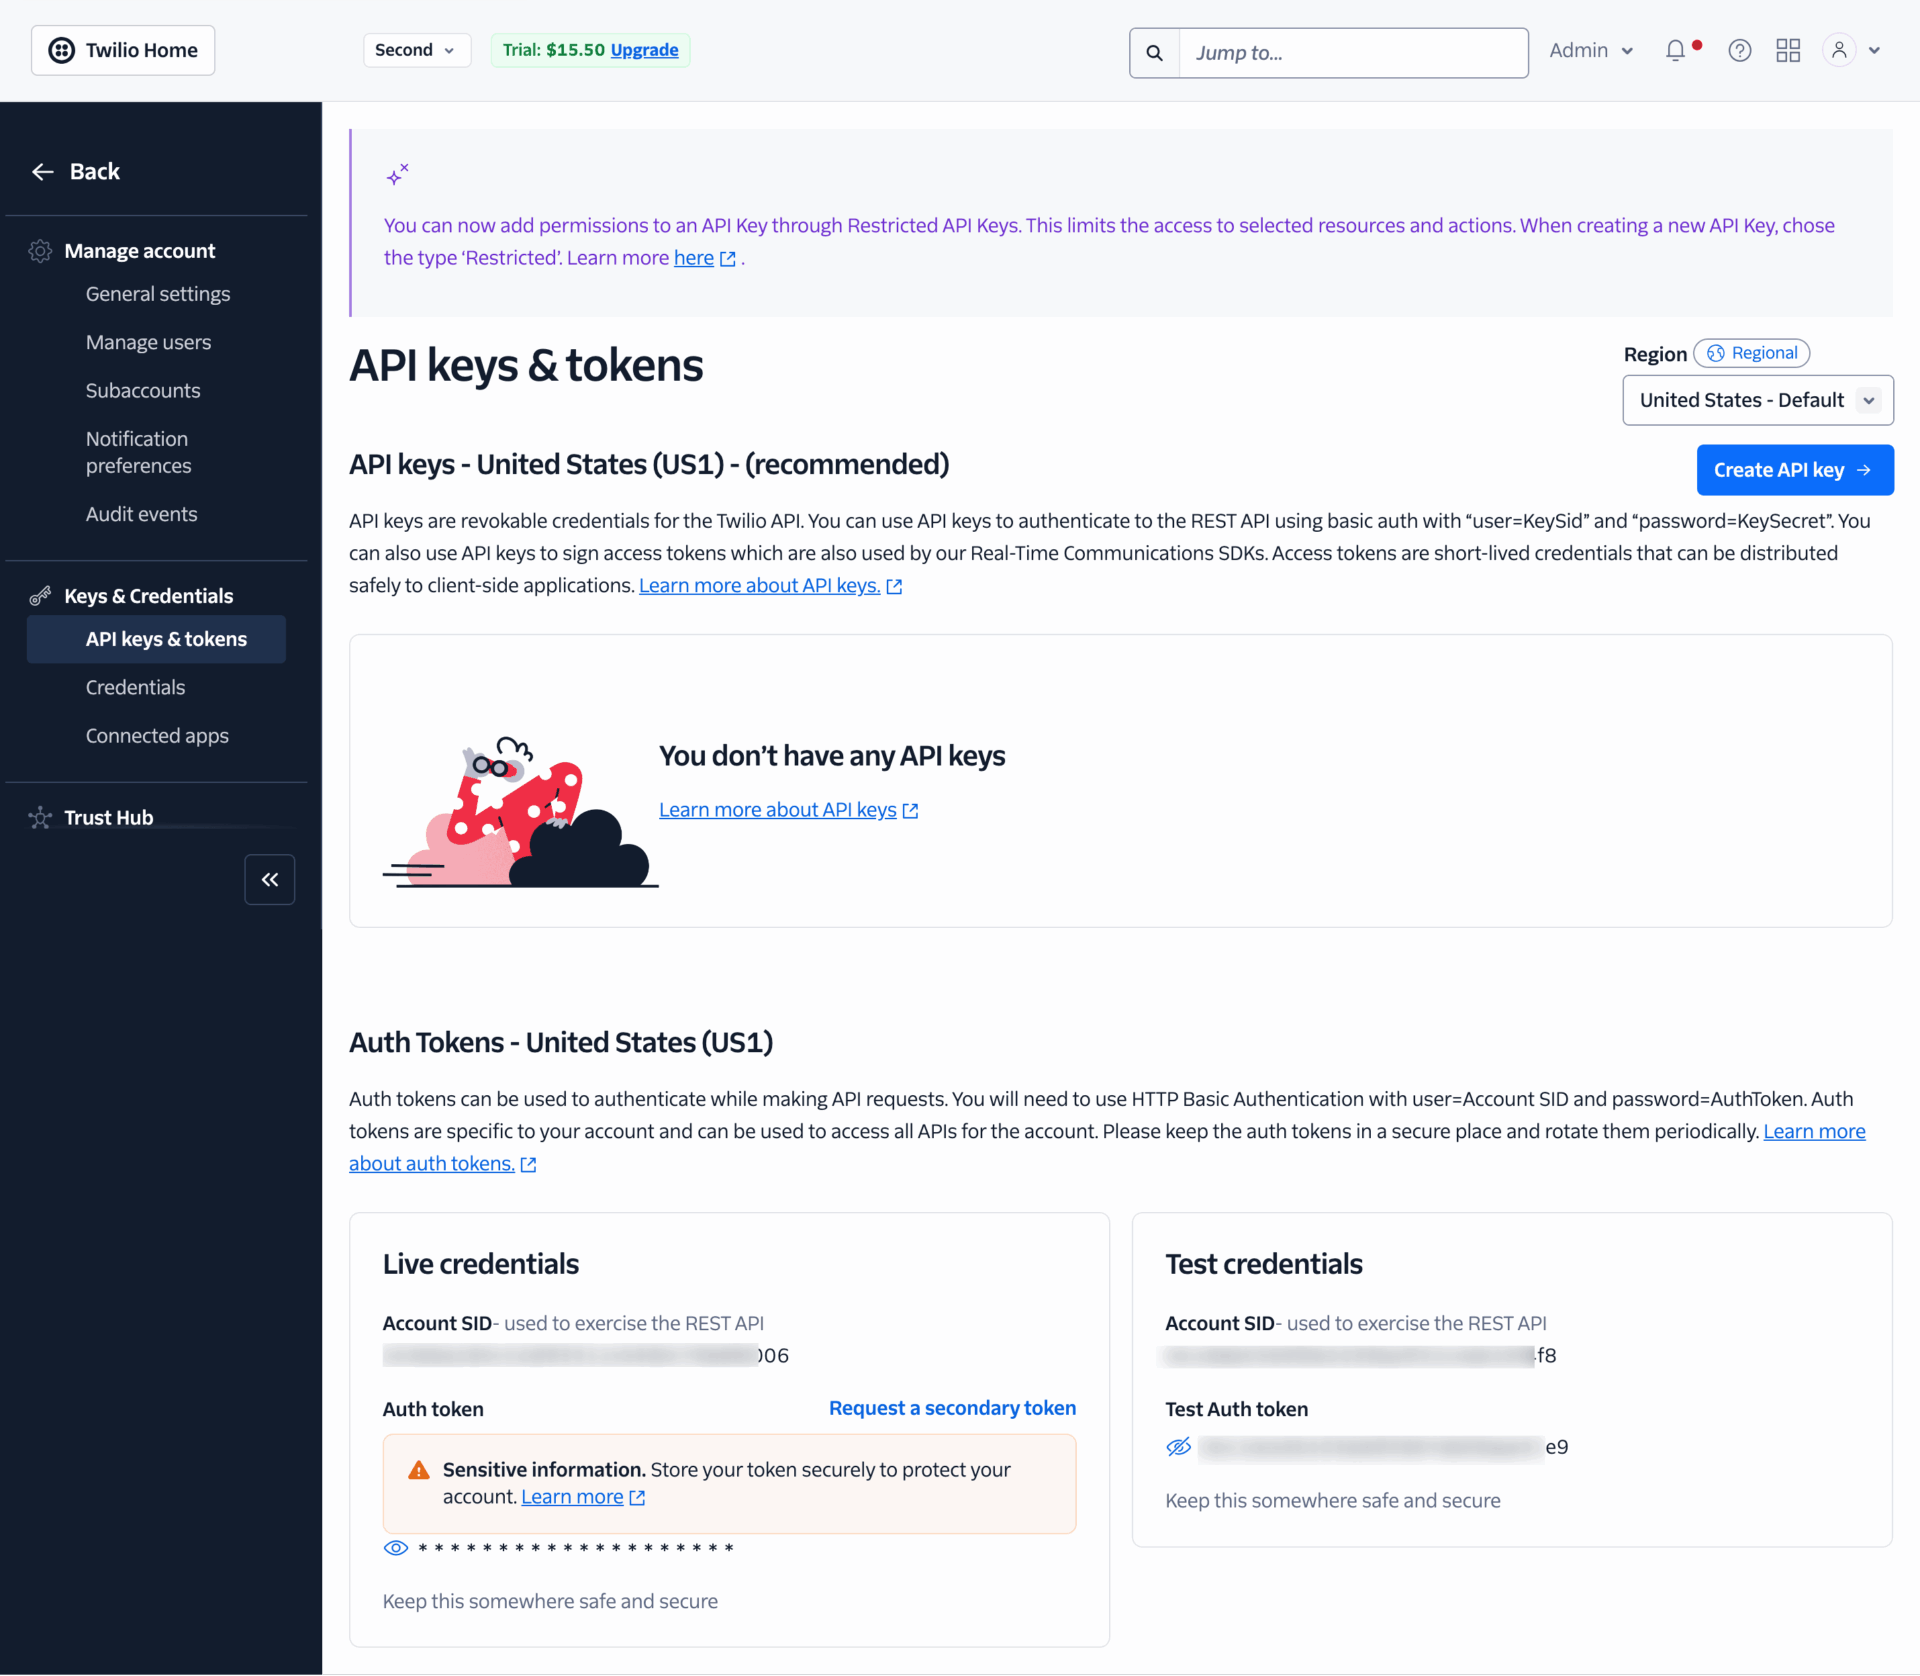
Copy and paste them on your Dokan settings page-
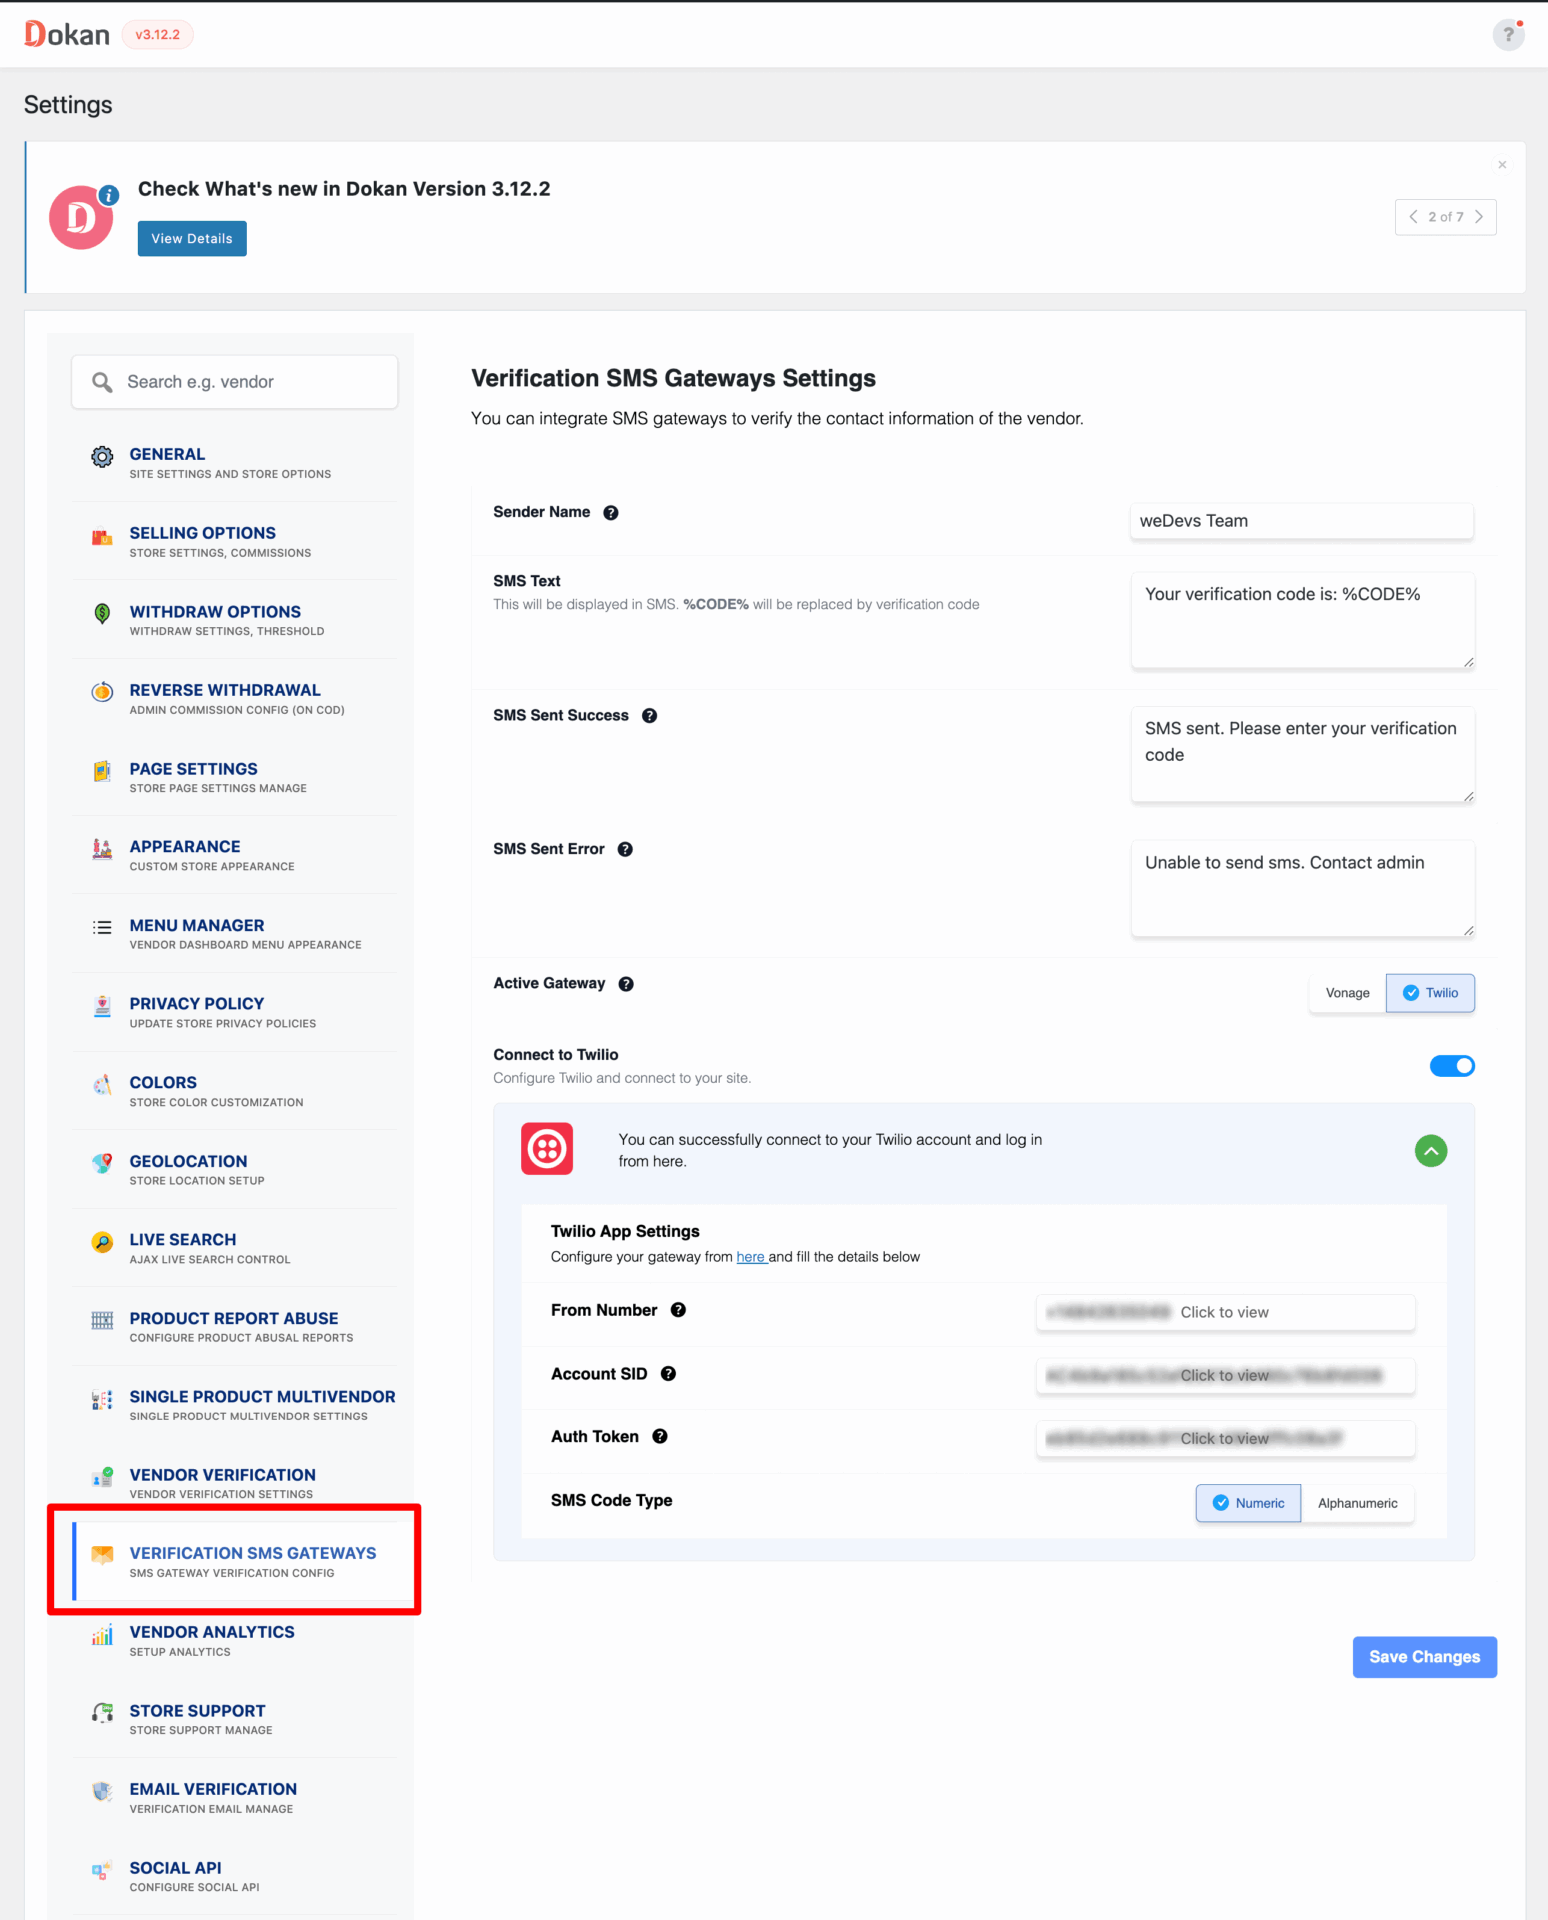
Don’t forget to save the changes.
Any of them can be used considering your needs and user base. Even you can have accounts with both providers and place the credentials and switch anytime between them.
The SMS system works through a 3rd party SMS gateway provider, who will white label your SMS’s and send automatic messages to the vendor’s phone.
It is totally optional and will not send more than 1 SMS, only when you want it to verify. So you do not have to worry about SMS charges.
That’s all about configuring the Vendor Verification module for Dokan.

