
After a lot of requests from our clients, we have added the EU Compliance fields module to the new Dokan Pro version 3.3.1. Now, users of Europe or with a bit of modification via hooks anyone can use these fields to meet the requirements of their country while running the marketplace. Let’s see how to set up this module.
Features Included in this Module:
- Custom fields for vendors
- Custom fields for customers
- Germanized for WooCommerce plugin support for vendors
- Individual PDF invoice numbers for vendors
Pre-requirements
Before you start, you need to install these plugins,
- WooCommerce
- Dokan Lite ( Latest Version)
- Dokan Pro(latest version)
Activating the Module
Now that you have installed the required plugin, you need to activate the module. To do that, navigate to WP Admin–> Dokan–> Modules. There find the EU Compliance Fields module, toggle the button to activate the module.
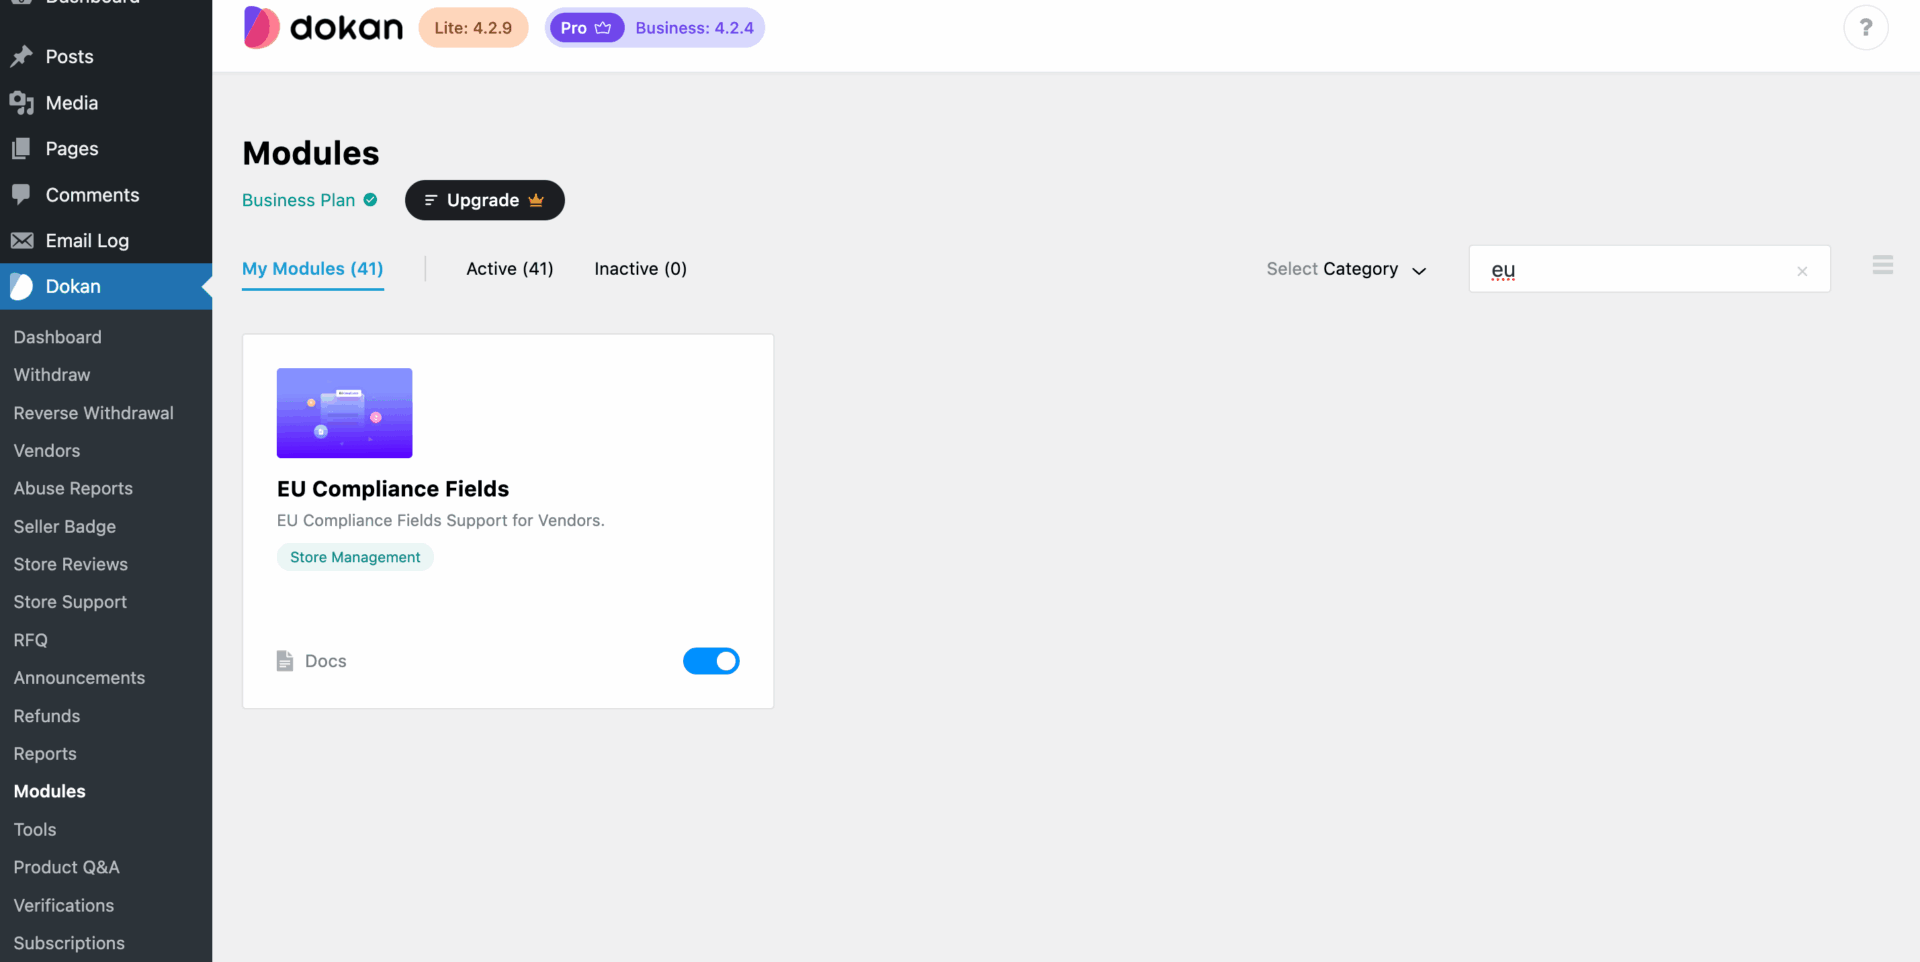
EU Compliance Fields Settings
After activating the module, navigate to WP Admin–> Dokan–> Settings-> Compliance-> EU Compliance. You will find the settings option for EU Compliance Fields.
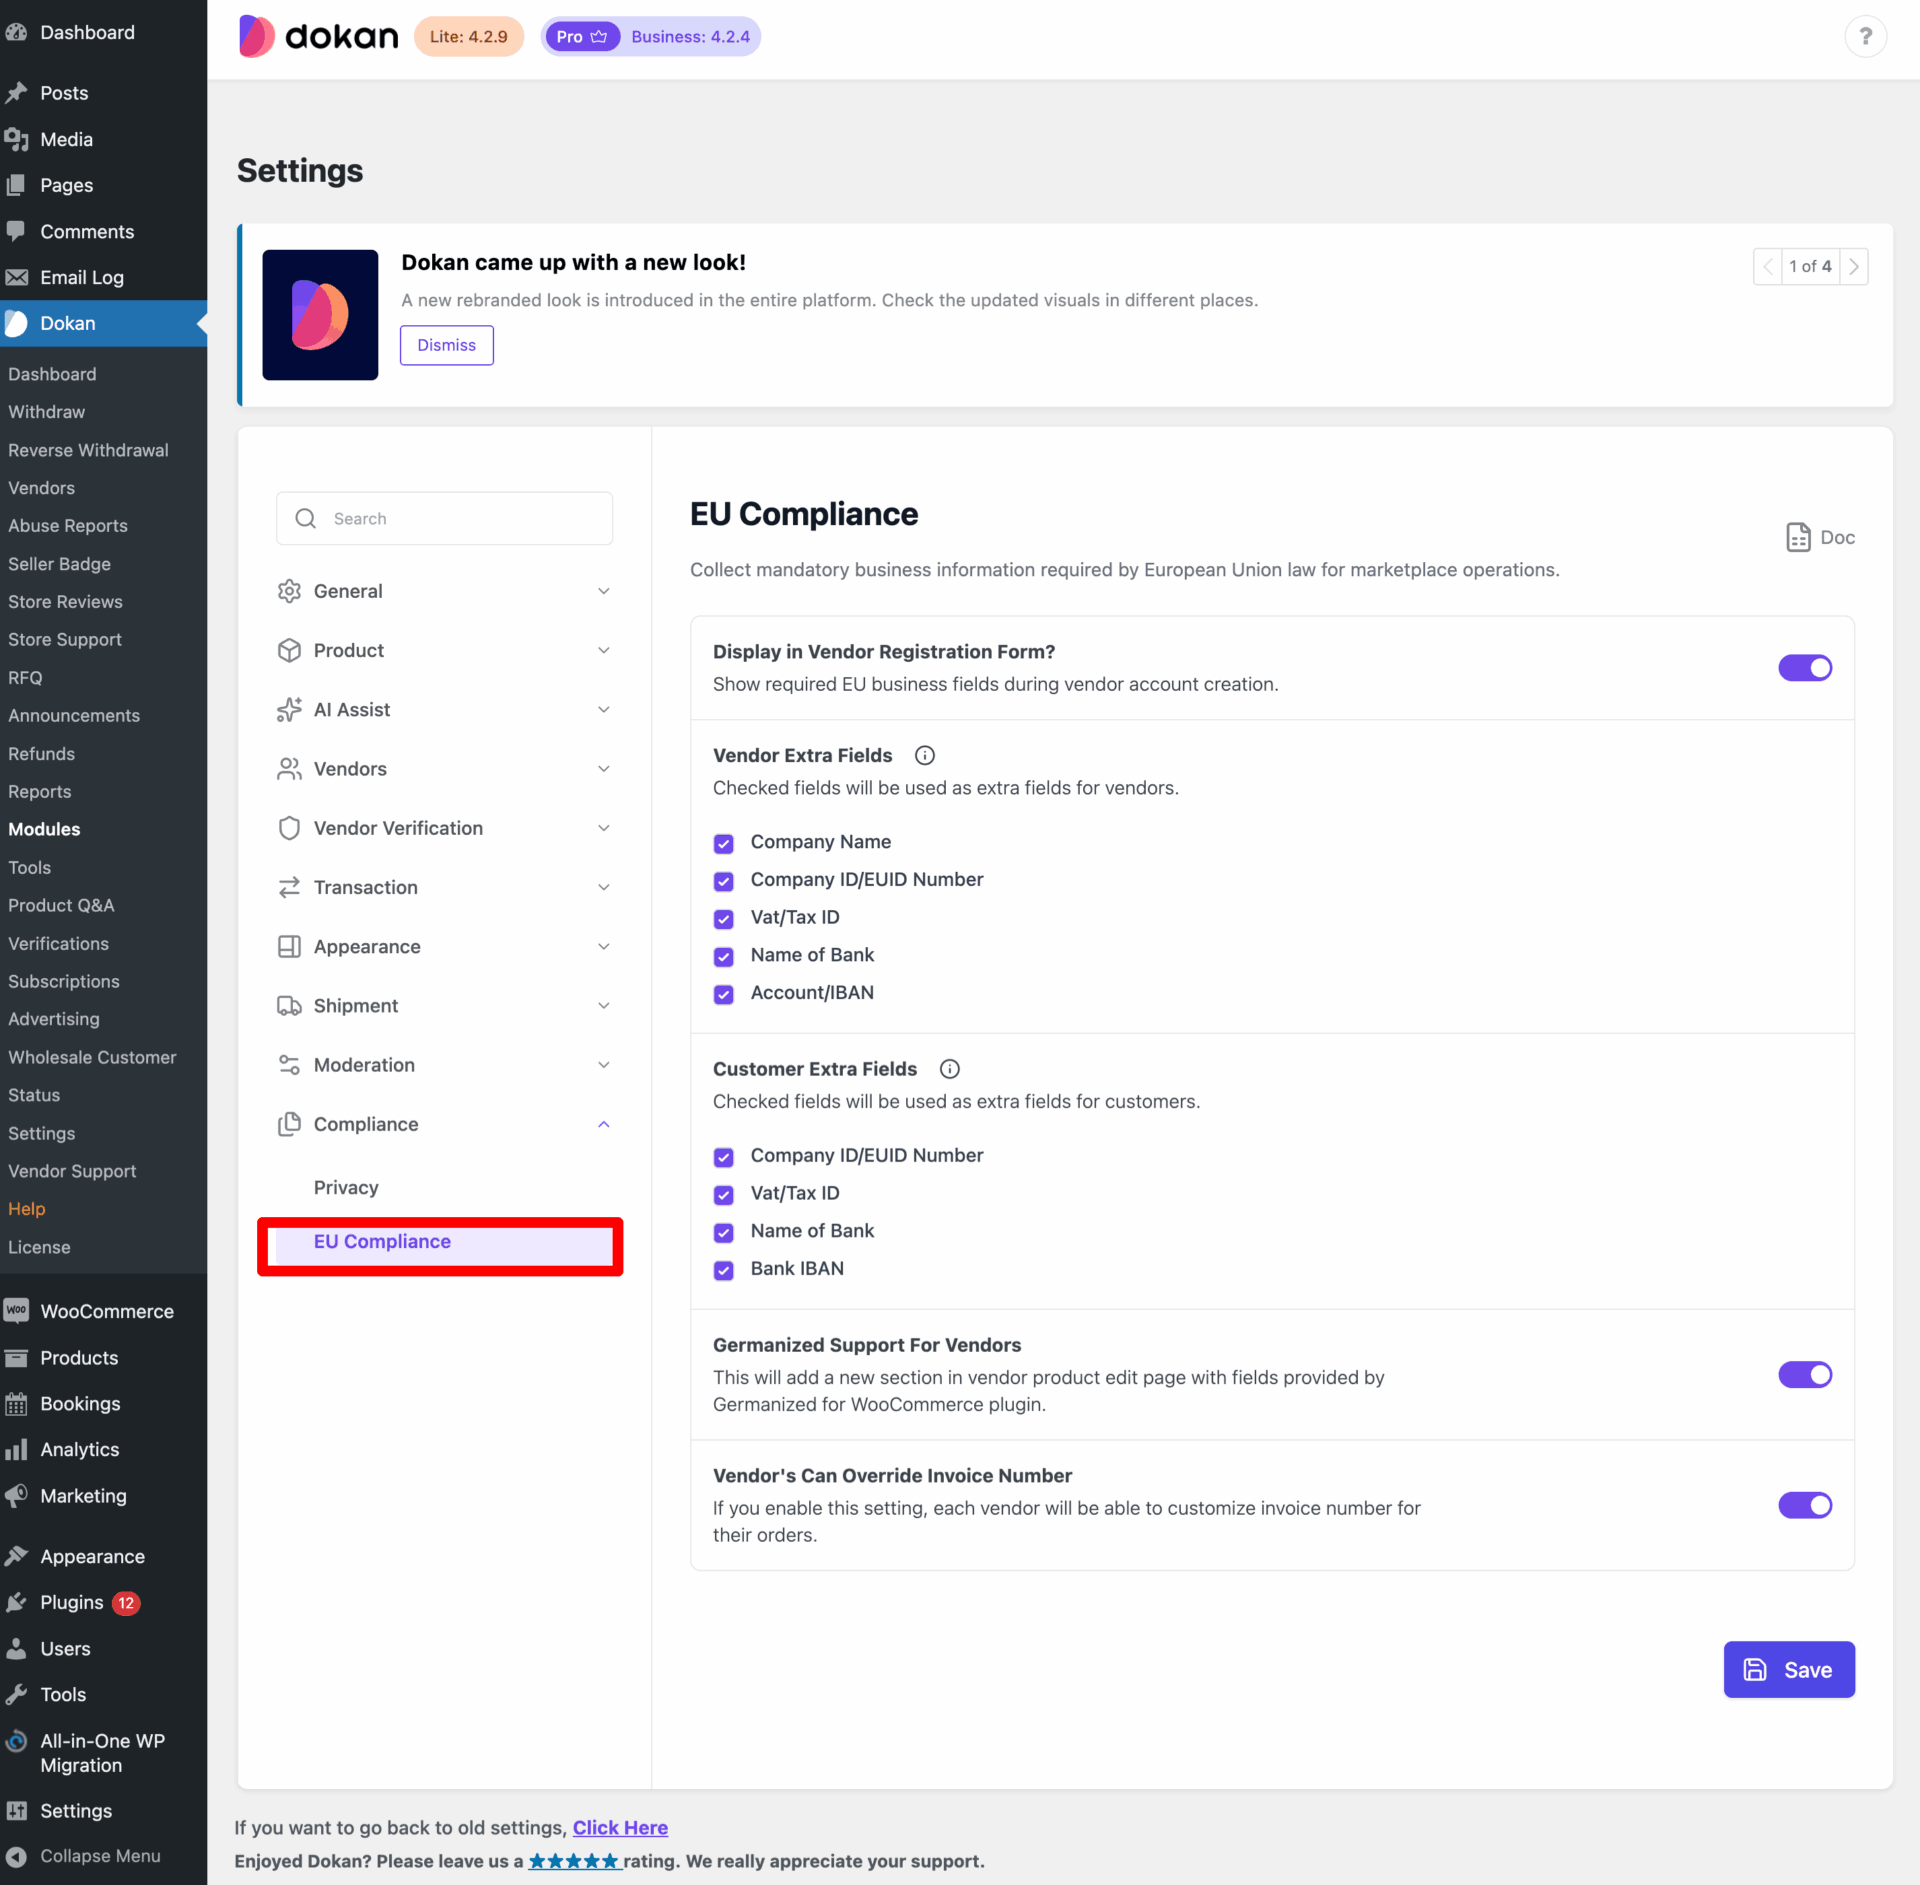
Vendor Extra Fields
Here, you will find fields for the,
- Company Name
- Company ID/EUID Number
- VAT/TAX Number
- Name of Bank
- Bank IBAN
All these fields will be selected by default. Also, the option to display these fields in the vendor registration form will be selected as well.
If the admins want, they can remove some of the fields which they don’t require. All they need to do is uncheck the fields they don’t need. And when you hide some of the fields, the fields will be removed from all the places we mentioned below. For example, the vendor pop-up page.
After selecting these fields, these are the places they will show. Like,
1. When You Add a New Vendor
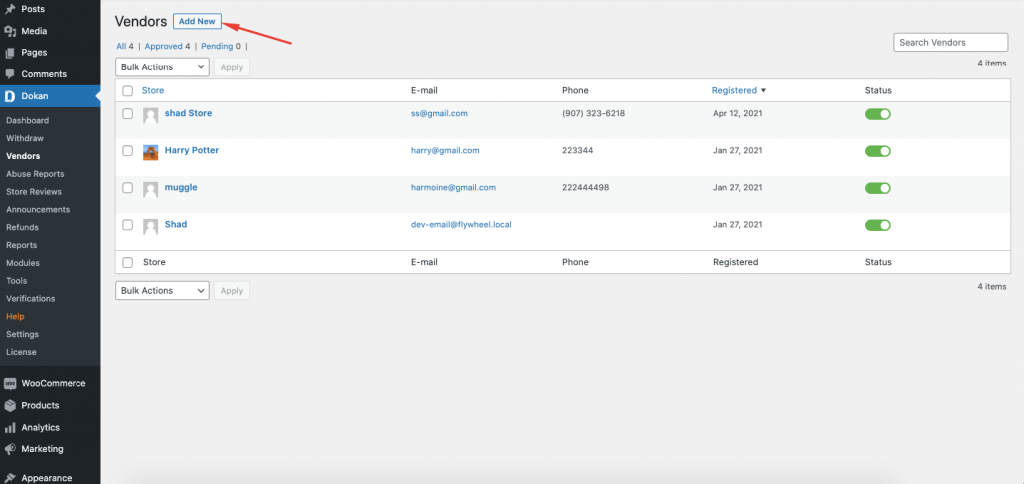
These fields will be shown when you add a new vendor. Navigate to WP Admin–> Dokan–> Vendors. There select the Add New option.
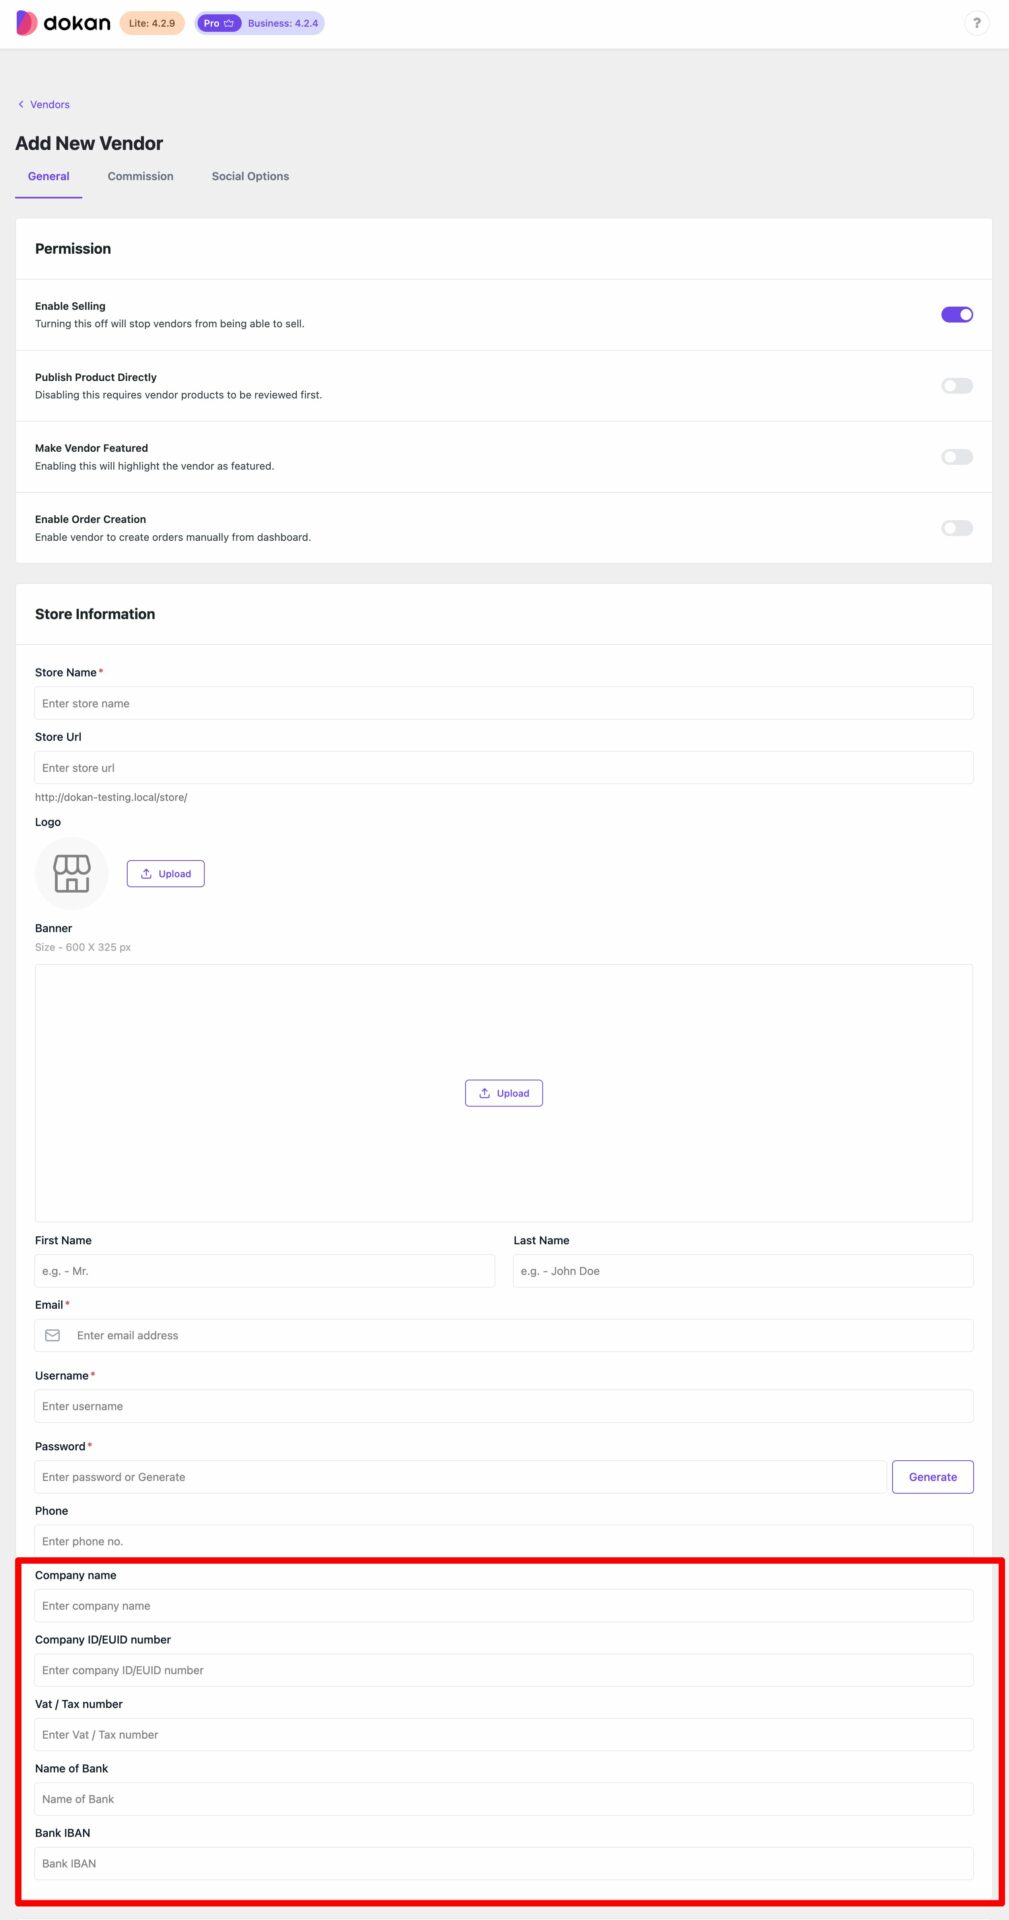
When the pop-up module appears, you will find the EU Compliance Fields when you scroll down. Fill them out as per the requirements.
2. Editing an Existing Vendor
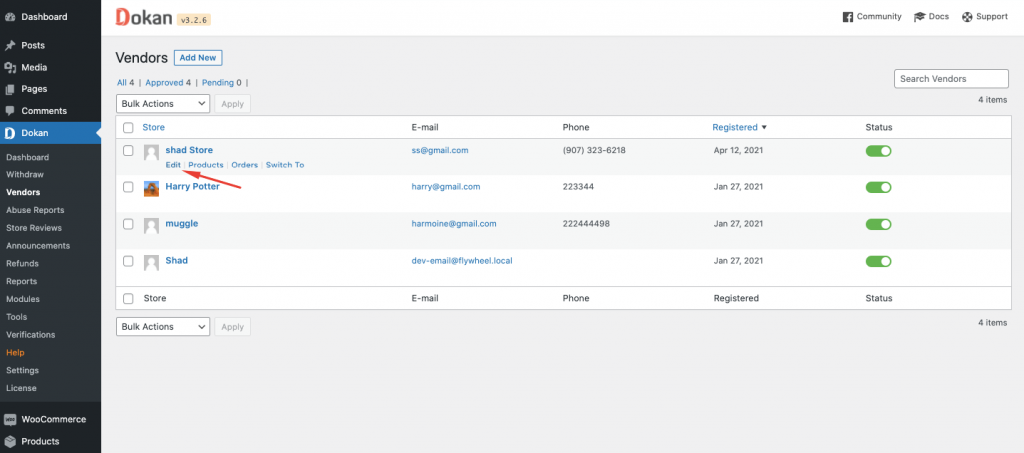
Also, you can find these fields when you edit an existing vendor as well. Click on the Edit button on one of the existing vendors,
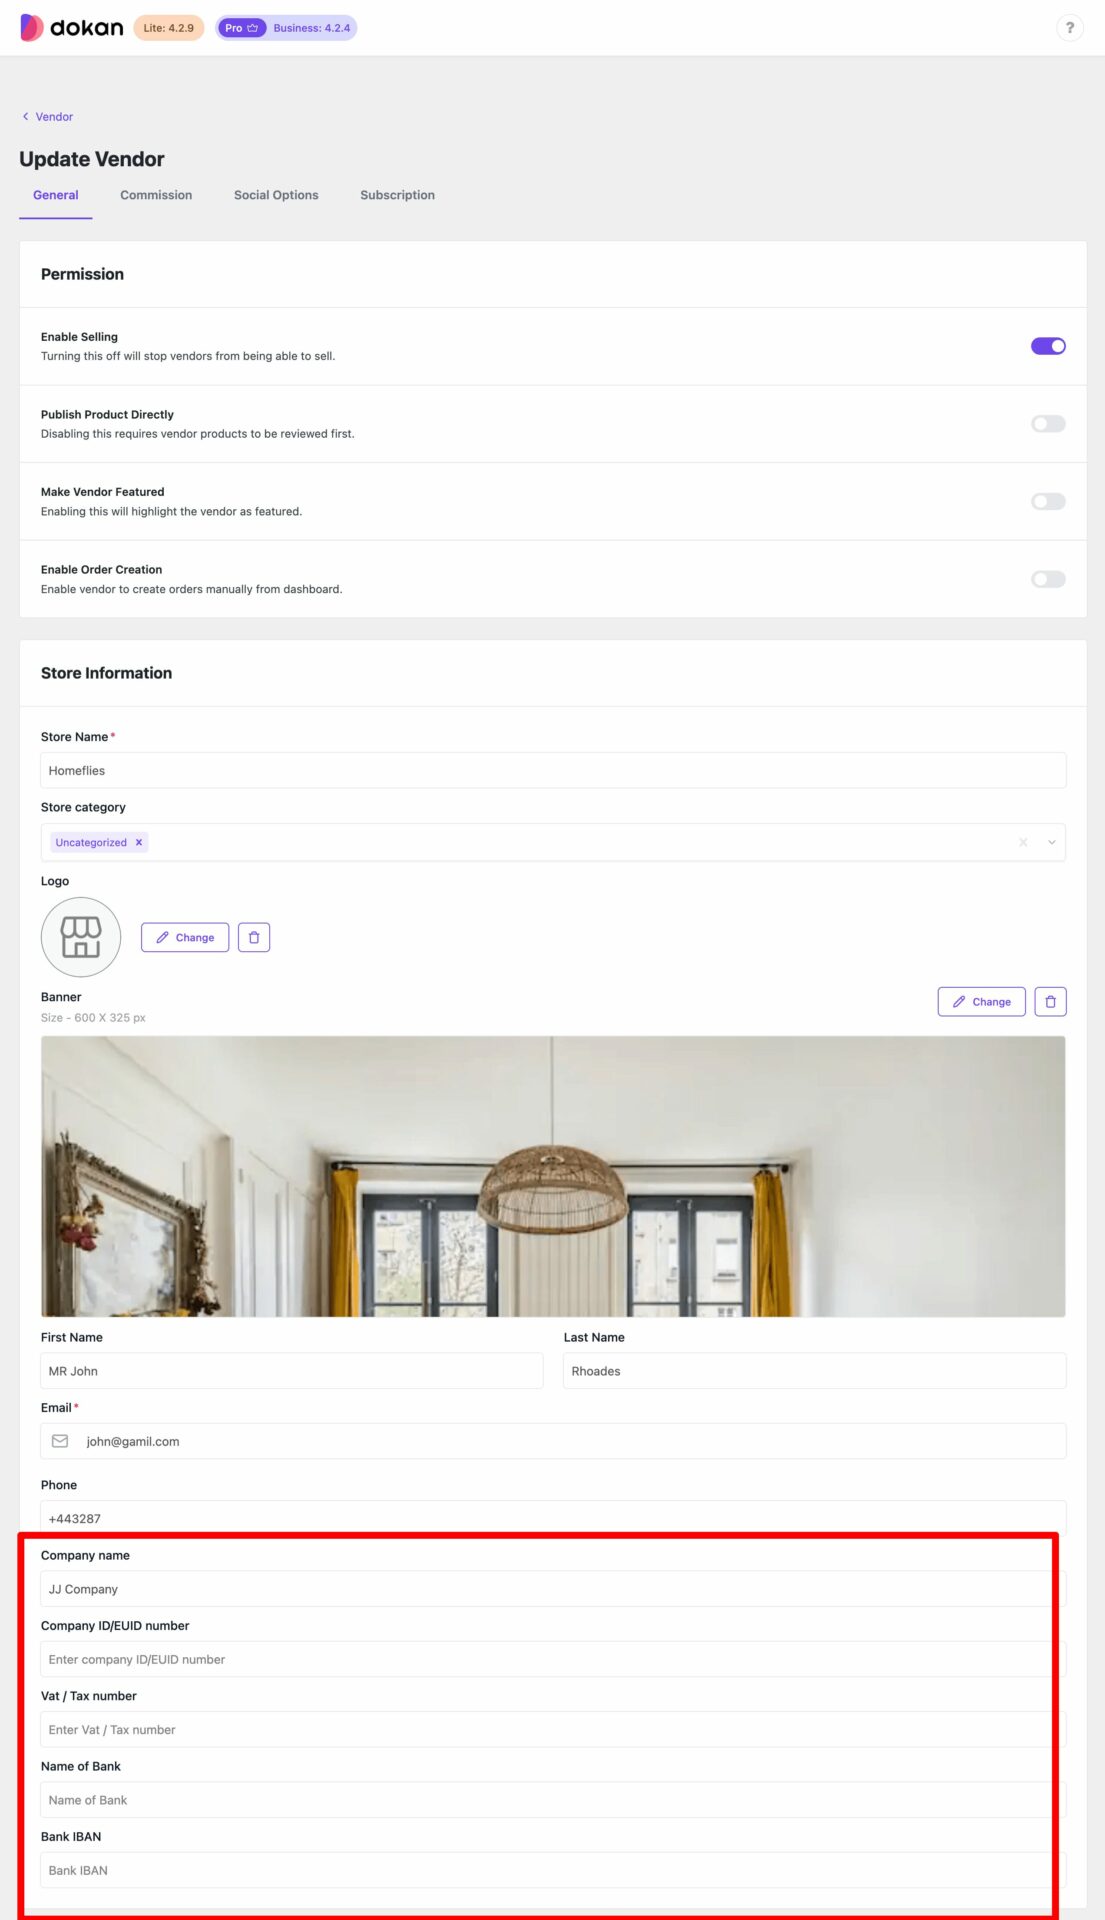
On the next page, you will find the fields that you have selected.
3. User Profile Page
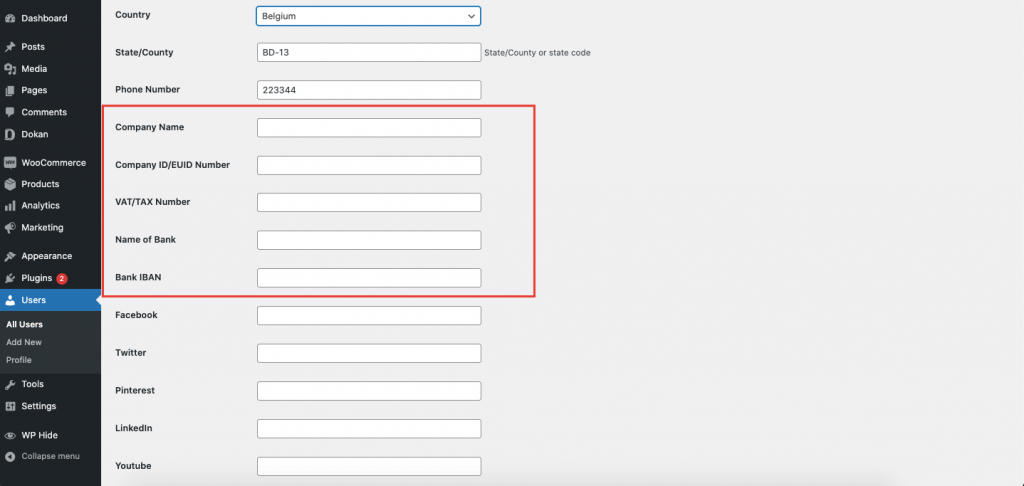
Next, we have added these fields to the user profile page as well. Navigate to WP Admin–> Users. Click on the Edit button. You will find the fields under the Dokan Options.
4. Single Store Page
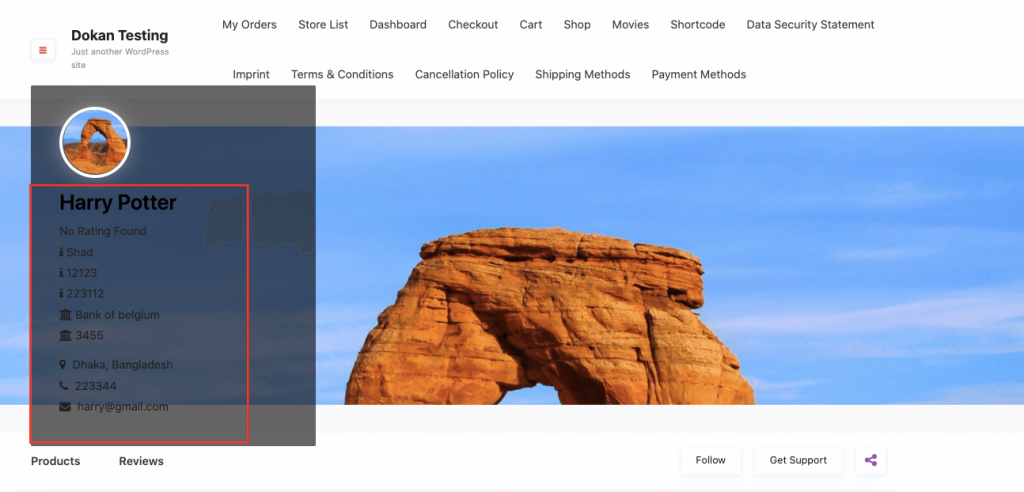
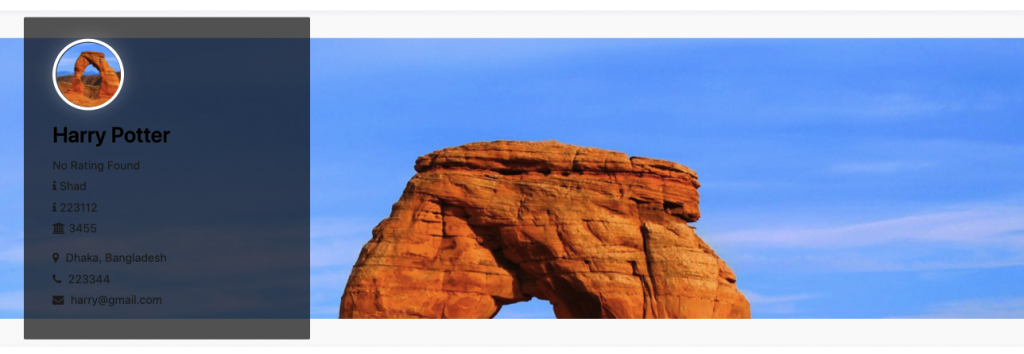
The selected fields will appear on the vendor store page as well. You will find the fields on the banner of the vendor store. Go to the Store List Page and click on a vendor store.
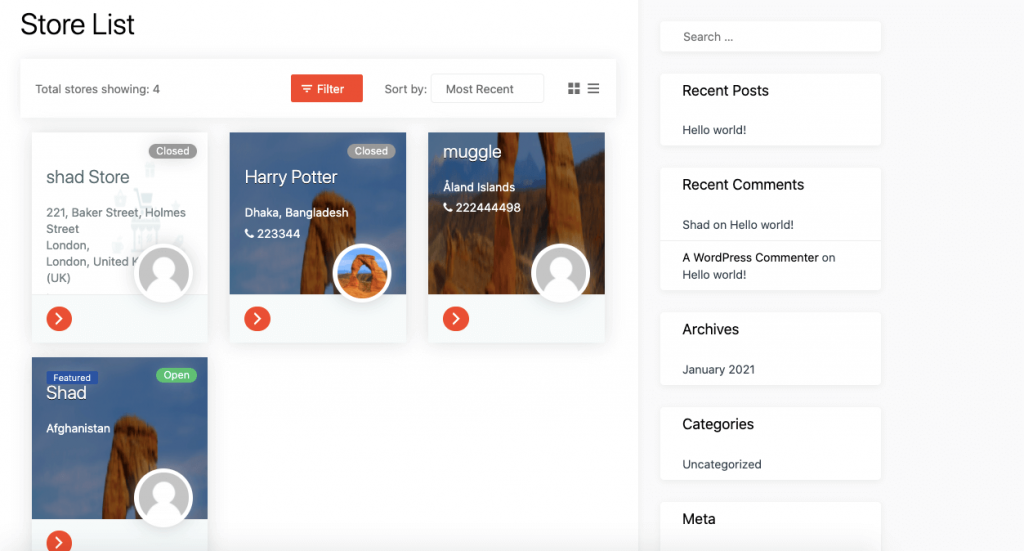
When you enter the store, you will see the fields details on the store banner.
Hiding Fields From the Store Banner
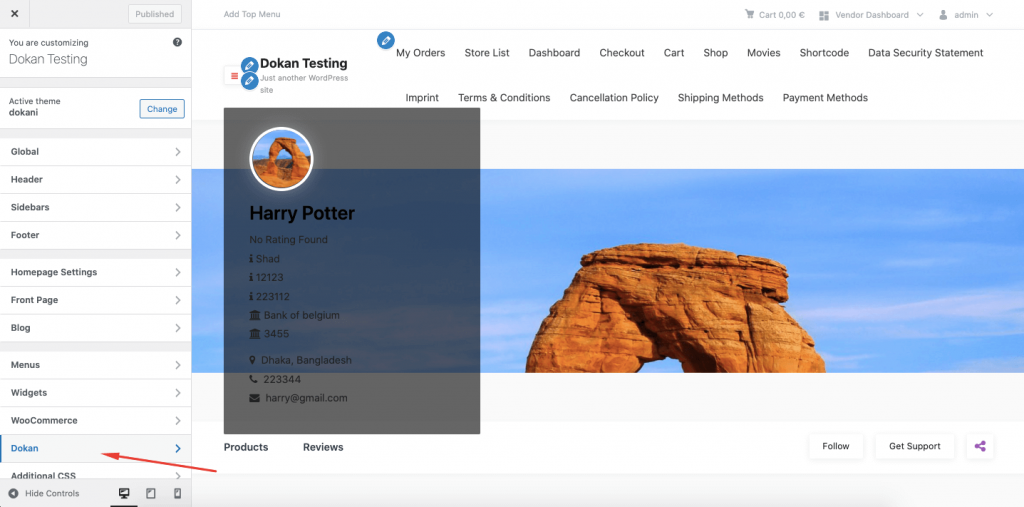
If the admins want, they can hide some of the fields from the store banner page by customizing the single store page. All you need to do is, click on the Customize option on top of the menu. Then select Dokan from the menubar.
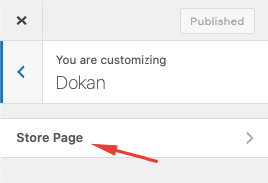
Now, select Store Page option
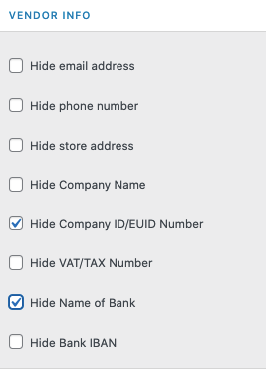
After that, if you scroll down you will find the options under Vendor Info. Check the fields you want to hide from the store page.
You will see that the selected fields have been hidden from the store banner.
5. Vendor Dashboard
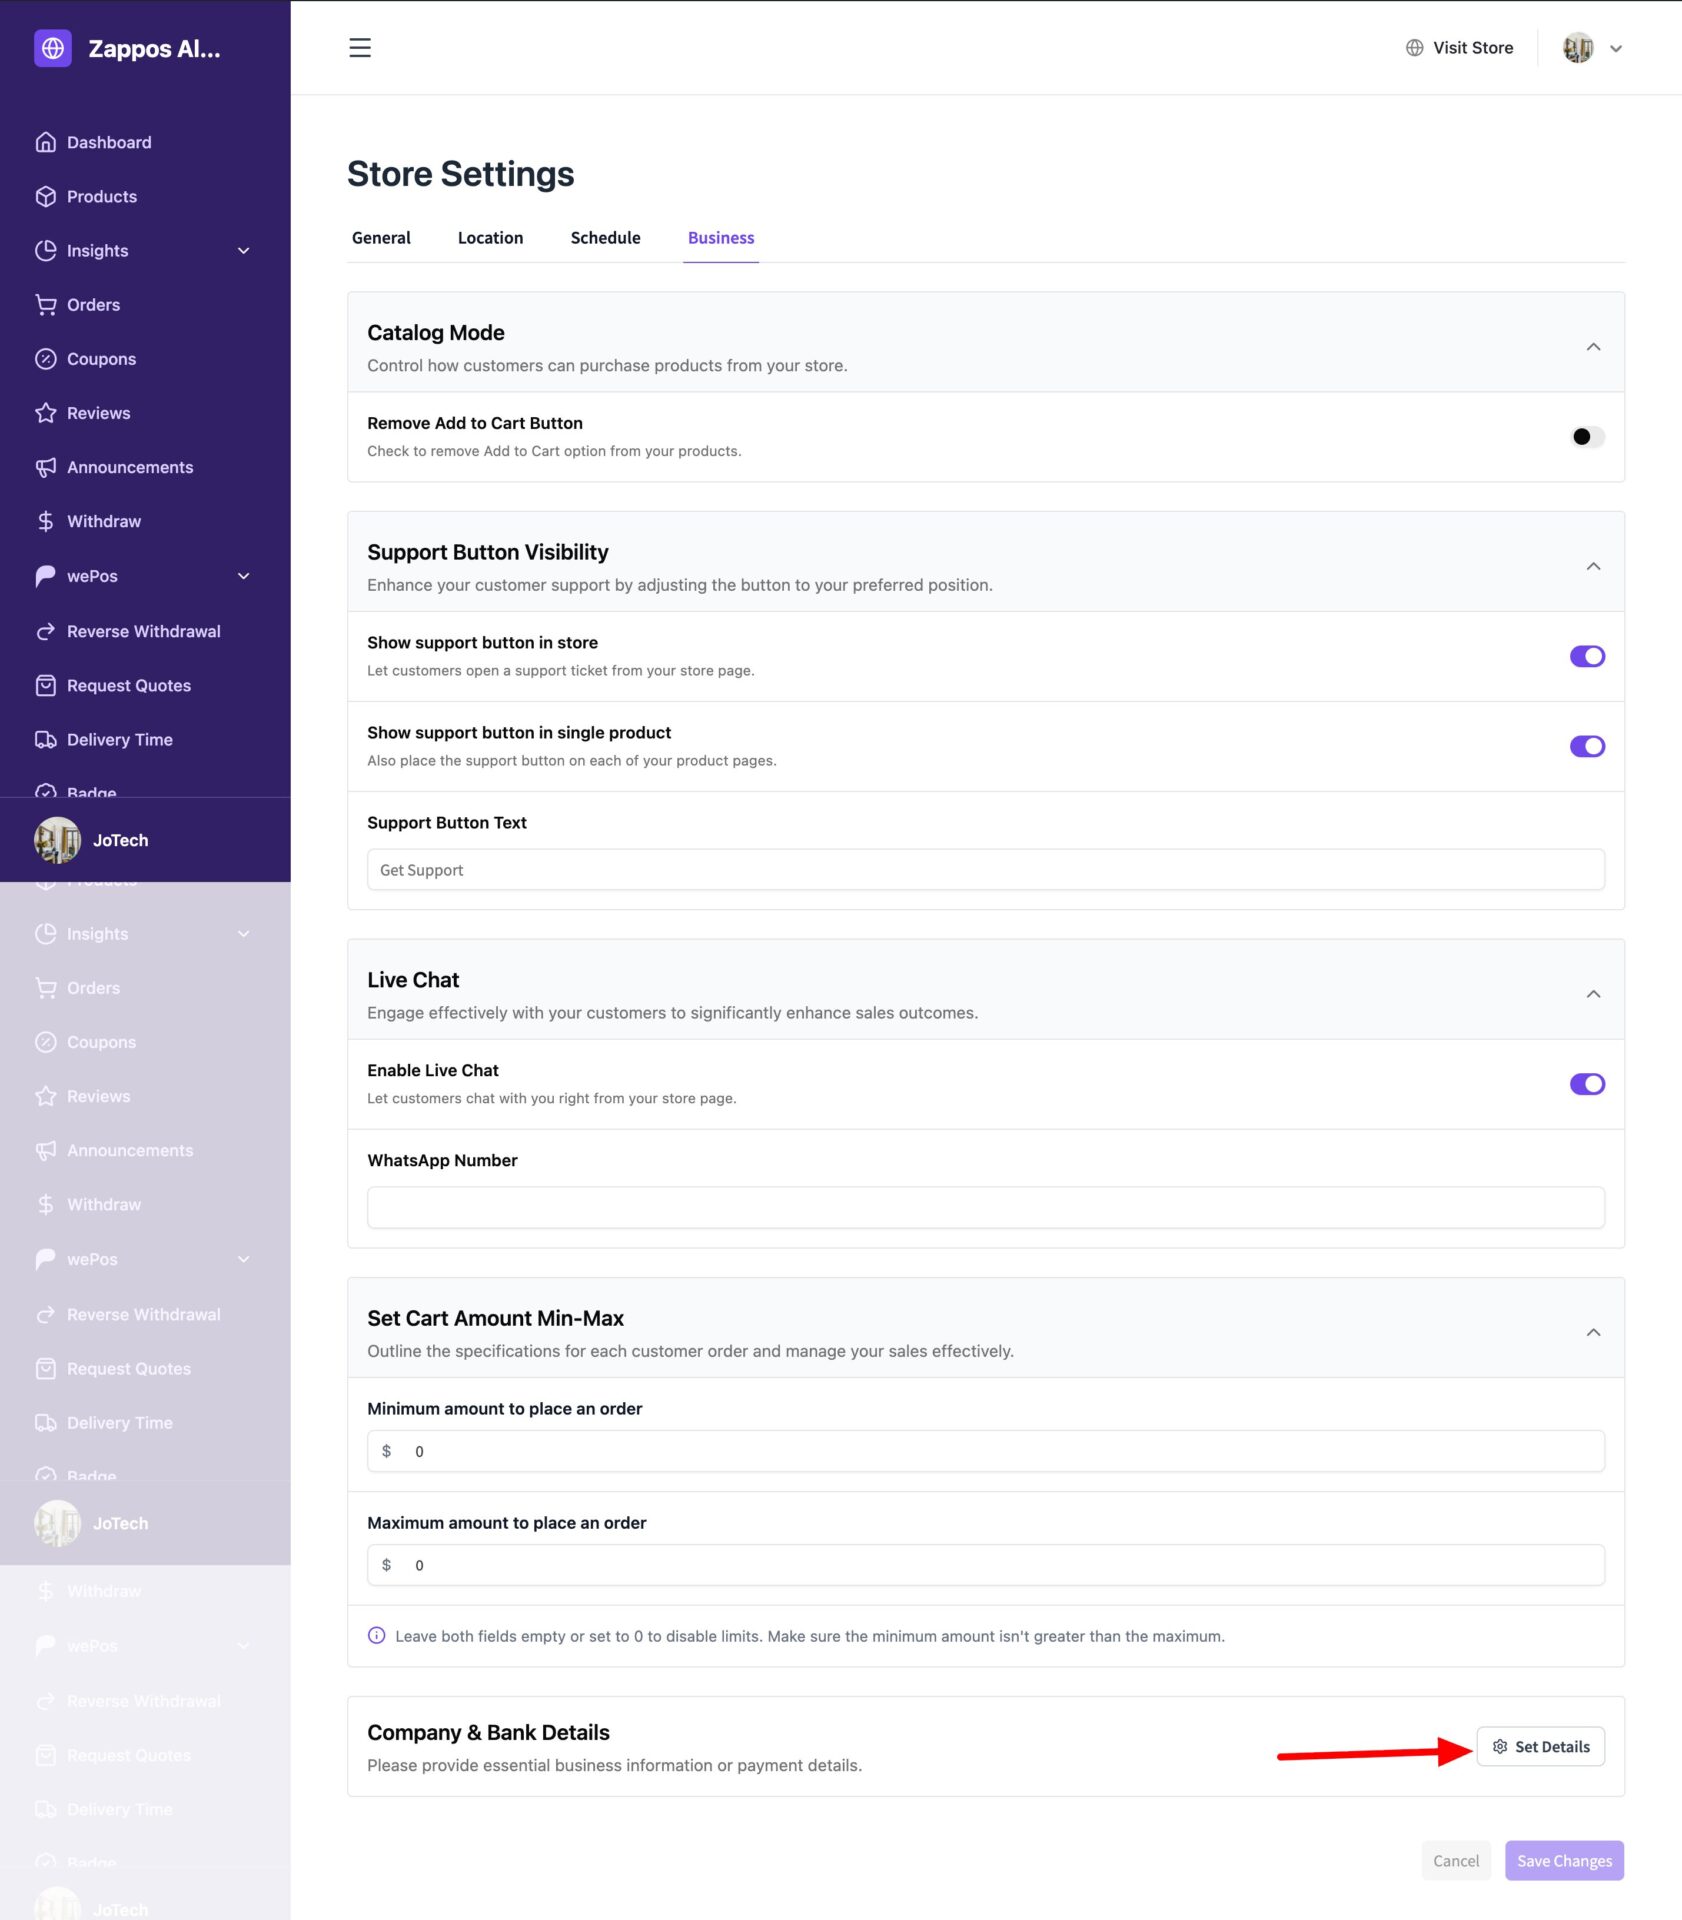
We have been talking about how admins can add the fields. However, vendors can also edit these fields from the vendor dashboard. Navigate to Vendor Dashboard–> Settings–> Store–>Business. If they scroll down, the vendors will find the fields and fill the information by themselves. Click on the Set Details button–
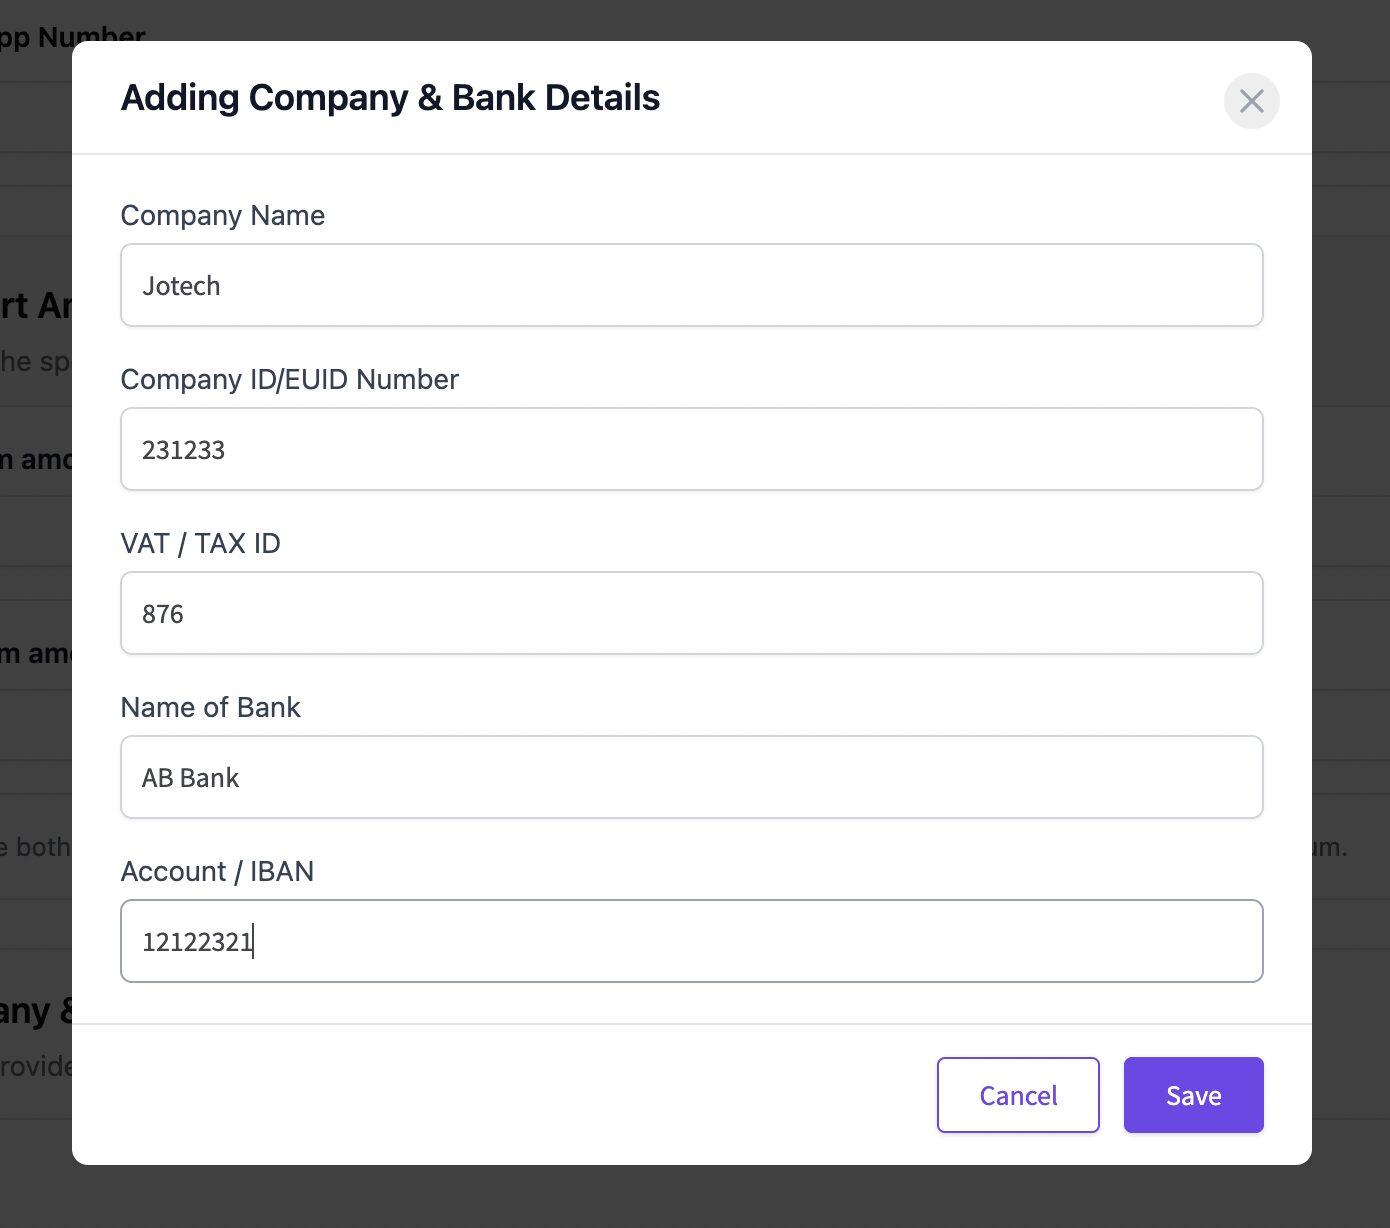
Then, in the pop-up, add the company details-
6. Vendor Registration Form
There was an option in the EU Compliances Field to display these fields in the vendor registration form. If you select that option,
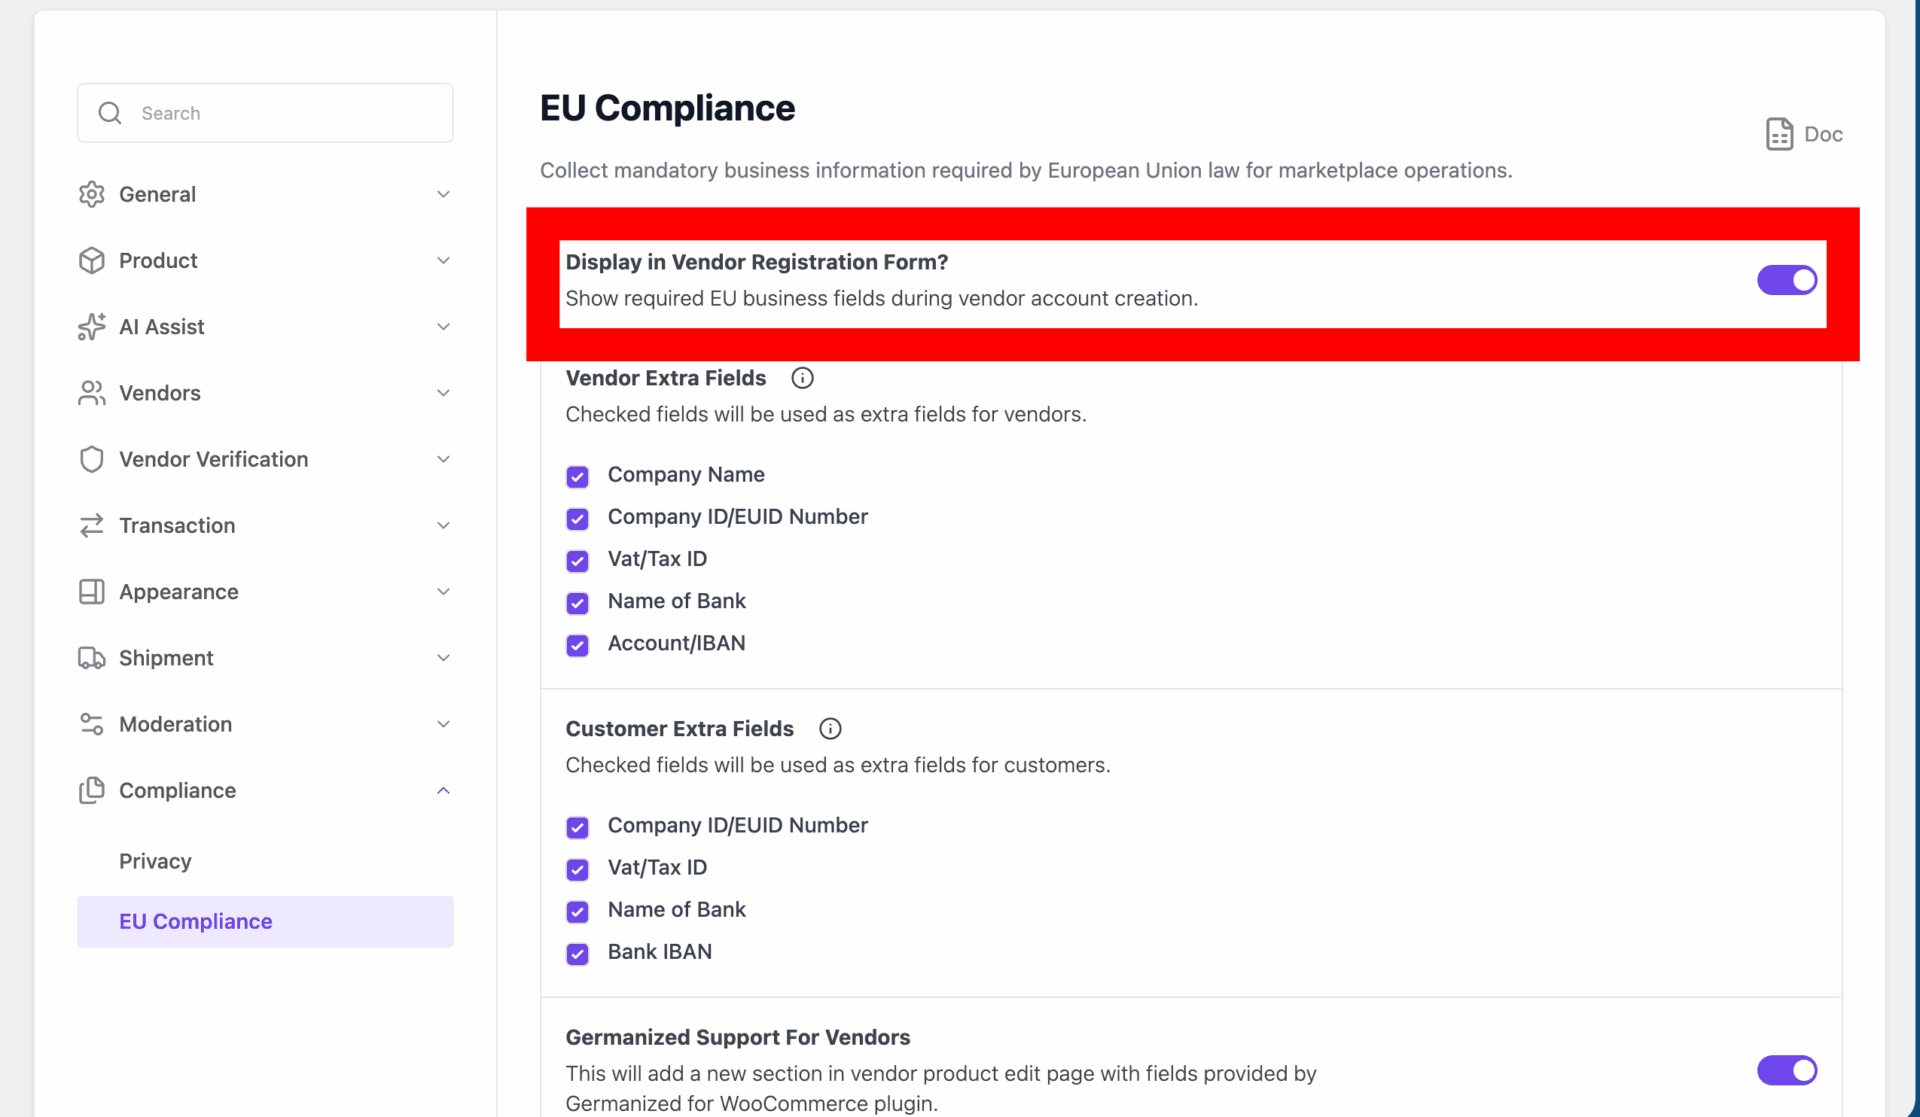
The vendors will see these fields when they register as a vendor.
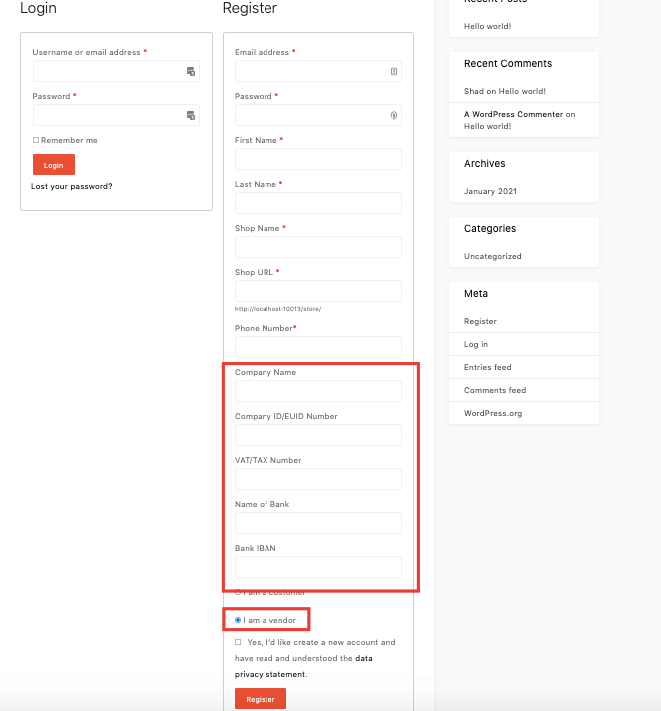
Note: If you use shortcode for ” Vendor Registration Form” on other pages, these fields will appear there as well.
- Company ID/EUID Number
- VAT/TAX Number
- Name of Bank
- Bank IBAN
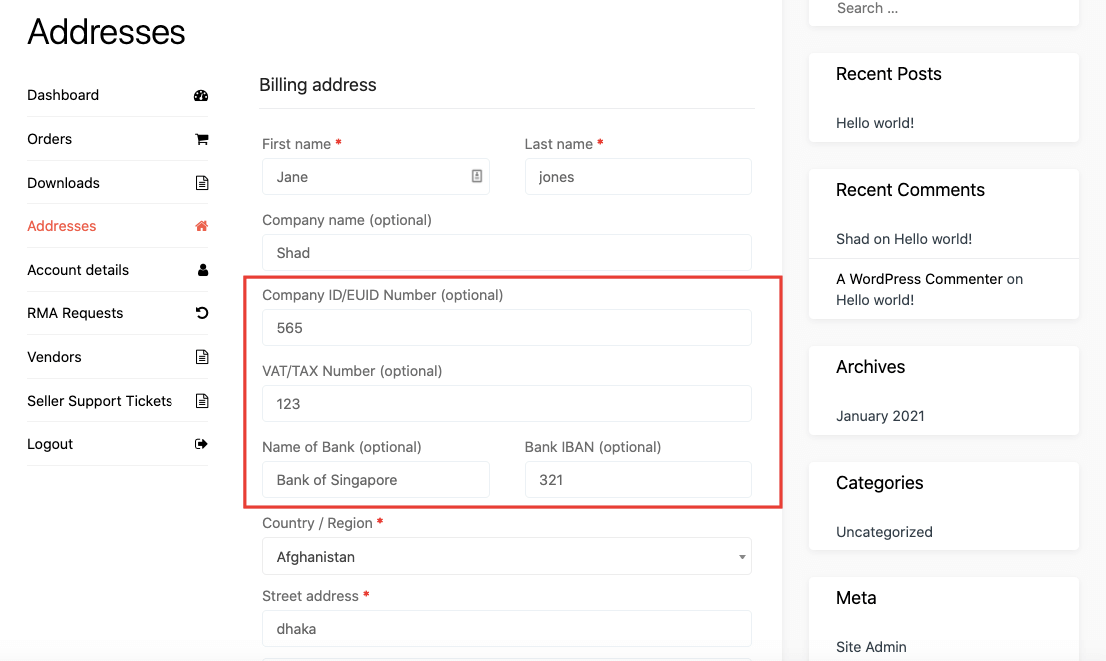
Customer Billing Address
Customers can also use these fields to add their information. They will find these options when they edit their billing and shipping address. They need to navigate to My Account–> Addresses. There click on the Edit option beside billing address.
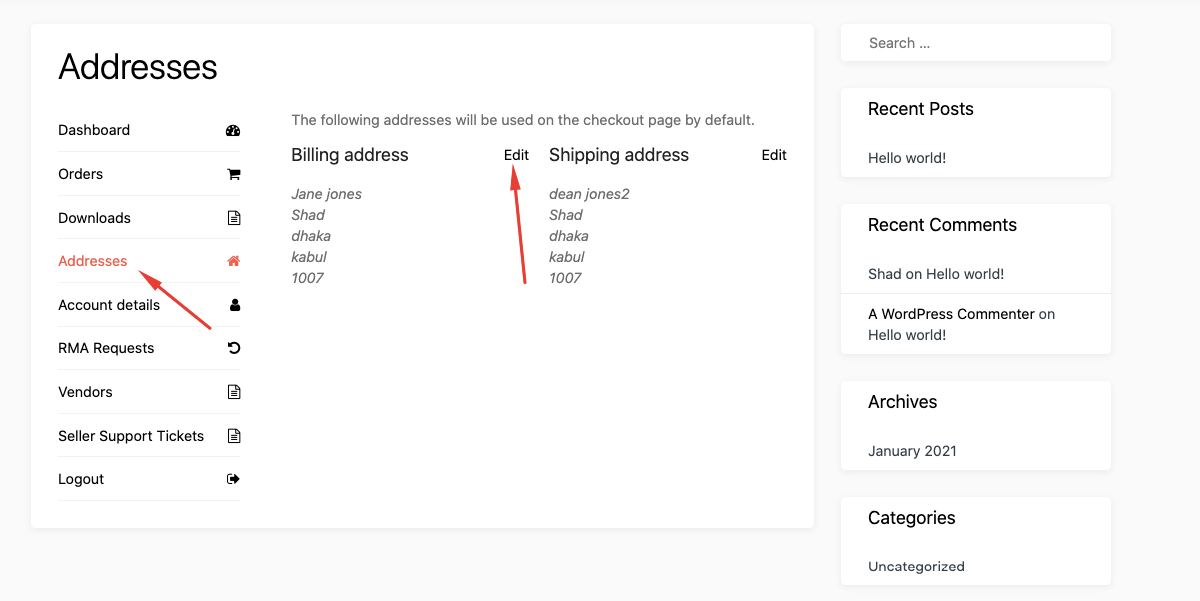
Then they will find these fields in the billing address form. Also, they will see these fields from the checkout page.
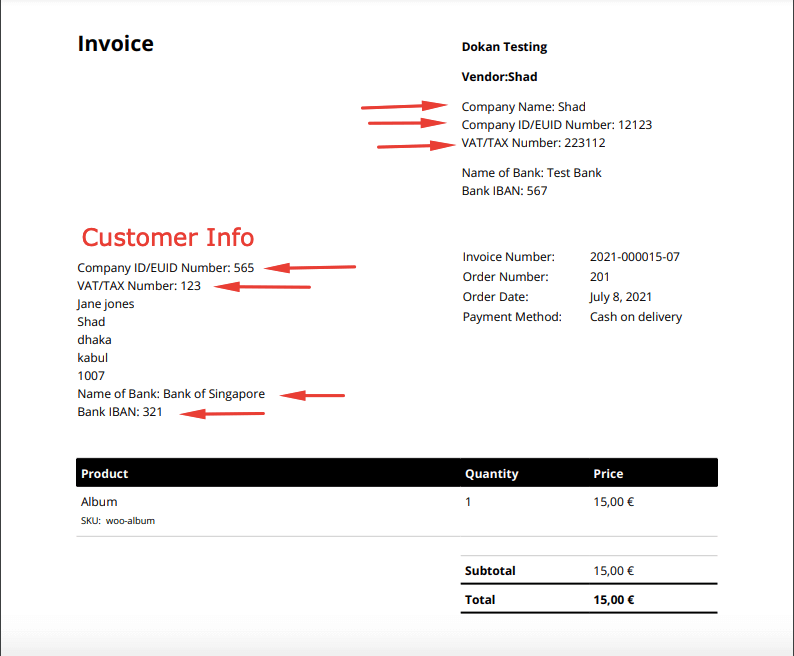
Vendors and Customer Fields Integration With WooCommerce PDF Invoices & Packing Slips
Dokan EU Compliance fields module also has Dokan PDF invoice support. That means you can control what to display in the invoices.
Individual PDF Invoice Numbers for Vendors
Admin Settings
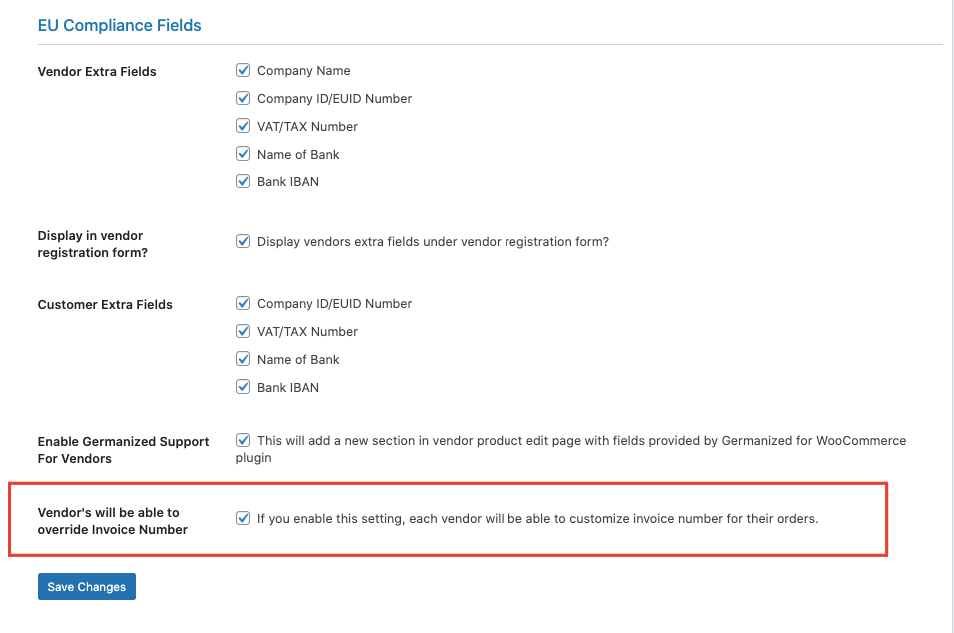
At first, the admin needs to enable the “Vendor’s will be able to override Invoice Number” option from WP Admin–> Dokan–> Settings–>EU Compliance Fields.
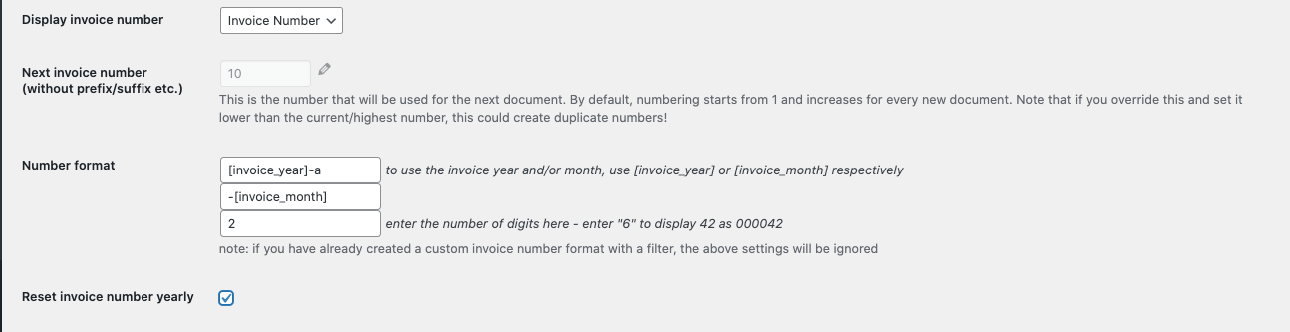
In order to customize the PDF settings, navigate to WooCommerce–> PDF invoice–> Documents. There you need to choose the Invoice number in the Display Invoice Number option. Otherwise the settings will not work.
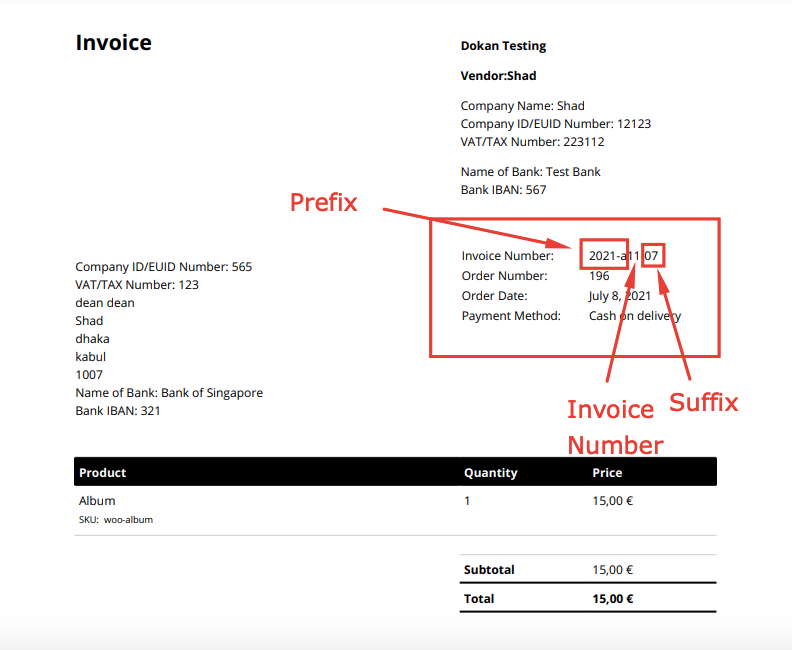
With this setting, the invoice will look like this,
How Vendors Can Override PDF Invoice Settings
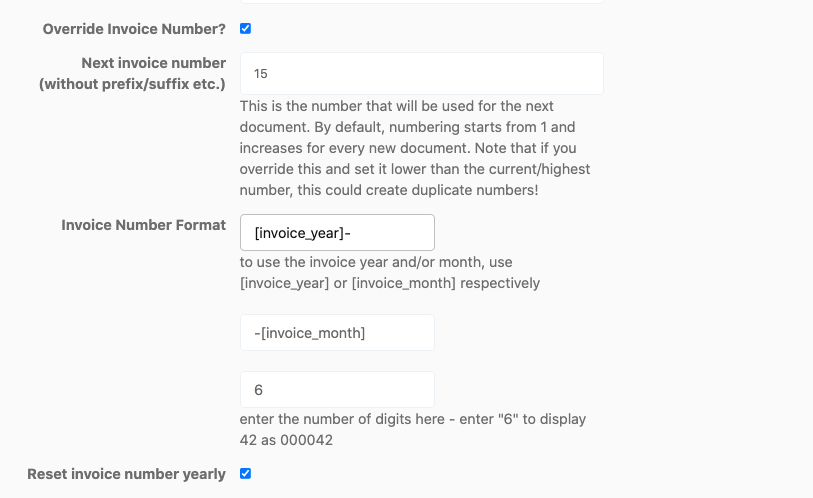
Vendors can also override the invoice numbers. Vendors will find the options in the vendor dashboard. They need to go to Vendor Dashboard–> Settings. Then they need to check the “Override Invoice Number?” box in order to open those three fields.
- Next invoice number (without prefix/suffix etc.): This is the invoice number that will be used for the next document.
- Invoice Number format : There are 3 types of number format,
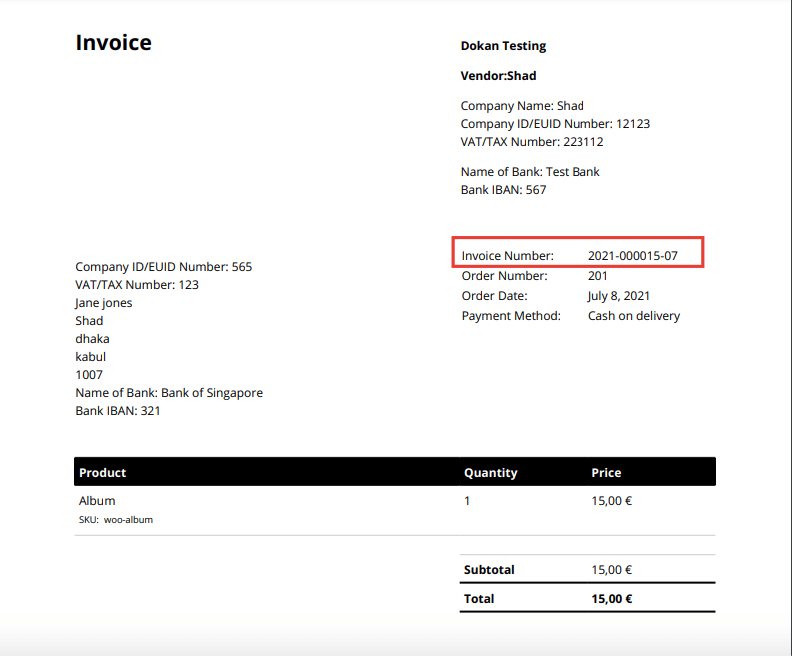
1. Prefix: If you want you can add any text before the invoice number. Like month or year. If your invoice number is 10 and you choose year, then the invoice will look like this, 2021-10.
2. Suffix: If you want you can add any text before the invoice number. Like month or year. If your invoice number is 10 and you choose year, then the invoice will look like this, 10-2021.
3: Padding: You can add digits before your invoice number. If you choose 6, then the invoice number will look like this, 000010.
- Reset invoice number yearly: If the vendor enables this field, then every year the invoice number will reset. Suppose the invoice at the end of the year 2021 is 500, then at the start of the year 2022, the invoice number will again start from 1.
According to these settings, the PDF invoice will look like this,
Enable Germanized Support for Vendors
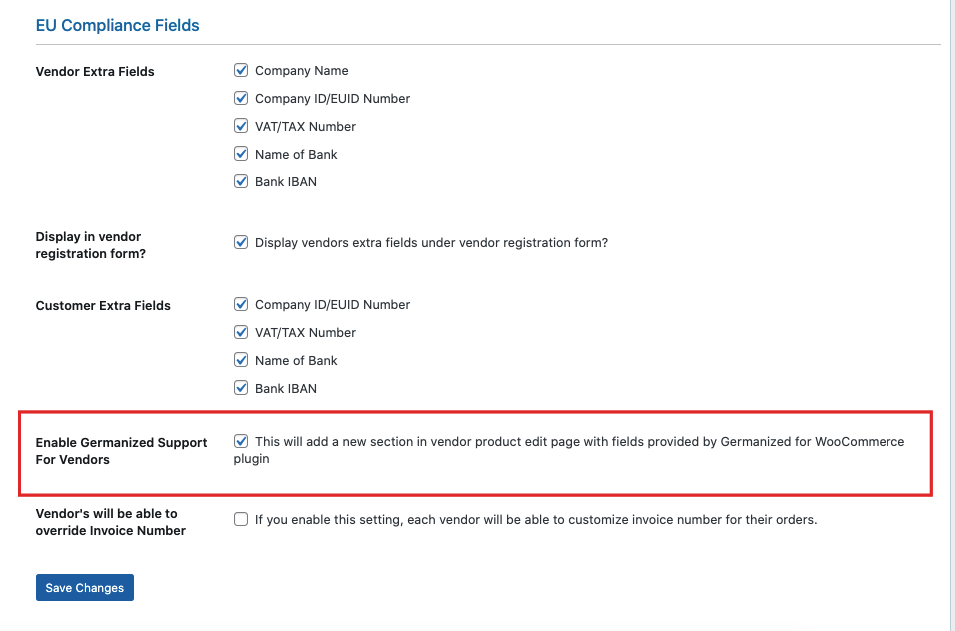
When you choose this option “Enable Germanized Support For Vendors”, you will get some extra set of fields while editing the products.
But first you need to install the “Germanized for WooCommerce” plugin first.
For Vendors
When you enable the Enable Germanized Support For Vendors, vendors will be able to see the EU Compliance Fields on the product edit page.
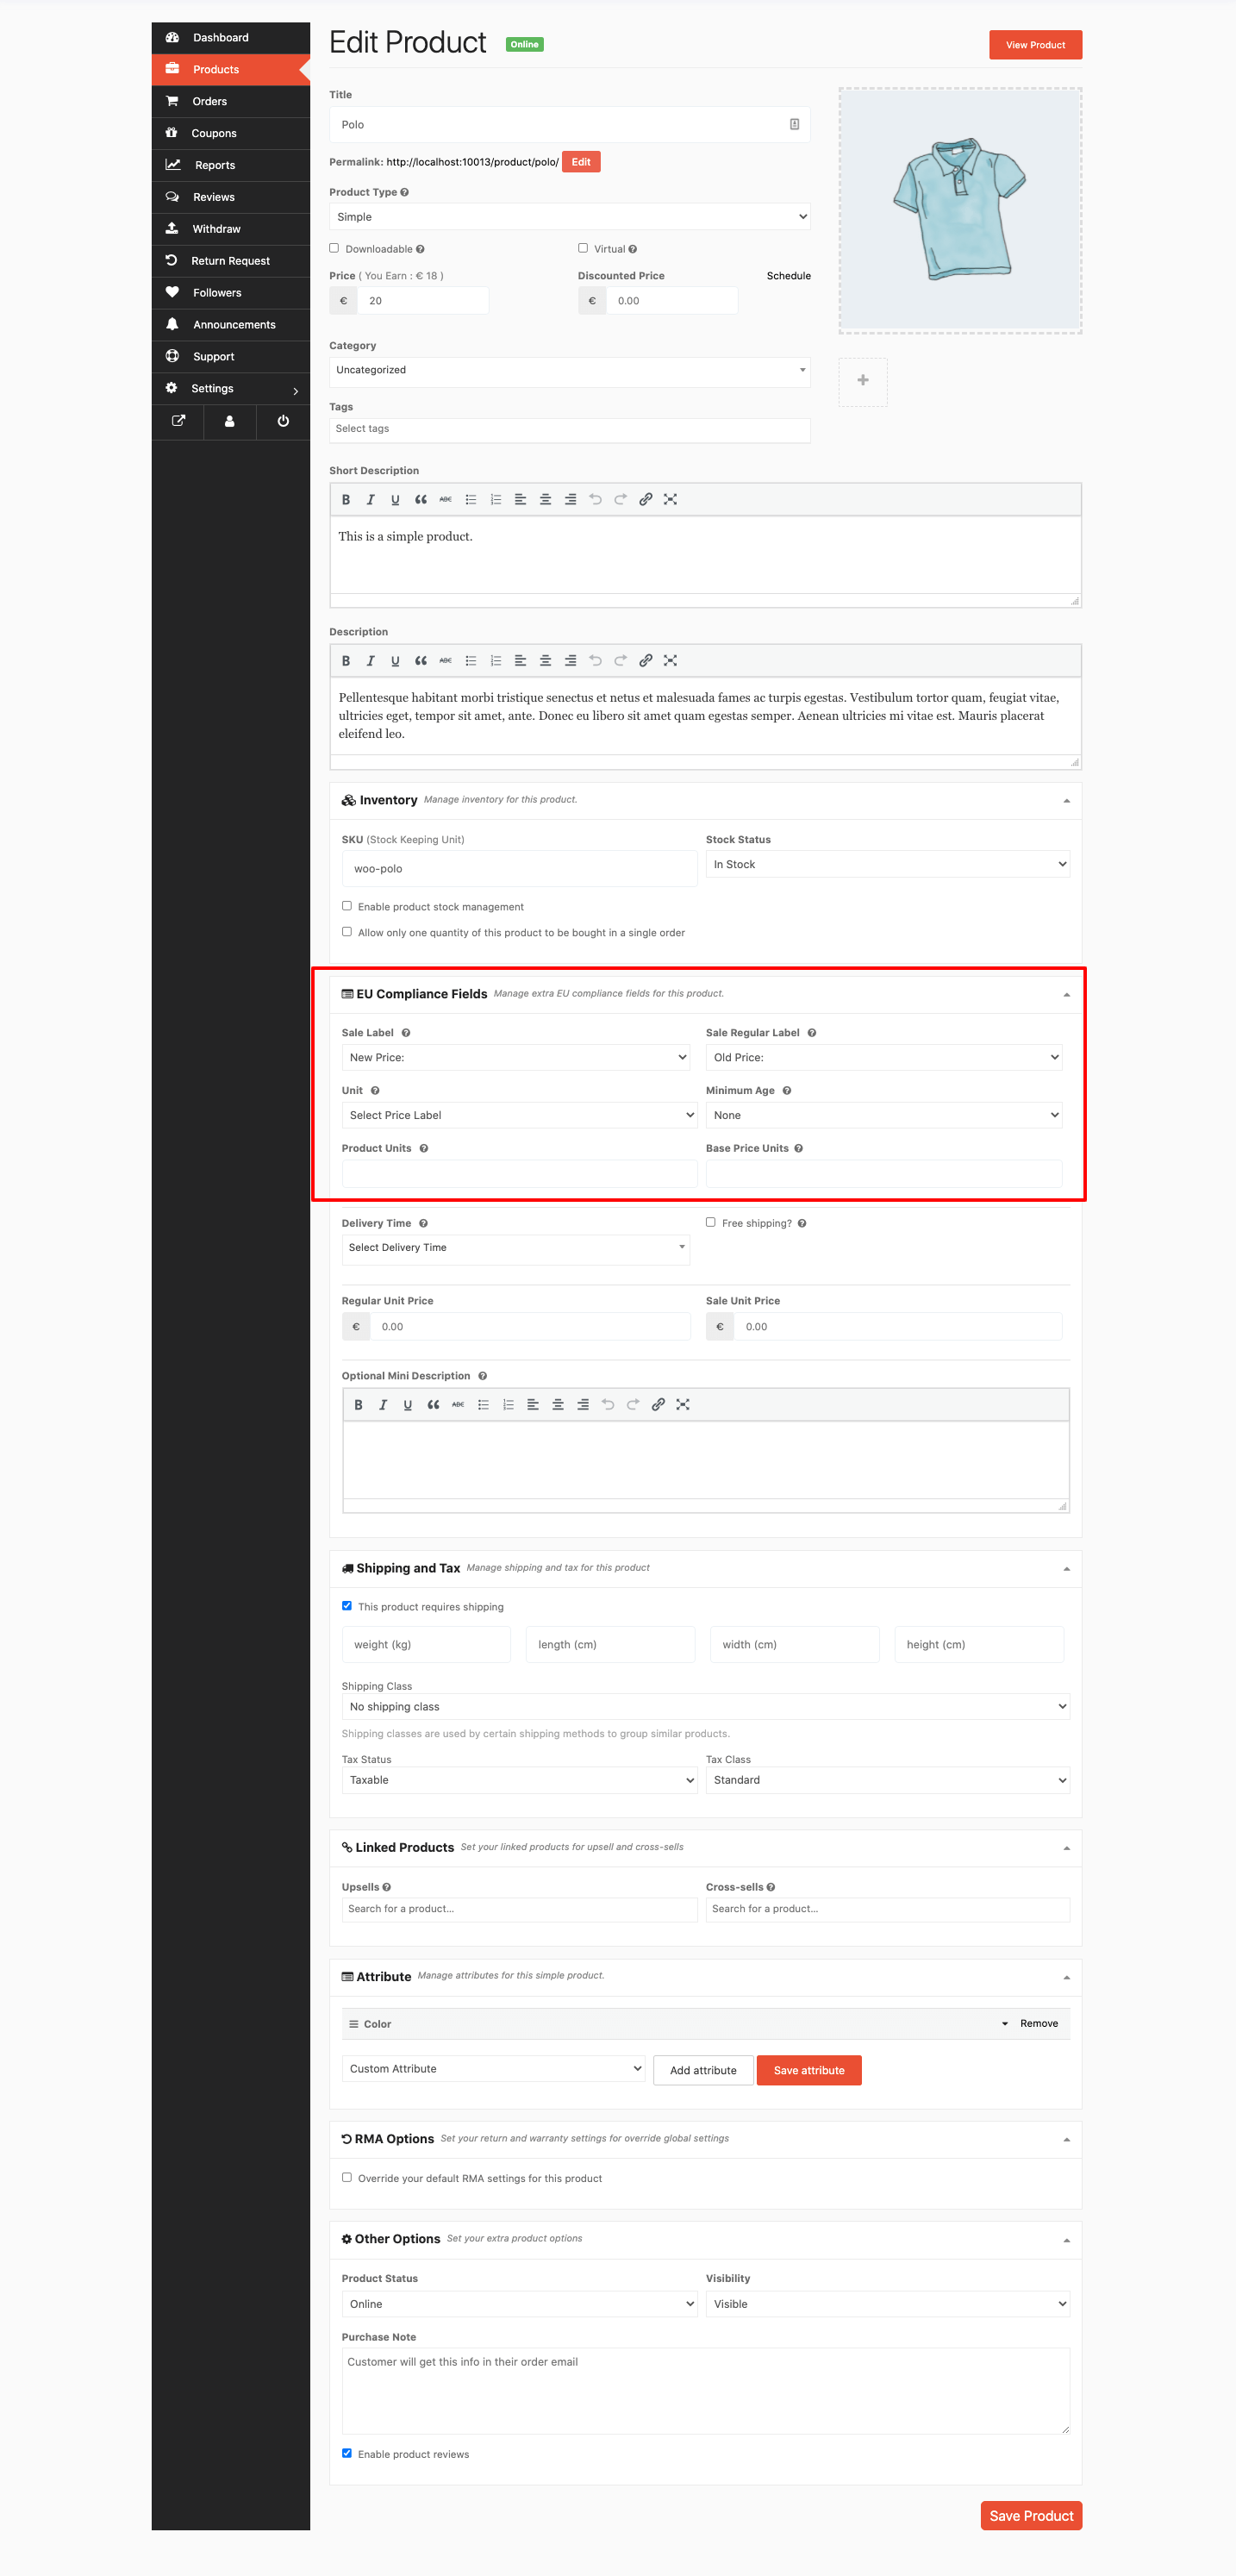
- Sale Label: If you put the product at discount, you can use these labels ( New Price, Old Price, RRP) to show the new price or the old price.
- Sale Regular Label: These labels are used to show the regular price of the product. You will get the same labels as the Sale Label.
- Unit: If you choose the sell the product per unit like KG, MM, ML, LBS, etc.
- Minimum Age: Add age verification checkbox. This will help you restrict sale of your products to certain age groups.
- Product Units: Number of units included per default product price.
- Base Price Units: Price of per unit of products.
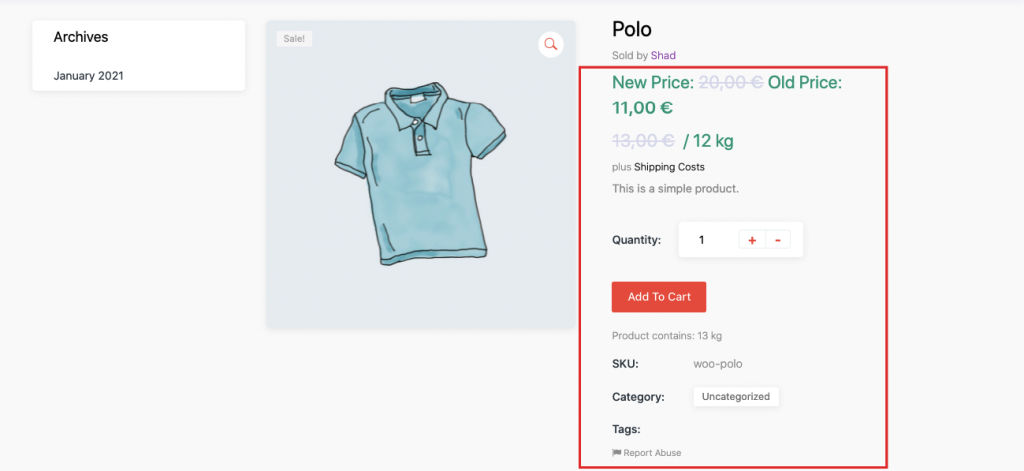
After the vendors have fill in these information, the products page will look something like this.
Note: If you choose the “Variable Product” type, then you will get the same fields. However, you need to enable the variation unit and unit prices on the general product data. The general product data means the EU Compliance Fields data.

EU Cooling-Off (Right of Withdrawal) on a Dokan Marketplace-Support
The right of withdrawal, commonly called the 14-day cooling-off period, is a consumer right under the EU Consumer Rights Directive (2011/83/EU). It is the law in every EU/EEA country, so it applies to your marketplace the moment you sell to a consumer located there.
How Dokan and Germanized divide the work
Dokan does not re-implement the legal machinery. WooCommerce Germanized already ships a complete withdrawal engine, the disclosure, the form, the 14-day clock, the acknowledgement emails, the exemption rules. Dokan makes that engine vendor-aware.
| Responsibility | Handled by |
| Cancellation policy page and checkout disclosure | Germanized |
| “Withdraw from contract” button and standard form | Germanized |
| 14-day countdown and eligible order statuses | Germanized |
| Acknowledgement, confirmation, and rejection emails to the customer | Germanized |
| Product-type exemptions (digital, personalised, etc.) | Germanized |
| Showing the customer one entry per purchase instead of one per vendor | Dokan |
| Routing the request to every affected vendor | Dokan |
| Letting each vendor accept or reject their own part | Dokan |
| Keeping the marketplace-level request and the per-vendor requests consistent | Dokan |
Important: issuing the money back is still a manual step. This integration records and routes the decision; it does not automatically refund the customer or reverse a vendor payout.
Also important: Germanized applies site-wide, not per country , non-EU customers see the withdrawal option too.
Note: This works for their other plugin as well.
How to Set it Up
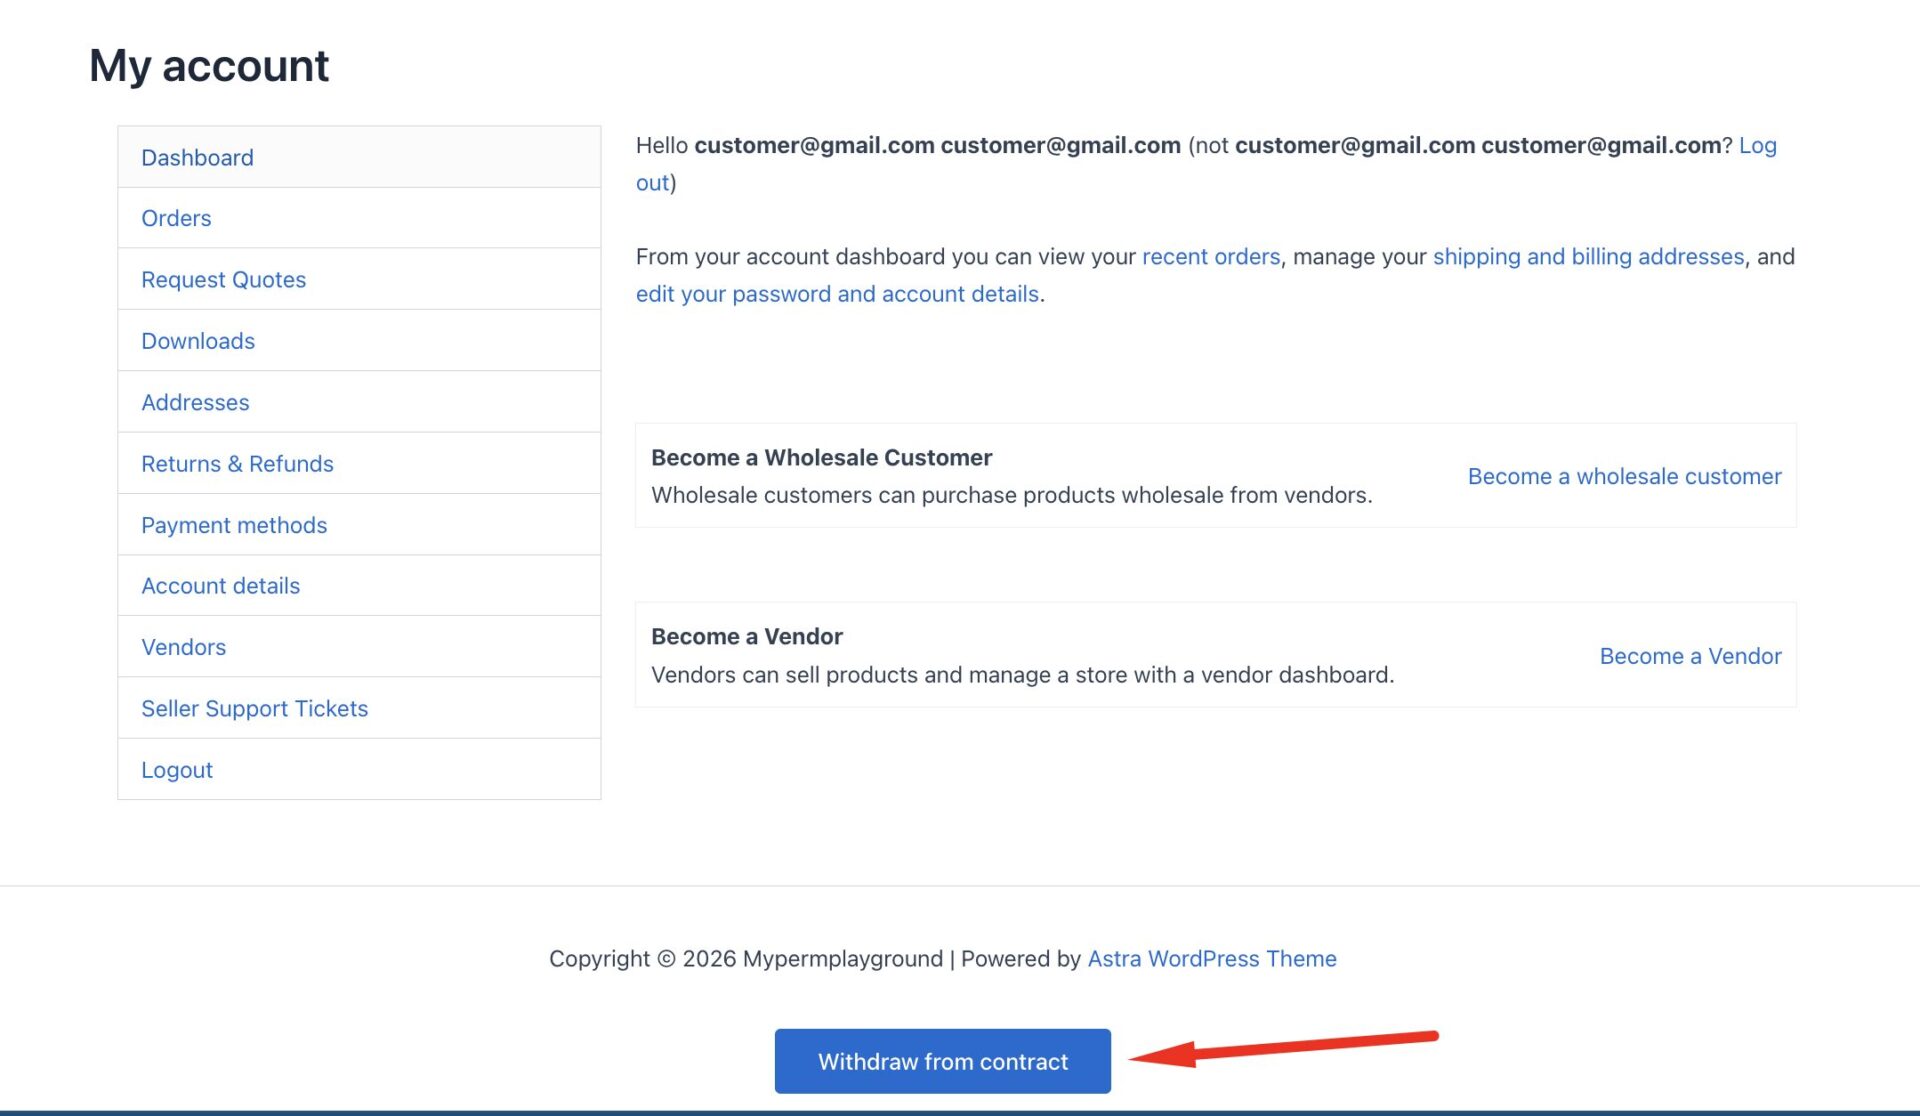
Publish a withdrawal page in Germanized. If no such page is published, the customer never sees the withdrawal button at all, this is the single most common reason the feature appears “missing”.
The customer opens the “Withdraw from contract” form (from your withdrawal page, or the link in their order emails).
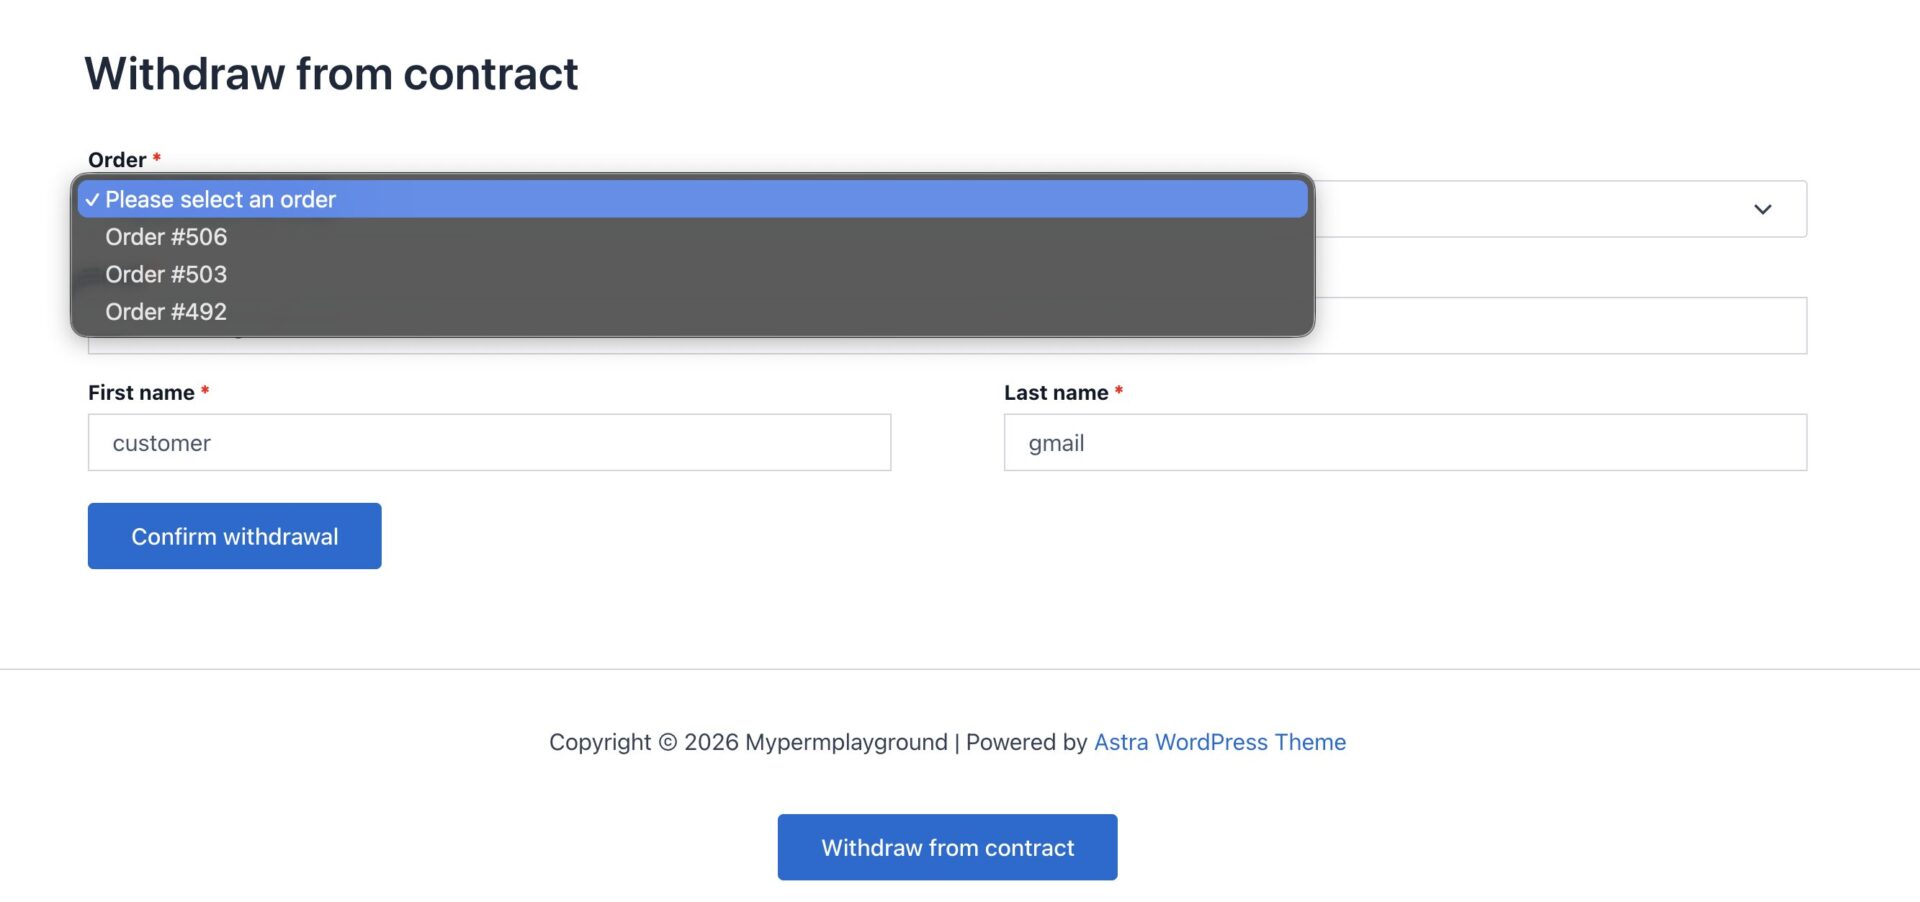
Then the customers can select the order number (if they have multiple orders) from the dropdown box-
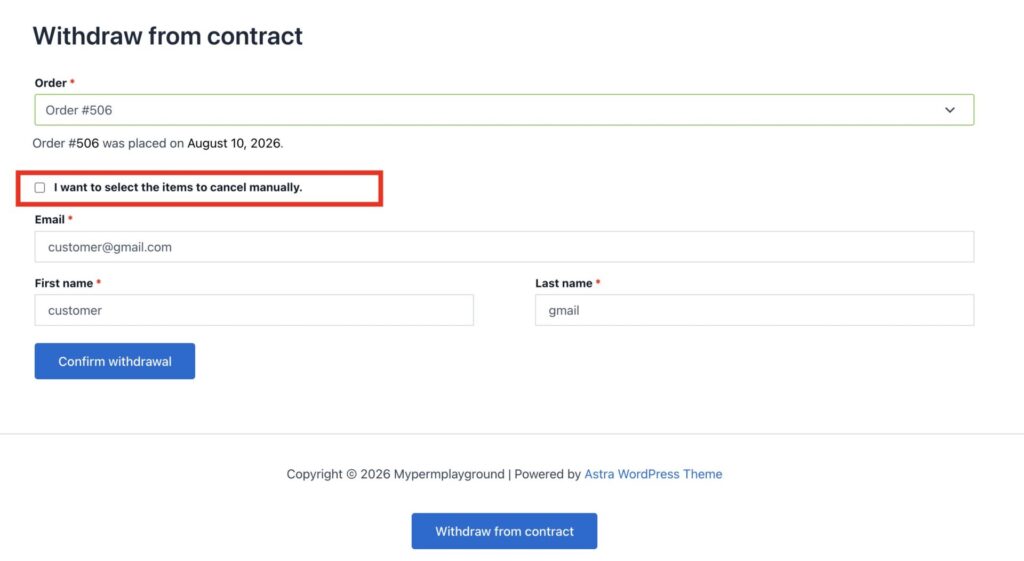
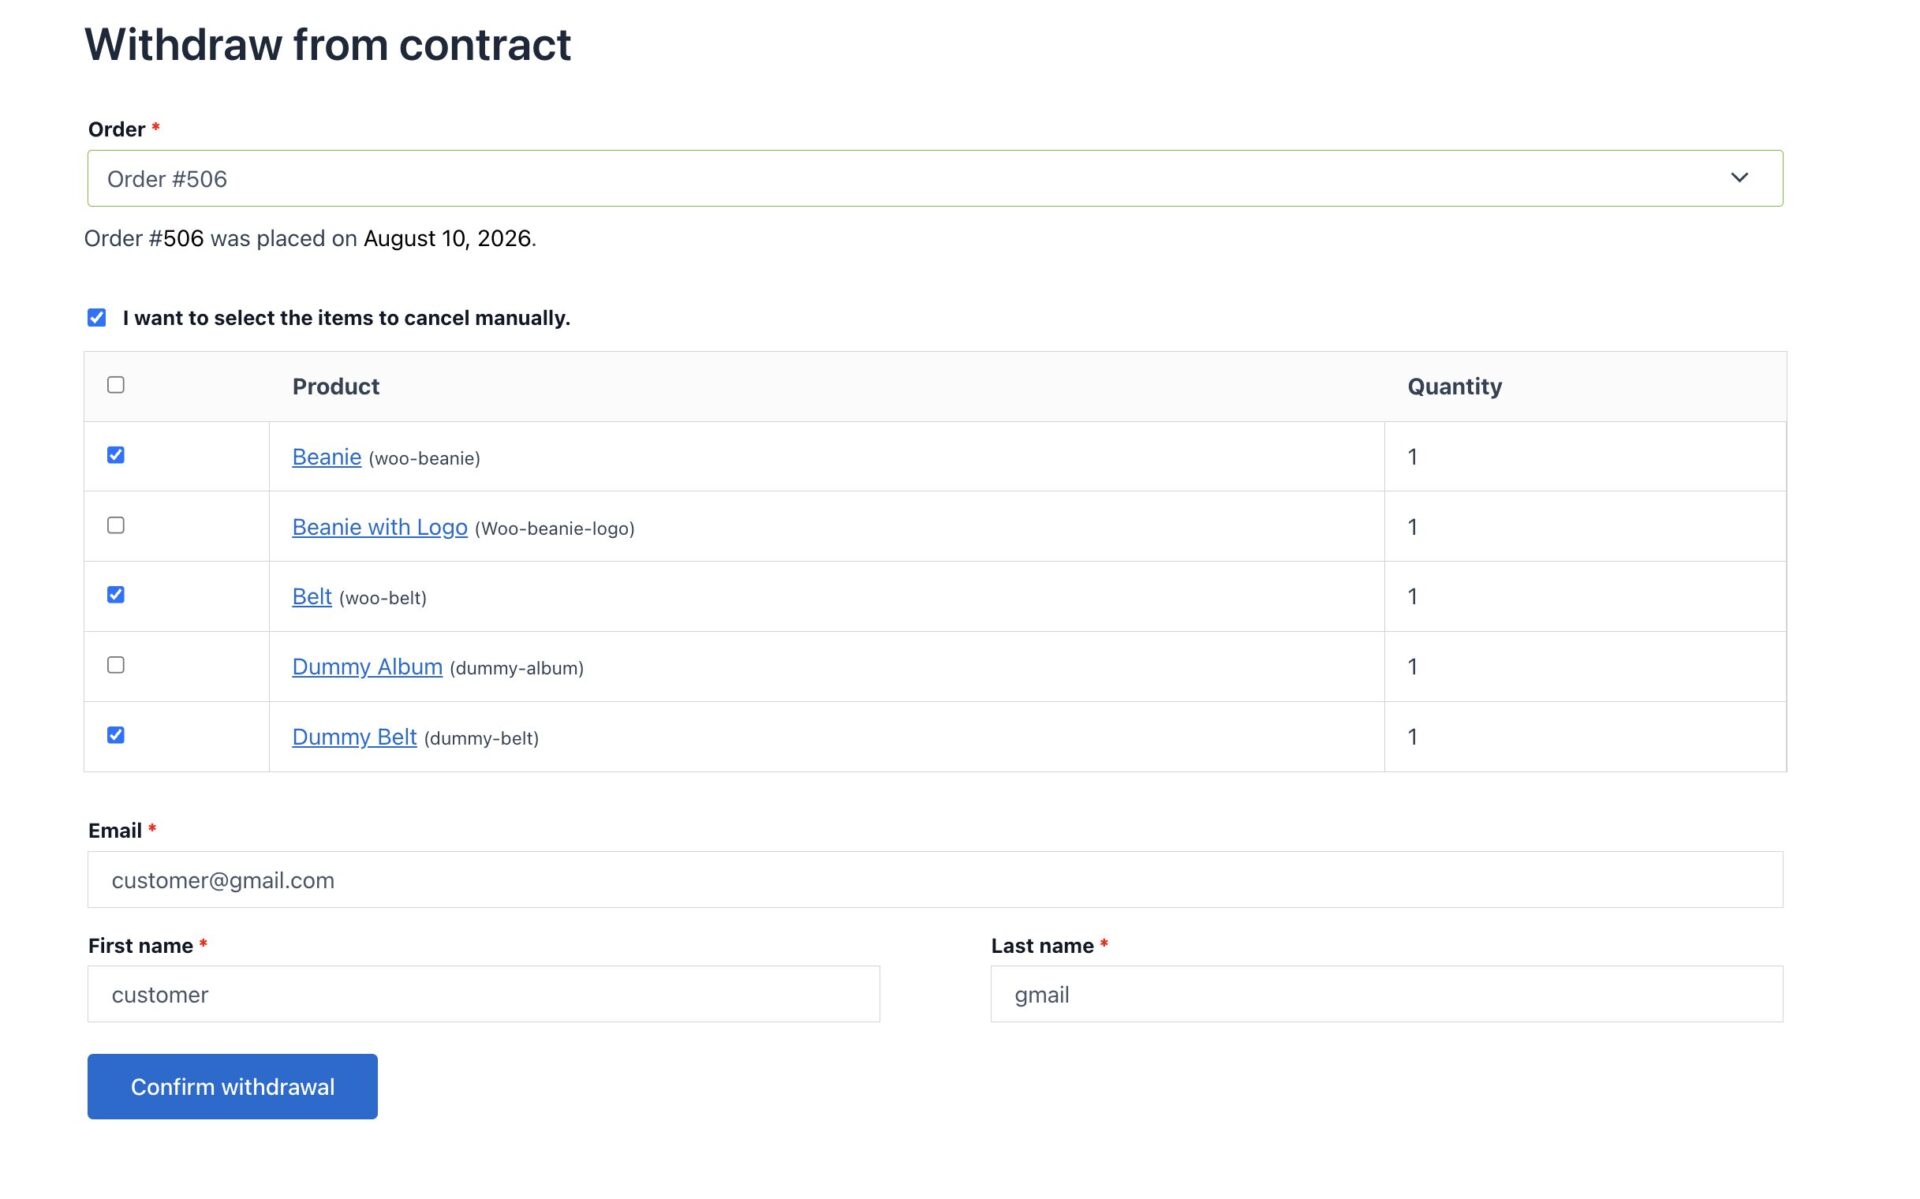
Customers can select the items manually or request withdrawal for the whole order-
The order dropdown lists each purchase once. Sub-orders are hidden, so a three-vendor purchase appears as a single line, not four. This works for logged-in customers and for guests who identify themselves by order number and email.
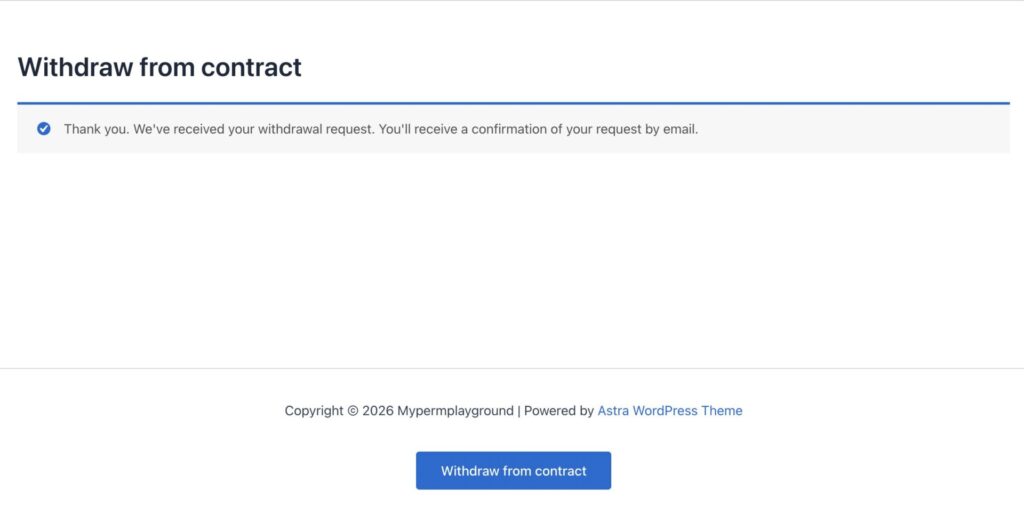
The customer selects the purchase, submits the form, and receives an acknowledgement.
For Vendors–
contains something withdrawable. Vendors whose items are all exempt (for example a digital-only vendor) receive nothing.
The vendor is notified by email, then handles the request from their dashboard:
- Vendor Dashboard → Orders → (the order)
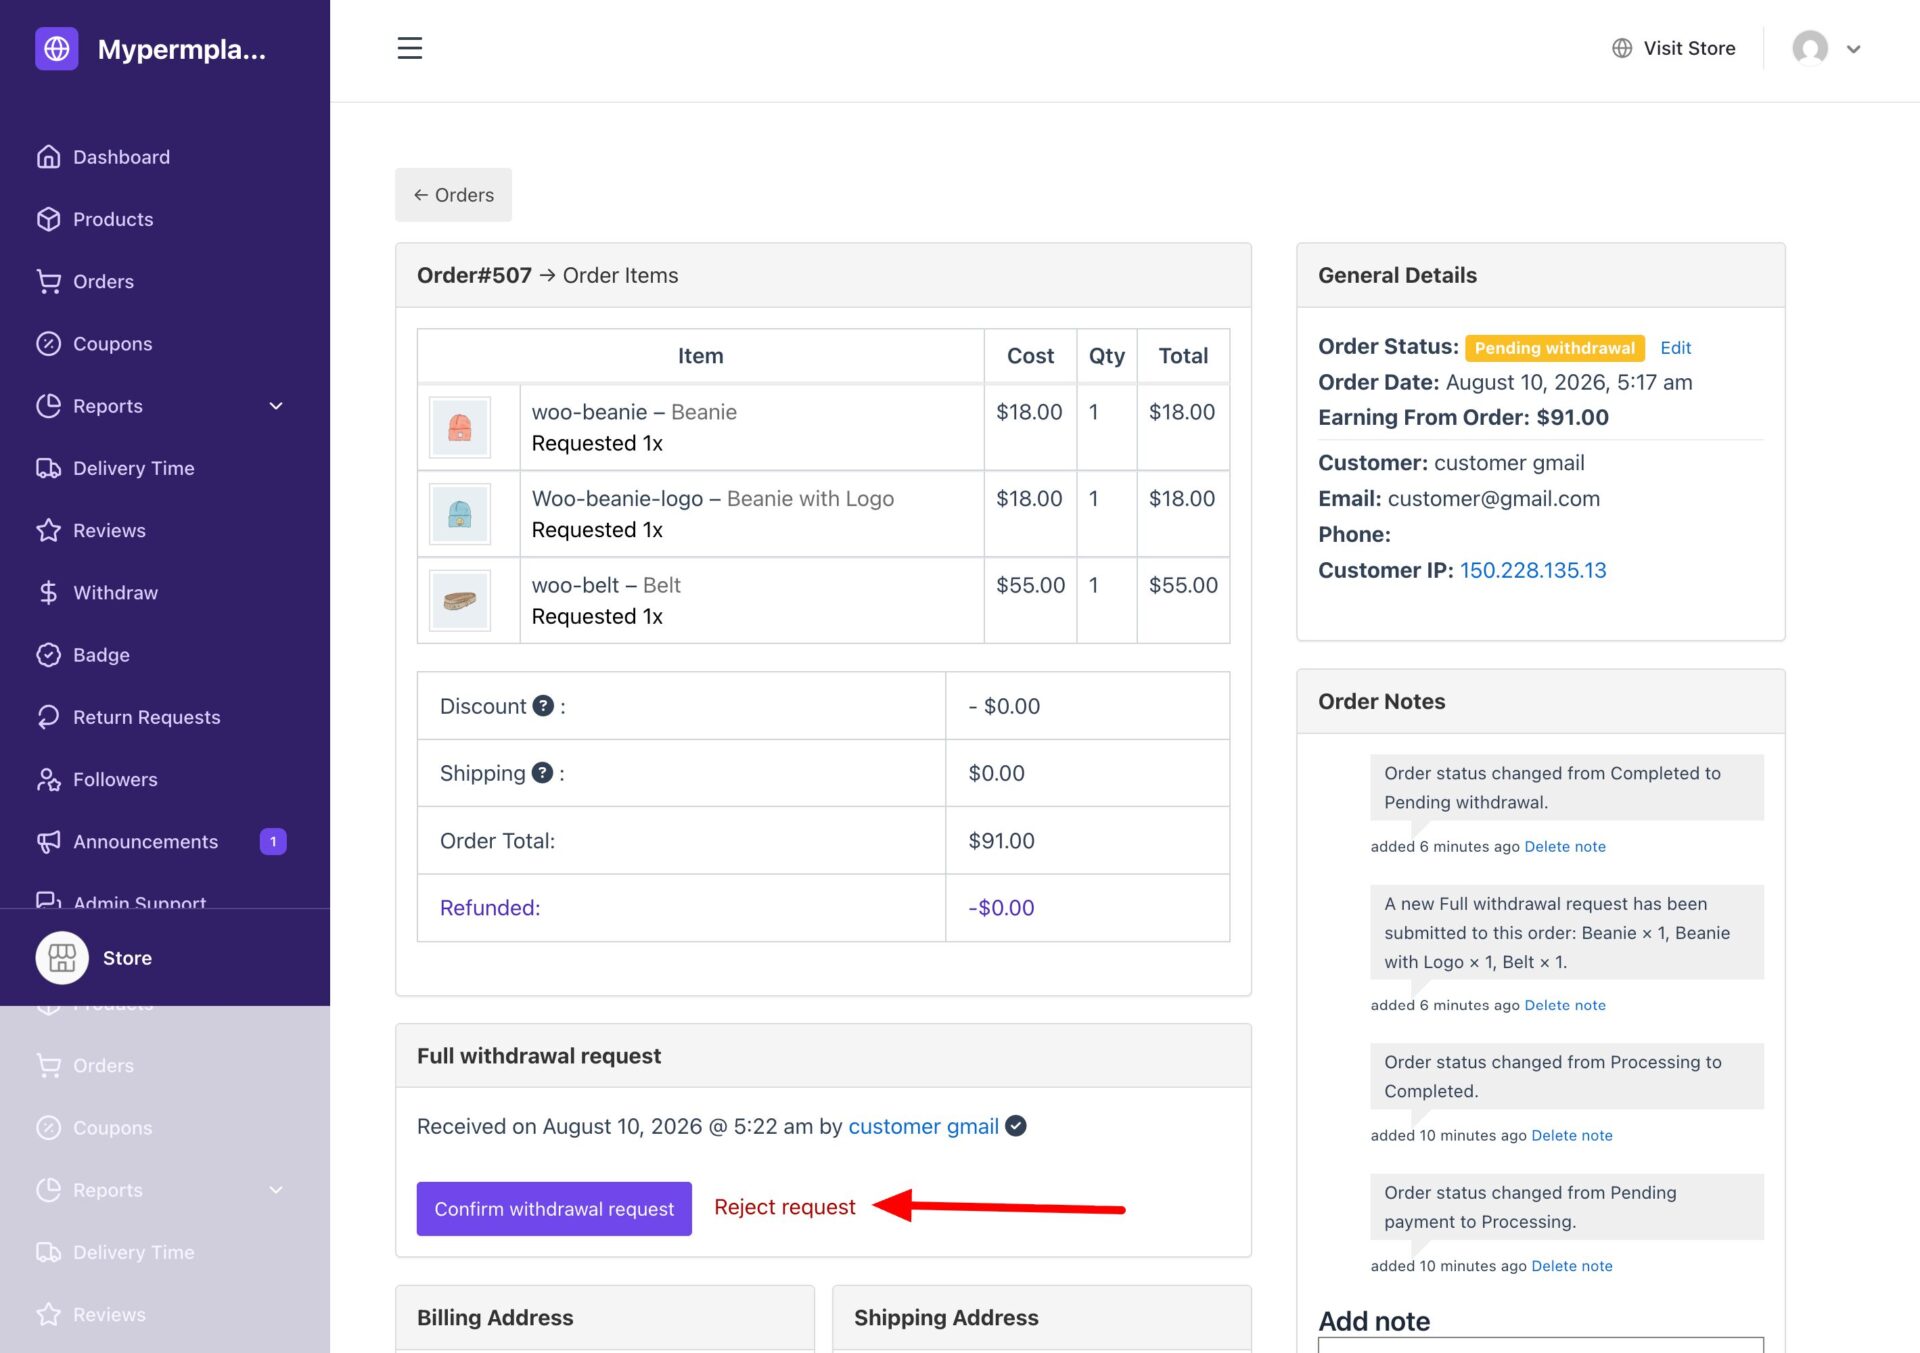
- A Withdrawal Request panel appears on the order details page, showing the status, the date it was received, and the customer’s name and email.
- Two actions are available:
- Confirm withdrawal request — accepts the cancellation. A confirmation prompt appears, because this cannot be undone.
- Reject request — declines it, with an optional Reason field that is recorded on the request.
What the Marketplace Admin Sees
The admin keeps Germanized’s normal withdrawal management screen, and can confirm or reject the marketplace-level (parent) request there. The two levels stay in sync automatically:
| Event | Result |
| Admin confirms or rejects the overall request | The same outcome is applied to every vendor request still open |
| Every vendor has now responded | The overall request closes too — confirmed only if all vendors confirmed, otherwise rejected |
| Customer deletes their request | The per-vendor requests created from it are removed with it |
| Customer submits a new request on the same order | Previous outcomes are cleared so the new request is judged on its own |
Re-submitting or re-processing does not create duplicate requests or send duplicate notifications.
Change Field Name (For Developers)
If you want you can change the EU Compliance Fields name. We have added some filter hooks that you can. Like,
Filter Hooks for Customer Extra Fields:
1. Company ID/EUID Number: dokan_customer_cf_company_id_number_label
2. VAT/TAX Number: dokan_customer_cf_vat_number_label
3. Name of Bank: dokan_customer_cf_bank_name_label
4. Bank Iban: dokan_customer_cf_bank_iban_label
Filter Hooks for Vendor Extra Fields:
1. Company Name: dokan_cf_company_name_label
2. Company ID/EUID Number: dokan_cf_company_id_number_label
3. VAT/TAX Number: dokan_cf_vat_number_label
4. Name of Bank: dokan_cf_bank_name_label
5. Bank Iban: dokan_cf_bank_iban_label
Code Example:
In this example we are changing company id label for vendor from Company ID/EUID Number to EUID Number using filter hook: dokan_cf_company_id_number_label
Add this code snippet in your theme/child themes functions.php file.
add_filter( ‘dokan_cf_company_id_number_label’, ‘my_prefix_change_company_id_label’, 10 , 1 );
function my_prefix_change_company_id_label( $label ) {
  return esc_attr__( ‘EUID Number’, ‘dokan’ );
}